
Although we've already used animations within our game, it's probably a good idea to review the terminology relating to animations within Stencyl.
In Stencyl, an animation is a collection of all the information required to be able to display a particular state for our actor. For example, our monkey actor has eight different animations, or states, that are listed below:
The information contained in each animation includes the individual frames that make up the animation and collision shape information, together with some additional animation settings that can be configured as required.
Each animation must contain one or more frames — the individual images that are used to give the impression of movement within an animation. For example, our monkey actor has an animation called Run Left, which contains two separate frames as shown in the following screenshot:
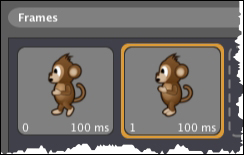
We can see that, in each frame, in addition to an image, there are two other pieces of information. The number shown at the lower-left corner of each frame is the frame number, and the number in the lower-right corner is the duration for which each frame will be shown before moving onto the next frame. In our example, the frames are numbered 0 and 1, and the duration of each frame is 100 milliseconds, or one-tenth of a second.
Frame timings can be adjusted by double-clicking on the frame and changing the duration in the Edit Frame dialog box. Lowering the duration makes the animation appear to run more quickly, and increasing the duration makes the animation appear to run more slowly.
In the Animation Editor, we can see that there are various properties that we can specify for each animation, as shown in the following screenshot:
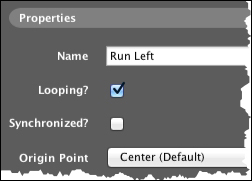
We have already made use of the first option, Name, which allows us to specify an easily recognizable name for each animation. While it is often tempting to leave the default name in place, for example, Animation 1, it is good practice to always provide a relevant name, even if the actor has only a single animation. This will help us to easily identify a specific animation within the Animation Editor, but it is also useful to be able to refer to an animation, by name, from within our behaviors' instruction blocks, as we'll learn later in this chapter in the section entitled, Using instruction blocks to control animations.
Note that the animations are ordered alphabetically in the Animations panel. However, if the name of an animation is changed, the list will not be reordered until the Animation Editor for the actor is closed and then reopened. Currently, our Angel animation appears at the end of the list of animations because we have just created it.
The second option shown in the above screenshot is Looping?, which allows us to specify whether or not the frames are shown repeatedly — looping back to the first frame after the final frame has been displayed. If we remove the check mark from this option, the animation will display each frame only once, and will then stop on the final frame. Our Run Left animation has two frames, which we would like to display repeatedly, so the Looping? option is checked for this animation. If there is only one frame within an animation, then this option will have no effect!
The Synchronized? option ensures that every instance of the same actor within a scene will display the same animation frames simultaneously. For example, if we have a power-up in our game, which is represented by a spinning coin, then checking the Synchronized? option will make all the coins spin in time with each other.
The final option available to us in the Properties section of the Animation Editor is Origin Point. In Chapter 4, Creating Behaviors, we learned that the origin point of an actor is the point around which it will rotate. The origin point is also used by Stencyl to position the actor at its x and y coordinates, and to determine when an actor has left the screen or scene.
By default, the origin point of an actor is set at its center, but if required, we can change the origin point to another location on the animation, by selecting an option from the drop-down list.
The default animation is the animation that will initially be displayed when the actor appears in a scene when the game is running. The first frame of the default animation is the frame that will be displayed when the actor is placed into a scene during editing with the Scene Editor.
Our monkey's default animation is Waiting and, if we look at this animation's icon in the Animations panel, we can see that a star, shown as follows, denotes its default status:

When we play our game, we might notice that the monkey's Idle Right animation is displayed, and not the default Waiting animation as specified in the Animation Editor. This is because the monkey's Jump and Run Movement behavior immediately displays the Idle Right animation before players of our game can see the default Waiting animation.
In our current game, the default animation is not relevant, but the first animation we create for an actor will always be set as the default animation, and one animation for each actor must be specified as the default.

If we need to specify a different animation as the default, we can click on the icon for the animation in the Animations panel of the Animation Editor, then click the Set as Default Animation button at the bottom of the left-hand panel, as highlighted in the previous screenshot.
Currently, each of the frames for the monkey's Run Left and Run Right animations has a display duration of 100 ms.
Experiment to see if the visualization of the movement of the monkey in the game can be improved by changing the duration of the frames.
Also, try changing the default animation for the monkey and note that regardless of which animation we select as the default, it will make no difference when the game is played because the Jump and Run Movement behavior immediately changes it!