
The game file to import and load for this session is 5961_02_05.stencyl.
We're currently looking at the Tileset Editor, but we're not going to be using it in this chapter, so we can close the tab and ensure that we are viewing the Scene Designer.
- Close the Stencyl Book Tileset tab by clicking on the small x icon in the tab.
- Close the StencylForge tab.
- Click on the Jungle tab to display the green jungle scene. If the Jungle tab isn't visible, click on the Dashboard tab, click on Scenes in the left panel, and then double-click on the Jungle scene thumbnail image in the right-hand side panel.
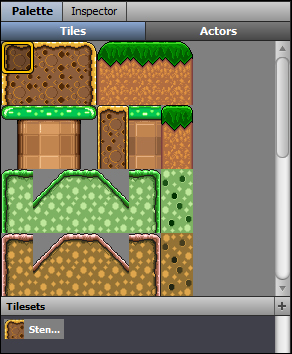
- In the Palette panel, on the right of the screen, click on the Tiles palette button, to display the tileset as follows:
- The tile in the upper-left corner of the tileset is already selected, so move the mouse cursor to the lower-left corner of the green jungle scene and click the mouse once to place the tile.
- In the Tiles palette, click on the second tile present in the top row of the tileset to select it.
- Place the newly-selected tile by clicking on the green jungle scene, immediately to the right of the first tile, so the lower-left corner of the jungle scene looks like the following screenshot:
We've started to design the layout of the jungle scene, but, so far, we have only placed two tiles.
Designing a scene using tiles is a straightforward process—we just click in the Tilesets palette to select a tile, and then we click on the scene to place the tile.
Our next step is to complete the basic layout for the jungle scene but, before we do that, we're going learn to make use of the design tools that are available to us.
If we had to click once on the scene every time we wanted to place one tile, the fun of designing a scene would soon turn into frustration! Let's have a look at some tips that will help us to speed up our placement of tiles in the Scene Designer.
To delete a tile from a scene, we first need to ensure that we do not have a tile attached to the mouse cursor, and this is done by pressing the Escape key on the keyboard. We can then click on any tile and press Delete on the keyboard to remove it.
If we want to replace an existing tile, we don't need to delete it first—we can simply place a new tile over the top of it.
We can move a single tile by clicking on the tile in the scene and then dragging it to a new location or, once we have clicked on a tile, we can use the arrow keys to position it. Again, we need to press Escape first, to ensure that we do not have a tile selected in the tile palette.
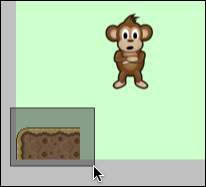
We can select multiple tiles by clicking-and-dragging a selection box around the tiles that we want to select. The trick is to ensure that we start the click-and-drag on an unused part of the scene—or start the click-and-drag outside the edge of the scene—as shown in the following screenshot:
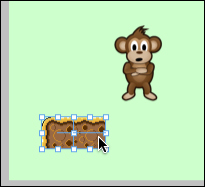
When we draw the selection box and let go of the mouse button, the selected tiles will be highlighted as a group, so they can be dragged or deleted together, which is much quicker than moving or deleting one tile at a time!
If we really want to speed things up, we can place multiple copies of the same tile on the scene, by "painting" the tiles into place, rather than clicking once to position each individual tile. To paint a tile onto a scene, we select the required tile from the Tiles palette and then click-and-drag the mouse to cover the areas where we want the tile to appear.
We can also select multiple tiles from the Tiles palette by clicking-and-dragging on the tiles that we want from the palette. We can then single-click to add that block into the scene or, we can "paint" the block onto the scene by clicking and dragging, just as we can do with a single block.
The game file to import and load for this session is 5961_02_06.stencyl.
Using the skills that we have discussed earlier, we can now go ahead and experiment with placing tiles in the scene. Go wild—after all, we're in a jungle, but don't spend too much time making the perfect scene—this is just an experiment, and our next task will be to delete our experimental tiles!
Try experimenting with the following techniques in our jungle scene:
- Placing a tile over the top of an existing tile
- Adding a single tile
- Painting a single tile onto the scene
- Deleting single and multiple tiles
- Moving single and multiple tiles
- Painting blocks of multiple tiles into the scene
The more we experiment with the tools, the more familiar we will become with them, and the easier it will become to design our scenes in the future!
It really doesn't matter what our scene looks like after experimenting with the tile-placement techniques—we're going to tidy it up shortly!
We've had fun experimenting with tiles in the Scene Designer, but we need a scene layout that we can work with for the rest of the tutorial, so the next task is to clear up the scene.
The game file to import and load for this session is 5961_02_06.stencyl.
We have now discovered all the tools that we need to place tiles into a scene, so let's delete our experimental tiles and set up our scene for the rest of the tutorial.
We need to do the following:
- Delete the experimental tiles that we have just placed in the scene.
- Ensure that the jungle scene looks like the following screenshot.
- Save the game!
We're going to keep the layout very basic to start with, as it will allow us to build up our game without becoming distracted by too many tiles—later on, we'll be adding to the scene to make it more challenging for the player.