
The game file that needs to be imported and loaded for this session is 5961_04_03.stencyl.
If we're following on immediately from the previous instructions, we should be looking at the monkey actor's behavior page. However, we need to return to the behavior editor so, click on the Collect Fruit tab or, if the tab is not visible, go to the Dashboard, click on Actor Behaviors (under LOGIC in the left-hand panel) and double-click on the Collect Fruit behavior, which is currently represented by an image of a hammer.
We can now see the orange when … block that we created earlier. Now perform the following steps:
- Click on the + Add Event button at the top of the left-hand panel.
- In the pop-up menu, move the mouse over the Collisions option, and select Member of Group.
- Double-click the new Actor – Group item in the left panel.
- Change the text to
Collides with Enemiesand press Enter on the keyboard. - On the orange when Self hits a… block, change the Actor Group option to Enemies by clicking on it, selecting Choose Group and double-clicking Enemies in the Choose an Actor Group dialog box.
- In the right-hand panel, ensure that the Actor button is selected at the top of the panel, click on Properties from the row of silver buttons in the right-panel, and drag the blue kill Self block into the orange when Self hits a… block.
- In the row of buttons shown at the upper-center of the screen, click on the Properties button, as shown in the following screenshot:

- In the Edit Properties dialog box, change the name from
Collect FruittoManage Player Collisions. - In the Descriptionbox, type
Manages all collisions for the player's character. - Click on the Apply Changes button.
- Test the game. First, make the monkey run into a piece of fruit, then make it bump into one of the enemy characters.
We have added a new event to the behavior that we created earlier, and we renamed the behavior.
The procedure for creating the Collides with Enemies event is very similar to the one we followed when creating the Collides with Collectibles event. We specified what type of event we wanted to create. In this case it is another group collision. Then, we specified which group we wanted to detect the collisions with, by changing the Actor Group to Enemies in the orange when Self hits a…
block.
The next step was to tell the event what to do when a collision occurs with the Enemies group—we need to kill the actor—so we dragged the kill Self block into the orange when Self hits a… block.
We might ask ourselves the question, "Which actor is going to be killed?" To find the answer, we first need to know that the kill Self block is going to kill Self. Remembering that this behavior is attached to the monkey actor, we can determine that Self refers to the monkey. So, the monkey will be killed when the collision occurs.
This is an important difference when compared to the Collides with Collectibles event because, in that event, it is the actor of group—the member of the kill Self group—that was killed.
The final step was to give the behavior a more relevant name, it doesn't just manage collisions with the fruit anymore. It manages all of the monkey's collisions so the name Manage Player Collisions seems more appropriate, and will help us to more easily identify the behavior if we need to make changes in the future.
When we test the game, we will find that both events are doing their jobs—when our monkey touches a piece of fruit, the fruit disappears but, when the monkey runs into one of the enemy actors, the monkey is killed.
When we are creating or editing behaviors, we have access to the block palette, the rightmost panel from which we have been selecting the instruction blocks.
The palette has been arranged so that it is easy to locate the blocks that we require, and it is organized as shown in the following screenshot:
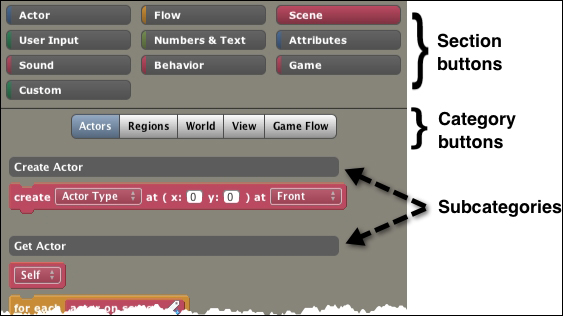
We have already used the section buttons to select blocks from the Actor and Scene sections, but it is worth noting that each section has different category buttons. For example, in the previous screenshot, we can see that the currently selected Scene section has five categories namely Actors, Regions, World, View and Game Flow. Underneath the category buttons, the blocks are separated into subcategories so, for example, the Actors category, in the Scene section, has the subcategories Create Actor and Get Actor.
If we click on the Actor section button, we will have a different selection of categories from which we can choose—Position, Motion, Properties, Draw, Tweening, and Effects. If we then click on the Position category button, we can see that the subcategories are Position and Direction.
As we learn more about Stencyl behaviors, we will become familiar with the sections, categories and subcategories, but one of the keys to mastering Stencyl is to understand which all instruction blocks are available to us, and where to find them.
Note
To learn more about how individual instruction blocks work, right-click on the block in the palette, and select View Help. This will open up the relevant help page on the stencyl.com website.
We've created a new behavior for the monkey, and it correctly manages the monkey's collisions, but we still have some work to do in order to refine the actions that take place when the collisions occur.
For example, rather than fruit disappearing instantly when it is collected, it might be more visually appealing if a special effect occurred. Perhaps the fruit could fade away gently or, for a more dramatic effect, it might explode, with the pieces fading away.
When the monkey collides with an enemy actor, the monkey vanishes without warning, which isn't very elegant, so we'll need to make some decisions about how that process is handled.
However, rather than holding ourselves back with the technicalities of special effects, we're going to carry on building the important mechanics of the game, and we'll consider options for some of the refinements and implement them later in the development process.
We are making fantastic progress with our game; we're only one quarter of the way through this chapter, and we have implemented several features and learned several new skills.
However, in its current state, the gameplay is not going to be very exciting for players of Monkey Run. The game will be exactly the same every time it is played and, as a designer, our job is to create a game that people will want to come back to play time and time again.
There is an important element missing from our game, and that is the element of chance, our game needs some randomness!
Random gameplay is very difficult to get just right. If a game has too many random elements, it will be too difficult to play, our players will give up very quickly and move on to more interesting games. For this reason, even when we, as designers are happy with the gameplay, it is vital that we find the opportunity to allow independent, unbiased game testers to provide us with feedback, so we can fine-tune the game and make it enjoyable to play.
We're going to introduce a new actor into our game—a mysterious Aztec statue that will fall from the sky at random locations and block the monkey's path. Our first task is to find the statue on StencylForge, download it and configure it for our game.
Because we are going to be building a more complex behavior in this section of the book, rather than jumping in and trying to create the whole behavior in one session, we'll break down the process so we can be sure that each step is working correctly.
As we create the behavior step-by-step, we'll notice that some things aren't working quite as they should. Don't worry we'll fix the problems as we work our way through the development process.
Building behaviors step-by-step is a good practice, jumping in and trying to create a complex behavior without regular testing can be a recipe for disaster. So, it's a good idea to get into the habit of working through the development process methodically, rather than rushing ahead and introducing difficult to fix bugs.
The game file that needs to be imported and loaded for this session is 5961_04_04.stencyl.
The skills required to complete the following tasks were covered in Chapter 3, Detecting Collisions, so if required, refer to the relevant sections and review the detailed steps to complete the tasks listed.
The tasks we need to achieve here are:
- Downloading the actor called Stencyl Book Statue from StencylForge
- Creating a new collision group called
Droppers - Configuring the new
Droppersgroup to collide withPlayers,Tiles,Enemies, andDroppers - Adding the statue to the
Dropperscollision group—this is a vital step, so don't forget to complete it - Saving the game, so we're ready for the next section, Time for action – creating a behavior to drop the statues
We now have a statue actor that is a member of a new group called Droppers, and we have configured it to collide with actors that are members of the specified groups.