
Loading layers in QGIS involves different steps, which are as follows:
- Load the layer. This step creates a variable with the layer information and related data.
- Register the layer in QGIS so that it can be used by other QGIS tools.
Loading a layer means loading a reference to the layer and its metadata. The layer is not necessarily loaded in memory, but is usually fetched only when data is accessed to be processed or visualized.
Loading and registering a layer are separate steps. A layer can be loaded, processed, and modified before it is visualized, or it can be loaded as temporary data for an algorithm. In this case, it's not necessary that the QGIS framework would be aware of the layer.
Every layer type is managed by a provider manager. QGIS has some internal implemented providers, but most of them are external libraries. The list of available providers depends on the QGIS installation. This list can be obtained by typing the following code snippet in the QGIS Python console:
>>> QgsProviderRegistry.instance().providerList()
[u'WFS', u'delimitedtext', u'gdal', u'gpx', u'grass', u'grassraster', u'memory', u'mssql', u'ogr', u'ows', u'postgres', u'spatialite', u'virtual', u'wcs', u'wms']
The preceding result shows a Python list of strings that have to be used when a PyQGIS command needs the provider parameter.
Like most free software projects, the QGIS community doesn't want to reinvent the wheel if it's not strictly necessary. For this reason, most raster formats that are managed by QGIS can be loaded, thanks to the GDAL library, which is documented at http://gdal.org/.
To code the loading of our first raster, named landcover.img, which is available in the qgis_sample_data folder, execute the following code snippet in the QGIS Python console, by adapting the path to landcover.img based on your operating system and data location:
myRaster = QgsRasterLayer("/qgis_sample_data/raster/landcover.img")In this way, the layer is loaded and referred to with the myRaster variable. If we want the layer to be visible in the legend with the name MyFirstRaster, we need to modify the preceding code snippet by adding a second parameter, as follows:
myRaster = QgsRasterLayer("/qgis_sample_data/raster/landcover.img","MyFirstRaster")Note
Two things should be noted. The first is that loading a raster layer is usually not necessary to specify the raster provider because it is GDAL by default. The second is that loading a layer is not the same as visualizing it in QGIS; a layer reference is loaded in memory to be processed and it is eventually visualized.
One of the basic actions after loading a layer, raster, or vector, is to ensure that it has been loaded correctly. To verify this, execute the following code:
myRaster.isValid()
It should return True if the layer has been loaded correctly. The following snippet does some recovery actions in case loading fails:
if not myRaster.isValid():
  <do something if loading failed>
Any raster is stored in an object of the QgsRasterLayer class, so it's important to explore the methods of this class. In the preceding code, the myRaster variable is an instance of the QgsRasterLayer class. This means that all methods of the raster are documented at http://qgis.org/api/classQgsRasterLayer.html. This class is a specialization of the generic QgsMapLayer class.
Tip
Most Python QGIS classes are direct bindings to their C++ version. This means that API documentation refers only to C++ APIs, but not all methods are visible to Python. If you want to have all the methods available in Python, use the Python help command by typing the help(QgsRasterLayer) command in the Python console.
For example, we can get some raster information by calling the methods, as follows:
print myRaster.height(), '-', myRaster.width()
The preceding code will produce the following output:
5046337 - 5374023
To get the extent of the layer, it is necessary to use the extent() method of the QgsMapLayer class; so, execute the following code:
print myRaster.extent()
This will generate a strange result, which is similar to the following output:
<qgis._core.QgsRectangle object at 0xaa55dd0>
This shows that the result of the extent() method is a QgsRectangle instance, where it is possible to call all the methods belonging to QgsRectangle. For example, the bounding box coordinates can be printed with the following code snippet:
ext = myRaster.extent()
print ext.xMinimum(), ext.yMinimum(), '-', ext.xMaximum(), ext.yMaximum()
This will produce the following result:
-7117600.0 1367760.0 - 4897040.0 7809680.0
Finally, we can visualize the raster using the centralized QGIS layer manager called QgsMapLayerRegistry. This class is like the hub where we can manage layer loading and unloading. It's useful to read the list of its methods in the QGIS API documentation.
QgsMapLayerRegistry is a singleton class. This means that it can't be instantiated multiple times like QgsRasterLayer. For example, we can have different loaded raster layers, and each one is an instance of the QgsRasterLayer class, but it's not possible to have different QgsMapLayerRegistry instances. This is because it is blocked by code and it's possible to get only the unique instance using the instance() method.
Finally, to visualize the layer, we have to execute the following code:
QgsMapLayerRegistry.instance().addMapLayer(myRaster)
This will produce an output similar to the following:
<qgis._core.QgsRasterLayer object at 0x955f3b0>
Another way to load it is by using a method similar to the one shown in the following code:
QgsMapLayerRegistry.instance().addMapLayers( [ myRaster ] )
This gives a similar result as before, but with two more brackets because it returns a list:
[<qgis._core.QgsRasterLayer object at 0x955fc20>]
The latter addMapLayers method differs from addMapLayer because it accepts a list of layers, mixing rasters and vectors. Layers will be displayed at the same time by following the list order.
After the image is loaded, QGIS will appear as shown in the following screenshot:
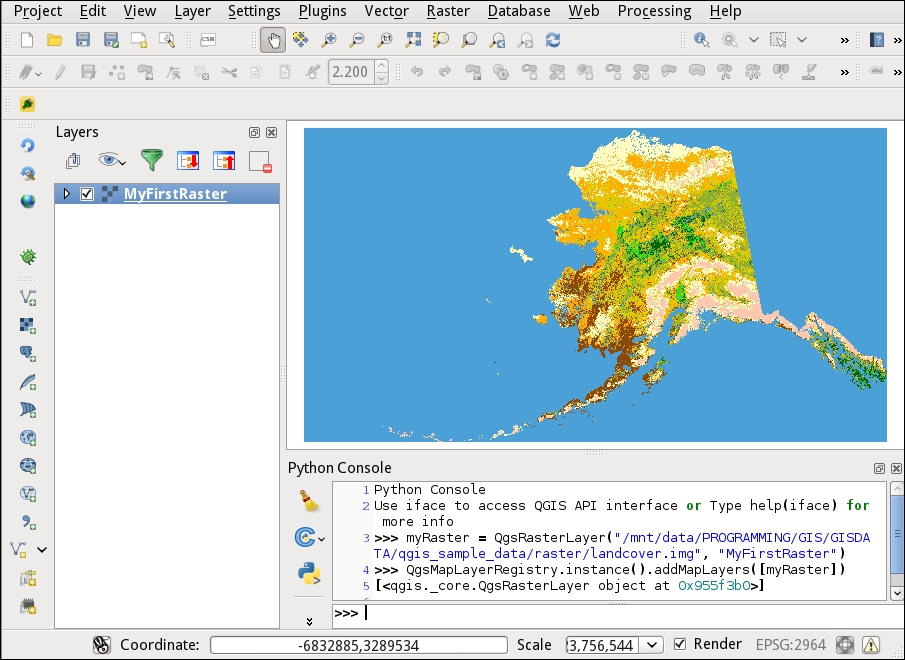
The preceding screenshot displays the image loaded in QGIS with a default false-color rendering palette.
Similar to the raster layer in the previous section, most of the vector formats managed by QGIS are supported by the OGR library, a part of the GDAL library. OGR is documented at the same link of the GDAL library. All vector formats managed by OGR are listed at http://www.gdal.org/ogr_formats.html.
To read vector data, it's always necessary to specify the provider because it can be provided by different sources.
To code the loading of our first shapefile named alaska.shp that is available in qgis_sample_data, execute the following code snippet in the QGIS Python console:
myVector = QgsVectorLayer("/qgis_sample_data/shapefiles/alaska.shp", "MyFirstVector", "ogr")This way, the layer is loaded and referred by the myVector variable. After adding the layer to QgsMapLayerRegistry, it will be visualized in the legend with the name MyFirstVector. In the QgsVectorLayer constructor call, it is possible to find a third string parameter, ogr, which specifies to use the OGR library to load the alaska.shp file.
As usual, we will check whether the loaded layer is valid using the following code:
myVector.isValid()
If vector data is hosted in a spatial database, it can be loaded by specifying the location and connection information using the QgsDataSourceURI class. A Uniform Resource Identifier (URI) is how a resource can be identified on a network such as the World Wide Web.
The following code snippet shows how to fill the URI with the necessary information to connect to a remote spatial database as PostGIS (http://postgis.net/):
uri = QgsDataSourceURI()
uri.setConnection("localhost", "5432", "myDb", "myUserName", "myPassword")
uri.setDataSource("public", "myTable", "the_geom", "myWhere")
print uri.uri()
The first line creates an instance of QgsDataSourceURI, which is filled with other information in the next lines.
The setConnection method accepts the IP or the symbolic name of the database server, the connection port, the database name, the username, and the password. If the password is set to None, QGIS will ask you for the password for connecting to the database.
The setDataSource parameter refers to the schema name, the table name, and the geometry column where the geometry is archived. Finally, an optional where string could be set to directly filter data, in this case, myWhere.
The last line shows you the URI string that will be used to point to the vector data. It will be a string similar to the following one:
dbname='myDb' host=localhost port=5432 user='myUserName' password='myPassword' table="public"."myTable" (the_geom) sql=myWhere
An alternative way is to create the URI string manually, rather than populating the QgsDataSourceURI class, but it's generally more readable and less error-prone to write the previous code, rather than a complex string.
If the database is on a SpatiaLite (http://www.gaia-gis.it/gaia-sins/) file, it's necessary to substitute the setConnection method with the following code:
uri = QgsDataSourceURI()
uri.setDatabase("/path/to/myDb.sqlite")
uri.setDataSource("", "myTable", "the_geom", "myWhere")
print uri.uri()
This generates the following URI string:
dbname='/path/to/myDb.sqlite' table="myTable" (the_geom) sql=myWhere
After the URI string is created, we can use it to create a new vector layer with the following code:
myVector = QgsVectorLayer(uri.uri(), "myVector", "postgres")
The third string parameter specifies the data provider, which in the case of vector data that is hosted on a SpatiaLite database, would have the value of spatialite.
As usual, to visualize the vector, we have to use the following code:
if myVector.isValid():
  QgsMapLayerRegistry.instance().addMapLayer(myVector)
The preceding code visualizes the vector only if it has been correctly loaded. Failures can happen for reasons such as errors in parameter settings, a restriction of the vector provider, or a limitation by the database server. For example, a PostgreSQL database can be configured that would allow access to a vector table only for a specific group of users.