Often you need to create a series of maps, all with the same data. For example, street atlases for urban areas, or maps of watersheds in a National Forest. The Atlas function in the Print Composer allow you to set up and configure a series of maps. Once configured QGIS will autogenerate each map image. This can be a tremendous time saver and can also reduce human error.
Typically map elements, such as the title or legend, will need to change with each atlas image. These map elements can be configured with Atlas to allow for map by map customizations. The key element in an Atlas is the Coverage layer whose features define the extent of each map and the number of maps.
For this example, you will use the Baltimore_Atlas.qgs project. Our goal is to generate a map of each neighborhood. Since there are 271, doing this manually would take days. However, using the Atlas feature we can accomplish this a much shorter period of time.
To begin, open the project file. This contains the same data used earlier in this chapter, but the base layer has been replaced by a QuickMapServices Google Road basemap. The basic Atlas setup is done using the following steps:
- Open a new Print Composition.
- From the Atlas menu, choose Atlas Settings.
- A new Atlas generation tab opens. Click Generate an atlas.
- Set the Coverage layer to
Baltimore Neighborhoods. If your Coverage layer is one that you do not want to appear on the maps, click the Hidden coverage layer option. You can use expressions in the Filter with option to refine your Coverage layer. You can also adjust the image generation order via the Sort by option: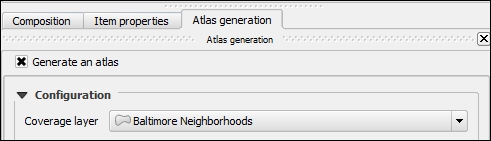
- Select the map object and switch to the Item properties tab.
- Click the Controlled by Atlas box. This control has three options:
- Margin around feature – This zooms to every Coverage layer feature with a 10% padding to the spatial extent
- Predefined scale – This chooses the most appropriate scale from those set in Settings | Options
- Fixed scale – All maps will be rendered using the specified scale
- For this example, we will use the Margin around feature option.
- Switch back to the Atlas generation tab.
- Now you can configure the outputs. You can set an expression to define the naming of each image. The output can be a single image per Coverage layer or you can produce a multi-page PDF by checking the Single file export when possible option. This option is only utilized if you choose PDF as your output file format.
- Once the basic setup is complete, you can use the Preview Atlas button on the Atlas toolbar to preview individual map images:

- Use the Previous and Next feature buttons along with the page number selector to preview specific map pages. Uncheck the Preview Atlas button when done:

When creating a map series, you really want each map to have a custom title. Fortunately, it is possible to use variables to generate dynamic titles for each page. To do this, create a title text label with the Add new label tool. Scroll to the bottom of the Item properties tab to the Variables section. There are a series of Atlas variables that can be leveraged to insert dynamic text:
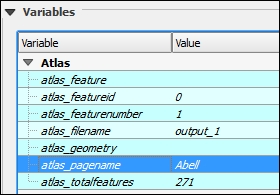
Scroll back up to the Main properties section. Click Insert an expression. Expand Variable and double-click on the variable atlas_pagename to insert that variable into the expression and click OK. The variable is inserted as the title text. This is yet another great application of QGIS variables!

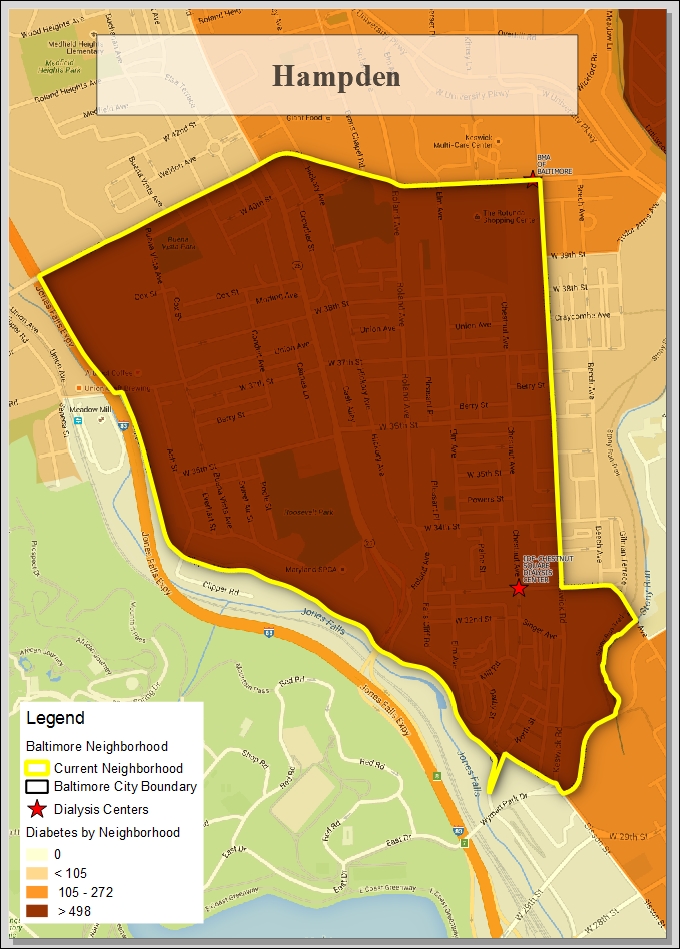
Using the Preview Atlas button, you can now see the title variable in action. The title will update to the Coverage layer neighborhood for each page:

Atlas variables can be used this way to create any other desired dynamic text on the composition.
Legend content can also be dynamic. After adding a legend, select the Item properties. In the Legend items section, select the Only show items inside current atlas feature option. This will filter the legend based on the features visible on a given page:

It is also possible to filter the contents of a layer to equal the Coverage feature. In this example, the Diabetes by Neighborhood layer has been duplicated and given a single symbol of hollow yellow polygons. The renderer is then switched to Rule-based. The rule is set to @atlas_featureid = $id.
This expression filters the layer so that it is equal to just the feature whose ID equals that of the current Atlas coverage feature. In this example, the polygon is also given a drop shadow via live layer effects:

This results in a map with a custom title, a filtered legend, and a highlighted coverage feature!