
After being able to parse all the features, it's necessary to learn how to modify them to satisfy our processing needs. Features can be modified in two ways:
- Using the data providers of the vector
- Using the methods of
QgsVectorLayer
The difference that exists between these two methods is the ability to interact with some editing features of the QGIS framework.
We will now modify the Alaska shapefile in the following subsections. If we modify some geometry of the legend classification, it will be necessary to refresh the canvas and/or layer symbology. The canvas can be refreshed with the following commands:
iface.mapCanvas().clearCache()
iface.mapCanvas().refresh()
The symbology of a modified QgsVectorLayer instance saved in the myVector variable can be updated with the following code:
iface.legendInterface().refreshLayerSymbology(myVector)
Each QgsMapLayer, as a QgsVectorLayer instance, has its own data provider that can be obtained with the dataProvider() method. This is shown in the following code snippet, which is executed in the Python console:
myVector = QgsVectorLayer("/qgis_sample_data/shapfiles/alaska.shp","MyFirstVector", "ogr")
QgsMapLayerRegistry.instance().addMapLayers([myVector])
myDataProvider = myVector.dataProvider()
print myDataProvider
This will print something similar to <qgis._core.QgsVectorDataProvider object at 0xaabdc20> on the Python console. This is the instance of the QgsVectorDataProvider class.
The data provider will directly access the stored data, avoiding any control by QGIS. This means that no undo and redo options will be available and no events related to the editing actions will be triggered.
The code snippets that follow describe how to interact with vector data directly using the data provider. These code samples will modify the Alaska shapefile set of files, so it's better to have a copy of the original files, to restore them after you apply the following examples.
Some of the following examples will work directly on features of myVector. We can get a feature directly using the QgsFeatureRequest. For example, to get the feature with ID 599, we can use the following code snippet:
features = myVector.getFeatures( QgsFeatureRequest(599) )
myFeature = features.next()
Feature 599 is the biggest polygon available in the Alaska shapefile. Remember that getFeatures returns an iterator and not the feature directly, so it's necessary to use next() to get it.
The next() method could generate a StopIteration exception when the iterator arrives at the end of the features list; for example, when the getFeatures result is empty. In our case, we don't care about this exception because we are sure that the feature with ID 599 exists.
After getting feature 599, we can change its geometry. We'll substitute its current geometry with its bounding box. The code snippet to do this is as follows:
oldGeom = myFeature.geometry()
bbox = oldGeom.boundingBox()
newGeom = QgsGeometry.fromRect( bbox )
newGeomMap = { myFeature.id() : newGeom  }
myDataProvider.changeGeometryValues( newGeomMap )
After we refresh the canvas, the shapefile will appear as in the following screenshot:
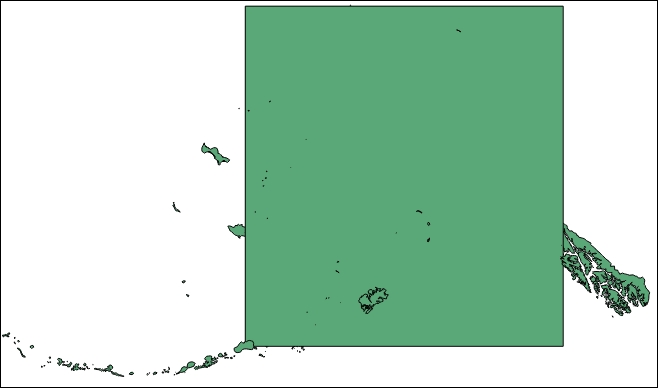
The changeGeometryValues() method accepts a QgsGeometryMap object. This is the Python dictionary, which contains the ID of the feature to change as a key and the new geometry as a value.
After getting feature 599, we can change its attributes in a way similar to how we changed the geometry of the feature in the previous subsection.
In this case, the map is a QgsChangedAttributesMap class that will be a Python dictionary. This is composed of a key, the ID of the feature to change, and another dictionary as a value. This last dictionary will have the index of the column to change as the key and the new value that has to be set as the value. For example, the following code snippet will change the area value to zero for column two of feature 599:
columnIndex = myVector.pendingFields().fieldNameIndex( "AREA_MI" )
newColumnValueMap = { columnIndex : 0  }
newAttributesValuesMap = { myFeature.id() : newColumnValueMap  }
myDataProvider.changeAttributeValues( newAttributesValuesMap )
You can check whether the value of the parameter has changed by navigating to View | Identity Features.
If you want to change more than one attribute, you just have to add more key/value pairs in the newColumnValueMap dictionary, using the following syntax:
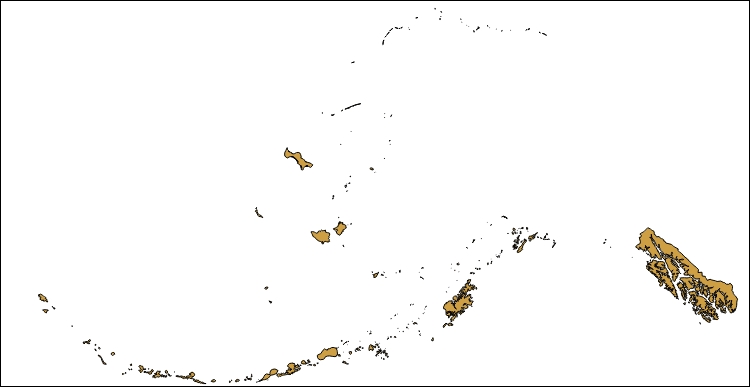
newColumnValueMap = { columnIndex1:newValue1, …, columnIndexN:newValueN}A feature can be deleted by pointing at it with its ID. The ID of the feature can be obtained with the id() method of the QgsFeature class. The following snippet will remove feature 599:
myDataProvider.deleteFeatures([599])
After you refresh the canvas, myVector will be shown as in the following screenshot:
After we reload the original Alaska shapefile, we will again get feature 599, which we will use as the base to create a new feature. The geometry of this new feature will be set as the bounding box of feature 599; this is done using the following code:
# get data provider
myDataProvider = myVector.dataProvider()
# get feature with id 599
features = myVector.getFeatures( QgsFeatureRequest(599) )
myFeature = features.next()
# create geometry from its bounding box
bbox = myFeature.geometry().boundingBox()
newGeom = QgsGeometry.fromRect( bbox )
# create a new feature
newFeature = QgsFeature()
# set the fields of the feature as from myVector
# this step only sets the column characteristic of the feature
# not its values
newFeature.setFields( myVector.pendingFields() )
# set attributes values
newAttributes = [1000, "Alaska", 2]
newFeature.setAttributes( newAttributes )
# set the geometry of the feature
newFeature.setGeometry( newGeom )
# add new feature in myVector using provider
myDataProvider.addFeatures( [newFeature] )
The preceding code is explained in the inline comments and it adds a new feature. The new feature can be checked by opening the attribute table and selecting the last record. This will produce an interface that is similar to the following screenshot:
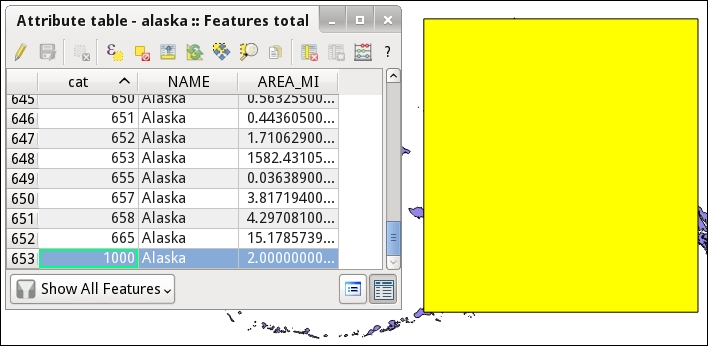
When you select the last record in the attribute table, it will be highlighted.
Editing using QgsVectorLayer gives you much more power to interact with the QGIS interface and to control the editing flow.
The QgsVectorLayer methods to modify the attributes or geometry of a feature are slightly different than the method used in QgsVectorDataProvider, but the main characteristic is that all these methods work only if the layer is in the editing mode; otherwise, they return False to notify failure.
An editing session on the myVector vector follows the steps described in the following pseudocode:
myVector.startEditing()
< do vector modifications saved in myVector.editBuffer() >
if <all ok>:
  myVector.commitChanges()
else:
  myVector.rollback()
Each step generates events that can be cached if they are useful for our processing scopes. The list of generated events can be read in the QgsVectorLayer documentation. For example, startEditing() will generate the editingStarted() event, adding a feature will generate the featureAdded() event, committing changes will emit the beforeCommitChanges() event before applying changes, and then the editingStopped() event will be generated.
A useful exercise for you is to create a simple script to connect all these events to print commands. This is a good way to learn the event sequence that is generated during vector editing.
For example, the following code snippet in the editing console will print a message every time someone starts to edit the vector layer, myVector:
def printMessage():
  print "Editing is Started"

myVector.editingStarted.connect( printMessage )
In the last line, we instruct Python to call the printMessage function every time the editingStarted event is emitted by myVector. In this case, the printMessage function is usually known as a callback or a listener.
It's possible to have fine-grained control of the editing session managing event of the QgsVectorLayerEditBuffer class that stores all modifications of the layer. It's also possible to access the buffer using the vector layer with the following code:
myEditBuffer = myVector.editBuffer()
A detailed description of this class is outside the scope of this chapter, but it's strongly suggested to explore it, to discover all the PyQGIS editing opportunities, such as setting the attribute of a new feature based on some parameters of the nearest geometry of another layer.
After we have reloaded the original Alaska shapefile and got feature 599, we can change its geometry. We'll substitute the current geometry with its bounding box, and the code snippet to do this is as follows:
oldGeom = myFeature.geometry()
bbox = oldGeom.boundingBox()
newGeom = QgsGeometry.fromRect( bbox )
myVector.startEditing()
myVector.changeGeometry( myFeature.id(), newGeom )
myVector.commitChanges()
In this case, it's not necessary to refresh the canvas because a canvas refresh is triggered by events generated during a commit. After the commit, the interface will appear similar to the image shown in the Adding a feature section.
In the preceding code, you can see that the changing geometry has a different API using the data provider. In this case, we can change a feature each time.
After we get feature 599, we can change its attributes in a way similar to how we changed the geometry of the feature in the previous section. The following snippet will change the area value to zero for column two of feature 599:
columnIndex = myVector.pendingFields().fieldNameIndex( "AREA_MI" )
myVector.startEditing()
myVector.changeAttributeValue( myFeature.id(), columnIndex, 0 )
myVector.commitChanges()
You can check whether the value of the parameter has been changed by navigating to View | Identity Features.
In the preceding code, notice that the changing attribute has a different API using the data provider. In this case, we can change features one at a time.