
QGIS Desktop provides powerful field-calculation functionality. In the field calculator, advanced mathematical, geometry, string, date and time, type conversion, and conditional functions are available for use. Leveraging these advanced functions along with standard operators allows for some powerful field calculations.
This section will explain the field calculator interface in detail, followed by multiple examples of advanced field calculations from a variety of functional areas. It is assumed that you know the basics of field calculations and common operators.
The field calculator can be opened in three ways, which are as follows:
- Open the attribute table of the layer whose details you wish to calculate and then click on the field
calculator button ()on the attribute table toolbar - Open the attribute table of the layer whose details you wish to calculate and then press Ctrl + I on your keyboard
- Select the layer whose details you wish to calculate in the Layers panel and then click on the field
calculator button ()on the attributes toolbar
The Field calculator window, shown in the following screenshot, has five sections:
- Field Designation: This determines which field will hold the output of the expression. You can use Create a new field or Update existing field by selecting the desired option and setting the relevant option(s). A virtual field can also be created by selecting Create a new field and Create virtual field. A virtual field is not stored in the dataset; instead, it is stored as an expression in the QGIS project file and will be recalculated every time the field is used.
- Function List: This contains a tree of field-calculation functions available for insertion into the expression.
- Function Help: This displays the help documentation for the selected function in the function list.
- Operators: This ensures quick button access to insert commonly used operators into the expression. These operators are also in the function list under the Operators branch.
- Expression: This is an editable text area that contains the expression which will calculate field values. Underneath the expression is a preview of the output for a sample record. If the expression is invalid, a notice will appear with a link to more information about the expression error:

The expression must meet strict syntax guidelines, otherwise the field calculator will report a syntax error instead of an output preview. The following are common syntax rules for expressions:
- Operators should be placed without any special formatting. For example,
+. - Fields should be surrounded by double quotes. For example,
"State_Name". - Text (string) values should be surrounded by single quotes. For example,
'Washington'. - Whole numbers (integer) and decimal numbers (float) should be entered without any surrounding characters. For example,
153.27. - Functions come in two types, as follows:
- Functions requiring parameters: These begin with a function name, followed by a set of parentheses. Inside the parentheses are function parameters separated by commas. For example,
log(base, value). - Functions not requiring parameters: These begin with a dollar sign (
$) followed by the function name. For example,$area.
- Functions requiring parameters: These begin with a function name, followed by a set of parentheses. Inside the parentheses are function parameters separated by commas. For example,
If this is a little confusing, don't worry, you can rely on the field calculator to enter a portion of the syntax for you correctly. To add an operator, field, or function to the expression, double-click on the desired item in the function list and it will be added to the cursor location in the expression.
In addition to adding functions through the function list, the field calculator can also add to the expression any value that currently exists in any field. To do this, expand the Fields and Values branch of the function list tree. A list of the fields in the attribute table will be listed. When you select a field, a Field values area will appear to the right underneath the function help (as shown in the following screenshot). Click on all unique to load the Field values area with all unique values found in the selected field. Then, click on 10 samples to load 10 samples that are found in the selected field into the Field values area. You can also load values by right-clicking on the field name and selecting it from the contextual menu (the contextual menu is shown in following screenshot). Double-click on a value to add it to the cursor location in the expression:

Let's put what we learned previously into practice. This section will walk you through creating three advanced field calculations. The first calculation will insert the current date into a field as a formatted string. The second calculation will insert a geometry value. The third calculation will calculate a label string that differs depending on the state's population.
The first example of an advanced field calculation uses two functions to calculate and format the current date. For this example, we will format the current date as dd/mm/yyyy:
- Open the Field calculator window.
- Select Create a new field and set the following options:
- Output field name:
Updated - Output field type:
Text (string) - Output field width:
10
- Output field name:
- In the Function list field, expand the String node and then double-click on format_date to add it to the Expression area. This function takes two arguments: a time string and a string representing the format to convert the time string to. We will use the current date function for the time and write a format string.
- In the Function list field, expand the Date and Time node and then double-click on now to add it to the Expression area after the open parenthesis.
- Type a comma after
now()and enter'dd/MM/yyyy', followed by a closed parenthesis. Thenow()function returns a string representation of the current time and date. The following screenshot shows the completed calculation: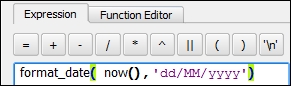
- Click on OK to execute the calculation. This will enable editing on the layer and calculate the field values.
- Open the attribute table of the layer to see the calculated and formatted date (shown in the following screenshot). To make the calculation permanent, save the edits to the layer and disable editing mode:

The second example of an advanced field calculation uses two functions to insert the centroid x coordinate of a geometry object and the number of vertices that compose a geometry object. First, we will calculate the x coordinate of the centroid. To do this, perform the following steps:
- Open the Field calculator window.
- Select Create a new field and set the following options:
- Output field name:
XCoord - Output field type:
Decimal number (real) - Output field width:
10 - Output field precision:
7
- Output field name:
- In the Function list field, expand Geometry and then double-click on x to add it to the Expression area. Next, double-click on $geometry to add it after the open parenthesis.
$geometryrepresents the geometry of the row being calculated. Lastly, close the parenthesis by typing ) on your keyboard. The completed expression should bex($geometry). This function returns the x coordinate of a point geometry or the centroid x coordinate of a non-point geometry (ex. line or polygon). The following screenshot shows the completed calculation: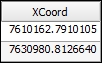
- Now let's store the number of vertices that compose each geometry object in the layer:
- Open the Field calculator window.
- Select Create a new field and set the following options:
- Output field name:
NumVerticies - Output field type:
Whole number (integer) - Output field width:
4.
- Output field name:
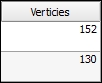
- In the Function list field, expand Geometry and then double-click on num_points to add it to the Expression area. This function returns the number of vertices that compose the geometry object. Inside the parentheses, you will need to specify the geometry of which you wish to count the number of vertices. Double-click on
$geometryto add it to the expression. Close the parenthesis by typing ) on your keyboard. The completed expression should readnum_points($geometry). - The following screenshot shows the completed calculations for the number of vertices for a polygon geometry type:
This third example populates a new field with a string that is used for labeling states. States that have a population of over five million will have a label with the state name and population. All other states will simply have a label with the state name. The basic logic of our calculation is if a state has a population of over five million, then create a label that lists the state name and population; otherwise, create a label that lists the state name.
Since we have two cases of possible labels, we will need to use the CASE ELSE conditional function. The purpose of the CASE ELSE function is to direct the field calculator to a calculation block when a condition is met. So, we will have one calculation block for states over five million in population and one for all other states.
For this example, the states48.shp sample data is being used. The POP1996 field contains the states' population values as of 1996 and is the field used to determine whether a state's population is over or under five million:
- Open the Field calculator window.
- Select Create a new field and set the following options:
- Output field name:
StateLabel - Output field type:
Text (string) - Output field width:
35
- Output field name:
- In the Function list field, expand the Conditionals node and then double-click on CASE to add it to the Expression area.
This will add
CASE WHEN expression THEN result ENDto the Expression area. We will replaceexpressionwith the test for populations greater than five million. TheresultafterTHENwill be replaced with the label we wish to create whenexpressionis true. We will then add theELSEand will add the label we wish to create whenexpressionis false. - Let's start by setting the label for states with a population of less than five million. Before
END, typeELSE "STATE_NAME". - Now, we will set the condition to check for population greater than five million. Replace condition with
"POP1996" > 5000000. The following screenshot shows the expression with optional formatting to make it easier to read: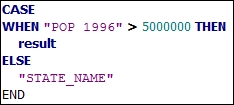
- The last step is to calculate the string for states with a population greater than five million. The format of the string will be
<state name> Population: <population>, with the state name on the first line and the population on the second line. As this is a complex string, it will be constructed in three parts, and then concatenated together using the concatenation operator,||(two vertical bars). - Replace
resultwith the"STATE_NAME"field. -
Add a concatenation operator after
"STATE_NAME"by either typing two vertical bars (||) or by clicking the concatenation operator button ( ). This allows the following text to be concatenated with the contents of the
 "STATE_NAME"field. - After the concatenation operator, type
'
Population: '
and keep a space between the colon and closing single quote. The - Add a concatenation operator to the end of the line.
The last item to add to the string is the population value stored in the
POP1996field. However, the population is stored as an integer and an integer (or any other number) cannot be concatenated to a string. Therefore, we need to convert the integer to a string so that we can concatenate. Luckily for us, theformat_number()function converts a number to a string and adds thousands separators and rounds the number (although rounding is not needed in this case). - After the concatenation operator, add the
format_number()function by expanding String in Function list and double-click onformat_number. You can also manually type in the function. - Inside the parenthesis of the
format_number()function, enter"POP1996",0where"POP1996"is the first parameter containing the population value, the comma separates the function parameters, and0is the number of decimal places to round the number. The following screenshot shows the completed expression, which is formatted across multiple lines for easy reading: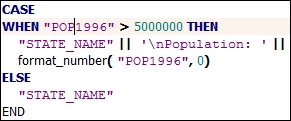
- Click on OK to perform the field calculation. This will enable editing on the layer and calculate the field values.
- Save the edits to the layer and disable the editing mode. The calculated values are now stored in the layer. The following screenshot shows a sample of labels calculated for states with populations greater and less than five million:
