There are two types of table you can work with in QGIS: attribute tables and standalone tables. Whether they are from a database or associated with a shapefile or a flat file, they are all treated the same. Standalone tables can be added by clicking on the Add Vector Layer menu by navigating to Layer | Add Layer. QGIS supports the table formats supported by OGR, along with database tables. Tables are treated like any other GIS layer; they simply have no geometry. Both types of table can be opened within Desktop by selecting the layer/table in the Layers panel, and then by either clicking on Open Attribute Table under Layer, or by right-clicking on the data layer and choosing Open Attribute Table from the context menu. They can also be previewed in QGIS Browser by choosing the Attributes tab.
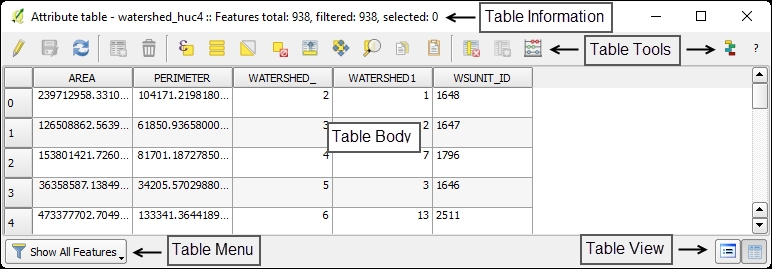
The table opens in a new window that displays the number of table rows and selected records in the title bar. Below the title bar are a series of buttons that allow you to toggle between editing, managing selections, and adding and deleting columns. Most of the window is filled with the table body. The table can be sorted by clicking on the column names. An arrow will appear in the column header, indicating either an ascending or a descending sort. Rows can be selected by clicking on the row number on the left-hand side. In the lower-left corner is a Tables menu that allows you to manage what portions of the table should be displayed. You can choose Show All Features (default setting), Show Selected Features, Show Features Visible on Map (only available when you view an attribute table), Show Edited and New Features, create column filters, and advanced filters (expression).
The lower-right corner has a toggle between the default table view and a forms view of the table. An attribute table is shown in the following screenshot, with parts of the table window identified:
Attribute tables are associated with the features of a GIS layer. Typically, one record in the attribute table corresponds to one feature in the GIS layer. Standalone tables are not associated with GIS data layers. However, they may have data of a spatial nature from which a spatial data layer can be generated (for more information, see Chapter 6, Advanced Data Creation and Editing). They may also contain data that you wish to join to an existing attribute table with a table join, which we will cover in the next section.
Let's say that you need to make a map of the total population by county. However, the counties' GIS layers do not have population as an attribute. Instead, this data is contained in an Excel spreadsheet. It is possible to join additional tabular data to an existing attribute table.
There are two requirements, which are as follows:
- The two tables need to share fields with attributes to match for joining
- There needs to be a cardinality of one-to-one or many-to-one between the attribute table and the standalone table
To create a join, load both the GIS layer and the standalone table into QGIS Desktop. QGIS will accept a variety of standalone table file formats including Excel spreadsheets (.xls and .xlsx), dBase (.dbf) files, and comma separated value (.csv) files. You can load this tabular data using the Add Vector Layer menu by navigating to Layer | Add Layer and setting the file type filter to All files (*) (*.*) as shown in the following screenshot:

Once the data is loaded, a join can be completed by following these steps:
- Select the GIS layer in the Layers panel that will receive the new data from the join.
- Navigate to Layer | Properties and choose the Joins tab.
- Click on the add join button (the one with a green plus sign).
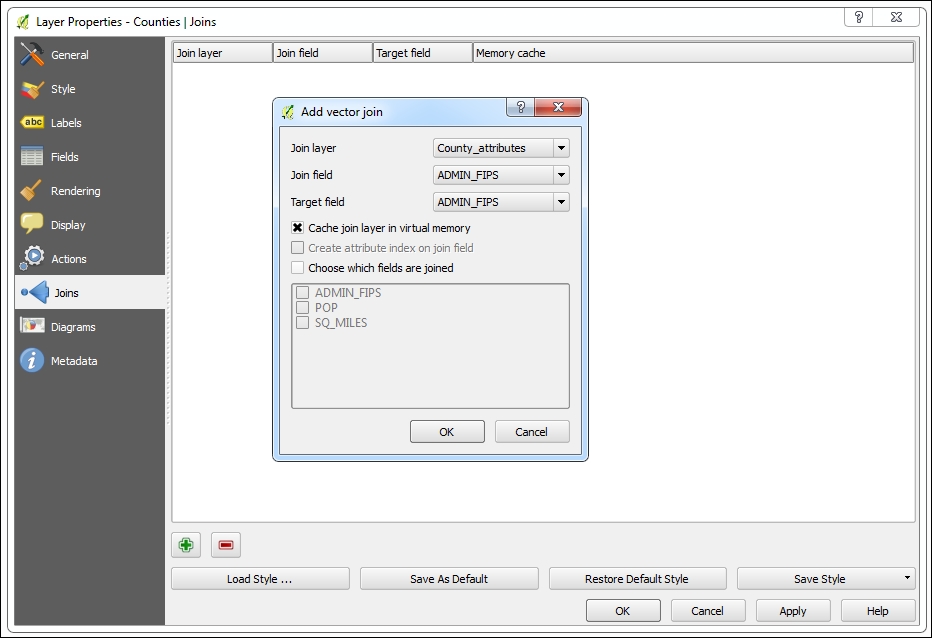
- Choose the Join layer, Join field, and Target field values. The Join layer and Join field values represent the standalone table. The Target field value is the column in the attribute table on which the join will be based.
- At this point, you can choose Cache join layer in virtual memory, Create attribute index on join field, or Choose which fields are joined. The last option lets you to choose which fields from the join layer to append to the attribute table. A new feature also allows you to set a Custom field name prefix. At this point, the Add vector join window will look like the following screenshot.
- Once created, the join will be listed on the Joins tab. The extra attribute columns from the Join layer will be appended to the attribute table, where the value in the Join field matched the value in the Target field.
- The additional data from the join can be used to query the data and style the data.
- Joins can be modified by selecting the join and clicking the pencil edit button. They can be removed by clicking on the remove join button (the one with a red minus sign):