Expression Web 2 is a great tool for managing any kind of site, including those that were created in FrontPage.
Virtually any FrontPage feature can still be used through Expression Web 2. Most of the absent FrontPage features were simply removed from the user interface but are present beneath the surface. The logic here is that the Expression development team wanted former FrontPage users to be able to open pages, change text and images, and make other page-level modifications, but not necessarily to continue using the original features.
Even though Expression Web 2 is nondestructive to Web sites that were created in FrontPage, it’s still a good idea to back up FrontPage sites before modifying them.
If you need to make significant modifications to FrontPage components or themes, the best method is to use FrontPage.
However, when you manage and publish FrontPage sites with Expression Web 2, you’ll get the benefits of better syntax highlighting (based on the DOCTYPE), much better style sheet creating and editing capabilities, the ability to easily insert media files such as Adobe Flash, Microsoft Windows Media, and Microsoft Silverlight applications, as well as many other standards-based improvements.
The following exercises will acquaint you with using Expression Web 2 to maintain and manage an existing FrontPage site.
Here’s the scenario: You need to change the content in a shared border in a FrontPage-created Web site. You don’t want to do a full conversion to the site; you simply want to change some common content and then publish it.
In this exercise, you will replace FrontPage content in a shared border.
Note
USE the FrontPageExample site you modified in the previous exercise.
OPEN the FrontPageExample site if it isn’t already open.
Open the index.htm page in Split view, and display the shared border at the bottom of the page.
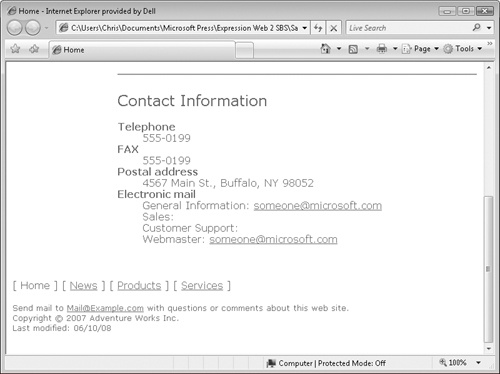
For this example, you will change the e-mail address at the bottom of the page from [email protected] to [email protected].
Tip
Not only is the content you want to change inside a shared border, but it is also a FrontPage substitution. You simply want to replace it with a normal e-mail address and mailto hyperlink.
Click the [email protected] hyperlink to select it, and then press the
 key to remove both the hyperlink and the FrontPage substitution.
Type [email protected] to replace the original hyperlink. Select the text you typed, right-click the selection, and then click Hyperlink. In the Insert Hyperlink dialog box, click E-mail Address.
Type the e-mail address and a message subject, and then click OK.
On the toolbar, click Save.
Expression Web 2 saves the changes to the page.
On the toolbar, click the Preview button to preview how visitors will see your change.
Click a few links and check the footer area of those pages to be sure that your change to the shared border updated the pages that receive that content.
You’ve just successfully changed a FrontPage proprietary feature from within the design surface of Expression Web 2. In the next exercise, you’ll make a change to an even more FrontPage-centric element from a less than apparent facility in Expression Web 2.

Here’s the scenario: You need to create a new page and add it to your existing Navigation view and link bars that were originally created in FrontPage. The best method would be to open the relevant site in FrontPage, create the new page, and add it to the Navigation view. However, this exercise assumes that FrontPage isn’t available to you.
Important
Navigation view does not appear in the Expression Web 2 interface. It has been removed to discourage continued use because the link bars it generates are not valid HTML. In the following exercise, you’ll temporarily bring back the Navigation view to add a page so that it will be included in the site’s existing link bars. It is strongly recommended that you use this method very sparingly and only in situations where it is absolutely necessary.
In this exercise, you will create a page and add it to your existing Navigation view and link bars.
Note
USE the FrontPageExample site you modified in the previous exercise.
OPEN the FrontPageExample site if it isn’t already open.
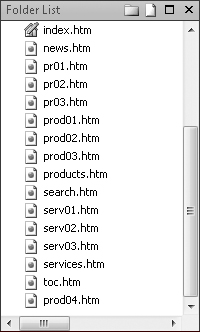
In the Folder List, right-click prod03.htm, click Copy, right-click the root folder, and then click Paste.
Expression Web 2 creates a file named prod03_copy(1).htm in the root folder.
Right-click the prod03_copy(1).htm file, click Rename, type prod04.htm, and then press
 .
.The Folder List displays the prod04.htm file in the list.
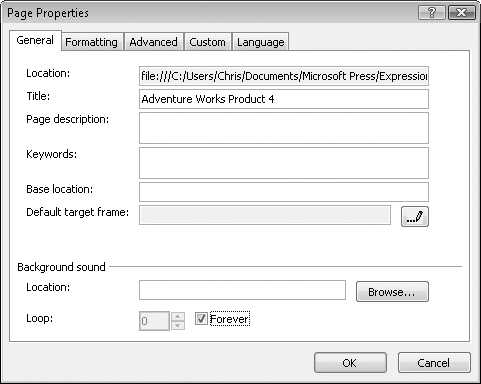
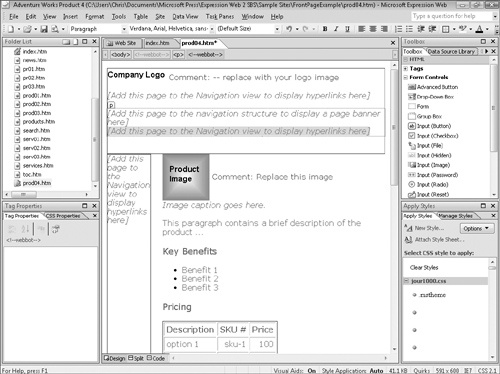
In the Folder List, double-click prod04.htm to open it for editing. Right-click the Design surface of the page, whether in Design or Split view, and then click Page Properties.
In the Title box of the Page Properties dialog box, change the page title to Adventure Works Product 4.
Click OK to close the Page Properties dialog box.
On the toolbar, click Save.
You have now created, renamed, and changed the page title of a very FrontPage proprietary site. You’ll notice that many of the page elements are showing notices about adding them to Navigation view to display the link bars and page banners.
In order to use your newly created page, you’ll need to get Navigation view back temporarily.
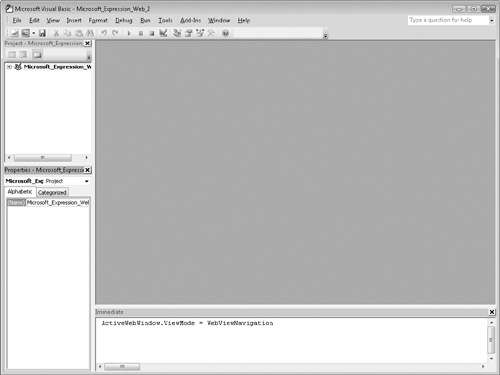
On the Tools menu, click Macro, and then click Visual Basic Editor.
The Microsoft Visual Basic Editor starts.
In the Visual Basic Editor, click View, and then click Immediate Window. In the Immediate window pane, type the following code:
ActiveWebWindow.ViewMode = WebViewNavigation
Press
to run the code. Then switch to Expression Web 2.A representation of Navigation view is displayed.
Drag the prod04.htm page you created in step 2 into the Navigation pane, and drop it immediately to the right of Product 3. Select the page icon, click its name to make it editable, and then type Product 4.
In the Navigation pane, double-click the Product 4 page icon to open the page for editing.
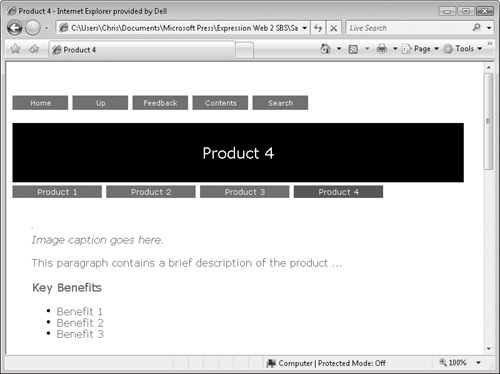
Notice that the page has the same elements as its sibling pages.
On the toolbar, click the Preview button to view this page as a visitor would see it. In the browser, navigate to a few of the other product pages to verify that your changes in the preceding steps have created a uniform page.


By using the preceding method, you can make minor changes to sites that rely heavily on the FrontPage navigation structure for elements such as navigation bars, page banners, and other elements that require the now obsolete FrontPage Navigation view.
It’s important to use the method for only quick changes to a site that isn’t ready for a full conversion. It would be counterproductive to use discontinued features such as Navigation view on new sites, especially because Expression Web 2 has so many tools to make use of superior techniques. For example, the ASP.NET Navigation controls would be a great replacement for a FrontPage navigation bar of a relatively high level of complexity, and a series of Interactive Buttons, whether in a Dynamic Web Template, an Include Content section, or simply on the face of a standard HTML page, can easily replace a simple graphical FrontPage navigation bar.