
After creating a site based on a template, as you did in the previous exercise, the first task you should undertake is organizing the pages. This task includes creating pages you need that don’t yet exist, deleting pages you don’t need, and organizing the folder locations and properties of existing pages.
In this exercise, you will delete the photo gallery and information links folders and the pages they contain, modify the properties of existing pages, and add a folder and a page.
Note
USE the CH6 site you created in the previous exercise.
OPEN the CH6 site if it isn’t already open.
Click the Web Site tab at the top of the workspace to switch to Web Site view.
In the Folder List, right-click the photo_gallery folder, and then click Delete. In the Confirm Delete message box, click Yes. Repeat this step for the information_links folder.
In the Folder List, double-click the about folder to expose the page within.
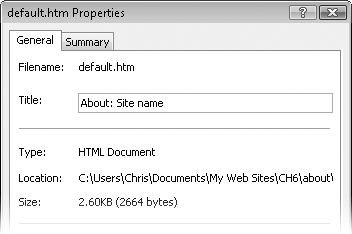
The page is named about.htm.
Right-click about.htm, click Rename, and then rename the page default.htm. In the Confirm Rename message box asking whether you want to update all linked pages, click Yes.
Right-click the newly renamed default.htm page, and then click Properties.
In the default.htm Properties dialog box, change the original, and less than descriptive, document title from "About" to something like "About site name" or "About business name."
Tip
You can optimize search engine results by including the name of the business, person, or organization in the page title. To enhance search engine results for specific geographic regions, consider adding the business’s or person’s name, full address, and phone number at the bottom (footer area) of every page.
In the default.htm Properties dialog box, click OK.
Repeat steps 3 through 7 to rename the files listed in the following table to default.htm, and then change the page title to suit an actual Web site you’re building or use the titles suggested in the table.
Folder
File
Title
calendar
calendar.htm
Calendar : Site Name
contact
contact.htm
Contact Us : Site Name
faq
faq.htm
Frequently Asked Questions : Site Name
news
news.htm
News : Site Name
Next, you will create another folder and page within the site.
In the Folder List, click the root folder. On the toolbar, click the New Document arrow, and then click Folder.
Expression Web 2 creates a folder named New_Folder and selects the folder name so you can change it.
Type products, and then press
 .
.To display content when a site visitor links to the products folder, you need to create a default file within it.
On the toolbar, click the New Document button.
Expression Web 2 creates a blank Web page named Untitled_1.html.
On the toolbar, click Save.
In the Save As dialog box, navigate to the products folder. In the File name box, enter default.htm.
In the Save As dialog box, click Change Title, and give the page a title, such as Products : Site Name. Then click Save.
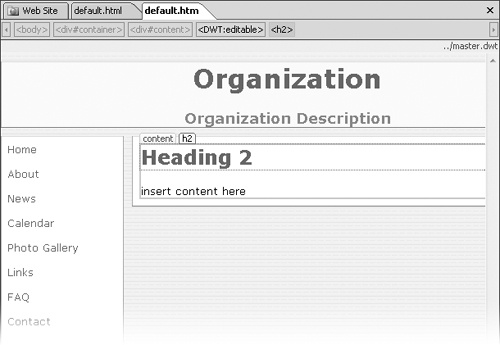
Notice that this page bears no resemblance to any of the other pages in this site. This is because this page is not attached to the Dynamic Web Template.
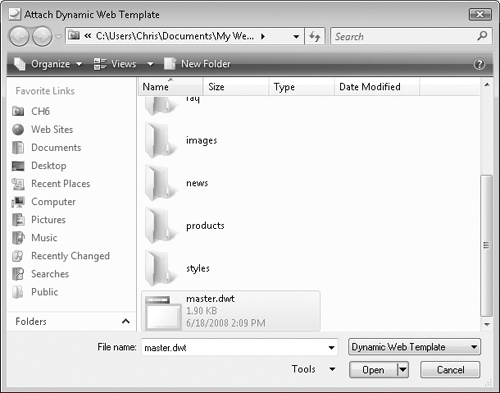
On the Format menu, point to Dynamic Web Template, and then click Attach Dynamic Web Template.
In the Attach Dynamic Web Template dialog box, browse to the site’s master.dwt Dynamic Web Template, and select it.
Click OK to close the dialog box and attach the template to your new page. Click OK in the Update Confirmation message box.
Your newly created page now has the correct template applied to it and is identical in style and layout to all the other pages in the site.
Click Save to save your changes.

You have just seen the big benefit of using Dynamic Web Templates to control layout of Web pages: There’s virtually no chance that pages attached to a Dynamic Web Template can have an inconsistent appearance, not to mention the ease of maintaining global elements such as navigation, which you’ll tackle in the next exercise.