IN THIS CHAPTER, YOU WILL
Change page layout.
Add tables.
Enhance your site functionality with Web modules.
Learn about advanced Web features.
JUST GETTING a professional-looking site up on the Web is a huge accomplishment, so congratulations! After you have the basic design and content situated the way you want it, you might find yourself beginning to wonder what you can do next. People seem to be flipping over video—should you add video clips to your site? Customers really like to see user reviews before they buy a product; perhaps giving your customers the opportunity to share their great experiences with your company will be effective in encouraging others to try your wares.
This chapter shows you how you can take your Web site to the next level by changing the layout of your page, adding tables, inserting Web modules, and (for those of you who are comfortable with Web technologies) work with CSS (cascading style sheets) and HTML on your site. You also learn how to add video clips and even a blog to your site.
Note
Not all sites need all things, so choose your enhancements carefully. Think about your audience. What will your customers want to see? What will they really use? Remember that your customers will appreciate it if you give them what they are looking for in the easiest possible way. Sometimes bells and whistles actually get in the way of what the user wants to accomplish online.
As you learned in the previous chapter, Microsoft Office Live Small Business makes page design easy for you by providing ready-made pages and Web page templates you can use as is or modify to suit your needs. You can change the layout of your pages at any time and create a totally new look for your site with a few simple clicks of the mouse. Here are the steps for changing the layout of a page:
Click Web Site in the left navigation bar.
In the Page Manager, click the Edit link for the page you want to change.
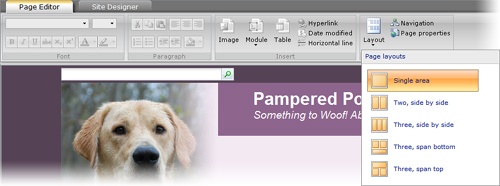
Click Layout in the Advanced group of the Page Editor (see Figure 5-1).
Click the layout you want. Table 5-1 describes the available choices.
If necessary, use Cut and Paste in the Paragraph group to move the page content into the appropriate zones.
Table 5-1. Choosing a Layout
LAYOUT STYLE | NAME | DESCRIPTION | USE WHEN |
|---|---|---|---|
Single area | Entire page is one large content area | You have large blocks of text or want to display a large image. | |
Two, side by side | Two vertical columns arranged parallel on the page | You want to display two running columns, similar to newsletter text (with or without images). | |
Three, side by side | Three vertical columns arranged side by side on the page | You want to compare a list of product features. | |
Three, span bottom | Two vertical columns appear in the upper half of the page, with one horizontal column below | You want to include several different text segments on the page. | |
Three, span top | One horizontal area at the top of the page with two vertical areas below | You want to create a page intro followed by a two-column list or content divided into sections. |