Now the fun begins. You get to create the product catalog pages for your site. This is where having some creative energy—or some talented people who specialize in creative arts—will really come in handy. As you design your product pages, you will have the opportunity to add information in each of the following areas, so they are worth thinking about before you begin creating your pages:
Product name
Product numbering or ID
Product price
A short description of your product
A longer description, if desired
The category of the product
Keywords that describe your product
Photos of the product
Dimensions
Weight
Tip
You may want to create an Excel spreadsheet that includes a column for each product with each of these items represented. That way you can be sure to be consistent in the way you number, name, categorize, and describe the various products in your catalog.
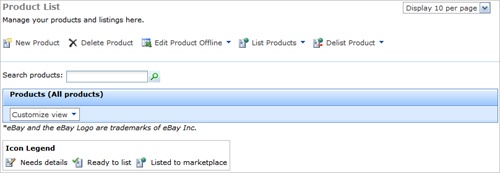
To get started, click Sell Online in the Office Live Small Business Home page, and then click Add Products And Images in the Getting Started area. The Product List page appears, as you see in Figure 8-7.
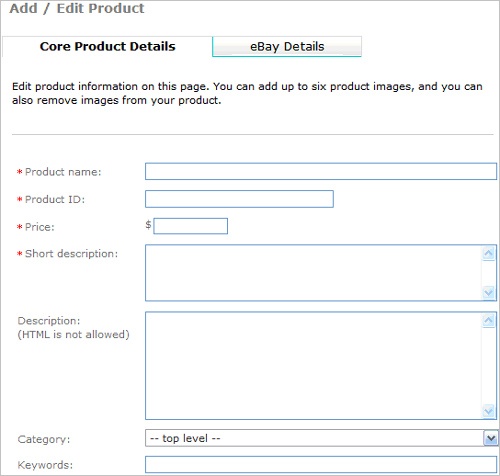
Click New Product, and the fun begins. In the Add/Edit Product page (see Figure 8-8), you will enter the information that describes and categorizes your first product. Notice that the Add/Edit Product page is set up with two tabs. At the top of the page you see Core Product Details and eBay Details. For now, leave Core Product Details selected, and you can add the basic information for your product following the description in the following sections.
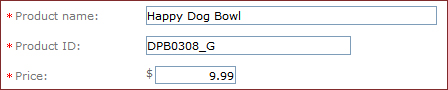
Your first task requires entering the product name and ID you have given to your product. If you currently use a numbering or classifying system to help keep you sane during inventory time, use that system for your Office Live Small Business online store. If you are just starting out and can name and/or number products any way you want, think carefully about the names you choose and the numbering you design.
Here are a few questions to consider:
If this is a product you have created yourself, is there a brand name attached to the product (for example, Flex-i-bend Leashes, Wags Natural Dog Bones, or TruePoint Clippers)?
Do you carry more than one type and size of a particular product? Will you create separate product listings for each?
Do you need a way to distinguish online sales items from in-person sales?
Does your product ID include important information such as product type, model number, and stock order date? (For example, a product ID for a case of carrot-flavored natural dog bones might be NDB0308C—Natural Dog Bones; arrived in March 2008; carrot-flavored.)
Setting the price of your product requires a lot of thought and testing, so if you are just considering this for the first time, discuss your proposed price with others before posting it online. Most retailers charge at least 100 percent markup on their original wholesale prices, and others use a 150 percent or even a 200 percent markup to break even with operating expenses, salaries, and promotion and distribution expenses.
To add the Product name, Product ID, and Price, click in each of those fields and type the information you want to provide.
When was the last time you sat down after dinner and read a catalog cover to cover? Most of us are looking for specific information when we browse a catalog. We want to see a simple description that lets us know whether the item sounds like something we need or want. We’re curious about dimensions, materials, and durability. In other words, will we get our money’s worth? Do your best to answer those key customer questions in your descriptions instead of dancing around them with fluffy or overblown text.
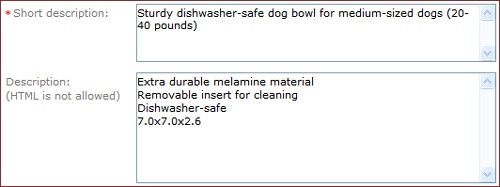
The short description is required for your product listing; the information you add here will appear beneath the product name in your store and in the customer’s shopping cart. Keep this description brief—you have only 1,075 characters to use.
The Description area offers you the chance to provide more detail about the product. Here’s where you have more room to discuss your product’s value proposition. You have a 10,000-character maximum for the description—but try to stick with the facts consumers need to make a good purchase decision.
The product categories you create on your site help you keep things organized and give your visitors a way to find specific items when there are many different types of products for sale on your site. On the Pampered Pooches site, for example, categories might include these:
Dog Beds
Dog Boots
Dog Coats
Collars and Leashes
Grooming Supplies
Owner Wear (where you’ll find that "I Heart Newfoundlands" t-shirt you’ve been looking for)
To add a new category to your product listing, follow these steps:
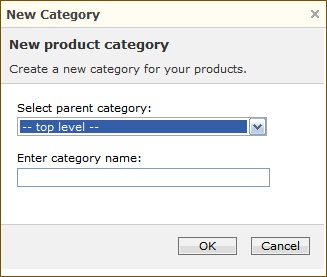
Click the Category arrow, and choose Add New Category. The New Category dialog box appears (see Figure 8-9).
Click in the Enter Category Name box and type the new name for the category.
Click OK.
This creates a new category at the top level. To add a subcategory to the level you just added, click the Category arrow again and choose Add New Category. In the New Category dialog box, click the Select Parent Category arrow and choose the category within which you want to create the new category. For example, the Dog Bowls subcategory could be created inside the Feeding Supplies category.
Earlier in this book, you learned about keywords and what they can mean to the placement of your site in search results. A well-placed, targeted keyword can bring lots of paying customers to your virtual door. To get the greatest possible use of the keywords that work for you, add those same keywords to your product pages to help extend the reach of your site.
In the Pampered Pooches site, keywords in use include dog grooming, pet grooming, dogs, dog training, dog bathing, dog supplies, grooming services, show dogs, and animal rescue. You can use additional keywords in the Keywords field on the Add/Edit Product page, but there is a 512-character maximum. Be sure to separate keywords with commas so search engines know where one keyword stops and another begins.
A good product photo is a great salesperson, letting prospective customers know what they’ll be getting for their money and reassuring them that the goods will be worth the cost. For that reason, make it a policy to upload only high-quality photos of your products.
What makes a photo good?
The image is sharp and in focus.
Lighting is adequate and consistent across the photo.
The color is bright and realistic.
The object is centered and clear, without other unnecessary elements in the shot.
The setting for the object is professional.
The object is photographed so that customers can envision using it themselves.
You can upload up to six photos for each product listing in Store Manager. To get the best use out of the multiple photos, capture photos from different angles and perspectives, or show the product in different settings and uses.
To upload photos for your product, follow these steps:
In the Add/Edit Product page, click the Add icon in the Pictures row.
In the Add Images To Product dialog box, click the Select Images From arrow and choose My Computer. The page changes to allow you to upload your product photos to the Online Image Folder (see Figure 8-10).
Click the Browse button and navigate to the folder storing the first product photo you want to add.
Leave the Add Image To setting at Online Image Folder, and then type a short caption for the photo in the Image Caption box.
Add notes about the photo if you want, or click Done to save the photo and add it to the Add Images To Product page.
Continue adding other photos if you like, or click Done when you are finished.
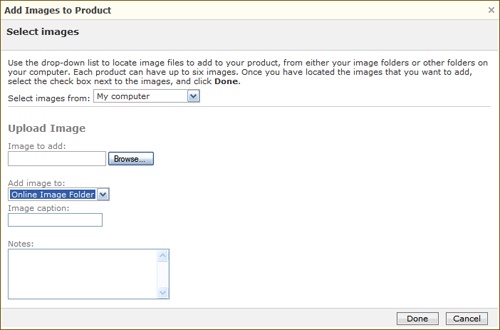
The image is added to the Add/Edit Product page listing. You can continue to add more photos or move on to the Shipping charges.

Now you get down to product specifics that come into play at the end of the sale. If you selected a Per Item shipping method in the Shipping section earlier, you can enter the amount you want to charge per item shipped in this box. If you want to add an overall shipping and handling fee, enter it in the Shipping Surcharge field.
Enter the weight and packaging dimensions in the next four fields (Weight, Packaging Height, Packaging Width, and Packaging Length) and then change the tax exempt status if it applies to the sales of your particular product. In the Private Notes box, you can enter notes that will not be visible to your customers (for example, "Drop price of this item in August to move inventory before the supply show in September").
Click Save to save your product page and return to the Product List page. The new product appears in the Products box, as you see in Figure 8-11.
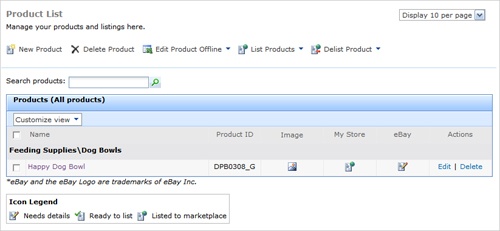
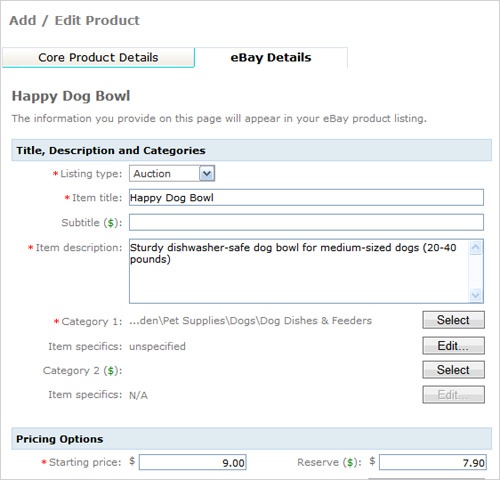
The icon legend on the Product List page shows that the eBay information for this product listing still needs more information. To reopen the product page, click Edit in the Actions column. In the product page, click the eBay Details tab.
If you already have an eBay account and it has been activated for Store Manager, you will see a variety of options that enable you to choose the type of sale to make (Auction, Fixed Price, or eBay Stores). You can also provide product information, starting and reserve pricing, payment methods, and shipping information (see Figure 8-12). Complete the information as you want it to appear on your eBay listing, and then click Save.
If you haven’t yet set up an account with eBay, you will be prompted to do that. Click the prompt that says Click Here To Get Started With eBay! and then, on the second page, click Get Started With eBay! If you are not yet an eBay member, a window appears that gives you an opportunity to create an eBay account. Follow the prompts on the screen or enter your existing eBay information. Be sure that your eBay account is set up as a Seller’s account. (You will need to provide your contact info and a credit card, but the process doesn’t cost anything.) After the process is complete, you will receive an e-mail message asking you to activate your eBay account. Click the button; you can now return to the Add/Edit Product page in Office Live Small Business and click the eBay Details tab to continue adding your eBay listing information.