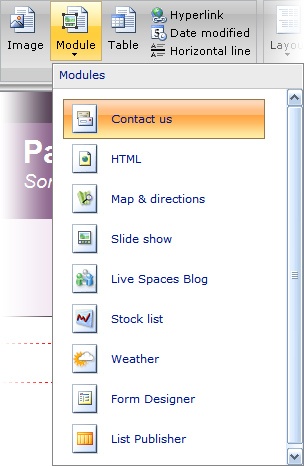
Web modules enable you to go beyond basic functionality on your site by adding special items that provide site visitors with additional features and options. Web modules are easy to add, move, and remove, so you can feel free to experiment with the ones that capture your interest. The process is simple: you click in the zone on the page where you want the module to appear (for example, click in Zone 1, Zone 2, or Zone 3, depending on the layout of your page), and choose the module you want from the Module list. Office Live Small Business includes the following Web modules you can add to your pages:
Contact Us
HTML
Map & Directions
Slide Show
Live Spaces Blog
Stock List
Weather
Form Designer
List Publisher
The sections that follow introduce you to the basic steps involved in adding and working with Web modules on your site.
To add a module to a selected page, follow these steps:
Click Web Site.
In the Page Manager, click the Edit link of the page you want to change.
Click to position the cursor at the point where you want to add the module.
Click the Module arrow in the Insert group. A gallery of modules appears (see Figure 5-5).
Click the module you want to add. The module is added to your page.
Suppose that you just added a module to Zone 2 on the current Web page but you really meant to add it to Zone 3. How do you fix that? Simple. Click the module and drag it to the correct zone. The cursor position will show you where the module will appear when you release the mouse button. The module then appears in the new zone, resized to fit the available area.
If you want to resize the module you’ve added, it’s not quite as simple as clicking and dragging (but it’s not too much harder than that). Here are the steps:
Right-click the module.
Click Resize. The Resize dialog box appears (see Figure 5-6).
By default, Office Live Small Business sets the sizing of the module to fit the content added to the module. To change the default and resize the module to meet your exact specifications, you can enter specific sizes (in pixels) in the Width and Height boxes.
Click OK to save your settings and resize the module.

Tip
You might need to experiment with the sizing to get a feel for the width and height you want. When you click the Specify Size (In Pixels) button, the current sizes appear in the Width and Height boxes. Use those values as benchmarks and increase or decrease the values depending on whether you want to expand or reduce the size of the module.
The Contact Us module is a simple module that collects information from your site visitors. You might simply use it on your Contact Us page, or you can adapt it to be used to collect customer testimonials, questions, and more (see Figure 5-7).
To add the Contact Us module, click Module in the Insert group of the Page Editor and select Contact Us. The Contact Us dialog box appears, asking you to enter the e-mail address you want Office Live Small Business to use to send you an alert when a user fills in the Contact Us form (see Figure 5-8). Enter your address and click OK. If you want to enter more than one address, use a semicolon to separate the addresses.

If you have some experience with HTML or you are familiar enough to copy and paste HTML from another site into your own, you might want to customize your page by adding an HTML module. Common HTML modules include clocks, site counters, local weather gadgets, and utilities. The example shown in Figure 5-9 shows a link to a book review that was created in HTML on another site and then copied and pasted into the HTML module in Office Live Small Business. By using content you’ve already added elsewhere (or using pieces of blog posts others have already published about your company—with their permission, of course), you can add testimonials, gadgets, and more to expand the functionality of your site and leverage content you already have.
To add the HTML module to your page, click Modules in the Insert group and choose HTML. In the Add And Edit HTML dialog box, paste the HTML content you’ve copied from elsewhere or type the HTML code you want to use in the module (see Figure 5-10). When you’re finished entering information, click OK to save your changes and view the HTML module on the page.

Figure 5-9. The HTML module enables you to use HTML gadgets, modules, or content you are already using elsewhere or can create easily.
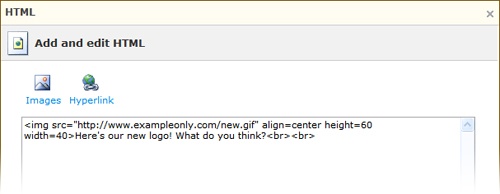
Figure 5-10. Enter or copy information into the Add And Edit HTML dialog box to add the item to the page.
If you want to make changes to the module content after you add it, simply right-click the module and click Properties. The Add And Edit HTML dialog box opens so that you can make the changes you need to make. Click OK when you’re finished.
One of the most popular uses for the HTML module involves adding a video player to your site. Depending on the type of business you’re in and the content your customers will expect (and want) to see, you might want to add video segments of product demonstrations, customer interviews, a word from the president, or simply something fun. When you add a video player in the HTML module of Office Live Small Business, you are including the code that links to the video on another site. This means that you might be embedding HTML from one of the sites listed on the following page:
YouTube
Google Video
MSN Soapbox
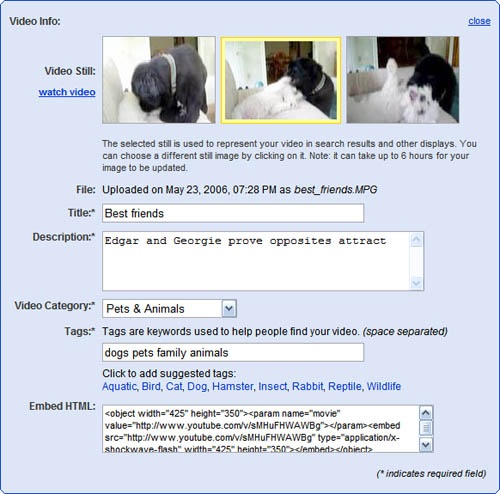
When you are adding HTML from a third-party site of which you’re a member, be sure to have your user ID and password information for that site handy. You will also need the identifying number of the specific video clip you want to include. On most sites, you can log in to your account, select the video you want to use, and then look for the Embed Video link or box, which will provide the HTML code you need in order to display the video on another site. When you find the Embed HTML code (see Figure 5-11), select it (be sure to include opening and closing brackets) and copy it into the HTML module dialog box. Click OK to save the video player and clip.
With the Map & Directions module, you can make it as easy as possible for potential customers to find and use your services. Similar to Windows Live Maps, this module asks you to enter your address and then choose the way in which the map and directions are displayed. Start by clicking in the zone on the page where you want to add the module; then click Module from the Insert group and choose Map & Directions. The Map & Directions dialog box appears (see Figure 5-12).
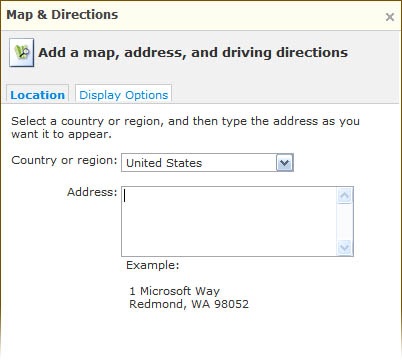
Figure 5-12. Type your business address in the Map & Directions dialog box and click Display Options.
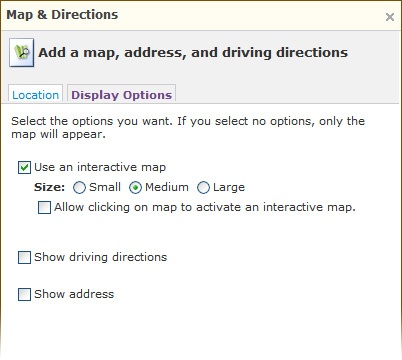
After you enter your address in the Location screen of the Map & Directions dialog box, click the Display Options tab. On this page, you can choose whether you want to include an interactive map, what size you want the map to be, and how much interaction you want to provide (see Figure 5-13).
Tip
Think of the convenience items you like when you work with sites such as Windows Live Maps or MapQuest. Do you like features that enable you to zoom in on the map by clicking it, scroll right and left (or up and down) by dragging on the map area, or get specific driving directions? Use your experience as a guide when making similar decisions for your own site.
If you want driving directions and your business address to be visible to the user, click the Show Driving Directions and Show Address check boxes. Click OK to save your settings and add the module to the page.
Figure 5-14 shows a completed map with linked driving directions. Professional, isn’t it? And you can add it to your Web site in less than two minutes (no kidding).

Figure 5-14. The Map & Directions module adds a sophisticated, convenient feature for your site visitors.
Tip
Want to provide multiple maps to multiple locations? Simple. Click in a different zone and add a new Map & Directions module in that area of the page. If you need to change the page layout to include more zones, click Layout in the Advanced group and select the new layout from the displayed list.
The Slide Show module gives you a great way to show off your products or services to the wider world. This module enables you to create a customized slide show that cycles through a series of photos—any photos—that showcase your stellar products or spotlight your happy customers. To add the Slide Show module to a zone on one of your pages, begin by clicking in the zone where you want to add the images. Then click Modules in the Insert group and choose Slide Show from the list. The Slide Show dialog box enables you to add photos using the Photo Upload tool if necessary, add an album title for the slide show, set the timing for the display of photos, and choose the pictures to be used. Here are the steps:
Display the page on which you want to add the slide show and click in the zone you want to use.
Click Modules in the Insert group of the Page Editor and choose Slide Show.
In the Slide Show dialog box, type a name for the slide show in the Album Name box (see Figure 5-15).
Click the Slide Interval arrow and choose the time you want to assign the display of each photo by clicking the value you want from the list.
If you want site visitors to be able to see and work with slide show controls (this enables them to page through the photos as they’d like), leave the Show Slide Show Controls check box selected.
Click the check box in the upper-left corner of each photo you’d like to include in the show.
Click Add. The photos are added to the Images In Slide Show area of the dialog box.
Reorder the images if you’d like by clicking an image in the Images In Slide Show area and clicking either the Move Left or Move Right buttons to change the position of the photo.
Click Next.
Select a photo and add a caption (optional) by typing it in the Caption box (see Figure 5-16). Click Save Caption to save the text you enter for each photo. Repeat as desired for other photos in the slide show.
Click OK to save the module and add it to your page. Figure 5-17 shows how the Slide Show module looks after it is added to the page in the Page Editor.
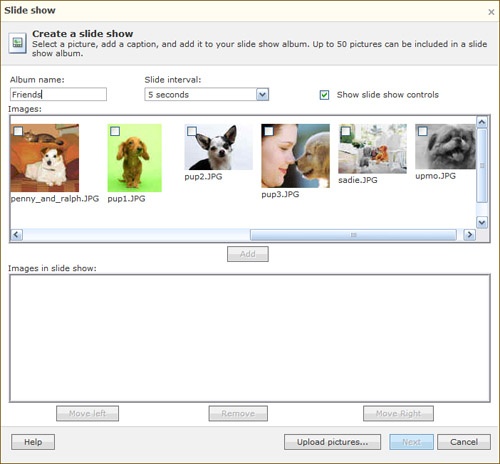
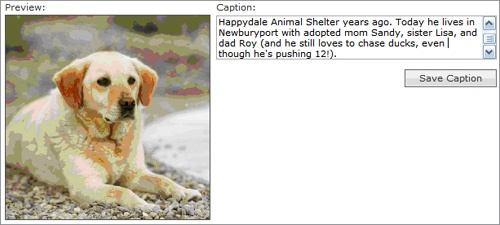
Figure 5-16. Add captions to individual photos to tell visitors more about your products, services, and success stories.
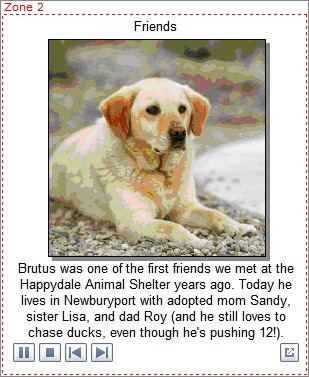
Figure 5-17. The Slide Show adds visual interest and helps visitors learn more about you and what you offer.
Note
The size of the slide show on the page will depend on the zone in which you add it. If your page is one large zone, the slide show will initially take up the entire width of the zone area. You can resize the Slide Show module by clicking it and dragging one of the handles in the corner or along the edges of the module to resize it. You can also limit the size of the module by creating it inside a smaller zone (such as Zone 2 or Zone 3 on a multizone page). To change the layout of your page to create additional zones, click Layout in the Advanced group and choose the layout with the zones you want to create. You can then cut and paste content into the different zones as needed.
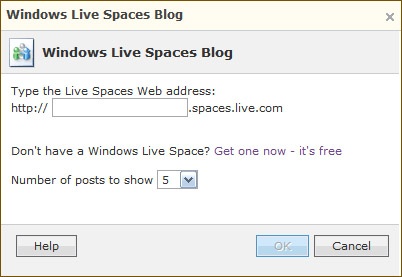
Blogs are big, whether you are blogging to promote your business or simply to express your ideas and interests. Windows Live Spaces is a successful blogging, photo sharing, and personal networking site that enables you to post ideas, articles, links, photos, and more to your blog. If you want to add a blogging feature to your Office Live Small Business site, you can easily do that by adding the Live Spaces Blog module to your page. Simply fill in the name of your space in the box provided (see Figure 5-18) and, if you’d like to change the number of blog posts that are linked to your Office Live Small Business page, click the Number Of Posts To Show arrow and choose the number you want from the list. Click OK to add the module to your page.
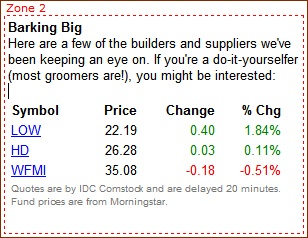
If your company serves customers who will be interested in knowing the latest stock prices for goods and services they care about, you can easily add a stock table to your site to display the latest trading information. If you don’t know the codes for the companies you’re interested in displaying, don’t worry—the module provides a link for you to use to research the company information online.
Here’s the process. Display the page you want to add the stock information to, and display the Page Editor. Click Module in the Insert group and click Stock List. In the Stocks dialog box (see Figure 5-19), enter the letters for the company name you want to add. If you are unsure about the letters, click the Find A Symbol link and locate the company by first selecting the industry area and then scrolling through the company list in the industry you select. When you’ve found the codes for the companies you want to use, enter each one in the Add A Symbol box, clicking Add after each addition.
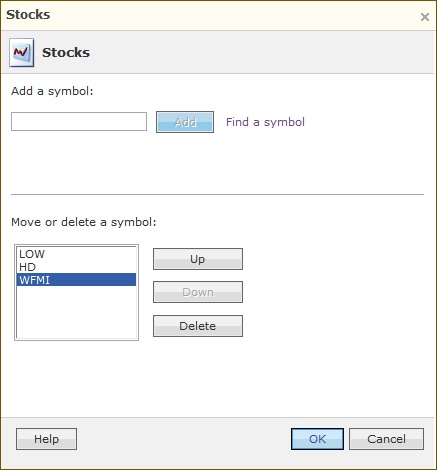
You can rearrange the items that appear on your list by clicking the stock you want to move and clicking Up or Down (or Delete, if you want to remove it altogether). When you’re satisfied with the list, click OK to add it to your page (see Figure 5-20).
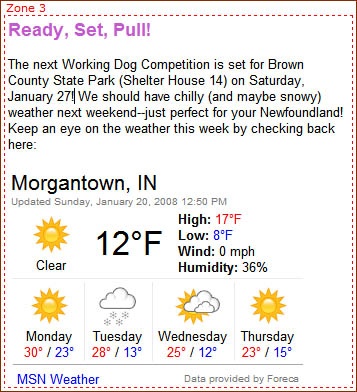
Especially if you serve a local audience, adding a Weather module to your site can be a great visitor service. (Plus, for some reason, most of us are simply interested in the weather.) You might want to post a Weather module on a page where you let site visitors know about upcoming events, for example—especially if those events will be held outdoors!
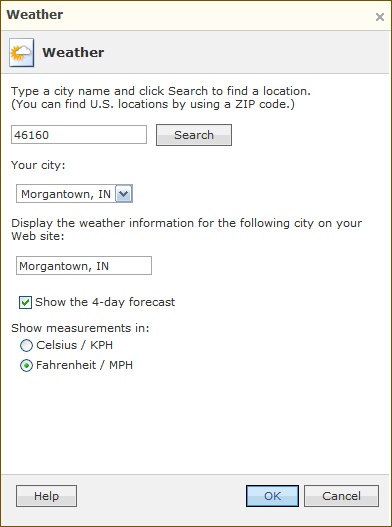
Here are the steps for adding the Weather module to your page:
Display the page you want to change. Select the zone you’d like to add the module to.
Click Module and click Weather.
In the Weather dialog box, type your ZIP code. Click Search. If the dialog box gives you a list of locations for that ZIP code, click the arrow and choose your city name from the list (see Figure 5-21).
If you want to display a four-day forecast, click the Show The 4-Day Forecast check box. Change the measurement unit if you live in an area where the temperature is tracked in Celsius.
Click OK.
The module is added to the zone in which you positioned the cursor. If you selected the four-day forecast, you will see a graphical representation for all four days, along with expected high and low temperatures for that period (see Figure 5-22).
Office Live Small Business gives you a simple way to gather information from your site visitors when they come to find out more about your company. Using the Form Designer module, you can create a form that collects information and then sends the data to Contact Manager, Document Manager, or your Team Workspace, depending on the application you choose. Here’s how it works:
Display the Web page on which you want to add the data form.
Click the zone on the page in which you want the form to appear.
Click Module and choose Form Designer.
Click the Application arrow and choose the application to which you want to send the data.
Click the List arrow and choose the data list to which you want the data added. The field area displays all the data items that will be included in the form by default (see Figure 5-23).
Click the check box of any fields you do not want to include on the form. If you want to remove the check marks in all fields at once, click the Display check box at the top of the list.
Click in the Display Name column and change the name of the field displayed on the form if desired.
In the Provide A Success Message area, type text you want visitors to see after they complete your form.
Click OK to save the form.
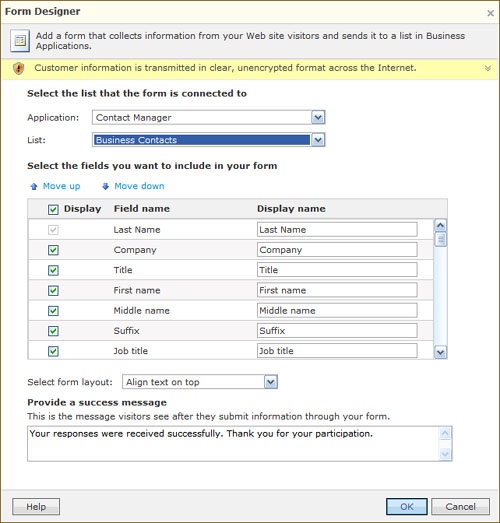
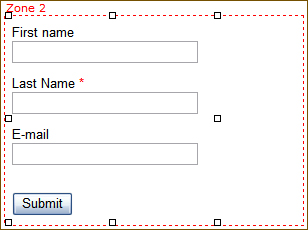
Figure 5-24 shows an example of a simple form that collects the e-mail addresses of visitors who sign up for the site newsletter.
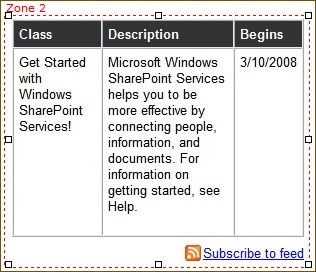
The List Publisher module enables you to publish data lists that you have created in Contact Manager, Document Manager, or Team Workspace to your Web page. This feature enables you, for example, to publish a class roster, an upcoming events list, or a list of available documents in a specific place on your page. To add a List Publisher module to one of your Web pages, follow these steps:
Click in the zone in which you want to add the module.
Click Module and click List Publisher.
In the List Publisher dialog box, click the Application arrow and choose the application from which you want to use the data.
Click the List arrow and choose the list you want to use. The field area displays all available fields that will be displayed in the module (see Figure 5-25).
Click the check box of any field you want to remove from the list. Change the display name for each field if desired.
Click OK.
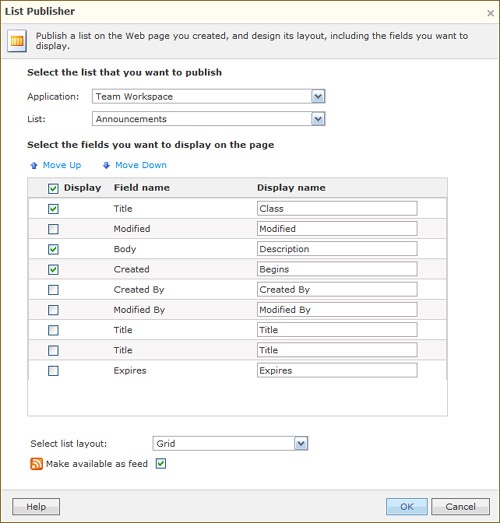
Figure 5-26 shows an example of data items displayed on the page by List Publisher.