Office Live Small Business makes it easy for you to work as a team—whether you are continually traveling from state to state and country to country or your staff is scattered around the world. If you have access to a Web browser, you can log in to your Office Live Small Business account and check your sales, send messages to customers, and work with your team.
One part of running a business remotely involves the ability to access, update, and share business-critical documents with others. You might be working on a draft of the business plan you need to share with your finance manager. Or perhaps you’ve just finished a new Microsoft Office PowerPoint presentation your field staff person has been waiting for. You can use Document Manager to upload, organize, and share the files your other team members need to help keep your business moving in a profitable direction.
Document Manager includes tools that enable you to do the following:
Upload documents and pictures.
Export documents and lists.
Revise documents and pictures.
Create customized libraries and folders for specialized documents.
Click Document Manager in the Business Applications window to display the program (see Figure 10-6). The documents are displayed in list form so that you can view and use them easily.
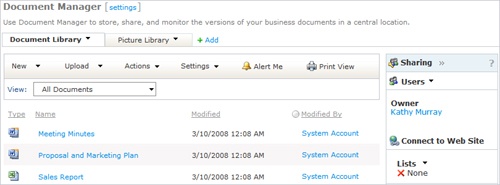
Figure 10-6. Document Manager enables you to create, store, organize, and work with files easily online.
The first task you’ll want to try with Document Manager most likely involves adding your own documents to the lists. The utility gives you the choice of adding documents one at a time or as a batch. Here’s how to upload documents in Document Manager:
Click Business Applications in the Office Live Small Business Home page and click Document Manager.
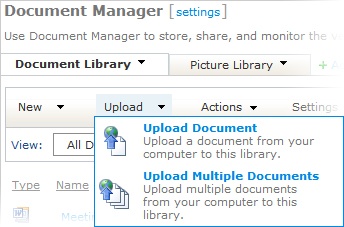
Click the arrow to the right of Upload. A list of choices appears:
To upload a single document, click Upload Document. To upload a collection of documents, click Upload Multiple Documents. Each selection takes you to a different window:
If you choose to upload a single document, the Upload Document: Document Library window appears. Here you can click the Browse button and navigate to the file you want to upload.
If you choose to upload multiple files, a tree-like structure appears in the Upload Document: Document Library window so that you can choose the folder containing the files you want to upload and click the check boxes of all files you want to add.
Select the file(s) you want to upload and click OK. The new files are added to the Document Library and you can view, edit, or work with them as needed.
Tip
You can easily create new documents while you’re working in Document Manager. Simply click the Document Library tab, click the New arrow, and choose New Document. The Microsoft Office Word window opens so that you can create, format, and save the new document. After you close the new file, it is added to the Document Library list.
The list view in Document Manager displays the files that are currently stored in your Document Library on Office Live Small Business. You can begin to view and work with those documents by following these steps:
Position the mouse pointer on a file you’d like to work with. The file becomes highlighted, and an arrow appears on the right side of the selection.
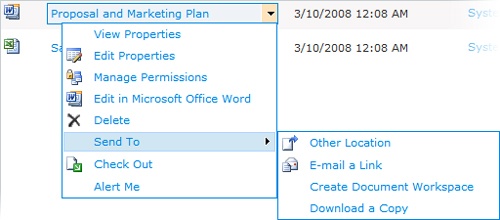
Click the arrow, and a menu appears (see Figure 10-7). One option, Send To, includes a second list of options you can use to send the file to another area.
Select the option that best fits the way you want to work with the document. Table 10-1 introduces the different choices in the list and explains what they do.
Table 10-1. Document Manager Choices
DESCRIPTION
View Properties
Shows you who created the file and when it was created and last modified
Edit Properties
Enables you to re-title and change the description of the document
Manage Permissions
Lets you assign permissions to allow (or restrict) access to the document
Edit In Word
Opens the document in Word
Delete
Removes the document from the Document Manager list
Send To
Enables you to send the file to another location
Check Out
Marks the document as checked out to you so that no one else can edit it simultaneously
Alert Me
Creates an alert so that you are notified if that document is accessed or modified
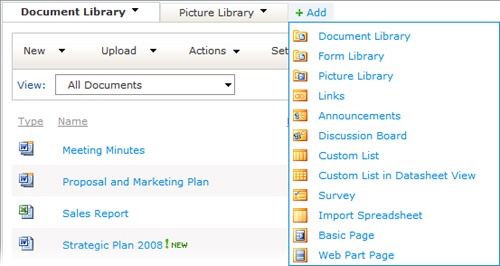
By default, Document Manager is set up to include two tabs: Document Library and Picture Library. To add your own library, click the Add link to the right of the Picture Library tab. A list of library choices appears so that you can click the one you want to add (see Figure 10-8).