
If you’ve used Web-based e-mail before, you’ll have no trouble finding your way around the e-mail portion of Office Live Small Business. The beauty of e-mail in Office Live Small Business is that it is seamlessly integrated with the other features on your site and available from any place you have Web access, 24/7. You can create up to 100 e-mail accounts in Office Live Small Business and track any number of contacts, with a huge range of information.
What’s more, Office Live Small Business enables you to track more than simple name, address, and e-mail information. You can use the Contact Manager to collect, organize, and work with an extensive amount of customer information, including accounts, contacts, opportunities, marketing campaigns, and more.
Click E-Mail in the navigation bar on the left side of the Office Live Small Business Home page. The E-Mail window appears, looking similar to the screen you see in Figure 7-3.
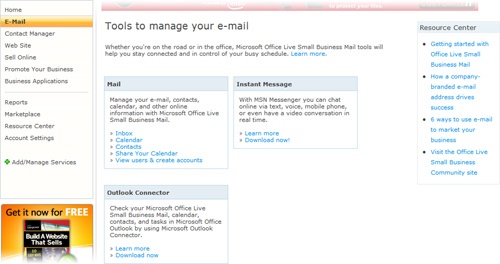
Figure 7-3. The E-Mail window gives you everything you need to stay in touch with customers, vendors, and staff.
The three different areas in the E-Mail window give you access to three separate methods of connecting with customers, vendors, and staff. The Mail area includes connections to your e-mail and enables you to do the following:
Check, create, send, and manage e-mail.
Add and manage contact information.
Add, update, and manage appointments on your calendar.
Create, assign, and update tasks for groups and individuals (and, of course, yourself).
Share your calendar and tasks with others in your contact list.
Create and manage e-mail accounts for site users.
The Instant Message area gives you the option of downloading Windows Live Messenger so that you can trade messages, images, files, and more in real time with customers, vendors, staff, and friends. If you don’t have Windows Live Messenger, you can download the utility directly from your Office Live Small Business page.
The Outlook Connector area gives you the option of downloading a utility that enables you to view your Office Live Small Business mail, contacts, calendar entries, and tasks in Microsoft Office Outlook. Again, a link is included on the page so that you can download the utility without leaving your Office Live Small Business account.
To get started with your e-mail, click Inbox in the E-Mail area. The Windows Live Hotmail window opens, displaying the e-mail messages currently in your inbox and giving you the tools you need to view, respond to, and organize your messages (see Figure 7-4).
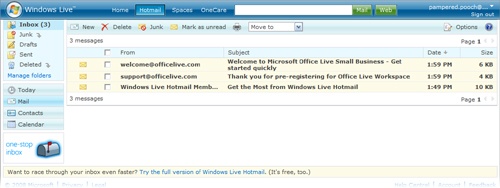
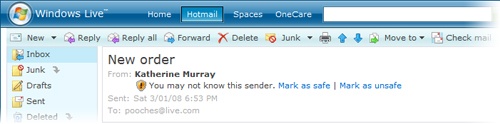
Unread messages in your inbox are displayed in bold type so that you can easily spot the ones you haven’t read yet. To open one of the messages in your inbox, simply click either the From or Subject link for the message you want to see. The message opens, as you see in Figure 7-5.
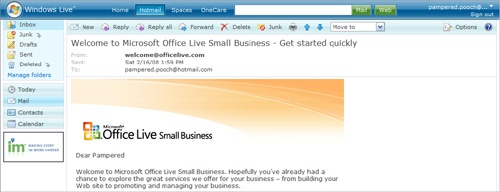
You can read through the message, using the vertical scroll bar as needed to view the rest of the message. After you read the content, you can use one of the tools in the toolbar to respond to the message, delete it, or file it away for future use. Table 7-1 introduces you to the tools in the Mail window.
Table 7-1. Mail Tools in Office Live Small Business
TOOL | NAME | DESCRIPTION |
|---|---|---|
New | Displays a new mail message window | |
Reply | Opens a new message window in response to the sender of the current message | |
Reply All | Opens a new message window and copies all recipients of the current message | |
Forward | Creates a new message window that includes the current message | |
Delete | Deletes the current message | |
Junk | Marks the existing message as junk mail and moves it to the Junk Mail folder | |
Prints the current message | ||
Previous Message | Displays the previous messages in the Inbox list | |
Next Message | Displays the next message in the Inbox list | |
Move To | Shows a list so that you can move the current message to a new folder |
When you want to reply to the current message, click Reply or Reply All. The contact who sent you the message will now appear in the To line. If multiple contacts were included on the message and you click Reply All, all contacts will appear in the header of the message.
By default, the header area of the message displays only the To line and the Subject line. You can add Cc (copied to) and Bcc (blind copied to) lines to the header area by clicking the Show Cc & Bcc link. To add contacts to the To, Cc, and Bcc lines easily, click in the line you want to add the contact to, and then click the contact name in the Contacts list along the right side of the message window.
Tip
You can use Office Live Small Business Mail to send messages from up to five other accounts as well. This lets you coordinate your accounts so that you can easily send messages from one point. To enable this feature, click the From arrow and choose Add An E-Mail Address; then follow the prompts to add other e-mail addresses to your Office Live Small Business account.
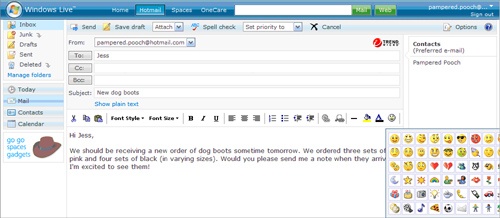
The tools available in the Reply window are different from the tools you saw in the message window. As Figure 7-6 shows, these tools enable you to prepare, check, and send your message. For example, to
Attach a file or photo your message: Click the Attach arrow and click your choice.
Check the spelling of your message: Click Spell Check.
Save a draft of the message: Click Save Draft.
Set the importance of the message: Click the Set Priority To arrow.
Close the message without saving it: Click Cancel.
Send the message to the recipients you selected: Click Send.
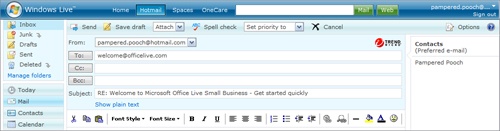
You can create a new message by clicking Compose on your Office Live Small Business Home page or by clicking New in the Inbox window. The new message window includes the tools and fields you saw in the Reply window (refer to Figure 7-6).
When you are replying to a message, the Subject line includes the subject of the previous message, preceded by "RE:." When you are creating a new message, you will create your own Subject line. To help keep your message out of other peoples’ junk filters, enter clear subject lines and avoid using punctuation characters if possible.
In addition to the tools at the top of the window, you can use the formatting tools across the top of the message area to set the font size, style, alignment, color, and format for your message. If you want to add a little lightheartedness, you can insert emoticons in your notes as well (see Figure 7-7).
Tip
You can easily attach files to messages you send from Office Live Small Business by clicking the Attach arrow, choosing File or Photo, and choosing the file you want to attach. The mail utility will automatically scan any files you attach and alert you if there is any risk associated with the files you attach. Similarly, when you receive messages from others that include file attachments, the mail utility scans those attachments for viruses and potential problems.
You can use the Move To list in both the inbox and message window toolbars to organize your messages in folders so that you can easily find and open them later. The navigation bar along the left side of the window shows you the different folders created automatically to organize your mail. In classic view, the Manage Folders list appears at the bottom of the folders list. You can add to those folders (or remove ones you don’t want) by clicking Manage Folders.
When you click Manage Folders, the folders window appears, listing the different folders already created and showing you the number of messages in each and the amount of storage space they use (see Figure 7-8).
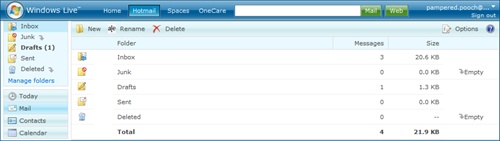
To add a new folder, click New. The New Folder window appears. Type a name for the new folder and click Save.
To rename a folder you’ve added, click the check box of the folder in the folders list and click Rename in the tools row.
You can also delete a folder you no longer need by clicking its check box and then clicking Delete.
Note
You cannot rename or delete the folders that are created by default in Office Live Small Business.
You can move messages to the new folders you’ve added when you’re working in either the inbox or the message window. To move multiple messages from the inbox, follow these steps:
Click the check boxes of messages you want to move to a specific folder.
Click the Move To arrow.
Choose the folder name from the list.
Office Live Small Business moves the messages you selected to the folder you specified.
To move a message you’re viewing in the message window to a selected folder, click the Move To arrow and select the folder from the list.
You can automate the process of filing messages by creating filters for your e-mail. This enables you to create a filter that sends all messages from a particular vendor, for example, into a folder for the product the vendor represents. Here are the steps for creating a filter for incoming messages:
Display your e-mail inbox.
Click Options in the right side of the toolbar.
Click More Options and choose Automatically Sort E-Mail Into Folders from the Customize Your Mail group.
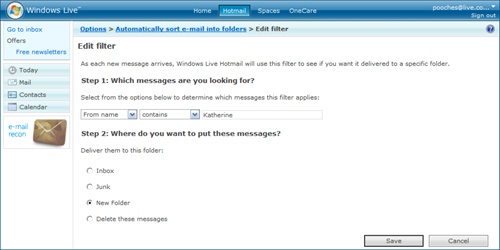
Click New Filter. The Edit Filter window appears, as Figure 7-9 shows.
In Step 1, click the arrow of the first field and choose the first filter option. Repeat for the second and third field selections. This step tells Office Live Small Business how to filter the mail you receive. Table 7-2 lists a few examples:
Choose where you want the filtered messages to be sent (Inbox, Junk, New Folder, or Delete These Messages). If you click New Folder, click in the blank following the option and type the name for the new folder.
Click Save. The Automatically Sort E-Mail Into Folders window shows you the newly created filter.
Most of us are getting pretty good at spotting spam—we certainly get a lot of practice! When you use e-mail as part of Office Live Small Business, you get the added benefit of having the latest antivirus utilities working to weed out the bad stuff and let the good stuff through. Office Live Small Business Mail includes the following anti-spam features:
A simple link on each e-mail message enables you to mark the e-mail as safe or unsafe.
A color-coding system shows you at a glance which messages the system believes are suspicious. A white bar at the top of the message means the message is from one of your contacts, yellow means the message is from someone not on your contacts list, and red lets you know the message is suspicious.
A Junk Mail tool is built into the e-mail toolbar so that you can easily identify (and weed out) unwanted messages.
A Not Junk tool enables you to retrieve messages inadvertently caught in your junk mail filter.
A Report Phishing Scam command enables you to instantly report a dangerous or suspicious solicitation.
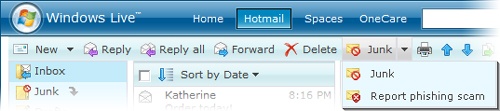
When you receive a message that is definitely junk mail, you can mark the message as junk with a simple click of the button. If the message is part of a phishing scam, you can report the sender to Microsoft so that other users can be alerted (and this sender can be checked out). To mark a message as junk mail, follow these steps:
In the Office Live Small Business Home page, click E-Mail and select Inbox.
In the Inbox list, click the message you want to mark as junk mail.
Click Junk in the toolbar. A drop-down list appears, as you see in Figure 7-10. Click Junk to mark the selected message, and then click OK. If you want to send a message report to Microsoft, click Report Phishing Scam and click OK.
Tip
Savvy spammers know just where to gather the e-mail addresses of unsuspecting users. Common gathering points include discussion boards, e-mail newsletter lists, and mailing lists. If you join a new list or discussion board and then begin getting an increased volume of spam, unsubscribe from the newly added list as soon as possible. You can also look for RSS feeds to gather the information you want to have without subscribing to lists.
Although Office Live Small Business Mail helps you see quickly which messages are trustworthy and which are not, you can teach the system to recognize the reputable users you want to receive e-mail from as well as the users you want to block.
To mark a sender as safe or unsafe, follow these steps:
Click the message in your E-Mail box on the Office Live Small Business Home page, or click Inbox and choose the message in the Inbox list.
In the message header, click Mark As Safe for senders you know to be reputable, or click Mark As Unsafe for senders you want to save to the Blocked Senders list (see Figure 7-11).
If you click Mark As Safe, the Add Contact option appears in the message header. To add the sender to your contact list, simply click Add Contact.
If you click Mark As Unsafe, Office Live Small Business displays a message box telling you that Microsoft may share the address with other users to cut down on spam. Click OK to continue.
You can use filters to tell Office Live Small Business Mail how to handle the junk mail you receive. By setting the filtering level, you can control the level of screening the mail utility uses when reviewing the incoming messages. Here’s how to check and change the junk mail filter on your account:
On the Office Live Small Business Home page, click E-Mail.
Click Inbox.
Click Options in the right side of the toolbar, and then click More Options.
Select Filters And Reporting in the Junk e-mail group. The Filters And Reporting window appears (see Figure 7-12).
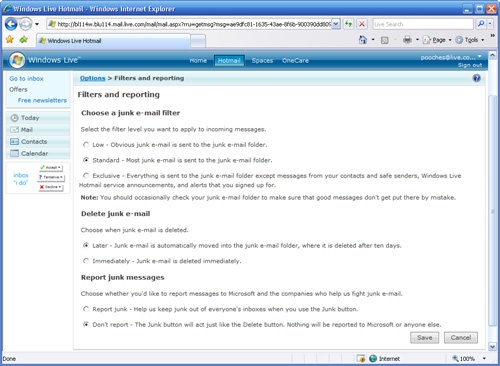
By default, Office Live Small Business Mail sets the junk mail filter to Standard, which sends most messages identified as junk mail to the Junk mail folder. If you want to allow more of those messages to come through so that you can review them and make the choice yourself, click Low in the Choose A Junk E-Mail Filter list. To raise the level of protection so that only messages from your contacts arrive in your inbox (everything else is sent to the Junk mail folder), click Exclusive.
The Filters And Reporting window also enables you to indicate how you want Office Live Small Business Mail to handle the junk mail you receive. By default, the messages stored in the Junk mail folder are not deleted right away—this gives you time to review the messages and make sure wanted messages aren’t being sent there by mistake. If you want junk mail messages to be deleted as soon as they are sent to the Junk mail folder, you can click Immediately. But for best results, until you get used to the mail service and the types of mail Office Live Small Business Mail classifies as junk, it’s a good idea to leave Later selected.
The last set of options in the Filter And Reporting window controls your choices about reporting phishing messages to Microsoft. The default setting is Don’t Report, but you can change it to Report Junk so that clicking Report Phishing Scam will send the message to Microsoft for follow-up.
Installing and Using the Outlook Connector
If you’re a Microsoft Office Outlook 2003 or 2007 user, you will be pleased to know that you can download and use a simple utility called the Outlook Connector that enables you to synchronize your mail, contacts, tasks, and appointments with those features in Office Live Small Business. Download the Outlook Connector by clicking E-Mail in the Office Live Small Business navigation bar and clicking Download Now in the Outlook Connector box. Follow the prompts on the screen to download the utility and save it to your desktop; then double-click the file and follow the Microsoft Office Outlook Connector Setup Wizard to install the file.
When the installation is complete, Outlook will restart and display the Microsoft Office Outlook Connector box so that you can enter your Office Live Small Business e-mail address and password. Enter the information and click OK.
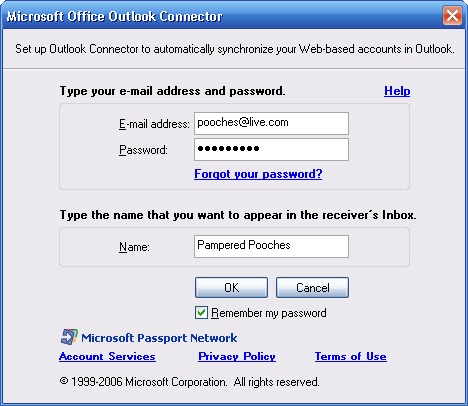
You will be prompted to restart Outlook, and when you do, the new account will be added automatically to your All Mail Folders List.
To find out more about the Outlook Connector, see Office Live Small Business help at office.microsoft.com/en-us/officelive/FX101984871033.aspx.