The goal of this chapter is to help get your system in basic working order after Microsoft Windows Server 2003 Setup completes. This involves verifying that Setup completed properly, adding and possibly troubleshooting devices, configuring the server’s network settings, and setting up the server to fulfill its role in life (or at least, its role on your network). It’s also of vital importance that you properly secure the server before placing it into service.
Most of the tasks in this chapter are short and simple so that you can get the server up and running quickly after Setup completes.
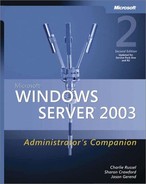
The Windows Server Post-Setup Security Updates window (shown in Figure 7-1) is the first thing that you see when you log on to a server as an administrator after performing a clean install of Windows Server 2003 with Service Pack 1 or Windows Server 2003 R2. Until you click Finish in the Windows Server Post-Setup Security Updates window, Windows blocks all inbound connections to the server (except port 3389 if you enabled Remote Desktop during automated Setup). This prevents viruses or hackers from compromising the security of the server while you install the latest software updates and an antivirus program. The Windows Server Post-Setup Security Updates window does not appear if you explicitly enable or disable the Windows Firewall during Setup using an Unattend.txt file or after Setup using Group Policy. If the window does not appear, update your server manually using Windows Update and also configure Automatic Updates manually.
The Windows Server Post-Setup Security Updates window appears automatically every time an administrator logs in until you click Finish. Simply closing the window does not allow inbound connections.
To use the Windows Server Post-Setup Security Updates window, follow these steps:
Click Update This Server in the Windows Server Post-Setup Security Updates window to launch Windows Update and install the latest software updates.
Perform this step even if you automate the deployment of software updates so that you close all known vulnerabilities before you open any ports in the Windows Firewall software firewall.
Install an antivirus program, and then restart the server if required by the antivirus program or any of the software updates you installed.
After restarting, click Configure Automatic Updating For This Server in the Windows Server Post-Setup Security Updates window to enable or disable Automatic Updates.
If you use Automatic Updates by itself or in conjunction with Windows Server Update Services (WSUS), set Automatic Updates to automatically download and install updates. If you use a different software update tool such as Systems Management Server (SMS), disable Automatic Updates. For more information on software updates, see Chapter 23.
Click Finish in the Windows Server Post-Setup Security Updates window to turn off Windows Firewall and allow inbound connections. After clicking Finish, you can re-enable Windows Firewall by clicking Start, Control Panel, and then Windows Firewall.
Note
Windows Firewall blocks Resultant Set of Policy (RSoP) and other remote administration tools by default. Test Windows Firewall for compatibility issues with your network and applications before deploying it on your network. For more information see the Microsoft Web site at http://www.microsoft.com/technet/prodtechnol/winxppro/maintain/sp2maint.mspx#EFAA and http://www.microsoft.com/technet/prodtechnol/windowsserver2003/library/Operations/73ee2e78-4b34-4683-b662-7e0f8582ffc3.mspx.
Security Alert
When you click Finish in the Windows Server Post-Setup Security Updates window, Windows creates a REG_DWORD value named DontLaunchSecurityOOBE with no data in the following registry key: HKLMSoftwareMicrosoftWindowsCurrent VersionServerOOBESecurityOOBE. This registry key blocks the Windows Server Post-Setup Security Updates window from appearing in the future.
If you have not changed the Windows Firewall settings, Windows also stops and disables the Windows Firewall/Internet Connection Sharing service after you click Finish in the Windows Server Post-Setup Security Updates window. If you enabled Internet Connection Sharing after Setup completed, Windows disables the Windows Firewall but does not stop or disable the shared Windows Firewall/Internet Connection Sharing service.
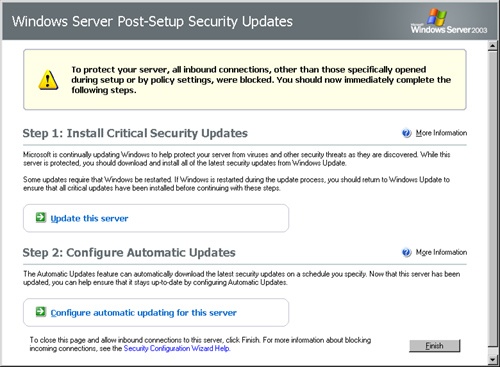
Unless you prefer the server room to your office, enable Remote Desktop after installing Windows and then relocate to a more comfortable location. Remote Desktop permits you to administer remotely virtually everything you need, as if you were sitting in front of the computer.
Security Alert
A server is only as secure as the least secure computer from which you administer it. For example, if you administer a server from a computer that has been compromised by attackers, viruses, or spyware, the server is probably now compromised as well. This is especially scary if you log on from a public terminal with a keystroke logger! To mitigate this security risk, administer servers only from computers that you secure to the same level as the servers, and do not use these computers for Web browsing and checking e-mail—and even use a separate nonadministrator account.
To enable Remote Desktop automatically, use the [TerminalServices] section of Unattend.txt. (See the Microsoft Windows Corporate Deployment Tools User’s Guide for more information.) To enable Remote Desktop manually after Setup completes, use the following procedure:
Click Start, choose Control Panel, and then choose System.
Click the Remote tab and then select the Enable Remote Desktop On This Computer check box (shown in Figure 7-2).
Click Select Remote Users, and optionally click Add to allow additional users or groups to administer the server remotely. (Members of the Administrators group are automatically given permission to connect remotely after Remote Desktop is enabled.)
Be extremely selective to whom you give permission to log on to a server. Consider using the default permissions (Administrators only). If you must add other users, as always, assign permissions to groups (creating new groups as necessary) rather than individual users.
If you enabled the Windows Firewall, you must also enable the Remote Desktop exception. To do so, click Start, choose Control Panel, choose Windows Firewall, click Exceptions, and then select the Remote Desktop check box. This enables the exception on all network connections.
To access the Windows Firewall settings for a specific network connection, right-click the network connection in the Network Connections folder, choose Properties, click Advanced, and then click Settings.
Security Alert
You can enable Remote Assistance by selecting the Turn On Remote Assistance check box in the System Properties dialog box. However, enabling Remote Assistance allows a logged-on user to give another user (who doesn’t have explicit permission to access the computer) the ability to view and even control the computer remotely. Control this capability carefully by disabling it entirely, using Group Policy to limit it, or configuring your firewall to block Remote Assistance invitations from leaving your company (block TCP port 3389). For more information about using Remote Assistance with Windows Server 2003, see http://support.microsoft.com/kb/301527/.
After your Windows installation is complete, check the system for setup errors or device problems. Here’s a quick list of actions to perform:
Click Start, choose Administrative Tools, and then choose Computer Management.
Select Event Viewer and then System.
Review the System event log and other logs, such as Application, Directory Service and DNS Server, as necessary.
Select Device Manager, and check for any problem devices (or any missing devices).
Select Disk Management, and verify that all hard disk drives and partitions are properly recognized.
Review setup errors. To do so, open the Windowssetuperr.log file. If this file is empty or does not exist, there were no errors during Setup.
One of the first things to do after installing an operating system is make sure devices are recognized and properly installed. Although Windows Server 2003 Setup usually does a superb job of detecting and configuring devices, Setup isn’t able to resolve resource conflicts or overcome a lack of drivers. You also need to enable any devices that you disconnected or disabled before starting the installation, such as an uninterruptible power supply (UPS).
To add a Plug and Play (PnP) device, plug it in and provide the drivers, if necessary. To check for device configuration problems, use Device Manager.
Device Manager is a central repository for device information in Windows. Use it to view or print the configuration and drivers loaded for any device on your system, as well as to disable, uninstall, or change the configuration for a device.
Note
To administer devices from a command line, you can use Devcon.exe, the Windows Management Instrumentation Command-line (WMIC), or scripts. (See Chapter 13 for more information about WMIC and Windows scripts.) Devcon.exe is a command-line version of Device Manager that is part of the Windows Support Tools found in the SupportTools folder on your product CD. Devcon also works in Windows PE, but not in the Recovery Console. For more information, see http://www.microsoft.com/technet/prodtechnol/windowsserver2003/library/TechRef/0f087656-fb2e-4828-9630-e76051a0a608.mspx.
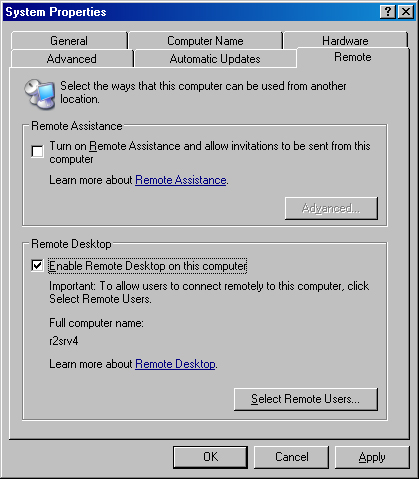
After opening Device Manager as part of the Computer Management (Compmgmt.msc) console or on the Hardware tab of the System tool in Control Panel, you see a list of all the devices that Windows has detected on your system. (See Figure 7-3.) Device Manager displays any nonfunctioning devices with an exclamation point, indicating that a problem exists with the device; disabled devices are displayed with a small red "x" over the icon.
Note
To use the Computer Management snap-in to remotely administer another computer running Microsoft Windows 2000, Windows XP, or Windows Server 2003, select Computer Management in the console tree and then choose Connect To Another Computer from the Action menu. Select the computer you want to manage, and click OK. You cannot perform some actions remotely, such as defragmenting disks or enabling Remote Desktop. In addition, Device Manager works on remote computers in read-only mode—you can diagnose problems, but you must make changes locally or using Remote Desktop.
On the far right side of the toolbar, icons are available according to the device you selected. In Figure 7-3, the following buttons are available (reading from left to right):
Scan For Hardware Changes. Click this button to tell the system to look for changes in hardware. Use this button after adding new PnP devices or after swapping hardware.
Update Driver. Click this button to open the Hardware Update Wizard, which you can use to install updated or new drivers for a device.
Uninstall. Select a device and click this button to uninstall it. Uninstalling a device doesn’t remove its drivers from the hard disk.
Disable/Enable. Select a device and click this button to disable it or enable it, depending on its current status. When a device is disabled, its resources are freed and its drivers remain but are not loaded during startup. Take care not to disable something you need to start the machine.
To change the Device Manager display, choose a setting from the View menu. (See Table 7-1.) Use the different view settings for Device Manager to organize your system’s devices in a way that makes it easy to find the information you need.
Table 7-1. View settings
Setting | Description |
|---|---|
Devices By Type | Shows devices categorized by device type; usually the most useful view (also the default) |
Devices By Connection | Shows all devices in relation to how they are connected to other devices |
Resources By Type | Shows all system resources, organized by type of resource |
Resources By Connection | Shows all system resources, organized and grouped by the device to which they’re connected |
Show Hidden Devices | Includes devices that are not PnP, devices that might have been physically removed but still have their drivers installed, and kernel drivers that do not correspond to physical devices |
To display a device’s properties (as shown in Figure 7-4), select the device and then click the Properties toolbar button or double-click the device.

In the Device Properties dialog box, there are several tabs. You can view the status and configuration information—as well as the device manufacturer, device type, and location—in the upper portion of the General tab. For more information about a message displayed in the Device Status box, check Microsoft Help and Support at http://support.microsoft.com. Other tabs include the Driver tab, which displays the details of the driver and lets you update, rollback, or uninstall the driver, and the Resources tab, which displays the hardware resources for the driver. Along with these tabs, some devices have additional advanced settings or tabs for device-specific settings.
Troubleshooting devices is not an exact science. Devices in Windows XP and Windows Server 2003 usually just work. If they don’t, it’s often difficult to make them work. With that said, here are some of the troubleshooting techniques gleaned from many years of device-induced headaches:
Open the properties for the device and see whether the cause of the problem is listed in the General tab or the Resources tab. If there are any conflicts, remove or disable the conflicting device, or plug the device into a different slot (if possible).
Select the device in Device Manager, and click the Uninstall toolbar button. Click Scan For Changes, and let Windows redetect the device. You can also uninstall the device and then restart Windows for a more thorough but time-consuming attempt.
Try plugging external devices into a different port or directly into the computer instead of through a hub. Connect high-power, bus-powered Universal Serial Bus (USB) or Firewire devices such as bus-powered external hard drives only to self-powered hubs (hubs with external power supplies). To check the power consumption of USB devices, open the device properties for the USB hub and click the Power tab.
If the problem is persistent, remove all unnecessary devices from the system and see whether the device works. If not, try the device in another system to see whether it’s faulty or whether there is a conflict unique to your system. If the device works, add the removed devices back one by one until a device fails, and then assess the situation. (You might need to leave some cards or devices unplugged.)
Note
If you disable something essential—like the mouse or keyboard—you can return to the previous hardware profile by restarting with the last good hardware profile. When the Loader menu appears, press F8 and choose Last Known Good Configuration. Then choose the version of Windows you installed from the Loader menu and press Enter. This action enables the last good hardware profile.
Partition and format only the system partition during Windows installation. The Disk Management snap-in (or the new diskpart command) is a much more elegant and efficient way of partitioning and formatting disks and volumes than is Windows Setup, and it is best for you to perform as many of your disk management chores as possible after Setup completes. Here are some of the tasks that you might need to complete (see Chapter 18 for complete procedures):
Set up any software-based redundant array of independent disks (RAIDs).
Check the Direct Memory Access (DMA) status of any Integrated Device Electronics (IDE) devices. (To do so, in Device Manager, select IDE ATA/ATAPI Adapters, select Primary IDE Channel, and then click Properties. Click the Advanced Settings tab, and select the Transfer Mode boxes. Repeat this procedure for the secondary channel as well.)
Defragment all disk drives. See Chapter 18 for more information about using the Defrag.exe command and scheduling the disk defragmenter to run regularly.
Implement an appropriate backup strategy (as discussed in Chapter 37).
Although most computers are properly set up for network access during Windows Setup, you might need to change these settings at some point—possibly immediately if the settings are wrong or incomplete. This section explains how to get a server running properly on a network.
To change the identity of a server that isn’t a domain controller, log on using an account with administrator permissions and follow these steps:
Open the System tool in Control Panel, and then click the Computer Name tab.
Optionally, enter a description for the server in the Computer Description box and then click Change. (The description appears next to the computer name when browsing the local network or searching for a computer in Active Directory.)
Type the new name for your computer in the Computer Name text box.
To change the domain or workgroup to which you belong, choose either the Domain option or the Workgroup option, and then type the domain or workgroup name in the text box.
Click More to manually specify the domain name for your computer and to preview the Network Basic Input/Output System (NetBIOS) name for your system. Click OK when you’re finished.
Real World: Naming Computers
It’s a good idea to use a computer name that is both DNS-compatible and NetBIOS-compatible so that all types of clients see the same name for your computer. To do this, keep the name to 15 characters or fewer and don’t use asterisks or periods. To obtain the best application compatibility, use dashes instead of spaces or underscores.
To add or change the settings for core network components such as clients, services, and protocols, open the Network Connections folder (found in Control Panel), right-click the Local Area Connection icon, and choose Properties from the shortcut menu. This procedure opens the familiar Local Area Connection Properties dialog box shown in Figure 7-5, which you can use to view and change your server’s networking components. The top of the General tab of the dialog box shows the network adapter to which you are binding networking services.
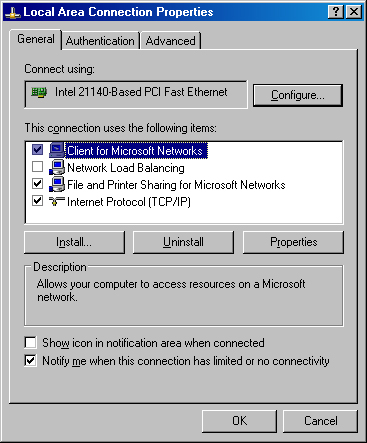
To install a network component, click Install, choose the type of component you want to install (Client, Service, or Protocol), and then click Add. Select the component from the list presented and click OK. To configure the component (if the component has a configurable option), select the component and click Properties.
Security Alert
If you have a multihomed server (a server with more than one network adapter) and one of the connections is to the Internet, disable everything but Transmission Control Protocol/Internet Protocol (TCP/IP) (and optionally QoS Packet Scheduler) on the Internet connection to increase security. Then give your local area connections names indicating to which network the adapters are connected. To do so, right-click the connections in the Network Connections folder and choose Rename.
TCP/IP is the most important protocol in today’s networks, and it’s the backbone for modern Microsoft networks. The protocol is well suited to enterprise networking, and it’s required for accessing the Internet. If you’re unfamiliar with TCP/IP, see Chapter 16 and Chapter 17 for more information.
The easiest and most reliable way to set up addressing on a network running the TCP/IP suite is to use a DHCP server to automatically distribute IP addresses. DHCP can also inform clients of the appropriate DNS servers and gateways to use. A DHCP server not only simplifies client configuration, but also simplifies server administration by managing the database of available IP addresses dynamically and automatically. (With static IP addressing, you must manually keep track of all IP addresses.)
Windows Server 2003 automatically connects to a DHCP server to obtain an IP address unless the server is a domain controller, in which case Windows prompts you to specify a static IP address. To toggle between dynamic and static IP addressing, follow these steps:
Select the Internet Protocol (TCP/IP) component in your Local Area Connection Properties dialog box. (Click Add to install TCP/IP if it’s not already installed.) Then click Properties. The Internet Protocol (TCP/IP) Properties dialog box appears (as shown in Figure 7-6).
Select the Obtain An IP Address Automatically option. Do not select this option on a DHCP server—a DHCP server must have a fixed, static IP address.
Select the Obtain DNS Server Address Automatically option if your DHCP server is set up to provide the DNS server addresses to clients; otherwise, select the Use The Following DNS Server Addresses option, and type the IP addresses for the DNS servers you want to use.

Real World: Assigning IP Addresses for WINS and DNS Servers
Most administrators use static IP addresses for WINS and DNS servers, and we prefer this method because it ensures that each server is at a known address, and it allows for easy configuration of specific and consistent IP addresses for DNS and WINS servers across multiple segments of the network. Some administrators, however, prefer to use DHCP reservations for their WINS and DNS servers, and this is technically feasible. It does have certain advantages—specifically it enables the DHCP administrator to easily change TCP/IP options that are included in the DHCP reservation without touching every affected server. It also allows the administrator to take back the address if the server is moved or decommissioned. See Chapter 17 for information about creating reservations on a DHCP server.
If your network doesn’t have a DHCP server or if you’re setting up a DHCP server, use a static IP address and DNS information by using the following steps:
Obtain an IP address from the person who maintains the database of IP addresses that your organization can use.
If the network also uses DHCP servers, add an exclusion for your IP address to all DHCP servers that service the address range in which your IP address is located.
Select the Internet Protocol (TCP/IP) component in the Local Area Connection Properties dialog box, and click Properties.
Select the Use The Following IP Address option, type the address you obtained in the IP Address text box, and then press Tab to automatically fill in the default subnet mask. If the network is using a specific subnet mask, type it in the Subnet Mask text box.
Type the IP address for the default gateway or router in the Default Gateway text box. The default gateway forwards, or routes, any traffic destined for hosts outside the local subnet, possibly to another portion of the wide area network (WAN) or to the Internet.
Choose the Use The Following DNS Server Addresses option to specify the IP addresses of the DNS servers. Type the primary and secondary DNS server addresses in the text boxes provided. Click OK when you are finished.
If you need to specify advanced TCP/IP options such as WINS servers, NetBIOS over TCP/IP, or multiple IP addresses per connection, click Advanced in the TCP/IP Properties dialog box. This opens the Advanced TCP/IP Settings dialog box.
The Advanced TCP/IP Settings dialog box contains four tabs, the first of which is the IP Settings tab. Use this tab to add the IP address and subnet mask for a network connection as well as the gateways the server must use. To change the options on this tab, follow these steps:
Use the Add, Edit, and Remove buttons in the IP Addresses box (shown in Figure 7-7) to modify the computer’s IP address and subnet mask settings. You can use multiple IP addresses and subnet masks for your network connection—either to access different logical IP networks or to use different IP addresses in a single, logical IP network.
To add a default gateway or router, click Add and type the IP address for the router.

Note
A router metric is a measurement of relative "cost" of the connection. Because most companies pay a flat fee for their network connections, this "cost" is usually a performance cost. As such, when you select the Automatic Metric check box, Windows automatically assigns the gateway a metric based on the performance of the gateway. To manually specify a metric, type a lower number (such as 10) for gateways that you want to use preferentially. Windows calculates the route metric for the default gateway based on the speed of the network link: 10 for a 200 Mb or faster link; 20 for an 81 Mb or faster link; 25 for a 21 Mb or faster link; 30 for a 4 Mb or faster link; 40 for a 501 Kb or faster link, or 50 for a 500 Kb or slower link. To view the routing table, type route print at a command prompt.
Click the DNS tab to access the advanced DNS settings for your network connection, as shown in Figure 7-8.

Use the following procedure to specify your DNS settings:
Use the Add, Edit, and Remove buttons in the DNS Server Addresses box to add or modify the DNS servers you want to use for this connection. Use the up and down arrows next to the box to change the order in which your server queries the DNS servers.
Select the appropriate options for resolution of unqualified names (such as srv1).
Append Primary And Connection Specific DNS Suffixes. Limits the resolution for unqualified names to the domain suffixes and connection-specific suffixes. If your primary DNS suffix is eng.example.com and you type ping srv4 at a command prompt, DNS looks for srv4.eng.example.com. If you also specify a connection-specific name (in the DNS Suffix For This Connection text box), such as dev.example.com, DNS queries srv4.eng.example.com and srv4.dev.example.com.
Append Parent Suffixes Of The Primary DNS Suffix. Includes parent suffixes up to the second-level domain in the resolution of unqualified names. So if the primary DNS suffix is eng.uk.corp.example.com and you type ping srv4 at a command prompt, DNS queries for the following:
srv4.eng.uk.corp.example.com
srv4.uk.corp.example.com
srv4.corp.example.com
srv4.example.com
Append These DNS Suffixes (In Order). Specifies the only domain suffixes to be appended to unqualified domain names during the name resolution process. If you specify domain suffixes here, Windows does not use the primary and connection-specific suffixes.
To override the parent DNS domain name specified for the computer in the Network Identification tab of the System Properties Control Panel tool, type the DNS domain name you want to use in the DNS Suffix For This Connection text box. (You can overrule this using Group Policy.)
To prevent the server from registering its IP address with the DNS server, clear the Register This Connection’s Addresses In DNS check box.
To force the server to register its fully qualified domain name (FQDN), including the DNS suffix listed in the DNS Suffix For This Connection text box (or taken from the DHCP server), select the Use This Connection’s DNS Suffix In DNS Registration check box.
To specify the WINS settings for your computer, click the WINS tab in the Advanced TCP/IP Settings dialog box (shown in Figure 7-9). If WINS servers are operating on the network, add their addresses here. This enables the server to communicate via NetBIOS with hosts on other subnets that are running Microsoft operating systems earlier than Windows 2000, and it minimizes broadcast traffic. For a more thorough discussion of when to use WINS servers on your network, see Chapter 17.
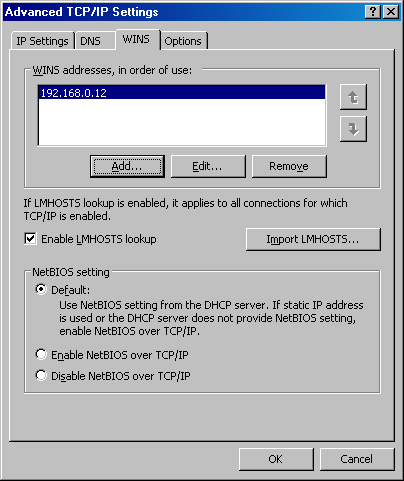
To enable the use of an Lmhosts file for resolving NetBIOS names to IP addresses, select the Enable LMHOSTS Lookup check box, and click Import LMHOSTS to import an Lmhosts file. Use Lmhosts files only when absolutely necessary because trying to keep them up to date can be tricky—the miniscule reduction of network traffic that Lmhosts files offer isn’t worth it.
Note
When you set up a WINS server, use the Ipconfig command at a command prompt to obtain your current IP address and then type that address in the WINS Addresses field. Don’t type any other WINS server in this field; you don’t want your WINS server registering its NetBIOS name with another WINS server if the WINS service hasn’t started in time to respond at bootup.
Make sure the Enable NetBIOS Over TCP/IP option is selected. Disable this only if you communicate exclusively with other computers running Windows 2000, Windows XP, and Windows Server 2003, or computers that rely solely on DNS for name resolution services (for example, UNIX). Also, note that any applications that use NetBIOS (and there are many of these) don’t work if you select Disable NetBIOS Over TCP/IP, so use this setting with caution.
If you need to specify any TCP/IP options, click the Options tab in the Advanced TCP/IP Settings dialog box. Select an option you want to modify, and then click Properties. For more information about TCP/IP properties and secure TCP/IP connections, see Chapter 16.
After you click Finish in the Windows Server Post-Setup Security Updates window, the Manage Your Server window (shown in Figure 7-10) appears. You can use the Manage Your Server window to perform the following tasks:
View what roles, such as domain controller or file server, you have assigned the server.
Add or remove roles using the Configure Your Server Wizard.
Launch administrative tools relevant to the roles you have assigned the server.
Get additional information about server management.
Although you can perform all these tasks using MMC consoles, the Manage Your Server window provides a central location from which you can manage a server. The Configure Your Server Wizard streamlines the role configuration process and guides you through some steps that aren’t included in other wizards.

To add or remove roles from the server, use the Configure Your Server Wizard, as described in the following steps:
Click the Add Or Remove A Role link in the Manage Your Server window, or click Start, choose Administrative Tools, and then Configure Your Server Wizard.
Verify that the server is connected to the network and is properly configured, and then click Next.
The Configure Your Server Wizard scans the network looking for other servers, checks for Internet connectivity, and searches for locally attached peripherals such as printers or external hard drives.
If you enabled the Windows Firewall on the server, Windows asks whether you want to create an exception for the Configure Your Server Wizard. Doing so adds the Configure Your Server Wizard to the list of exceptions in Windows Firewall for all network connections for which the Windows Firewall is enabled.
If the wizard can’t find any other servers on the network, the Configuration Options page appears, which gives you the choice of configuring the server with roles typical for the first server on a network (as discussed in the Configuring the First Server on a Network sidebar) or choosing roles individually.
Important
Don’t add any Windows Server 2003 domain controllers to an existing Windows 2000 or Microsoft Windows NT domain until you properly upgrade or prepare the domain. For more information, see Chapter 6.
If the wizard finds other servers on the network, if you have previously set up roles on the server, or if you chose Custom Configuration on the Configuration Options page, the wizard displays a list of server roles you can choose. Choose a server role from the list, as shown in Figure 7-11 and described in Table 7-2, and then follow the instructions onscreen.
If you enabled the Windows Firewall, verify that the proper exceptions are enabled in the firewall (for example, File and Printer Sharing) after setting up a role.
Table 7-2. Server role choices in the Configure Your Server Wizard
Role
Windows Server 2003
Windows Server 2003 R2
File Server
Configures disk quotas and the Indexing service; installs the File Server Management console and launches the Share A Folder Wizard.
Upgrades the File Server Management console; installs the File Server Resource Management and DFS Management consoles; and allows you to optionally install the DFS Replication Service, the Storage Manager for SANs (and the Virtual Disk Service version 1.1), Microsoft Services for NFS, and File Services For Macintosh components. Might require a restart. See Chapter 10 for more information.
SharePoint Services
Not available.
Installs Internet Information Service (IIS), ASP.NET and Windows SharePoint Services 2.0 with Microsoft SQL Server Desktop Engine (WMSDE) using the default settings.
Print Server
Launches the Add Printer Wizard and Add Printer Driver Wizard. See Chapter 8 for more information.
Installs the Print Management console. See Chapter 8 for more information.
Application Server
Installs IIS and optionally enables Microsoft FrontPage Server extensions and/or ASP.NET with the .NET Framework. Also enables COM+ for remote transactions and Microsoft Distributed Transaction Coordinator (DTC) for remote access.
Unchanged.
Mail Server
Installs and configures a lightweight POP3 mail server software and the SMTP service of IIS. See Chapter 33 for more information about the SMTP service, or Windows Help for information about the POP3 server.
Unchanged.
Terminal Services
Installs Terminal Services (not Remote Desktop). Requires a restart and a Terminal Services License Server on the network. See Chapter 30 for more information.
Unchanged.
Remote Access/VPN Server
Runs the Routing and Remote Access Setup Wizard. See Chapter 25 for more information.
Unchanged.
Domain Controller
Starts the Active Directory Installation Wizard (dcpromo), and optionally installs and configures DHCP and DNS. Also installs Routing And Remote Access (RRAS) on multihomed servers. See Chapter 14 for more information.
Unchanged.
DNS Server
Installs the DNS server software, and starts the Configure A DNS Server Wizard. See Chapter 17 for more information.
Unchanged.
DHCP Server
Installs the DHCP server software, and starts the New Scope Wizard. See Chapter 17 for more information.
Unchanged.
Streaming Media Server
Installs Windows Media Services.
Unchanged.
WINS Server
Installs the WINS server software. See Chapter 17 for more information.
Unchanged.

Note
You can also install components manually using the Windows Components Wizard, or from a command prompt using Sysocmgr.exe. For information about Sysocmgr.exe, see the Microsoft Windows Corporate Deployment Tools User’s Guide (Deploy.chm and Ref.chm) on Windows Server 2003 R2 Disc 2 or at the Microsoft Download Center (http://www.microsoft.com/downloads/).
Configuring the First Server on a Network
If you are setting up the first server in a new domain, choose the Typical Configuration For A First Server option in the Configure Your Server Wizard (as described in step 3 of the procedure under Setting Up Server Roles). Doing so instructs the Configure Your Server Wizard to guide you through the configuration process of setting up Active Directory, DNS, and DHCP, as described in the following steps:
If you have not done so already, specify a static IP address for the server in the appropriate address range. See Chapter 16 for information about choosing an appropriate network address.
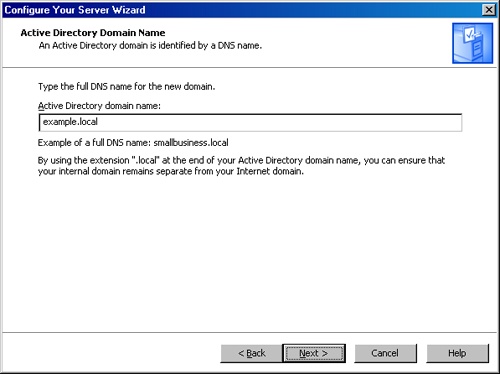
After choosing the Typical Configuration For A First Server option in the Configure Your Server Wizard, type the domain name you want to use in the first text box, as shown in Figure 7-12, and then click Next.
Use a domain name that is different from your Internet domain name, and/or uses the .local, .office, or .lan suffix, which are not valid Internet top-level domains. Using separate internal and external domain names reduces confusion for end-users, simplifies the DNS server configuration, and can increase security by preventing DNS from making internal host names available to Internet DNS servers. For more information about namespace planning, see Chapter 3.
If the server is multihomed (has multiple network adapters) and you have enabled the Windows Firewall/Internet Connection Sharing service, stop it and disable it using the Services console in the Administrative Tools folder. RRAS cannot install properly while the Windows Firewall/Internet Connection Sharing service is running.
Verify that the DNS domain name and NetBIOS domain name are correct, click Next, verify the settings, and then click Next again.
If the server is multihomed, the Routing and Remote Access Server Setup Wizard appears. Select the network adapter that connects to the Internet, choose whether to enable the RRAS Basic Firewall, click Next, and then click Finish.
At this point, Windows installs RRAS (if the server has multiple enabled network cards), DNS, DHCP, and Active Directory and then restarts the computer. After you log on again, the Configure Your Server Wizard assigns the server a static IP address (192.168.0.1) if the server does not already have one, attempts to assign a DNS forwarder, creates a scope of IP addresses for DHCP (192.168.0.10–192.168.0.254 if the static IP address is 192.168.0.1), and authorizes the DHCP server in Active Directory.
Configure all systems and devices on your network to use DHCP or to use a static IP address in the range of 192.168.0.2–192.168.0.9 (if the static IP address for the server is 192.168.0.1). (You can expand the reserved address range by making the DHCP scope smaller or adding reservations—see Chapter 17 for more information.) If you did not assign a static IP address to the server before performing this procedure and you use a router to share your Internet connection, make sure that the router does not use 192.168.0.1 as its IP address, and disable its DHCP server.
Change the DHCP options (as described in Chapter 17) to provide the appropriate IP address of your Internet router (the default gateway).
Real World: Special Facts About Domain Controllers
Although it’s true that all domain controllers are peers, the first domain controller in a domain is special. The first Active Directory domain controller in a domain automatically assumes the role of Global Catalog server. There must be at least one Global Catalog server in every domain. The global catalog is a database that contains a full replica of all directory objects in its host domain, plus a partial replica of all directory objects in every domain in the forest. The global catalog’s role is to locate in which domain a resource is located and to provide universal group membership information during a logon event. After you install additional controllers, you can reassign the role of Global Catalog server or designate more than one machine as a Global Catalog server. (This is necessary only in multidomain forests and in some branch-office scenarios.) This process is described in Chapter 14.
The first domain controller also takes the operations master roles. A single controller must perform each of these roles because they are functions that cannot be executed in different places at the same time. (For example, a single controller must handle the creation of security identifiers to ensure that each identifier is unique.) Under most circumstances, you don’t have to change the location for any of the operations master roles, but it is helpful to understand each of the roles and what happens in the case of failure. See Chapter 15 for information about operations master roles.
Entire books could be (and have been) written about securing Windows Server 2003, and rightly so; it’s an important topic. In the meantime, here are some security precautions to take before considering your server "online" (for more information, see Chapter 21 and Chapter 22):
Use the Security Configuration Wizard (SCW) to create and apply policies that lock down the server and disable unneeded services (but be careful not to lock down the server so much that clients cannot communicate with it).
Run Microsoft Baseline Security Analyzer. (See http://www.microsoft.com/downloads/details.aspx?FamilyID=4b4aba06-b5f9-4dad-be9d-7b51ec2e5ac9&DisplayLang=en.)
Implement appropriate physical security—if an attacker gains physical access to a system, it is no longer your system.
Enable security auditing. (The SCW can automatically configure an appropriate audit policy.)
Eliminate FAT. (Make sure all hard disk partitions are using NTFS.)
Rename the administrator account, and create a strong password for it.
Do not install unnecessary applications such as e-mail, Microsoft Office, or utilities.
Disable unnecessary accounts.
Check folder permissions.
Remove unnecessary file shares.
Install antivirus software and the latest virus definition files.
Set appropriate password policies and account lockout policies for your network using Group Policy.
Real World: Protecting the Administrator Account
A good precaution after installation is to use the built-in Administrator account to make a second account with full administrative privileges. This account can have a generic name, or you can call it something descriptive. Use it for all the day-to-day administrative work.
Then rename the default Administrator account and relegate it to semi-retirement. If your other administrator account gets disabled for some reason, you still have the original uncontaminated, known-to-be-good administrator account to which you can resort, just in case.
For bonus points, create another account, named Administrator, and disable it. Enable the Audit Account Logon Events setting in Group Policy, and then scan the Event Log for failures to log on with the decoy Administrator account. This tells you how much "action" the account is seeing from internal hackers (or at least, how forgetful the administrators are).
Note
Clear the logon history after installing Windows so that would-be hackers must figure out both the password and the user name. To do this on a standalone server, click Start, choose Administrative Tools, and then Local Security Policy. Select Local Policies and then Security Options, double-click Interactive Logon: Do Not Display Last User Name, choose Enabled, and then click OK. Use Group Policy to control this on a member server or domain controller.
After installing Windows Server 2003, you have some important configuration steps to perform. These tasks include documenting the installation, installing the latest software updates, enabling remote administration, and configuring devices and network settings. You also need to set up the server to fulfill its intended role on the network, which is made easier by the useful Manage Your Server window and the Configure Your Server Wizard. The last part of a server’s post-installation shakedown is securing the server as appropriate for its roles.
In the next chapter, the topic is how to manage print servers.