One of the lesser known services in Microsoft Windows Server 2003 is the Indexing Service. The Indexing Service provides Web-type indexing and querying to corporate intranets, Internet sites, and more conventional networks without reformatting documents. With the click of a button, users can index and query the contents of intranet or Internet sites on Windows Server 2003 with Internet Information Services (IIS). The Indexing Service does more than just index documents, however. It provides a system for publishing information on your intranet or on the Web. Because the Indexing Service indexes both the content and properties of formatted documents, you don’t need to convert existing documents to HTML to make them available to your users. Instead, documents in a variety of formats, such as Microsoft Office Word or Excel, are directly available.
Even though its primary function is the indexing of Web servers, the Indexing Service is useful on any network where searches for documents are common, and it is essential on any network with frequent searches through large numbers of files.
The Indexing Service functions much as one would expect—it catalogs a set of documents, enabling dynamic full-text searches using the search function, a query form, or Microsoft Internet Explorer. Just as an index in a book maps an important word to a page inside the book, content indexing on a computer takes a word within a document and maps it back to that document. Documents to be indexed can be specified in catalogs and can include document properties as well as the actual text in the document. After the Indexing Service is set up, no ongoing maintenance is needed, and administration is required only when you need to change a basic configuration. If you didn’t include the Indexing Service in your original installation of Windows Server 2003, you can add it through Add/Remove Programs in Control Panel.
When administering the Indexing Service, you’ll encounter a number of terms that have a special meaning when used in the Indexing Service context. Here are some of the most common ones, with their definitions:
Catalog. A directory where all temporary (word lists) and persistent (shadow and master) indexes and cached properties are stored for a particular scope.
CiDaemon. A child process created by the Indexing Service (cisvc.exe). CiDaemon works in the background, filtering documents for the Indexing Service.
Corpus. The entire collection of HTML pages and other documents indexed by the Indexing Service.
Filter. Part of a dynamic-link library (DLL) of filters, each designed to extract textual information and properties from a specific type of formatted document.
Master index. A persistent index that contains the indexed data for a large number of documents. This is usually the largest persistent data structure. In an ideal state, this is the only index present because all the indexed data is stored in the master index and there are no shadow indexes or word lists. A master index is created through a master merge.
Master merge. The process by which shadow indexes are combined with the current master index into a single master index. Unlike shadow merges, this is usually a fairly long process.
Persistent index. Data for an index that is stored on disk. Unlike word lists, which exist only in memory, a persistent index survives shutdowns and restarts. Persistent-index data is stored in a highly compressed format. There are two types of persistent indexes: shadow indexes (also referred to as saved indexes and temporary indexes) and master indexes.
Query. A request to search files for specific data.
Scan. The process by which files and directories are checked for modifications. Scanning is performed against virtual roots that have been selected for indexing.
Scope. The range of documents to be searched when executing a query. Physical paths or virtual roots can specify scopes.
Shadow index (also known as saved index). A persistent index created by merging word lists and occasionally other shadow indexes into a single index. A catalog can have multiple shadow indexes.
Shadow merge. The process by which word lists and shadow indexes are combined into a single shadow index. A shadow merge is performed to free up memory used by word lists and also to make the filtered data persistent.
Virtual root. An alias to a physical location on disk. Index Server can index any directory defined as a virtual root. Index Server can be set up to work with a central index but point to files on other servers.
Word list. When a document is indexed, the index information goes first to a small temporary index, called a word list. Word lists are maintained in memory until the Indexing Service combines them into the existing indexes.
The Indexing Service uses filters that can read certain types of documents, extract the text and properties, and send that information to the indexing engine. The filters included with Windows Server 2003 index the following kinds of documents: text, HTML, Microsoft Office 95 and later, and Internet Mail and News (provided that IIS is installed). The Indexing Service can use other filters made available by software vendors. The vendor that supplies the filter also supplies installation instructions.
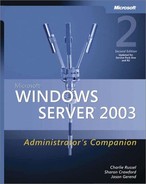
After extracting the text and properties, the Indexing Service determines the language the document is written in and removes words that are on the language’s exception list. The exception list contains prepositions, pronouns, articles, and so forth, and is appropriately named Noise.xxx, where xxx represents the language. Noise.xxx is in the System32 directory. Figure 31-1 shows a portion of the Noise.eng file, which contains the exception list for American English. You can add words to or remove words from the exception list using any text editor, such as Notepad.
After words from the exception list are removed, the remaining words are stored first in a word list in memory. At least once a day, the word lists are combined to form temporary saved indexes, and later the Indexing Service consolidates the temporary indexes into a single master index. All this is done automatically, although under certain circumstances you might need to intervene by initiating a merge manually, as described later in this chapter.
When designing an indexing site, the first question that arises is how much storage space will be needed. The minimum disk space allocated should be at least 30 percent of the size of your corpus, and 40 percent is better. During a master merge, the Indexing Service can temporarily need up to 45 percent of the corpus size.
Depending on the filters used to index a group of documents, the actual size of the indexes might be less than the standard 30 percent. For example, if you write a filter for indexing large documents (such as large image files), you can limit indexing to the first few hundred bytes (about all you need to get the header information), thus reducing the amount of space needed for the index.
Note
Because most Indexing Service operations are read requests (searching the indexes, returning the results, and then accessing the actual documents), disk striping (RAID-0) or a RAID-5 array is a good way to reduce disk-bound I/O operations. Disk striping and RAID arrays are covered in detail in Chapter 19.
Planning for future site growth is essential. Moving documents to larger disks to overcome space limitations can cause query errors until you are able to run a complete reindex, which can take many hours. Another critical part of planning an Indexing Service site is to make sure that plenty of memory is available on the indexing machine. Table 31-1 shows the minimum memory required versus the recommended minimum amount for different quantities of documents. As usual, the more memory you have available, the better (and with the price of memory as low as it is, consider 512 MB a minimum for any type of Windows Server 2003). With large numbers of documents, a faster CPU also speeds up indexing and searching.
The Indexing Service automatically combines memory-resident word lists into disk-resident temporary lists and, once a day, merges all temporary indexes into a master index. Depending on the number of temporary lists, merging can be a long process that uses much of the CPU’s resources. Queries are slower during a merge, and other processes on the computer are slower still.
By default, merges are done at midnight local time. If this is unsuitable for your system, you can change the default when the master merge is performed. You can also initiate a merge manually when a large number of documents in a catalog are changed. This section describes how to perform these two tasks.
To change the operation’s schedule from the default time, follow these steps:
Run Regedit.exe.
Navigate to HKEY_LOCAL_MACHINESYSTEMCurrentControlSetControlContentIndex.
In the rightmost pane of the Registry Editor window, double-click the MasterMergeTime value.
The DWORD Editor dialog box opens. In the Data box, type the number of minutes after midnight when a master merge should be initiated. Be sure to select Decimal from the Base options.
Click OK and close the Registry Editor.
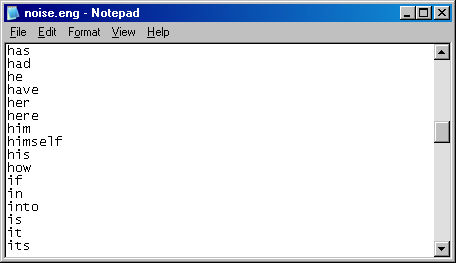
If a large number of documents change in a short period, you might want to perform a merge of the temporary indexes without waiting for the scheduled master merge. To initiate a merge, follow these steps:
Open Computer Management, and select Indexing Service in the console tree.
Right-click the appropriate catalog, point to All Tasks on the shortcut menu, and choose Merge. (See Figure 31-2.)
You’re asked to confirm that you want to merge the catalog. Click Yes.
For easy and frequent access, ideally you should set up a Microsoft Management Console (MMC) with Indexing Service. To do so, follow these steps:
Choose Run from the Start menu. Type mmc, and press Enter.
Choose Add/Remove Snap-in from the File menu. Click Add.
In the Add Standalone Snap-In box, select Indexing Service and click Add. Select Local Computer.
Click Close and then OK, and you see an Indexing Service MMC like the one shown in Figure 31-3.

The illustrations and examples in the following sections use the Indexing Service MMC, but you can also perform these tasks just as well through Computer Management.
A catalog contains all the index information for a particular set of file directories. During installation, the Indexing Service creates a default catalog called System. This catalog lists the contents of all permanently attached disk drives and, by default, all the directories and subdirectories on the drives. If IIS is installed, the Indexing Service also creates a Web catalog that contains all the IIS files.
You can create catalogs, adding and removing them as needed. You can also configure catalogs, setting which directories are to be included or excluded and specifying which properties are to be stored.
To create a catalog for the Indexing Service, open the MMC with the Indexing Service snap-in and follow these steps:
Highlight Indexing Service in the console tree.
From the Action menu, choose New, and then choose Catalog.
In the Add Catalog dialog box, supply a name for the catalog and a path to the folder in which you want the catalog placed. (See Figure 31-4.) Click OK.
You must stop and restart the Indexing Service before the new catalog can be found and indexed. Right-click Indexing Service, and choose Stop from the shortcut menu. To restart the Indexing Service, right-click Indexing Service again and choose Start from the shortcut menu.

After you create a catalog, you need to configure it so that it works as you expect. To do so, open the Indexing Service console and locate the catalog. Right-click the catalog, and choose Properties to do the following:
Index a Web server. Click the Tracking tab and, in the WWW Server box, select the Web server you want to index. If IIS isn’t installed, this option isn’t available.
Index files with unknown extensions. Click the Generation tab. Ordinarily, this setting is inherited from the overall Indexing Service properties and is inactive by default. If you want all the files in this catalog to be indexed, including those without installed filters, clear the Inherit Above Settings From Service check box. Select the Index Files With Unknown Extensions check box.
Generate abstracts. Click the Generation tab. The Generate Abstracts setting is inherited from the overall Indexing Service properties and is inactive by default. To select this option, you must first clear the Inherit Settings From Service check box. If Generate Abstracts is selected, the Indexing Service produces abstracts in the list of query results. This slows the query process, so it’s best not to increase the default size of abstracts.
Add a network share alias automatically. Click the Tracking tab. By default, this setting is inherited from the Indexing Service, where it is enabled.
With the exception of Generate Abstracts, all these changes take effect only after you stop and restart the catalog. To do so, right-click the catalog, point to All Tasks on the shortcut menu, and choose Stop. Then right-click again, point to All Tasks, and choose Start. If you change the Generate Abstracts setting, you need to stop and restart the Indexing Service for the change to be recognized.
By default, the System catalog includes everything on the local drives, excluding temporary Internet files and history files. When you create a new catalog, you have to add the directories that are to be included as well as specifically exclude directories that are not to be part of the index. To add a directory to a catalog, follow these steps:
Open the Indexing Service console. Right-click the new catalog, and select new and then Directory from the shortcut menu.
In the Add Directory dialog box, supply the path to the directory and the Uniform Naming Convention (UNC) path, if necessary.
If the directory is on another computer, supply a name and password for a user with permission to access the remote share, as shown in Figure 31-5. Click OK and the directory becomes part of the catalog.

To change settings for a directory, double-click the directory in the details pane of the Indexing Service console to open the Add Directory dialog box.
To exclude a particular directory, you must specify it. For example, the Bettiman Archives catalog shown being created in Figure 31-4 includes a directory called Book Files. In that directory is a subdirectory called Correspondence that you want to exclude from indexing.
To exclude a directory, follow these steps:
Open the Indexing Service console. Right-click the catalog, and select New and then Directory.
In the Add Directory dialog box, supply the path to the directory you want to exclude and the UNC path, if necessary. Again, if the directory is on another computer, supply a name and password for a user with permission to access the remote share.
In the Include In Index area, select No. Click OK.
The directory appears in the directory list, but under Include In Catalog, the entry is No.
Note
Although you can include a directory and then specifically exclude a portion of it, this process does not work in reverse. If you exclude a directory, you cannot then include some portion of it, even if you specify the directory and set it to be included in the index. If you attempt to do this, the directory is in the catalog’s directories and is listed as being included in the catalog, but it is not indexed.
The Indexing Service saves certain file properties in a two-level cache in each catalog. The primary level contains a small number of values that are accessed frequently. The secondary level contains values that are used less often. Table 31-2 shows the properties that are stored in each catalog by default, though many more are available.
Table 31-2. Property values stored in a catalog by default
Friendly Name | Function | Value | Storage Level |
|---|---|---|---|
DocTitle | Document title | 0x2 | Secondary |
Unique identifier for NTFS volumes | 0x5 | Primary | |
Work ID of the parent directory | 0x6 | Primary | |
Secondary storage ID, used internally by the Indexing Service | 0x7 | Primary | |
File Index | Unique identifier of a document in an NTFS partition | 0x8 | Primary |
Path | Document path | 0xb | Secondary |
Size | Document size | 0xc | Secondary |
Attrib | Document attributes | 0xd | Primary |
Write | Date and time the document was last written to | 0xe | Secondary |
In general, approach changing these properties with caution, always bearing in mind the following facts:
Adding property values to either level—but particularly to the primary level—has a negative effect on the performance of the Indexing Service.
Adding variable-length properties to the primary level increases the size of the cache exponentially.
After you add a property value to either level and then restart indexing, you can’t change the level for that property.
But don’t assume that changing the property cache is always a poor idea. For example, information such as when files were created or when they were last accessed can be important, depending on your needs.
To add a property to the properties saved in the property cache, follow these steps:
Open the Indexing Service console. Under the appropriate catalog, click Properties.
In the details pane, select the property you want to add.
From the Action menu, choose Properties to open the property’s Properties dialog box.
To include this property in the property cache, select the Cached check box. (See Figure 31-6.) You can see and change the datatype and the size of the property. (Only properties with variable sizes can be adjusted.) The storage level can also be assigned. Click OK when you’re done.

Changes take effect after the Indexing Service is stopped and restarted, but these newly added properties are included in the property cache only for new documents. To update the entire index with the newly included properties, perform a full scan of the index, as described in the next section. If you later decide to remove a property or alter its settings, you can do so by clearing the Cached check box in the property’s Properties dialog box. Again, a full scan is required to update the entire index.
A full scan of the index consists of a complete inventory of all the documents in the catalog. The Indexing Service automatically performs a full scan when it is first installed, when a directory is added to a catalog, and as a part of recovery if an error occurs. Incremental scans are done automatically when the Indexing Service restarts to detect documents that were changed while it was inactive. You can perform a full or incremental scan at any time by following these steps:
Open the Indexing Service console. In the console tree, click the appropriate catalog and then click Directories.
From the Action menu, point to All Tasks and then choose Rescan (Full) or Rescan (Incremental), depending on the type of scan you want to perform. You’re asked to confirm your choice. Click Yes and the scan proceeds.
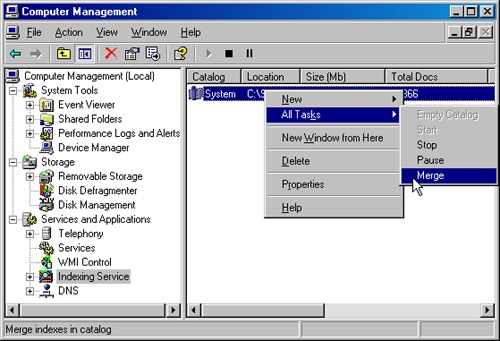
The Indexing Service is controlled by entries in the registry. These entries can be edited using Regedit.exe, although the usual caveats apply because a misstep in the registry can cause problems in not only the Indexing Service but elsewhere in Windows Server 2003 as well. Edit only those entries that you must. If the Indexing Service console has a method for making changes, use that instead. Always back up the registry before editing it.
Entries for the Indexing Service can be found in the registry at HKEY_ LOCAL_MACHINESYSTEMCurrentControlSetControlContentIndex. Figure 31-7 shows some of the registry entries for the Indexing Service. (Remember, the values displayed by Regedit are in hexadecimal. An entry of 0x7530 is actually 30,000 in decimal.) Table 31-3 lists some of the critical operational parameters for the Indexing Service that are accessible through the registry.
Table 31-3. Selected registry entries for the Indexing Service
Registry Entry | Function |
|---|---|
EventLogFlags | Controls the generation of event log messages. |
FilterContents | Indicates whether the contents of a file will be filtered or whether only the properties of the file will be filtered. A value of 0 specifies that the contents will not be filtered. With any other value, the file will be filtered. |
FilterDirectories | When set to a value of 0, directories will not be filtered for system properties or displayed in query results. With any other value, the directories will be filtered. |
FilterFilesWithUnknownExtensions | Indicates whether files with nonregistered extensions will be filtered. When set to a value of 0, only registered file types will be filtered. |
FilterRetries | Indicates the maximum number of times a file will be retried for filtering after a failure. |
GenerateCharacterization | Controls the automatic generation of file abstracts. |
IsapiMaxEntriesInQueryCache | Shows the maximum number of cached queries. |
IsapiMaxRecordsInResultSet | Indicates the maximum number of rows to return for a single query. |
IsapiMaxRecordsPerGetRows | Indicates the maximum number of rows to fetch when getting data to display on an HTML page. |
IsapiRequestQueueSize | Controls the maximum number of Web query requests to queue when the server is busy with other requests. |
MasterMergeTime | Indicates the time at which a master merge will occur. This value is stored as the number of minutes after midnight. (The default is 60 minutes after midnight.) |
MaxCharacterization | Shows the maximum number of characters in abstracts generated automatically. |
MaxFilesizeFiltered | Controls the maximum size in kilobytes of a single file to be filtered using the default filter. If the size of a file exceeds this value, only file properties will be filtered. This limit does not apply for registered file types. The default is 256. |
MaxFreshCount | Specifies the maximum number of files whose latest indexed data is not in the master index. (The default is 100,000.) If this number is exceeded, a master merge is performed. |
MaxIndexes | Sets the maximum number of saved indexes in the catalog. If this number is exceeded (25 is the default), a shadow merge is performed to bring the total below this number. |
MaxPendingDocuments | Sets the maximum number of pending documents to be filtered before considering the content index out of date for property queries. |
MaxQueryExecutionTime | Identifies the maximum execution time (in seconds) for a query. If the CPU time for a query takes longer than this value, processing stops and an error message is returned. |
MaxShadowFreeForceMerge | A master merge is forced when free space on the catalog hard disk has fallen below the MinDiskFreeForceMerge value and the disk space occupied by the shadow indexes exceeds this value. |
MaxShadowIndexSize | A master merge is started when the disk space occupied by the shadow indexes exceeds this percentage of the catalog drive. |
MaxWordLists | Sets the maximum number of word lists that can exist at a time. The default is 20. |
MinDiskFreeForceMerge | A master merge is forced when the free space on the catalog drive has fallen below the amount set here (the default is 15 MB) and the disk space occupied by the shadow indexes exceeds the value of MaxShadowFreeForceMerge. |
MinSizeMergeWordLists | Sets the minimum combined size of word lists that will force a shadow merge. |
The simplest way to query the index is to use the Search operation on the Start menu. Point to Search, choose For Files And Folders, and type a filename or a single word from the text or some other known property. Depending on the number of documents to be searched, the use of the Indexing Service can make a remarkable difference in search times. Even in small-sized to medium-sized databases, a search that takes 10 seconds without indexing appears instantaneous with indexing.
Queries can also be performed using the Indexing Service query form, which enables wide-range searches. Clicking the Query The Catalog directory in the Indexing Service console opens the query form. (See Figure 31-8.)
With the query form, you can do the following:
Search for words and phrases.
Search for words or phrases that are in proximity to other words or phrases.
Search for words or phrases within textual properties. For example, you can search for a word that appears in a document’s abstract or summary.
Search for words or phrases in specific document formats, such as within a Microsoft Excel spreadsheet or a Microsoft PowerPoint presentation.
Use the relational operators <, <=, =, =>, >, and != against a constant, such as a date or file size.
Use the Boolean operators AND, OR, AND NOT, and NEAR. (Note that the Boolean operators are available only in the English language.)
Use wildcard characters such as * and ? and regular expressions for "fuzzy" queries.
Rank results by the quality of the match.
The Indexing Service uses three types of files—very similar to those implemented by IIS—to allow the development of custom query forms, formatted results pages, and administrative scripts. These file types are as follows:
Internet data query files
HTML extension files
Index data administration files
With a query form, you can conveniently search for a word or phrase anywhere in a set of documents. The user simply types a word or phrase, and all documents containing the word or phrase are returned in a list.
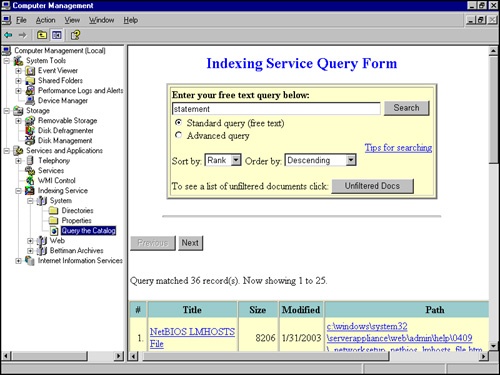
With the Indexing Service, the administrator of a Web server can create customized forms to help employees and other clients find specific information from a set of documents. For example, a form can be tailored to search for a word or phrase (such as "systems management") or for properties (such as the author or subject). You create a query form in standard HTML format, just as you create any Web page. If you know how to create pages in HTML format, you can quickly put together a simple query form such as the following:
<FORM ACTION="/scripts/querydemo.idq? " METHOD="POST">
So what's your question?:
<INPUT TYPE="TEXT" NAME="CiRestriction" SIZE="60" MAXLENGTH="100" VALUE=" ">
<INPUT TYPE="SUBMIT" VALUE="Start Search">
<INPUT TYPE="RESET" VALUE="Clear">
</FORM>
More Info
For assistance in creating a query using ASP.NET, go to http://support.microsoft.com and search for Knowledge Base Article 311521.
The <FORM ACTION> line shows the location of the .IDQ (Internet data query) file, which defines query parameters such as the scope of your search, any restrictions, and query result sets. A basic .IDQ file looks something like this:
[Query]
CiColumns=filename,size,rank,characterization,vpath,DocTitle,write
CiFlags=DEEP
CiRestriction=%CiRestriction%
CiMaxRecordsInResultSet=100
CiMaxRecordsPerPage=25
CiScope=/
CiTemplate=/scripts/bdq.htx
CiSort=rank[d]
CiCatalog=d:
The following list explains each line of the sample .IDQ file:
[Query]
Identifies the information that follows as a query specification.
CiColumns=filename,size,rank,characterization,vpath,DocTitle,write
Indicates the kind of information to return in the result set.
CiFlags=DEEP
Tells the query to search all subdirectories within the scope.
CiRestriction=%CiRestriction%
Indicates the query terms to search for.
CiMaxRecordsInResultSet=100
Sets the maximum number of results to be returned, 100 in this example.
CiMaxRecordsPerPage=25
Determines how many results are shown on each Web page returned, 25 in this example.
CiScope=/
Tells where to start the query. In this example, the query starts at the root of the storage space.
CiTemplate=/scripts/bdq.htx
Indicates what file to use to format the results; in this case, it’s Bdq.htx.
CiSort=rank[d]
Tells how to sort the results. In this example, the results will be listed by rank—by how well the document matches the query—and [d] indicates that the results will be listed in descending order.
CiCatalog=d:
Points to the index to use. In this example, the index stored on d: is to be used.
The combination of the sample HTML file and the sample .IDQ file produces the query form shown in Figure 31-9.

When you create a new Web site, it isn’t automatically marked as indexed when you create a catalog for it. To correctly index a new Web site, follow these steps:
Open the Indexing Service console, and create a new catalog.
Right-click the new catalog, and choose Properties from the shortcut menu.
Click the Tracking tab, and select the Web site you want to index. Click OK.
Open the Internet Information Services console. Right-click the appropriate Web site, and choose Properties from the shortcut menu.
Click the Home Directory tab, select the Index This Resource check box, and click OK.
Stop the Indexing Service and then restart it. The new catalog should come online and begin indexing the new Web site.
The performance of the Indexing Service depends, obviously, on the number and size of the documents being indexed and the resources available to the Indexing Service. When the number of documents being indexed is fewer than 100,000, no special hardware or tuning is likely to be needed. The Indexing Service works in the background and without attention. As the number of documents grows, however, performance begins to lag unless sufficient memory is available.
You can adjust the performance of the Indexing Service based on how you use the service. It’s not always necessary to perform hardware upgrades. Instead, you can reduce the amount of resources needed for indexing by reducing the demand that indexing places on the system. Alternatively, you can give the Indexing Service a high priority on a given system when many documents need to be processed. To adjust the Indexing Service’s performance, follow these steps:
Open the Indexing Service console. In the console tree, right-click Indexing Service and choose Stop from the shortcut menu.
From the Action menu, point to All Tasks and choose Tune Performance.
In the Indexing Service Usage dialog box, you can select the option that best describes how this computer uses indexing:
Dedicated Server. Adjusts performance settings to provide maximum Indexing Service performance. The underlying settings are "Instant" indexing and "High Load" querying.
Used Often, But Not Dedicated To This Service. Adjusts performance settings to provide improved performance. The underlying settings are "Lazy" indexing and "Moderate Load" querying. (This is the default setting.)
Used Occasionally. Adjusts performance settings to provide lowest resource utilization at the expense of some performance loss. The underlying settings are "Lazy" indexing and "Low Load" querying.
Never Used. Turns off Indexing Service.
Customize. Allows the use of custom settings.
If you select the Customize option and then click Customize, the dialog box shown in Figure 31-10 opens.
Move the Indexing slider to Instant for immediate indexing of all new and modified documents. Move the slider to Lazy for indexing to take place when the system isn’t busy with other tasks and for indexing that does not affect overall system performance.
Move the Querying slider to High Load for processing many queries at a time. Move the slider to Low Load if few queries are expected at a time.
Click OK twice when you’re finished.

Changes to the Indexing Service’s performance are unlikely to have noticeable results except in an environment where indexing needs are either very high or very low. In most environments, the Indexing Service works unobtrusively in the background without fine-tuning.
Chapter 35 describes how to use the data from Performance Monitor to target processes and components that need to be optimized, monitor the results of tuning and configuration efforts, and understand and observe the trends in workloads and the corresponding effect they have on resource usage. Among the many performance counters available in Windows Server 2003 are several that can assist in monitoring the Indexing Service and the Indexing Service Filter. Table 31-4 lists the relevant counters and what they measure. See Chapter 35 for details about analyzing performance data to determine acceptable values for counters and for information about solving any performance problems that are found.
Table 31-4. Performance Monitor counters related to the Indexing Service
Counter | Description | |
|---|---|---|
Indexing Service | Number of documents indexed | Number of documents indexed in the current indexing session |
Deferred for indexing | Number of documents in use that need to be indexed | |
Documents to be indexed | Smallest number of documents known to need indexing | |
Index size (MB) | Total size, in megabytes, of all saved indexes | |
Merge progress | Percentage of merge completed | |
Running queries | Number of queries currently being processed | |
Saved indexes | Number of saved indexes | |
Total number of documents | Number of documents known to the Indexing Service | |
Total number of queries | Total number of queries that have been conducted in the current indexing session | |
Unique keys | Number of unique keys (words, properties) in the index | |
Word lists | Total number of word lists | |
Indexing Service Filter | Binding time (msec) | Average time in milliseconds to bind to a filter |
Indexing speed (MBph) | Speed of indexing document contents in megabytes per hour | |
Total indexing speed (MBph) | Speed of indexing document contents and properties, in megabytes per hour |
This section lists common error messages and possible solutions. Some of the most common problems with the Indexing Service can be fixed quite easily. For more complex issues, search the Microsoft Knowledge Base online at http://support.microsoft.com/search for solutions.
Instead of receiving a list of matching documents when you perform a query using the Indexing Service, you might receive the error message No Documents Matched the Query. This common error means that the catalog is responding correctly but that there is an incorrect setting somewhere. To find the incorrect setting, try each of the following procedures in turn, testing after each one:
In an .IDQ file, you should see a line like the following:
CiCatalog=d:inetpubwwwroot mjs_index
You might need to change the pointer to the catalog if you are not using the default catalog. Make sure the path is pointing to the directory that contains the catalog’s Catalog.wci directory.
In the code of your page, make sure that the following is true:
In an .IDQ file:
CiScope=/
CiRestriction=%CiRestriction%
CiCatalog=<path to the directory holding the Catalog.wci directory>
Launch Internet Information Services (IIS) Manager from the Administrative Tools folder on the Programs menu. Right-click the root of your Web site and choose Properties. In the Home Directory tab, make sure that the Index This Resource check box is selected. Try your query again.
The Indexing Service does its indexing as the System account. If the System account does not have at least Read permissions on the files that are to be cataloged, the files are not indexed. Also, make sure that the System account has Full Access permissions on the root of the drive that physically contains the catalog and on the Catalog.wci directory.
Users are allowed to view only results that they have permissions to see. If you are accessing the query page as an anonymous user, make sure that the anonymous user has at least Read permission on the document you are trying to find.
Authenticate coming into the query page as an administrator if possible. Try setting the directory that the query page is located in to Basic/Clear Text authentication only, so that you receive a prompt when you attempt to connect to that page. If you get results, you have a permissions issue. If you log on as an administrator and still receive a No Documents Matched the Query message, you probably do not have a permissions issue.
If you are querying on a specific page and it is returning in a #filename query but it is not being filtered (the abstract is not populated), and it is an HTM, HTML, or ASP page, make sure you do not have a ROBOTS=NOINDEX metatag in the header of the document. This does not prevent indexing, but it does prevent filtering.
Adobe makes a free filter called Adobe PDF IFilter v6.0 that enables the indexing of .PDF (Portable Document Format) files. After you install the filter, .PDF files might not be indexed after the Indexing Service is restarted or the computer is restarted.
The problem is caused when the Indexing Service restarts and reregisters all the filter .DLL files. One of these .DLL files has a default association with the .PDF extension and therefore registers itself as the filter for these files. To fix this problem, ensure that the list of filter .DLL files includes the PDF filter by following these steps:
Stop the Indexing Service. (Right-click Indexing Service in the console pane, and select Stop.)
Start the Registry Editor (Regedit.exe).
Locate the following key in the registry:
HKEY_LOCAL_MACHINESYSTEMCurrentControlSetControlContentIndex
Add the path to the Pdffilt.dll to the DLLsToRegister key. The path to the PDF filter should be added as the last entry in this key.
Close the Registry Editor. Restart the Indexing Service.
Note
The free PDF filter can be downloaded at http://www.Adobe.Com/Support/Downloads/Detail.Jsp?Ftpid=2611. (Adobe site registration is required.)
When you use the Indexing Service to run a query and you set the sort method to anything other than Rank Descending, you do not receive the top matching records and you might get a different set of files on subsequent queries. Sorting on Rank Descending is the only way to get the top matching records from the catalog when the maximum number of returns is limited. Sorting on anything other than Rank Descending returns a subset of the total set of matching documents.
If the Indexing Service reports that the catalog is corrupted after the indexing process is completed, it means that a file can’t be filtered and that Filter Retries is set to a number greater than 4. This can occur as soon as the indexing process has completed or several minutes later.
When this happens, the information that the filter process sends to the Indexing Service causes a report that the catalog information is corrupted even though the data on the drive is fine. To fix this, start the Registry Editor (Regeditexe) and navigate to HKEY_LOCAL_MACHINESYSTEMCurrentControlSetControlContentIndexFilterRetries. Change the value of this key to 4 or less, close Registry Editor, and restart the Indexing Service.
On occasion, it might take an extremely long time to index documents, and some documents might appear not to get indexed at all. In addition, the abstract for documents might be blank or contain incorrect information. This is usually caused by third-party software that places a lock on the Web content you are attempting to index. Antivirus software programs and any other software that monitors or scans your Web content for extended periods of time can cause this problem. To work around this problem, disable any software that may be monitoring the Web content.
More Info
For more about the Indexing Service, visit the public newsgroup microsoft.public.inetserver.indexserver or search for "indexing service" on http://www.microsoft.com. Another good source of information about Index Server is the Index Server FAQ, which can be found at http://www.indexserverfaq.com.
The Indexing Service offers administrators of Web sites or networks with large numbers of documents a way to locate and access documents quickly and easily. Queries can be delimited by document contents and properties. The next chapter begins the portion of the book devoted to Internet servers and services with a discussion of the basics of Internet Information Services.