Many IT professionals need to support legacy or specialized applications in their environment that require an older operating system, such as Windows NT4, or one that is not generally used by the rest of the company, such as a version of UNIX. Many of these specialized or dedicated applications run on older servers that could not be easily replaced in the event of a hardware failure. By consolidating them onto a newer server but running them in a virtual machine environment, the overall maintenance and supportability is improved.
Another critical application compatibility need is the testing of new applications or patches to existing applications before they are deployed across the company. Few IT professionals have the luxury of a completely segregated and isolated test environment with all the possible configurations and environments that they need to support and test against.
Microsoft Virtual Server is a virtualization application that creates a virtual hardware environment that can support multiple virtual machines running multiple operating systems on the same physical hardware. The physical server is called the "host" and each virtual operating system is called a "guest." Guest operating systems can be any operating system that runs on standard x86 hardware, including UNIX, Linux, MS-DOS, Microsoft Windows 3.1, Windows 9x, Windows NT, or any of the currently shipping and supported 32-bit Windows operating systems.
Virtual Server presents each guest operating system with an entirely segregated and isolated virtual environment that simulates the necessary hardware for the guest operating system to run. The guest has no awareness of being in a virtual environment and is fully supported running under Virtual Server.
Virtual Server is an ideal environment for testing new applications and patches to existing applications. You can create multiple guest virtual machines on a single server, and test the new application under carefully controlled and isolated conditions that accurately reflect your real network conditions, without having to have many dedicated machines to support.
Virtual Server is also a great tool for testing new technologies, such as clustering, in a controlled environment and without having to actually buy expensive clustering hardware until you’re sure everything will work as you expect.
Virtual Server 2005 R2 can be installed on any 32-bit version of Windows Server 2003, and on x64 versions of Windows Server 2003. It can also be installed on Windows XP Professional Service Pack 2 and Windows XP Professional x64 Edition. It is not, however, supported for production use when installed on Windows XP.
Note
The screen shots and steps used in this chapter were taken using a beta version of Microsoft Virtual Server R2.
To install Virtual Server, you need to first install Internet Information Services 6.0 (IIS6) on either the host computer (the default) or on another computer with access to the machine that will host Virtual Server. This is because all configuration and maintenance of Virtual Server is done on the Virtual Server Administration Website. This Web site is created on the host machine by default, but if you need to configure Virtual Server to be administered from a separate computer you should follow the instructions in the Release Notes for Virtual Server. If you won’t be using IIS for any other Web functionality, you should just install the minimum components of IIS that are required for Virtual Server. These are: Common Files, Internet Information Services Manager, and World Wide Web Service. Installing these components will reduce the number of unnecessary services and attack surfaces on your server. If you already have IIS running somewhere on your network, do the installation of Virtual Server as a split installation.
To install IIS for Virtual Server, follow these steps:
Open Add/Remove Components, and select Add/Remove Windows Components to open the Windows Components Wizard, shown in Figure 29-1.
Highlight Application Server, and click Details.
Highlight Internet Information Services, and click Details.
Select Common Files and Internet Information Server Management.
Select World Wide Web Service, and click Details to open the World Wide Web Service page shown in Figure 29-2.
Select only World Wide Web Service and then click OK twice to return to the Application Server page. You should have Enable Network COM+ Access selected and Internet Information Services (IIS) partially selected, as shown in Figure 29-3.
Click OK one more time, and then click through the rest of the wizard to finish installing IIS.


If your intention is to only use IIS for management and configuration of Virtual Server, you should configure the Windows Firewall accordingly to block access to the default Web site, especially from any externally facing IP address.
To install Virtual Server, follow these steps:
Ensure that IIS is installed and started.
Start the Virtual Server 2005 installation program, setup.exe, from the CD or other installation point to bring up the Microsoft Virtual Server 2005 Setup Wizard shown in Figure 29-4.
Click Install Microsoft Virtual Server 2005, and then Accept the license agreement and click Next again.
Fill in the Customer Information dialog box, and click Next to bring up the Setup Type dialog box shown in Figure 29-5.
Choose Complete if you are installing Virtual Server on a computer that has IIS already installed.
If you are doing a split installation, choose Custom, and then change Virtual Server Web Application to This Feature Will Not Be Available, as shown in Figure 29-6.
Click Next to bring up the Configure Components dialog box shown in Figure 29-7 (available with a complete install only).
Click Next, and select Enable Virtual Server exceptions in Windows Firewall.
Click Next and then click Install to perform the actual installation.
When the installation completes, the Installation Summary page will be displayed, as shown in Figure 29-8. The exact contents of this page will vary, depending on exactly what components were installed.
Note the location of the Installation Summary page for future reference, or add it to your Favorites. Finally, click Finish to close the installation program. No reboot is required.


Virtual Server is entirely configured from the Administration Website shown in Figure 29-9. When you first log on to this Web site, you’ll be prompted by the Windows Server 2003 Internet Explorer Enhanced Security Configuration. For simplicity, if you’ll be configuring Virtual Server from the server’s console, you should add the Web site to your Trusted Sites. You can also connect from your personal workstation by pointing Internet Explorer at http://machinename:1024, assuming you used the default port for the Virtual Server Web site.
By default, only members of the local Administrators group on the Virtual Server host machine have access to the Administration Website, and you’ll be prompted for credentials when you attempt to log on.
You can create virtual networks, virtual disks, and virtual machines from within the Web site. All the settings for individual machines and their virtual hardware are controlled from this Web interface. We’ll start by configuring our networks, and then setting some useful defaults before we actually create a virtual machine. While you can also preconfigure and create Virtual Disks, we prefer to create the disks when we are creating the virtual machine.

Virtual Server will create a virtual network card for each enabled physical network card it sees on the computer during initial installation, plus another virtual network card that is only for connecting to other virtual machines on the same physical computer. To see the list of available virtual network cards, log on to the Administration Website if you aren’t already logged on, and click Configure- and then View All in the Virtual Networks section of the leftmost frame of the Web site. This will display all the virtual network cards that are currently configured, as shown in Figure 29-10.

This is a nice feature because it lets you see what virtual networks you have. But you can’t actually change anything from this page. On the server xmpl-srv4, we see that there are three virtual networks defined—two external networks and the Internal Network. The Internal Network is not connected to any physical network card on the host server; rather, it is connected to a private, virtual network on the host that only other virtual machines can connect to.
To configure the Internal Network, perform the following steps:
Click Configure, Internal Network under the Virtual Networks section of the leftmost frame of the Administration Website to open the "Internal Network" Virtual Network Properties shown in Figure 29-11.
Click Network Settings to change the settings for this adapter. They’re not terribly interesting for the Internal Network.
Click DHCP Server to change the settings for the built-in Dynamic Host Configuration Protocol (DHCP) server, as shown in Figure 29-12. By default, the DHCP server is enabled for this network and uses a 10.237.0.0 network address.
Make any changes to the default DHCP settings and then click OK to save them. If you’ll be creating and assigning a DHCP role to one of your virtual machines on this network, you should disable this virtual DHCP server to avoid issues. Otherwise, it would be good to enter in the IP addresses of the DNS server or servers that will be created on the network, along with WINS servers, and a gateway if you will be configuring this network to connect to an outside network.

To configure the external networks, follow these steps:
Click Configure, External Network under the Virtual Networks section of the leftmost frame of the Administration Website to open the External Network Virtual Network. If you have multiple physical network cards on the host computer, you’ll actually be choosing from multiple external networks, each with a very long name that describes the hardware.
Click Network Settings to open the Network Properties page shown in Figure 29-13.
Give the virtual network a useful name that identifies it clearly, but that also is a bit easier to work with. You can also change the physical network card that this network is connected (bridged) to if you need to change the default. Add any administrative notes, and click OK to save the settings.

There are two server properties that you can set for the host server to simplify management and creation of virtual machines. There are other settings for the server and Web site we can set, but we’ll address them in the Administering Virtual Server section later in the chapter. The two settings we’ll worry about now are these:
Virtual Machine Remote Control. A feature of Virtual Server that allows a remote connection directly to the virtual machine
Search Paths. The path that Virtual Server will use to find resources and components it needs
To enable Virtual Machine Remote Control, follow these steps:
Log on to the Virtual Server Administration Website if you aren’t already logged on.
Click Server Properties in the Virtual Server section of the leftmost frame.
Click Virtual Machine Remote Control (VMRC).
Select Enable to allow the VMRC client to be able to connect to virtual machines on this host.
Set the TCP/IP address. The default is All Assigned. If you have externally facing adapters on the host, you should specify only the internal adapter IP address to limit access to the virtual machines.
Set the Idle timeout. The default is enabled, and it times out after 15 minutes of inactivity. We find that a bit short for how we use Virtual Server, so we set it to 30 minutes.
Configure any other settings here you want to change, and then click OK to actually enable the changes.
To set search paths, perform the following steps:
Log on to the Virtual Server Administration Website if you aren’t already logged on.
Click Server Properties in the Virtual Server section of the leftmost frame.
Click Search paths.
The default search path is in a bad place and would put all your virtual machines on the system drive by default. We suggest creating a SharedVirtualMachines folder on a different volume where you have plenty of space. Enter that folder path into the Default virtual machine configuration folder box.
You can also specify additional search paths that Virtual Server will use when it looks for CD, floppy, and hard drive images. When you’ve entered any additional paths you want to add, click OK to save the changes.
Once you’ve got your Virtual Server environment set up and ready, it’s time to actually create a virtual machine (VM). The wizard will walk you through creating the virtual machine and let you make some basic choices. You can then adjust them as appropriate for your particular environment.
To create a basic Windows XP Virtual Machine, follow these steps:
Log on to the Virtual Server Administration Website if you aren’t already logged on.
Click Create in the Virtual Machines section of the leftmost frame to open the Create Virtual Machine page, shown in Figure 29-14.
Enter a name for the virtual machine. The name should be as descriptive as possible, especially if you’ll be running several different but similar virtual machines on the same host. The machine will be created in its own subfolder of the default shared virtual machine folder you specified previously. If you want this machine to be in a different location, specify a fully qualified path name to the location for the machine.
Enter the amount of RAM to make available to the virtual machine.
Specify the maximum size of the first hard disk for this virtual machine and the type of virtual hard disk to create (IDE or SCSI). If you already have a virtual hard disk you want to reuse, you can specify that instead of a new hard drive.
Specify the initial network adapter to connect to. You can add more network adapters later.
Click Create. the virtual machine will be created and added to the Master Status panel of the Administration Website, and you’ll see the status page for the virtual machine as shown in Figure 29-15.


When you first create a virtual machine, you’ll see the status page for that machine as shown in Figure 29-15. From here, you can start the virtual machine immediately or set additional configuration details for the machine before starting it. Some configuration details can be set only on virtual machines that are shut down, so now is a good time to take care of those items. The default settings are listed in Table 29-1.
Table 29-1. Default Virtual Machine Settings
Property | Initial Default |
|---|---|
General Properties | Don’t start automatically. |
Save state when the virtual machine stops. | |
Virtual Machine Additions | Not installed by default. |
Memory | Depends on the guest operating system. |
Hard Disks | 1 virtual IDE hard disk. |
Automatically expands to 16 GB maximum size. | |
CD/DVD | 1 virtual CD/DVD drive. Attached to the first physical CD/DVD drive in the host computer. |
SCSI Adapters | None, unless you specified a SCSI virtual hard disk. |
Network Adapters | 1 virtual network adapter, with a dynamic MAC address. |
Scripts | Initially disabled. |
Floppy Drive | 1 virtual floppy drive, but not connected to any device |
COM Ports | 2 initial virtual COM ports. Not connected by default. |
LPT Ports | 1 initial virtual LPT port. Not connected by default. |
The default configuration for a virtual machine has a single CD/DVD drive attached to the master position on the second virtual IDE channel. This virtual CD/DVD drive is set to capture the first physical CD/DVD drive on the host machine. You can change this to capture a different physical CD/DVD if you have more than one CD/DVD drive on the host computer, or you can capture a CD or DVD image file. An image file, usually with the extension of .ISO, is an actual image of what the CD or DVD contains. It can be captured and used by Virtual Server just as if it were a physical CD or DVD drive. This is extremely useful for rapid access to operating system CDs, for example, where you have multiple VMs running different operating systems on the same host. You don’t need to have physical access to the host computer to swap out CDs; just capture the appropriate .ISO file for the operating system used by that virtual machine.
To configure a Virtual CD/DVD Drive, perform the following steps:
Log on to the Virtual Server Administration Website if you aren’t already logged on.
Click Master Status in the Navigation section of the leftmost frame.
Highlight the virtual machine you want to configure the CD/DVD drive for, and select Edit Configuration, as shown in Figure 29-16.
The status page for the virtual machine will open. Click CD/DVD in the configuration section to open the CD/DVD Properties page for the virtual machine, as shown in Figure 29-17.
Select No Media to release any existing captures. Select Physical CD/DVD Drive, and specify which physical drive to capture. Or select Known Image Files to specify the path to an .ISO file to capture.
If you’re capturing an .ISO image and it is on your search path (as described in the steps for setting search paths earlier in the chapter), you can select it from the drop-down list under Known image files, or you can enter the exact, fully qualified path name for the .ISO file you want to capture.
Click OK to capture the file.


OK, you’ve got everything configured and ready to go, and you really want to create that first virtual machine. There are two ways to start the machine and install the operating system:
Click the image of the virtual machine in the Master Status window.
Connect directly to it with the Virtual Machine Remote Control (VMRC) client.
Personally, we like the second option that allows us to do it directly from our main desktop, but there are significant security implications if you’re not certain of who might be listening to your network. Definitely don’t use that method over a wireless connection from a remote machine, for example. The more usual method is to open the Virtual Server Administration Website and click the image of the target virtual machine. This will start the virtual machine and leave it as a thumbnail on the Master Status page. Choose Remote Control from the action menu to open the remote control page for a particular virtual machine—you’ll see your virtual machine running directly in the Web page, as shown in Figure 29-18.
Note
The first time you launch this remote control page, you’ll be prompted to install the necessary ActiveX control in Internet Explorer. And some good news for x64 Edition users—there are both 64-bit and 32-bit ActiveX controls, so either version of Internet Explorer will work just fine.
To connect to a Virtual Machine with VMRC, follow these steps:
Open the VMRC from the Start, All Programs, Microsoft Virtual Server menu to open the VMRC as shown in Figure 29-19.
Enter the information for the virtual machine to connect to. You need to use the fully qualified host name, the port number (5900 by default) and the virtual machine name, as shown in Figure 29-19—for example: vmrc://xmpl-srv4.example.local:5900/xmpl-xp-vm1.
You’ll be warned about the security implications with two separate messages, as shown in Figure 29-20, and Figure 29-21. Click Yes in each message box to proceed.
Finally, you’ll be prompted for credentials to connect to the remote host machine. Enter your credentials, and click OK to open the VMRC and connect to the virtual machine.


Once your virtual machine starts, it behaves exactly like any other physical machine. You will see the standard power-on self test (POST) messages from the BIOS, the enumeration of your hard drives—including any SCSI devices—and the machine will boot from the available media. Follow the standard operating system installation instructions for your guest operating system.
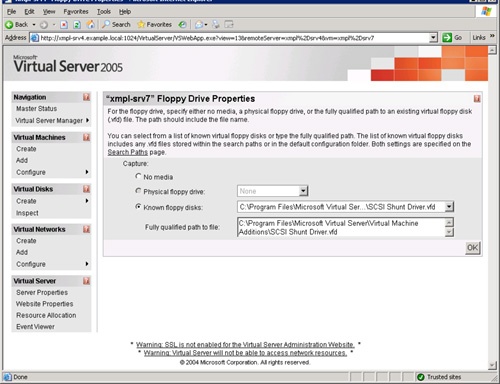
If you’re installing Windows Server 2003, Windows XP Professional, or Windows 2000 and you want to use a virtual SCSI hard disk, it can be installed without extra drivers, but it will be faster with the Virtual Machine SCSI Shunt drivers installed. To load these during the setup process, use the standard Windows technique of pressing the F6 key when the first blue installation screen is displayed. When prompted to specify additional drivers, go to the configuration screen for the VM, click Floppy drive, and select Known Floppy Disks, and then select the SCSI Shunt Driver from the drop-down list, as shown in Figure 29-22. Click OK to capture the floppy image.
VMRC is an application you’ll love to hate. It is an essential tool for managing and configuring your virtual machines, but its behavior is not always as you’d expect or wish. Once you know its quirks, though, you’ll find it a useful tool. The basic keystrokes are the same whether you use the standalone VMRC or the ActiveX control in the Administration Website. The default key bindings are shown in Table 29-2.
Table 29-2. Default Key Bindings for Virtual Machine Remote Control
Function | Key |
|---|---|
Connect to Server | Host+C |
Connect to the Administrative Display | Host+A |
Full Screen (Toggle) | Host+Enter |
View Connection Properties | Host+I |
View Only | Host+V |
Change Host Key | Host+H |
Switch to Next VM | Host+RightArrow |
Switch to Previous VM | Host+LeftArrow |
Release Mouse/Keyboard | Host |
Send Ctrl+Alt+Del | Host+Delete |
Probably the two most important keys in Table 29-2 are the Host key itself, which will release your keyboard and mouse when they’ve been captured by the virtual machine, and the Host+Delete combination that sends the Ctrl+Alt+Delete secure attention sequence (SAS) to the guest operating system. The need for the Host key to release your mouse and keyboard will go away once you actually get the operating system installed and can add the Virtual Machine Additions to it. Assuming, of course, that it is an operating system that has a set of Virtual Machine Additions to support it.
Once your virtual machine has been created and the operating system has been installed, there are several changes you can make to improve the functionality of Virtual Server and a particular VM. Some changes can be accomplished while the machine is running, and some can be accomplished or changed only while the machine is completely shut down.
Some features of a virtual machine can be modified while the virtual machine is running. Here are your options:
Change the devices that are captured.
Pause the virtual machine.
Save the state of the virtual machine.
Turn off the virtual machine.
The final option listed, turning off the virtual machine, is a lot like pulling the power cord on the virtual machine. This is usually not what you intended to do. We’ve already talked about capturing devices, so we won’t cover that option again here. Pausing the virtual machine is just like it sounds. When you pause a virtual machine, it stops using any of the available processing power of the host machine. It’s a lot like putting a laptop into standby mode. You don’t release any of the memory being used by the virtual machine, but it doesn’t actually do anything while it’s paused, nor does it require any processor cycles.
Save state is the virtual machine equivalent of hibernate on your laptop. It saves the current state of the virtual machine to your hard drive, and then frees up the memory it was using. When you restore your virtual machine from the saved state, it returns to exactly where it was when you saved the state.
Important
Do not use save state on a domain controller. It can cause problems with replication in the domain.
If you have Undo Disks enabled, you have some additional options. For a full list of possible options for a running virtual machine, see Table 29-3.
Table 29-3. Options for Running Virtual Machines
What the Option Does | |
|---|---|
Turn On | Starts the virtual machine (Power On). |
Pause | Standby mode. |
Resume | Resumes from Pause. |
Save State | Hibernates the virtual machine. |
Save and Commit Undo Disks | Hibernates the virtual machine, and merges the undo disk back into the main disk. |
Save State and Keep Undo Disks | Hibernates the virtual machine, but maintains the undo status so that the virtual machine can be rolled back to its prior saved state. |
Shut Down Guest OS | Tells the operating system to shut down. |
Shut Down Guest OS and Keep Undo Disks | Tells the operating system to shut down, and does not merge the undo disks. |
Shut Down Guest OS and Commit Undo Disks | Tells the operating system to shut down, and merges the undo disk, resulting in a complete shutdown. |
Turn Off | Essentially pulls the plug on the virtual machine. |
Turn Off Virtual Machine and Keep Undo Disks | Turns off the virtual machine immediately, and doesn’t make any changes to the undo state. |
Turn Off Virtual Machine and Commit Undo Disks | Turns off the virtual machine immediately, and merges any undo information back into the parent. |
Turn Off Virtual Machine and Discard Undo Disks | Turns off the virtual machine immediately, and discards any undo information. When the virtual machine restarts, it will be back at its previous saved state. |
Reset | Resets the virtual machine, which is slightly politer than Turn Off. |
Restore From Saved State | Resumes from hibernate. |
Discard Saved State | Discards any saved state information. Does not restart the machine. |
All changes to the hardware configuration of a virtual machine have to be done while the machine is completely shut down. Hardware changes can be made even if undo information exists. But hardware changes can not be made when the virtual machine is paused or in a saved state.
The configuration options that you can change while a machine is stopped include the following:
We haven’t talked about the last option in the list. You can enable a "snapshot" capability with Virtual Server that allows you to make changes to a virtual machine and then simply abandon those changes and return to a known state. To enable this, you need to turn on Undo Disks for the particular virtual machine. Then, when you shut down or save the state of a virtual machine, you have the option to commit the undo disks (move the fallback position to the current state), discard the undo disks (rollback to the fallback position), or simply save the current state without changing the undo status. This is a powerful capability that lets you repeatedly test a configuration change on your test network to see whether it’s a good idea to make the change. Once you’ve tried it, you can roll back to the original condition and try it a different way.
A useful add-on to Virtual Server is Virtual Machine Additions. These improve the integration of the guest operating system in the host computer and the overall performance and manageability of the virtual machine. Among other things, they get rid of the trapped mouse problem. Virtual Machine Additions are available for the following versions of Windows:
Microsoft Windows Server 2003 (all versions)
Microsoft Windows 2000 Server
Microsoft Windows NT Server 4.0 with Service Pack 6a (SP6a)
Microsoft Windows XP (all versions)
Microsoft Windows 2000 Professional
Microsoft Windows Millennium Edition
Microsoft Windows 98
Microsoft Windows 95
To install Virtual Machine Additions, perform the following steps:
Log on to the Virtual Server Administration Website if you aren’t already logged on.
Click Master Status in the Navigation section of the leftmost frame.
Highlight the virtual machine you want to install the additions to, and select Edit Configuration from the action menu.
Click Install Virtual Machine Additions in the Status window.
Select the Install Virtual Machine Additions box in the Virtual Machine Additions Properties page, as shown in Figure 29-23, and click OK.
In the virtual machine, the installation will start automatically if the virtual machine is running. When the installation completes, reboot the guest operating system.

In addition to the areas of Virtual Server we’ve already discussed, there are additional administrative capabilities you can take advantage of. The administrative options you can change for Virtual Server are listed in Table 29-4.
Table 29-4. Administrative Settings for Virtual Server
Setting | What the Setting Controls |
|---|---|
Virtual Server security | Allows you to assign permissions to users and groups. The default is a single entry for local administrators to have full control. |
Virtual Machine Remote Control | Enable or Disable VMRC and sets the IP address and port for VMRC connections. |
Virtual Server scripts | Enable or disable scripts, and specifies scripts for various conditions. |
Search Paths | Specifies the search paths that Virtual Server will use to locate resources. |
Website Properties | Controls various settings for the Administration Website, including refresh rate, number of events displayed, number of virtual machines displayed, and so forth. |
Resource Allocation | Controls the resources assigned to virtual machines, including percentage of CPU reserved for the machine. |
There are two well-known alternatives to Virtual Server that run on Windows Server 2003: Microsoft Virtual PC and VMWare’s suite of virtualization products, including VMWare Workstation.
Microsoft Virtual PC (VPC) is designed for running personal virtual machines. VPC is not really a server-class product, and it will not install on x64 Editions of Windows, including Windows XP Professional x64 Edition. Virtual machines running under VPC do support a virtual audio card however, something that is not supported in Virtual Server.
Virtual PC doesn’t require a running Web server and generally has a more user-friendly interface compared to Virtual Server. In our experience, virtual machines running under Virtual PC don’t seem to run quite as fast as those running under Virtual Server, even on identical single-processor hardware. And VPC doesn’t take advantage of multiple processors or hyperthreading.
VMWare’s VMWare Workstation is an interesting and powerful competitor to Virtual Server. It supports both x64 hosts and guests, giving it a real advantage in environments that are testing x64 compatibility.
VMWare Workstation also has a broader range of supported virtual hardware, including audio support and USB support. VMWare Workstation also supports multiple snapshots, giving you additional options for recovering to a known good point or testing multiple scenarios.
Another interesting VMWare Workstation capability is virtual teams. A virtual team is a group of virtual machines that can share a private network and can be started and stopped together.
In this chapter, we’ve covered the setup and configuration of Microsoft Virtual Server 2005 R2, an important tool for the IT professional who needs to provide application compatibility for legacy applications, consolidate resources onto fewer servers, and provide a robust testing environment for new applications and patches. In the next chapter, we’ll cover another key tool for the IT professional—terminal services.