In the realm of computer security, one of the most common and critical mistakes administrators make is to confuse the presence of security features with a secure system. It’s not enough to piece together protocols, methods, and algorithms into a collage of security. In such environments, the weakest link usually goes unnoticed until it’s too late. To be effective, system security must be applied as a whole, and it needs to be well designed, complete, and easy to maintain.
This chapter introduces you to a number of tools that allow you to implement and manage security settings for your server. The first tool is the Security Configuration Wizard, which allows you to create, edit, and apply a number of security settings in a single application. We’ll cover the Windows Firewall, a fundamental tool to protect your server from intruders. We also delve into the intricacies of security templates, which are text files that contain all security settings for a system. We cover both authentication and what to do when unauthenticated visitors decide to pay a visit. A thorough understanding of the fundamentals of security is crucial to managing a secure and robust installation.
Well-designed systems are accompanied by policies that dictate how, when, and at what level security is applied. Complete systems provide multilevel security that is both sound and as transparent to the user as possible. Easily maintained systems allow administrators to centrally manage security and keep track of critical events. A flexible but easy-to-use tool for creating, editing, and applying security policies for your server is the Security Configuration Wizard.
Note
Before you use the Security Configuration Wizard to harden a particular server, make sure that all roles (such as domain controller or application server) are active and properly configured on that server.
To install the Security Configuration Wizard, start Add/Remove Programs in Control Panel. Select Add/Remove Windows Components. Select it from the list in the Windows Components Wizard (shown in Figure 22-1), and click Next. Have the installation media available, because you might be prompted for it. Click Finish to complete the installation.
Verify installation was successful by checking that the Security Configuration Wizard option was added to the Administrative Tools. Note that this is not the only way you can use the Security Configuration Wizard. You can access the same functionality using the Security Configuration Wizard command-line tool, scwcmd.
Start the Security Configuration Wizard from the available Administrative Tools. Click Next to close the introductory window.
There are seven parts, or sections, of the Security Configuration Wizard. See Table 22-1 for a description.
Table 22-1. Steps of the Security Configuration Wizard
Section | Description |
|---|---|
Starting Security Configuration Wizard | Select the action to perform, select the server, and process the security configuration database. |
Role-Based Service Configuration | Select the roles, client features, and administration options. Indicate how to handle unspecified services. |
Network Security | Open and add ports. |
Registry Settings | Specify outbound and inbound authentication methods. |
Audit Policy | Specify the system audit policy. |
Internet Information Services | Enable or disable dynamic content, handle existing virtual directories, and allow or prevent anonymous access. |
Completing Security Configuration Wizard | Save and apply the new or changed security policy. |
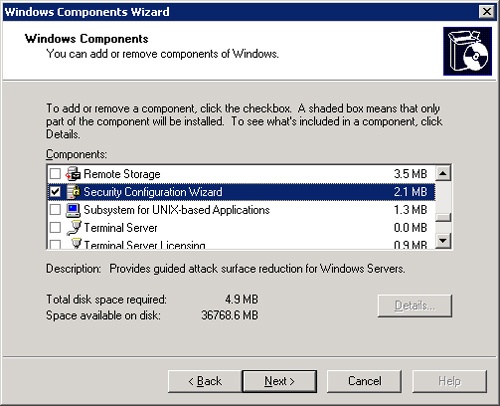
A security policy, in the most basic terms, is an XML file. The tool to perform operations on a security policy is the Security Configuration Wizard. The Security Configuration Wizard provides you with four options for dealing with security policies. You can create a new security policy, edit an existing policy, apply an existing policy, or roll back the last applied policy. (See Figure 22-2.) Let’s assume you are running the wizard for the first time; we need to create a new configuration by selecting the first option.
Note
Every role the security policy can address might not be installed on your server. Therefore, some options described in this section might not be available.
When you create a new configuration, the current server settings are used as a baseline for future edits. By default, the local server is selected as the current server. Select the server whose baseline settings you want to use and click Next. The wizard will detect your settings and use them as the baseline settings. Once the wizard completes this task, you can view the security configuration database. Click Next to continue to the next phase of the wizard, Role-Based Service Configuration. (Click Next to dismiss the initial window of this phase.)
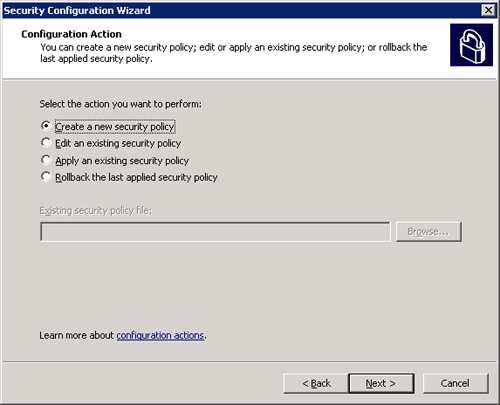
As you see in Figure 22-3, we have a single role for the current server. It’s a file server. Click Next to see the client features installed on the selected server. This might sound odd, but even your server can be a client to other servers, and this window displays the client features your server has installed. Clicking Next again to view the administration and other options that determine which services are enabled and which ports are open. Click Next once you have finished looking through these options.
The next step of the wizard allows you to specify what you want the server to do if it has a service enabled that is not listed in the configuration database. That is, if the server you’re exporting the Security Configuration Database to has services that aren’t available on the server with which you created the database, what should the new server do? You can either disable the service or leave the service as is.
The final step of the Role-Based Service Configuration portion of the wizard allows you to inspect the changes to the services that you’ve (indirectly) specified in the first steps of the wizard. Click Next to accept those service changes.
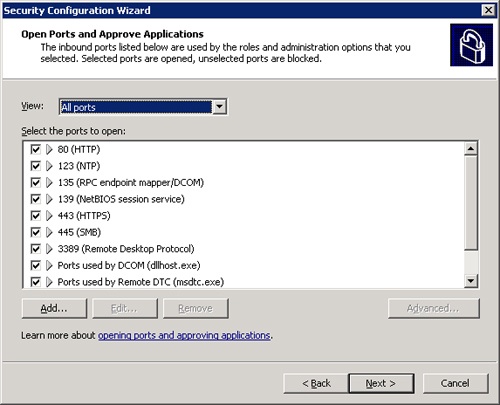
The next set of steps allows you to specify port options in Windows Firewall and specify encryption options for port traffic. Once you click Next to dismiss the introductory window, you will see the page that allows you to open ports and allow applications, as shown in Figure 22-4. You can deselect ports you want to close, though that may prevent your server from operating properly. You can also highlight a port and click the Advanced button to specify remote access and local interface restrictions for that port. Click Next once to view the port configuration resulting from the changes you made, and click next again to proceed to the next portion of the Security Configuration Wizard.
Note
Use netstat to determine port usage. Be careful when you are restricting ports; you can easily lock yourself out of the system!
The Registry Settings options allow you to require server message block (SMB) security signatures, require Lightweight Directory Access Protocol (LDAP) signing, select the outbound authentication methods, and select inbound authentication methods. Of course, you’ll have the obligatory summary at the end, so you can go back and make changes if necessary.
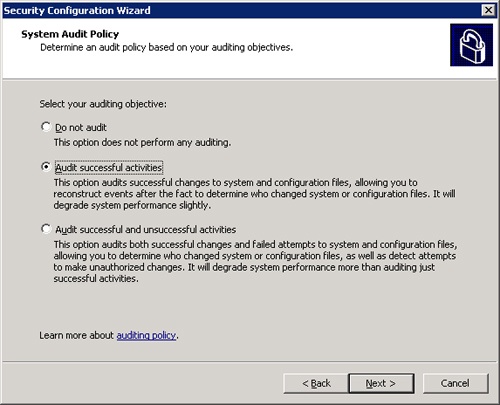
The fifth portion of the wizard specifies options for the system audit policy. As you can see in Figure 22-5, you can select the audit objective. You can audit nothing (not recommended), audit successful activities, or audit successful and unsuccessful activities. The summary is displayed when you have finished. Click Next to move to the sixth stage.
The Internet Information Services (IIS) options allow you to specify the security options with respect to your application server. You can select the Web service extensions the server requires, select the virtual directories to retain, and specify whether or not to deny anonymous write access to files on your Web site. (The last option is valid only if you are running IIS on an NTFS partition.) Click Next when you’ve selected your options, and click Next again to dismiss the IIS summary.
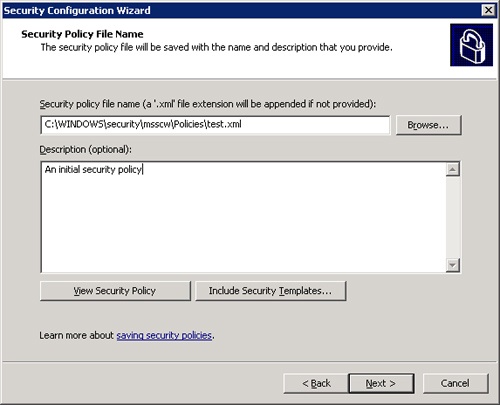
The final stage of the wizard allows you to save and apply the security policy you’ve developed in the preceding steps. As shown in Figure 22-6, you use options on this page to save the security policy and give it a meaningful description. You can also view the settings and include security templates at this point. After clicking Next, you will be prompted to apply the security settings now or later. Clicking Next finishes the wizard, with the policy written to a file and, if you opted to apply now, the security policy is applied to the system.
You can deploy the policy you’ve created in three ways. The first is the Security Configuration Wizard itself. The second is the command-line utility scwcmd.exe. The third mechanism available for deploying the policy is Group Policy.
The SCW is the best method to apply a security policy to a single server. On the Configuration Action window, click the Apply An Existing Security Policy button (see Figure 22-2) and follow the instructions. Next, specify the server to which you want to apply the policy and click Next twice. Once the application of your policy is complete, click Next and then click Finish to complete.
Scwcmd.exe allows you to easily configure multiple servers. Use the command scwcmd configure to view the available application parameters. To apply a security policy, use the command scwcmd configure /p:filename /i:machine, where filename is the file containing the security policy you want to apply and machine is the server you want to apply the policy to.
The scwcmd.exe command can also convert the XML-based security policy in to a Group Policy object (GPO). Use the command scwcmd transform /p:filename /g:gponame, where filename is the security policy file and gponame is the name of the GPO. The GPO is automatically created in Active Directory and it is applied when you link it to an organizational unit.
Microsoft Windows Server 2003, as you now know or are quickly learning, has a rich and diverse range of security features. With these features, however, comes a multitude of security policies and attribute settings that need to be configured. Configuring a system with policies consistent with your company’s security needs is, in itself, no small task. Multiply that by all the computers at your site or in your organization, and you have quite a chore. And that doesn’t include the maintenance time required whenever company policies need to be reevaluated.
Enter security templates. A security template, quite simply, is a configuration file for all the security attributes of a system. Security templates are powerful and help ease the strain of administration. Using a single interface, an administrator can generate a security template that reflects the security needs of a given server and then apply it to that server or import it into a Group Policy Object in the Active Directory service. When you incorporate the template into a Group Policy Object, all computers affected by that object receive the template settings.
Security templates can be created and modified with the Security Templates snap-in of the Microsoft Management Console (MMC). To add the snap-in to the MMC, do the following:
Run Mmc.exe from the Run dialog box, which you access from the Start menu.
From the File menu, choose Add/Remove Snap-in. Click Add on the Stand-Alone tab, and select Security Templates from the list of snap-ins provided.
Click Add in the Add Stand-Alone Snap-in dialog box to add the Security Templates entry to the Add/Remove Snap-in dialog box and then click Close.
Click OK in the Add/Remove Snap-in dialog box, and the Security Templates snap-in is added to Console Root in the console tree.
In the console tree, expand Security Templates and the SecurityTemplates folder to display an initial list of templates. These are predefined templates that can be tweaked for a company’s specific needs. When a new template is created or an existing one is copied, it’s added to this list. Select any one of these preloaded policies, and the right pane of the console displays all the security areas available for configuration. (See Figure 22-7.)
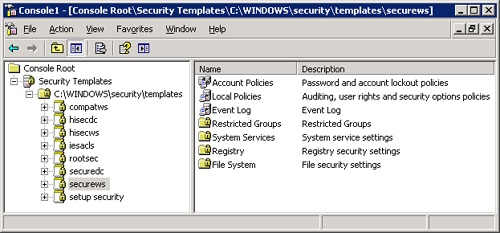
Essentially, each template in the list represents a single readable .INF file. The snap-in is merely an interface for modifying these security template files. The files can be found in the system root folder under %SystemRoot%SecurityTemplates. The following is a small excerpt from the securews template (Securews.inf), showing the Account Policies area:
[System Access]
;----------------------------------------------------------------
;Account Policies - Password Policy
;----------------------------------------------------------------
MinimumPasswordAge = 2
MaximumPasswordAge = 42
MinimumPasswordLength = 8
PasswordComplexity = 1
PasswordHistorySize = 24
RequireLogonToChangePassword = 0
ClearTextPassword = 0
LSAAnonymousNameLookup = 0
EnableGuestAccount = 0
Each template contains attribute settings for the seven areas of security configurable in Windows Server 2003. Double-click a security area in the right pane of the console or expand the console tree in the left pane to display the specific sections. Here are the seven configurable areas:
Account Policies. The Account Policies area includes policies pertaining to user accounts. It contains Password Policy, Account Lockout Policy, and Kerberos Policy.
Local Policies. The Local Policies area includes policies pertaining to who has local or network access to the computer and how events are audited. This area contains Audit Policy, User Rights Assignment, and Security Options.
Event Log. The Event Log area contains attributes that determine how the application, security, and system event logs behave. Log attributes include maximum size and access restriction. Event logs can be viewed in Event Viewer.
Restricted Groups. The Restricted Groups security setting is for adding members to built-in user groups, which have predefined capabilities, or to other administrator-defined groups that might be privileged. Built-in user groups include Administrators, Power Users, and Backup Operators.
System Services. The System Services area includes security attributes of all system services on the local computer. System services include file services, print services, network services, and telephone services.
Registry. The Registry area contains security attributes for existing registry keys, including auditing information and the access permissions.
File System. The File System area allows the configuration of access permissions and auditing of specific directories and files on the local system.
The predefined templates supplied by Windows Server 2003 can be used as is, or they can be customized to conform to a more rigorous security requirement. These templates span a range of security levels and represent typical security scenarios for the different types of computers found in a system—namely workstations, servers, and domain controllers. Table 22-2 shows some of the predefined security templates, categorized by security level.
Note
These predefined templates intentionally omit user rights assignments so as not to overwrite any assignments made by application setup programs. This omission means that these security templates can be applied to a machine to reset the security configuration of that system.
Table 22-2. Some predefined security templates
Security Level | Template Name | Description |
|---|---|---|
Secure | securews | Secure workstation or server template |
securedc | Secure domain controller template | |
Highly secure | hisecws | Highly secure workstation or server template |
hisecdc | Highly secure domain controller template | |
Compatible | compatws | Compatible workstation or server template |
Out of the box | setup security | Out-of-the-box default settings template |
If you’re familiar with Microsoft Windows 2000 Server, you’ll see that the basicws and basicdc security templates were removed to ensure that Windows Server 2003 is more secure. You must choose from more secure (and hence safer) security templates.
Two secure templates are provided: one for the domain controller, and a combined template for the workstation and server. With stricter password and lockout policies and with audit logs that restrict guest access, the secure templates provide a medium layer of security.
Unsuccessful logon events and privilege use, as well as successful and unsuccessful account management and policy changes, are configured for auditing. In addition, the secure domain controller template provides auditing for object and directory service access. Account and local policies also appear in the secure domain controller template. Because the permissions of files, folders, and registry keys are configured securely by default, these security areas are omitted in this template type.
Real World: Strengthening the Secure Template Without Going Too Far
The secure template is generally a good template to apply to workstations and servers. However, consider the following settings that can improve security without compromising functionality, as some of the high-security templates do. All the following settings are in the Local Policies–Security Options container except the first one, which is in the Local Policies–Audit Policies container:
Audit System Events. Success or Failure
Do Not Display Last User Name In Logon Screen. Enabled
LAN Manager Authentication Level. Send NTLMv2 response only or refuse LM and NTLM (This blocks MS-DOS, Microsoft 9.x, improperly-configured Windows NT 4.0, and OS/2 clients from logging on.)
Number Of Previous Logons To Cache. 0 logons (but don’t do this on laptops or your users will be unhappy)
Rename Administrator Account. Rename to something other than admin, root, or boss
Restrict CD-ROM Access To Locally Logged-On Users Only. Enabled
Unsigned Driver Installation Behavior. Do not allow installation
The highly secure templates are actually quite lean and concentrate on the security of communications in native-mode (Windows XP and Windows Server 2003) environments. In short, security attributes are set for digitally signing client-side and server-side communications and for signing and encrypting secure channel data. Because maximum protocol protection is set, however, systems to which these templates are applied will not be able to communicate with machines running Microsoft Windows 95, Microsoft Windows 98, or Microsoft Windows NT. Aside from there being no Authenticated Users in the Power Users restricted group in the highly secure workstation/server (hisecws) template, the highly secure workstation/server and domain controller templates are essentially the same.
The goal of the compatible security template is to allow most applications to run successfully, while not compromising the security levels of Power Users. The Compatible Security Template settings allow members of the local Users group to run only certified Windows applications, whereas only members of the Power Users group and above can run applications that are not certified. Therefore, if your users need to run uncertified applications, you must promote those users to at least Power User status.
Note
The net effect of promoting all Users to Power Users is lower system security. An alternative method that doesn’t compromise security is to make all users members of the Users group by default. Then adjust security settings to allow the execution of uncertified applications.
To facilitate flexible system usage for members of the Users group, a limited preset list of files, folders, and registry settings are modifiable under the Compatible Security Template.
The setup security template contains security settings appropriate for the installation and initial configuration of workstations and servers. The domain controller security template builds on the setup security template, adding default security settings for domain controllers.
You can use a predefined template as a starting point for your own security scheme. First make a copy of it by right-clicking the template name and choosing Save As. Next specify a filename with the .INF extension. You can modify the attributes in any of the security areas of your new template by fully expanding the template tree to that area. For attributes, right-click an attribute name and choose Security from the shortcut menu to open the Template Security Policy Setting dialog box. For the Restricted Group, Registry, and File System folders, right-click the folder and choose Add Group, Add Key, or Add File, respectively.
You can also choose to generate an entirely new security template. In the console tree of the Security Templates snap-in, right-click the parent default template folder (%SystemRoot%SecurityTemplates) and choose New Template. In the dialog box that appears, type a template name and a description of the template’s purpose. The new template is saved as an .INF file in the Templates folder and is added to the list of available templates.
At this point, the new template file is empty, except for some version and description info. Viewing any of the policy attributes in the new template lists attributes as Not Defined. The Restricted Groups, Registry, and File System folders contain no entries.
For each security area, you can configure any or all security attributes or you can choose to leave that area untouched. To modify an attribute’s settings, double-click the attribute in the right pane. The Template Security Policy Setting dialog box appears. Select the Define These Policy Settings In The Template check box to enable the settings and set the attribute. Figure 22-8 shows the dialog box for the Audit Account Logon Events attribute. Enabling this option allows you to track successful logon attempts, unsuccessful logon attempts, or both.

It’s just as easy to configure security areas that contain a list of items instead of individual attributes. Right-click Restricted Groups, Registry, or File System, and select Add Group, Add Key, or Add File, respectively. You can then browse for the object to add and choose access permissions, ownership, and auditing information in the Access Control dialog box.
After the security template is complete, save it by right-clicking the template name and choosing Save. It’s then ready to be applied to the local computer or to a Group Policy Object.
Planning
When creating new security templates for your system architecture, remember that security can be applied through the layering of templates. The configuration database allows templates to be imported one after another so that the security policies in the different templates have a masking effect. Conflicts of specific attributes are resolved by giving highest priority to the most recently loaded template. This means that templates with varying degrees of security do not need to contain redundant data. Instead, basic security attributes can be applied with a standard security template that you load first. Higher level security templates then need to contain only security differences between the two levels.
A security template containing system security settings can be either applied to a local computer or pushed to a group of computers by importing it into a Group Policy object. Applying the template to a local computer is done through the Security Configuration and Analysis snap-in or using the Security Configuration Wizard. See the Importing and Exporting Templates section later in this chapter for detailed instructions.
To import the security template into a Group Policy Object, take the following steps:
Security Configuration and Analysis is an MMC snap-in that allows an administrator to check the state of a system’s security against one or more security templates and make appropriate modifications. Useful as both a setup tool and a maintenance tool, the snap-in lets you import predefined or modified security templates, analyze every security area against templates with a single command, and view concise results. You can then synchronize system security to the template at once or resolve discrepancies on an attribute-by-attribute basis.
This tool, along with an appropriate security template, is invaluable for setting up the initial security configuration of a machine on which many security attributes—and also file, folder, and registry-key permissions—have to be defined. A company or division’s entire computer security policy can be translated into a single template and imported to quickly configure one or more machines. In addition, the snap-in is useful for maintaining the security level of a system. Invariably, in the course of resolving temporary network or administrative problems, security attributes become disabled and permissions of objects are set to full access. Periodically analyzing a system’s security against its defining template allows you to locate and easily fix security flaws.
Finally, the tool permits you to export security templates that were modified during the configuration of a machine or to reevaluate such templates in the Security Templates snap-in. If more than one template has been imported, you can save a single composite template that is the sum of all the template settings.
Like any other MMC snap-in, Security Configuration and Analysis is added to the MMC by choosing Add/Remove Snap-In from the Console menu. Click Add and select Security Configuration And Analysis from the list of snap-ins provided.
Security templates are imported into a database, which is used to perform the analysis and configuration. Security database files use an .SDB extension. To create a new database or open an existing one, do the following:
Right-click Security Configuration And Analysis, and choose Open Database.
In the Open Database dialog box, select an .SDB file to open or type a new filename to create a database.
When you type a new filename, a second dialog box appears allowing the import of a base security template.
Choose a predefined template or a template modified with the Security Templates snap-in.
The list of predefined templates is in the %SystemRoot%SecurityTemplates folder.
See the Using Predefined Templates section earlier in this chapter for an explanation of these security templates.
After you open a security database, you can import additional security templates into it. To do so, right-click Security Configuration And Analysis and choose Import Template. Select the .INF template file you want to import. This template supplements the current database template or templates; it does not replace them.
In the process of analyzing and configuring a system’s security with a database template, you might find it necessary to define a more precise policy and thereby modify the template. This modification is not saved to the original imported template; instead, it is saved as a database copy. To use the modified template on another machine, you need to export it. You can also combine multiple imported templates into a single composite template that you then export. To export a template, right-click Security Configuration And Analysis and choose Export Template. In the ensuing dialog box, choose a filename for the template, using the .INF extension.
After you import the necessary templates into the database, you can analyze the system. To analyze system security, right-click Security Configuration And Analysis and choose Analyze System Now. In the Perform Analysis dialog box, select the target path and filename of the analysis results. Click OK, and the Analyzing System Security progress window appears, as shown in Figure 22-9.
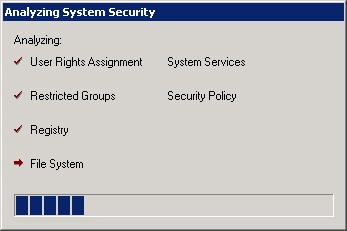
The analysis generates two types of results. First, the success and failure of each analyzed component is written to an error log. Second, the security areas listed under Security Configuration And Analysis in the console tree are populated. Each area gives the analysis results in an attribute-by-attribute comparison. When the analysis is complete, view the error log by right-clicking Security Configuration And Analysis and choosing View Log File. The log appears in the right pane with a date and timestamp; it reports on the completion of each analyzed area. The following code is a small excerpt from a typical log file:
Log file: C:My DocumentsSecurityLogsNewDB.log
-------------------------------------------
Monday, October 03, 2005 7:27:53 PM
----Analysis engine was initialized successfully.----

----Reading Configuration Info...

----Analyze User Rights...
Analyze SeNetworkLogonRight.
Mismatch - SeNetworkLogonRight..

...

Registry values analysis completed successfully.

----Analyze available attachment engines...

Attachment engines analysis completed successfully.

----Un-initialize analysis engine...
This log file does not show discrepancies in individual attributes but rather integral errors in the analysis. To view the actual analysis results, expand Security Configuration And Analysis in the console tree. The familiar seven areas of system security appear: Account Policies, Local Policies, Event Log, Restricted Groups, System Services, Registry, and File System.
To view analysis results for any of these areas, expand the area and highlight a subcategory. Restricted Groups and System Services are not hierarchical and need only to be highlighted. Figure 22-10 shows sample results for Security Options under Local Policies.
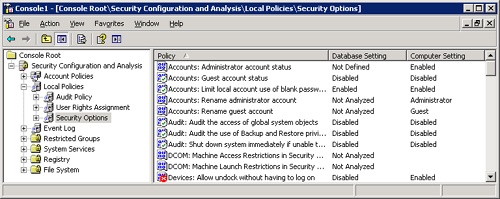
In the right pane of the console, each attribute is followed by two settings: the stored template (database) setting, and the analyzed system (computer) setting. The icon for the attribute in which settings agree contains a green check mark. If the database and computer settings differ, a red "X" punctuates the attribute icon. Attributes that are not configured in the template are not analyzed, and no marking appears in the icon.
After you successfully analyze the system and find discrepancies between database and computer settings, you have a few alternatives. Depending on your evaluation of the results, you might decide that the current security template is not appropriate for this computer. A more stringent or relaxed template might be required, or perhaps vital attributes were left unconfigured and additional security areas need to be addressed. The solution is to import a template that is better suited to your particular security requirements. Templates can be added in increasing order of importance. New templates that are merged into the database override any conflicting attributes or permissions.
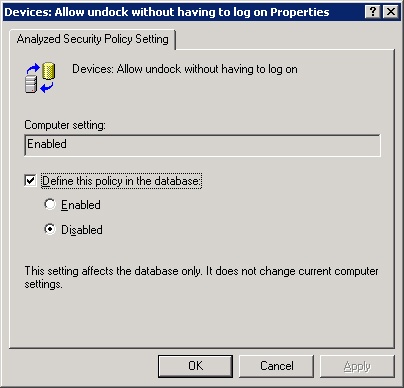
On the other hand, you might decide that the correct template was indeed used but that the specific setting used in the template was incorrect. In this case, you want to change the database template so that further analysis doesn’t show any discrepancies. To do so, right-click the offending attribute and choose Security to display a dialog box in which you can change the database template. For example, right-clicking the attribute that shows a conflict in Figure 22-10 displays the dialog box shown in Figure 22-11. You can change the template setting to match the computer setting, or you can deselect the Define This Policy In The Database check box to specify that the setting should no longer be considered during analysis.
Finally, you might determine that the security template is correct and that the system is in violation of your security policy and needs to be aligned. After you weed out all the template mismatches and only valid discrepancies remain, configure the system by right-clicking Security Configuration And Analysis and choosing Configure Computer Now.
Windows Firewall protects your system from unsolicited inbound connection attempts. It blocks traffic on unused ports to prevent what’s called an "unsolicited request" from an outside source. Windows Firewall is disabled by default for Windows Server 2003.
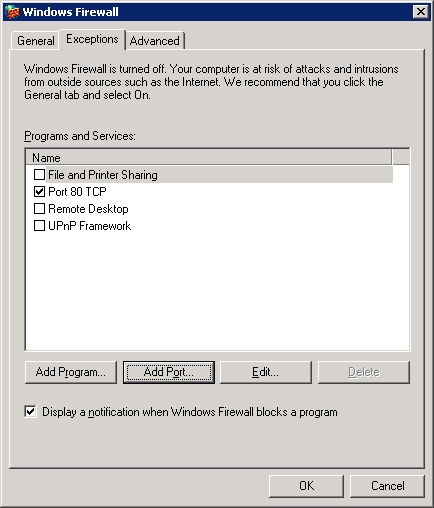
Access the Windows Firewall configuration utility from Control Panel. The utility has three tabs: General, Exceptions, and Advanced. The options on the General tab allow you to turn off the firewall completely (which is not recommended unless you’re using another host-based firewall to protect your system) or to disallow exceptions, in which case the Windows Firewall will prevent all incoming activity on any port and, though you won’t be notified by Windows Firewall, discarded traffic is logged. The latter option is useful if your server has been compromised and you are in a discovery and recovery mode. (See the section What to Do When Hacked later in this chapter for more information.)
Exceptions are ports or programs you want to leave open for particular programs or protocols that require certain open ports and would not work properly if those ports are blocked. You can specify a port be open—that is, create an exception for your firewall rules—on the Exceptions tab. For example, a Web browser usually accesses content from a server on port 80. (See Chapter 32 and Chapter 33.) Clearly, if your server is an Application Server for your organization or the Web itself, you probably want to leave TCP port 80 open so that the requests will get through. It just so happens that the server whose exception tab is displayed in Figure 22-12 has an exception for TCP traffic through port 80 and therefore accepts incoming request traffic over that port.
The Advanced tab allows the administrator to specify which connections are protected by the Windows Firewall. You can also create a log file, which is a useful record of attack attempts on your server, or configure ICMP settings. Finally, you can restore all the Windows Firewall options to a default state by clicking the Restore Defaults button.
You can configure Windows Firewall by using Group Policy. Open the GPO, expand Computer Configuration, Administrative Templates, Network, Network Connections, and then Windows Firewall.
Note
There is more in-depth information about Windows Firewall on Microsoft’s TechNet site at http://www.microsoft.com/technet/prodtechnol/windowsserver2003/techref/wf.mspx.
Among its many other tasks, the domain controller authenticates users to a network, using security policies and user authentication information stored in Active Directory. During an interactive logon event, a user logs on to a domain account with a password or smart card. The domain controller confirms the user’s identity with the information stored in Active Directory. After an interactive logon event to a domain controller has taken place, network authentication is performed for the user without any further effort on the user’s part. The user can access resources on the network without having to reenter a password or smart card personal identification number (PIN). An interactive logon event can also authenticate a user to a local computer rather than a domain account. With a local interactive logon event, network authentication requires the reentry of a password any time the user needs to access a network resource.
The Kerberos version 5 authentication protocol is used for an interactive logon event and is also the default protocol for network authentication. Each domain controller includes Kerberos version 5. Both the key distribution center and the ticket-granting service are components of Kerberos and become integral parts of the domain controller. The key distribution center runs as part of Active Directory, which stores passwords and user account information for authentication. A Kerberos client is installed on all Microsoft Windows XP Professional and Windows Server 2003 machines. See Chapter 21 for more information about Kerberos authentication.
Remote access clients, in addition to logging on to the network, must be authenticated by the remote access server before they can access the network. Smart cards and certificates, as well as password-based protocols, are used for dial-up networking. The next section explains how to obtain and use cryptographic tokens for network authentication, as well as how to configure remote clients and servers.
Smart cards combine the security of public-key cryptography with the portability of passwords. Before a smart card can be used for authentication, a logon certificate needs to be programmed onto the card. The administrator can accomplish this by using the Smart Card Enrollment station, which is integrated with Microsoft Certificate Services in Windows Server 2003.
More Info
Visit the Microsoft Windows Server 2003 PKI site for more advanced information (http://www.microsoft.com/windowsserver2003/technologies/pki/default.mspx).
To request smart card certificates from a certificate authority (CA), the administrator needs a special certificate to sign the request. This certificate, known as an Enrollment Agent certificate, must be requested by a logged-on domain administrator from the dedicated machine that will be used to program smart cards. An enrollment agent certificate is a software-based certificate and private key that can be requested through the Certificates MMC snap-in. (See the Requesting Certificates section later in this chapter.) Be sure to use the enrollment agent certificate template as the basis for your certificate. Only this template produces certificates that allow the administrator to make smart card certificate requests.
After the administrator installs a smart card reader on a system and obtains the enrollment agent certificate, the system is ready to program smart cards. Smart card installation adds a cryptographic service provider (CSP) to the system that is to be selected during the smart card programming process. (See Chapter 21 for more information.)
The Web-based request process first generates a public/private-key pair on your smart card. Using the public key and the user’s name, the CA issues and signs a certificate. Finally the certificate is added to the smart card. To program a smart card, follow these steps:
Log on as the enrollment agent.
Open Microsoft Internet Explorer, and specify the URL of the server that houses the certification authority. This URL ends with /Certsrv.
Select Request A Certificate and then click Advanced Certificate Request.
Click Request A Certificate For A Smart Card User Using The Smart Card Certificate Enrollment Station. Click Yes if prompted to accept the certificate.
The Smart Card Enrollment Station Web page appears. Set the fields to the values shown in Table 22-3.
Table 22-3. Values for fields on the Smart Card Enrollment Station Web page
Field
Value
Certification Template
Smart Card Logon (if you want to use the smart card for logging on to Windows only)
Smart Card User (if you want to use the smart card for e-mail as well as logging on to Windows)
Certificate Authority
CA to issue certificate
Cryptographic Service Provider
The smart card manufacturer’s CSP
Administrator Signing Certificate
The enrollment agent certificate (discussed in the previous section)
In User To Enroll, click the Select User option, and then choose the user account. Finally, click Enroll.
Click Submit Certificate Request.
Insert the smart card when prompted, and then click OK. Type the PIN when the system prompts you. If the smart card has already been programmed, you are prompted to verify that you want to reprogram it.
You can now view the certificate or make a new smart card certificate request.
Authentication can also be accomplished with private keys and certificates residing on a local computer. See the Requesting Certificates section later in this chapter for information about how to obtain a certificate through the Certificates snap-in.
After a smart card reader is installed on the target system and the user obtains a properly programmed smart card from the administrator, the user can use the smart card to log on to the computer. To do so, the user inserts the smart card into the reader and types a PIN when prompted to do so. This process takes the place of pressing Ctrl+Alt+Del and typing a user name and password.
Important
To keep thieves from accessing the system by using a stolen card, the system tracks incorrect logon attempts. After a number of consecutive failures, the card is locked out of the system. The number of allowed failures varies with the hardware; the smart card manufacturer specifies the number of failures, so you have to read the smart card documentation for the specifics.
As was mentioned earlier, a user’s public-key certificate, used for authentication, can be either programmed onto a smart card or stored locally on the computer. Follow the steps in the next two sections to enable dial-in authentication for each scenario.
To enable authentication with a certificate that resides on a smart card, follow these steps:
From the Start menu on the remote machine, open Control Panel and double-click Network Connections.
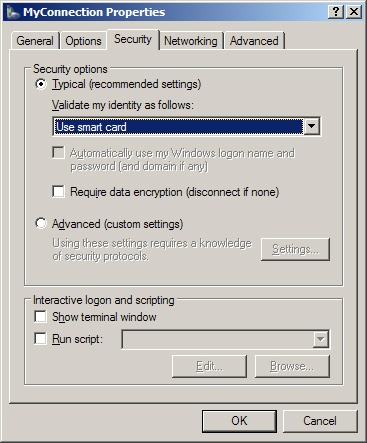
Right-click the network or dial-up connection for which you want to enable authentication, and choose Properties. In the Properties window for the connection, click the Security tab (shown in Figure 22-13).
Ensure that Typical is selected and that the Validate My Identity As Follows list is set to Use Smart Card, as shown in Figure 22-13. The Require Data Encryption check box can be selected for additional security.
To enable authentication with a certificate that is stored on a local computer, follow these steps:
From the Start menu on the remote machine, open Control Panel and double-click Network Connections.
Right-click the network or dial-up connection for which you want to enable authentication, and choose Properties. In the Properties window for the connection, click the Security tab (shown in Figure 22-13).
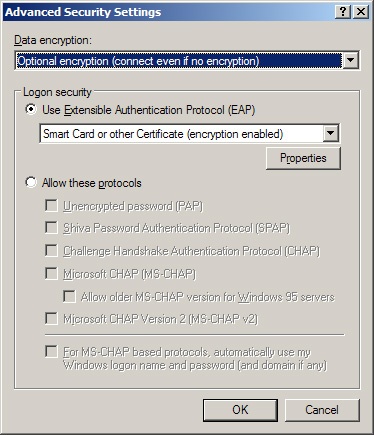
Click the Advanced (Custom Settings) button in the connection’s Properties window, and click the Settings button. In the Advanced Security Settings dialog box, shown in Figure 22-14, select Use Extensible Authentication Protocol (EAP) and make sure the list box shows Smart Card Or Other Certificate (Encryption Enabled).
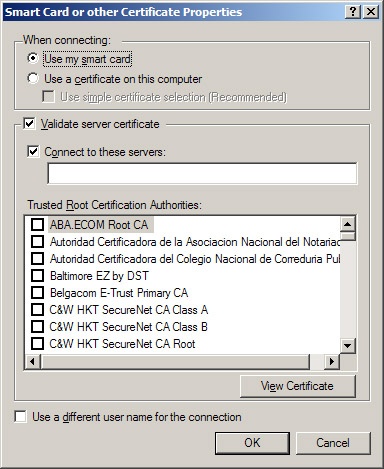
Click Properties to display the Smart Card Or Other Certificate Properties dialog box, as shown in Figure 22-15. To configure authentication for certificates residing in the local certificate store, select Use A Certificate On This Computer.
Note
The Advanced Security Settings dialog box is also used to set alternate password authentication protocols for a connection. These protocols, listed under Allow These Protocols, range from the unencrypted Password Authentication Protocol (PAP) to version 2 of the Microsoft Challenge Handshake Authentication Protocol (MS-CHAP v2). One or more of these allowable protocols can be selected.
Two other certificate-specific options appear in this window. First you can restrict connections to specific servers. To do this, select the Validate Server Certificate option and activate one or both of the validation methods:
Connect Only If Server Name Ends With. This option requires servers to be in a certain domain. For instance, type netsolvers.com in this box to connect only to servers in the Netsolver domain.
Trusted Root Certificate Authority. This option lets you choose which certificate hierarchy the server belongs to. See the Importing Certificates section later in this chapter for information about how to add a certificate as a root CA.
The second option, Use A Different User Name For The Connection, keeps the authentication process from automatically using the certificate subject as the user name. This allows you to specify an alternate name.
Click OK to accept your changes and close the window.
In addition to configuring the remote access client, you also need to set up the remote access server to allow smart card–based and certificate-based logon events. Follow these steps to do so:
Choose Routing And Remote Access from the Administrative Tools folder on the Programs menu.
Right-click the name of the remote access server, and choose Properties. On the Security tab, click Authentication Methods, ensure that the Extensible Authentication Protocol (EAP) check box is selected, and then click OK twice.
Back in the Routing And Remote Access dialog box, expand the remote access server and click Remote Access Policies. Right-click the policy that is to be used when the smart card clients log on, and choose Properties. Click Edit Profile, and in the Edit Dial-In Profile dialog box, click the Authentication tab. Click EAP Methods. If the Smart Card Or Other Certificate EAP type is not listed, click Add, click Smart Card Or Other Certificate, and then click OK. Click Edit to view the properties of the Smart Card Or Other Certificate EAP type and verify that the correct computer certificate is selected.
Note
If your remote access server is configured for RADIUS authentication, you can view and alter the security settings by right-clicking the server’s node, choosing Properties, and then selecting the Security tab on the Properties screen that appears.
Note
If clicking Configure returns an error stating that no certificate could be found, a machine certificate needs to be installed. You can do this by ensuring that your enterprise CA is configured for computer certificate autoenrollment, which automatically allocates computer certificates for members of the domain. With this configured, run gpupdate from a command prompt on your remote access server to obtain a computer certificate.
In the real world, authorization is dictated by policy. When it comes to using resources, reading documents, or accessing rooms, different people have different access rights. The implementation of this policy can be locked safes or badge-access rooms. In the Windows Server 2003 environment, authorization is also based on policy. Different people or groups of people have different access rights. Policy here is implemented through access control. Quite simply, access control determines which users can access which resources. Resources in Windows Server 2003 are described in the following list:
Files and folders, which can be accessed through Windows Explorer
Shared volumes, folders, and files
Active Directory objects, which are managed with the Active Directory Users and Computers snap-in
Registry keys, which are managed with the Registry Editor
Services, which are managed with the Security Configuration Tool Set
Printers, which are configured through Settings on the Start menu
Each resource has a security descriptor associated with it that defines the object’s owner, the object’s access permissions, and the object’s auditing information. Auditing of the object is discussed in the Auditing section later in this chapter.
For Active Directory objects, administrative responsibility can be delegated to group administrators. Delegating allows object permissions to be managed in one organizational unit of the domain, without requiring multiple administrators for the entire domain. For more information, see Chapter 9.
The owner of an object controls who can access the object by setting object permissions. By default, the object’s owner is its creator. Typically, administrators create most network objects and are responsible for setting the object permissions.
One of the standard permissions associated with all objects is the Take Ownership permission. By granting this permission, the owner allows a user (or member of a group) to assume ownership of the object. Taking ownership can be done through the tool that manages the specific type of object. For example, printers are managed through the interface found under Settings on the Start menu. The Security tab on the Properties window for the printer shows the groups and users for which permissions are set. Clicking Advanced opens the Advanced Security Settings dialog box. With the correct permissions, ownership can be modified on the Owner tab. Administrators can assume control of any object under their administrative jurisdiction, regardless of the setting of the Take Ownership permission for the object.
Object permissions are broken down into specific actions that can be performed on that particular object. For registry keys, this includes the ability to create subkeys and set values. For Active Directory objects, permissions include the ability to create and delete children.
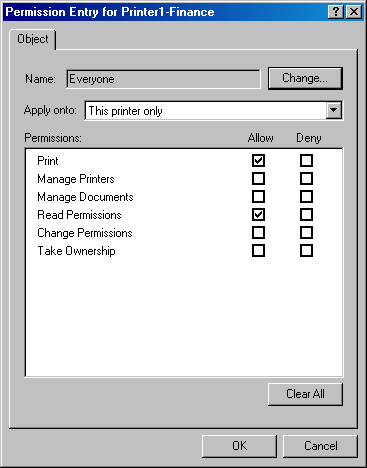
Permissions are set for the specific users or groups who perform actions on a particular object. For a given folder, one group might be granted permissions to create and delete files within that folder. Another group might be allowed only to list the folder’s contents. Figure 22-16 shows printer permissions granted to the Everyone group.
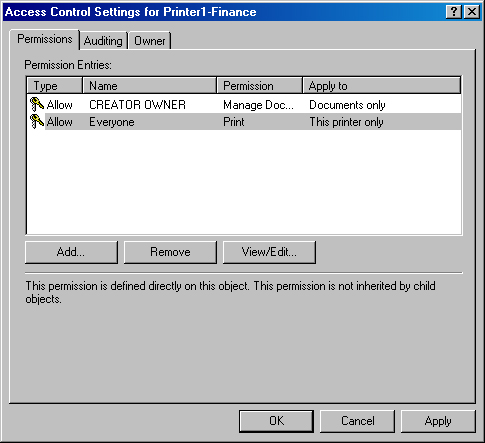
To display permissions for a user or group, choose an entry in the Advanced Security Settings dialog box, and click Edit. The owner of the object, or a user or group granted Change Permissions permission, can use this dialog box to modify permissions for the user or group. To add a user or group to the access control list (shown in Figure 22-17), click Add and select the user or group to add. Remember to set the appropriate permissions.
Note
You can ease the burden of administering a domain of user rights and permissions by following a few guidelines. First, delegate administration to local authorities whenever closer management of users and services makes sense. Second, assign permissions on a group basis, rather than on a user basis. Third, set permissions at common node points in Active Directory and let them propagate down the tree to lower nodes.
Public-key certificates serve as the security medium for many of the Windows Server 2003 protocols and mechanisms. Network authentication, IPSec, Encrypting File System (EFS), Secure Sockets Layer (SSL), and Secure Multipurpose Internet Mail Extensions (S/MIME) all use certificates. The MMC provides the Certificates snap-in for the single purpose of managing user, computer, and service certificates.
To add the Certificates snap-in to the MMC, run Mmc.exe from the Start menu. From the File menu, select Add/Remove Snap-In. Click Add and select Certificates from the list of snap-ins provided. You’re given a choice of which account to manage certificates for: My User Account, Service Account, or Computer Account. For the service and computer accounts, you can select which computer the snap-in will manage. For the service account, you also need to specify which service to manage.
Note
Each account with user-level permissions can administer his or her personal certificate. To administer the certificates for the local computer account or computer service, local administrator permissions are required.
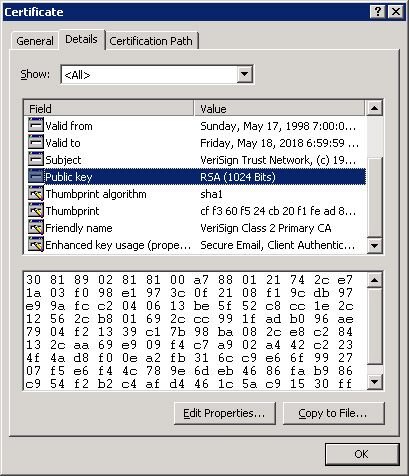
The certificate store is made up of five categories: Personal, Trusted Root Certification Authorities, Enterprise Trust, Intermediate Certification Authorities, and Active Directory User Object. Other categories may also be available based on your server configuration. Trusted Root and Intermediate CA certificates are preloaded. To view the details of any certificate, double-click the certificate. Figure 22-18 shows the public key of a VeriSign root certificate.
The Export command in the Certificates snap-in provides two distinct functions. First, it allows a certificate or certificate chain to be exported for the purpose of sharing it with users or computers that are not privy to a certificate directory. Second, it allows the export of a certificate or certificate chain along with the associated private key for cryptographic use on another machine.
Note
By default, only private keys for basic EFS and EFS recovery agents are marked as available for export. This keeps all other private keys from being unnecessarily exposed. Certificates and keys that are purposely meant to be exported can be marked during certificate request.
You can export any type of certificate, including those in root CAs. Naturally, only certificates with available private keys (that is, personal certificates) that are marked as exported can be exported together. To export a certificate, follow these steps:
Find the certificate in the Certificates snap-in, and right-click the entry.
Point to All Tasks, and choose Export. You’re welcomed to the Certificate Export Wizard.
Make your way through the wizard, choosing whether to export the private key (if available).
Choose the format for storing the certificate. DER Encoded Binary and Base 64 Encoded are single-certificate formats. With the PKCS #7 format, you can include the full certificate chain. Private-key combinations are stored in a PKCS #12 file and are password protected; you need to specify a password for the file.
Type a target path and filename for the exported certificate.
Note
With a highly populated certificate database, finding a particular certificate for exporting or enabling might be difficult. Use the Find Certificate command, found by right-clicking the Certificates snap-in, to locate certificates by issuer (Issued By), subject (Issued To), fingerprint (SHA1 Hash or MD5 Hash), or serial number.
Users can import certificates into any one of the certificate categories found in the certificate store. In the Certificates snap-in, right-click the certificate category to which you want to import the certificate, point to All Tasks, and choose Import. Type the certificate filename, which should have a standard certificate format extension (.PFX, .P12, .CER, .CRT, .P7B, .STL, .SPC, .CRL, or .SST). For PKCS #12 files, which contain private keys as well as certificates, type the password used to protect the file.
Before using any application that relies on the public-key infrastructure, you need a certificate. Chapter 24 covers how to configure and install Microsoft Certificate Services. Certificate servers configured to be enterprise CAs in Active Directory environments can request certificates by using the Certificates snap-in.
Note
Using Internet Explorer, you can request certificates from Microsoft Certificate Services, running in either Standalone or Enterprise mode, through the Web interface.
The certificate request process involves first generating a key pair consisting of a public key and a private key. The private key is stored and protected on the local computer. The public key, along with information identifying the user, is sent to the CA as a certificate request. If the CA determines that the user, device, or service is authorized for the certificate being requested, the CA generates and signs the certificate. The certificate can then be retrieved with the Certificates snap-in and placed in the local certificate store.
To request a certificate from an enterprise CA, open a MMC console with the Certificates snap-in installed and right-click the Certificates folder under the Personal certificate store. Point to All Tasks, choose Request New Certificate, and follow the instructions in the Certificate Request Wizard. You need to choose a certificate type (the purpose for which the certificate is to be used), a friendly name for the certificate, and the CA that is to issue the certificate, if more than one is available. To allow you to download the certificate after the CA issues it, the Certificate Request Wizard provides the Install Certificate option.
Certificates can be issued for specific types of uses. These uses are programmed directly into the certificate, using a certificate extension field. For example, the Key Usage certificate extension tells whether a certificate can be used for data signing, certificate signing, nonrepudiation, or other functions. The Enhanced Key Usage extension extends this property to other uses, such as time stamping or file recovery.
Certificates can also be enabled for certain purposes on an account basis. That is, a user or administrator can decide which certificates to allow or disallow for specific uses. Although the actual certificate can’t be modified, the attributes in the certificate store can be configured. For example, a certain certificate might have no internal key usage restriction. However, a user might want to enable that certificate only for code signing and secure e-mail.
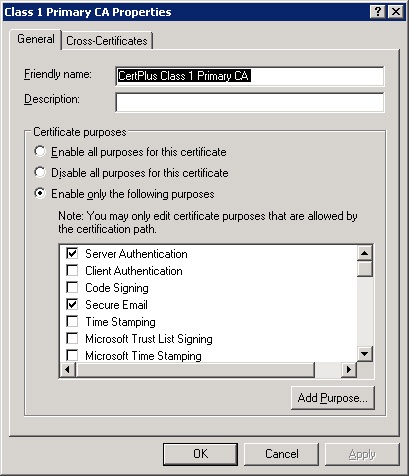
To set certificate purposes, right-click the certificate and choose Properties. The three choices for enabling certificate purposes, as shown in Figure 22-19, are Enable All Purposes For This Certificate, Disable All Purposes For This Certificate, and Enable Only The Following Purposes. Choose the third option, and select the purposes you want that certificate used for. Remember that only purposes allowed by the actual certificate or certificate path appear in the list.
IPSec provides end-to-end security for network communications—in the form of confidentiality, integrity, and authentication—using public-key technology to protect individual IP packets. Chapter 21 provides a description of this protocol. This section covers the MMC snap-in for IPSec configuration, IP Security Policy Management.
To add the IP Security Policy Management snap-in to the MMC, select Add/Remove Snap-In from the Console menu. Click Add, and select IP Security Policy Management from the list of available snap-ins. The dialog box that appears allows you to select the range of management: the local computer, the local computer’s domain, another domain, or another computer.
An IPSec policy is passed from the policy agent to the IPSec driver and defines proper procedures for all facets of the protocol, from when and how to secure data to what security methods to use. Before jumping into the actual configuration, let’s go over some terminology by defining the components of an IPSec policy:
IP filter. A subset of network traffic based on IP address, port, and transport protocol. It tells the IPSec driver what outbound and inbound traffic should be secured.
IP filter list. The concatenation of one or more IP filters, defining a range of network traffic.
Filter action. What the IPSec driver should do with network traffic.
Authentication method. How identities are verified for the pair of computers to which an IPSec rule applies.
Security method. Security algorithms used for data confidentiality, data integrity, authentication. and key exchange.
Tunnel setting. The IP address or DNS name of the tunnel endpoint (if using IPSec tunneling to protect the packet destination).
Connection type. The type of connection affected by the IPSec policy: remote access, LAN, or all network connections.
Rule. A composite of the components: an IP filter list, a filter action, one or more authentication methods, a tunnel setting, and a connection type. An IPSec policy can have multiple rules to manage each subset of network traffic differently.
Three basic predefined policies are available for immediate use or as a starting point for more involved IPSec policies. Figure 22-20 shows the predefined policies.
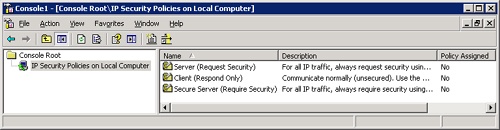
Use the Client (Respond Only) policy on computers that normally do not send secured data. This policy does not initiate secure communications. If security is requested by a server, the client responds, securing only the requested protocol and port traffic with that server.
The Server (Request Security) policy can be used on any computer—client or server—that needs to initiate secure communications. Unlike the Client policy, the Server policy attempts to protect all outbound transmissions. Unsecured inbound transmissions are accepted but not resolved until IPSec requests security from the sender for all subsequent transmissions.
The strictest of the predefined policies, the Secure Server (Require Security) policy neither sends nor accepts unsecured transmissions. Clients attempting to communicate with a secure server must use at least the Server predefined policy or an equivalent because after this policy is enabled, the server will only accept inbound IPSec-enabled TCP/IP sessions that have been authenticated with Kerberos.
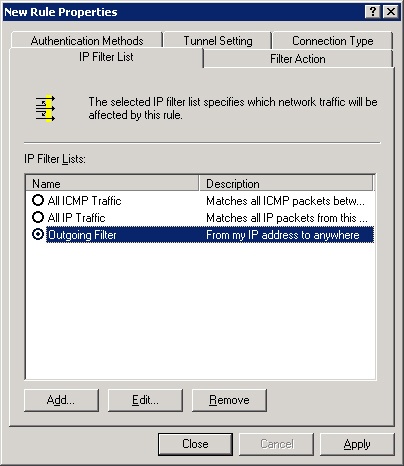
The section that follows demonstrates how to generate an IPSec policy from scratch. Let’s first peruse one of the predefined policies. Notice the Secure Server policy in Figure 22-20. Right-clicking this policy and choosing Properties brings up the Secure Server (Require Security) Properties window, with the Rules tab in the foreground, as shown in Figure 22-21.
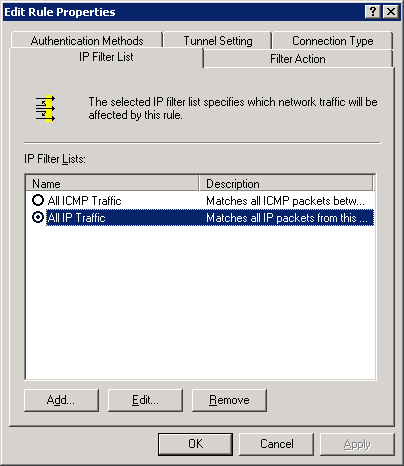
This policy has three rules, all activated, as indicated by the check marks. The first rule has an IP filter of All IP Traffic, a filter action of Require Security, an authentication method of Kerberos, a tunnel setting of None, and a connection type of All. A rule can be added or removed from this list with the appropriate buttons. Clicking Edit brings up an Edit Rule Properties dialog box with five tabs, one for configuring each field of the rule. (See Figure 22-22.)
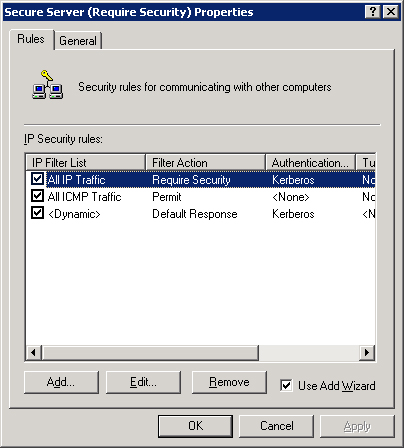
These configurations are explored in the next section. Back in the Secure Server (Require Security) Properties window (Figure 22-21), you can view the general properties of the policy—including a policy description and minute intervals at which to check for policy change—by clicking the General tab.
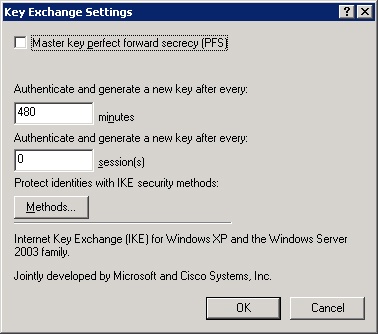
Clicking Settings on the General tab displays a Key Exchange Settings dialog box, shown in Figure 22-23. This dialog box allows you to specify the life of a key in minutes or sessions. Using a short key lifetime makes transmission more secure by increasing the number of keys that an attacker has to break, but it adds overhead to transmission time. Selecting the Master Key Perfect Forward Secrecy check box ensures that existing keys cannot be reused to generate additional keys. Use this option with caution because it adds significant overhead. Clicking Methods allows you to select security methods and preference order. A security method includes an encryption and integrity algorithm, along with a Diffie-Hellman group, which affects key generation.
Note
For more information about IPSec, visit http://www.microsoft.com/windowsserver2003/technologies/networking/ipsec/default.mspx.
In addition to using a predefined IPSec policy as a template, an administrator can generate policies from the ground up with the IP Security Policies item in the MMC. A custom policy can be restrictive or permissive, simple or powerful, depending on the function of the machine, the environment in which it operates, and the types of systems with which it communicates.
To add an IPSec policy, right-click the IP Security Policies item in the MMC and select Create IP Security Policy. You’re presented with the IP Security Policy Wizard. The following steps guide you through this wizard:
Click Next at the Welcome page.
Type a meaningful policy name and description, and click Next.
Select or clear the Activate The Default Response Rule check box, based on whether the policy should allow negotiation with computers that request IPSec. Clearing this check box adds an inactivated response rule to the policy. Click Next.
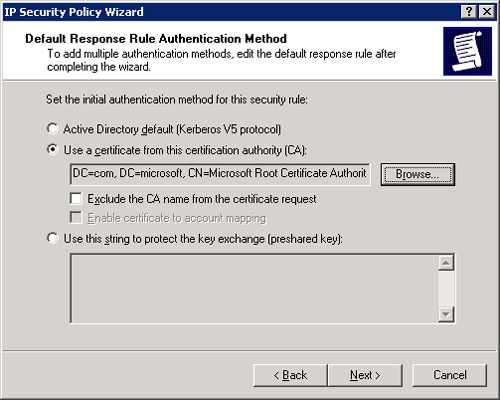
If you selected the Activate The Default Response Rule check box in the previous step, you see the dialog box shown in shown in Figure 22-24, in which you choose the authentication method. Kerberos version 5 is the Active Directory default protocol but is allowed only on machines that are members of an Active Directory domain. The second choice, Use A Certificate From This Certificate Authority (CA), promotes public-key authentication. You need to choose a CA that is appropriate for the certificate to be used. The third and final option allows you to type a preshared key that will be used for key exchange. This string must also be known by the requesting computer for successful exchange. Click Next when you make your choice.
Select the Edit Properties check box if you want to display the policy’s Properties window. You can also display this window by right-clicking the policy after it’s listed and choosing Properties.
The previous section showed how to create an IPSec policy, but to add functionality to your policy, you need to edit it. (To do so, right-click the policy and choose Properties.) Figure 22-21 shows the Properties window for an IPSec policy. A newly created policy contains only one default response rule, which is activated—or not activated—depending on the choices you made in the wizard during policy creation.
You add functionality to an IPSec policy by creating rules that govern when and how security is to be applied based on the type of TCP/IP traffic being sent/received on the system. Each combination of a filter list, filter action, authentication method, tunnel setting, and connection type is a separate rule.
Rules can be added manually or with the Add Wizard; both accomplish the same thing, but the wizard is a bit friendlier. Turn off the Add Wizard by clearing the Use Add Wizard check box in the lower right corner of the Properties window for the policy. Doing so allows you to explore each aspect of a rule in its native dialog box. Editing rules after they’re created is done through this interface as well.
With the Add Wizard turned off, click Add. You’re presented with the New Rule Properties dialog box, which, except for the title, is the same as the Edit Rule Properties dialog box shown in Figure 22-22. The dialog box has five tabs, one for each element of a rule. Here’s a look at each of the tabs in turn.
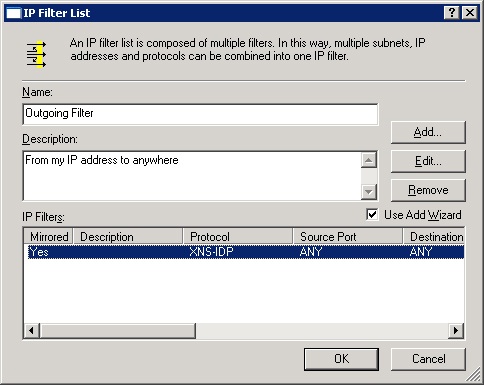
The IP filter list is made up of one or more filters that specify which network traffic to act on. As shown in Figure 22-25, the All IP Traffic and the All ICMP Traffic filter lists are added by default but are not activated. In the figure, a third filter list has been added and activated by clicking its option button.
Clicking Add brings up the IP Filter List dialog box, which allows you to specify filters to include in a customized filter list. Figure 22-26 shows a filter list under construction.
Here, if you click Add with the Use Add Wizard option selected, the IP Filter Wizard starts, which allows you to construct a new filter based on the following categories:
Addressing. Filters the source and destination addresses specified by IP address (My IP Address, Any IP Address, Specific IP Address, Specific IP Subnet, DNS Servers, WINS Servers, DHCP server, or Default Gateway) or a specific DNS name
Protocol. Filters by protocol type, such as TCP, and source and destination ports
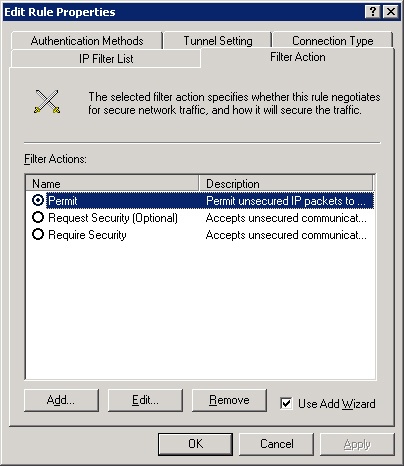
The filter action determines how the IPSec driver responds to types of traffic represented by entries in the filter list and what security methods to use. You can choose one of the supplied actions shown in Figure 22-27 by selecting it, or you can add your own action.
The Request Security action causes the driver to attempt to establish secure communications with the client, but if this is unsuccessful it communicates without security. The Require Security action requires clients to establish trust and security methods. The Permit action allows unsecured IP packets to pass through. The Block action does exactly that: it causes the driver to block packets.
Adding an action involves choosing a filter name, a description, and general behavior that permits communications, blocks communications, or negotiates security. If you choose to negotiate security, you need to configure two other areas.
In the Communicating With Computers That Do Not Support IPSec step of the Add Filter Action Wizard, you must choose either to disallow communications with those computers or to allow unsecured communication.
In the IP Traffic Security step of the Add Filter Action Wizard, you must select a Security Method: Integrity and Encryption, Integrity Only, or Custom. For the custom security method, you choose encryption and integrity algorithms and specify session key settings such as how often to generate new keys.
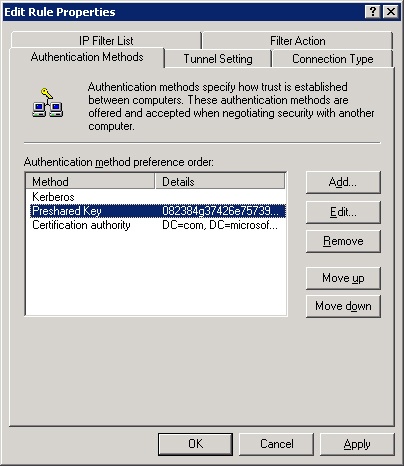
The authentication method specifies how trust is to be established with the remote computer. You can specify one or more methods to use when requesting secure communications or when being requested for secure communications. Figure 22-28 shows three allowable authentication methods, listed in order of preference. Change the priority of a method with the Move Up and Move Down buttons. The Add button provides you with the following three choices for a new method:
Windows 2000 Default (Kerberos V5 Protocol). This option uses Kerberos V5, which enables interoperability with Windows 2000 machines in their default configuration.
Use A Certificate. This option uses public-key certificates for authentication. You need to specify the CA of users or entities to authenticate. To allow authentication for users under separate CAs, add a separate authentication method for each.
Use This String To Protect The Key Exchange. This option uses a preshared key that you specify in the box provided. You can use multiple preshared keys by adding additional authentication methods.
The Tunnel Setting tab allows you to specify a tunneling endpoint if you choose to invoke IPSec tunneling. The endpoint can be specified as a DNS name if you’re running DNS service on your network, or it can be in the form of an IP address.
After an IPSec policy is established in the IP Security Policies item in the MMC, it can be applied to a single machine or to a set of computers governed by a Group Policy Object. To assign an IPSec policy to a local machine, right-click the policy name and choose Assign. The active policy’s icon includes a green dot. If another policy has already been assigned, this action resets that policy for this computer. Assign IPSec policies to groups by selecting the target Group Policy Object in the MMC. Under this object, expand Computer Configuration, Windows Settings, and then Security Settings. Select IP Security Policies, right-click the desired policy, and choose Assign.
Encryption of stored files in Windows Server 2003 is accomplished through the use of EFS. Using public-key encryption, EFS allows files and directories stored on NTFS partitions to be encrypted and decrypted transparently. EFS accesses the user’s EFS public and private keys to perform self-encryption. In addition, if files encrypted with EFS are saved to another machine, the user’s key information must be imported into that machine for decryption to occur.
File encryption keys are automatically encrypted by the recovery agent key. In the event of key loss, the recovery agent can decrypt the files. EFS encrypts the bulk of the file with a single symmetric key. The symmetric key is then encrypted twice: once with the user’s EFS public key to allow decryption, and once with the recovery agent’s public key to allow data recovery. See Chapter 21 for more information about data encryption.
It’s deceptively simple to encrypt and decrypt files in Windows Server 2003. Of course, anything that’s sensitive enough to be encrypted should be treated very carefully, so take time to think before implementing file and folder encryption.
First, implement a recovery policy. As mentioned earlier in this chapter, the recovery policy provides a way to recover an encrypted file when its key has been lost. To recover the file, the recovery certificate for the recovery agent (a specially designated user account) is used. On an Active Directory domain, the recovery agent is set automatically to the Administrator account on the first domain controller of the domain.
Security Alert
We suggest that you create a special account just for the recovery agent role, and then assign the recovery agent role to this account. Because the recovery agent is such a sensitive role (specifically, it’s capable of decrypting any file on the domain), it’s imperative that you take proper precautions with it.
Because the recovery agent is such a sensitive role (specifically, it’s capable of decrypting any file on the domain), it’s imperative that you take proper precautions with it. The following steps take you through adding extra recovery agents, backing up the recovery certificate to a floppy disk, and deleting the locally stored recovery key for extra security:
Launch the Active Directory Users and Computers snap-in.
Right-click the appropriate domain or OU, and choose Properties from the shortcut menu.
On the Group Policy tab, select the appropriate policy and click Edit.
In the console tree, select Computer Configuration, then Windows Settings, Security Settings, and finally Public Key Policies.
Under Public Key Policies, select Encrypting File System.
Right-click the Encrypted Data Recovery Agents folder, and choose Add Data Recovery Agent from the shortcut menu.
Use the Add Recovery Agent Wizard to add another recovery agent to the domain or OU. (Microsoft recommends two or more recovery agents per OU.)
Note
Create recovery agent accounts specifically for the recovery agent role, and do not use them for anything else. Replace the default Administrator recovery agent with one of the new, specially created, recovery agent accounts to minimize the impact of the Administrator account getting compromised.
Right-click a recovery agent, and choose All Tasks and then Export from the shortcut menu.
Use the Certificate Export Wizard to export the recovery key to an external storage device, such as a USB key or floppy disk. Store it in a highly secure, preferably off-site, location.
Log on using the recovery agent’s account, and then open the Certificates MMC snap-in. (If prompted, select My User Account and click OK.) You might have to open a blank MMC console and add the Certificates snap-in to it.
From the console tree, select Personal and then Certificates.
Select the certificate corresponding to the recovery key that you exported, and then click the Delete toolbar button. Now the only copy of the recovery key is stored separately in a secured location. Even someone with physical access to the computer does not have access to the recovery key.
Note
You can easily create a recovery agent. For a local computer, add the Group Policy Object Editor snap-in to the MMC console. Select the Local Computer, click Close, and then click OK. Expand Local Computer Policy, Computer Configuration, Windows Settings, Security Settings, and then Public Key Policies. In the rightmost pane, right-click Encrypting File System and click Add Data Recovery Agent from the menu. You can also use the cipher /r command to generate a PFX and a CER file together with a self-signed EFS recovery certificate.
Encrypting files with EFS is as easy as setting any other file attribute, such as Hidden or Read-Only. To encrypt a file in Windows Explorer, follow these steps:
Right-click the file and choose Properties.
On the General tab, click Advanced.
Select the Encrypt Contents To Secure Data check box.
Important
Encrypt entire folders only. If you encrypt individual files but not their folders, a program might create a temporary file (which won’t be encrypted) and then save the file over the original file, thereby leaving the file decrypted.
Note
Remember that system files, compressed files, and files on partitions other than NTFS can’t be encrypted using EFS. Further, a drive’s root folder cannot be encrypted using EFS.
Like normal files, encrypted files can be moved and copied with the Edit menu commands Cut, Copy, and Paste. Files moved or copied using drag-and-drop editing do not necessarily retain their encryption. You can also rename encrypted files as you do any other file.
Important
Encrypted files and directories are not immune from deletion. Any user with appropriate rights can delete an encrypted file.
You can use the same method for encrypting a folder as you use for encrypting a file. When encrypting a folder, you are asked whether you want all files and folders contained in the current folder to be encrypted. If you choose to encrypt them, they are immediately encrypted, but if you choose not to, only the folder is encrypted. No matter which you choose, however, any files or folders subsequently added to the encrypted folder are encrypted as well.
EFS allows a user to reverse the encryption process. However, describing this as a mere decryption operation is a bit misleading. Indeed, removing data encryption from a file does cause the file to be decrypted, but any encrypted file is also decrypted every time a user or application accesses it. This is permanent decryption.
Real World: Encryption Best Practices
Here are some encryption best practices to consider:
Encrypt the My Documents folder of sensitive desktops and laptops.
Encrypt the Temp folders of appropriate user profiles to protect temporary data, or data that was marooned in the Temp folder following a program crash.
If you use spool files while printing, encrypt the Spool folder.
Don’t tamper with the EFS keys.
To indicate that a file no longer needs to be encrypted or that a folder no longer needs to encrypt its files, follow these steps:
Windows Server 2003 permits the sharing of encrypted files and folders. This mechanism facilitates data recovery and business collaboration by permitting a specified list of users to access encrypted data.
There are a few steps you need to perform to share the encrypted file or folder. Right-click the encrypted file or folder and select the Properties menu item. Select the General tab. Then click Advanced. Click Details in the Advanced Attributes dialog box. Click Add and select the users with whom you want to share the item.
There are a couple of limitations you need to be aware of. You can share the encrypted items with users only; that is, sharing with a group is not permitted. Also, the user you want to share the encrypted file or folder with must have a valid certificate for EFS.
More Info
For a description of the specifics of cryptography, including symmetric-key and public-key methods, visit http://www.microsoft.com/technet/security/topics/cryptographyetc/cryptpki.mspx.
When you encrypt files to protect them from prying eyes, you run the risk of protecting them from yourself and ultimately losing the data. EFS requires the user’s private key (associated with the user’s EFS public-key certificate) to decrypt a file. As long as this key is available, EFS-protected files can be accessed. In the event of key loss, a secondary means of retrieving the data is necessary. Consider, too, that a key might be lost because of the voluntary or involuntary departure of a user—for example, a user who encrypts company files might leave the company. Multiuser sharing described in the previous section solves this problem, but consider the situation where sharing isn’t enabled.
The ability to recover files starts when an individual user backs up his or her EFS public-key certificate and associated private key. To back up this information, the user must export the certificate and key through the Certificates snap-in in the MMC. (See the Exporting Certificates and Private Keys section earlier in this chapter.) If the private key is ever lost, the user can import the saved EFS private key and certificate and salvage the data. To do so, follow these steps:
Launch the Certificates MMC snap-in.
Select Personal from the console tree, and then right-click the Certificates folder and choose All Tasks and then Import from the shortcut menu.
Use the Certificate Import Wizard to restore the backup key, which allows access to the encrypted file again.
Note
Exported keys and certificates are stored in a standard PKCS #12 (also known as Personal Information Exchange or PFX) format. This format is understood by a number of security-enhanced applications, allowing exchange of keys between independent computers or applications.
If a user is unable to decrypt lost data, an administrator can salvage the data by using a recovery agent certificate. To do so, follow these steps:
Instruct the user with the encrypted files to back up the files using Backup or another Windows Server 2003–compatible backup program, and send the backup file to the recovery agent using e-mail or removable media.
Log on using a Recovery Agent account, and restore the recovery key using the previous procedure. (The recovery key is presumably stored in a secure location such as a vault and deleted from the system when not in use.)
On the Recovery Agent’s computer, use Backup or another backup program to restore the files to a local folder.
In Windows Explorer, right-click the folder and choose Properties from the shortcut menu.
In the General tab, click Advanced.
Clear the Encrypt Contents To Secure Data check box. This decrypts the files using the recovery agent’s recovery certificate.
Back up the decrypted files and e-mail or deliver them to the user, who can then encrypt them using his or her key (which is probably newly issued after the old key was lost). Consider using e-mail encryption when sending the files, if appropriate.
Real World: Protecting Recovery Agent Certificates
Store recovery agent certificates in a secured storage facility to prevent possible data compromise. (It’s important to store the old recovery agent certificates because the associated certificate or recovery policy for encrypted files is updated only when the files are opened.) Upon receiving the recovery agent certificate, the recovery agent exports it to a diskette or other device that can be protected and deletes it from the machine. When data needs to be recovered, the certificate and associated private key can be imported. After the data is recovered, delete the certificate again. For information about exporting certificates, see the Exporting Certificates and Private Keys section earlier in this chapter.
Both a proactive and reactive security tool, auditing informs administrators of events that might be potentially dangerous and leaves a trail of accountability if a security infraction does occur. Auditing failed logon attempts, for instance, can warn of rogue users attempting to gain unauthorized access to the system. In addition to auditing normal system events, you can audit policy modification to keep a trail of when a specific event audit was disabled and by whom.
The administrator establishes an audit policy by determining which types of security events to audit. Based on the security needs of the organization, the administrator might also choose to audit access to individual objects.
The first step in establishing an audit policy is to determine which event categories are to be audited. The following event categories are available for audit:
To select the event categories to audit, you must first determine whether the computer is a domain controller. If it is not, choose Local Security Policy from the Administrative Tools folder. Expand the Local Policies root node to reach Audit Policy.
If the computer is a domain controller, open the Default Domain Controller policy (Start, All Programs, Administrative Tools, Domain Controller Security Policy). On the Group Policy tab, select the policy and click Edit. Then expand Computer Configuration, Windows Settings, Security Settings, and Local Policies, and then select Audit Policy.
Using either technique, selecting Audit Policy displays the auditable event categories in the right pane. To modify the policy for an event category, right-click that event and choose Properties. Select the check box for auditing successful events, auditing failed attempts, or both.
After the Audit Object Access category is enabled in the Audit Policy item, members of the Administrators group can specify audit criteria for files, folders, network printers, and other objects. The following list describes some of the audit criteria for an object:
Who is audited for this object
Whether accessing this object succeeded or failed
What type of object access is audited
Examples of access types include viewing a folder’s permissions, executing a file, and deleting an object. Follow these steps to select an object for auditing:
Right-click the object in Windows Explorer and choose Properties.
On the Security tab, click Advanced.
On the Auditing tab, click Add.
Click OK to display the Auditing Entry dialog box. Use the Access list to select whether successful access, failed access, or both types of access are audited.
For folders, use the Apply Onto drop-down list to indicate where the auditing should take place.
Select or clear the Apply These Auditing Entries To Objects And/Or Containers Within This Container Only check box to invoke or prevent inheritance, respectively.
There are more detailed descriptions of auditing in Chapter 12.
The security log details audit information of events specified in your audit policy. Each time an auditable event occurs, it’s added to the log file where it can filtered, sorted, searched for, or exported. The security log, along with the application and system logs, is located in Event Viewer and can be found in the Computer Management console tree by expanding System Tools, Event Viewer, and Security.
Each entry in the log contains critical information about the audited event, including whether the attempt failed or was successful, the date and time of the event, the event category and ID, and the audited user and computer. Additional information can be obtained for each entry by double-clicking the entry.
The security log can be sorted by any of the fields listed in the display, such as user or date of event. Clicking a field header at the top of the pane causes the log events to be arranged in ascending order by that field. Clicking the field header again sorts them in descending order. For even more efficiency, you can filter the log to show only events you’re interested in—for example, failed audits only. On the View menu, click Filter. On the Filter tab of the Security Properties window that appears, select which event criteria to view and click OK.
The security log has a defined maximum size. To set the size, right-click Security in Event Viewer and choose Properties. Edit the Maximum Log Size field specifying the size in kilobytes. The options beneath this field, which are outlined next, specify how events are overwritten:
Overwrite as needed. Old events will be discarded if necessary to make room for new events.
Overwrite events older than X days. Events more than X days old will be discarded to make room for new events. If there is no room and all events older than X days have already been deleted, the new, incoming events will be discarded.
Do not overwrite events. New events will be discarded if there is no room. A manual cleaning must occur to make room for new events.
Note
Presumably, all event categories specified in the event policy are relevant. Be careful that automatic event wrapping does not overwrite events more frequently than either log archival or manual log interrogation.
To archive the security log, right-click Security in Event Viewer and choose Save Log File As. Choose the path and filename for the file. If you save it as an event log file (with the extension .EVT), the file can be opened in Event Viewer at a later time.
More information about the settings for the Security Log as well as on other components in Event Viewer can be found in Chapter 12.
The Microsoft Baseline Security Analyzer is a powerful tool you can use to check the security settings of multiple computers. As such, it’s the first tool to pull out when verifying the security status of computers on your network.
To use the Microsoft Baseline Security Analyzer, take the following steps:
Download and install the program from the Microsoft Security Web site—http://www.microsoft.com/mbsa.
Launch the program from the Start menu or the Desktop.
Click the Scan A Computer hyperlink to scan a single computer, or click the Scan More Than One Computer link to scan multiple computers.
Specify the IP address or address range of the computers, specify what you want to look for, and click Start Scan.
Review the results, clicking links as appropriate to view more detailed information.
If you’ve used MBSA before, the second version of the tool adds features you should be aware of. Alongside updated instructions and help files, there is improved 64-bit support, Office XP awareness, and support for Microsoft Update (MU), Windows Server Update Services (WSUS), Systems Management Server (SMS), and Microsoft Operations Manager (MOM). The original version of MBSA is supported only Software Update Services (SUS).
If your network is hacked, you must take swift action to assess damage, limit further damage, and preserve evidence, which can potentially be used to press charges against the perpetrators. If your system is compromised, you should:
Immediately remove the system from the network, but do not reboot or shut it down.
Take a disk image of the server immediately after it was hacked.
Check with your software and hardware vendors to determine what vulnerability was exploited and how to prevent it from happening again.
Check log files for evidence.
Change passwords for any affected systems; social engineering attacks (as popularized by the Iloveyou virus) are startlingly common and effective.
Document what you learned, and develop an incident response plan. Do this for both internal and external servers.
Microsoft recommends you reformat and reinstall.
As this chapter has shown, security issues extend to nearly every corner of Windows Server 2003. Learning to use the security-related snap-ins in the MMC will help you manage the rich features this operating system has to offer and will help prevent security weaknesses in your system.
Chapter 21 and this chapter cover security in broad terms by discussing planning and implementation. Chapter 24 brings security into sharper focus by covering a particular security feature of Windows Server 2003, Microsoft Certificate Services.