Back in the early, heady days of desktop personal computers, people talked a lot about the coming "paperless office." This vision of the future has not come to pass. In fact, today the paper-recycling box is the biggest receptacle in an average office!
The cost of basic printers has declined over the years, but increasingly, companies have invested in sophisticated high-speed printers that enable users to handle jobs that once required an outside print shop. These are expensive both to buy and to use. Therefore, printer sharing remains an important function of enterprise networks. Setting up multiple users to share printers reduces cost and can increase printing output. You can direct routine work to low cost-per-page printers, schedule long print jobs for off hours, and limit access to high-end printers.
Before you deploy printers and Microsoft Windows Server 2003 print servers, it is important to establish printer-naming and location-naming conventions, evaluate whether to upgrade or migrate existing print servers, and prepare for print server failures.
More Info
For information about print server sizing, see the Print Server Scalability and Sizing Technical Overview whitepaper on the Microsoft Web site at http://www.microsoft.com/windowsserver2003/techinfo/overview/printservscal.mspx.
Note
When possible, connect printers to the print server via a network connection. Network printers are faster and require fewer resources on the print server than do locally attached printers, and you can also place the printers anywhere you can run a network cable (or wireless connection).
An effective printer-naming convention is important if you want to ensure that users can easily identify printers on the network. When creating a printer naming convention, use the following guidelines:
Obtain management support for the convention so that you can establish a naming scheme that is enforceable in the company.
The printer name can be any length up to 220 characters, but it should be much shorter than this for readability and so that users can remember the printer name.
The share name can be up to 80 characters long, but it should be shorter than this for readability and compatibility. The share name is the name that all clients see when they browse for a printer, use the Add Printer Wizard, or use the Net Use command.
Some older applications cannot print to printers with fully qualified printer share names (the computer name and printer share name combined) that exceed 31 characters, or to print servers where the default printer’s share name exceeds 31 characters. MS-DOS and Microsoft Windows 3.x clients cannot access printers with share names longer than eight characters followed by a three-character extension. Clients using other operating systems might also have trouble with names longer than 31 characters or names containing spaces or other special characters.
The printer name and share name should convey as much relevant information about the printer as possible without exceeding a reasonable length.
Most companies use a variant of the printer model name followed by a number if multiple identical printers exist in the same location. Some companies also include the location of the printer in the printer name, for example, LaserJet8100_Floor10_1.
In small organizations, finding printers is easy: stand up and look around, or ask the person sitting next to you. This does not work as well in larger organizations where printers are widely scattered and of varying capabilities. A much easier way is to browse or search for printers in Active Directory based on the criteria you want, including printer features and printer location.
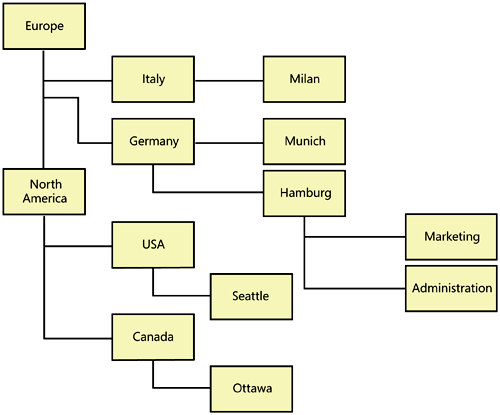
Location names are similar in form to domain names and use the name/name/name... syntax. They start with the most general location name and become progressively more specific. For example, a multinational corporation might have the location name structure shown in Figure 8-1. Each part name can be a maximum of 32 characters and can contain any characters except the forward slash (/), which Windows reserves as a delimiter. The entire location name cannot be longer than 260 characters, with a maximum of 256 levels.
Note
As with choosing domain names, creating a printer location-naming scheme is political, so get the appropriate sign-off from management. Keep the naming convention simple and easy to understand for end users—after all, they need to be able to look at the location name and answer the age-old question "Where’s my printout?" A sample location name is NorthAmerica/Seattle/HQ/Floor10/ConferenceRoom. (You can be more precise than just naming the location of the subnet.)
After creating a printer location-naming convention, enable printer location tracking in Active Directory, as discussed in the Enabling Printer Location Tracking section of this chapter.
If you are not using the printer location-tracking feature of Active Directory, you can still include location information with printers, although this approach has some limitations. To enter location information, type the location name in the General tab of the printer’s Properties dialog box. Be careful and consistent with location names. Make sure that all administrators use the same name for a particular location, and keep the names short and easy to remember: users need to know the exact location names when they search for printers if Active Directory’s location-browsing capabilities are unavailable.
Note
Try to keep printers and print servers on the same network segment as the users of the printer if you expect a high print volume. This approach minimizes the impact to users on other parts of the network. In any case, try to minimize the number of network hops a print job needs to take to get from users to their default printer. Deploy print servers to branch offices to prevent Windows from sending print jobs across a WAN link to the print server and then back across the WAN link to the printer. You can centrally manage print servers using the new Print Management Console.
To enable users to search Active Directory easily for printers by location, create a location-naming convention as discussed in the Creating Location-Naming Conventions section of this chapter, and then follow these steps to set up printer location tracking:
Open Active Directory Sites and Services from the Administrative Tools menu.
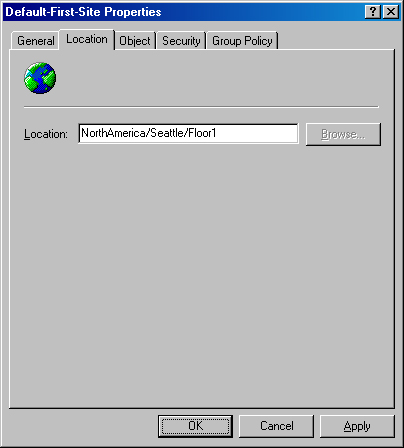
In the Sites folder, right-click the first site and choose Properties from the shortcut menu.
Click the Location tab, and type the location name for the site, as shown in Figure 8-2, or click Browse to select the location from the location tree for the enterprise.
Click OK, and repeat steps 2 and 3 for each site and subnet on the network.
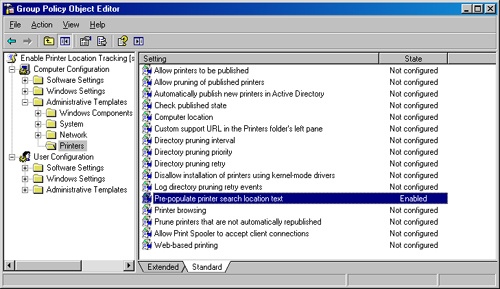
Create a new Group Policy object that applies to all computers on which you enable printer location tracking. To do this, open the Group Policy Management Console (available from the Microsoft Web site at http://go.microsoft.com/fwlink/?linkid=21813), right-click the domain, and then choose Create And Link A GPO Here.
Right-click the GPO, and choose Edit. The Group Policy Object Editor appears.
In the console tree, click Computer Configuration, the Administrative Templates folder, and finally Printers (shown in Figure 8-3).
Double-click the Pre-Populate Printer Search Location Text policy, select Enabled, and click OK. Close the Group Policy window, and then close the domain’s Properties dialog box. When searching Active Directory, this automatically fills in the location of the user’s subnet.
Open the Print Management Console or Printers And Faxes folder for your print server, right-click a printer, choose Properties, and then type the location in the Location text box, or click Browse to select the location from the location tree for the enterprise. Repeat this for all printers in Active Directory, or use the Prncnfg.vbs script to automate this procedure. (For help using this script, type cscript %windir%system32prncnfg.vbs /? at a command prompt.)
Test printer location tracking by searching Active Directory by location from a client machine.
If you still have Microsoft Windows NT 4 print servers deployed in your organization, it is time to upgrade or replace them with Windows Server 2003 print servers. Doing so increases reliability, manageability, and performance. You can also consolidate several Windows NT 4 print servers into a single Windows Server 2003 print server (when appropriate), providing further savings in operating costs.
There are three ways of dealing with existing Windows NT 4 (and Windows 2000) print servers:
Perform an in-place upgrade. Upgrading the server to Windows Server 2003 preserves all settings, printer drivers, ports, and print queues, saving reconfiguration time, which can be significant for print servers with a large number of installed printers. Windows Server 2003 attempts to upgrade existing drivers to a native level 3 version, but it preserves existing Windows NT 4 printer drivers (level 2 drivers) if it cannot locate a native driver. (Windows NT 4 printer drivers run in kernel mode and can destabilize the operating system or force a reboot if they crash.)
Upgrading Windows 2000 print servers does not require updating drivers.
Perform a clean install. A clean install provides the most stable and high-performance environment, but it takes the most time to set up and install all printers.
Migrate settings to a new server. The Print Migrator version 3.1 utility makes it possible to save all relevant print server settings (drivers, ports, queues, and preferences) from a Windows NT 4.0, Windows 2000 Server, or Windows Server 2003 print server and then apply them to a server running Windows Server 2003. This saves time as compared to a normal clean install. If you choose this approach, replace as many of the Windows NT printer drivers as possible with native level 3 drivers.
If print server downtime is an issue, set up a new Windows Server 2003 print server before taking the existing print server offline. Then switch users to the new print server, using one of the methods discussed in the Preparing for Print Server Failure section later in this chapter. You can also migrate the print server to a Windows Server 2003 print server by using the Print Migrator utility, as discussed in the following sidebar.
Note
Before you upgrade or migrate a Windows NT 4 print server, use the Fixprnsv.exe utility (located in the PrintersFixprnsv folder on the Windows Server 2003 CD-ROM) to identify incompatible drivers. After the upgrade or migration is finished, you can use the utility again to identify any incompatible drivers that made it through, and possibly upgrade them.
Using Printer Migrator to Back Up or Migrate Print Servers
Printer Migrator is a useful tool that you can use to back up print server settings, drivers, and print queues from a print server running Windows NT 4, Windows 2000, or Windows Server 2003 system, and restore the data to any server running Windows Server 2003.
You can download Printer Migrator from the Microsoft Web site at http://www.microsoft.com/WindowsServer2003/techinfo/overview/printmigrator3.1.mspx, and then use the following list to back up or migrate print server settings after installing and opening the program (which is shown in Figure 8-4).
To view the printer settings of a remote server, choose Target from the View menu and type the UNC name of the remote print server.
To back up a print server, choose Backup from the Actions menu, type the computer name of the server that you want to back up in the Target Server box, type a name for the backup file, and then click Open. This saves the configuration to a compressed .CAB file.
To restore a backup file, choose Restore from the Actions menu, type the name of the server on which you want to restore the configuration in the Target Server box (or leave it blank to restore to the local machine), specify the backup file, and then click Open.
To attempt to convert Line Printer Remote (LPR) printer ports to the faster Windows Server 2003 standard Transmission Control Protocol/Internet Protocol (TCP/IP) printer port (SPM) during a restore operation, select the Attempt LPR To SPM Conversion check box. To migrate LPR printer ports to a new print server without converting them to SPM ports, install Print Services for UNIX on the target machine before migrating the LPR ports and do not select the Install The Active Directory Client Extensions check box.

If you attempt to restore the configuration of a Windows NT 4.0 print server on a Windows Server 2003 server, Print Migrator warns you that kernel-mode drivers (Windows NT 4.0 drivers) are blocked. Click Cancel to install the Windows NT 4.0 drivers anyway, or click OK to exit without installing the drivers. After restoring the Windows NT 4.0 drivers, upgrade the drivers to level 3 (Windows Server 2003/Windows 2000/Windows XP) if possible.
Installing a printer is a familiar task for most computer users—if the printer uses a USB or IEEE 1394 (Firewire) connection, plug it in to the server and insert the driver disk. If the printer uses a network connection (the best way to connect a printer), use the Add Printer Wizard to install the printer, as described in this section, or use the new automatic detection feature of the Windows Server 2003 R2 Print Management Console, as described in the Using the Print Management Console section of this chapter.
To set up a network-based printer through a standard TCP/IP printer port, follow these steps:
Connect the printer to the network, and set up the printer with the proper TCP/IP settings for the network. If you configure the printer to use DHCP, create a DHCP reservation for the printer so that its address does not change.
Select the appropriate print server in the Print Management Console and choose Add Printer from the Action menu, or open the Printers And Faxes folder and choose Add Printer from the File menu. The Add Printer Wizard appears.
On the Local Or Network Printer page, select the Local Printer Attached To This Computer option, and clear the Automatically Detect And Install My Plug And Play Printer check box.
On the Select A Printer Port page, select Create A New Port, select Standard TCP/IP Port from the drop-down list, and then click Next. Windows launches the Add Standard TCP/IP Printer Port Wizard.
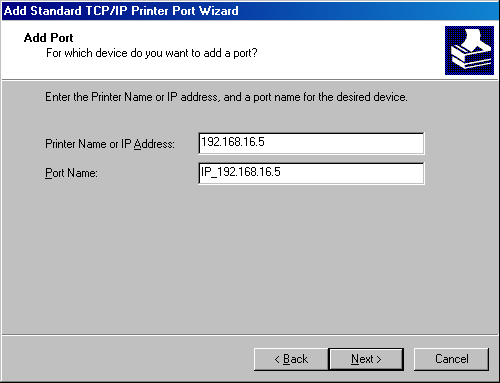
On the Add Port page, shown in Figure 8-5, type the IP address of the printer in the first text box and then click Next. Windows attempts to connect to the printer.
If Windows cannot detect the printer, the Additional Port Information Required page appears. Accept the Generic Network Card device type (which works for most printers), select a specific device type, or click Custom to specify the port settings manually. Click Next to continue.
Most device types in the list configure the printer port to use the Line Printer Remote (LPR) protocol, which is slower than the raw protocol. If the device type that matches your printer uses the LPR protocol, try selecting Generic Network Card instead or try choosing Custom and manually specifying the RAW protocol and port 9100 (the default port for the raw protocol).
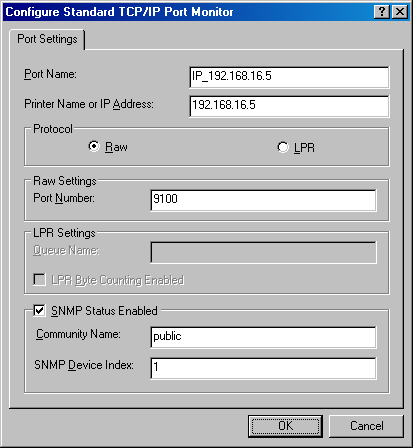
If you select Custom, the Configure Standard TCP/IP Port Monitor dialog box appears, as shown in Figure 8-6. Specify the appropriate settings and then click OK.
Choose Raw to use the raw protocol, or choose LPR to use a slower LPR-compatible protocol to communicate with a printer that uses the LPD service.
Type the port number for the printer if you are using the raw protocol. Use the default port number (9100) unless the printer documentation specifies that you must use a different port.
If you choose the LPR protocol, type the queue name in the box provided.
If the printer supports Simple Network Management Protocol (SNMP) as defined in RFC 1759, select the SNMP Status Enabled check box and type the Community Name (usually "public") and SNMP Device Index.
Figure 8-6. The Configure Standard TCP/IP Port Monitor dialog box of the Add Standard TCP/IP Printer Port Wizard
Note
Select the LPR Byte Counting Enabled check box in the Configure Standard TCP/IP Port Monitor dialog box if the printer prints incomplete documents or has other problems. However, selecting this check box tells the server to count the number of bytes in a document before sending it to the printer, greatly reducing printing performance.
If Windows does not detect the printer, choose the printer model on the Install Printer Software page.
On the Name Your Printer page, type a name for the printer in the Printer Name text box.
On the Printer Sharing page, type a share name for the printer.
On the Location And Comment page, type the location name for the printer in the Location box. (See the Creating Location-Naming Conventions section earlier in this chapter for information about choosing a location-naming scheme.) Describe the capabilities of the printer in the Comment text box.
Print a test page by clicking Yes on the Print Test Page page, and then click Next to display a summary of the printer installation. Click Finish to complete the installation.
This section focuses on some common management chores such as connecting to a printer and viewing the print jobs; managing print jobs in the queue; and transferring print jobs from one printer to another using the new Windows Server 2003 R2 Print Management Console, the Printers and Faxes folder, a Web browser, or a command prompt.
The Print Management Console (PMC) is a new MMC management console that makes it possible to centrally manage and monitor print servers. You can use the PMC to manage a single print server or hundreds of print servers with thousands of printers across the world, all without consuming a significant amount of network bandwidth or ever touching the Printers and Faxes folder.
To install the Print Management Console, install Windows Server 2003 R2 and then install or upgrade the Print Server role, as discussed in Chapter 7, or download and install the PMC setup files for Windows XP from http://www.microsoft.com/downloads. You cannot install the Print Management Console on a computer running Windows XP.
Important
To deploy printer connections via Group Policy, you must update the Active Directory schema to Windows Server 2003 R2 level, although you do not need to deploy any Windows Server 2003 R2 domain controllers. For more information about updating the Active Directory schema, see Chapter 6.
After you install the Print Management Console, you can open it from the Manage Your Server window or from the Administrative Tools folder. You can monitor print servers using any account, but you must use an account with Administrator privileges to administer printers or server.
Use the following list to perform common tasks using the Print Management Console:
To add print servers to the console, right-click the Servers container and then choose Add/Remove Servers. You can manage any Windows Server 2003, Windows XP, or Windows 2000 print server, and you can view the queue status of any SAMBA print server with which you can authenticate. You can also manage Windows NT 4.0 print servers, although Microsoft does not officially support this scenario and the functionality might differ from that of newer versions of Windows.
Note
If you cannot see any printers on a remote server, open Windows Firewall from Control Panel, click the Exceptions tab, select the File And Printer Sharing check box, and click Edit. Use the Edit A Service dialog box to change the scope of each port to Any Computer. Before changing the scope to Any Computer in a production environment, evaluate the potential security risks and verify that other firewalls on the network block these ports from distrusted networks such as the Internet.
Use the Drivers, Forms, Ports, and Printers containers to view and manage drivers, forms, ports, and printers on a print server.
Choose Add/Remove Columns from the View menu to add or remove additional columns from a view. Click a column heading to sort the view by that heading.
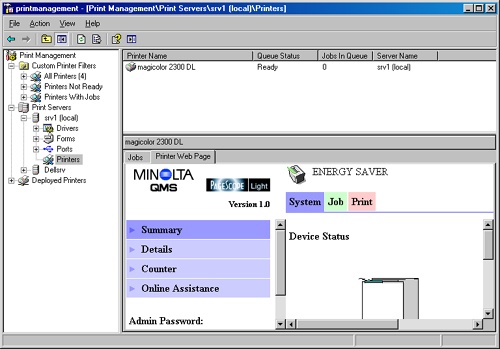
To view print jobs and the printer configuration Web page for each printer (when available), right-click a Printers container and choose Show Extended View. Figure 8-7 shows the Extended View of Print Management Console.
To perform a task on a group of printers, select the printers, right-click them, and choose the appropriate command from the shortcut menu. You can perform the following tasks on a group of printers:
Pause printing
Resume printing
Publish printers in Active Directory
Unpublish printers in Active Directory
Cancel all print jobs
Delete the printers
To manage the print server options, right-click the print server and then choose Properties.
To automatically add printers on a local subnet, right-click Local Print Server (you cannot perform this procedure on a remote print server), and then choose Automatically Add Network Printers. If Windows cannot find the proper driver for a printer it detects, specify the location of the proper driver.
To manage Integrated Color Management (ICM) color profiles, right-click the appropriate printer, choose Properties, and then click the Color Management tab.
You can create virtual folders in the Print Management Console called filtered printers folders that display printers that match the criteria you specify—for example, printers with errors. You can also use filtered printers folders to send e-mail notifications or launch scripts when Windows finds printers that match the criteria that you specify—this is invaluable if you want Windows to notify you when a printer goes offline, for example.
To create a filtered printers folder, which appears in the Print Management Console under the top-level Printers container, use the following steps:
Right-click the Custom Printer Filters container, and choose Add New Printer Filter.
On the Printer Filter Name and Description page, type a name and optionally a description for the folder, and then select the Display The Total Number Of Printers Next To The Name Of The Printer Filter to display in the console tree how many printers the folder contains.
On the Define A Printer Filter page, specify what criteria to use when selecting printers to display in the folder.
On the Set Notifications page, choose whether you want to receive an e-mail notification or launch a script when Windows detects printers that match the criteria you specify.
Note
You can save a Print Management Console window that you customize as a new Microsoft Management Console (MMC) file (.msc) by choosing Save As from the File menu. This is the fastest way to duplicate the Print Management Console settings, including server connections and filtered printers folders, on another server.
To deploy printer connections to users automatically, you have three options. You can connect a computer to shared printers during unattended Setup, as discussed in Chapter 5. You can write a custom logon script and deploy it via Group Policy. Or you can use the Print Management Console in Windows Server 2003 R2 to deploy printer connections to users via Group Policy.
Using the Print Management Console to deploy printer connections is the most convenient method of deploying printer connections to computers running Windows XP Professional, Windows Server 2003, or Windows 2000. However, on computers running Windows 2000 you can deploy printer connections only by using user-based Group Policy—not computer-based Group Policy.
To deploy printer connections using the Print Management Console, use the following steps:
Update the Active Directory schema to the Windows Server 2003 R2 revision, as discussed in Chapter 6.
Copy the Pushprinterconnections.exe script (located in the \%WINDIR%Pmcsnap folder) to a network share that is accessible by all users and computers to which you want to deploy printer connections.
Create a new Group Policy object that applies to all computers or users to which you want to be able to deploy printer connections. To do so, open the Group Policy Management Console (available from the Microsoft Web site at http://go.microsoft.com/fwlink/?linkid=21813), right-click the domain or OU in which you want to deploy the startup script, and then choose Create And Link A GPO Here. See Chapter 11 for more information about Group Policy.
Right-click the GPO, and choose Edit. The Group Policy Object Editor appears.
To deploy printer connections to users, click User Configuration in the console tree, Windows Settings, and finally Scripts.
To deploy printer connections to computers, instead click Computer Configuration, Windows Settings, and finally Scripts.
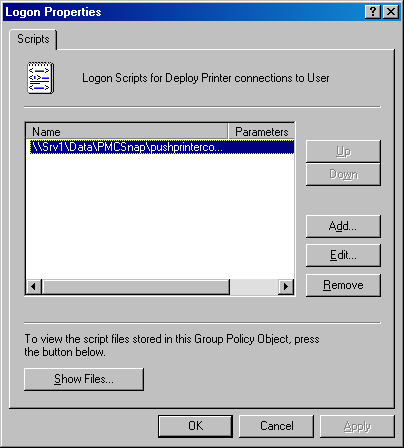
Double-click Logon or Startup as appropriate, and then use the Logon Properties dialog box (shown in Figure 8-8) or Startup Properties dialog box to add the network path to the Pushprinterconnections.exe script. Close the Group Policy Object Editor when you are finished.
Important
The Pushprinterconnections.exe script must execute during every Windows startup when deploying printer connections to computers, or during every user logon when deploying printer connections to users. Executing the Pushprinterconnections.exe script at Windows startup does not enable you to deploy printer connections to users—you must run it as a logon script. If the script does not run, new or updated printer connections that you deploy via Group Policy do not appear on the client computers.
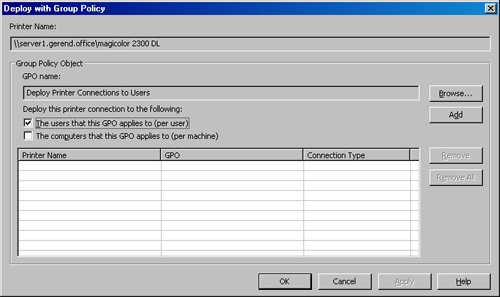
In the Print Management Console, right-click the printer you want to deploy to clients and then choose Deploy With Group Policy.
In the Deploy With Group Policy dialog box (shown in Figure 8-9), click Browse to select the GPO you created to deploy printer connections.
In the Deploy With Group Policy dialog box, select whether to deploy printer connections to users and/or computers in the GPO:
To deploy the printer connections to users in the GPO, select the The Users That This GPO Applies To (Per User) check box.
To deploy the printer connections to computers in the GPO, select the The Computers That This GPO Applies To (Per Machine) check box.
To remove a printer connection, select the connection and click Remove.
Click OK when you are finished. The Print Management console adds the Deployed Printers node to the Computer Configuration and User Configuration nodes of the appropriate Group Policy Object, adds the specified printers to the appropriate Deployed Printers node, and then displays the results of the operation in the Print Management Console dialog box. Verify that the operation succeeded and then click OK.
Windows installs or removes the printer connections the next time the user logs on (for per-user deployments), or the next time the computer restarts (for per-machine deployments).
The easiest way to manage print servers is to use the Print Management Console. However, if you do not yet have a Windows Server 2003 R2 print server on your network, you can manage printers from any machine running Windows Server 2003, Windows XP, or Windows 2000 using the Printers And Faxes folder. Regardless of the method you use to manage printers, the tasks are identical and simple.
To manage print jobs, double-click the printer in the Print Management Console or the Printers And Faxes folder and then use the following list:
To temporarily stop a document from printing, right-click the selected document and choose Pause from the shortcut menu. To resume printing, right-click the document and then choose Resume.
To temporarily stop all documents from printing, choose Pause Printing from the Printers menu. To resume printing all documents, select Pause Printing a second time from the Printer menu.
To cancel one or more print jobs, select the documents, right-click, and choose Cancel from the shortcut menu. (You can also cancel print jobs by selecting them and pressing Delete.)
To cancel all print jobs in the print queue, select Cancel All Documents from the Printer menu.
To restart a print job (that is, force the document to print from the beginning again), right-click the document and choose Restart from the shortcut menu.
Sometimes a print job appears stuck in the queue and you cannot delete it. If this occurs, turn the printer off and then on again, or stop the Print Spooler service on the print server and restart it.
To change the priority or scheduling of a print job, right-click the print job, choose Properties, and then use the Priority slider to adjust the priority of the document, with 1 being the lowest priority and 99 the highest priority.
To specify that the document should be printed only during a certain period, select the Only From option and choose the time range to allow the document to print.
To move all documents from one printer to another printer that can use the same printer driver, right-click the printer, choose Properties, click the Ports tab, select the port that the second printer is on, and then clear the check box next to the original port.
To install a new replacement printer, click Add Port and then add the appropriate port for the second printer. If another print server hosts the printer, choose Local Port and add the printer using the \printserverprintersharename format. (See Installing Printers earlier in this chapter for help.)
If you have Internet Information Server (IIS) with Internet Printing support installed on the print server, you can manage printers from any browser, provided you have sufficient privileges. (Set the permissions on the Printers node of the Default Web Site in IIS, as described in Microsoft Knowledge Base Article 323428.)
Security Alert
Do not install IIS and Internet Printing unless you have a strong need to manage printers using a Web browser—installing IIS exposes the server to additional security risks. Instead, use the Print Management Console, the Printers And Faxes folder, Remote Desktop, or command-line tools to manage a print server remotely. You can disable Internet printing support on Windows 2000 print servers using Group Policy—to do so, disable the Web-based Printing setting in the Computer Configuration, Administrative Templates, Printers folder of the appropriate Group Policy object. This policy setting does not apply to Windows Server 2003.
To manage a print server using a Web browser from a computer running Windows Server 2003, Windows XP, Windows 2000, or Windows 9x with the Internet Print Services client (available on the Microsoft Web site at http://www.microsoft.com/windows98/downloads/contents/WUPreviews/IPP/Default.asp), type the URL of the print server followed by /printers in the browser’s Address window. Then use the following list:
To display the printer’s queue, click the printer you want to manage.
To pause, resume, or cancel the printing of all documents in the print queue, click a hyperlink under the Printer Actions heading.
To pause or cancel a specific print job, select the option button to the left of the document, and then click the Pause hyperlink or the Cancel hyperlink under the Document Actions heading.
To view the properties for the printer, click the Properties hyperlink under the View heading. Note that you can use a Web browser only to view properties, not to change them.
Windows Server 2003 makes command-line administration practical for Windows administrators. You can now perform almost any administration task from a command line—printers included. Hallelujah! Use the following list of commands and scripts to get started.
Print. Prints the specified text file to the specified printer.
Lpr. Prints the specified text file to the specified LPD print queue.
Net print. Displays information about the specified print queue or print job. Can also hold, release, or delete print jobs.
Lpq. Displays information about the specified LPD print queue.
Net start. Starts the specified service. You can use the Net start spooler and Net stop spooler commands to start or stop the spooler service.
Cscript %Windir%System32Prnmngr.vbs. Adds, deletes, or lists printers on a Windows print server.
Cscript %Windir%System32Prnjobs.vbs. Lets you view and manage the print jobs of printer shares on a Windows print server.
Cscript %Windir%System32Prncfg.vbs. Allows you to view and change the settings of printers on a Windows print server.
Cscript %Windir%System32Prnqctl.vbs. Pauses or resumes printing, clears the print queue, or prints test pages.
Cscript %Windir%System32Prnport.vbs. Administers all things related to printer ports.
Cscript %Windir%System32Prndrvr.vbs. Adds, deletes, or lists printer drivers on a Windows print server.
Cscript %Windir%System32Pubprn.vbs. Publishes shared printers on computers running Windows NT 4.0 or Windows 98 to Active Directory.
Note
You can administer printers and print servers from a command-line with the help of the Windows Management Instrumentation (WMI) API and the Windows Scripting Host. Together, these technologies provide you with the ability to administer Windows Server 2003 using the scripts Microsoft provides or with scripts that you write yourself. This section does not go into depth about how to use the Windows Scripting Host and WMI—for help with that, see Chapter 13 or the Microsoft Script Center at http://www.microsoft.com/technet/scriptcenter.
There are myriad printer options that you can configure; some of the most relevant options for an administrator are the security options, availability and group priority settings, separator pages, and print spooler settings.
Security can be an important factor to consider with printing. For example, you might not want everyone to print to the five-dollar-a-page dye sublimation printer purchased for the art staff. At a more basic level, you probably do not want most users to modify printer properties or change the priorities of documents in the print queue.
Setting permissions on a print queue is no different from setting permissions on a folder. To set permissions on a printer, right-click the printer, choose Properties, and then use the Security tab to assign permissions to groups of users. Click Advanced to exert finer control over permissions or to enable auditing. You can view the results of the audit settings in the security log.
There are three levels of control permissions for a printer: Print, Manage Documents, and Manage Printers:
Print. Users or groups with Print permission can connect to the printer, print documents, and pause, restart, or delete their own documents from the print queue. Windows by default grants members of the Everyone group the Print permission (which in Windows Server 2003 does not include Anonymous Logon).
Manage Documents. Users or groups with Manage Documents permission have the Print permissions along with the ability to change the settings for all documents in the print queue and to pause, restart, and delete any user’s documents from the print queue. Windows grants the Creator/Owner group the Manage Documents permission level by default.
Manage Printers. Users or groups with Manage Printers permission have the Manage Documents and Print permissions along with the ability to modify printer properties, delete printers, change printer permissions, and take ownership of printers. The Manage Printers permission level is the equivalent of Full Control permission in Windows NT. Windows grants this permission level to print operators, server operators, and administrators by default.
You can set up a printer in a way that the print jobs submitted by some users or groups print before print jobs submitted by other groups; for example, you can give priority to managers or groups with tight deadlines. You can also reserve a printer for exclusive use by certain groups during certain times; for example, you can reserve a printer outside of normal business hours so that the groups you specify can print large, high-priority print jobs.
To control availability or group priority, create two or more logical printers for a single physical printer, give each logical printer a different priority and/or make it available at different times, and give different sets of users or groups permission to print to each logical printer.
To perform this procedure, use the following steps:
Create two or more logical printers for the physical printer by using the Add Printer Wizard to install the printer multiple times on the same port.
Give each printer a descriptive name that describes the printer’s purpose or who is allowed to print to it. For example, LaserPrinter1_OvernightJobs or LaserPrinter1_Executives.
In the Print Management Console or the Printers And Faxes folder, right-click the first logical printer for the physical printer you want to control, select Properties, and then click the Advanced tab.
Click the Security tab, and assign permissions only to the groups to which you want to give special priority or allow to print during the times you specify.
Click the Advanced tab, shown in Figure 8-10.
To make the logical printer available only during specific hours, select the Available From option and then select the earliest and latest times the printer is to be available to users.
To change the priority of the users and groups that use this logical printer, type a number in the Priority text box. The priority range goes from 1, which is the lowest priority, to 99, which is the highest priority.
Click OK, and repeat the process for all other logical printers you created for the printer.
Use a separator page with busy printers to help prevent one user from picking up the next user’s print job in addition to their own. Windows Server 2003 comes with four default separator pages located in the %systemroot%System32 folder:
Pcl.sep. Switches the printer to Printer Control Language (PCL) and then prints a separator page.
Pscript.sep. Switches the printer to PostScript and does not print a separator page.
Sysprint.sep. Switches the printer to PostScript and then prints a separator page.
Sysprintj.sep. Switches the printer to PostScript with Japanese character support and then prints a separator page.
If your printer does not support these languages, create a custom separator page, as discussed in the Custom Separator Pages sidebar. To specify a separator page, use the following steps:
In the Print Management Console or the Printers And Faxes folder, right-click the printer you want to modify and select Properties.
Click the Advanced tab.
Click Separator Page to select a page to insert between printed documents to help separate the print jobs.
Real World: Custom Separator Pages
To create a custom separator page, create a text file in Notepad or any text editor, save it with the .sep file extension, and then create your separator page. On the first line, type the escape character you want to use (for example ""), and then the text that you want to appear on the separator page. (See Table 8-1 for a listing of commands you can use on a separator page.) Following is an example of a simple print separator page that prints the user name, job number, date, and time of the print job, using the "" character as the escape character:
ULUser Name: N
ULJob : I
ULDate: D
ULTime: T
E
Table 8-1. Separator page commands
Command | Function |
|---|---|
Escape character used by the separator file interpreter to delimit commands. Can be any character, but this table uses "" as an example. | |
Hn | Sends the n control sequence to the printer. See your printer manual for the correct control sequence to use with your printer. |
Wn | Specifies the width of the separator page, beyond which Windows omits all characters. The default width is 80, and the maximum width is 256. |
n | Skips the number of lines you specify by n. Valid numbers are 0 through 9, with 0 acting as a carriage return, moving printing to the next line. |
Fpathname | Prints the contents of file specified by pathname directly to the printer. The file must be rendered in the appropriate language for the printer. |
L | Prints all characters following the L command until the next escape character. |
N | Prints the user name of the user that submitted the print job. |
I | Prints the print job number. |
D | Prints the date when the print job is printed, using the date format used by the print server. |
T | Prints the time when the print job is printed, using the time format used by the print server. |
U | Disables block printing of characters in the separator file until explicitly enabled. |
BS | Prints characters in single-width block text until the separator file interpreter encounters a U command. |
BM | Prints characters in double-width block text until the separator file interpreter encounters a U command. |
E | Ejects the current page. |
Print spooling, or storing a print job on disk before printing, affects how clients perceive printing performance and the actual printing speed. You can change the way print spooling works to correct printing problems or to hold printed documents in the printer queue in case a user needs to print the document again.
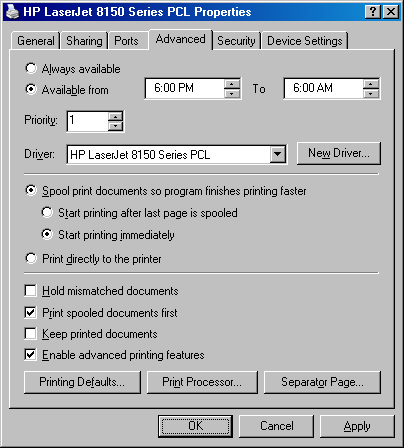
To change the spool settings for a printer, right-click the printer you want to modify, select Properties, and then use the following settings on the Advanced tab to modify the spool settings:
Spool Print Documents So Program Finishes Printing Faster. Spools the print documents to the print server, freeing the client to perform other tasks more quickly.
To reduce the time it takes to print a document, select Start Printing Immediately.
To ensure that the entire document is available to the printer when printing begins, select Start Printing After Last Page Is Spooled. This step might correct some printing problems, and it helps high-priority documents print before low-priority documents.
Print Directly To The Printer. Turns off spooling, causing a performance hit on the server (though it might fix some printing problems).
Hold Mismatched Documents. Holds documents in the queue that do not match the current printer settings (for example, documents that require legal-size paper when letter paper is currently in the printer). Other documents in the print queue are unaffected by held documents.
Print Spooled Documents First. Prints the highest priority document that is already spooled first, ahead of higher priority documents that are still spooling. This step speeds overall printer throughput by preventing the printer from waiting for documents to spool.
Keep Printed Documents. Keeps a copy of print jobs in the printer queue in case users need to print the document again. In this circumstance, the user can resubmit the document directly from the queue rather than printing from his or her application a second time.
Note
For optimal performance, place the spool folder for the print server on a separate drive from Windows, its applications, and especially its swap file. Also, make sure the drive is big enough to hold all the documents in the print queue. (If you choose to hold printed documents, use a large drive or disk array and use the File Server Resource Manager to create a quota for the print queue that notifies you if the print queue grows too large.) To change the spool settings for the print server, right-click the server in the Print Management Console and choose Server Properties, or open the Printers And Faxes folder, choose Server Properties from the File menu, and then click the Advanced tab.
When you install a printer, Windows installs the Windows Server 2000, Windows XP, and Windows Server 2003 version of the driver that corresponds to the processor architecture used by the server (x86, x64, or Itanium). To use the printer from a client computer that runs an older version of Windows or uses a different processor architecture than the server, you must install additional drivers. For example, if the server is running a 32-bit version of Windows but the client computer is running Windows XP Professional x64 Edition, you must install x64 drivers on the server for all printers to which you want the client computer to be able to print.
You might also need to remove or reinstall problematic drivers, or set up a printer pool where two or more printers act as one printer to improve speed and availability.
To install printer drivers that Windows automatically downloads onto a client machine when a user connects to the printer, follow these steps:
In the Print Management Console, right-click the Drivers folder on the appropriate print server and choose Manage Drivers. Or open the Printers And Faxes folder, choose Server Properties from the File menu and then click the Drivers tab of the Print Server Properties dialog box.
Use the Drivers tab of the Print Server Properties dialog box to manage drivers:
To install drivers, click Add and then use the Add Printer Driver Wizard to install drivers for the appropriate operating system and processor architecture.
To remove an obsolete or problematic driver, select it and click Remove.
To reinstall a driver, select it and click Reinstall.
To view the details of a printer driver, select the driver and click Properties.
Note
When installing new drivers for multiple operating system versions and/or processor architectures, use drivers that are designed to work together so that printer settings you specify on the print server can be applied to client computers when they connect to the printers. Some printer manufacturers provide multiple-platform driver packages just for this purpose.
A printer pool is useful for handling a large volume of printing at a single location, particularly when there is a mix of large and small documents. For example, someone with a single-page memo probably does not want to be stuck in the queue behind a print job that is the corporate equivalent of the Encyclopedia Britannica.
If multiple printers share a single driver, you can add them to a printer pool, which appears to users as one printer. The advantage of using a printer pool is that clients simply print to the single logical printer on the print server, which then sends the print job to the first available printer. If one printer in a printer pool goes offline, Windows sends the print jobs to the other printers in the printer pool, eliminating downtime for users. Printer pools also simplify administration because you manage all printers in a printer pool with one logical printer; if you modify the properties for the single logical printer, all physical printers in the printer pool use the same settings.
To set up a printer pool or change the port settings for a printer, follow these steps:
In the Print Management Console or the Printers And Faxes folder, right-click the logical printer on which you want to enable printer pooling, and choose Properties.
Click the Ports tab.
Select the Enable Printer Pooling check box.
To add an additional printer to the printer pool, select the port to which the printer is connected.
If the printer is a network printer and you have not yet added it to the print server, click Add Port to add a new Standard TCP/IP printer port for the printer. (See the Installing Printers section of this chapter for more information.)
To change the transmission retry settings for a port, select the port and click Configure Port.
This section discusses how to perform two common print server maintenance tasks—optimize a print server and prepare for a print server failure—as well as how to troubleshoot common printer problems.
The goal in troubleshooting printing problems, as in troubleshooting any type of problem, is first to isolate and identify the problem and then to determine a course of action to fix it. This section helps you diagnose your printer problems and locate the printing subsystem where the error is occurring, and it gives you specific tips for solving your problems.
Printing problems usually fall into the following categories:
Physical problems. Including problems with the printer and the transmission media.
Print server problems. Including problems with printer drivers, permissions levels, and software status.
Network connectivity problems. Including not being able to communicate between the server and the clients because of incorrect protocols, network settings, or hardware failures. (You can troubleshoot these problems on either the client or the server, depending on where the connectivity problem exists.)
Client problems. Including problems with printer drivers, permissions, and applications.
Try to determine which category the problem is in before getting into details. A process of elimination usually works. Start by printing from a couple of client machines. If only one does not work, you narrowed the problem down to that client machine; if all clients fail, try printing from the print server. If this succeeds, you know that the problem lies either in the print server configuration or in network connectivity. Keep trying alternatives until you isolate the problem as precisely as possible, and then apply the most common fixes until you solve the problem.
If you already know where the problem is, jump straight to the heading in this section that applies and continue.
More Info
If you cannot resolve the problems by using the information provided here, use the Microsoft Knowledge Base on the Microsoft Web site at http://support.microsoft.com.
For best performance, use a fast, dedicated drive or disk array just for the print spool folder, and do not place any system files—especially the swap file—on this drive. Windows Server 2003 gives file sharing a higher priority than printer sharing, so expect reduced print performance if you use the print server for both services. Also, place the print server on the same network segment as the users and printers.
To monitor the performance of print servers to determine whether they are performing optimally, launch the Performance snap-in from the Administrative Tools folder and add counters from the new Print Queue object under the Performance category.
Many companies have a secondary print server in case the primary print server fails. When the primary print server fails, the administrator has three options:
Send e-mail instructing users to choose ReserveServer2 (for example) for printing. This option is easiest for the administrator but, inevitably, some users have difficulty connecting to another printer. If you planned the print server downtime, you can use the Print Management Console to deploy printer connections to the backup server and remove connections to the offline server.
If your network requires an extremely high level of print performance and reliability, set up a print server cluster. This provides additional capacity and automatic fail-over should one server stop responding. For information about clustering, see Chapter 19.
Create an alias on a backup print server so that clients see the backup server instead of the primary server. The backup print server must connect to the same network printers as the primary print server and use the same share names. (Use Print Migrator to copy the configuration of the primary server to the backup server.)
To switch users to the backup server instead of the primary server, follow these steps:
Open Registry Editor (Regedit.exe) on the backup print server, and navigate to the following registry key:
HKEY_LOCAL_MACHINESystemCurrentControlSetServicesLanmanServerParameters
Create a new String Value named OptionalNames with the primary server name as the data.
Create a new DWORD Value named DisableStrictNameChecking with a value of 1.
Security Alert
The DisableStrictNameChecking registry value makes it possible for someone on the internal network to use the OptionalNames parameter to impersonate a computer, although name resolution would be unreliable unless they also "poisoned" the DNS and/or WINS server. Remove this registry value as soon as the primary print server is back online; otherwise, you push new printer connections to all clients and remove connections to the offline server.
Create a DNS Alias (CNAME) record mapping the primary server’s DNS name to the backup server’s DNS name.
If you are using WINS on the network, create a DHCP reservation for the backup print server so that its IP address does not change, and then create a new static mapping in WINS that maps the primary print server’s NetBIOS name to the backup print server’s IP address. See Chapter 17 for more information about administering WINS, DHCP, and DNS.
Restart the server.
To bring the primary print server back online, delete the new registry values, DNS alias, and WINS registration and then restart the server.
Note
If a printer fails on the print server but the server itself does not, you can easily move users to another printer that can use the same printer driver. (Recent printers in the same model line can often use the same driver.) To do so, right-click the printer, choose Properties, click Ports, and then select the port of the printer to which you want to redirect users of the failed printer. This port can be a local port, network port, or printer share on another print server. You can also create a printer pool to automate the failover of one printer to another that uses the same driver.
Print from the client machine, and observe any error messages that appear. These messages often uncover the cause of the problem or at least indicate some possibilities. If the document prints properly, you probably have a user error, in which case you might need to educate the users as to the proper printing procedure. Otherwise, you might have a problem with a particular program, or there might be a compatibility problem with the printer driver.
Note
Many administrators use this step later in their troubleshooting process to minimize the number of times they need to visit client systems. To understand whether the problem affects only the client or clients reporting the problem or whether it is generalized, check the print server or print from another client computer such as your own computer.
Under the Hood: What Happens When You Print a Document
When a Windows XP or Windows 2000 client prints a document, the following sequence of events occurs, as illustrated by Figure 8-11:
The application calls the Windows Graphical Device Interface (GDI), which calls the locally installed printer driver for the remote print device.
The GDI and the printer driver cooperate to render the document in the printer language of the printer.
Windows sends the rendered document with enhanced metafile (EMF) data type, to the client side of the spooler (Winspool.drv).
Winspool.drv then makes a remote procedure call (RPC) connection with the Windows print server’s spooler service (Spoolsrv.exe).
The print server’s spooler service makes an application programming interface (API) call to the print server’s print router (Spools.dll).
The print router communicates with the client’s remote print provider (Win32spl.dll), which then establishes an RPC connection directly with the print server’s spooler service and sends the print job over the network.
The document is saved in the print queue as an .SPL (spool) file by the local print provider.
When the print job reaches the front of the queue, the local print provider on the print server polls the print processor to determine whether it needs to convert the print job to a different data type before printing.
The print job moves to the Separator Page Processor (SPP) for the insertion of a separator page, if required.
Windows despoils the job to the language monitor and, from there, through the appropriate printer port (most likely a standard TCP/IP port) to the printer itself.
The printer receives the print job either in its entirety or gradually as the print monitor feeds the printer at the appropriate rate to keep the printer’s buffers full. The printer converts each page to a bitmap format and then prints the document.

When a document prints but appears garbled or has some other defect, a compatibility problem exists between the client, printer driver, and printer. Make sure that the client is using the proper client printer driver and that the server is using the proper printer driver. If the client is using an x64 edition of Windows, obtain a native x64 version of the printer driver for the specific printer model you are using instead of using a printer driver written for a similar model.
You might want to try installing a duplicate logical printer to test whether the printer driver is corrupt. If this is not the problem, try changing the spool settings on the client driver. If multiple clients experience the same problem, change the server’s printer driver. Specifically, try changing the following options on the Advanced tab of the printer’s Properties dialog box. (See Changing Spool Settings earlier in this chapter for a more detailed procedure.)
To ensure that the entire document is available to the printer when printing begins, select the Start Printing After Last Page Is Spooled option.
If you continue to have printing problems, choose the Print Directly To The Printer option to turn off spooling. This action causes a performance reduction on the server.
Clear the Enable Advanced Printing Features check box on the print server to turn off metafile spooling, which disables some printer options such as page order, booklet printing, and pages per sheet (if available on the printer).
Note
If the printer has multiple trays with different forms, match the form to the tray so that documents using the form always print properly. Under the Form To Tray Assignment heading, select each tray and choose the form that the tray holds. If the printer supports Page Protection and has 1 MB or more of available optional memory, click the Device Settings tab and turn on this option to ensure that complex pages print properly. When you turn this option on, the printer creates each page in memory before beginning to print.
If the document does not print at all, perform the troubleshooting tasks described in the following list:
If you receive an error stating that the appropriate printer driver is not available for download, install the printer drivers on the print server that correspond to the client computer’s operating system and processor architecture. (See the Managing Printer Drivers section of this chapter for more information.)
If you receive an error stating that the print device was unavailable, you might have a network connectivity problem, or the user might not have Print permissions on the printer. (See the Setting Security Options section of this chapter for more information.)
If you experience a lot of disk access and the document fails to print, verify that the drive holding the client’s spool folder contains enough free disk space to hold the spooled document. (See the Changing Spool Settings section of this chapter for more information.)
Determine whether you can see and connect to the print server across the network. Try copying a file to the print server to see whether you can access the print server. (Generally, if you cannot access the print server, you cannot access any attached printers.)
Print a test document from Microsoft Notepad. If you can print with Notepad, the printer drivers are correct and the application is likely the problem.
If you cannot print with Notepad, you can also try printing from the command line by typing the following command: echo test > [printer port name], using the share name of the network printer as the printer port name.
Some applications experience problems when printing in Windows. Some of the issues you might encounter are listed here:
Printing from Microsoft Outlook on a system with multiple languages is slow. This occurs if languages are installed on the client that are not available on the server. To remedy this, copy the fonts to the %SystemRoot%Fonts folder on the print server, and open the Fonts folder (or restart the server).
"Access denied" error message occurs when configuring a printer inside an application. This occurs when you do not have sufficient privileges to change the printer’s configuration. To change advanced printer settings, you need to have Manage Printers permissions.
"Out-of-memory" error message occurs on application load on Windows 3.x client. This can occur if the user has not selected a default printer. Install a printer, and set it as the default printer.
MS-DOS program does not print. Try quitting the program—some MS-DOS programs do not print until you close them. Also, use the net use command to map a local port to the shared printer. (For more information, see Microsoft Knowledge Base Article 314499 on the Microsoft Web site at http://support.microsoft.com/kb/314499.)
More Info
For other issues, consult the Printers.txt file on the installation CD-ROM for the client operating system if the system is Windows XP, Windows 2000, Windows NT 4, Windows 95, or Windows 98. You might also want to check the Microsoft Knowledge Base at http://support.microsoft.com.
Administrators often check the print server status before actually going to the client machine because they can do it remotely. Use the following list to check the print server status:
Check for stalled documents or error messages in the print queue or on the printer configuration Web page (if present). If the printer is out of paper or toner or if there is a paper jam, an error message frequently appears here.
Check that sufficient free disk space exists on the drive holding the spool folder.
If documents print garbled, the printer might be using the wrong data type (EMF or raw). Try using the raw data type to see whether this corrects the problem. You might also want to clear the Enable Advanced Printing Features check box in the Advanced tab of the printer’s Properties dialog box. (See the Changing Spool Settings section earlier in this chapter for more information.)
Check to see whether any documents are printing. If no documents exist in the print queue to observe, print a test page or document from the print server to verify that the print server is printing properly.
If some documents in the print queue do not print and you cannot delete them, the print spooler might be stalled. Restart the Print Spooler service to see whether this corrects the problem. You might also want to add another logical printer (printer driver) for the printer to try to rule out the possibility of a corrupt printer driver.
If you ruled out the clients and the server as the source of the problem but you still cannot print any documents on the printer, take a close look at the printer. Pause the print queue, and then go check the actual printer. Are any errors reported on the printer? If you find any paper jams or if the printer is low on toner or needs servicing, the printer usually reports an error message. Make sure that the ready or online light is illuminated and that the printer cable is securely attached, or that the network cable is properly plugged in and the light next to the network port is illuminated (if available).
If you still cannot print to the printer, attempt to print a test page directly from the printer. Most printers support this capability. If this works, try configuring a different print server with the printer. If you can print from a different print server, you have a problem with the original print server. If this does not work, use the ping.exe program to see if you can access the printer’s IP address.
If you cannot delete documents in the print queue or if documents do not print, the print spooler might be stalled. This also affects any fax services the server is running. To restart the Print Spooler service, follow these steps:
Launch the Services snap-in from the Administrative Tools folder.
Select the Print Spooler service in the right pane, and then click the Restart Service toolbar button.
To specify a recovery process to perform if the Print Spooler service fails, click the Recovery tab, and then specify whether you want to restart the service, restart the computer, or run a program after each print spooler failure.
Restarting the service is usually a good option—it saves time. Automatically restarting the computer is a last option because of other processes that might be interrupted or stopped by a restart.
To view the services (such as remote procedure call) on which the print spooler depends, double-click the Print Spooler service and then click the Dependencies tab. You can also use this tab to view the services that depend on the print spooler to function properly.
Printer location tracking can have its own set of problems, although these are usually related to the way your printers and network are set up.
This problem usually occurs when you do not name a printer according to the printer location name conventions the company decided to implement. When you have printer location tracking enabled, clients by default can locate only printers with location attributes that match the naming convention. To fix the problem, type the correct location name in the missing printer’s Location field.
If the company changes its organizational structure or if you find that the current location-naming scheme needs to be changed, use Active Directory Sites and Services to update the sites and subnet names and then type the new location names in the Location field of each printer that is affected by the location name restructuring. You can also do this with an Active Directory Services Interface (ADSI) script.
Almost all networks need comprehensive and reliable print services. You must plan how to meet present printing needs while also preparing for expansions and changes. Contingency plans are essential because even a brief disruption in printing is inconvenient and costly. The next chapter covers the day-to-day tasks that network administrators perform and how to customize the tools in Windows Server 2003 to make your work easier and more efficient.