Backing up the data on your network is frequently more complicated than it has to be, and Microsoft Windows Server 2003 has an additional complication in the form of the Active Directory service. Fortunately, the operating system includes the Windows Server 2003 Backup utility licensed from Veritas Software that, although it doesn’t include all the bells and whistles of the major third-party network backup products, at least gets the job done in a reasonably efficient manner. You can use Windows Server 2003 Backup to protect the Windows Server 2003 system on which it runs and to back up other systems accessible by way of the network. This chapter examines the capabilities and limitations of Windows Server 2003 Backup, and it describes some basic strategies you can use to protect your network against data loss related to hardware failure, virus attack, or accidental file deletion.
The first decision you must make when planning a backup strategy is where you intend to store your data. Windows Server 2003 Backup supports magnetic tape, the traditional backup medium, but it can also archive your data to a backup file you can store on any device addressable by the Windows Server 2003 file systems, including cartridge drives (such as Iomega Zip and Jaz drives), floppy disks, and even recordable CD-ROMs. For more extensive archiving, Windows Server 2003 Backup also supports the use of media pools—that is, libraries of disks or tapes that you access through a jukebox or autochanger. Choose your medium based on your budget, the amount of data you have to back up, and how much time you have available for creating the backup.
Estimating the cost of a backup storage medium isn’t simply a matter of pricing tape drives and disk drives. The cost of the recording medium is also an important consideration. Also look at the ongoing costs, especially if you’re using offsite, long-term storage where you’ll need more media on an ongoing basis.
When you install a tape, CD-ROM, cartridge drive, or autochanger in Windows Server 2003 using the Add New Hardware Wizard, the drive falls under the control of the Removable Storage service. The Windows Server 2003 Backup utility relies on this service to provide basic media-handling functions. When you mount, dismount, or eject a disk or tape, the Removable Storage service, not Windows Server 2003 Backup, manages the device.
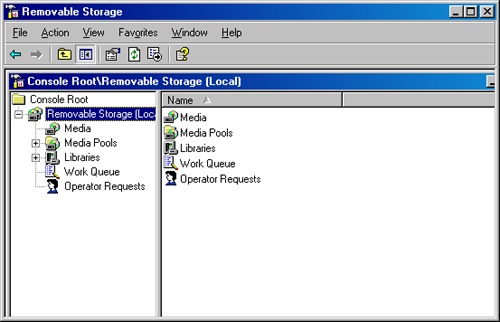
The Removable Storage service has its own user interface, separate from Windows Server 2003 Backup, in the Removable Storage snap-in for the Microsoft Management Console (MMC), as shown in Figure 37-1. You use this tool when you need to send commands directly to a tape drive or other device, such as when you want to eject, format, or re-tension a tape.
As an alternative to backing up using a device registered in the Removable Storage service, you can also back up system data to a file. Windows Server 2003 Backup can create the file on any writable storage device addressable by using a standard drive letter, such as a hard disk, cartridge, floppy disk drive, or even a CD/DVD drive if you have software that makes it look like a regular drive. By default, the backup file has a .BKF extension, but you can name the file anything you want and store it on any supported device.
Because of their extremely low media cost, recordable CD-ROMs can be an excellent storage medium for system backups. Two types of writable CD-ROMs are commonly used: CD-Rs, which are WORM (write once, read many) devices, and CD-RWs, which you can write to many times. Using CD-Rs for backups might seem wasteful because you can fill them only once, but blank disks are cheap enough to make this feasible. As an added benefit, you get a permanent archive of your system, eliminating the need to develop a media rotation system and keep track of how many times you have used a particular tape or cartridge.
Real World: Backups vs. Archiving
Normal business backups have a limited lifespan. Their purpose is disaster recovery and business continuity. Normal backups that are older than a few weeks have limited usefulness for disaster recovery because the data loss becomes unacceptable for normal business recovery and continuity.
Archival backups, however, are not used for business continuity, but are done for historical purposes or because of a specific legal requirement to retain data for a specified time period. These kinds of backups should be done on a backup media that will have a long shelf life, and should be stored in special locations that will subject them to the minimum amount of deterioration.
CD-R and CD-RW media have a limited lifespan and should not be considered archival media. They deteriorate over time and are subject to environmental deterioration as well. Here are some suggestions for extending the lifespan of your CDs:
Do not use adhesive labels of any sort.
Store them in a cool, dry, dark place.
Keep them away from solvents and airborne pollutants.
Note
Windows Server 2003 Backup doesn’t provide direct support for WORM devices such as recordable CD-ROMs. You must use third-party backup software to use CD-R devices. CD-RW devices can be used like a standard removable disk drive if you have the appropriate packet-writing software installed (such as Roxio’s DirectCD).
To effectively back up a network, you must plan your approach to this complex task. Network backups are more complicated than simply putting a tape in the drive and starting up the software. Your backup strategy should address all the following questions:
Note
For maximum security, assign the Backup and Restore permissions to different users. Only trusted administrators should be allowed to restore from backup to guard against data corruption or theft.
The backup window is the amount of time you have available to perform backups of your data. The length of your backup window is a major factor in determining which devices you purchase for backing up your network and which types of backups you perform. Compare the length of your backup window with the amount of data you have to back up to determine the optimum backup rate for your network. If, for example, your organization works overlapping shifts, leaving only a few hours of network time during which to perform backups, you might have to purchase faster equipment or run several devices in parallel to back up all your data in the time allotted. Or you might consider using a two-stage backup—backing up to fast hard disk space during your backup window, and then backing from the hard disk to tape or other removable media after the first stage of the backup completes. With the price of hard drives coming down, the wide availability of relatively inexpensive Network Attached Storage (NAS), the speed of tape not keeping up, and the huge volumes of data that need to be backed up, this option is becoming more attractive.
Part of creating a strategy to fit your available backup window involves selecting the type of backups you’ll perform. Windows Server 2003 Backup supports five types of backup jobs that specify how much of your data is backed up during each job. By selecting the appropriate job type, you can minimize the number of tapes (or other media) and the amount of time required to perform your backups without compromising the safety of your data.
Most of these backup types depend on the archive attribute to determine when the files on a given disk have changed and must be backed up again. The archive attribute in Windows Server 2003 is the same as it was back in the days of MS-DOS, no matter which file system you’re using. The attribute is a single bit included in the directory entry for each file, which the backup software can set or clear as needed.
Typically, a backup program clears the archive attributes for all the files it backs up during a particular job. When you modify a file later, the system automatically sets the attribute as it writes to the disk. This enables the backup software to examine the archive attributes during the next job and back up only the files for which the attribute is set—that is, the files that have changed since the last backup. The backup types described in the following sections are variations on this technique.
A normal backup, in Windows Server 2003 parlance, is a full backup of all the files and directories you select in the Windows Server 2003 Backup software. As part of the job, the program clears the archive attribute on each file. This type of job is the baseline for future jobs that back up only the modified files.
During an incremental backup, the program examines the archive attributes and backs up only the files that have changed since the last normal or incremental backup. As with a normal backup, this type of job also clears the archive attribute on each file it copies. Incremental backups use the minimum amount of tape and also save time by not copying all the files that remain unchanged during every job. However, performing a restore is inconvenient.
For example, if you perform a normal backup on Monday and incremental backups on Tuesday through Friday, you must restore from all five of these tapes in the order in which they were written to ensure that you have the most current version of every file. If a particular file is updated daily, Windows Server 2003 Backup overwrites it with a newer version during the restoration of each tape. However, if you restore only the Monday and Friday tapes, because they represent the last normal backup and the most recent incremental backup, you lose the most current versions of files that were modified on Tuesday through Thursday, but not on Friday.
A differential backup is identical to an incremental backup except that the program doesn’t clear the archive attributes for the files that it copies to tape. This means that during each differential backup you are copying every file that has changed since the last normal or incremental backup. Thus, after a normal backup on Monday, a differential backup on Tuesday copies all the files that have changed (just like an incremental job). However, the differential backups performed on Wednesday through Friday copy all the files changed since Monday’s normal backup. In other words, some redundancy of data is likely during this kind of job because a file modified only once on Tuesday is copied during each day’s differential backups.
This type of job requires more tape than using incremental jobs, and more time as well, but the advantage is that when you perform a restore, you need only the tapes containing the last normal backup and the most recent differential. Thus, if you have to rebuild a system on Saturday, you need restore only the normal backup from the previous Monday and the most recent differential backup from Friday.
A network backup strategy typically uses incremental or differential backups in addition to normal jobs, but not both. If you’re faced with a lot of data to back up and a limited backup window, incremental backups are faster and more economical. However, if you have to perform frequent restores, differential backups make the process far easier.
A daily backup copies only the files that have changed on the day that the backup job is performed, disregarding the current state of the archive attribute. This type of job also doesn’t clear the archive attributes of the files it copies as it runs. Daily jobs are useful when you want to perform an extra backup on a given day without disturbing an established backup strategy by modifying the archive attributes.
A copy backup job is the equivalent of a normal backup, except that the program doesn’t clear the archive attributes of the files it writes to the tape or other backup medium. You can use a copy backup job to perform an extra full backup without disturbing the archive attributes used by an established backup strategy.
A media rotation scheme dictates how many tapes (or other media) you use for your backups. In most cases, you’ll want to keep copies of your backups for a while in case you need to perform a restore from them, but eventually, they become obsolete and you can reuse the tapes. For example, a small network might use a total of five tapes to perform a full backup each weekday and reuse the same tapes each week. In contrast, a large, security-conscious organization might use new tapes for every backup and permanently archive all the used ones. Most media rotation schemes fall somewhere between these two extremes.
One popular rotation scheme is known as the grandfather-father-son method because it uses three "generations" of tapes representing monthly, weekly, and daily backups, respectively. In this rotation scheme, you perform a full backup every month and retain the tape for a year (preferably off-site); this is the "grandfather." You also perform a full backup every week and retain the tape for a month; this is the "father." The "son" backups are performed daily and retained for a week. The daily jobs can be either full, incremental, or differential backups.
The point of a media rotation scheme is to ensure that you always have a current copy of your data on tape and to reuse the tapes in an even and organized manner. Be sure to label your tapes carefully and store them in a safe place, away from magnetic fields and other adverse environments. It is also strongly recommended that you store a copy of your backups off-site, such as in a safety deposit box or other fireproof vault, or with a service that provides pickup, secure storage, and retrieval, so that in the event of a true disaster, such as a fire, your data is protected.
Note
Some third-party network backup products can automatically implement a customizable rotation scheme by tracking the tapes, the number of times they’re used, and the names to put on the labels. These programs also tell you which tape to put in the drive each day and let you know which tapes you must use to restore particular files. Unfortunately, Windows Server 2003 Backup lacks this feature.
The Windows Server 2003 Backup program provides several methods you can use to create and execute backup jobs. When you launch Windows Server 2003 Backup for the first time—by clicking Start, pointing to Programs, choosing Accessories, choosing System Tools, and then choosing Backup—you see the Welcome page for the Backup Or Restore Wizard. This wizard provides a straightforward way to back up the local computer, but for more flexibility, clear the check box for Always Start In Wizard mode and click the Advanced Mode link.
Backup jobs can also be run from the command line using the executable program Ntbackup.exe with the appropriate parameters. See Executing Jobs from the Command Line later in this chapter for more information.
The following sections examine the various methods for creating a backup job. Regardless of the particular method you use, creating any backup job involves the following basic steps:
Select the drives, directories, and files you want to back up.
Specify the storage medium that is the destination for the backup.
Configure backup options such as backup type, logging, and file exclusions.
Specify when the backup is to occur.
Real World: NTBackup Cannot Back Up Case-Sensitive File Systems
The NTBackup program has serious limitations when dealing with some advanced features introduced in Windows Server 2003 R2. Specifically, it cannot correctly back up and restore files and folders on an NFS volume, nor does it know how to handle the case-sensitive files that can be created by Windows Subsystem for UNIX-Based Applications (SUA), even when those files are stored locally on an NTFS volume. The backup portion of NTBackup will report that it has successfully backed up case-sensitive files, but if there are multiple files with the same name except for case, only one version of the file will be available to restore—and which version of the file that is cannot be predicted. This means that C:MyFilesImportantFile.txt and C:MyFilesimportantfile.TXT will be reported as backed up, but only one of them will be restorable.
The only workaround that will successfully back up case-sensitive files is to use a UNIX or SUA tar program to backup the file system and then use NTBackup to back the tar file to your backup media.
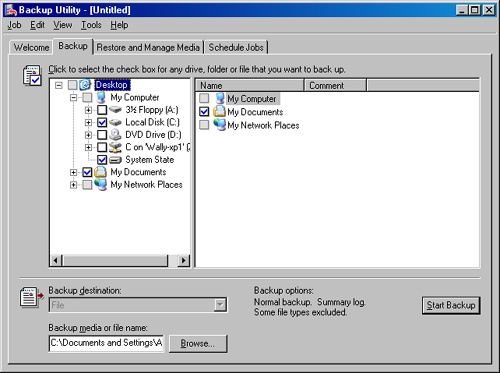
The Backup tab of the Windows 2000 Backup program (shown in Figure 37-2) is where you select the files and directories to be backed up and choose their destination. You use a Microsoft Windows Explorer–like hierarchical display to browse local and network drives and make selections with the check boxes. You can select entire drives or individual files and directories for backup. The System State item backs up the registry and the Active Directory database on the local machine, as well as other system elements required in a disaster recovery situation. See Backing Up the System State, later in this chapter, for more information about the system state and disaster recovery.
After you select the files and directories to back up, you can create a selection script that contains the job configuration you created. After choosing Save Selections from the Job menu, you specify a filename with a .BKS extension for the selection script and the directory where the program should create it. You can use selection scripts to create an identical backup job during a subsequent session by loading the selection script from the Job menu. When you do this, the same system elements you selected before creating the script are selected again. You can then run the job as is or make additional selections. You can also use the script to execute the job from the Ntbackup.exe command line.
To back up any files and folders, the account used to run the job must have the appropriate permissions granting access to those files and folders. A user who is a member of the local Backup Operators group or Administrators group is automatically granted permission to back up any and all files and folders on the local machine. Members of the domain Backup Operators group and Administrators group can back up all files and folders on any computer in the domain, as well as any computer in a domain with which a two-way trust relationship exists.
A user who isn’t a member of any of these groups must either be the owner or have the Read, Read and Execute, Modify, or Full Control permission for each of the files and folders to be backed up. Disk quota restrictions can also limit a user’s ability to back up systems.
After you specify what you want to back up, you must tell the program where to write the data. By default, Windows Server 2003 Backup provides the File option only in the Backup Destination field. If you installed a tape drive or other device so that it is managed by the Removable Storage service, that device is also provided as a destination option. After you make a selection, use the Backup Media field or the File Name field to specify a tape or disk name or the path and filename the program should use to create a backup file.
When you select a tape or other removable storage drive, the Backup Media field enables you to select it by the name you already created with Windows Server 2003 Backup or to select New Media, which enables you to specify a name for a new blank device.
At this point, you can click Start Backup to trigger the backup job using the parameters specified on the Backup tab of the Backup window, or you can further configure the job by choosing Options from the Tools menu. On the General tab of the Options dialog box, you can specify whether the program should use certain media-handling features and, most importantly, select whether the program should verify the data on the tape after completing the backup job. A verification pass compares the data that has been written to the tape or other medium with the original copy on the hard disks to ensure that the data has been written properly. Although the verification process considerably lengthens the time required to run the job, it’s a good precaution to take, especially when you’re working with a newly installed drive.
Important
Although verifying the backup data written to any tape is a wise precaution to take, it isn’t foolproof. Many times a backup job seems to complete successfully and is even verified, but the data can’t be restored for one reason or another. The only absolutely reliable method for ensuring that the data you backed up has actually been written to the tape is to perform test restores.
On the Backup Type tab of the Options dialog box, you select the type of job you want to run (either normal, incremental, differential, copy, or daily, as described in the Backup Types section earlier in this chapter). The default is to run a normal backup, which might be undesirable if you’re in the midst of a backup sequence that relies on the archive attributes to determine which files the program should copy to the tape.
On the Backup Log tab of the Options dialog box (shown in Figure 37-3), you can specify whether the program should keep a log of the activities that occur during the job and the level of detail in the log. Because a detailed log lists every file and directory copied during the job, the file can be quite long. If you want to review the job only to see that all the procedures completed successfully, select the Summary option.

The backup logs are stored as ASCII files with a .LOG extension in a subfolder named Local SettingsApplication DataMicrosoftWindows NTNTBackupData. This path is located in the Documents And Settings folder named for the user scheduling the job. You can view the logs with any text editor, but unfortunately, Windows Server 2003 Backup gives the files incremental names like Backup01.log and Backup02.log, making it difficult to locate the log for a particular job. To view a log by the job name, choose Report from the Backup program’s Tools menu, select a particular job, and click View or Print. This displays the log file using Notepad.
On the Exclude Files tab (shown in Figure 37-4), you can list specific files and directories that the program should skip during the backup process. By default, the list already contains the files that never need to be backed up, such as the Windows Server 2003 memory paging file (Pagefile.sys). You can add other items to the list as needed. The advantage of using the Files Excluded For All Users list instead of simply clearing specific files on the Backup tab is that you can use wildcards to skip files located anywhere in the job. For example, you can add the file mask Backup*.wbk to the list to exclude all the automatically created Microsoft Word document backup files, wherever they occur in the selected drives and directories.

The Exclude Files tab contains two lists: one to exclude files owned by all users on the system, and one to exclude only files owned by the user currently logged on. With the latter option, you can add the Backup*.wbk file mask to the current-user-only list and safely skip your Word document backups without disturbing anyone else’s.
To add files to either list, click the appropriate Add New button and either select a registered file type or specify a custom file mask in the Add Excluded Files dialog box. (See Figure 37-5.) You can also specify a particular path in which the files—selected either by file type or by file mask—are to be excluded. By default, the program excludes the files in the chosen folder and all its subfolders, but you can limit the exclusion to the selected folder only by clearing the Applies To All Subfolders check box.

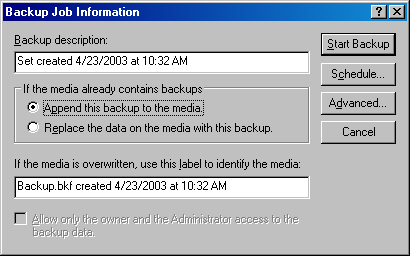
After you configure the options for the job, click Start Backup on the Backup tab and the Backup Job Information dialog box opens. (See Figure 37-6.) You’re prompted to specify a descriptive name for the backup set and to decide whether the job should be appended to the selected tape (or other medium) or whether to overwrite any existing data. If you intend to overwrite the tape, you must specify a new name for it. If you choose to overwrite the tape, you can also control access to the data written to the tape by selecting a check box that permits only the owner of the job and members of the Administrators group to restore its files.
When you click Advanced in the Backup Job Information dialog box, the program prompts you for a backup type (with the value selected on the Backup Type tab of the Options dialog box as the default), and you can choose to enable the following options:
Back Up Data That Is In Remote Storage. When selected, this causes the program to back up data that has been migrated to remote storage. (The data must be temporarily recalled to be backed up.)
Verify Data After Backup. When selected, this causes the program to compare the data written to the tape with the original data. The default value is taken from the equivalent item on the General tab of the Options dialog box.
If Possible, Compress The Backup Data To Save Space. When selected, this activates the data compression capabilities built into the selected tape drive or other device. Windows Server 2003 Backup doesn’t include any software-based compression capabilities; it facilitates only the use of your storage device’s hardware-based compression. This option is enabled by default if the selected device has hardware-based compression capabilities, and it’s disabled if the device doesn’t.
Automatically Back Up System Protected Files With The System State. This option is enabled only if the System State object has been selected for backup. When this option is selected, all the system files in the %SystemRoot% folder and any subfolders are backed up in addition to the files normally backed up for a system state backup.
Disable Volume Shadow Copy. When selected, this option allows the backup of in-use documents. See Chapter 18 and Chapter 20 for details on configuring and using shadow copies.
At this point, you can start the backup job immediately by clicking Start Backup in the Backup Job Information dialog box, but to establish an organized backup strategy, you’ll want to schedule your jobs to execute at specific intervals. When you click Schedule in the Backup Job Information dialog box, if the backup selections have not been saved, you are instructed to do so before you can schedule a backup. Otherwise, the program prompts you to specify the user name and password for the account that the system should use when running the job. The program then calls for you to specify a name for the job and displays the current date and time for the start date. To execute the job later, click Properties to display the Schedule Job dialog box shown in Figure 37-7.
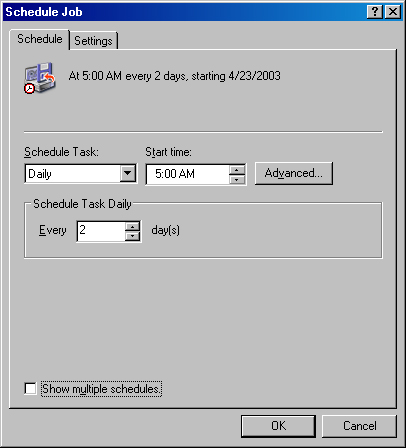
Here you can specify whether the job is to be executed once at a certain time or repeated at regular intervals. The options available in the Schedule Task drop-down list are as follows:
Once. Executes the job once at a specific time on a specific date.
Daily. Executes the job at the specified time each day or, if you modify the value of the Schedule Task Daily selector, each specified number of days.
Weekly. Executes the job at the specified time on each of the specified days of the week or, if you modify the value of the Schedule Task Weekly selector, each specified number of weeks.
Monthly. Executes the job at the specified time once a month, based on either a selected date (such as the first of every month) or a day of the week (such as the first Monday of every month). By clicking Select Months, you can specify the months in which the job should run.
At System Startup. Executes the job the next time the system is started.
At Logon. Executes the job the next time the job owner logs on.
When Idle. Executes the job when the system has been idle for a specified number of minutes.
Note
The scheduling capabilities of Windows Server 2003 Backup are quite comprehensive but not always intuitive. For example, you must select Weekly to run a daily job only on weekdays, and then select all the days except Saturday and Sunday.
If you select the Show Multiple Schedules check box, the heading on the Schedule tab changes to a selector in which you can create and manage separate schedules for the same job. You can, for example, schedule a normal backup job to execute every weekday and create a separate event to execute the same job on the last Sunday of each month, to create an extra copy for off-site storage.
If you select Once, Daily, Weekly, or Monthly from the Schedule Task list, the Advanced button becomes available. Clicking this button opens the Advanced Schedule Options dialog box. In this dialog box, you can specify a date at which a repeating job should no longer be rescheduled and you can also configure a job to repeat continually after a specified interval has elapsed. You can use this feature to copy important and volatile data to a backup file every few minutes, as an extra precaution against data loss.
On the Settings tab of the Schedule Job dialog box, you can specify conditions under which the system is instructed not to run the job, such as when the computer has not been idle for a specified length of time or when it’s running on battery power. You can also configure the job to terminate if it doesn’t finish within a specified length of time.
After you schedule a job for later execution, you see an icon representing it in the backup program’s Schedule Jobs tab. Rest the pointer on any icon for the name of the job to appear. (See Figure 37-8.) You can modify the parameters for any scheduled job by clicking its icon to access its Scheduled Job Options dialog box.

Windows Server 2003 Backup includes still another wizard to guide you through the process of configuring and creating a backup job. You can launch the wizard either from the Windows Server 2003 Backup program’s Welcome tab, by double-clicking a particular calendar date on the Schedule Jobs tab, or by clicking Add Job on the Schedule Jobs tab. If you already selected drives, folders, or files to back up on the Backup tab, the program offers to use those selections in the wizard when you select a date.
The prompts presented by the wizard correspond to the options available in the program’s regular GUI dialog boxes, reminding users of the program’s capabilities and preventing them from inadvertently omitting an important option.
In addition to the wizards and the GUI, you can also execute jobs from the command line. In fact, when you schedule a job for later execution using the GUI or the Backup Wizard, the program actually uses the Windows Server 2003 Task Scheduler to launch the job with the command-line equivalents to the options you chose. Select Task Scheduler from the Control Panel menu, and select your backup job. On the Task tab, you can see the command line for your job in the Run field. (See Figure 37-9.)

The executable file for the Windows Server 2003 Backup program is still called Ntbackup.exe and is located in the %SystemRoot%System32 folder. The best application for this command-line capability is to execute selection scripts that you previously created in the backup program’s GUI interface from batch files or other scripts. The syntax for running Ntbackup.exe from the command line is as follows:
Ntbackup backup [systemstate] "@filename.bks" /J "jobname"
[/P "poolname"] [/G "guidname"] [/T "tapename"] [/N "medianame"]
[/F "backupfilename"] [/D "setdescription"] [/DS "servername"]
[/IS "servername"] [/A] [/V:{yes|no}] [/R:{yes|no}] [/L:{f|s|n}]
[/M backuptype] [/RS:{yes|no}] [/HC:{on|off}] [/SNAP:{on|off}]
backup. Specifies that the program perform a backup operation (even though restore is not a valid parameter on the command line).
systemstate. Specifies that the program should back up the system state in addition to the files and folders specified on the local computer’s command line or in a selection script.
bksfilename|foldername. Specifies the name of a selection script file or the name of a folder for the program to back up (along with its subfolders). The @ character must precede the name of the.bks Backup selection file.
/J "jobname". Specifies a name for the backup job that the program uses to identify it in the log file.
/P "poolname". Specifies the name of the media pool from which the program should take the tape (or other medium) to perform the backup. This option must not be used with the /A, /G, /F, or /T switch.
/G "guidname". Specifies that the program perform the backup to a tape or other medium identified by the guidname variable. This option cannot be used with the /P switch.
/T "tapename". Specifies that the program perform the backup to a tape or other medium identified by the tapename variable. This option cannot be used with the /P switch.
/N "medianame". Specifies the new name for a tape or other medium that is being overwritten by the backup job. This option cannot be used with the /A switch.
/F "backupfilename". Specifies the name of the .BKF file to which the program should back up the selected files and folders. This option cannot be used with the /P, /G, or /T switch.
/D "setdescription". Specifies a descriptive label to be assigned to the backup set.
/DS "servername". Causes the program to back up the directory service file for a specified Microsoft Exchange server.
/IS "servername". Causes the program to back up the information store file for a specified Microsoft Exchange server.
/A. Causes the program to append the backup job to the tape or other medium specified by the /G or /T switch. This option cannot be used with the /P switch.
/V:{yes|no}. Specifies whether the program should verify the data after the backup is completed.
/R:{yes|no}. Specifies whether access to data on the tape or other medium should be restricted to the owner of the job and members of the Administrators group.
/L:{f|s|n}. Specifies the type of log that the program should keep while executing the backup job, where f = full, s = summary, and n = none.
/M backuptype. Specifies the type of backup to be performed, where backuptype is replaced by one of the following values: normal, incremental, differential, copy, or daily.
/RS:{yes|no}. Specifies whether the program should back up migrated Removable Storage data. (The Remote Storage database is backed up automatically when you back up the %SystemRoot% folder.)
/HC:{on|off}. Specifies whether the program should activate the hardware-compression capabilities of the tape drive.
/SNAP:{on|off}. Specifies whether the backup should use a volume shadow copy.
The default states of the /V, /R, /L, /M, /RS, and /HC switches correspond to the current settings of the corresponding options in the backup program’s GUI dialog boxes.
Windows Server 2003 Backup allows you to select individual files and directories for restoration or simply to restore the entire backup set to its original location. As with the program’s backup function, you can create restore jobs using GUI screens or a wizard. There is no command-line restore function in NTBackup, a serious omission in our opinion.
When you display the Restore And Manage Media tab in the Windows Server 2003 Backup program, you see a list of the media in the backup media pool and the backup files you created. As part of each backup operation, Windows Server 2003 Backup creates a catalog of the backup set and stores it on the tape or other medium. (If a backup job spans two or more tapes, the backup set catalog is stored on the last tape.) The program accesses this catalog whenever you select a tape from the list for restoration.
After you insert the proper tape into the drive, the program reads the catalog and shows the contents of the tape in a hierarchical display just like that of the Backup tab. (See Figure 37-10.) You can select drives, folders, and files to restore just as you selected them to be backed up.

In a disaster-recovery situation, you probably want to restore an entire backup set to its original location, but in many cases, network administrators perform restores to retrieve a copy of a file or folder that a user has accidentally deleted or that has become corrupted somehow. When this is the case, you might not want to restore the files to their original location, and Windows Server 2003 Backup provides options that enable you to specify another location. The Restore Files To drop-down list on the Restore And Manage Media tab provides the following options:
Original Location. Restores all the selected files and folders to their original locations on local or network drives, preserving the original directory structure
Alternate Location. Restores all the selected files and folders to a specified folder, preserving the directory structure of the restored material
Single Folder. Restores all the selected files to a single specified folder, disregarding the original directory structure
Important
If you elect to use the Single Folder option when performing a restore and you have files with identical names in the selected directories, the program uses the settings from the Restore tab in the Options dialog box to determine whether to overwrite the first files with subsequent, identically named files.
On the Restore tab of the Options dialog box (Options from the Tools menu), you specify how the backup program should behave when it encounters existing files with the same names during a restore operation. The following options are available:
Do Not Replace File On My Computer. Restores only the files that don’t already exist on the destination disk
Replace The File On Disk Only If The File On Disk Is Older. Compares the dates of the identically named files, and overwrites existing files on the destination disk only if the backed-up version is newer
Always Replace The File On My Computer. Restores all the selected files to the destination disk, overwriting any existing files with identical names
When you click Start Restore, the Confirm Restore dialog box gives you the opportunity to click Advanced to configure the following advanced restore options before beginning the restore process:
Restore Security. Specifies whether the program should restore all the security settings for each file and folder, including ownership, permissions, and audit entries. To restore the security settings, the destination for the restore job must be an NTFS drive (and the files and folders must have been backed up from an NTFS drive).
Restore Removable Storage Database. Specifies whether the program should restore the Removable Storage database to the %SystemRoot%System32Ntmsdata folder, overwriting any existing Removable Storage database at that location.
Restore Junction Points, And Restore File And Folder Data Under Junction Points To The Original Location. Specifies whether the program should restore the junction points created with mounted drives as well as the data that the junction points reference. When this feature is disabled, Windows Server 2003 Backup restores the junction points themselves but doesn’t necessarily restore the referenced data.
When Restoring Replicated Data Sets, Mark The Restored Data As The Primary Data For All Replicas. Specifies whether the program should restore file replication service (FRS) data so that it is replicated to other servers. When this feature is disabled, Windows Server 2003 Backup restores the FRS data, but because of its age, it is likely to be overwritten later by data from the replicas on other servers.
A catastrophic hard-disk failure on a server is every network administrator’s ultimate challenge, and other misfortunes can end in the destruction of disks or even entire systems. Making sure you have current backups of your disks is an essential part of any disaster recovery plan, as described in Chapter 36, but other Windows Server 2003 system elements should also be protected. Windows Server 2003 Backup includes additional features that allow you to protect the entire system configuration and simplify the process of restoring the computer to its former state.
A separate entry called System State appears with the local drive letters under the My Computer heading on the Backup tab of Windows Server 2003 Backup. Selecting the System State entry causes the program to back up the components of the local system configuration that aren’t directly accessible through the file system. These components include the following:
Registry (on both servers and workstations)
Class Registration database (on both servers and workstations)
System boot files (on both servers and workstations)
Certificate Services database (on certificate servers only)
Active Directory (on domain controllers only)
SYSVOL folder (on domain controllers only)
Backing up these components makes it possible for you to completely restore a system to a new disk without losing any of the domain and local user accounts or the rights and permissions associated with them. You can back up the system state only for the local machine, meaning that if you have multiple Windows Server 2003 systems on your network, you have to run the backup program on each computer to fully protect them. In most cases, however, only Windows Server 2003 domain controllers contain system state information that is irreplaceable.
Because of dependencies between the system state elements, you can’t back them up or restore them individually; you must treat them as a unified system element. However, you can restore the system state to another location, in which case on domain controllers the program restores only the registry, SYSVOL, and system boot files.
Note
Even if you can’t back up the system state on remote systems, you can back up disks from those systems over the network. You can effectively protect all your systems by first running a backup of the system state on each computer, saving it to a network share. Schedule the same backup to run at regular intervals. Then schedule a backup of the files on the share in addition to the regular remote backup to run after the backup of the local system states. Should you need to reconstruct a machine, the data files can be restored from the network backup and the system state can be restored locally.
Backing up and restoring data in a network environment is a process that has always been subject to special problems and considerations. Windows Server 2003 Backup addresses some of these problems, as discussed in the following sections.
Because they can be constantly in use, mail servers such as Microsoft Exchange have unique backup problems. The backup program includes a feature specifically designed to back up Exchange servers, which is available only when the program detects an Exchange module called Edbbcli.dll on the local system. When this module is present, a Microsoft Exchange item appears in the backup program’s Tools menu, enabling you to specify the Uniform Naming Convention (UNC) name of the Exchange server you want the program to access. Also, the expandable display in the Backup tab includes a Microsoft Exchange icon you select to back up the mail server.
Encrypted files aren’t stored any differently from unencrypted files by the Windows Server 2003 file systems; only their data format is different. Therefore, backing up encrypted files doesn’t in any way compromise their security status. The files are copied to the tape or other medium in their encrypted form and restored the same way. The personnel responsible for backing up the files don’t need to have access to the encryption codes, nor does access to the tape itself present a risk.
Backing up the system state is as simple as selecting the appropriate box on the Backup tab, but restoring it is a bit trickier. The restoration process must not only overwrite vital system data that is currently in use, such as the registry, but it must also (in the case of a domain controller) restore the Active Directory database. This problem is particularly difficult because in a domain with multiple domain controllers, the replication system can overwrite the newly restored data because of its outdated update sequence numbers.
Therefore, to effectively restore the system state on a domain controller, you must perform two special procedures during the restoration process: start the computer in directory services restore mode, and perform an authoritative restore of the Active Directory database.
Note
You can restore the system state only on the local system. The Windows Server 2003 Backup program automatically determines the correct destination for the restored data, based on the location of the system root directory (typically C:Windows), and it overwrites the existing system state data on the computer.
To restore Active Directory and the SYSVOL volume on a Windows Server 2003 domain controller, you must first reboot the system in directory services restore mode, a form of safe mode that ensures that the system is ready to have its Active Directory database overwritten. To do this, restart the system and press the F8 key when you see the Please Select The Operating System To Start message. From the Boot menu, choose Directory Services Restore Mode. After checking the system’s local drives to ensure their integrity, Windows Server 2003 loads the operating system in a standalone server configuration with a set of generic drivers that permit safe-mode access to the operating system.
Because your domain controller system isn’t functioning as a domain controller at this time, you might see error messages stating that Active Directory–dependent services have failed to load. This is to be expected. Because the machine isn’t functioning as a domain controller, it isn’t using the user and group objects associated with the domain. Instead, the system is using a small set of user and group accounts stored in the registry rather than in Active Directory. At this point, you can run Windows Server 2003 Backup and restore the system state.
When you restore the system state on a domain controller, the restored Active Directory objects have the same update sequence numbers as when they were backed up. These numbers are necessarily older than those currently in use in Active Directory and, as a result, they are considered to be outdated and are overwritten during the next replication pass. To prevent this from happening, you must perform an authoritative restore of the Active Directory data stored as part of the system state on the backup medium. An authoritative restore is one that flags the restored Active Directory objects as authoritative, meaning that during the next replication event they overwrite the equivalent objects on the domain controllers containing the replicas.
To perform an authoritative restore, you must run the Windows Server 2003 Ntdsutil.exe program after you restore the system state and before you reboot the computer. Ntdsutil .exe modifies the update sequence numbers of the restored objects so that they appear to the replicas to contain the newest data available. During the next replication pass, the system uses the restored Active Directory database objects to overwrite the data on the domain’s other controllers.
Note
Windows Server 2003 will not allow a restoration of domain controller backup older than the tombstone lifetime configured for the enterprise. The default tombstone lifetime is 60 days except on Windows Server 2003 SP1 or later where the default is 180 days when creating a new forest, as described in Microsoft Knowledge Base Article 216993. See http://support.microsoft.com/default.aspx?scid=216993 for more information.
The Ntdsutil.exe program is an interactive command-line utility copied to the %SystemRoot%System32 folder by default during the operating system installation. You see a prompt labeled ntdsutil: when you run the executable file from the command line. The program uses a series of menus to navigate its various functions. Type a question mark (?) or help at any prompt to list the available commands and submenus for that prompt. To perform an authoritative restore, type authoritative restore at the ntdsutil prompt and then type help to display the available commands, which are as follows:
Restore Database. Modifies the update sequence numbers of all Active Directory objects, making them authoritative for the entire domain
Restore Database Verinc %d. Authoritatively restores the entire database specified by the variable %d, and overrides version increase
Restore Subtree %s. Modifies the update sequence numbers of Active Directory objects in the subtree specified by the %s variable, making them authoritative for the entire domain
Restore Subtree %s Verinc %d. Authoritatively restores the subtree specified by the variable %s, and overrides version increase
Thus, to use the entire Active Directory database restored with the system state as authoritative information, you use the Restore Database command at the Ntdsutil.exe authoritative restore: prompt. The program opens the database and increases the version number of all the Active Directory objects by 100,000. When the process is complete, you can exit the program by typing quit twice, and restart the system in normal mode. When the computer is functioning as a domain controller again, it replicates its Active Directory database to all the other controllers in the domain, and because the version numbers of its objects are substantially higher than those of the other replicas, the system copies the restored data to all the replicas in the domain.
File system permissions are an essential element of any network storage policy, and for a backup program to function in a network environment, it must be able to save the permissions along with the files and restore them either to the same or a different location. However, the various file systems supported by Windows Server 2003 complicate this process considerably. The FAT file systems don’t support permissions, the NFS file system has a completely different set of permissions, and if you restore a backup of an NTFS drive to a FAT or NFS drive, those permissions are lost or, in the case of NFS, simplified.
The Windows NT backup utilities suffer from serious deficiencies in their tape-drive support, scheduling capabilities, and other features. For some networks, NTBackup will be sufficient, but in many enterprise environments, it just isn’t a sufficient tool.
One of the shortcomings of the Windows Server 2003 Backup program is that because the backup set catalogs are stored on the backup media themselves, you can’t tell whether a particular file is on a tape without loading it so that the program can read the catalog. This can be more than a little time consuming and annoying if you have several days’ worth of tapes to go through to find a particular version of the file. Some third-party backup products store the catalog information in a database on the local drive, enabling you to search for particular files (and even particular versions of files) to discover which tape you must use to restore them. This feature uses a substantial amount of disk space, but disk space is much less expensive than an administrator’s time in most environments.
Although Windows Server 2003 Backup supports backing up to CD-RW media (if you have packet-writing software such as Roxio’s DirectCD installed), it doesn’t support disk spanning (the ability to save the backup to multiple disks), and it doesn’t support DVD at all. This, combined with the lack of CD-R support (because CD-R disks are much cheaper than CD-RW disks), makes the Windows Server 2003 Backup program less than useful when paired with CD-ROM burners. Fortunately, most third-party backup programs support both CD-R media and disk spanning, allowing you to back up to multiple CD-ROM media (although your patience might be taxed if backing up more than a couple of gigabytes).
Most third-party programs also simplify the process of creating a media rotation scheme by enabling you to specify the types of jobs you want to run each day and indicating when to run them. The program takes charge of the tape labeling by telling you which tape to insert each day and assigning it a new name. After overwriting each tape a specified number of times, the program advises you to retire it and add a new tape to the rotation. This also makes restoring to a specified file easier because the program can tell you by name exactly which tape you need to restore from.
Some network backup solutions also provide additional capabilities such as modules that enable you to back up certain types of files while they’re in use or that allow you to back up workstations running non-Windows operating systems. Although third-party network backup solutions aren’t absolutely necessary, they can provide simplified backup administration and expanded capabilities.
While not a third-party solution, the Microsoft System Center Data Protection Manager 2006 (DPM) is a new, and interesting, addition to the system administrator’s backup toolset. Unlike NTBackup, which is primarily a tape-based backup and recovery tool, DPM is designed around disk-based backup and recovery. It provides nearly continuous backups of files and file modifications, and enables rapid restoration of file versions from multiple points in time. This initial release only supports file system backups, but future versions will support additional Microsoft products such as Exchange and SQL Server. DPM is not a complete substitute for NTBackup or another tape-based backup utility, but should be actively considered as a supplement to a tape solution.
After you develop an adequate backup strategy and configure the software to implement it, it’s up to the administrator to see that the plan is carried out. Frequently, backups require no more attention than the insertion of a new tape into a drive, and yet even this simple task is often overlooked. Too many administrators learn about the importance of keeping current backups the hard way, through the irretrievable loss of important data. Those who find suitable employment afterward have usually learned their lesson, but it’s always better if you can learn painful lessons without the pain. The next chapter focuses on the tools for building a Windows Server 2003 environment that is both fault tolerant and available.