For many small to medium networks, the groups built into Microsoft Windows Server 2003 can, with perhaps a little tweaking, provide perfectly adequate security. However, larger networks and those with special needs might not be able to alter the groups to provide all the levels of security needed. In those instances, Group Policy can give administrators a degree of control that is as granular as anyone could wish for.
Group Policy can reduce lost productivity caused by the usual suspects—users who accidentally delete system configuration files, misplace vital folders, or inadvertently introduce a virus to the network. Also, Group Policy can help increase productivity by making it easier for users to find what they need to work more efficiently. Group Policy accomplishes this by allowing the administrator to delineate the elements of the user’s desktop environment by specifying which programs are available, which programs appear on the desktop, and which options are available on the Start menu.
Group Policy consists of several configurable components. The first is administrative templates, which set registry-based policy. Administrative templates provide policy information for the items that appear under the Administrative Templates folder in the console tree of the Group Policy Object Editor (GPOE) and in the Group Policy Management Console (GPMC). (These tools will be discussed in further detail later in the chapter.) The other main components of Group Policy are as follows:
Security Settings. Configures security for users, computers, and domains.
Scripts. Specifies scripts for computer startup and shutdown, as well as for user logon and logoff events.
Folder Redirection. Places special folders such as My Documents or specified application folders on the network.
Software Settings. Assigns applications to users. (See Chapter 28 for more about publishing software on the network.)
A collection of policy settings is called a Group Policy Object (GPO). A GPO contains both policies that affect computers and policies that affect users. Computer-related policies include security settings, application settings, assigned applications, and computer startup and shutdown scripts. User-related policies define application settings, folder redirection, assigned and published applications, user logon and logoff scripts, and security settings. In cases of conflicting policies, computer-related settings usually override user-related settings.
Note
Group Policy is the successor to the System Policy Editor in Windows NT and was first introduced in Windows 2000.
GPOs are stored at the domain level and are associated with an Active Directory object—a site, domain, or organizational unit (OU). One or more GPOs can apply to a site, domain, or OU, just as a single GPO can be linked to multiple sites, domains, and OUs.
GPOs store information in two locations: in a folder structure called a Group Policy template (GPT) and in a Group Policy container (GPC) in Active Directory.
The GPT is in the SYSVOL folder of all domain controllers. It contains information about software policy, file and application deployments, scripts, and security settings. A GPC contains GPO properties, including the Active Directory class information related to application deployment. The information stored in a GPC changes infrequently.
Note
A GPO that applies locally is stored in the local computer’s %SystemRoot%System32GroupPolicy folder. A computer can have only one local Group Policy.
When you create a GPO, the corresponding GPT folder structure is created automatically. The actual name of the folder for the GPT will be the globally unique identifier (GUID) for the GPO—a number that is useful to the computer but is otherwise incomprehensible. However, to see the policy folder, look in %SystemRoot%SYSVOL domainPolicies.
When Active Directory is set up, two domain GPOs are created. The Default Domain Policy is linked to the domain and affects all computers and users in the domain. The Default Domain Controllers Policy is linked to the Domain Controllers organizational unit and applies to all domain controllers in the domain.
Group Policy can be created and modified using the Group Policy Object Editor (GPOE) snap-in for the Microsoft Management Console (MMC) plus additional snap-ins such as Active Directory Users and Computers, Active Directory Sites and Services, and Resultant Set of Policy. Different aspects of Group Policy functionality is provided by these additional snap-ins. If this is how you’ve been managing Group Policy until now and are content with the results, you can continue in the same way.
However, you should consider adding the new Group Policy Management Console (GPMC) to your repertoire. The GPMC provides a comprehensive overview of group policy across the enterprise in a single console. All Group Policy management tasks can be performed from the GPMC except configuring individual policies in GPOs. And when you want to configure individual policies from within a GPO, right-click the GPO and select Edit, and the Group Policy Object Editor will launch with the GPO loaded.
As compared with the default Group Policy tools of Windows Server 2003, GPMC adds the following new features:
Back up and restore Group Policy objects
Import and export GPOs and Windows Management Instrumentation (WMI) filters
Copy and paste GPOs and Windows Management Instrumentation (WMI) filters
Easier management of Group Policy–related security
HTML reporting for GPO settings and Resultant Set of Policy (RSoP) data
Note
Download GPMC at http://www.microsoft.com/downloads. If you have at least one valid license of Windows Server 2003 or Windows 2000 Server, you can use an unlimited number of copies of GPMC.
GPMC manages Windows Server 2003 as well as Windows 2000–based Group Policy implementations.
Table 11-1 lists some common Group Policy tasks and how they’re performed on computers with and without GPMC.
Table 11-1. Comparison of tasks with and without GPMC
Task | On a computer without GPMC | With Group Policy Management snap-in |
|---|---|---|
Create a Group Policy Object | Navigate to the Group Policy Properties tab for a site, domain, or organizational unit; click the tab, and then click New. | Open GPMC, navigate to Group Policy Objects, right-click it, and then click New. |
Create a Group Policy object (GPO) and a link to it | On the Group Policy tab for a site, domain, or organizational unit, click New. | In GPMC, right-click the domain, site, or OU; select Create; And Link A GPO Here. For more information, see the Creating a Group Policy Object section later in this chapter. |
Create an unlinked GPO | Go to the Group Policy Properties tab for a site, domain, or organizational unit, and click Add. On the All tab, right-click the Name pane and then click New. | Open GPMC, and navigate to Group Policy Objects. Right click Group Policy Objects, and select New. For more information, see the Creating a Group Policy Object section later in this chapter. |
Edit a GPO | Navigate to the Group Policy Properties tab for the relevant domain, site, or OU. Select the GPO, and then click Edit. | Open GPMC, navigate to Group Policy Objects, right-click the GPO, and then click Edit. The Group Policy Object Editor will open with the GPO loaded. For more information, see the Creating a Group Policy Object section later in this chapter. |
Link an existing GPO to a site, domain, or organizational unit | Go to the Group Policy Properties tab for a site, domain, or organizational unit; click Add; and then select a GPO. | In GPMC, navigate to a site, domain, or organizational unit; right-click it; and then click Link An Existing GPO Here. |
Disable a branch of a GPO | Navigate to the Group Policy Properties tab for the relevant domain, site, or OU. Make your selection on the General tab. | Open GPMC, and navigate to the GPO. Right click, and select Edit, which will launch the Group Policy Object Editor. Right click the GPO, and select Properties. Make your selection on the General tab. See the Disabling a Branch of a GPO section later in this chapter. |
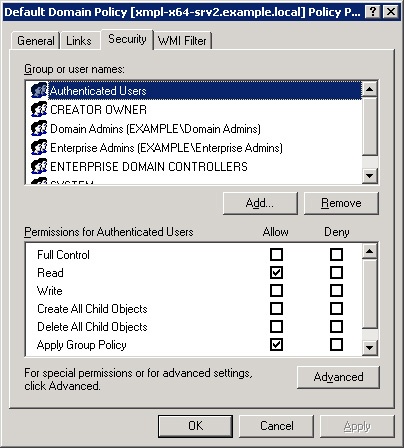
Use security groups to filter the scope of policy | Open the GPO in the Group Policy Object Editor. Right-click the GPO, select Properties, and then click the Security tab. | In GPMC, click a GPO or GPO Link and then click the Scope tab. Use Add and Remove buttons to set the groups, users, and computers to which the GPO applies. For more information, see the Setting the Scope of Group Policy Objects section later in this chapter. |
Delegate permissions on GPOs | Navigate to the properties of a GPO, and select the Security tab. In the Permissions For Authenticated Users pane, select the permissions you want to grant. | In GPMC, click the GPO, click the Delegation tab, and then click the Add or Remove button. For more information, see the Delegating Permissions on GPOs section later in this chapter. |
Determine Resultant Set of Policy with Group Policy Results | In the Resultant Set of Policy snap-in, right-click Resultant Set of Policy and then select Generate RSoP Data. Select Logging Mode or Planning Mode in the Resultant Set of Policy Wizard. | In GPMC, right-click Group Policy Results and then click Group Policy Results Wizard. For more information, see the Using Resultant Set of Policy (RSoP) section later in this chapter. |
Add a WMI filter | Navigate to the Properties of a Group Policy Object, and click the WMI Filter tab. | In GPMC, right-click WMI Filters and click New. |
Group policies are processed in the following order:
Local group policy object.
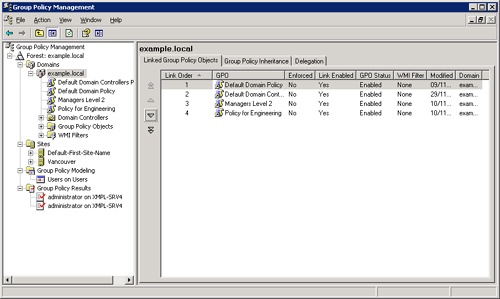
GPOs linked to the site, in the order specified by the administrator. See the Linked Group Policy Objects tab for the site in the Group Policy Management Console (GPMC). The GPO with the lowest link order is processed last and therefore has the highest precedence.
Domain GPOs in the order specified by the administrator. See the Linked Group Policy Objects tab (shown in Figure 11-1) in the Group Policy Management Console (GPMC). The GPO with the lowest link order is processed last and therefore has the highest precedence.
Organizational unit Group Policy Objects, from largest to smallest organizational unit (parent to child organizational unit).
In this sequence, the last writer wins. If multiple GPOs attempt contradictory settings, the GPO with highest precedence wins.
As a rule, Group Policy settings are passed from parent containers down to child containers. This practice means that a policy applied to a parent container applies to all the containers—including users and computers—that are below the parent container in the Active Directory tree hierarchy. However, if you specifically assign a Group Policy for a child container that contradicts the parent container policy, the child container’s policy overrides the parent Group Policy.
If two policies are not contradictory, both can be implemented. For example, if a parent container policy calls for an application shortcut to be on a user’s desktop and the child container policy calls for another application shortcut, both appear. Policy settings that are disabled are inherited as disabled. Policy settings that are not configured in the parent container are not inherited.
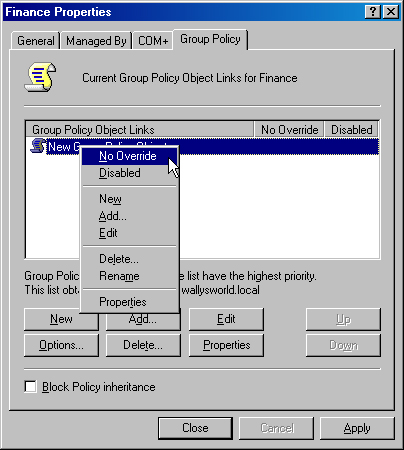
Several options are available for changing how inheritance is processed. One option prevents child containers from overriding any policy setting set in a higher level GPO. On a computer with GPMC, this option is known as enforcing the GPO link. On computers without GPMC, the same function is called No Override. This option is not set by default and must be turned on in each GPO where it’s wanted.
Open GPMC and follow these steps:
On a computer without GPMC, set the No Override option by following these steps:
Open the GPO you want to administer.
Right-click the GPO, and choose No Override from the shortcut menu (as shown in Figure 11-2). A check mark appears next to the GPO under No Override.
Click OK.
A second option is Block Inheritance. When you select this option, the child container does not inherit any policies from parent containers. If there is a conflict between these two options, the Enforced/No Override option always takes precedence.
Simply stated, Enforced/No Override is a link property, Block Policy Inheritance is a container property, and Enforced takes precedence over Block Policy Inheritance.
In the console tree, navigate to the domain or organizational unit for which you want to block inheritance. Right click the domain or OU, and select Block Inheritance.
In the Group Policy Object Editor, right-click the GPO for which you want to block inheritance. Select Properties from the shortcut menu. On the Group Policy tab, select the box for Block Policy Inheritance. (The check box can be seen in Figure 11-2.)
Creating an Active Directory domain also creates a Default Domain Policy and a Default Domain Controllers Policy. With a few judicious adjustments to meet the needs of your own situation, you might never need anything else., though most organizations will likely need a few OUs with Group Policy Objects linked to them. When the time comes to set up a GPO of your own, follow the procedure in Creating a GPO in GPMC or the steps in Creating a GPO on a Computer Without GPMC.
Open GPMC, and navigate to the container to which you want the new GPO to apply. Right-click the domain, site, or OU; select Create; And Link A GPO Here from the shortcut menu.
To create a Group Policy Object using a computer without GPMC, follow these steps:
Launch Active Directory Users and Computers (for domain or OU Group Policy Objects) or Active Directory Sites and Services (for site GPOs).
Right-click the object for which you want to create a GPO, and choose Properties from the shortcut menu.
Click the Group Policy tab, and then click New.
Type a name for the new GPO, and choose from the following buttons:
Add. To add a link to the new policy.
Edit. To open the new GPO in the Group Policy Object Editor.
Options. To set No Override or to disable the GPO.
Delete. To remove the GPO permanently or remove it from the list. If you choose Remove The Link From The List, the GPO remains in Active Directory but is no longer applied to the particular Active Directory container.
Properties. To set filtering for the GPO through security groups.
Click OK when you’re finished.
When you click Default Domain Policy in the Group Policy console tree, the Group Policy Object Editor (GPOE) displays two nodes: Computer Configuration and User Configuration. When you click these nodes, you find that each displays extensions for Software Settings, Windows Settings, and Administrative Templates.
Note
In GPMC, right-click the Default Domain Policy and select Edit to open GPOE with the policy loaded.
Use the Computer Configuration folders to customize policies for computers on the network. These policies go into effect when the computer is turned on and the operating system starts. Settings in these folders apply to any user who logs on to the computer. For example, if you have machines in a training room for which you want to enforce a strict environment, the Computer Configuration node is where you make those settings.
The User Configuration node contains settings for customizing environments or setting policies for users on the network. User Configuration policies come into play when a specific user logs on to the network.
With numerous GPOs on a network, it’s important to keep track of links between GPOs and Active Directory containers such as a domains or OUs. To find out what links exist for a particular GPO, open the Group Policy Object Editor, right-click the GPO, and choose Properties from the shortcut menu. Click the Links tab and then click Find Now to see a list of links to the GPO.
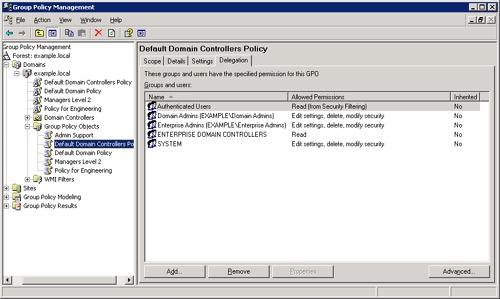
Using GPMC, navigate to Group Policy Objects and select the GPO to view. In the details pane, click the Scope tab to display links. (See Figure 11-3.)
To link a Group Policy Object using GPMC, open the Group Policy Management Console. In the console tree, locate the site, domain or organizational unit to which you want to link a GPO and then select one of the following options:
To link an existing GPO, right-click the domain or organizational unit in the domain, and then select Link An Existing GPO from the shortcut menu. In the Select GPO dialog box, click the GPO that you want to link and then click OK.
To link a new GPO, right-click the domain or OU and then select Create And Link A GPO Here on the shortcut menu. In the Name box, type a name for the new GPO and then click OK.
To link an existing GPO to a domain or organizational unit, open Active Directory Users and Computers. To link to a site, open Active Directory Sites and Services. Right-click the domain, OU, or site to which you want to link a GPO and then follow these steps:
Select Properties, and then click the Group Policy tab.
To add the Group Policy object to the Group Policy Object Links list, click Add. This opens the Add A Group Policy Object Link dialog box.
Click the All tab, click the Group Policy object that you want, and then click OK.
In the properties dialog box for the site, domain, or OU, click OK.
Note
To link a new GPO, follow the steps in the Creating a GPO on a Computer Without GPMC section earlier in this chapter.
The settings of a GPO are implemented when the GPO is linked to a site, domain, or OU. The sum total of the users and computers to which a GPO applies is called the scope.
A GPO applies to all the users and computers in the Active Directory container to which the GPO is linked unless the user or computer portion of the GPO is disabled. Active Directory containers being what they are, there are inevitably users and computers in the container that should not have a particular GPO applied. In addition, policies for a particular GPO apply only to users or computers who have Read and Apply Group Policy permissions for that GPO. To filter the application of a GPO, create security groups and assign Read and Apply Group Policy permissions only to the groups to which the GPO applies.
Filtering the scope of a GPO using security groups involves using the Access Control List (ACL) Editor to allow or deny access to the GPO for particular groups.
Table 11-2 shows the settings needed to have a GPO apply or not apply to a security group. The location of the security group doesn’t matter when making the settings. What matters is the location of the users or computers that are members of the security group. If a user or computer doesn’t belong to the Active Directory container that the GPO is associated with (directly, through a link, or by inheritance), no combination of permissions or membership in a security group can force the GPO to apply to that user or computer.
Table 11-2. Setting policies for security groups
Intended Result | Permissions Needed | Outcome |
|---|---|---|
This group policy will be applied to the members of this group. | Apply Group Policy: Allow Read: Allow | Group Policy will be applied to all members except members who belong to another group with Apply Group Policy or Read set to Deny. |
This group policy will not be applied to members of this group. | Apply Group Policy: Deny Read: Deny | Group Policy will not be applied to any members of this group, no matter what other groups they belong to. |
Membership in this group should not be a relevant factor in whether this Group Policy is applied. | Apply Group Policy: No setting Read: No setting | Application of this Group Policy to members of this group will depend on whether members belong to other security groups with Allow or Deny settings. |
In GPMC, click a GPO or GPO Link, and then select the Scope tab. Under the Security Filtering heading, click Add. In the Enter The Object Name To Select box, type the name of the group, user, or computer that you want to add to the security filter. Click OK.
To set the scope of a GPO when you’re not using GPMC, follow these steps:
Open the GPO you want to administer in the Group Policy Object Editor.
Right-click the GPO, and choose Properties from the shortcut menu.
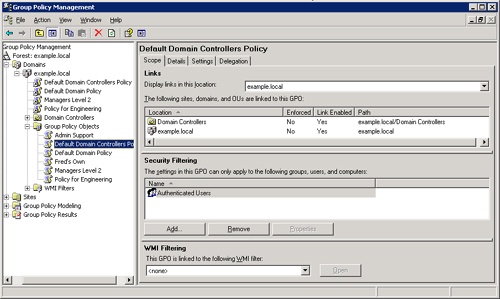
Click the Security tab as shown in Figure 11-4.
Add or remove groups, or edit the settings.
Click OK several times when you’re done to close all the open windows.
Not every network is of such size and complexity as to require delegation of permissions on GPOs. However, many networks are this complicated, so if you’re considering handing off some of the responsibility for GPOs, here are issues to bear in mind:
If permission is set to inherit to all child containers, authority delegated at the domain level will affect all objects in the domain.
Permissions granted at the OU level can affect just that OU or that OU plus its child OUs.
Control delegated at the site level is likely to span domains and can influence objects in domains other than the domain where the GPO is located.
Always assign control at the highest OU level possible.
Just about every chore connected with Group Policy can be delegated, including creating, editing, and managing GPOs. However, the right to edit, delete, or modify security is delegated separately from the right to link GPOs. And both of those are separate from permission to create GPOs.
Open GPMC, and navigate to the domain where you want to grant permission. In the console tree, select Group Policy Objects. Click the delegation tab (shown in Figure 11-5), and then select the Add button to identify the user or group you want to permit to create GPOs.
Open GPMC, and navigate to the domain where you want to grant permission. In the console tree, click the domain. In the details pane, click the Delegation tab. In the drop-down list, select Link GPOs and click the Add button to identify the user or group you want to give link permission to.
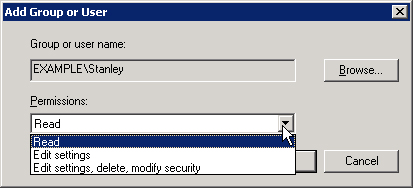
Open GPMC, and navigate to the domain where you want to grant permission. In the console tree, select the specific Group Policy Object. In the details pane, click the Delegation tab. Click the Add button to locate the user or group. In the Add Group Or User dialog box (shown in Figure 11-6), select the range of permissions you want to delegate.
By default, only Domain Administrators, Enterprise Administrators, Group Policy Creator Owners, and SYSTEM can create new Group Policy Objects. So if you want a non-administrator user or group to be able to create GPOs, add that user or group to the Group Policy Creator Owners security group. A nonadministrator member of the Group Policy Creator Owners group can create GPOs and edit those GPOs, but the user has no additional rights regarding other GPOs.
In addition, members of the Group Policy Creator Owners group can’t link GPOs to containers unless they have been explicitly granted the right to do so on a particular site, domain, or OU.
To allow a nonadministrator to create new Group Policy Objects, follow these steps:
If a GPO has an entire node under User Configuration or Computer Configuration that’s not configured, disable the node to avoid processing those settings. This speeds startup and logon for all users subject to that GPO.
Open Group Policy Management Console, and follow these steps:
In the console tree, navigate to the domain or OU that contains the GPO.
Double-click the domain or OU.
Right-click the GPO that contains the user or computer settings you want to disable, point to GPO Status, and then choose one of the following options:
Click User Settings Disabled to disable user settings for the GPO.
Click Computer Settings Disabled to disable computer settings for the GPO.
A check mark next to User Settings Disabled or Computer Settings Disabled indicates that the option is in effect.
To disable either the computer or users portion of a Group Policy, follow these steps:
In the Group Policy Object Editor, right-click the GPO and choose Properties from the shortcut menu.
On the General tab, select the option to disable the User Configuration or Computer Configuration settings for this GPO.
Click OK when you’re finished.
The settings you’ve chosen to disable no longer affect any Active Directory container to which the GPO is linked.
Policy changes are immediate, but they are not instantly propagated to clients. Client computers process a policy each time one of the following events happen:
The computer starts
A user logs on
An application requests a refresh
A user requests a refresh
The Group Policy refresh interval has elapsed
By default, client computers receive policy updates every 90 minutes, though to prevent multiple computers refreshing at the same time, the actual refresh interval can vary from 90 to 120 minutes.
The value of shorter times between policy refreshes must be measured against the increase in network traffic that’s generated as a result.
To change a Group Policy refresh interval, follow these steps:
Open the Group Policy Object in the Group Policy Object Editor.
In the console tree, expand Computer Configuration, Administrative Templates, and then System, until you reach Group Policy.
In the details pane, double-click Group Policy Refresh Interval For Users.
Click Enabled, specify the refresh interval and then click OK.
Because policy can be set at several levels, when you click a policy object, you see both local policy and the policy in effect on the system. These might not be the same if the computer is inheriting settings from domain-level policies. If you make a policy setting and it isn’t reflected in effective policy, a policy from the domain is overriding your setting.
It’s also possible that the policy change hasn’t been refreshed since you made it. To force a policy refresh for the local computer, open a command window and type:
gpupdate [/target:{computer | user}] /force
Use the Target parameter if you want only computer settings or only user policy settings to be refreshed.
A valuable feature, new in Group Policy Management Console, is the ability to back up and restore Group Policy Objects. Regular backups of all GPOs should be part of your overall disaster planning strategy. To back up a GPO, follow these steps:
Open Group Policy Management. In the console tree, navigate to Group Policy Objects in the domain that contains the GPO to be backed up.
To back up a single GPO, right-click the GPO, and select Back Up from the shortcut menu. To back up all GPOs in the domain, right-click Group Policy Objects and select Back Up All.
In the Back Up Group Policy Object dialog box, type the path to the backup location and then click Back Up.
After the operation completes, click OK.
Using GPMC, you can restore GPOs that have been backed up. If you back up all the GPOs in a container, you can restore all, some, or one of them at a time.
To restore backed-up GPOs, follow these steps:
Open Group Policy Management Console. In the console tree, navigate to Group Policy Objects in the domain that contains the GPO that you want to restore.
To restore a previous version of an existing GPO or to restore a deleted GPO, right-click Group Policy Objects and select Manage Backups.
In the Manage Backups dialog box, select the GPO to restore and click the Restore button.
When you have a lot of GPOs to sort through, select the box to display only the latest versions of the backed-up GPOs. If you’re unsure which GPO to restore, highlight them one at a time and click View Settings.
Folder Redirection is an extension to Group Policy that allows you to place folders that you choose on the network. For example, you might want to redirect users’ My Documents folders that can become quite large over time. There are real benefits to using this feature, including:
Users can log on to different computers and still have access to the redirected folders.
If you use roaming profiles, only the network path to the redirected folders is part of the user profile, making logging on and off much faster.
Folders on a network server can be backed up as part of routine maintenance without the users having to do anything extra.
Folders can be redirected to one location for everyone in the Active Directory container affected by the GPO. They can also be redirected to different locations according to security group membership.
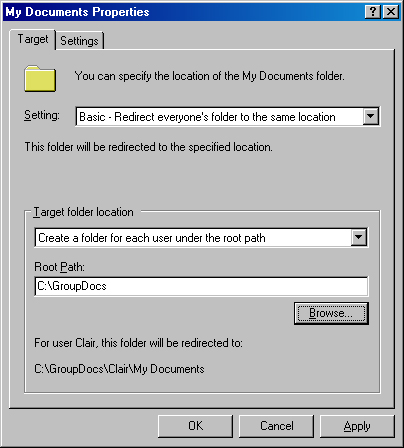
By far, the most common form of redirection is to send everyone’s My Documents folder to a single location on a network server. The following steps show how to do this (you can substitute other Windows special folders in the steps to redirect them as well):
Create a shared folder on the server.
Open the GPO linked to the Active Directory container containing the users whose folders are to be redirected.
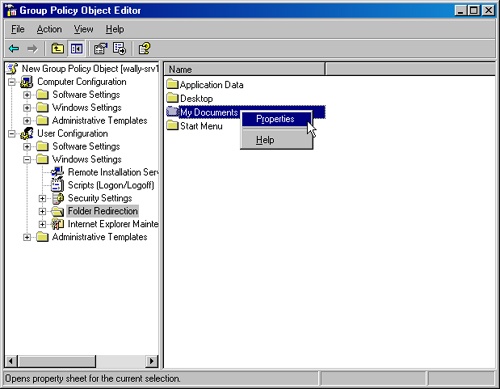
In the console tree, click User Configuration, and then Windows Settings, and finally Folder Redirection.
Right-click My Documents, and choose Properties from the shortcut menu. (See Figure 11-7.)
On the Target tab, select Basic—Redirect Everyone’s Folder To The Same Location. Choose the Target folder location that coincides with the new shared folder on the server and provide a root path, as shown in Figure 11-8.
Click the Settings tab. The following settings are enabled by default:
Grant The User Exclusive Rights To My Documents. The user and the local system have exclusive rights to the folder. No administrative rights are enabled. If this setting is disabled, the permissions that exist on the folder in its present position remain.
Move The Contents Of My Documents To The New Location. The contents of the user’s current My Documents folder are sent to the new location. If this option is disabled, the user has a new, but empty, My Documents folder at the new location.
Policy Removal. The default is to leave the folder in the new location when the policy is removed. If you choose to redirect the folder back to the local user, see the Removing Redirection section later in this chapter.
My Pictures Preferences. The My Pictures folder will follow My Documents as a subfolder by default.
Click OK when you’re finished.
Special folders can also be redirected based on the user’s membership in security groups. To do so, follow these steps:
Create the shared folders at the locations to which the folders will be redirected.
Open the GPO linked to the site, domain, domain controller, or OU containing the users whose folders are to be redirected.
In the console tree, click User Configuration, and then Windows Settings, and finally Folder Redirection.
Right-click the special folder (in this case, My Documents), and choose Properties from the shortcut menu.
In the drop-down list, select Advanced – Specific Locations For Various User Groups, and then click Add.
In the Specify Group And Location box, type the security group and the location for the redirected folders. Always use a UNC path, even if the folders are to be on the local computer, so that roaming users will be able to see their folders.
Click OK. Add more groups and locations as needed.
Click the Settings tab. The following settings are enabled by default:
Grant The User Exclusive Rights To My Documents. The user and the local system have exclusive rights to the folder. No administrative rights are enabled. If this setting is disabled, the permissions that exist on the folder in its present position remain.
Move The Contents Of My Documents To The New Location. The contents of the user’s current My Documents folder will be sent to the new location. If this option is disabled, the user will have a new, but empty, My Documents folder at the new location.
Policy Removal. The default is to leave the folder in the new location when the policy is removed. If you choose to redirect the folder back to the local user, see the Removing Redirection section.
My Pictures Preference. My Pictures will follow My Documents as a subfolder.
Click OK when you’re finished.
When folders have been redirected and later the policy changes, the effect on the folders depends on the combination of choices made on the Settings tab in the special folder’s Properties dialog box. Table 11-3 shows the various combinations of settings and the outcome when the policy is changed. (Software policy settings are covered in Chapter 28.)
Table 11-3. Settings and their outcome when redirection is removed
Policy Removal Option | Move Contents of Folder to New Location | Outcome When Policy Is Removed |
|---|---|---|
Redirect the folder back to the local user profile location when policy is removed. | Enabled | The folder returns to its user profile location; the contents of the folder are copied back to the original location; the contents are not deleted from the redirected location. |
Redirect the folder back to the local user profile location when policy is removed. | Disabled | The folder returns to its user profile location; the contents of the folder are not moved or copied back to the original location. Warning: this means the user cannot see the folder contents. |
Leave the folder in the new location when policy is removed. | Enabled or Disabled | The folder and its contents remain at the redirected location; the user has access to the contents at the redirected location. |
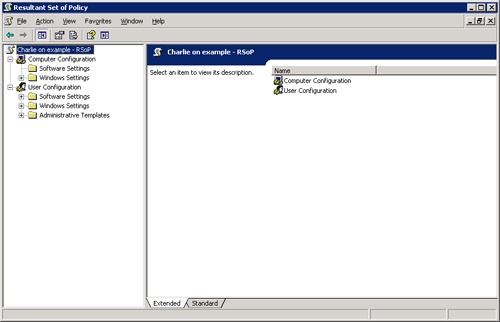
The Resultant Set of Policy (RSoP) tool is a welcome addition to Group Policy because a hazard of creating and configuring GPOs is that the results are sometimes unpredictable and very difficult to troubleshoot. RSoP gathers information on all existing policies to determine the policies in effect and the order in which they are applied.
RSoP has two modes: logging mode and planning mode. In planning mode, RSoP helps construct a "what if" scenario so that you can test the effect of a new policy or test policy precedence. In logging mode, RSoP can tell you what policies are being applied to a particular user and can help you discover policies that should be removed or repaired.
An RSoP query can be run on a site, a domain, a computer account, a user account, or an OU. Both planning mode and logging mode have options to assist in configuring your query.
For a query using the Group Policy Object Editor, Add the RSoP snap in to a Microsoft Management Console. In the console tree, right-click Resultant Set of Policy and select Generate RSoP data to launch the Resultant Set of Policy Wizard. On the Mode Selection page, select the mode.
If you’re using GPMC, right-click Group Policy Modeling and select Group Policy Modeling Wizard. You’ll need to specify the domain controller on which the query is to be run, and then follow the steps in the next sections based on the operation you’re performing.
The planning mode in RSoP simulates what the effect will be of change in your system. If you’re thinking of moving, adding, or deleting a group or making any changes to group policy, RSoP tells you what the result of proposed changes will look like. When you select Planning Mode as described in the previous section, the Resultant Set of Policy Wizard starts. Follow these steps:
In the User And Computer Selection window use the Browse buttons to specify the user, computer, or container to be analyzed, and then click Next. The following simulation options are on the Advanced Simulation Options page.
Slow network connection. Some policies do not apply when a dial-up or other slow connection is used. Choose this option to simulate a slow connection.
Loopback processing. If you’re in a situation where you must modify the user policy based on the computer the user logs on to, loopback processing simulates the application of the GPOs to any user who logs on to a computer controlled by alternate user policy settings. You can choose to replace the user’s usual policies or merge the new with the existing policies.
Site. Specifies the site and physical location of the subnet to use. Use this setting to test startup or logon events on a different subnet.
After making your selections, click Next.
To simulate changes to the user or computer location, enter the new location and click Next.
In the list of Security groups, add or remove groups to simulate the result of policies based on changes in security group membership. Click Next.
The next page is Computer Security Groups. Here you can simulate changes to the computer’s security group memberships. Click Next.
On the WMI Filters For Users page, you can link Windows Management Instrumentation (WMI) filters to arrive at resulting policy based on whether the user meets the criteria specified in all or some WMI filters. Click Next.
On the WMI Filters For Computers page, you can link Windows Management Instrumentation (WMI) filters to arrive at resulting policy based on selected information such as installed software. Click Next.
The next page summarizes the selections made so far. Review it carefully. There are a lot of steps in this wizard, and one misstep can make the results useless.
Click Next. When the operation is complete, select Finish.
The RSoP will appear in a Microsoft Management Console (as shown in Figure 11-9), which you can examine, compare to other RSoP planning results, and save for future reference.
In logging mode, RSoP reports on current policy settings as they apply to users and computers. Planning mode shows the administrator the outcome of a possible future change, but logging mode is all about what’s going on now. A logging RSoP is what you need to discover which policies are applied to a particular user or computer or to investigate why certain policies are not working as expected.
When using Group Policy Object Editor, just choose Logging mode on the Mode Selection page of the Resultant Set of Policy Wizard.
In the Group Policy Management Console, right-click Group Policy Results to launch the Group Policy Results Wizard.
Note
To run RSoP on a remote computer, you must be a member of Domain Admins, be a member of Enterprise Admins, or have had the right to generate RSoP delegated to you. You must be a member of Enterprise Admins to cross domain boundaries in a forest.
For more information, see the Microsoft Windows Group Policy Guide in the Microsoft Windows 2003 Server Resource Kit (Microsoft Press, 2005).
The success of a network is judged by both the availability of needed information and resources and the restriction and protection of others. This chapter has explored the options available to the administrator for configuring shares, permissions, and group policy through Windows Server 2003. The next chapter covers day-to-day administrative tasks and how to simplify and streamline these tasks for maximum efficiency.