The central task of a network is to provide the customers (the users) with everything they need and clear away the clutter that hampers their progress. What they need includes access to the files, folders, applications, printers, and Internet connections that they require to do their jobs. What they don’t need is any trouble getting at what they do need.
The network administrator has additional needs, including shielding need-to-know material from those who don’t need to know, protecting the network from malicious or otherwise dangerous users, and protecting the users from themselves. The key to meeting all these needs is the configuration of organizational units, groups, users, and Group Policies—the topic of this chapter and Chapter 11.
By definition, groups in the Microsoft Windows Server 2003 family are Active Directory directory service or local computer objects that can contain users, contacts, computers, or other groups. In general, though, a group is usually a collection of user accounts. The point of groups is to simplify administration by allowing the network administrator to assign rights and permissions to groups rather than individual users.
Windows Server 2003 allows two group types: security and distribution. Almost all groups used by Windows Server 2003 and Microsoft Windows 2000 Server are security groups because they’re the only groups through which permissions can be assigned. Each security group is also assigned a group scope, which defines how permissions are assigned to the group’s members. Programs that can search Active Directory can also use security groups for nonsecurity purposes, such as sending e-mail to a group of users. Distribution groups, on the other hand, are not security-enabled and can be used only with e-mail applications to send e-mail to sets of users.
Later in the chapter, you find sections on user rights and how they are defined and assigned to groups. Chapter 10 follows with a discussion on permissions and how they are assigned.
When a group is created, it is assigned a group scope that in turn defines how permissions are assigned. The three possible group scopes—global, domain local, and universal—are defined in the following sections.
A group with a global scope is truly global in the sense that permissions can be granted for resources located in any domain. However, members can come only from the domain in which the group is created, and in that sense it is not global. Global groups are best used for directory objects that require frequent maintenance, such as user and computer accounts. Global groups can be members of universal and domain local groups in any domain, and they can have the following members:
Other global groups in the same domain
Individual accounts from the same domain
A domain local group is the inverse of a global group in that members can come from any domain but the permissions can only be assigned for resources in the domain in which the group is created. The members of a domain local group have a common need to access certain resources in a particular domain. Domain local groups can have one or more of the following members:
Other domain local groups in the same domain
Global groups from any domain
Universal groups from any domain
Individual accounts from any domain
Note
The nesting rules apply fully only in domains with a Windows 2000 native or higher domain functional level—that is, when all the controllers in the domain are servers running at least Microsoft Windows 2000 or Windows Server 2003. In domains with a Windows 2000 mixed domain functional level, security groups with global scope can contain only individual accounts, not other groups. Security groups with domain local scope can contain both global groups and accounts. For more about domain functional levels, see Chapter 6.
A universal security group can have members from any domain and can be assigned permissions to resources in any domain. Although the universal scope sounds like an ideal solution in a multiple-domain enterprise, it’s available only in domains that are running in Windows 2000 native domain functional level and higher. Universal groups can have the following members, which can be drawn from any domain:
Other universal groups
Global groups
Individual accounts
Even in a Windows 2000 native or higher domain functional level, universal groups must be used with discretion because of the negative impact they can have on network performance, as described in the Real World sidebar, How Groups Affect Network Performance.
Real World: How Groups Affect Network Performance
The importance of planning groups becomes even more apparent when you consider the negative effect your group organization can have on network performance. When a user logs on to the network, the domain controller determines the user’s group memberships and assigns a security token to the user. The token includes the security identifiers (SIDs) of all the groups that the user belongs to, in addition to the user account ID. The more security groups the user belongs to, the longer it takes to assemble the token and the longer it takes the user to log on.
In addition, the security token, once assembled, is sent to every computer the user accesses. The target computer compares all the SIDs in the token against the permissions for all the shared resources available at that computer. A large number of users added to a large number of shared resources (including individual folders) can take up a lot of bandwidth and processing time. One solution is to limit membership in security groups. Use distribution groups for categories of users that don’t require specific permissions or rights.
Groups with universal scope have a performance impact of their own because all such groups, along with their members, are listed in the global catalog. When there’s a change to the membership in a group with universal scope, this fact must be relayed to every global catalog server in the domain tree, adding to the replication traffic on the network. New to Windows Server 2003 is the ability to enable universal group caching for remote domain controllers. This improves logon performance and limits replication traffic when changes are made to universal group membership on a remote domain controller. Groups with global or domain local scope are also listed in the global catalog, but their individual members are not, so the solution is to limit the membership of universal groups primarily to global groups.
Organizational units (OUs) are, as their name implies, organizing tools for collections of objects within a domain. An OU can contain any collection of Active Directory objects such as printers, computers, groups, and so forth.
In the past, a domain that got very complicated was usually sorted out by splitting the domain into multiple domains. OUs provide an alternative administrative substructure that is infinitely more flexible. They can be arranged hierarchically within a domain, and administrative control can be delegated for functions in a single OU or an entire subtree of OUs. (An OU is the smallest entity over which you can delegate administrative control.) At the same time, OUs can be modified, moved, renamed, and even deleted easily. Another plus is that, unlike a domain, a subtree of OUs doesn’t require a separate domain controller.
Real World: Organizational Units or New Domain?
Unfortunately, there’s no firm rule you can apply to decide when an expanding network should be divided into separate domains and when new OUs are called for. If any of the following applies, multiple domains might be the answer:
Decentralized administration is needed.
The network encompasses competing business units or joint ventures.
Parts of the network are separated by very slow links (analog modems, for example), so complete replication would create severe traffic problems. (If the link is merely slow, you can use multiple sites within a single domain because replication is less frequent.)
Different account policies are needed. Because account policies are applied at the domain level, greatly differing policies might call for separate domains.
The following list describes situations that call for the use of OUs:
Localized and/or tightly controlled administration is needed.
The structure of the organization requires the arrangement of network objects into separate containers.
The structure that you want to separate is likely to change at some point.
So, in general, when the situation calls for a flexible, even fluid structure, OUs are the answer.
OUs are containers only. They don’t confer membership and aren’t security principals. Rights and permissions are granted to users through group membership. After your groups are constructed, use OUs or organize group objects and assign Group Policy settings. The use of Group Policy is covered in Chapter 11.
OUs are easily created and appear as folders in a domain structure. The following steps describe how to create an OU:
Choose Active Directory Users And Computers from the Administrative Tools menu.
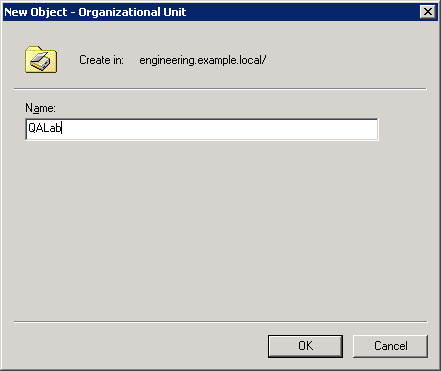
Right-click the domain, and select New and then Organizational Unit to open the dialog box shown in Figure 9-1.
In the Organizational Unit dialog box, type the name for the unit and then click OK.
One of the most useful aspects of OUs is that they can be moved from one container or even one domain to another. The following steps describe how to move an OU:
OUs can also be deleted easily. However, exercise caution when deleting an OU because the contents of the OU are also removed. That means you can inadvertently delete all the resources and user accounts contained in an OU if you act too hastily. The following steps describe how to delete an OU:
Looking at your network and the various group types, and then factoring in your specific needs, you can end up feeling as though you’re working on some infernal logic puzzle: Claire lives in a blue house, Luisa collects stamps, Sam drives a Toyota, and Ross eats cheese. Which one has red hair?
Nevertheless, as in so many other aspects of network administration, planning is the essential step. The domain mode determines the types of groups available to you. A domain having Windows 2000 mixed domain functional level, for example, can’t support groups with universal scope. Thus, as long as you have Microsoft Windows NT backup domain controllers, you are limited to groups with global and domain local scopes.
In planning your groups, determine a naming scheme that is appropriate for your organization. Two factors have to be considered:
Group names must be instantly recognizable. Administrators searching Active Directory don’t have to guess at their meaning.
Comparable groups must have similar names. In other words, if you have a group for engineers in each domain, give all the groups parallel names, such as NorAmer Engineers, SoAmer Engineers, and Euro Engineers.
Develop a strategy for using the different groups. For example, users with common job responsibilities belong in a global group. Thus, add user accounts for all graphic artists to a global group called Graphic Artists. Other users with common needs are assigned to other global groups. Then you must identify resources to which users need access and create a domain local group for that resource. If, for example, you have several color printers and plotters that are used by specific departments, you can make a domain local group called Printers&Plotters.
Next, decide which global groups need access to the resources you identified. Continuing the example, you add the global group Graphic Artists to the domain local group Printers&Plotters, along with other global groups that need access to the printers and plotters. Permission to use the resources in Printers&Plotters is assigned to the Printers&Plotters domain local group.
Keep in mind that global groups can complicate administration in multiple-domain situations. Global groups from different domains must have their permissions set individually. Also, assigning users to domain local groups and granting permissions to the group does not give members access to resources outside the domain.
Note
Remember that the nesting rules apply only in Windows 2000 native and higher domain functional level. In environments with Windows 2000 mixed domain functional level, security groups with global scope can contain only individual accounts, not other groups. Security groups with domain local scope can contain global groups and accounts.
When you’re able to use universal groups (that is, when your domain is running in Windows 2000 native or higher domain functional level), keep the following guidelines in mind:
Avoid adding individual accounts to universal groups, to keep replication traffic down.
Add global groups from multiple domains to universal groups to give members access to resources in more than one domain.
Universal groups can be members of domain local groups and other universal groups, but they can’t be members of global groups.
After you plan your strategy and test it using a variety of scenarios, you’re ready to begin putting the structure into place.
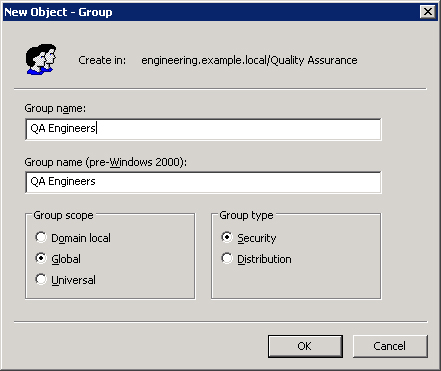
Use Active Directory Users And Computers to create and delete groups. Create groups in the Users container or in an OU that you create for the purpose of containing groups. The following steps demonstrate how to create a group in the Quality Assurance OU:
Choose Active Directory Users And Computers from the Administrative Tools menu.
Expand the domain in which the group is to be created.
Right-click the Quality Assurance OU, point to New, and choose Group from the shortcut menu to open the dialog box shown in Figure 9-2.
Fill in the required information:
The group name must be unique in the domain.
The group name as it will be seen by pre–Windows 2000 operating systems is filled in automatically. (In Windows 2000 native and higher domain functional level, this field is Downlevel Name Of New Group, but it is still filled in automatically based on the name you provide as the group name.)
For Group Scope, click Domain Local, Global, or Universal.
For Group Type, click Security or Distribution.
Click OK when you’re finished. The new group appears in the Quality Assurance OU. You might have to wait a few minutes for the group to be replicated to the global catalog before adding members.
Don’t create groups you don’t need, and when groups are no longer necessary be sure to promptly delete them from the system. Unnecessary groups are a security risk because it is all too easy to unintentionally grant permissions where you shouldn’t.
Each group, like each user, has a unique security identifier (SID). The SID is used to identify the group and the permissions assigned to the group. When the group is deleted, the SID is deleted and not used again. If you delete a group and decide later to re-create it, you have to configure the users and permissions as if for a new group.
To delete a group, right-click its name in Active Directory Users and Computers and choose Delete from the shortcut menu. Deleting a group deletes only the group and the permissions associated with the group. It has no effect on the accounts of users who are members of the group.
After you create a group, you need to add members to it. As was mentioned earlier in the chapter, groups can contain users, contacts, other groups, and computers. The following steps show how to add members to a group:
Choose Active Directory Users And Computers from the Administrative Tools menu.
In the console tree, click the container that includes the objects you want to add to the group.
Highlight the accounts you want to add. (You can use the Shift and Ctrl keys to select multiple accounts.)
Right-click the highlighted accounts, and select Add To A Group from the shortcut menu. This opens the Select Group dialog box. Click Look For and Look In to narrow the search.
Type the first few letters of the group name and click OK. All matches are displayed. Highlight the correct group name and click OK.
You can also approach adding users to a group from another angle by following these steps:
Right-click a group name, and select Properties.
Click the Members tab and then click Add. Make sure the Object Types and Locations fields are pointing to the positions you want.
Click Advanced, and then click Find Now. All the potential group members appear in the lower pane.
Highlight the accounts to be added and click OK.
Note
A contact is an account without security permissions and is typically used to represent external users for the purpose of e-mail. You can’t log on to the network as a contact.
Over time, you might find that you need to change the scope of a particular group. For example, you might need to change a global group to a universal group so that users from another domain can be part of the group. However, the types of changes that can be made to a group scope are quite limited, and you might need to delete the group and create a new one to get the configuration you need.
To change a group scope, right-click the group name in Active Directory Users And Computers and choose Properties from the shortcut menu. Make the necessary changes on the General tab, and click OK when you’re finished. There are several rules for changing a group scope, as described here:
In Windows 2000 mixed domain functional level, a security group cannot have universal scope.
A global group can be changed to a universal group if the global group is not already a member of another global group.
A domain local group can be changed to a universal group if the domain local group does not already contain another domain local group.
A universal group can be converted to a global group, as long as no other universal groups are members.
A local group is a collection of user accounts on a single computer. The user accounts must be local to the computer, and members of local groups can be assigned permissions for resources only on the computer where the local group was created.
Local groups can be created on any computer running Windows Server 2003 except a domain controller. In general, you don’t want to use local groups on a computer that’s part of a domain or, at least, you want to do so sparingly. Local groups don’t appear in Active Directory, so you must administer local groups separately on each computer. The following steps describe how to create a local group:
Right-click the My Computer icon on the desktop, and choose Manage from the shortcut menu.
In the console tree, expand System Tools and then Local Users And Groups.
Right-click the Groups folder, and select New Group from the shortcut menu.
In the New Group dialog box, type the group name. You can include a description if you want.
Click Add to add members to the group. (You can add members now or later.)
Click Create when you’re finished, and the new group is added to the list of groups in the details pane.
When you create an Active Directory domain with one or more Windows Server 2003 domain controllers, built-in groups are automatically created in both the Users and Built-In containers. Many of these groups also have built-in rights that are automatically assigned to members of the group.
Member servers and standalone servers running Windows 2000 Server (Service Pack 3 or later) and computers running Microsoft Windows 2000 Professional (Service Pack 3 or later) or Microsoft Windows XP Professional (Service Pack 1 or later) have built-in local groups that give rights to perform tasks on a single computer. Install Adminpak.msi from the Windows Server 2003 installation disk on these computers as needed. Table 9-1 shows the built-in local groups on a standalone server. Many are common to clients and servers alike, but some, where noted, are only on member servers and standalone servers.
Table 9-1. Built-in local groups
Local Group | Description |
|---|---|
Administrators | Members can perform all administrative tasks on the computer. The built-in Administrator account that’s created when the operating system is installed is a member of the group. When a server (not a domain controller) or a client running Windows XP Professional or Windows 2000 Professional joins a domain, the Domain Admins group (described in Table 9-3) is made part of this group. |
Backup Operators | Members can log on to the computer, back up and restore the computer’s data, and shut down the computer. Members cannot change security settings but can override them for purposes of backup and restore. No default members. |
DHCP Users (installed with DHCP Server service) | Members of this group can read DHCP information stored at a specific server for troubleshooting purposes. No default members. |
Servers or Domain Controllers only | |
DHCP Administrators (installed with DHCP Server service) | Members of this group can administer DHCP Server service but do not have access to other parts of the server. No default members. |
Servers only | |
Guests | Members can perform only tasks for which an administrator has granted rights. Members can use only resources for which an administrator has specifically granted permission. The guest account is a default member of this group. |
HelpServicesGroup | No users are assigned to this group. The only member should be the account associated with support applications. |
Network Configuration Operators | Members can change TCP/IP settings, and renew and release addresses. No default members. |
Performance Monitor Users | Members can monitor performance counters on a specific server locally and remotely. No default members. |
Servers only | |
Performance Log Users | Members can administer performance logs, counters, and alerts on a specific server, locally or remotely. No default members. |
Servers only | |
Power User | Members can create and modify user accounts and install programs on the local computer but cannot view other users’ files. Members can create and delete local groups, and add or remove users from the groups they have created. Members can add or remove users from the Power Users, Users, and Guests groups. No default members. |
Print Operators | Members can manage printers and print queues on a specific server. No default members. |
Servers only | |
Remote Desktop Users | Members are allowed to connect remotely. No default members. |
Replicator | Do not add user accounts of actual users to this group. If necessary, you can add a "dummy" user account to this group to permit you to log on to Replicator services on a domain controller to manage replication of files and directories. |
Users | Members of this group can log on to the computer, access the network, save documents, and shut down the computer. Members cannot install programs or make system changes. When a member server, Windows 2000 Professional, or Windows XP Professional machine joins a domain, the Domain Users group is added to this group. The Interactive and Authenticated Users groups are also members of the users group, so all user accounts are automatically members of the Users group. |
WINS Users (installed with WINS) Servers only | Group members have read-only access to information and properties stored at a specific WINS server. No default users. |
Note
If you don’t want members of the Domain Users group to have access to a particular workstation or member server, remove Domain Users from that computer’s local Users group. Similarly, if you don’t want the members of Domain Admins to administer a particular workstation or member server, remove Domain Admins from the local Administrators group.
The Windows 2000 and Windows Server 2003 built-in domain local groups provide users with rights and permissions to perform tasks on domain controllers and in Active Directory. The domain local groups have predefined rights and permissions that are granted to users and global groups that you add as members. Table 9-2 shows the most commonly used built-in domain local groups.
Table 9-2. Commonly used built-in domain local groups
Domain Local Group | Description |
|---|---|
Account Operators | Members can create, delete, and manage user accounts and groups. Members cannot modify the Administrators, Domain Admins, and Domain Controllers groups, or any of the Operators groups. Members can log on locally to domain controllers and shut them down. No default members. |
Administrators | Members are automatically granted every right and permission on all domain controllers and the domain itself. The Administrator account, Enterprise Admins group, and Domain Admins group are members. |
Backup Operators | Members can back up and restore data on all domain controllers, and they can log on to domain controllers and shut them down. There are no default members, and membership should be granted with care. This group is not the same as the Built-In Local Group Backup Operators. |
Cert Publishers | Members can publish certificates for users and computers. No default members. |
DnsAdmins (installed with DNS) | Members have administrative access to DNS servers. No default members. |
Guests | Members can perform only tasks for which an administrator has granted rights. Members can use only resources for which an administrator has specifically granted permission. The Guest User and Domain Guests groups are members by default. |
Incoming Forest Trust Builders (appears only in forest root domain) | Members can allow an incoming forest trust to let users in another forest access resources in the home forest. No default members. |
Network Configuration Operators | Members can change TCP/IP settings, and they can renew and release addresses on domain controllers. No default members. |
Performance Monitor Users | Members can monitor performance counters on domain controllers either locally or from remote clients without being Administrators or members of the Performance Log Users group. No default members. |
Performance Log Users | Members can manage performance logs, counters, and alerts on domain controllers either locally or remotely without being Administrators. No default members. |
Pre–Windows 2000 Compatible Access | Provided for backward compatibility for computers running Windows NT 4. Add users to this group only if they are running Windows NT 4 or earlier. No default members. |
Print Operators | Members can manage all aspects of domain printer operation and configuration. |
RAS and IAS Servers | Servers in this group have access to the remote access properties of users. No default members. |
Remote Desktop Users | Members can remotely log on to domain controllers. No default members. |
Server Operators | Members can perform most administrative tasks on domain controllers, except the manipulation of security options. |
Users | Members can log on to the computer, access the network, save documents, and shut down the computer. Members cannot install programs or make system changes. The Domain Users group is a member by default. |
Security Alert
In Windows NT, all domain users are members of the Everyone group. This group is controlled by the operating system and appears on any network with Windows NT servers. In Windows 2000 Server and Windows Server 2003, the equivalent group is called Authenticated Users. Unlike Everyone, Authenticated Users contains no anonymous users or guests. The Everyone group survives as a special identity. You don’t see it when you administer groups, and it cannot be placed in a group. When a user logs on to the network, the user is automatically added to Everyone. You can’t see or change the membership of the special identities, which also include the Network and Interactive groups.
Built-in global groups are created to encompass common types of accounts. By default, these groups do not have inherent rights; an administrator must assign all rights to the group. However, some members are added to these groups automatically, and you can add more members based on the rights and permissions you assign to the groups. Rights can be assigned directly to the groups or by adding the built-in global groups to domain local groups. Table 9-3 describes the built-in global groups that are commonly used.
Table 9-3. Commonly used built-in global groups
Global Group | Description |
|---|---|
DnsUpdateProxy (installed with DNS) | Members are DNS clients that can provide dynamic updates to DNS on behalf of other clients. No default members. |
Domain Admins | This group is automatically a member of the domain local Administrators group, so members of Domain Admins can perform administrative tasks on any computer in the domain. The Administrator account is a member of this group by default. |
Domain Computers | All controllers and workstations in the domain are members. |
Domain Controllers | All domain controllers in the domain are members. |
Domain Guests | The Guest account is a member by default. This group is automatically a member of the domain local Guests group. |
Domain Users | All domain users and the Administrator accounts are members. The Domain Users group is automatically a member of the domain local Users group. |
Enterprise Admins | This group is for users who are to have administrative rights for the entire network. Enterprise Admins is automatically a member of the Administrators group on all domain controllers in the forest. |
Group PolicyCreator Owners | Members can create and modify group policy for the domain. The Administrator account is a default member of the group. |
Schema Admins (appears only in forest root domain) | Members can alter the Active Directory Schema. |
What users can and cannot do depends on the rights and permissions that have been granted to them. Rights generally apply to the system as a whole. The ability to back up files or to log on to a server, for example, is a right that the administrator giveth or taketh away. Rights can be assigned individually, but most often they are characteristics of groups, and a user is assigned to a particular group on the basis of the rights that the user needs.
Permissions indicate the access that a user (or group) has to specific objects, such as files, directories, and printers. For example, the question of whether a user can read a particular directory or access a network printer is a permission. Permissions are discussed at length later in this chapter.
Rights, in turn, are divided into two types: privileges and logon rights. Privileges include such functions as the ability to run security audits or force shutdown from a remote system—obviously not tasks that are done by most users. Logon rights are self-explanatory; they involve the ability to connect to a computer in specific ways. Rights are automatically assigned to the built-in groups in Windows Server 2003, although they can be assigned to individual users as well as groups. Assignment by group is preferred, so whenever possible, assign rights by group membership to keep administration simple. When membership in groups defines rights, rights can be removed from a user by simply removing the user from the group. Table 9-4 and Table 9-5 list the logon rights and privileges and the groups to which they are assigned by default.
Table 9-4. Logon rights assigned to groups by default
Name | Description | Groups Assigned the Right on Domain Controllers | Groups Assigned the Right on Workstations and Servers |
|---|---|---|---|
Access this computer from the network | Permits connection to the computer through the network | Administrators, Authenticated Users, Everyone | Administrators, Backup Operators, Power Users, Users, Everyone |
Allow logon locally | Permits logging on to the computer interactively | Administrators, Account Operators, Backup Operators, Print Operators, Server Operators | Administrators, Backup Operators, Power Users, Users, Guest |
Allow logon through Terminal Services | Allows logging on as a Terminal Services client | Administrators | Administrators, Remote Desktop Users |
Table 9-5. Privileges assigned to groups by default
Description | Groups Assigned the Privilege by Default | |
|---|---|---|
Act as part of the operating system | Allows a process to authenticate as any user. A process that requires this privilege must use the LocalSystem account, which already includes this privilege. | None |
Add workstations to domain | Allows a user to add new workstations to an existing domain. | Authenticated Users on domain controllers |
Adjust memory quotas for a process | Allows user to set the maximum amount of memory a process can use. | Administrators |
Back up files and directories | Allows backing up the system; overrides specific file and folder permissions. | Administrators, Backup Operators |
Bypass traverse checking | Allows a user to go through directory trees (folder structures) even if the user doesn’t have permission to access the directories being passed through. | Administrators and Authenticated Users on domain controllers; on servers and workstations, Administrators, Backup Operators, Power Users, Users, and Everyone |
Change the system time | Allows the setting of the computer’s internal clock. | Administrators and Server Operators on domain controllers; Administrators and Power Users on servers and workstations |
Create a pagefile | Allows the creation and modification of a pagefile. | Administrators |
Create global objects | Allows the creation of global objects in a Terminal Services session. | Administrators |
Debug programs | Allows the user to attach a debugger to a process. | Administrators |
Enable computer and user accounts to be trusted for delegation | Permits a user to set the Trusted for Delegation setting on an object. | Administrators on domain controllers; not assigned on member servers or workstations |
Force shutdown from a remote system | Allows the shutdown of a computer from a remote location on the network. | Administrators and Server Operators on domain controllers; Administrators on member servers and workstations |
Impersonate a client after authentication | Allows an account to impersonate another account. | Administrators |
Increase quotas | Allows a process with write property access to another process to increase the processor quota assigned to that process. | Administrators |
Increase scheduling priority | Allows the use of Task Manager to change the scheduling priority of a process. | Administrators |
Load and unload device drivers | Install and remove device drivers. | Administrators |
Manage auditing and security log | Allows a user to specify auditing options and to view and clear the security log in Event Viewer. Audit Directory Service Access must be turned on for object access auditing to be performed. (See Chapter 11.) Administrators can always view and clear the security log. | Administrators |
Modify firmware environment variables | Allows the configuration of nonvolatile RAM on computers that support such function. | Administrators |
Profile a single process | Allows performance sampling on a process. | Administrators and Power Users on member servers and workstations; Administrators on domain controllers |
Profile system performance | Allows performance sampling of the system. | Administrators |
Remove computer from docking station | Allows the removal of a laptop from a docking station using Eject PC on the Start menu. | Administrators, Power Users, and Users (default setting for this is Disabled, not enforcing any limitations) |
Restore files and directories | Allows restoring files and folders to a system; overrules specific file and folder permissions. | Administrators, Backup Operators, and Server Operators on domain controllers; Administrators and Backup Operators on workstations and servers |
Shut down the system | Shuts down the local computer. | Administrators, Account Operators, Backup Operators, Print Operators, and Server Operators on domain controllers; Administrators, Backup Operators, and Power Users on member servers; Administrators, Backup Operators, Power Users, and Users on workstations |
Synchronize directory service data | Allows a user to initiate a synchronization of Active Directory. | None |
Take ownership of files or other objects | Allows a user to take ownership of any security object, including files and folders, printers, registry keys, and processes. | Administrators |
Rights are assigned and removed most easily at a domain level using Group Policy. Suppose you have a group of users who should be able to log on locally to servers running Windows Server 2003 but you don’t want them to be members of any groups that have this logon right by default. One way to approach this situation is to create a group called Logon Rights, add the users to the group, and assign the right to log on locally to the Logon Rights group. The following steps describe how to assign a right to a particular group:
Choose Active Directory Users And Computers from the Administrative Tools menu. Right-click the domain name, and select Properties.
Click the Group Policy tab, and then click Edit. Select Computer Configuration, and then choose Windows Settings.
Under Security Settings, click Local Policies and then click User Rights Assignment. (See Figure 9-3.) In the details pane, double-click Allow Log On Locally.
Select Define These Policy Settings and then click Add.
Type the name of the group to be granted this right (or click Browse to search for the group). Click OK twice, and close Default Domain Policy.

The same process can remove rights, except that you click Remove, rather than Add, in step 4. Rights can also be assigned to an individual user by using this method.
Rights can be assigned or removed locally, though you must bear in mind that a defined domain-level policy overrides a local policy setting. The following steps describe how to assign a policy locally:
Choose Local Security Policy from the Administrative Tools menu.
Under Security Settings, click Local Policies and then click User Rights Assignment.
In the detail pane, double-click the policy you want to assign to open the policy’s properties window.
Click Add User Or Group to select an individual or a group in the Select Users Or Groups dialog box. Make sure the Look For and Look In fields are pointing to the locations you want. Click Advanced, and then click Find Now. All the potential group members appear in the lower pane.
Highlight the accounts to be added and click OK.
If the Add User Or Group and Remove buttons aren’t available in the Properties window as shown in Figure 9-4, it means the policy has been set at the domain level and can’t be overridden locally.

Every person who has access to the network requires a user account. A user account makes it possible to do the following:
Authenticate the identity of the person connecting to the network
Control access to domain resources
Audit actions performed using the account
Windows Server 2003 creates only two normal predefined accounts on a domain controller: the Administrator account, which is granted all rights and permissions, and the Guest account, which has limited rights. On domain controllers, there is also a KRBTGT key distribution account; on non-domain controllers, there are built-in special accounts for Help and Support and Remote Assistance. All other accounts are created by an administrator and are either domain accounts (which are valid throughout the domain by default) or local accounts (which are usable only on the machine on which they are created).
In Active Directory, each user account has a principal name. The name consists of two parts, the security principal name and the principal name suffix. For existing Windows NT user accounts, the security principal name is by default the same as the name used to log on to the Windows NT domain. For new Windows Server 2003 user accounts, an administrator assigns the security principal name. The default principal name suffix is the DNS name of the root domain in the domain tree. So a user identified as EduardoP in a Windows NT domain has a principal name such as [email protected] in Windows Server 2003 (as well as Windows 2000 Server).
Planning account options for users simplifies the process of creating accounts. Consider the following account options:
Logon Hours. By default, a user can log on at any hour of the day or night. For security reasons, you might want to restrict access by some or all users to certain times of the day or certain days of the week.
Log On To. By default, users can log on to all workstations. For security reasons, you can limit logon access to a particular machine or machines if you have the NetBIOS protocol installed in the domain. Without NetBIOS, Windows 2000 is unable to determine a specific logon location.
Account Expiration. You can decide whether you want to set accounts to expire. For obvious reasons, it makes sense to set an expiration date for temporary employees to coincide with the end of their contracts.
Other options—many other options—can be set in user accounts and are detailed in the section Setting User Account Properties. The three options just listed are the most likely to be applied across large numbers of users.
Real World: Establishing a Naming Convention
Assign the security principal name using a consistent naming convention so that you and your users can remember user names and find them in lists. The following list describes some options for user names:
First name plus last initial. Examples are MichaelG and SusanM. In the case of duplicate first names, you can add numbers (MichaelG1 and MichaelG2) or enough letters to provide identification (IngridMat and IngridMur).
First name plus a number. Examples are Dave112 and Dave113. This approach can be a problem, especially for people with first names that appear frequently in the population. This approach can make it hard to remember your own user name much less any others.
First initial plus last name. An example is MSmith. If you have both a Linda Smith and a Louise Smith, you could use LiSmith and LoSmith or LSmith1 and LSmith2.
Last name plus an initial. This convention is useful in a large network. When you have multiple users with the same last name, add a few letters as in SmithLi or SmithLo.
No matter which approach you choose, you must not only accommodate the existing users on your network but you must also be able to integrate future users. Then, whether the company’s next hire is U Ti or Chomondely St. J. Montmorency-Glossup, your user-name convention can still handle it.
All your users must have well-chosen passwords and be required to change them periodically. Passwords should be chosen according to the guidelines in the Real World sidebar Rules for Good Passwords. Set accounts to lockout when invalid passwords are entered. (Allow three attempts, to leave room for typographical errors by the user.)
Real World: Rules for Good Passwords
A good password has the following characteristics:
It is not a rotation or reuse of the characters in a logon name. (How many brain cells does it take to figure this one out?)
It contains at least two alphabetic characters and one nonalphabetic character.
It is at least seven characters long.
It isn’t the user’s name or initials, the initials of his or her children or significant other, or any of these items combined with other commonly available personal data such as a birth date, telephone number, or license plate number.
Among the best passwords are alphanumeric acronyms of phrases that have a meaning to the user but are not likely to be known to others. This makes the password easy for the user to remember, while at the same time making it hard for an outsider to guess. Another good password isn’t a word at all but a "passphrase"—an entire phrase or sentence, complete with spaces and punctuation.
It pays to educate your users about passwords and password privacy, but most of all, it pays to heed your own advice: make sure the password you select for administration is a good password, and change it frequently. Doing so will help you avoid the consequences of having somebody break into your system and wreak havoc in your very own kingdom. If users dial in to the network from home or other remote sites, include more security than domain-level password authorization.
Administrators should have two accounts on the system: one administrative account and one normal user account. Use the normal user account unless you are performing administrative tasks like installing software or configuring accounts. Because of the privileges associated with administrative accounts, they are prime targets for intruders. Chapter 12 includes details about using the secondary logon feature to keep the administrative account safe.
Domain user accounts can be created in the default Users container, or you can make an OU to hold domain user accounts. The following steps describe how to add a domain user account:
Choose Active Directory Users And Computers from the Administrative Tools menu.
Right-click the container in which you want to create the account, point to New, and then choose User from the shortcut menu.
Provide the user’s first and last name. The Full Name box is filled in automatically. The full name must be unique in the OU where the user account is created.
Provide the user logon name based on your naming convention. (See Figure 9-5.) This name must be unique in Active Directory. The pre–Windows 2000 logon name is filled in automatically. This is the name used to log on from computers running older Windows operating systems such as Windows NT. Click Next.
Provide a password, and set password policies. Click Next. A confirmation screen appears.
If the details of the account you are about to create are correct, click Finish. Otherwise, click Back to make corrections.

At this point, the new user account is added to the OU with default settings. It’s unlikely that the default settings are exactly what you want, so you need to adjust the properties of the new account, as described in the section Setting User Account Properties.
A local account can’t log on to the domain and therefore has access only to the resources on the computer where it’s created and used. The following steps describe how to create a local user account:
Right-click My Computer, and choose Manage from the shortcut menu.
In the console tree, click Local Users And Groups. Right-click Users, and choose New User from the shortcut menu.
In the New User dialog box, supply the user name, full name, and description.
Provide a password, and set password policies. Click Create. At this point, the new user account is created with default settings. Local accounts can belong to locally created groups (on the single computer).
The Properties window for a domain user can have up to 13 tabs, depending on the domain’s setup; Table 9-6 describes these tabs. Information entered in the Properties window can be used as the basis for a search in Active Directory. For example, you can find a user’s telephone number or department by searching for the user’s last name. The following steps describe how to set the properties for a domain user account:
Choose Active Directory Users And Computers from the Administrative Tools menu.
Open the OU where the domain user account was created.
Double-click the user account to open the Properties window.
Click the tab for the properties you want to set. Make the changes, and click OK when you’re finished.
Table 9-6. Tabs in the Properties window for a domain user account
Description | |
|---|---|
General | Documents the user’s name, description, office location, telephone number, e-mail address, and Web page address |
Address | Documents the user’s physical address |
Account | Documents the logon name, logon restrictions, password options, and whether the account expires |
Profile | Shows the user’s profile path, the path of any script that runs when the user logs on, the path to a home folder, and any automatic drive connections |
Telephones | Lists additional telephone numbers such as for a pager, cellular phone, or Internet phone |
Organization | Documents the user’s title, department, company, manager, and direct reports |
Remote Control | Configures the degree to which an administrator can view or control the user’s Terminal Services sessions |
Terminal Services Profile | Documents the user’s Terminal Services profile |
COM+ | Documents the user’s participation in COM+ partition sets |
Member Of | Lists the user’s group memberships |
Dial-In | Documents the user’s dial-in access |
Environment | Settings for the user’s Terminal Services environment |
Sessions | Terminal Services disconnect and reconnect settings |
As you develop different types of user accounts, it’s advisable to test them. Create a dummy account with the memberships and restrictions you’re planning on using. Then log on to a client machine and see whether the account produces the results you expect by doing the following:
Test restrictions to logon hours and passwords by attempting to bypass them.
Test home folders and profiles (discussed in Using Home Folders, later in this chapter) to see whether they are actually created.
Test group memberships by performing a task that membership in the group is supposed to allow (or deny), such as logging on to a server.
The time to discover an unfortunate setting is in a test environment. Test Group Policy settings using Resultant Set of Policy, discussed in Chapter 11.
On a large, busy network, managing user accounts is a continual process of additions, deletions, and changes. Although these tasks aren’t difficult, they can be time-consuming and need to be managed carefully.
On small networks, it’s easy enough to locate a user under Active Directory Users And Computers. On a larger network, more advanced search techniques must be brought to bear.
To search for a particular user account, choose Active Directory Users And Computers from the Administrative Tools menu and on the toolbar, click the Find icon, shown here:
This opens the Find Users, Contacts, And Groups dialog box. Click the drop-down arrow in the Find box and you see that you can also use this tool to search for computers, printers, shared folders, OUs, and more. (See Figure 9-6.)

Select the scope of your search in the In box. Type a name or part of a name, and click Find Now. A search for a portion of a name returns all users, contacts, and groups with that element in their names.
Choose another option in Find and the possible search parameters adjust. For example, choose Common Queries in the Find list and you have an easy way to search for disabled accounts or users with nonexpiring passwords.
For even more in-depth searches, click the Advanced tab and select criteria from the Field drop-down list. Searches can be made on virtually every bit of information in a user, contract, group, or other object record. Figure 9-7 shows a search for a printer that can print double-sided on legal-sized paper and can staple and can print at least four pages per minute and has a resolution of 600 dpi or greater. A tall order, but if it exists, it will be found.

If you need to deactivate a domain user account for some period of time but not delete it permanently, you can disable it. Find the user account, right-click the user name, and select Disable Account from the shortcut menu (as shown in Figure 9-8).
An informational box opens telling you that the object has been disabled, and a red circle with an "X" appears over the user account’s icon. Enable a disabled account by reversing the process, choosing Enable Account from the shortcut menu.

Each user account in the domain has an associated SID that is unique and never reused, which means that a deleted account is completely deleted. If you delete Jeremy’s account and later change your mind, you have to re-create not only the account but also the permissions, settings, group memberships, and other properties that the original user account had. For that reason, if there’s any doubt about whether an account might be needed in the future, it’s best to disable it and not perform the deletion until you’re sure it won’t be needed again.
However, accounts do have to be deleted at regular intervals. Just find the user account, right-click the user name, and select Delete from the shortcut menu. An Active Directory dialog box prompts you to confirm the deletion. Click Yes and the account is deleted.
Moving a user account from one container to another is similarly easy. Find the user account in Active Directory. Right-click and select Move from the shortcut menu. In the Move dialog box, select the destination container and click OK. Or just drag and drop the account into its new destination container.
Using the Ctrl and Shift keys, you can select multiple user accounts to move at once.
On occasion, a user account might need to be renamed. For example, if you have an account configured with an assortment of rights, permissions, and group memberships for a particular position and a new person is taking over that position, you can change the first, last, and user logon names to fit the new person. The following steps describe how to rename an existing user account:
Find the existing user account. Right-click the user name, and choose Rename from the shortcut menu. (You can also slowly click the user name twice.)
Press the Delete key and then the Enter key to open the Rename User dialog box.
Type the changes, and click OK. The account is renamed, and all permissions and other settings remain intact. Other data in the account’s Properties window—such as address, phone number, and so forth—have to be changed as well. If a home folder exists, it will not be renamed for the new user and will have to be created separately.
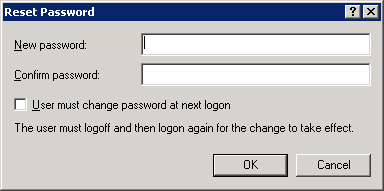
For passwords to be effective, they must not be obvious or easy to guess. However, when passwords are not obvious or easy to guess, they are often forgotten. When a user forgets his or her password, you can reset it. The best practice is to reset it to a simple password and require the user to change the password the next time he or she logs on to the network.
The following steps describe how to reset a password:
Find the user account whose password you need to reset.
Right-click the account name and choose Reset Password from the shortcut menu.
In the Reset Password dialog box (shown in Figure 9-9), type the new password twice, and select the User Must Change Password At Next Logon option. Click OK to implement the change.
If a user violates a group policy, such as exceeding the limit for bad logon attempts or failing to change an expired password, Active Directory locks the account. When an account is locked, it cannot be used to log on to the system. When the penitent comes pleading for reinstatement and after you deliver a few firm words on the importance of following rules, take the following steps to unlock the user account:
Find the locked account in Active Directory. Right-click the account and choose Properties from the shortcut menu.
In the Properties window, click the Account tab.
Clear the check box next to Account Is Locked Out. Click OK.
By default, Group Policy does not lock accounts because of failed logon attempts—you make this setting for security reasons. See Chapter 11 for more about Group Policy.
Note
For instructions about how to delegate the right to unlock locked accounts, see Chapter 12.
Home directories or folders are repositories you can provide on a network server for users’ documents. Placing home folders on a network file server has several advantages:
Backup of user documents is centralized.
Users can access their home folders from any client computer.
Home folders can be accessed from clients running any Microsoft operating system (including MS-DOS and all versions of Windows).
The contents of home folders are not part of user profiles, so they don’t affect network traffic when users log on. (A home folder can also be on a client computer, but that defeats much of its purpose.)
The following steps describe how to create a home folder on a network file server:
On the server, create a new folder for the home folders. Name it Home Folders. Right-click the new folder, and choose Sharing And Security from the shortcut menu.
Click the Sharing tab, and select the Share This Folder option.
Click the Security tab, and assign Full Control to the Users group (as shown in Figure 9-10).

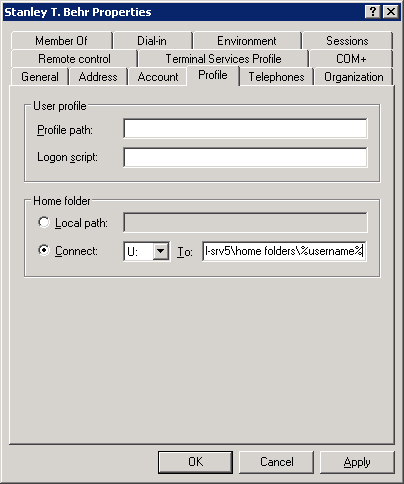
To provide a user with a home folder, you must add the path for the folder to the user account’s properties. Follow these steps to give a user access to a home folder:
Find the user account in Active Directory. Right-click the user name, and choose Properties from the shortcut menu.
Click the Profile tab. In the Home Folder area, click the Connect option and specify a drive letter to use to connect to the file server.
In the To box, specify the UNC name for the connection—for example, \server_nameshared_folderuser_logon_name. If you use the variable %username%, as shown in Figure 9-11, a home folder is given the user’s logon name.
A profile is an environment specifically customized for a user. The profile contains the desktop and program settings for the user. Every user has a profile, whether the administrator configures one or not, because a default profile is automatically created for each user who logs on to a computer. Profiles offer a number of advantages:
Multiple users can use the same computer, with the settings for each user restored at logon time to the same state as when he or she logged off.
Desktop changes made by one user do not affect any other user.
If user profiles are stored on a server, they can follow users to any computer on a network running Windows Server 2003, Windows XP Professional, Windows 2000, or Windows NT 4.
From an administrator’s standpoint, the information in the profile can be a valuable tool for setting up default user profiles for all users on the network or for customizing default profiles for different departments or job classifications. You can also set up mandatory profiles that allow a user to make changes to the desktop while logged on but not to save any of the changes. A mandatory profile always looks exactly the same every time a user logs on. There are three types of profiles:
Local profiles. Profiles made on a computer when a user logs on. The profile is specific to a user, local to that computer, and stored on the local computer’s hard disk.
Roaming profiles. Profiles created by an administrator and stored on a server. These profiles follow a user to any computer on a network running Windows Server 2003, Windows XP Professional, Windows 2000, or Windows NT 4.
Mandatory profiles. Roaming profiles that can be changed only by an administrator.
Real World: What’s Stored in a Profile?
All profiles start out as a copy of the Default User profile that is installed on every computer running Windows Server 2003, Windows XP Professional, Windows 2000, and Windows NT 4. Registry data for Default User is in the Ntuser.dat file contained in the Default User profile. Inside each profile are the following folders:
Application Data. Program-specific settings determined by the program manufacturer plus specific user security settings
Cookies. Messages sent to a Web browser by a Web server and stored locally to track user information and preferences (not in Windows NT 4)
Desktop. Desktop files, folders, shortcuts, and the desktop appearance
Favorites. Shortcuts to favorite locations, particularly Web sites
Local Settings. Application data, History, and Temporary files (not in Windows NT 4)
My Documents. User documents and My Pictures, which contains user graphics files (not in Windows NT 4)
NetHood. Shortcuts to My Network Places
PrintHood. Shortcuts to items in the Printers folder
Recent. Shortcuts to the most recently accessed folders and files
SendTo. Items on the Send To menu
Start Menu. Items on the user’s Start menu
Templates. Application templates
By default, only the Cookies, Desktop, Favorites, My Documents, and Start Menu folders are visible in Microsoft Windows Explorer. The other folders are hidden; to see them select Folder Options, click the View tab, and select Show Hidden Files And Folders.
Local profiles are created on computers when individual users log on. On a computer upgraded from Windows NT 4, the profile is stored in the Profiles folder on the system root partition. On a computer with a new installation of Windows Server 2003, Windows XP Professional, Windows 2000 Server, or Windows 2000 Professional, the user profile is in the Documents And Settings folder (as shown in Figure 9-12).

The first time a user logs on to a computer, a profile folder is generated for the user, and the contents of the Default User folder are copied into it. Any changes made to the desktop by the user are saved in that user’s profile when he or she logs off.
If a user has a local account on the computer as well as a domain account and logs on at different times using both accounts, the user will have two profile folders on the local computer: one for when the user logs on to the domain using the domain user account and one for when the user logs on locally to the computer. The local profile is shown with the logon name. The domain profile is also shown with the logon name but has the domain name appended to it.
Roaming profiles are a great advantage for users who frequently use more than one computer. A roaming profile is stored on a server and, after the user’s logon attempt is authenticated in the directory service, the profile is copied to the local computer. This allows a user to have the same desktop, application configuration, and local settings at any machine running Windows Server 2003, Windows XP Professional, Windows 2000, or Windows NT 4.
Here’s how it works. You assign a location on a server for user profiles and create a folder shared with users who are to have roaming profiles. You type a path to that folder in the user’s Properties window. The next time the user logs on to a computer, the profile from the server is downloaded to the local computer. When the user logs off, the profile is saved both locally and in the user profile path location. Specifying the user profile path is all it takes to turn a local profile into a roaming profile, available anywhere in the domain.
When the user logs on again, the profile on the server is compared to the copy on the local computer, and the more recent copy is loaded for the user. If the server isn’t available, the local copy is used. If the server isn’t available and this is the first time the user has logged on to the computer, a user profile is created locally using the Default User profile. When a profile isn’t downloaded to a local computer because of server problems, the roaming profile is not updated when the user logs off.
Security Alert
It’s best to put user profiles on a member server rather than on a domain controller to speed up the process of authentication and to avoid using a domain controller’s processing power and bandwidth for the downloading of profiles. In addition, place the profiles on a server that is backed up regularly so that copies of roaming profiles are as recent as possible.
Setting up roaming profiles is easy—you assign a location on a server and complete the following steps:
Create a shared folder for the profiles on the server.
On the Profile tab in the user account Properties window, provide a path to the shared folder, such as \server_nameshared_profile_folder\%username%.
Figure 9-13 shows an example of a path for a roaming profile. When you use the variable %username%, Windows Server 2003 automatically replaces the variable with the user account name.

After you create a shared profile folder on a server and supply a profile path in the user account, a roaming profile is enabled. The user’s configuration of his or her desktop is copied and stored on the server and is available to the user from any computer. Most of the time, though, you don’t want to send your users off to fend for themselves. Life is easer for them, and for you, if users are assigned a customized profile that is already set up with appropriate shortcuts, network connections, and Start menu items. For this, you need to set up customized profiles.
Creating customized roaming profiles is a simple—albeit multistep—process:
Create a user account with a descriptive name such as District Managers or Sales Staff. This is just a "blank" user account that you use to create a template for the customized configuration.
Log on using the template account, and create the desktop settings you want, including applications, shortcuts, appearance, network connections, printers, and so forth.
Log off the template account. Windows Server 2003 creates a user profile on the system root drive in the Documents And Settings folder.
Log on again using an administrator account. Find the accounts that are going to have this customized roaming profile.
In each account, click the Profile tab, and in the Profile Path box, type \server_nameprofile_folder%username%. Click OK.
In Control Panel, select System.
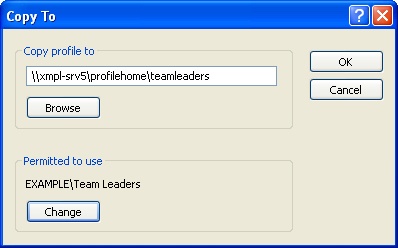
Click the Advanced tab, and then in the User Profiles section, click Settings. Highlight the template account—in this case TeamLeaders—and click Copy To.
In the Copy To dialog box, type the path of the profiles folder on the server, \server_name oaming_profiles_folderusername. Note that this time you must use the actual name of the roaming profile or the profile will be stored under the name of whoever is logged on.
In the Permitted To Use area, click Change to give the appropriate group permission to use the profile. (See Figure 9-14.) Click OK to copy the template profile.
Logon scripts can be assigned by profile or through Group Policy. (Group Policy is covered in Chapter 11.) The following steps describe how to assign a script to a profile:
Choose Active Directory Users And Computers from the Administrative Tools menu.
In the console tree, click Users. Right-click the user account, and choose Properties.
Click the Profile tab, and type the name of the logon script in the Logon Script box.
Click OK when you’re finished.
Windows Server 2003 always looks for logon scripts in the same place—on the authenticating domain controller at the path %SystemRoot%SYSVOLsysvoldomain_ namescripts. Scripts in this folder can be typed in the Logon Script path by name only, as shown in Figure 9-15. If you use folders inside the Scripts folder, you must show that part of the path in the Logon Script path. Table 9-7 shows the special variables that can be used when creating logon scripts. Logon scripts can also be created in VBScript and JScript. Replication of logon scripts to all domain controllers is automatic on NTFS volumes on servers running Windows Server 2003 and Windows 2000 Server. Scripts on FAT16 and FAT 32 partitions must be replicated manually.

Table 9-7. Logon script variables
Variable | Description |
|---|---|
%homedrive% | Letter of the drive containing the user’s home directory on the user’s local workstation |
%homepath% | Full path of the user’s home directory |
%os% | User’s operating system |
%processor_architecture% | Processor type on the user’s workstation |
%processor_level% | Processor level of the user’s workstation |
%userdomain% | Domain where the user’s account is defined |
%username% | Account user name |
Writing and using scripts is covered in Chapter 13. For additional information about scripting and sample scripts, the TechNet Script Center at http://www.microsoft.com/technet/scriptcenter/default.mspx is an excellent resource.
The success of a network operation is measured by both the availability of some information and resources and the restriction and protection of others. Windows Server 2003 offers the network administrator the tools and functionality to meet the information needs of users, while protecting sensitive information stored on or passed through the network. This chapter has explored the options available to the administrator for configuring groups, group scope, and user accounts through Windows Server 2003. The next chapter covers the use of group policy, shares, and permissions to provide accessibility and security for any network—from the simplest to the most complex.