Hard-drive prices have plummeted, capacities have soared, and demand has risen accordingly. While some administrators manage storage crises by simply adding more storage, this approach can lead to an unmanageable amount of storage and devices, complicating backup and archival tasks, and leading to backwaters of the network where vast quantities of data sit unused or where users store their personal music and movie collections, consuming yet more resources.
By managing your storage more wisely, you can manage the growth in storage on the network, avoid storage crises such as file shares that run out of disk space, and increase reliability and performance.
To help manage storage on the network, Microsoft provides new tools in Windows Server 2003 R2, such as File Server Resource Manager, Storage Manager For SANs (storage area networks), and a much more useful and high-performance Distributed File System (DFS), as well as the Windows Server 2003 Removable Storage and Remote Storage tools, which are unchanged since Windows Server 2003.
More Info
For information about Shared Folders, see Chapter 10; for information about disk management, see Chapter 18.
File Server Resource Manager (FSRM) is a collection of three tools that provides administrators the ability to view all their local storage resources from a single console, as well as to create and apply policies that control these resources. The three tools included in File Server Resource Manager are
Storage Reports Management
Quota Management
File Screening Management
Specifically, these tools allow administrators of Windows Server 2003 R2 file servers to keep track of storage growth and usage on the local server, as well as create hard or soft policies limiting the amount and type of files that users can save in specific folders.
To use the File Server Resource Manager MMC snap-in (Fsrm.msc) of the File Server Management console (Fs.msc), install or upgrade the File Server role on a server running Windows Server 2003 R2, open the File Server Management console from the Administrative Tools folder, and then use the following sections to apply settings appropriate for your situation.
Note
The File Server Resource Manager can manage only a single server at a time, and it works only on servers running Windows Server 2003 R2 that have the File Server Resource Manager installed. To manage multiple servers, use Microsoft Operations Manager (MOM) in conjunction with the File Server Resource Manager Management Pack.
Before you can create notifications in FSRM, you need to specify the e-mail settings. This is also a good time to configure other global options, such as where Windows stores storage reports and whether to audit file screening.
To set global options, right-click File Server Resource Manager in the File Server Management or File Server Resource Manager console, and choose Configure Options.
Use the E-mail Notifications tab (or the Storrept Admin Options command at a command prompt) to specify the e-mail settings:
The SMTP server to use when sending storage reports and notifications. This is most likely the server name of a nearby Microsoft Exchange Server.
The administrator e-mail address or addresses to which Windows should send storage reports and notifications by default. (You can specify other addresses when creating storage reports and notifications.)
The e-mail address that File Server Resource Manager should use as the "From" address for e-mails it sends. Use the e-mail address of the server administrator, or another address to which administrators or users can respond if they have questions (for example, about quotas).
Click Send Test E-mail to test the e-mail settings.
Use the Storage Reports tab (or the Storrept Reports command) to edit and review storage reports. (You can also do this when creating storage reports, as discussed in the Scheduling Storage Reports section of this chapter.)
Use the Report Locations tab (or the Storrept Admin Defaults command) to specify where Windows should store storage reports.
Use the File Screen Audit tab (or the Filescrn Admin Options command) to enable auditing for files that Windows blocks according to file screens you create (as discussed in the Screening Files section of this chapter). To view the audited events, use the File Screening Audit storage report. (See the Scheduling Storage Reports section for more information.)
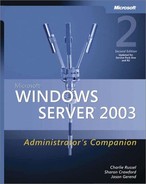
FSRM supports reporting in Dynamic Hypertext Markup Language (DHTML), HTML, Extensible Markup Language (XML), Comma-Separated Values (CSV) text, or plain text, making it easy to view reports or process them using scripts, Microsoft Excel, or other applications.
File Server Resource Manager includes the following storage reports:
Large files
Files by owner
Files by file group
Duplicate files
Least recently accessed files
Most recently accessed files
Quota usage
File screening audit
To schedule a storage report, use the following steps:
In the File Server Management console tree, click File Server Resource Manager, and then click Storage Reports Management.
Right-click Storage Reports Management, and choose Schedule A New Report Task. The Storage Reports Task Properties dialog box appears, as shown in Figure 20-1.
In the Scope section of the dialog box, click Add to select the local folders that you want to monitor.
In the Report Data section of the dialog box, select the reports that you want to generate.
To view the settings for all selected reports, click Review Selected Reports. To adjust the settings for a report, select the report and then click Edit Parameters.
In the Report Formats section of the dialog box, select the formats in which you want to generate the reports.
Click the Delivery tab, select the Send Reports To The Following Administrators check box, and type the e-mail addresses of the administrators who should receive the storage reports, separating each address with a semicolon.
Click the Schedule tab, and then click Create Schedule. The Schedule dialog box appears, which you can use to schedule the storage reports.
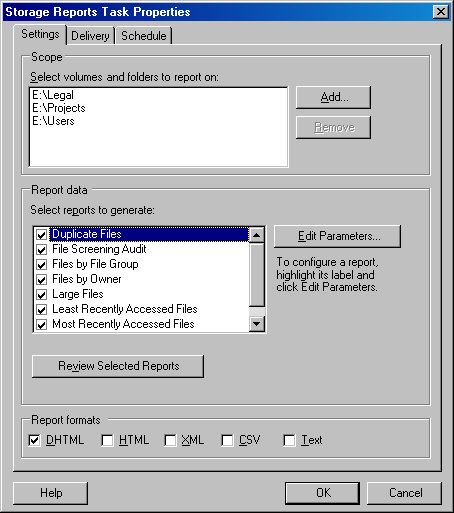
After you finish creating the scheduled report task, click OK in the Storage Reports Task Properties dialog box. The new scheduled report task appears in the File Server Resource Manager node of the File Serve Management console, as shown in Figure 20-2.
To run the scheduled report immediately, right-click it and choose Run Report Task Now. The Generate Storage Reports dialog box appears, asking whether you want to view the reports immediately or whether File Server Resource Manager should generate the reports in the background for viewing later from the %SystemDrive%:StorageReportsScheduled folder.
To schedule a storage report from a command prompt, use the Schtasks /Create command to create a task in the Scheduled Tasks folder for the report and then use the Storrept Reports Add command to create the report. For example, open a command prompt window and then type the following commands:
Schtasks /Create /S Srv1 /SC Monthly /MO First /D Sun /TN
    "Monthly_Large_Files_Storage_Report"
    /TR "C:WindowsSystem32Storrept.exe
    Reports Generate /Scheduled /Task:"Monthly_Large_Files_Storage_Report""
    /RU "SYSTEM"
Storrept Reports Add /Report:LargeFiles
    /Task:"Monthly_Large_Files_Storage_Report"
    /Scope:"E:Projects|E:Legal
    /Name:"Monthly_Large_Files_Storage_Report"
    /Format:DHTML /Remote:Srv1
One way to slow the growth of storage on a network is to limit the amount of disk space each user can utilize on a server. There are two ways of doing this in Windows Server 2003 R2—disk quotas and the Quota Management node of the File Server Resource Manager. Disk quotas allow you to create storage limits on each volume for individual users.
The Quota Management node of the File Server Resource Manager allows you to manage storage at a folder or volume level. You can create quota templates and quotas that Windows automatically applies to subfolders and newly created folders. Unlike disk quotas, quotas that you create using Quota Management look at that actual amount of disk space used by a file, enabling users to reduce their quota consumption by using NTFS compression, and they provide powerful notification capabilities.
Note
Quotas that you create using Quota Management apply to all users indiscriminately, unlike disk quotas, which you can apply differentially to individual users and groups. Both types of quotas apply only to a single server. To avoid confusion, do not use both types of quotas on the same server. For more information about disk quotas, see the Using Disk Quotas section of this chapter.
The following list describes the key concepts involved with Quota Management:
Quotas. Sets the total amount of disk space that a folder and all subfolders can consume. For example, if you create a quota that limits the Users folder to 2 GB, the contents of this folder and all subfolders cannot exceed 2 GB in size, regardless of the user.
To create a quota, choose Create Quota On Path in the Create Quota dialog box, as discussed later in this chapter.
Auto Apply Quotas. Sets the amount of disk space that each subfolder of the specified folder can consume. For example, if you create an auto apply quota for the Users folder and set the limit at 2 GB, each subfolder (for example, UsersJason; UsersSharon) and all files and folders within the subfolder is limited to 2 GB in size. An auto apply quota does not set a limit on the contents of the parent folder, only the subfolders (children). This is useful for quickly setting identical quotas on multiple subfolders, such as user folders or project folders.
To create an auto apply quota, choose Auto Apply Template And Create Quotas On Existing And New Subfolders in the Create Quota dialog box, as discussed later in this chapter.
Quota Templates. Standardizes and centralizes quota and auto apply quota settings, making it easy to apply and update multiple quotas. When you change the settings of a quota template, you can automatically apply the changes to all quotas that use the quota template.
Hard and Soft Quotas. Quotas can use either "hard" limits, which prevent users from exceeding their quotas, or "soft" limits, which merely serve as a warning and notification method.
To create a quota or auto apply quotas, use the following steps. To create a quota template, see the Creating and Editing Quota Templates section of this chapter.
In the File Server Management console, click File Server Resource Management, and then click Quota Management.
Right-click Quotas in the console tree and choose Create Quota.
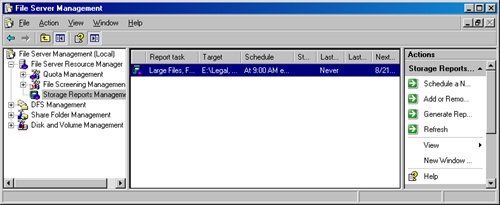
The Create Quota dialog box appears, as shown in Figure 20-3.
Click Browse, select the folder to which you want to apply a quota, and then click OK.
To create a quota that limits the size of a folder, including all subfolders, select the Create Quota On Path option. To create an auto apply quota that limits the size of subfolders individually (which is useful for setting quotas on the Users folder), select the Auto Apply Template And Create Quotas On Existing And New Subfolders option.
Select the quota template you want to apply, or choose Define Custom Quota Properties and click Custom Properties to create a custom quota. (You cannot create custom quotas for auto apply quotas.) Click Create when you are finished.
If you chose to create a custom quota, the Save Custom Properties As A Template dialog box appears. Use this dialog box to save the custom quota as a quota template, or choose Save The Custom Quota Without Creating A Template.
To create a quota from a command prompt, use the Dirquota Quota Add command. For example, open a command prompt window and then type the following command:
Dirquota Quota Add /Path:E:Users /
SourceTemplate:"200 MB Limit Reports To User" /Remote:Srv1
Best Practices
Use quota templates instead of creating custom quotas. Using a quota template allows you to make changes to the template that apply to all quotas that are derived from the template. For example, to change the administrator e-mail address for all quotas on a server, edit the appropriate quota templates and then apply these changes to all quotas. This eliminates the need to manually update each quota individually.
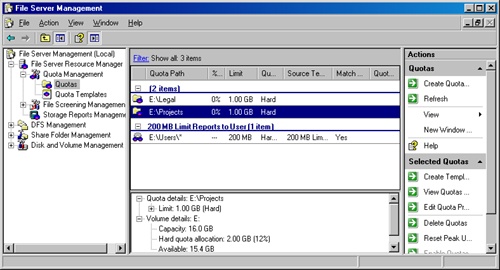
Click Quotas in the File Server Management console tree (shown in Figure 20-4) to view or manage existing quotas:
To filter the display by quota type or path, click the Filter hyperlink and then use the Quota Filter dialog box.
To disable a quota, select the quota or quotas, right-click the quota, and then choose Disable Quotas. To enable a disabled quota, right-click it and choose Enable Quota.
To reset the peak usage data for a quota, select the quota or quotas, right-click the quota, and choose Reset Peak Usage. Resetting peak usage data resets notifications for a quota so that users receive another notification the next time they cross a threshold.
Quota templates enable you to quickly apply standardized quota settings, as well as simultaneously update all quotas that make use of a template—when you edit a quota template Windows gives you the option to update all quotas based on the template. To create or edit a quota template, use the following steps:
In the File Server Resource Manager console, right-click Quota Templates and choose Create Quota Template, or right-click an existing quota template and choose Edit Template Properties.
To create a quota template based on an existing quota, right-click the quota and choose Create Template From Quota.
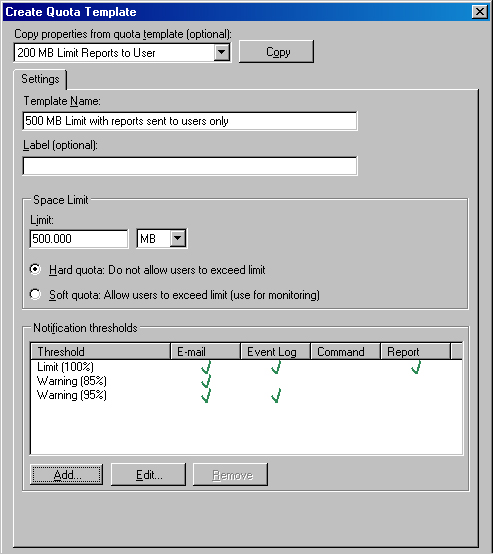
To base the template on an existing template, in the Create Quota Template dialog box (shown in Figure 20-5) choose a template from the Copy Properties From Quota Template box and then click Copy.
Type a name and label for the template in the Template Name and Label boxes.
In the Limit box, type the maximum amount of disk space each user can use in the specified folder.
Choose Hard Quota to prevent users from exceeding the limit you specify, or choose Soft Quota to use the quota only for monitoring.
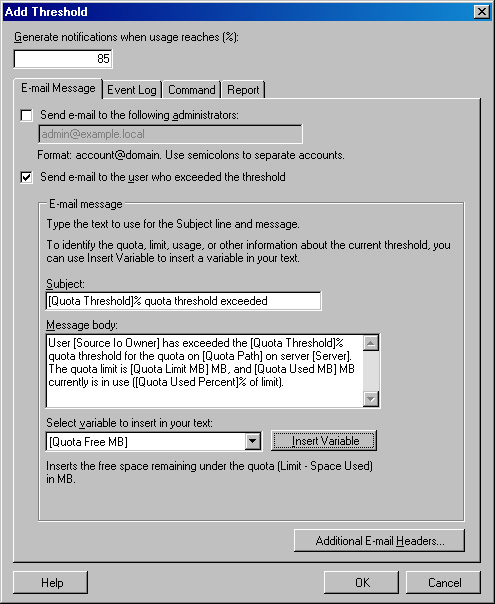
In the Notification Thresholds section of the dialog box, click Add to create a new notification, or select an existing notification and then click Edit. The Add Threshold dialog box appears (as shown in Figure 20-6).
In the Generate Notifications When Usage Reaches box, specify when to notify users.
A typical configuration is to use three notification thresholds, which are often set at 85 percent, 95 percent, and 100 percent.
Specify which of the following actions to take when a user exceeds the threshold you specify, and click OK when you are finished:
Use the E-mail Message tab to send an e-mail notification to a user who exceeds the threshold and/or an administrator. Use the E-mail Message section of the tab to customize the message that Windows generates. Click Additional E-mail Headers to change the From or Reply To addresses so that users can easily reply to the appropriate e-mail address.
Use the Event Log tab to record a log entry on the server when a user exceeds the threshold.
Use the Command tab to run a command or script when a user exceeds the threshold.
Use the Report tab to generate a storage report when a user exceeds the threshold. See the Scheduling Storage Reports section earlier in this chapter for more information about storage reports.
Click OK when you are finished. If you are editing an existing template, the Update Quotas Derived From Template dialog box appears. Choose one of the following options and then click OK:
Apply Template Only To Derived Quotas That Match The Original Template. Updates quotas based on the quota template only if you have not customized them
Apply Template To All Derived Quotas. Updates all quotas based on the quota template
Do Not Apply Template To Derived Quotas. Does not update any quotas based on the template
To create a quota template from a command prompt, use the Dirquota Template Add command. For example, open a command prompt window and then type the following command:
Dirquota Template Add /Template:"500 MB Limit Reports to User" /Limit:500MB
/SourceTemplate:"200 MB Limit Reports To User" /Remote:Srv1
Note
To import or export quotas from one file server to another, use the Dirquota Template Export and Dirquota Template Import commands. For example, to export all templates, type Dirquota Template Export /File:C:Quoatatemplates.xml. To import only a template named 1 GB limit, type Dirquota Template Import /Template:"1 GB limit" /File:C:Templates.xml.
Administrators who use storage reporting tools for the first time are often surprised, and occasionally outraged, over how many audio and video files they find on file servers. In addition to the massive amounts of disk space that audio and video files can consume, companies might be legally liable if users obtained these files illegally or share them with coworkers.
To help administrators control what type of files users can save on a file share, Windows Server 2003 R2 includes File Screening Management, which is a component of the File Server Resource Manager MMC snap-in. File Screening Management enables administrators to block users from saving files with certain file extensions to a specific file share, as discussed in the following sections.
To create a file screen, use the following steps:
In the File Server Management console, click File Server Resource Manager and then click File Screening Management.
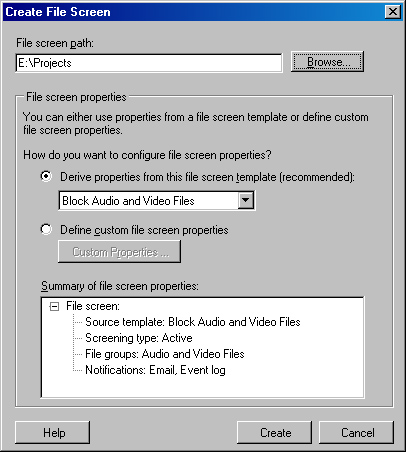
Click the File Screens container, right-click File Screens in the console tree, and choose Create File Screen. The Create File Screen dialog box appears, as shown in Figure 20-7.
Click Browse, select the folder to which you want to apply the file screen, and then click OK.
Select the file screen template you want to apply, or choose Define Custom File Screen Properties and then click Custom Properties to create a custom file screen. Click Create when you are finished.
If you chose to create a custom file screen, the Save Custom Properties As A Template dialog box appears. Use this dialog box to save the custom file screen as a file screen template, or choose Save The Custom File Screen Without Creating A Template.
To create a file screen from a command prompt, use the Filescrn Screen Add command. For example, open a command prompt window and then type the following command:
Filescrn Screen Add /Path:E:Projects /SourceTemplate:"Block Audio
and Video Files"
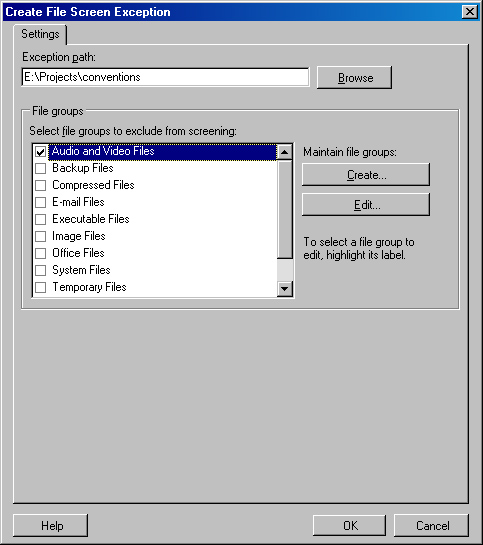
To create an exception to a file screen, use the following steps:
Click the File Screens container, right-click File Screens in the console tree, and choose Create File Screen Exception. The Create File Screen Exception dialog box appears, as shown in Figure 20-8.
Click Browse, select the folder to which you want to apply the file screen, and then click OK. The folder you select cannot already contain a file screen, but it can be a subfolder of a folder that contains a file screen.
Select the file groups that you want to allow, excluding them from any file screens applied to parent folders. Click OK when you are finished to return to the File Screening Management snap-in.
To create a file screen exception from a command prompt, use the Filescrn Exception Add command. For example, open a command prompt window and then type the following command:
Filescrn Exception Add /Path:E:ProjectsConventionsPowerpoint /Add-
Filegroup:"Audio and Video Files"
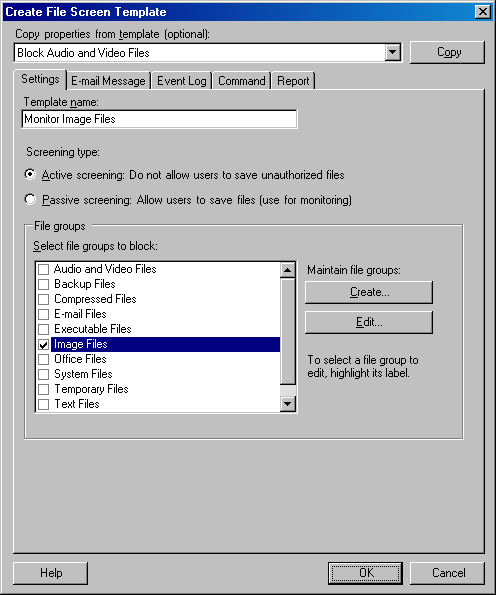
To create or edit a file screen template, use the following steps:
In the File Server Resource Manager console, right-click File Screen Templates and choose Create File Screen Template, or right-click an existing quota template and choose Edit Template Properties.
To create a file screen template based on an existing file screen, right-click the file screen and choose Create A Template From File Screen.
To base the template on an existing template, in the Create File Screen Template dialog box (shown in Figure 20-9) choose a template from the Copy Properties From Template box and then click Copy.
Type a name and label for the template in the Template Name box.
Choose Active Screening to prevent users from saving files of the type you specify, or choose Passive Screening to use the file screen only for monitoring.
Select the file group or groups that you want to block. To create a new file group, click Create; to edit an existing file group, select the group and then click Edit.
Specify which of the following actions to take when a user saves a screened file type, and click OK when you are finished:
Use the E-mail Message tab to send an e-mail notification to the user who saved a screened file type, and/or an administrator. Use the E-mail Message section of the tab to customize the message that Windows generates.
Use the Event Log to record a log entry on the server when a user saves a screened file type.
Use the Command tab to run a command or script when a user saves a screened file type.
Use the Report tab to generate a storage report when a user saves a screened file type. See the Scheduling Storage Reports section earlier in this chapter for more information about storage reports.
Click OK when you are finished. If you are editing an existing template, the Update File Screens Derived From Template dialog box appears. Choose one of the following options and then click OK:
Apply Template Only To Derived File Screens That Match The Original Template. Updates file screens based on the quota template only if you have not customized them
Apply Template To All Derived File Screens. Updates all file screens based on the quota template
Do Not Apply Template To Derived File Screens. Does not update any file screens based on the template
To create a file screen template from a command prompt, use the Filescrn Template Add command. For example, open a command prompt window and then type the following command: Filescrn Template Add/Template:"Monitor Image Files"/Type:Passive/Add-Filegroup:"Image Files"
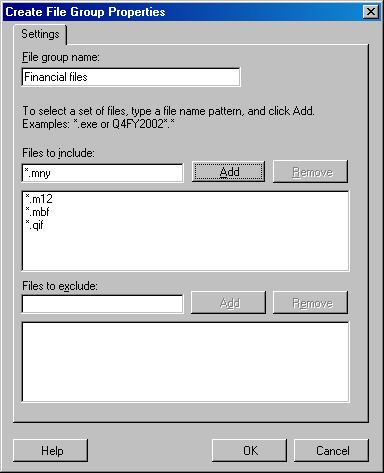
A file group is a group of similar file types. For example, the Audio And Video file group includes audio files (with the .MP3, .WMA, and .AAC file extensions), as well as video files (with the .WMV, .MPEG, and .MOV file extensions). The storage reports feature uses file groups when reporting on the types of files present on a file share, while file screening uses file groups to control which files to block. To create or edit a file group, use the following steps:
In the File Server Management console, click File Server Resource Manager and then click File Screening Management.
Click the File Groups container, right-click File Groups in the console tree, and choose Create File Group. The Create File Group dialog box appears, as shown in Figure 20-10.
Type a name for the file group in the File Group Name box.
Type the file name criteria to include in the file group in the Files To Include box, using asterisks (*) as wildcards, and then click Add. For example, type *.xml or financial*.*.
To exclude files from the file group, type the file name criteria to exclude from the file group in the Files To Exclude box. Click OK when you are finished.
To create a file group from a command prompt, use the Filescrn Filegroup Add command. For example, open a command prompt window and then type the following command:
Filescrn Filegroup Add /Filegroup:"Financial files"
/Members:"*.qif | *.mny | *.m12 | *.mbf"
Beginning with Windows 2000, Microsoft provides for either advisory or absolute disk quotas by user or group. Disk quotas are useful for setting quotas on entire volumes, but they do not have the granularity, templates, and notification features that quotas created with Quota Management do.
Note
Local files in the Recycle Bin count toward the limit just as much as regular files (although shadow copies do not), so users must delete files and empty the Recycle Bin to get below the limit when using files on a local drive.
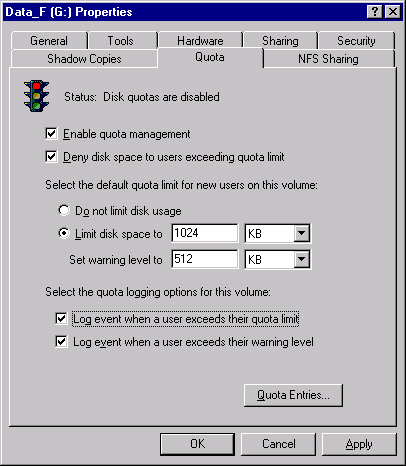
By default, disk quotas are turned off for all partitions and volumes. Disk quotas are available only for volumes that Windows assigns a drive letter. Follow these steps to enable disk quotas:
Right-click the drive letter in Windows Explorer, and choose Properties.
Click the Quota tab (shown in Figure 20-11).
Select the Enable Quota Management option.
Define the limits on disk usage for this drive letter. The available choices are as follows:
Deny Disk Space To Users Exceeding Quota Limit. Select this option to enforce quotas, or clear it to use disk quotas only for auditing.
Limit Disk Space To. Here you can specify the limits of disk space usage for new users on the volume.
Set Warning Level To. This option indicates the limit at which users receive a warning message.
Select the Quota Logging Options for this Volume. You can choose to log an event in the System event log hourly when users exceed either their usage limit or their warning level.
You see a confirmation message. If everything is correct, click OK to scan the drive and enable quotas.
To enable disk quotas from a command prompt but not set any options, use the Fsutil Quota Enforce command. For example, open a command prompt window and then type Fsutil Quota Enforce g:.
The Fsutil Quota command has limited functionality, so to enable disk quotas and set limits, use the Windows Management Instrumentation Command-Line (WMIC). For example, open a command prompt window and then type the following command:
WMIC QuotaSetting Set Volumepath=G:, DefaultLimit=1048576,
DefaultWarningLimit=524288, State=2, ExceededNotification=True,
WarningExceededNotification=True
To set disk quotas on administrators (who are otherwise excluded from disk quotas), or to tweak the disk quotas for individual users, you need to perform these additional steps:
Right-click the drive you want to set quota entries for, and choose Properties. Click the Quota tab to display the dialog box shown previously in Figure 20-7.
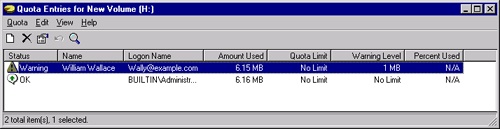
Click Quota Entries to display the quota entries for the volume. You see the window shown in Figure 20-12. This window contains entries for everyone who has ever stored files on the volume, unless you have explicitly removed the entries for users who no longer store files there. You can sort by any of the columns or use the Find function to locate a specific entry.
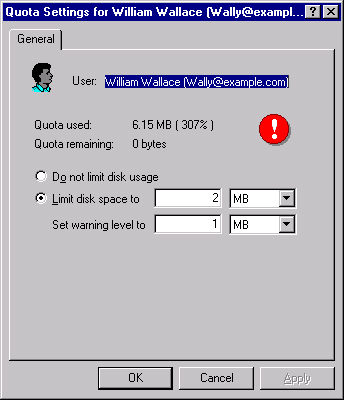
To change the properties for any entry, double-click the entry, which displays the dialog box shown in Figure 20-13.
To view quota entries from a command prompt, use the Fsutil Quota Query command. For example, open a command prompt window and then type Fsutil Quota Query G:.
To modify quota entries from the command prompt, use the Fsutil Quota Modify command. For example, type Fsutil Quota Modify G: 1048576 2097152 EXAMPLEWally.
Note
To prevent a large administrative headache, make changes to the disk quotas for an individual only when there is a compelling reason to do so, and then keep careful records so that all administrators have ready access to the information. There is no way to assign disk quotas to groups, though you can create a script that emulates this function.
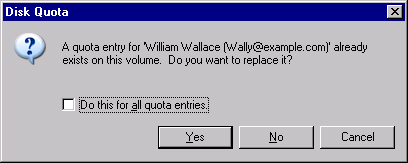
Windows Server 2003 lets you export the disk quotas from one volume to another, simplifying the setup process for complicated disk quota systems. If a user already has a quota entry, Windows asks whether you want to overwrite it with the imported quota entry for that user (as shown in Figure 20-14). Avoid importing disk quota settings onto an existing drive unless you are changing your overall disk quotas across the entire server. Any customizations you made on the current drive could be lost, and having to acknowledge each change that affects an existing user lends itself to mistakes. In addition, any special limits set for specific users on the source volume will be applied to the target volume.
There are two ways to import disk quotas from one volume to another. You can open the Quota Entries window for the source volume, click Quota, choose Export to save the entry to a file, and then open the Quota Entries window for the target volume and choose Import from the Quota menu. Or you can simply open both Quota Entries windows and drag the entries you want to import from the source window to the target one.
You can use the Quota Entries window to create reports about disk usage. Select the accounts you want to include in the report and drag them into the reporting tool you’ll be using. The supported formats include Rich Text Format, Comma-Separated Values, CF_UNICODETEXT, and CF_TEXT. If you drag the entries into Microsoft Excel, for example, you get not only the entries but also the column headings. This makes whipping out a disk usage report pretty trivial, though not nearly as trivial as creating a storage report, as discussed earlier in this chapter.
The Distributed File System (DFS) solution in Windows Server 2003 R2 is a combination of two technologies, DFS Namespaces and DFS Replication, that together provide a fault-tolerant, virtual file system composed of file shares on multiple file servers kept in sync by a WAN-friendly replication algorithm that is vastly more efficient and robust than the file replication service (FRS).
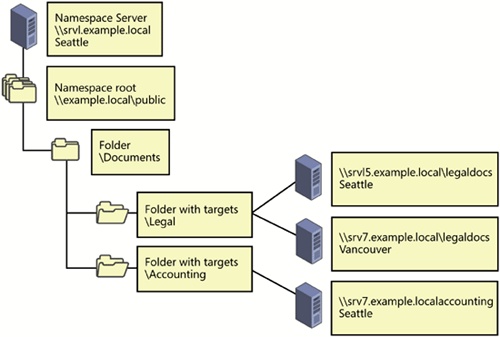
DFS Namespaces replaces the Distributed File System component of Windows Server 2003 and Windows 2000 Server. It allows administrators to group shared folders scattered across the network into a virtual tree of folders called a namespace (as shown in Figure 20-15).
DFS Replication is the successor to the FRS. It allows administrators to replicate folders in a bandwidth-efficient manner using the remote differential compression (RDC) algorithm that replicates only the changed blocks within a file, unlike FRS, which can replicate only complete files.

DFS Namespaces and DFS Replication are useful for the following purposes:
To organize a large number of file shares scattered across multiple servers into a contiguous namespace so that users can find the files they need
To improve the availability and performance of file shares, especially in network environments with multiple sites, where DFS Namespaces can redirect users to the closest available server
To "cache" data at a branch office so that users can access files at a local file server, which then efficiently replicates with a central file server across a WAN connection
To centralize backup from branch offices by replicating all data from the branch office to a central server that is backed up regularly
To keep two or more file shares in sync over LAN or WAN links
The DFS Namespaces and DFS Replication features of Windows Server 2003 R2 are much more efficient, robust, and easier to use than the Distributed File System and FRS features in previous versions of Windows. This section discusses only the DFS Namespace and DFS Replication tools included in Windows Server 2003 R2.
Note
You can use DFS to create a loosely coupled collaboration environment where DFS Replication replicates data between multiple servers. However, DFS Replication does not include the ability to "check out" files, or replicate files that are in use, such as multi-user databases. Therefore, use Windows SharePoint Services in environments where users regularly attempt to edit the same file at the same time from different locations.
Real World: Use DFS for Better Performance and Availability
DFS Namespaces offers better availability and performance than normal shared folders. It does this in three ways. First, DFS Namespaces hides the underlying file shares from users. This enables you to replace servers and shares without affecting the users. For example, to take a server offline, simply change the affected folders in DFS Namespaces to point to another server with a copy of the folder share.
Second, DFS Namespaces supports multiple namespace servers and multiple folder targets for each folder in the DFS namespace. When a user attempts to connect to a domain-based namespace, a domain controller refers the user to the nearest namespace server. When the user connects to a folder with multiple folder targets, the namespace server redirects the user to a server in the same site as the user, or if this is not possible, to the server with the lowest WAN costs (performance or financial). If a server fails, the user is automatically connected to another folder target.
Third, DFS Replication in Windows Server 2003 R2 supports the remote differential compression (RDC) replication algorithm for replicating content between folder targets or namespace servers, greatly reducing bandwidth consumption.
There are quite a few changes in DFS for Windows Server 2003 R2; the following list highlights the most noteworthy ones:
Terminology changes. DFS now refers to both DFS Namespaces and DFS Replication. Additionally, a DFS root is now called a namespace (or namespace root); the root server is now called the namespace server; a link is now called a folder; and a link target is now called a folder target.
Drag and Drop DFS namespace restructuring. You can restructure the namespace by using drag and drop, or you can do it at a command-line using the Dfsutil.exe command.
Target priorities and client failback. You can assign priorities to folder targets in DFS Namespaces so that clients preferentially use or avoid certain servers. Client failback enables clients that have failed over to a secondary folder target to automatically switch back to the primary folder target when it comes back online.
DFS Replication replaces FRS in DFS. Windows Server 2003 R2 uses the new DFS Replication tool, instead of FRS, to replicate DFS folders. However, domain controllers still use FRS to replicate the SYSVOL folder, which contains group policy and scripts.
Remote differential compression (RDC) conserves WAN bandwidth. The new remote differential compression (RDC) algorithm replicates only changed blocks in files, yielding large savings in network bandwidth for files larger than 64 KB.
Standalone DFS namespaces support replicating folders. DFS Replication can enable replication on folders in a standalone namespace, as well as on folders that are not part of a namespace, as long as the folder targets are all members of the same Active Directory forest.
Better reliability. DFS Replication is designed to be reliable and self-healing. Unlike FRS, DFS Replication in most cases automatically handles problems such as USN Journal wraps (as described in Microsoft Knowledge Base article 292438), journal loss, database corruption, and file conflicts. DFS Replication also provides new health reports that make it easy to ascertain whether there are any major problems with replication that DFS Replication cannot handle automatically.
DFS is a distributed file system, and it uses different terminology than the local Windows file system. The following sections talk about namespace roots, folders in DFS Namespaces, and folder targets, as well as DFS replication.
Note
DFS in Windows Server 2003 R2 refers to both DFS Namespaces and DFS Replication, unlike previous versions of Windows, which use the term "DFS" to describe only the namespace component.
The structure of a DFS Namespaces tree in Windows Server 2003 R2 begins with a namespace root (called a DFS root in Windows Server 2003 and Windows 2000 Server), similar to the way the Windows file system starts with a drive. The namespace root is the shared folder that serves as the root for a particular namespace. Because DFS is a virtual file system, the namespace root can be any shared folder on an NTFS partition.
The namespace root can contain normal files and subfolders, though you must use folders (as opposed to file system folders) in DFS Namespaces to create the top levels of your namespace structure. So be careful when designing your folder structure. The server that stores the namespace root is called the namespace server (or host server in Windows Server 2003 and Windows 2000 Server).
Note
Windows 2000 supports only one DFS root per server; Windows Server 2003 Enterprise Edition and Windows Server 2003 Datacenter Edition support multiple namespace roots per server.
There are two types of DFS namespaces: standalone and domain based. A standalone namespace (for example, \srv1public) stores all namespace information on the registry of the namespace server instead of in Active Directory. Any server running Windows Server 2003 R2, Windows Server 2003, or Windows 2000 Server can host a standalone namespace, regardless of whether the server belongs to a domain or not (though servers running Windows Server 2003 or Windows 2000 Server do not support all features of DFS Namespaces). Standalone namespaces can host more folders (up to 50,000 folders with targets) than domain-based namespaces (which can hold up to 5000 folders with targets), but the only way to provide redundancy for a standalone namespace root is to use a server cluster. You cannot use multiple namespace servers to host a standalone namespace as you can with a domain-based namespace. However, Windows Server 2003 R2 supports replication for folders in a standalone namespace, unlike earlier versions of DFS, as long as all replication members belong to the same Active Directory forest.
Important
DFS Replication is not cluster aware. To use DFS Replication with a server cluster, place replicated folders in local storage of each node.
Domain-based namespace roots (for example, \example.localpublic) differ from standalone namespace roots in a couple of ways. First, you must host domain-based namespace roots on a member server or domain controller of an Active Directory domain. Second, domain-based namespace roots automatically publish the DFS topology in Active Directory. This arrangement provides fault tolerance and network performance optimization by directing clients to the nearest target, as discussed in the next section.
Choose a standalone namespace if the network does not use Active Directory, if the namespace contains more than 5000 folders with targets, or if you want to host the namespace on a server cluster. Otherwise, choose a domain-based namespace to use multiple namespace servers for redundancy and to take advantage of Active Directory for site-aware client referrals. You can also combine the two—for example, you can create a domain-based namespace that includes a standalone root as a folder.
Before creating namespaces, design the namespace hierarchy in a similar manner to the way you designed the domain structure for the organization. (See Chapter 3 for more information.) Create a namespace structure that is logical, easy to use (by end users!), and matches the organization design, and then get the key stakeholders in the project to sign off on the design. Enlist some representative users from the organization to review the namespace design and provide feedback.
To add content and provide hierarchical structure to a namespace, use DFS folders. A folder in a Windows Server 2003 R2 namespace can contain other DFS folders (adding depth to the folder hierarchy), or it can contain folder targets that map to file shares. Both types of folders appear to users as normal subfolders of the namespace root, even though they can contain files and subfolders from file shares scattered throughout the enterprise. (See Figure 20-16.)
Unlike normal folders and file shares, DFS folders can link to identical folders on multiple servers called folder targets (or targets or replicas in Windows Server 2003 and Windows 2000 Server). The user sees only a single, ordinary folder.
DFS clients automatically choose a folder target in their site, if available, reducing intersite network utilization. If more than one target is available on the client’s site, each client randomly selects a target, spreading the load evenly across all available servers. If a target goes down, the client automatically picks a different target. (This process is called client failover.) When the original target comes back online, the client automatically switches back to the preferred target if the namespace server and the client support client failback. (See the Requirements section for more information.) In this way, targets provide fault tolerance, load balancing, and site awareness. You can use DFS Replication to keep folder targets synchronized.
Note
When a user opens a new folder in a DFS namespace, he or she is likely connecting to a new server, which entails some delay. Because of this, it is important to minimize the number of "wrong turns" users make by opening folders that do not contain the files they are looking for. To help users find the data they want with as little delay as possible, establish a consistent and intuitive naming structure for DFS folders, and create a site map at key levels of the namespace.
Windows Server 2003 and Windows 2000 Server use the file replication service (FRS) to replicate content between DFS target folders, as well as to replicate the SYSVOL share for domain controllers. Windows Server 2003 R2 uses the new DFS Replication feature to replicate content between DFS target folders in a replication group but does not replace FRS for domain controller replication.
A replication group is defined as two or more servers that participate in replication. Replication groups define the replication topology used by members for replication. Target folders that Windows synchronizes using DFS Replication are called replicated folders.
DFS Replication, like FRS, is a multimaster replication engine that detects changes in a file by monitoring the update sequence number (USN) journal and replicating the changed file once the file is closed. Unlike FRS, DFS Replication uses a version vector exchange protocol to determine what parts of the file are different, and then uses the RDC protocol to replicate only changed blocks of files larger than 64 KB. This makes DFS Replication much more efficient at replication than FRS, which is particularly important when replicating with servers across a WAN link. DFS Replication does not replicate files that make use of EFS encryption.
Note
You can disable RDC on replication groups that consist largely of small files or that do not use a WAN connection, as discussed in the Managing Replication Groups section of this chapter. You can also change the minimum file size that RDC will engage from the 64-KB default size by using the Dfsradmin Connection Set command.
Neither DFS Replication nor FRS support file checkout or merging. If two or more users modify the same file simultaneously on different servers, DFS Replication uses a conflict-resolution method that keeps the most recently modified copy of the file (or the earliest creator when dealing with folders). DFS Replication moves the other copies to a conflict folder on the losing server but does not replicate this folder by default, unlike FRS, so the folder remains on the local server. To avoid conflicts, use Windows SharePoint Services when users in multiple locations need to collaborate on the same files at the same time. (Windows SharePoint Services allows users to check out files.)
DFS Replication can make use of several of topologies: hub and spoke, full mesh, and custom. These topologies are familiar to most network administrators, but here is a quick review:
Hub and spoke. This topology is also known as a star topology. Each server replicates with a central server, minimizing the use of WAN links. This topology is similar to an Ethernet network, which uses a hub or switch as the center of the network. Choose this topology to reduce network usage when there are more than 10 members of the replication group, or when members of the replication group are in a site connected via a WAN connection.
Full mesh. All servers replicate with all other servers. This topology is the default in Windows 2000 Server for DFS replication. (Replication of SYSVOL uses the Active Directory replication topology.) Choose this topology when there are fewer than 10 servers in the replication group and all links have low enough costs (performance or monetary) to allow each server to replicate with every other server. The Full Mesh topology minimizes the time it takes to propagate changes to all members of the replication group and increases reliability by replicating with all members of the replication group, but it also increases network traffic from replication.
Custom. This topology allows you to manually specify replication connections.
To use the DFS Namespaces and DFS Replication features of Windows Server 2003 R2, clients must have a DFS client, and servers must run Windows Server 2003 R2 or an appropriate version of Windows Server for the DFS features the network requires. If the network does not support NetBIOS over TCP/IP, there are additional requirements.
To access the DFS folder structure, you need a DFS client. Table 20-1 shows the level of DFS support by operating system. Users can access file shares that are part of a DFS namespace without a DFS client; however, the user does not benefit from any of the DFS features, such as hierarchical namespaces, multiple folder targets, and site-aware client referrals.
Table 20-1. Operating system support for DFS access
Operating System | DFS Client Support |
|---|---|
Non-Microsoft: Apple MacOS, UNIX, IBM OS/2 | None. (Thursby Software ADmitMac provides limited support for DFS on Mac OS X clients.) |
MS-DOS | None. |
Windows 3.x | None. |
Windows 95 | Downloadable client. |
Windows 98 | DFS standalone client is included; DFS domain-based client is installed with Active Directory client. |
Windows Me | DFS standalone client is included. |
Windows NT 4 with Service Pack 3 or later | DFS standalone client is included; DFS 5 domain-based client is installed with Active Directory client. |
Windows 2000, Windows XP, Windows Server 2003 | Full support built in. Client failback requires Windows XP with Service Pack 2 and the post SP2 client failback hotfix, or Windows Server 2003 with Service Pack 1 and the client failback hotfix. |
Windows PE 2005 | Standalone client is included. |
Any edition of Windows Server 2003 (including Windows Server 2003 Web Edition) or Windows 2000 server can host a namespace root, either in domain-based mode or standalone mode. However, to use all features of DFS Namespaces and DFS Replication, key servers must run Windows Server 2003 with Service Pack 1 or newer, or in some cases Windows Server 2003 R2. (See the sidebar Upgrading an Existing DFS Infrastructure for more information.) To use DFS Replication, all replication members must belong to the same Active Directory forest.
Any computer that Windows can resolve using a Uniform Naming Convention (UNC) path can contribute file shares (DFS folders) to a DFS namespace, including Novell NetWare, UNIX, and Mac OS X. Keep in mind that users need adequate permissions on a share to be able to use it. Clients accessing UNIX and NetWare file shares also need client support for Network File System (NFS) and NetWare, respectively.
Important
To replicate through firewalls, open port 135 in the firewalls for use by the remote procedure call (RPC) Endpoint Mapper. (This is the same port used by Active Directory and Microsoft Exchange Server replication.) Alternatively, you can use Dfsrdiag.exe on the replication members to specify a static Remote Procedure Call (RPC) port for DFS Replication, and then open that port on the firewalls instead of port 135. Even though DFS Replication encrypts replicated data, do not send replication traffic over a public network such as the Internet without using a virtual private network (VPN) connection or encrypting the traffic using Internet Protocol Security (IPSec).
DFS Namespaces relies on NetBIOS to resolve share names. If your network has NetBIOS over TCP/IP disabled or has eliminated WINS, you need to enable fully qualified DFS names in the registry of each DFS namespace server before creating the DFS namespace. (Do not perform this procedure if you use NetBIOS addressing on your network.)
To do so, follow these steps on every server that will host a DFS root:
Open the Registry Editor by choosing Run from the Start menu, typing regedit, and then clicking OK.
Open the following registry key:
HKEY_LOCAL_MACHINESYSTEMCurrentControlSetServicesDFS
Change the DFSDnsConfig value to have the value data of 1. (A value of 0 disables fully qualified name resolution.) If the value doesn’t exist, create it using the following information:
Value Name: DFSDnsConfig
Data Type: REG_DWORD
Value Data: 1
Before you can use DFS Management and DFS Replication, you must install them. To do so, use one of the following methods on a server running Windows Server 2003 R2:
Use the Manage Your Server window and Configure Your Server Wizard to add or upgrade the File Server role.
Use the Windows Components Wizard to install the Distributed File System component.
Use the Sysocmgr.exe command-line tool to automate the installation of the DFS management (DFSFRSUI) and DFS Replication (DFSR) components.
DFS namespaces makes it possible to organize file shares scattered throughout an enterprise into a single, contiguous, and hierarchical namespace. This section discusses how to open or create a new namespace, add namespace servers and DFS folders, change advanced settings, and back up the DFS topology.
Note
If you store the files for an intranet Web site on a shared folder instead of on the local Web server itself, create the Web site in a shared folder, create a DFS folder for the shared folder, and configure Internet Information Services (IIS) to use the DFS folder for the Web site. If you need to take down the server that is storing the shared folder, add a DFS folder target that points to a copy of the shared folder on another server and then remove the existing folder target. This method allows you to change the file share without breaking any hyperlinks.
The first step in working with DFS Namespaces is to create a namespace or open an existing namespace root. To do so, follow these steps:
Launch the File Server Management console from the Administrative Tools folder, navigate to DFS Management and then to Namespaces.
To open an existing namespace root, right-click Namespaces and choose Add Namespace To Display.
To create a new namespace root, right-click Namespaces and choose New Namespace. The New Namespace Wizard appears.
On the Namespace Server page, type the name of the server that you want to host the namespace root, and then click Next. If the DFS service is disabled, click Yes in the Warning dialog box to start the DFS service and set its startup setting to Automatic.
On the Namespace Name And Settings page, type the name to use for the namespace root. This name appears as the share name to users—for example, \example.localpublic.
The New Namespace Wizard creates the namespace root in the %SYSTEMDRIVE%:DFSRootsname folder and gives all users read-only permissions. To change these settings, click Edit Settings.
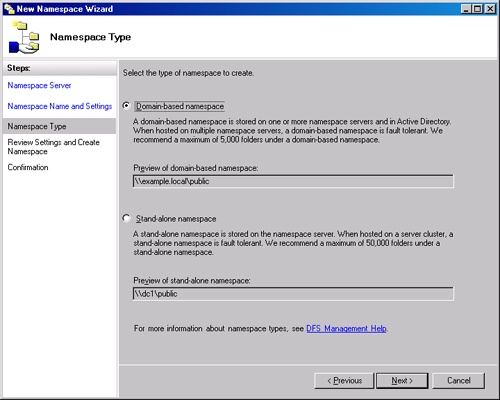
On the Namespace Type page (shown in Figure 20-17), choose whether to create a domain-based namespace or a standalone namespace:
Select Domain-Based Namespace to store the namespace on multiple servers in Active Directory. An example of a domain-based namespace is \example.localpublic.
Select the Stand-Alone Namespace option to create the namespace on a single server or server cluster. An example of a standalone namespace is \srv1public.
On the Review Settings And Create Namespace page, click Create. The New Namespace Wizard creates the namespace root. Review any errors and then click Close.
To create a namespace from a command prompt, use the Dfsutil /Addftroot or Dfsutil /Addstdroot commands. For example, to create the same namespace as shown in Figure 20-17, use the following steps:
Extract the Dfsutil.exe file from the Windows Server 2003 Service Pack 1 (or later) Support Tools to a folder on the hard drive.
Open a command prompt window, and then start the DFS service and set the startup type to Automatic if it is not already by typing the following commands:
Sc Start Dfs
Sc Config Dfs Start= Auto
Create a folder and file share for the namespace root by typing the following commands:
Md E:Public
Net Share Public=E:Public
Create the domain-based namespace root by typing the following command:
Dfsutil /Addftroot /Server:Srv1 /Share:Public
The namespace root is the most important part of the namespace. Without it, clients cannot access any DFS folders. Because of this, the first step in creating a more fault-tolerant namespace is to add namespace servers to the namespace root. If possible, add at least one namespace server on each site where users need access to the DFS namespace.
In the DFS Management console, navigate to Namespaces, right-click the domain-based namespace root you want to replicate, and then choose Add Namespace Server.
In the Add Namespace Server dialog box, type the path to the namespace server, and then click OK.
Windows creates the namespace root on the target server in the %SYSTEMDRIVE%:DFSRootsname folder and gives all users read-only permissions. To change these settings, click Edit Settings.
If the DFS service is disabled, click Yes in the Warning dialog box to start the DFS service and set its startup setting to Automatic.
To add a namespace server to a namespace from a command prompt, create the appropriate shared folder, verify that the DFS service is started and the startup type is set to Automatic, and then use the Dfsutil /Addftroot command. For example, open a command prompt window and then type Dfsutil /Addftroot /Server:Srv2/Share:Public
Note
If you assign more than 16 namespace servers to a namespace, change the namespace polling method to Optimize For Scalability. For more information, see the Changing Namespace Polling Settings section of this chapter.
DFS folders allow users to navigate from the namespace root to other file shares on the network without leaving the DFS namespace structure. To create a DFS folder, follow these steps:
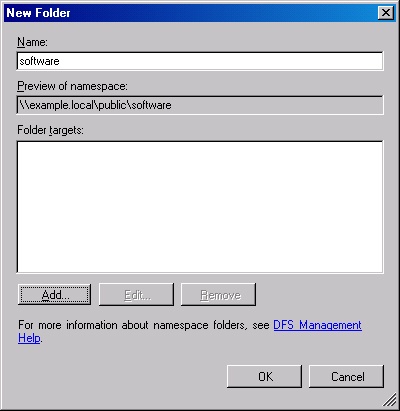
Right-click the namespace root to which you want to add a folder, and then choose New Folder. This displays the New Folder dialog box, shown in Figure 20-18.
Type a name for the folder in the Name box. To create a folder that contains other DFS folders, click OK without adding any target folders. This creates a layer of structure to the namespace.
To add target folders, click Add, and then type the shared folder’s UNC or DNS path in the second text box, or click Browse to browse to the shared folder.
Add any additional folder targets and then click OK.
If you added multiple folder targets, click Yes in the Replication dialog box to create a replication group for the folder targets, or click No to set up a replication group later (or not at all). If you click Yes, the Replicate Folder Wizard appears with some settings already entered. For more information, see the Creating a Replication Group section of this chapter.
To create a DFS folder from a command prompt, create the appropriate file shares, and then use the Dfscmd /Map command. (You cannot add DFS folders without folder targets from a command prompt.) For example, open a command prompt window and then type the following commands:
Dfscmd /Map \Example.localPublicSoftware \Dc1Software
Dfscmd /Add \Example.localPublicSoftware \Srv2Software
Note
To publish a DFS folder or namespace root in Active Directory so that users can find the folder or namespace when searching Active Directory for shared folders, right-click the appropriate container in the Active Directory Users and Computers console, choose New, choose Shared Folder, and then type the path of the namespace or DFS folder in the Network Path box.
The default settings for DFS Management are appropriate for most installations, but if you need to change advanced namespace settings such as the referral order, to change how namespace servers poll domain controllers for DFS metadata, or to delegate DFS management permissions, use the following sections.
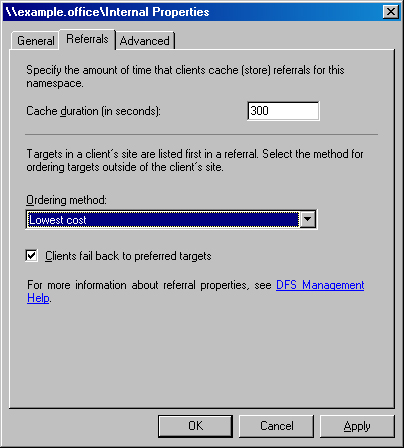
To change the cache duration, the order in which domain controllers or namespace servers refer clients to namespace servers and folder targets, or the failback settings for an entire namespace, right-click a namespace root or folder, choose Properties, and click the Referrals tab as shown in Figure 20-19:
Next, use the following list to complete the process:
In the Cache Duration box, specify how long clients should cache referrals before polling the domain controller or namespace server for a new referral.
In the Ordering Method box, choose how domain controllers and namespace servers should refer clients to folder targets and namespace servers.
Select the Clients Fail Back To Preferred Targets option to make a client switch back to using its preferred server when it comes back online.
The preferred server is based on site and any custom referral ordering settings you specify on folder targets. This setting is supported by clients running Windows XP with Service Pack 2 and the post–SP2 Windows XP client failback hotfix, Windows Server 2003 with Service Pack 1 and the Windows Server 2003 client failback hotfix, and Windows Server 2003 R2. See Knowledge Base article 898900 at http://support.microsoft.com/kb/898900/ for information on how to obtain this hotfix.
DFS folders inherit referral settings from the namespace root unless you specifically override them. To override the referral settings for a folder, right-click the appropriate folder, choose Properties, click the Referrals tab, and then specify the settings you want to override.
To explicitly set a single folder target as the preferred target or set the folder target as a target of last resort, right-click the folder target, choose Properties, click the Advanced tab, select the Override Referral Ordering check box, and then specify the priority for the target folder.
DFS Management sets the permissions on the namespace object in Active Directory or in the registry of the namespace server (when using a standalone namespace). To change the ability of users to perform common management tasks, use the following list:
Create and manage namespaces. To view, add, or remove groups who can manage namespaces, right-click the Namespaces node, choose Delegate Management Permissions, and then use the Delegate Management Permissions dialog box, shown in Figure 20-20.
Manage individual namespaces and replication groups. To view groups who can manage a namespace or replication group, select the namespace or replication group, and then click the Delegation tab. To remove management permissions for a group, right-click the group and choose Remove. To give management permissions for the namespace to a group, right-click the namespace, choose Delegate Management Permission, type the name of the group in the Select Users Or Groups dialog box, and then click OK.
Create and manage replication groups. To view, add, or remove groups who can manage replication, right-click the Replication node, choose Delegate Management Permissions, and then use the Delegate Management Permissions dialog box.

To change how namespace servers poll domain controllers for the latest namespace metadata in a domain-based namespace, right-click the appropriate namespace, choose Properties, click the Advanced tab, and then choose one of the following polling methods:
Optimize For Consistency. Polls the primary domain controller (PDC) emulator for new namespace data every hour and after each change to the namespace. Use this setting when the network contains 16 or fewer namespace servers to minimize the time it takes to propagate namespace changes to all namespace servers. This is the default setting.
Optimize For Scalability. Polls the nearest domain controller every hour for changes to the namespace. Use this setting when the network contains more than 16 namespace servers to reduce the load on the PDC emulator. However, choosing this setting increases the amount of time it takes to propagate namespace changes to all namespace servers. Servers running Windows 2000 Server do not support this setting and continue to use the Optimize For Consistency polling method.
To enable the Optimize For Scalability polling method from a command prompt, use the Dfsutil /Rootscalability command. For example, open a command prompt window, change to the directory in which you placed the Dfsutil.exe file, and then type Dfsutil /Root:Example.localPublic /Rootscalability /Enable.
The DFS Namespaces database for domain-based DFS is stored in Active Directory, and you can back it up and restore it using Active Directory–aware backup methods.
To back up the listing of folder targets for a standalone namespace root, type the following text at a command prompt (replacing ServerName and Namespace with the name of the appropriate server name and namespace root):
DFScmd /View \ServerNameNamespace /Batch >DFS_backup.bat
To restore this DFS structure, re-create the DFS namespace and then run the batch file you created.
An easy-to-use, fault-tolerant, and high-performance file system is not worth much if the data you want to access is unavailable or out of date. To ensure that files are available to users even if a server goes down, create additional folder targets (as described earlier in this chapter) and use DFS Replication to keep the folder targets in sync. You can also use DFS Replication to synchronize folders that are not part of a DFS namespace—for example, to replicate data from a branch office to a server in the main office that you back up regularly and reliably.
To use DFS Replication, select the DFS Replication node in the File Server Management console, right-click Replication, and choose Add Replication Group To Display to open any existing replication groups, and then use the following sections.
There are two ways to create a replication group using DFS Management. You can add a DFS folder to a new replication group, or you can use the New Replication Group Wizard to create a branch office replication group or a multipurpose replication group.
Important
Do not create replicated folders on volumes managed by Remote Storage. DFS Replication can cause all remote files to be recalled, and it can cause data loss in this configuration.
To create a replicated folder in a new replication group that replicates a DFS folder, use the following steps (and to add a folder to an existing replication group, see the Managing Replication Groups section of this chapter):
Right-click the appropriate folder under the Namespaces node of DFS Management, and choose Replicate Folder. The Replicate Folder Wizard appears.
On the Replication Group And Replicated Folder Name page, confirm the name for the replication group and for the replicated folder. (The name for the replication group must be unique on the domain. To add to an existing replication group, use the instructions in the following sections.)
On the Primary Folder Target page, select the server that holds the data that you want to use as the seed for the initial replication.
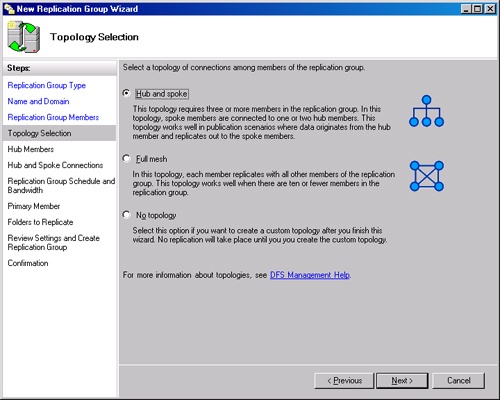
On the Topology Selection page, select one of the following replication topologies:
Hub And Spoke. Spoke servers replicate with one or two central hub servers. Hub servers replicate with all other hub servers by using the Full Mesh topology, as well as with designated spoke servers. Choose this topology in large network environments and environments with multiple branch offices. This topology requires a minimum of three members.
Full Mesh. All servers replicate with all other servers. Choose this topology when there are less than 10 servers in the replication group and all links have low enough costs (performance or monetary) to allow each server to replicate with every other server instead of a central hub server.
No Topology. This option does not specify a topology and postpones replication until you specify a replication topology manually. To specify a replication topology after creating the replication group, right-click the replication group in the DFS Management snap-in and then choose New Topology.
On the Hub Members page that appears if you chose the Hub And Spoke topology, specify the hub servers.
On the Hub And Spoke Connections page that appears if you chose the Hub And Spoke topology, verify that the wizard lists the proper spoke servers. To change the required hub server with which a spoke member replicates preferentially, or the optional hub member with which a spoke member replicates if the required hub member is unavailable, select the spoke server, click Edit, and then specify the required hub and the optional hub.
On the Replication Group Schedule And Bandwidth page, choose when to replicate and the maximum amount of bandwidth you want DFS Replication to use.
To create a custom schedule, choose Replicate During The Specified Days And Times and then click Edit Schedule. You can create a custom schedule that uses Coordinated Universal Time (UTC) or the local time of the receiving server.
Note
Windows uses a hash algorithm to compare files, and it uses the RDC protocol to replicate the differences, unless you disable RDC, as discussed in the Managing Replication Groups section of this chapter.
On the Review Settings And Create Replication Group page, review the settings, and then click Create. Review any errors and then click Close.
Windows then replicates topology and replication settings to all domain controllers. A replication group member polls its nearest domain controller regularly. (By default, replication group members perform a lightweight poll every 5 minutes for Subscription objects under the local computer container and a full poll every hour.) It receives the settings after Windows updates the domain controller. To change the replication polling interval, use the Dfsrdiag command.
To replicate a DFS folder from a command prompt, use the Dfsradmin command. For example, open a command prompt window and then use the following steps:
Create a folder for the DFS Staging folder by typing the following commands on each member of the replication group:
Md E:DocumentsDfsrPrivateStaging
Attrib +H /S /D E:DocumentsDfsrPrivate
Create a new replication group by typing the following command:
Dfsradmin Replicationgroup New /Rgname:Example.localPublicDocumentsAdd members to the replication group by typing the following commands:
Dfsradmin Member New /Rgname:Example.localPublicDocuments
    /Memname:Dc1 /Force
Dfsradmin Member New /Rgname:Example.localPublicDocuments
    /Memname:Srv1 /Force
Create a new replicated folder by typing the following command:
Dfsradmin Replicatedfolder New /Rgname:Example.localPublicDocuments
    /Rfname:Documents
    /Replicatedfolderdfspath:\Example.localPublicDocuments /Force
Add members to the replicated folder by typing the following commands:
Dfsradmin Membership Set /Rgname:Example.localPublicDocuments
    /Rfname:Documents
    /Memname:Dc1 /Membershiplocalpath:E:Documents
    /Membershipstagingpath:E:DocumentsDfsrprivateStaging
    /Isprimary:True
    /Membershipenabled:True /Force
Dfsradmin Membership Set /Rgname:Example.localPublicDocuments
    /Rfname:Documents
    /Memname:Srv1 /Membershiplocalpath:E:Documents
    /Membershipstagingpath:E:DocumentsDfsrprivateStaging
    /Membershipenabled:True /Force
Create replication connections by typing the following commands:
Dfsradmin Connection New /Rgname:Example.localPublicDocuments
    /Connectionsendingmembername:Dc1
    /Connectionreceivingmembername:Srv1
    /Connectionenabled:True
Dfsradmin Connection New /Rgname:Example.localPublicDocuments
    /Connectionsendingmembername:Srv1
    /Connectionreceivingmembername:Dc1
    /Connectionenabled:True
To create a replication group that replicates a single branch server with a single hub server, use the following steps:
In the DFS Management snap-in, right-click Replication and choose New Replication Group. The New Replication Group Wizard appears.
On the Replication Group Type page, choose Replication Group For Data Collection.
On the Name And Domain page, type a name for the replication group that is unique on the domain, specify in which domain to host the replication group, and optionally type a description of the replication group.
On the Branch Server page, type the name of the branch server that holds the data that you want to replicate with the hub server.
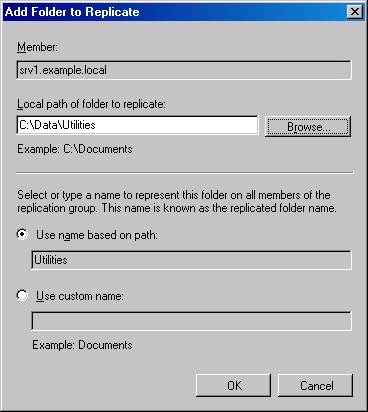
On the Replicated Folders page, click Add, and then use the Add Folder To Replicate dialog box to specify the local folder on the branch server to replicate with the hub server, as shown in Figure 20-21. Click OK when you are finished.
On the Hub Server page that appears if you chose Replication Group For Data Collection on the Replication Group Type page, type the name of the hub server that serves as a replication target for the replicated folders.
On the Target Folder On Hub Server page, specify the local folder on the hub server in which you want to place replicated data from the branch server. This folder is usually located in a folder or volume that you back up regularly.
On the Replication Group Schedule And Bandwidth page, choose when to replicate and the maximum amount of bandwidth you want to allow DFS Replication to use.
To create a custom schedule, choose Replicate During The Specified Days And Times and then click Edit Schedule. You can create a custom schedule that uses Coordinated Universal Time (UTC) or the local time of the receiving server.
On the Review Settings And Create Replication Group page, review the settings, and then click Create. Review any errors and then click Close.
Windows then replicates topology and replication settings to all domain controllers. A replication group member polls its nearest domain controller regularly. (By default, replication group members perform a lightweight poll every 5 minutes for Subscription objects under the local computer container and a full poll every hour.) It receives the settings after Windows updates the domain controller. To change the replication polling interval, use the Dfsrdiag command.
To create a replication group from a command prompt, use the Dfsradmin command. For example, open a command prompt window and then use the following steps:
Create a folder for the DFS Staging folder by typing the following commands on each member of the replication group:
Md C:DataUtilitiesDfsrprivateStaging
Attrib +H /S /D C:DataUtilitiesDfsrprivate
Create a new replication group by typing the following command:
Dfsradmin Replicationgroup New /Rgname:UtilitiesAdd members to the replication group by typing the following commands:
Dfsradmin Member New /Rgname:Utilities /Memname:Dc1
Dfsradmin Member New /Rgname:Utilities /Memname:Srv1
Create a new replicated folder by typing the following command:
Dfsradmin Replicatedfolder New /Rgname:Utilities /Rfname:Utilities
Add members to the replicated folder by typing the following commands:
Dfsradmin Membership Set /Rgname:Utilities /Rfname:Utilities
    /Memname:Dc1
    /Membershiplocalpath:C:DataUtilities
    /Membershipstagingpath:C:DataUtilitiesDfsrprivateStaging
    /Isprimary:True
    /Membershipenabled:True /Force
Dfsradmin Membership Set /Rgname:Utilities /Rfname:Utilities
    /Memname:Srv1
    /Membershiplocalpath:C:DataUtilities
    /Membershipstagingpath:C:DataUtilitiesDfsrprivateStaging
    /Membershipenabled:True /Force
Create replication connections by typing the following commands:
Dfsradmin Connection New /Rgname:Utilities
    /Connectionsendingmembername:Dc1
    /Connectionreceivingmembername:Srv1 /Connectionenabled:True
Dfsradmin Connection New /Rgname:Utilities
    /Connectionsendingmembername:Srv1
    /Connectionreceivingmembername:Dc1 /Connectionenabled:True
To create a replication group that replicates any number of servers with any number of other servers, use the following steps:
In the DFS Management snap-in, right-click Replication and choose New Replication Group. The New Replication Group Wizard appears.
On the Replication Group Type page, choose Multipurpose Replication Group.
On the Name And Domain page, type a name for the replication group that is unique on the domain, specify in which domain to host the replication group, and optionally type a description of the replication group.
On the Replication Group Members page, add the servers on which you want to replicate content.
On the Topology Selection page (shown in Figure 20-22), select one of the following replication topologies:
Hub And Spoke. Spoke servers replicate with one or two central hub servers. Hub servers replicate with all other hub servers by using the Full Mesh topology, as well as with designated spoke servers. Choose this topology to reduce network usage when there are more than 10 members of the replication group, or when members of the replication group are in a site connected via a WAN connection. This topology requires a minimum of three members.
Full Mesh. All servers replicate with all other servers. Choose this topology when there are less than 10 servers in the replication group and all links have low enough costs (performance or monetary) to allow each server to replicate with every other server. The Full Mesh topology minimizes the time it takes to propagate changes to all members of the replication group by increasing network usage.
No Topology. This option does not specify a topology, and it postpones replication until you specify a replication topology manually. Use this setting if you want to create a custom topology from scratch instead of modifying an existing topology.
On the Hub Members page that appears if you chose the Hub And Spoke topology, specify the hub servers.
On the Hub And Spoke Connections page that appears if you chose the Hub And Spoke topology, verify that the wizard lists the proper spoke servers. To change the required hub server with which a spoke member replicates preferentially, or the optional hub member with which a spoke member replicates if the required hub member is unavailable, select the spoke server, click Edit, and then specify the required hub and the optional hub.
On the Replication Group Schedule And Bandwidth page, choose when to replicate and the maximum amount of bandwidth you want to allow DFS Replication to use.
To create a custom schedule, choose Replicate During The Specified Days And Times and then click Edit Schedule. You can create a custom schedule that uses Coordinated Universal Time (UTC) or the local time of the receiving server.
On the Primary Member page, select the server that holds the data that you want to use as the seed for the initial replication. For information about how Windows handles conflict resolution during the initial replication, see the Replicating a DFS Folder section of this chapter.
On the Folders To Replicate page, click Add, and then use the Add Folder To Replicate dialog box to specify the folder to replicate. Click OK when you are finished.
On the Local Path Of Folder On Other Members page, select a replication member that you want to participate in replication of the specified folder, click Edit, and then use the Edit Local Path dialog box to enable replication and specify the local folder on the target server in which to place replicated data from the hub server.
Repeat this step for every replicated folder you specify in the Replicated Folders page.
On the Review Settings And Create Replication Group page, review the settings and then click Create. Review any errors and then click Close.
Windows then replicates topology and replication settings to all domain controllers. A replication group member polls its nearest domain controller regularly. (By default, replication group members perform a lightweight poll every 5 minutes for Subscription objects under the local computer container and a full poll every hour.) It receives the settings after Windows updates the domain controller. To change the replication polling interval, use the Dfsrdiag command.
More Info
To create a multipurpose replication group from the command-line, see the Creating a Branch Office Replication Group section of this chapter—the command-line procedure is identical.
Select a replication group, and then use the Memberships, Connections, Replicated Folders and Delegation tabs of the DFS Management console to manage the replication group, as discussed in the following list:
Note
Click a column heading to change how Windows groups items in the view. To add or remove columns, right-click the column heading and choose Add/Remove Columns.
Use the following options on the Memberships tab to view and manage the member servers for each replicated folder:
To disable a member of the replication group, right-click the member and then choose Disable. Disable members that do not need to replicate a specific replicated folder. Do not disable members temporarily and then enable them—doing so causes roughly one kilobyte of replication traffic per file in the replicated folder, and overwrites all changes on the disabled member. (See the Conflict Resolution During the Initial Replication sidebar for more information.)
To delete a member of the replication group, right-click it and then choose Delete.
To add a member server that participates in replication, right-click the replication group in the DFS Management console, choose New Member, and then use the New Member Wizard to specify the local path of the replicated folders, connections, and schedule.
To change the size of the conflict or staging folders or to disable the retention of deleted files, right-click the member, choose Properties, click the Advanced tab, and then use the Quota boxes. The conflict folder stores the "losing" files that Windows deletes when it encounters two versions of the same file during replication as well as the most recently deleted files in the replicated folder, and the staging folder queues replication data.
Note
The default size of the staging folder is 4096 MB, but by increasing the size of the staging folder, you can increase the performance of replication group members that replicate with a large number of replication partners or that contain large files that change often. Look for event ID 4208 in the DFS Replication event log; if this event appears multiple times in an hour, increase the staging folder size 20 percent until the event no longer appears frequently.
To create a report showing the replication health as well as RDC efficiency, right-click the replication group, choose Create Diagnostic Report, and then use the Diagnostic Report Wizard to create the report. (See Figure 20-23 for an example of a health report.)
To verify the replication topology, right-click the replication group and then choose Verify Topology.
Note
RDC increases processor utilization on the server, so you might want to disable it on servers with slow processors or high-speed links, and in environments that replicate only new content or files smaller than 64 KB. To disable RDC on a connection, click the Connections tab, right-click the member, choose Properties, and then clear the Use Remote Differential Compression (RDC) check box. You can also change the minimum file size that RDC engages from the 64-KB default size by using the Dfsradmin Connection Set command. Monitor RDC statistics and CPU utilization before and after disabling RDC to verify that you reduce processor utilization enough to warrant the increased network traffic.
Use the Connections tab to view and manage all replication connections. To add a new replication connection between two members of a replication group, right-click the replication group and choose New Connection. Then use the New Connection dialog box to specify the sending member, the receiving member, the schedule, and whether or not to create a one-way replication connection or two-way connection.
Use the following options on the Replicated Folders tab to view and manage all replicated folders:
To add a new replicated folder to the replication group, right-click the replication group in the DFS Management console, choose New Replicated Folder, and then use the New Replicated Folder Wizard to specify the primary member and the local folders to replicate.
To omit certain file types or subfolders from replication, click the Replicated Folders tab, right-click the replicated folder, choose Properties, and then use the File Filter and Subfolder Filter boxes on the General tab.
To share a replicated folder on the network and optionally add the folder to a DFS namespace, right-click the replicated folder, choose Share And Publish In Namespace, and then use the Share Or Publish Replicated Folder Wizard.
Use the Delegation tab to view and manage administrative permissions. See the DFS Namespaces section of this chapter for information about the Delegation tab.
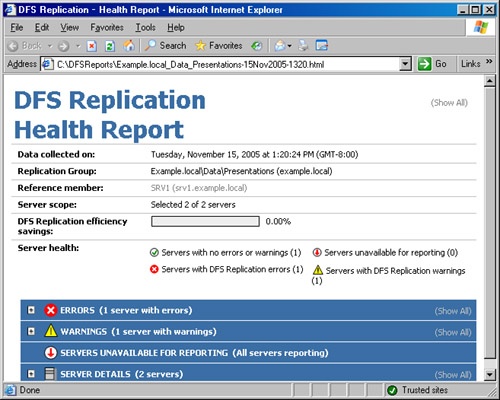
The Storage Manager For the SANs console in Windows Server 2003 R2 lets small and mid-sized organizations with sophisticated storage needs take advantage of low-cost storage area network (SAN) hardware, without using complicated third-party SAN management software that often requires extensive training and a dedicated SAN administrator. It also enables you to administer SAN subsystems from different vendors from the same management computer while using the same tool (Storage Manager For SANs).
Large enterprises with basic SAN requirements can also benefit from Storage Manager For SANs, however, the tool does not provide the same capabilities as enterprise-level SAN management software. For example, Storage Monitoring For SANs does not provide any built-in notification capabilities, although you can integrate Storage Manager For SANs with Microsoft Operations Manager (MOM) to provide this capability.
More Info
SANs are complicated, and their implementation varies greatly from manufacturer to manufacturer. Consult the manufacturer of the SAN subsystem for information about what network topologies and methods of SAN discovery the SAN subsystem supports. For more information about Microsoft support for Internet Small Computer System Interface (iSCSI), or to download the Microsoft iSCSI Initiator or iSNS Server, see the Microsoft Web site at http://www.microsoft.com/WindowsServer2003/technologies/storage/iscsi/default.mspx.
Note
To test SAN management tasks in a lab that does not have SAN hardware, use third-party software such as WinTarget from String Bean Software (http://www.stringbeansoftware.com) to create a software-based SAN subsystem on a server running Windows Server 2003.
To manage a SAN, it is helpful to understand the basics of how SANs work, as well as the terminology used in Storage Manager For SANs to describe various components of a SAN.
At a basic level, a SAN consists of the following components (as shown in Figure 20-24):
SAN subsystem. This is a specialized server or server appliance that hosts a large number of hot-swappable hard disks for use on the storage network. The hard disks in a SAN subsystem are usually connected using a Fibre Channel, Small Computer System Interface (SCSI), or Serial Advanced Technology Attachment (SATA) connection.
Storage network switch. This is a Fibre Channel or Gigabit Ethernet switch (when using the iSCSI protocol) that connects to the SAN subsystem and any hosts that directly access storage on the SAN subsystem.
Hosts. This refers to servers or server clusters that use storage on the SAN subsystem. Storage assigned to the host appears as a normal hard drive in Windows. Hosts are connected to the storage network switch via a Host Bus Adapter (HBA) or a Gigabit Ethernet network card (when using iSCSI), and to the LAN switch via an Ethernet network card.
Management computer. This refers to the server or servers running Windows Server 2003 R2 that are connected to the SAN subsystem for management purposes. A management computer can be a host server or another server on the storage network.
LAN switch. Connects computers to the organization’s internal network, where other servers and client computers are located.
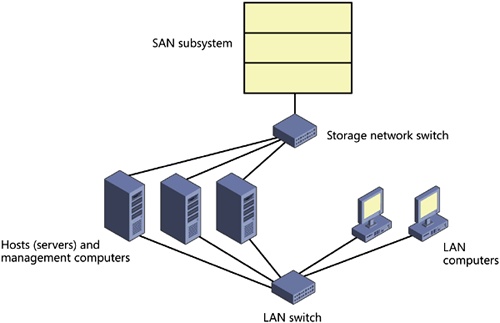
The SAN subsystem contains numerous hard drives, which Storage Manager For SANs can segment and then allocate to hosts. A portion of a SAN that the SAN subsystem makes available to hosts and management servers is called a logical unit (LU). Hosts cannot directly access an LU. First you must use Storage Manager For SANs (or the SAN subsystem’s management software) to assign an address—the logical unit number (LUN)—to the LU. After you create a LUN, you can use Storage Manager For SANs to assign it to a server, where it appears as a normal hard drive. Like a real hard disk, only one server or server cluster can safely access a LUN at a time. To meet this requirement, you must assign the LUN to a server (when using Fibre Channel to communicate with the SAN subsystem) or to a target (when using iSCSI).
A target is a group of one or more LUNs that you create on an iSCSI subsystem using Storage Manager For SANs or other iSCSI management software. To access a LUN on an iSCSI SAN, the host server or server cluster must log on to the target using an iSCSI initiator (driver). The initiator connects to the target using one or more IP addresses and a port numbers. The combination of an IP address and port number is called a "portal." See Figure 20-25 for a graphical depiction of an iSCSI SAN.
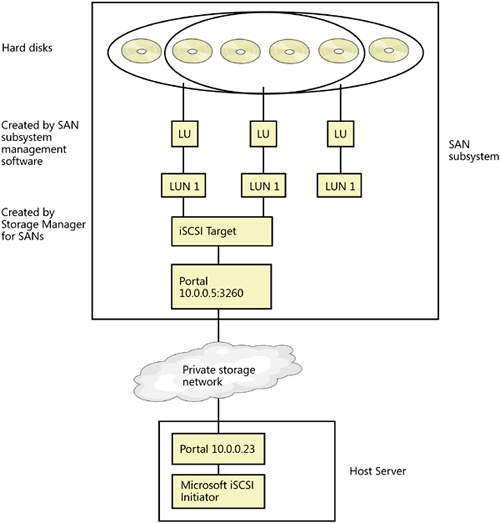
Before you can use Storage Manager For SANs, you must perform the following steps:
Follow the instructions provided with the SAN subsystem to physically install the hardware and configure it to work on the appropriate network (preferably a dedicated storage network with limited physical access).
Setup the host servers. This process includes the following tasks:
Installing Multipath IO (MPIO) software on the host if using MPIO with multiple Fibre Channel HBAs or a storage array that uses multiple ports.
Installing iSCSI initiator software on the host if using an iSCSI SAN. The Microsoft iSCSI Initiator is available from the following Web site: http://www.microsoft.com/WindowsServer2003/technologies/storage/iscsi/. To use MPIO with iSCSI, select the Microsoft MPIO Multipathing Support For iSCSI option when installing the Microsoft iSCSI Initiator.
Setting up the clustering service if using the host in a server cluster. (See Chapter 19 for information about clustering.)
Host machines that access the SAN do not need Storage Manager For SANs or Virtual Disk Service (VDS) hardware providers.
Follow the instructions included with the SAN hardware to install the Virtual Disk Service (VDS) hardware provider (provided by the SAN subsystem hardware manufacturer) on the computer on which you want to manage the SAN.
Install Storage Manager For SANs on a management computer running Windows Server 2003 R2 using one of the following methods:
Use the Manage Your Server window and Configure Your Server Wizard to add or upgrade the File Server role.
Use the Windows Components Wizard to install the Storage Manager For SANs component.
Use the Sysocmgr.exe command-line tool to automate the installation of the Storage Manager For SANs component.
To use the Storage Manager For SANs console, open the File Server Management snap-in, or open the Storage Manager For SANs console (SanMmc.msc) from the Administrative Tools folder. The Storage Manager For SANs console, shown in Figure 20-26, consists of three nodes:
LUN Management. This node is where you can perform all management tasks, such as managing server connections, managing iSCSI targets, creating LUNs, and assigning LUNs to servers.
Subsystems. This node lists all SAN subsystems detected by the Storage Manager For SANs console.
Drives. This node lists all hard disks in all SAN subsystems, and it allows you to blink drive lights or beep drive speakers (if supported by the SAN subsystem hardware).

The first task you must perform before you can create and manage LUNs is to set up SAN Manager with connections to the appropriate SAN host computers, as detailed in the following steps:
In the Storage Manager For SANs console on the SAN administration computer, right-click LUN Management and then choose Manage Server Connections. The Manage Server Connections dialog box appears (as shown in Figure 20-27), listing the local server and any servers you add to the management console.
To add a server, click Add. In the Configure Server dialog box, type the server name and a description, and then click OK.
To add a server cluster, add all servers in the cluster, click Manage Clusters, and then click Add in the Manage Clusters dialog box. In the Add Cluster dialog box, type a name for the cluster, select the servers in the cluster, and then click OK.
Important
Create the server cluster before adding it to Storage Manager For SANs—Storage Manager For SANs cannot create clusters. If you add servers to a cluster in Storage Manager For SANs that do not have the clustering service properly installed and configured, you will irreversibly corrupt the volume.
Select a server and then use the Fibre Channel Ports or iSCSI Initiator tabs, as explained in the following list, to view and enable ports on the server:
Fibre Channel Ports. Windows automatically detects Fibre Channel HBA ports on servers running Windows Server 2003 and lists them on the Fibre Channel Ports tab if the server is on the same physical network as the management computer. To add a Fibre Channel port manually, click Add, type the World Wide Name (WWN) of the port and a description in the Add Port dialog box, and then click OK. Select the check box next to each port to enable communication with a LUN.
iSCSI Initiator. Windows lists any iSCSI initiators it detects on the iSCSI Initiator tab. If the iSCSI initiator name does not appear, click Refresh. If Windows cannot find the iSCSI initiator name, locate the name by running the iSCSI Initiator Control Panel tool on the host computer. Next, type the name in the iSCSI Initiator Name box, and click Refresh.
To manage server connections from a command prompt, use the Diskraid command. For example, open a command prompt window and then type the following commands:
Diskraid
List Subsystem
Select Subsystem 0
List HbaPort
Select HBAPort 0
Detail HBAPort
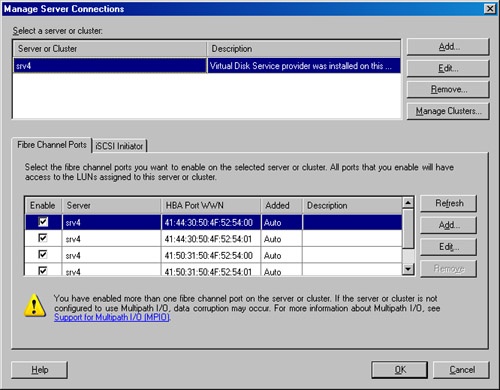
Important
Do not enable multiple Fibre Channel ports for communication with a LUN unless you install and configure MPIO software that is compatible with the HBAs. In addition, do not enable multiple iSCSI initiator adapters unless you also enable MPIO support in the iSCSI initiator. Enabling MPIO before properly configuring the HBAs or iSCSI initiator can cause irreversible corruption of the LUN.
If the SAN subsystem is an iSCSI device, use the following procedure to manage iSCSI targets before creating a LUN:
On the Storage Manager For SANs console on the SAN administration computer, right-click LUN Management in the console tree and then choose Manage iSCSI Targets. The Manage iSCSI Targets dialog box (Figure 20-28) appears, listing the storage subsystem and any targets you have already added to the management console.
Select a subsystem from the Select A Subsystem To Manage box and then click Add to add a target, or select an existing target and click Edit to change the target’s settings.
In the Add Target dialog box, type a descriptive name for the target and then select the portals to enable with this target. Click OK when you are finished.
To perform this procedure from a command prompt, use the Diskraid command. For example, open a command prompt window and then type the following commands:
Diskraid
Select Subsystem 0
Create Target Name="SQL Data"
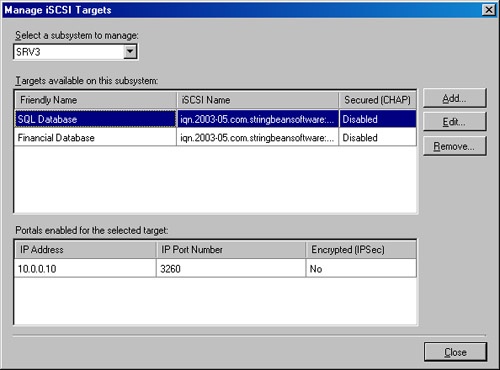
Although physically separate storage network provides the best performance and security, it is not always practical. In addition, even a physically separate network is not necessarily secure, and it is a best security practice to enable two-way authentication (where the host authenticates with the SAN hardware and the SAN hardware authenticates with the host). To configure iSCSI authentication, use the following steps:
On the Storage Manager For SANs console on the SAN administration computer, right-click LUN Management and then choose Manage iSCSI Security. The Manage iSCSI Security dialog box appears. (See Figure 20-29.)
Use the Targets tab to configure one-way CHAP authentication with the appropriate target or targets.
Use the Local Initiator tab to configure CHAP authentication for the iSCSI initiator (which is the second part of mutual CHAP authentication).
To manage iSCSI security from a command prompt, use the Diskraid command. For example, open a command prompt window and then type the following commands:
Diskraid
Select Subsystem 0
Select target 0
CHAP Target Set Secret="password" Initiator
CHAP Target Remember Secret="password"
    Initiator=iqn.1991-05.com.microsoft:srv4.example.local
CHAP Initiator Set Secret="password"
CHAP Initiator Remember Secret="password" Target=0
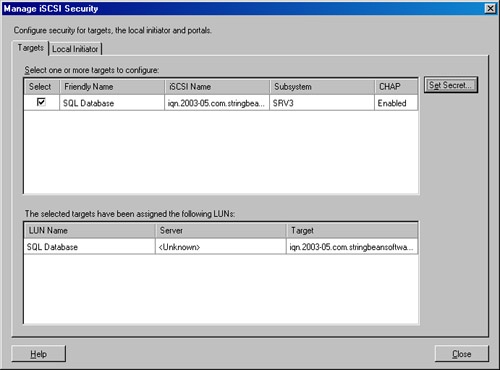
Before you can use a LUN on an iSCSI target, the iSCSI initiator must log into the target. You need to do this only once; afterwards, the iSCSI initiator logs in automatically.
On the Storage Manager For SANs console on the SAN administration computer, right-click LUN Management in the console tree and then choose Log On To iSCSI Targets. The Log On To iSCSI Target dialog box appears. (See Figure 20-30.)
Select the targets that you want to log on to, and then click Log On. To change security or authentication methods, click Manage iSCSI Security.
To log on to an iSCSI target from a command prompt, use the Diskraid command. For example, open a command prompt window and then type the following commands:
Diskraid
Select Subsystem 1
Select Target 1
Login Target Iadapter=0
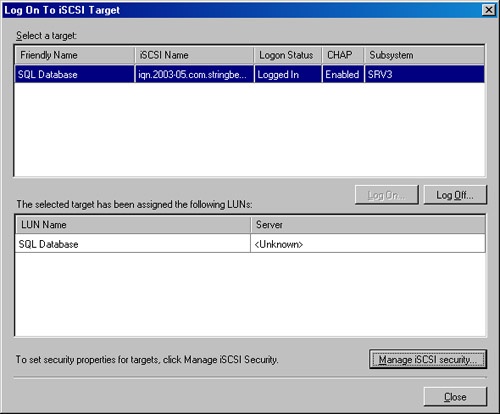
To give a server or server cluster storage resources on a SAN, you must first create a LUN and assign it to the server or cluster, as detailed in the following steps. A LUN that you assign to a server or cluster appears on the server just like a normal hard drive.
On the Storage Manager For SANs console on the SAN administration computer, click the Subsystems node in the console tree and verify that Storage Manager For SANs lists the storage subsystem on which you want to create a LUN.
Right-click LUN Management in the console tree and then choose Create LUN. The Create LUN Wizard appears.
On the Subsystem And Type page of the Create LUN Wizard, select the subsystem, and then select the LUN type you want to create: Simple, Spanned, Striped, Mirrored, or Striped With Parity.
Note
The LUN types that the Create A LUN Wizard lists correspond roughly to the Redundant Array of Independent Disks (RAID) level used by the SAN subsystem. However, the actual implementation is dependent on the hardware; for example, some SAN subsystems use RAID 1+0 (10) for the Striped With Parity setting, while others use the more standard RAID 5. Consult the hardware manufacturer for details on the RAID levels that the SAN subsystem supports.
On the Size And Name page, type a name for the LUN (if the SAN subsystem supports LUN naming), and the size for the LUN.
On the Target Access page that appears for iSCSI subsystems, choose Assign The LUN Now and then choose the target to which you want to assign the LUN. You must assign the LUN to an iSCSI target before you can assign it to a server.
On the Server Access page, choose Assign The LUN Now and then choose the server or server cluster to which you want to assign the LUN. You must assign the LUN to a server or cluster before you can create a volume on it or access it from the server or server cluster.
On the Create Volume page that appears for Fibre Channel subsystems, optionally create a basic volume on the LUN, assign a drive letter, and format the volume. The Create A LUN Wizard cannot create volumes on remote servers; use the Disk Management snap-in or Diskpart.exe command-line tool to create a volume on a remote server.
On the Create New LUN page, click Create LUN. Storage Manager For SANs creates the LUN, assigns it to the server or target you specify, and formats the volume (if you chose to on the Create Volume page). If you cannot access the volume from the host server, open Disk Management, initialize the volume, assign a partition to it, and format it.
If you did not assign the LUN to a server in the wizard, do so now by right-clicking the LUN in the Storage Manager For SANs console and choosing Assign LUN. Then use the Assign LUN Wizard to select the server to which you want to assign the LUN. To unassign a LUN, right-click it and choose Unassign LUN.
To create a LUN and assign it to a server or an iSCSI target from a command prompt, use the Diskraid command. For example, open a command-prompt window and type the following commands:
Diskraid
Select Subsystem 0
Create LUN RAID Size=10GB
Associate Targets 0
Unmask LUN Initiator=iqn.1991-05.com.microsoft:srv4.example.local
As long as there is available storage space on the SAN, you can increase (extend) the size of an existing LUN. If the SAN subsystem runs low on available disk space, simply add more hard disks.
To extend a LUN, right-click the LUN you want to extend, Choose Extend LUN, and then use the Extend LUN dialog box to specify a new LUN size. After extending a LUN on a remote server, you must use Disk Manager or the Diskpart.exe command-line tool to extend the file system.
The Removable Storage console is the definitive place to turn if you have major device or media management tasks to do or have problems to address. This section covers its terminology and conventions, and shows how to use it to manage your media and devices.
Removable Storage has its own language relative to removable devices. In the interest of speaking the same language (and impressing people at cocktail parties), here’s a quick discussion of how Removable Storage handles its tasks, as well as the terminology it uses.
Removable storage collectively refers to removable storage devices and their associated media (tapes or disks) as libraries. Before you purchase a removable storage library to use with Removable Storage, check the Windows Server Catalog Web site at http://www.microsoft.com/windows/catalog/server to make sure Windows Server 2003 fully supports the device. Also check to make sure the program you plan to use the device with supports the class of device.
When you connect a removable storage device to the system, Windows tries to recognize and configure it. When you launch Removable Storage, it performs its own device configuration and attempts to configure all removable storage devices connected to the system.
Important
If you plan to use a robotic media library with Removable Storage and want the library to be automatically configured (trust us, you do), make sure that all drives in the library are connected to the same SCSI (or similar) bus as the drives’ associated media changer and that no other devices reside on this SCSI bus. Also make sure that the library supports drive-element address reporting.
All removable media belong to a media pool, which is a group of media that all have the same properties. Media are available for use by applications only if they belong to the appropriate media pool. Two types of media pools exist: system pools and application pools. All media that are not reserved for use by an application reside in one of the three system media pools. See Table 20-2 for a description of the three system media pools.
Note
The free media pool is where applications look when they need media and no media exists with space available in the application’s pool. Therefore, try to keep some media in the free media pool so that applications can draw from it as necessary.
Table 20-2. The three system media pools and their purposes
System Media Pool | Purpose |
|---|---|
Free | To hold empty (blank but formatted) media available to all applications. |
Import | To hold newly added media to the system that has a recognizable format but has never been used in the system before. You can move the media to the free media pool if you want to erase the media or to an application pool to use in a particular application. |
Unrecognized | To hold unrecognized media until they can be moved into the free pool or an application pool by a user or an application. |
An application media pool is any media pool that applications create to hold their own media. For example, the Windows Backup program creates its own media pool, as does Remote Storage. Applications can create multiple media pools, or multiple applications can share the same media pool, although most require media to be in their own application pool.
Removable Storage keeps track of all media that you insert into the removable storage libraries in one of two ways: by using on-media identifiers, or by using barcodes. On-mediaidentifiers are small data stamps that Removable Storage imprints on the media the first time you insert them. The identifier has two parts: a label type and a label ID. The label type identifies the format used on the media, and the label ID uniquely identifies the tape or disk. Removable Storage uses these two identifiers to determine which media pool to place new media in and to keep track of all the media in the system. Table 20-3 shows how Removable Storage deals with recognized and unrecognized labels.
Table 20-3. Removable Storage and media identifiers
Label Type Recognized | Label Type Unrecognized | |
|---|---|---|
Label ID Recognized | Media placed in appropriate media pool, and database updated to show media is online | N/A |
Label ID Unrecognized | Media placed in import media pool | Media placed in unrecognized media pool |
If you have a robotic library that has a barcode reader, you can use it to quickly keep track of all media that goes with the library. Removable Storage can use either the on-media identifier or the barcode to identify the media, although using the barcode is often much faster than using on-media identifiers because you do not have to mount each piece of media to keep track of it.
Removable Storage handles media with file systems on them (such as CD-ROMs and Zip disks) a little differently than other types of media. The label type for these media is usually the format type (NTFS, FAT, or CDFS), and the label ID is the volume serial number. Additionally, in the case of CD-ROM and DVD media, Removable Storage permits multiple media with the same label ID (such as a CD-ROM tower with multiple copies of the same disc), as the media can function interchangeably.
Removable Storage uses media states to figure out the current status of a piece of media, both in terms of the physical state of the media—whether it is being used or sitting idle—and in terms of the media’s availability for additional data (for example, whether the media is full, formatted incorrectly, or reserved by a single program). Removable Storage refers to these two types of media states as physical states and side states.
Note
Libraries and drives also have their own states, but they are self-explanatory and less important than media states.
Physical states describe the actual physical availability of the media—is the media in the drive, and if so, is it ready to be used? Removable Storage recognizes the following five physical states:
Idle. The media is in the library or shelved offline in a changer.
In-use. The media is currently in the process of being mounted or dismounted.
Loaded. The media is mounted and available for read/write operations.
Mounted. The media is mounted but not yet available for read/write operations.
Unloaded. The media has been dismounted and can be removed from the drive.
A side is where information is actually stored on a tape or disk, and yes, it does refer to which physical side of the tape or disk on which information is stored. Side states in Removable Storage indicate media use; physical states report media readiness.
Removable Storage uses side states in part to determine which media pool to place the media into. Media pools can hold media only in the same state as the pool—for example, the import pool can contain sides that are currently in only the Imported state, the unrecognized pool can contain sides only in the Unrecognized state, and so on. The nine side states that Removable Storage uses are as follows:
Allocated. An application has reserved the side.
Available. The side is currently available for use by applications.
Completed. The side is in use but full, so it is unavailable for further write operations.
Decommissioned. The side is no longer available for use because it has reached its allocation maximum.
Imported. The side label type is recognized, but the label ID hasn’t yet been cataloged into a media pool by this computer’s Removable Storage tool.
Incompatible. The formatting of the side is incompatible with the library. Remove the media.
Reserved. The side is unavailable to all applications except the application that allocated the opposite side. This state applies only to dual-sided media where one side has already been allocated.
Unprepared. The side has been placed in the free media pool but doesn’t yet have a free media label. This state is temporary and changes to the available side state, barring a problem.
Unrecognized. Removable Storage cannot recognize the side’s label type and ID.
To access Removable Storage (Ntmsmgr.msc) from the Computer Management snap-in, launch the Computer Management snap-in from the Administrative Tools folder on the Start menu, and then expand the storage root in the console tree and select Removable Storage from the tree. Then use this section to manage Removable Storage.
The tasks involved with managing libraries are all physically oriented: configuring libraries added to the system, enabling and disabling libraries, changing the available media types, working with robotic libraries, and cleaning libraries.
Removable Storage automatically creates an inventory of the media as you insert them into the library (actually, each time a library door is accessed). To change the way Removable Storage updates the media inventory for robotic storage libraries, or to force Removable Storage to recheck the inventory, use the following steps:
To inventory the robotic storage library, right-click the library in the Libraries folder of Removable Storage and choose Inventory from the shortcut menu. Removable Storage inventories the library according to the default method specified for the library.
To change the default method of inventorying for a library, right-click the library in the Libraries folder of Removable Storage and choose Properties from the shortcut menu. Then choose an option from the Inventory Method drop-down list box, described in Table 20-4.
Clear the Perform Full Inventory On Mount Failure check box if you don’t want Removable Storage to conduct a full inventory every time the library fails to mount a tape or disk.
To inventory a library from the command-line, use the RSM Inventory command. For example, type RSM Inventory /LF "Archive Python 06408-xxx SCSI Sequential Device" /Afast.
Note
Run the RSM View command to obtain the friendly name or GUID to use with other commands. For example, to view the friendly name and GUID for all libraries in the server, type RSM View /TLibrary /GUIDDisplay. Enclose friendly names that contain spaces within quotes when using them in commands, and make sure the quotes are strict ACSI quotes, not Microsoft Word "smart quotes."
Table 20-4. Library inventory methods and their descriptions
Inventory Method
Description
None
No automatic inventory is performed.
Fast
Performs a quick inventory by checking which slots have had media swapped.
Full
Mounts each media in the library, and reads the media’s on-media identifier. The response can be slow on libraries with a lot of media.
All libraries have at least one inject/eject port that is used for inserting and removing media from the library, and robotic libraries also often have a door that can be opened to directly access media in a particular drive. To set the amount of time allowed before Removable Storage times out the port or door, thereby preventing further operations with it, follow these steps:
Right-click the library you want to configure, and then choose Properties from the shortcut menu.
Click the Components tab, and then type a timeout period in minutes for the library door (if available) and inject/eject ports.
Note
To open a library door, right-click the library and then choose Door Access from the shortcut menu. When prompted, you can open the door and access the media. (You have until the door timeout period expires.) However, whenever you open the library door, Removable Storage needs to perform a full inventory unless you use a barcode reader. Therefore, it is preferable to use the inject/eject port in most circumstances.
If you have a storage library with multiple drives, you can disable or enable individual drives as needed. To do this, follow these steps:
Most removable storage libraries need to be cleaned—maybe once a week or more depending on their use and the type of drive. Because of this ongoing need, Removable Storage makes it easy to clean the drives and keep track of when you last did so.
To clean a robotic library, right-click the library you want to clean and choose Cleaner Management from the shortcut menu. Then use the Cleaner Management Wizard to clean the drive.
To clean a standalone library, manually insert the cleaning tape and clean the drive as instructed by the drive manufacturer or the tape manufacturer. When you are finished, right-click the drive you cleaned in the pane on the right and choose Mark As Clean from the shortcut menu.
Handling media pools is the most important task you perform with Removable Storage. Applications draw from either the free media pool or one or more application media pools when they require media.
Note
To move a piece of media from one media pool to another, drag the media from its current location to the media pool in which you want to store it.
Most of the time Removable Storage and your applications create all the media pools you need, but there might be times when you want or need additional pools. To create additional media pools, follow these steps:
Right-click Media Pools (or a media pool that can contain other media pools to create a child media pool), and then choose Create Media Pool.
In the Create A New Media Pool Properties dialog box shown in Figure 20-31, type a name and description for the media pool.
Select Contains Media Of Type option, and choose the appropriate media type.
Select the Draw Media From Free Media Pool check box to take media from the free media pool when no media are available in this media pool. Select the Return Media To Free Media Pool check box to return media to the free media pool when it is no longer needed.
To change the permissions for the media pool, click the Security tab and assign the appropriate access permissions for the media pool.
To create a media pool from the command-line, use the RSM CreatePool command. For example, type RSM CreatePool /M"8mm Backup" /TF"8mm AIT" /Anew.

Note
You can create a media pool to hold different types of media—perhaps for a backup program that needs access to the tape drive as well as a magneto optical (MO) drive. To do this, create a media pool that stores other media pools, and then open the new media pool and create a child media pool for each media type you want to use.
When an application media pool is no longer required—either you uninstalled it or you no longer use the application for which you created the media pool—you might want to delete it. To do so, move all media in the media pool you want to delete into another media pool, select the media pool you want to delete, and then click the Delete toolbar button.
Physical media—tapes or disks—are the reason storage libraries and media pools exist. Actually dealing with the physical media is pretty easy, and the kind of tasks involved include inserting and ejecting media, mounting and dismounting media, enabling and disabling media, and moving media between media pools. This is simple stuff, but a quick review might be useful.
Use Removable Storage to handle injecting and ejecting media into robotic storage libraries instead of using the device’s physical buttons or ports. Injecting (inserting) and ejecting media in standalone drives is simple: to inject, place the media in the drive; to eject, press the eject button.
To inject media from a storage library, right-click the library and choose Inject from the shortcut menu. To eject a tape or disk from the storage library, right-click the media you want to eject, and then choose Eject from the shortcut menu.
When you insert a piece of media in a library, the media is in the Idle state and cannot be immediately accessed by an application. To use a piece of media, Windows must first mount the media, which puts it in the Loaded state. Most applications automatically mount the media as needed; however, you can also manually mount media. To do so, right-click the media and then choose Mount from the shortcut menu.
To eject a piece of media, the media must be idle. Normally if an application is finished accessing the media, the media returns to the Idle state; however, if the media is currently in the Loaded state and you need to eject the media immediately, you have to manually dismount the media before you eject it. To dismount the media, right-click the media and then choose Dismount from the shortcut menu.
The work queue is a list of all activities that have been performed in Removable Storage. It acts in much the same way as the Windows event log does, except that the work queue lists actions that need to be performed as well as completed actions. To view the work queue or the operator requests list, select Work Queue from the console tree in the Removable Storage MMC snap-in. At this point, you can perform the following tasks:
To view any additional information about an action, such as additional error messages on failed actions, right-click the action and choose Properties from the shortcut menu.
To cancel a pending action, right-click the action and choose Cancel Action from the shortcut menu.
To adjust the priority of a pending action, right-click the pending action and choose Reorder Mounts. Removable Storage displays the Change Mount Order dialog box.
To move the request to the beginning of the queue, select the Move To The Front Of The Queue option.
To move the request to the end of the queue, select the Move To The End Of The Queue option.
To specify exactly which place in the queue the request should be, select the Make It Number option and select the number in the queue that you want the request to be.
Operator requests occur when an action requires direct operator intervention, such as the insertion of offline media or the need for a new cleaning cartridge. When an operator request occurs, the system displays a message indicating that a specific action is required. Perform the action, and click OK to resolve the request. The following actions are possible:
To refuse the request or manually mark the request as completed, select Operator Requests in the Removable Storage console tree, right-click the pending operation, and choose Refuse from the shortcut menu to cancel the request, or choose Complete after fulfilling the request.
To modify how long Removable Storage keeps old operator requests, right-click Operator Requests in the console tree, choose Properties from the shortcut menu, and then use the Operator Requests Properties dialog box to change these settings.
To change how Removable Storage notifies you when an operator request is due, right-click the Removable Storage root in the console tree, choose Properties, and then set the values for the Display Operator Request Dialogs and Use Status Area Icon For Notifying About Mounts check boxes.
Like money and RAM, you can never have too much hard disk space. Because of this universal truth, Windows Server 2003 and Windows 2000 include the ability to extend hard disk capacity using tape and magneto-optical media. Remote Storage does this by transparently migrating infrequently used files to tape while keeping them easily accessible.
Users see migrated files as if they were still stored on the disk instead of on tape, the only noticeable differences are a small dialog box informing them that the file is being recalled from tape and of a longer file load time. Remote Storage performs all migration and recovery from tape automatically (unless the required media is offline, in which case Removable Storage places a request for an operator to retrieve the media).
The following sections examine key concepts and requirements of Remote Storage, its setup and configuration, and its data recovery and protection.
Real World: Disk-Based Solutions vs. Remote Storage
Tape drives have been hard hit by the shrinking costs and growing capacities of hard-disks, especially as new backup-to-disk and hierarchical storage solutions that use inexpensive Serial ATA (SATA) hard drives come to market. Many companies choose not to use remote storage and simply buy more hard drives or hierarchical storage solutions that migrate infrequently used files to inexpensive disk subsystems that are backed-up less frequently.
You can also use the storage reports feature of the File Server Resource Manager console to create a crude disk-based archival script. To do so, create a Least Recently Accessed Files storage report that outputs the report in a format that your script can parse, and then use a script to read the file listing in the report and move old files to an archival disk array, and optionally create shortcuts to the files on the archival array.
However, if your company needs to archive large quantities of data that users access infrequently, Remote Storage in conjunction with large-capacity robotic tape or magneto-optical libraries remains unmatched.
You probably have some questions about the purpose of Remote Storage: How does it interact with other programs such as the backup program and antivirus program? What kind of hardware and software do you need to make it work? Here is some background you can use to answer those nagging questions.
Remote Storage allows for two tiers of data storage. The first tier, local storage, is the standard hard disk or removable disk drive hosting an NTFS volume. The second tier, remote storage, is the tape drive or robotic tape library. Data is initially stored in local storage, and after the data has settled down (has not been accessed within a specified period), it is copied or migrated to remote storage but also left intact, or cached, in local storage for quick access. When it becomes necessary to free up space in local storage for additional data, Remote Storage removes files from local storage that it has migrated to remote storage and replaces them with placeholders (links to the files in remote storage). These placeholders (shown in Figure 20-32) look and act the same as normal locally stored files, except for a few differences.
The differences between these placeholders and normal locally stored files are as follows:
Windows uses an icon with a small clock face on it to indicate that the file is in remote storage, and to open the file, a user must wait while Windows retrieves the file.
Windows Explorer subtracts remote files from disk space estimates, and it does not count them against quotas created with Quota Management. However, Windows does count files in remote storage against disk quotas, and it displays the size of the file the same regardless of whether the file is in remote storage or local storage.
Windows Explorer also adds a Remote Storage tab to the Properties dialog box of managed volumes, allowing administrators to view and change the settings on managed volumes directly from within Windows Explorer.
When a user accesses a file in remote storage, the Recalling From Remote Storage dialog box appears. (See Figure 20-33.) If a user does not want to wait for the file, he or she can click Cancel and leave the file in remote storage. Otherwise, Windows copies the file into local storage and resets its last-accessed-date timestamp, preventing Windows from migrating the file back to remote storage until the file settles down.
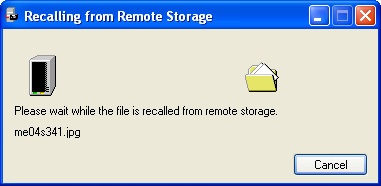
Windows does not recall placeholders that you rename or move to a different location on the same volume. However, when a user copies the file, Remote Storage recalls the file and then copies it to the new location. Note that the new file is in not linked to the old file in remote storage, just as you would expect from a copied file. When a user moves a placeholder to a different volume, Remote Storage recalls the file, copies it to its new location, and then deletes the original file.
Some programs might not behave optimally unless they are specifically written to be Remote Storage–aware. Two examples are backup programs and antivirus programs.
Backup programs that are not Remote Storage–aware can back up all locally stored data and data links, but they have no way of backing up data that has been moved to remote storage, except by restoring the remotely stored files, rendering Remote Storage useless. If a backup program is Remote Storage–aware (such as the Windows 2000 and Windows Server 2003 Backup program), you might have the option to retrieve files from remote storage and back them up along with all locally stored data, and then return the files to remote storage when finished.
Many antivirus, backup, search, and indexing programs that are not Remote Storage–aware have a nasty tendency to access every file they check, thereby resetting Remote Storage usage data, as well as pulling files from remote storage to check them for viruses. Remote Storage–aware programs do not have this liability.
Important
Microsoft Office 97 causes Windows to recall all Word documents, PowerPoint documents, and HTML files in remote storage at the end of Office 97 installation. You can stop this by terminating the Findfast.exe process. Turn FindFast off by using the FindFast Control Panel tool and by making sure the Findfast.exe shortcut isn’t in the Startup folder on the Start menu.
Fortunately, Remote Storage has a workaround for programs that are not Remote Storage–aware. Remote Storage limits the allowable number of successive recalls from remote storage. If a program recalls a file from remote storage and requests another file from remote storage within 10 seconds of the last file, Remote Storage counts this. When the count reaches a configurable limit (the default is 60), Remote Storage prohibits further recalls during that session. Setting a limit does not usually bother normal users, but doing so can prevent an antivirus program that is not Remote Storage–aware from inadvertently restoring all remote storage files.
Most companies perform regular backups of the local storage systems and make copies of Remote Storage’s media. Thus, every time you back up the local storage, you make a copy of the Remote Storage media and keep that with the local storage backup. This ensures that the entire storage system is backed up—both the local storage tier and the remote storage tier.
Another way to protect data is by using a Remote Storage–compatible backup program to back up data in remote storage along with the local storage backup. The recovery process is the same as that for any other type of backup.
To thoroughly protect your data, use a strategy similar to the following one (and for more specific information, see the Data Recovery and Protection section later in this chapter):
Back up the local data regularly.
Validate local volumes managed by Remote Storage regularly.
Make more than one copy (up to three) of the Remote Storage media master, and regularly synchronize these copies with the media master each time you perform a full backup.
Optionally, take a media copy and add it to the backup set (as described later in this chapter). This allows you to keep the complete data together, and removes the limitation of three media copies.
Back up data in remote storage at the same time as you back up local storage. It might take longer and use more media, but it offers greater data protection and flexibility in case of a disaster.
Remote Storage supports only SCSI-class magneto-optical disks, 4 mm (DAT), 8 mm, and DLT tape libraries that Removable Storage recognizes. It does not support QIC tape libraries, CD-RW, writeable DVD formats, or any type of removable disk drive (Jaz, Zip, and so on). If you are thinking about any of these unsupported formats, you probably do not need Remote Storage—you need additional hard disks.
The following sections explain how to set up Remote Storage, how to configure it optimally, and how to protect your data from disaster.
Note
Remote Storage does not detect devices installed after you install Remote Storage. To add a remote storage–compatible library, recall all files from Remote Storage, uninstall Remote Storage, install the device, and then reinstall Remote Storage.
Remote Storage is easy to set up. Install the storage library you want to use with Remote Storage and then follow these steps:
Open the Add/Remove Programs tool from Control Panel, and then click Add/Remove Windows Components in the left pane.
Select the Remote Storage check box, click Next, and then restart the computer.
Launch Remote Storage from the Administrative Tools folder on the Start menu. The Remote Storage Setup Wizard appears, detects any compatible storage devices, and checks the security settings.
On the Volume Management page, select the volumes with which you want to use Remote Storage. (Only NTFS volumes appear.)
On the Volume Settings page (shown in Figure 20-34), type the minimum amount of free space you want available on the managed volumes, the size of the smallest files you want Remote Storage to migrate to tape, and the number of days that must pass since a file has been accessed before the file is eligible for migration to tape.
On the Media Type page, select the media you want Remote Storage to use from the Media Types drop-down list. (Only detected, supported media are listed.)
On the Schedule For Copying Files page, click Change Schedule to change when Remote Storage copies files to tape, or click Next to accept the default schedule.
Review the settings you entered, and then click Finish to complete the Remote Storage setup. To Change volume settings later, right-click the volume you want to configure in the Remote Storage console, and then choose Settings from the shortcut menu.
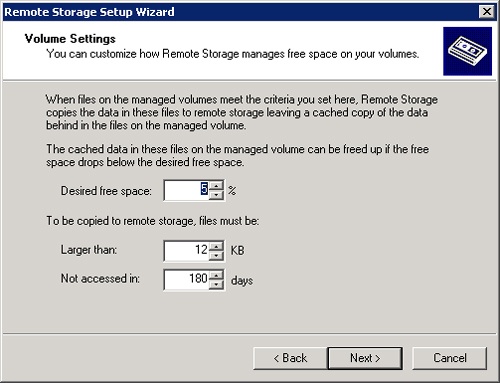
To set up additional storage volumes on the system for use with Remote Storage after you already completed the initial setup, you can use the Add Volume Management Wizard. To do so, follow these steps:
Launch the Remote Storage MMC snap-in from the Administrative Tools folder on the Start menu, or type Rsadmin.msc in the Run dialog box or at a command prompt.
Right-click the Managed Volumes folder in the console tree, choose New, and then choose Managed Volume(s). The Add Volume Management Wizard appears.
On the Volume Management page, select the check box next to the NTFS volume on which you want to enable Remote Storage, or choose the Manage All Volumes option to instruct Remote Storage to manage all eligible volumes.
On the Volume Settings page (shown in Figure 20-31), type the minimum amount of free space you want available on the managed volumes, the size of the smallest files you want Remote Storage to migrate to tape, and the number of days that must pass since a file has been accessed before the file is eligible for migration to tape.
Review the settings on the final wizard page, and then click Finish.
To set up additional volumes from the command-line, use the RSS Volume Manage command. For example, type RSS Volume Manage E:
Remote Storage uses a set of rules to govern which files are eligible for migration to remote storage. You set these rules initially when you set up a storage volume on the computer for Remote Storage to manage, using either the Remote Storage Setup Wizard or the Add Volume Management Wizard. To change these settings or add exclusions follow these steps:
Select the Managed Volumes folder in the Remote Storage console tree, right-click the volume you want to configure, and choose Settings from the shortcut menu.
Click the Include/Exclude Rules tab, select a rule that you want to modify (some rules cannot be changed), and then click Edit to modify the rule or click Remove to delete it.
To add a new rule, click Add to display the Edit Include/Exclude Rule dialog box, shown in Figure 20-35.
Type the folder path you want to apply the rule to in the Path box, or type a backslash ()to apply the rule to the entire volume.
In the File Type box, type the type of file you want to include or exclude from Remote Storage.
Select Exclude Matching Files to exclude files matching the criteria, or select Include Matching Files to explicitly allow Remote Storage to manage files matching the criteria.
Select the Apply Rule To Subfolders check box if you want Remote Storage to apply the rule to all subfolders of the folder listed in the Path box.
To change include and exclude rules from a command prompt, use the RSS Volume Set command. For example, open a command prompt window and type RSS Volume Set E: /Include:Programs:*.ico
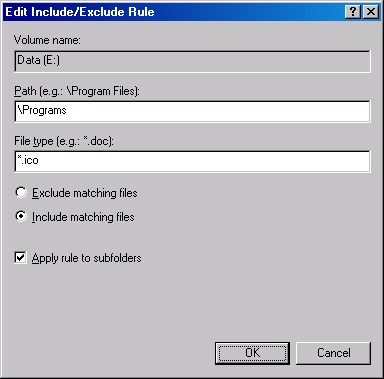
If you plan to uninstall Remote Storage, discontinue managing all the volumes and recall the files in remote storage. If you do not perform this step before uninstalling Remote Storage, you must perform a complicated and risky Remote Storage recovery procedure. See Data Recovery and Protection later in this chapter for more information.
To remove a managed volume from Remote Storage, or to prevent Remote Storage from adding additional files to the remote storage tier without turning off Remote Storage, follow these steps:
Click Managed Volumes in the console tree, right-click the volume you want to remove from Remote Storage, and then choose Remove from the shortcut menu. The Remove Volume Management Wizard appears.
On the Removal Options page, choose whether to recall all files from remote storage or to remove volume management while allowing Remote Storage to continue managing the files currently in remote storage. Note that if you choose to recall files, the managed volume must have enough free disk space to hold all recalled files.
Click Yes in the dialog box that opens, review the settings, and then click Finish.
To disable Remote Storage for a managed volume from a command prompt, use the RSS Volume Unmanage command. For example, open a command prompt window and then type RSS Volume Unmanage E: /Full.
Remote Storage is configured to perform almost all operations automatically, using the Windows Scheduled Tasks folder. To perform scheduled tasks manually, click Managed Volumes in the console tree, right-click the appropriate volume, choose All Tasks from the shortcut menu, and then choose a task from the submenu. See Table 20-5 for a description of the tasks you can perform.
Table 20-5. Tasks you can perform manually
Task | Description |
|---|---|
Copy files to remote storage | Immediately copies all eligible files on the managed volume to remote storage. |
Validate files | Verifies that all placeholders and locally cached files are still linked to valid data in remote storage, and updates volume statistics. |
Create free space | Removes all cached data from files that have already been migrated to remote storage. This creates free space only if there is data cached locally. |
Note
Remote Storage places all tasks in the Scheduled Tasks folder—both tasks that Remote Storage performs automatically and tasks that you perform manually. To change the schedule Remote Storage uses to copy files to remote storage, or to validate placeholders and cached files or create free disk space, right-click the Remote Storage root in the Remote Storage console tree and choose Change Schedule from the shortcut menu.
When you set a recall limit, also known as a runaway recall limit because it limits only recalls that take place within 10 seconds of the last recall, you prevent programs that are not Remote Storage–aware from inadvertently recalling all files from remote storage. This usually does not affect end users because most users are not fast enough to trigger the recall limit unless they are performing a mass copy operation.
To configure the recall limit, right-click the Remote Storage root in the Remote Storage console tree, choose Properties, and then click the Limits tab.
Because even the best data protection plans cannot always prevent a disaster, you must also know how to recover data if a problem occurs. The following sections teach you how to protect and recover data with Remote Storage.
The strategy you use to protect the remotely stored data varies depending on your ability to create copies of the Remote Storage media. (You need two drives of the same media type to do this.)
Note
The entire Remote Storage database is stored in only two places: in the %SystemRoot%System32RemoteStorage folder, and on each media master tape. If the local folder is deleted, you must restore from your Remote Storage tapes—a complicated procedure described in Microsoft Knowledge Base Article 235469. Always perform full backups of essential servers.
If you are using only a single tape drive with Remote Storage, back up the local files according to your preexisting backup plan (and consider replacing Remote Storage with a larger disk array). For full backups, back up migrated Remote Storage data. Note that this almost certainly means backing up to a different drive from the one holding the Remote Storage media. If you do not have another backup device, purchase one or upgrade to a disk-based solution.
Usually you do not need to include files in remote storage in differential or incremental backup schedules because files in remote storage probably have not changed since the last full backup. If the files have changed since the last full backup and have been migrated to remote storage and have had their local cache removed (if you have a long backup schedule or a short migration schedule and a full volume), you can restore the files from a recent differential or incremental backup. Keep in mind, of course, that the longer the period between full backups, the more incremental restore operations you must perform to restore from backup (which is a good reason to use differential backups instead) or the more data that is lost if you don’t frequently perform incremental backups. See Chapter 37 for more information about using the Windows backup utility.
In addition to the regular backup schedule, frequently verify the remote storage placeholders and cached files to make sure they are still linked to valid data in remote storage. Note that Remote Storage automatically creates an appropriate validation schedule during installation.
Supplement your backup plan by creating copies of the remote storage media and frequently synchronizing the copies. Back up the local files according to your preexisting backup plan. For full backups, you can choose to instruct the backup program to back up migrated Remote Storage data, thus eliminating the need to deal with Remote Storage when recovering.
Important
You cannot restore Remote Storage files to another computer. To restore data to another computer, you must use backups that also backed up migrated remote storage files.
In addition to your backup schedule, make one to three copies of the media master (the media that holds the remote storage data), and routinely synchronize them. If the media master fails, you can re-create it from one of the copies. If you do not back up the migrated remote storage files during the full backups, make sure you synchronize a media copy and keep it with your full backup. This ensures that the full backup has all data backed up.
Note
To keep your backup sets complete, either perform a full backup (including data in Remote Storage) or back up only local storage, and then add a synchronized media copy to the backup set (by dragging it to the Backup media pool). The media copy you add to the backup set is removed from the Remote Storage media pool, allowing another media copy to be generated to replace it.
In addition to the regular backup schedule, frequently verify the remote storage placeholders and cached files to make sure they are still linked to valid data in remote storage.
Remote Storage automatically creates a validation schedule when you install it, and this is usually fine for most purposes. Just make sure it covers all the volumes Remote Storage manages.
Because you cannot create fault-tolerant arrays of remote storage devices, Microsoft provides the ability to create copies of Remote Storage media so that some level of redundancy exists for remotely stored data.
Note
Place new media in the free media pool instead of manually in the Remote Storage pool. Remote Storage automatically takes and appropriately formats media from the free media pool when necessary.
Use the following list to work with media copies:
Changing the number of media copies. To specify the number of media copy sets, right-click the Remote Storage root in the Remote Storage console tree, choose Properties, click the Media Copies tab, and then specify the number of media copy sets you want to create for each media master set (up to three maximum). When one copy is finished, Remote Storage creates the next copy, provided enough media is available in the Remote Storage application pool or free media pool. Each group of media copies is called a media copy set.
Note
If you decide that you don’t need as many media copy sets as you originally thought, you can decrease the number of sets that Remote Storage displays and accesses, as just described. However, note that doing so does not deallocate any media. If you want to free up media, you need to delete the media copies, as described in the next section.
Deleting and checking the status of media copies. To delete or check the status of a media copy, right-click the media master that is associated with the media copy you want to delete or check, choose Media Copies, view the status information of the media copies, and then click the appropriate Delete Copy button for any media copies you want to delete.
Synchronizing media copies. To synchronize media copies, right-click Media in the console tree and then choose Synchronize Media Copies from the shortcut menu. You cannot recall or copy data to remote storage while synchronizing media copies.
Adding media copies to backup sets. To add a media copy to a full backup set, creating a complete backup set of both local and remote storage, use the following steps:
In the console tree, select Media Pools, select Remote Storage, and then select the appropriate media type for your system.
Right-click the synchronized media copy, and choose Copy from the shortcut menu.
Select the Backup media pool, right-click the appropriate Backup media pool, and then choose Paste from the shortcut menu. This adds the media copy to the Backup media pool, so you can then eject it and keep it with the rest of your backup set. Remote Storage automatically regenerates the ejected media copy with media from the Remote Storage or free media pools.
Re-creating a Media Master in Case of Disaster. To re-create a media master from a recently synchronized media copy, right-click the most recently synchronized media copy for the media master that you want to re-create, choose Media Copies, click the Recovery tab, and then click Re-create Master.
Re-creating a media master does not recover data that Windows migrated to remote storage and removed from the local cache since the last time you synchronized the media copy.
Disasters happen. Servers go down. Drives fail. The cable goes out during the season finale of your favorite TV show. These are facts. However, if you are prepared ahead of time, you can reduce the negative impact of disaster when it strikes. The following list summarizes what actions to take in the event of some common disaster scenarios:
Hard disk failure. If the hard disk fails, restore locally stored files from a backup, but do not perform a Remote Storage validation operation until all incremental or differential backups are restored. As long as the Remote Storage database stored in the %SystemRoot%System32RemoteStorage folder is not affected, you do not need to do anything other than perform a validation operation to clean up any invalid placeholders.
Hard disk failure of system drive. If the hard disk storing Windows fails, restore the system from backup if possible. The system should function normally; however, you might see the following error when recalling a file from remote storage:
Pathfilename.doc. The file cannot be accessed by the system.If you experience this error, see Knowledge Base Article 235469 and perform the Restore A Damaged RSS Database procedure.
Clean reinstall of Windows. To perform a clean reinstall of Windows, first recall all data from remote storage. (Refer to the Disabling Remote Storage for a Managed Volume section earlier in this chapter.)
If a disaster occurs that precludes you from recalling the data and you cannot restore the system from backup, perform a clean install of Windows into the same drive and folder as it was before, without installing Remote Storage, and then restore the Removable Storage database. Next, install Remote Storage and use the Rstore.exe command-line tool to restore the Remote Storage database. This is tricky business, so refer to Knowledge Base articles 235469 and 235032 for the exact procedures.
Windows Server 2003 R2 provides a number of new and improved features that help you manage storage, including the storage reports, quotas, and file screens of File Server Resource Manager; the fault-tolerant, site-aware namespaces and replication groups of Distributed File System; and the Storage Manager For SANs console, which makes it far easier to manage simple SANs. It also includes the Removable Storage and Remote Storage features, which are unchanged from Windows Server 2003. The next chapter covers how to plan a secure operating environment with Windows Server 2003.