Now that you understand some of the underlying principles of TCP/IP (which were covered in Chapter 16), it’s time to deal with the day-to-day issues of managing and administrating TCP/IP.
The three basic network features that virtually all TCP/IP-based networks need to use are:
Dynamic Host Configuration Protocol (DHCP), to dynamically provide clients with IP addresses and configuration information
Domain Name System (DNS), to translate IP addresses into friendly names that are easier to deal with and vice versa
Windows Internet Naming Service (WINS), to translate NetBIOS names and IP addresses for clients that still use NetBIOS
Although Active Directory and Microsoft Windows clients function with standards-based DHCP and DNS servers, such as those available for UNIX systems (nobody other than Microsoft makes WINS servers), Active Directory works best with the DHCP and DNS servers provided as a part of Microsoft Windows Server 2003 and Microsoft Windows 2000 Server. There are a few additional capabilities available when you deploy Active Directory in conjunction with DHCP and DNS servers running Windows Server 2003 or Windows 2000 Server, such as secure dynamic updates for legacy clients and multiple-master replication between DNS servers.
This chapter shows you how to install and manage DHCP, DNS, and WINS servers running Windows Server 2003.
More Info
For basic background information about these services, see Chapter 14. For more in-depth information, pick up a copy of Microsoft Windows Server 2003 TCP/IP Protocols and Services Technical Reference (2003) from Microsoft Press. More information about installing and managing DHCP, DNS, and WINS is available in the Windows Server 2003 Help system, as well as in the Microsoft Windows Server 2003 Resource Kit (2005), available from Microsoft Press.
If you’ve ever managed more than a very small number of computers on a network, you’ve probably used DHCP. DHCP can provide both an IP address and all the essential configuration information that any client on the network needs to connect and communicate with other computers, both on the network and outside on the Internet. By providing a central location for address management and disbursement, the DHCP service of Windows Server 2003 makes it easy to configure and manage your TCP/IP network.
The DHCP server provided with Microsoft Windows Server 2003 is truly excellent—it works predictably, reliably, and properly. The following sections describe how to use it. If you need to get up to speed about how DHCP works, see Chapter 16.
It’s important to design the deployment of DHCP servers in a way that fits the network. Small, nonrouted networks can use a single DHCP server. If you have a larger network, consider the subnets and routers in use, and also split the address space between two servers or host your DHCP service on a cluster to improve fault tolerance. Use the following checklist as part of your planning:
Draw a map of the network, showing each physical and logical subnet and the routers joining the subnets.
If the network uses routers to subnet the network, determine whether the routers support forwarding DHCP broadcasts. (Most newer routers do, although this option usually needs to be turned on.)
Plan on sectioning the IP address range between two DHCP servers to provide fault tolerance. (DHCP servers can’t communicate with each other, so they can’t share the same addresses.) Give 80 percent of the addresses to one server, and 20 percent to the other server. (This is called "the 80/20 rule.") If one server goes down, clients can still receive IP addresses from the other server. Alternatively, you can set up a DHCP server cluster to handle 100 percent of the addresses.
If the link between the subnets is fast and reliable and the routers in between can be configured to forward DHCP broadcasts (or if you add a DHCP relay agent), you can place the second DHCP server on a different physical subnet. Otherwise, deploy a pair of DHCP servers to each physical subnet.
Don’t run a DHCP server on a domain controller if you plan on using the DHCP server to update DNS records for legacy clients. Doing so creates an additional security risk. (Consult the DNS Help topic in the Windows Server 2003 Help system for more information—specifically, check the Dynamic Updates topics.)
Size the servers appropriately. A single DHCP server can service no more than 10,000 clients and 1000 scopes.
Upgrade any Microsoft Windows NT 4 domain controllers to Windows Server 2003 or Windows 2000 Server. (See Chapter 6 for more information about upgrading.)
Use a disk drive with fast access time, or better yet, use a redundant array of independent disks (RAID). DHCP servers frequently access the disk drives, and a fast storage subsystem means better DHCP performance.
Note
Another method of protecting against DHCP server failure is to have a hot backup. To do this, set up a DHCP server identically to the primary DHCP server, except with its own scope, that encompasses 20 percent of the address space (or possibly less). Don’t activate this server. (It could be serving other roles that you don’t want to slow down except in the case of an emergency.) If the primary DHCP server goes down, manually bring the backup server online by activating its scope. However, splitting the address range between two live servers or using a DHCP server cluster is a superior solution because it provides automatic fault tolerance—no manual intervention is required.
Although DHCP servers aren’t high-value targets for hackers, there are nonetheless a number of vulnerabilities inherent to DHCP servers. Because the number of IP addresses in a scope is limited, an unauthorized user can launch a denial-of-service (DoS) attack on the network by acquiring a large number of IP addresses from the DHCP server. A DoS attack on the DNS server can also be initiated by performing a large number of DNS dynamic updates via DHCP. Similarly, a user with physical access to the network can easily use a non-Microsoft DHCP server to set up a rogue DHCP server that provides improper IP addresses to other clients.
To round off the list of DHCP security vulnerabilities, any user that obtains an IP address from the DHCP server will probably also obtain the addresses for company DNS and WINS servers. A hacker can then obtain further information about the network configuration from these servers or attack them.
To minimize these risks, limit physical access to your network. If a hacker can plug into your network, his or her job is immensely easier than trying to break through a firewall. The use of 802.1x across the entire physical network to control access can significantly reduce the risk. Also make sure to maintain and regularly review DHCP audit logs (stored by default in the %windir%System32Dhcp folder).
Besides determining how to place the DHCP servers into the network structure, you also need to plan the IP address ranges you’ll use, as well as which IP addresses to reserve or exclude from this pool of addresses. Use the following list to help plan the IP address ranges to use and exclude:
Determine the range of IP addresses that the DHCP server will manage. Most likely, this will be a private address range such as 10.x.x.x or 192.168.x.x.
Make a list of any IP addresses to exclude to support hosts with static IP addresses. Only DHCP servers and hosts that don’t work as DHCP clients need static IP addresses, although you might want to use static addresses for DNS servers as well.
Note
Consider switching all hosts with statically assigned IP addresses to DHCP assigned addresses. If any servers need unchanging addresses, create client reservations for the servers using DHCP. (Lease reservations are covered later in this chapter.) This allows the servers to use an unchanging address and yet still have all TCP/IP options configured automatically through DHCP. It also makes it easier to track and manage IP addresses, and it will make your life much easier if your company ever needs to change its addressing, as might happen after a merger. The fewer static addresses, the better.
Make a list of servers that need to have unchanging IP addresses, such as DNS and WINS servers, and then decide whether you can use a DHCP reservation or whether bona fide static addresses are needed.
If the DHCP server will be using Internet-registered IP addresses (which it probably won’t), register the IP addresses with the Internet service provider (ISP).
The easiest way to set up the DHCP service is by using the Manage Your Server Wizard (also called the Configure Your Server Wizard) to install the DHCP server role and create a new scope. (The Configure Your Server Wizard is discussed in Chapter 7; creating scopes is covered in the next section.) However, you can also do this manually by installing the Dynamic Host Configuration Protocol (DHCP) component, accessible through the Add/Remove Programs tool.
Note
Configure the server with a static IP address before setting up the DHCP server service. See Chapter 7 for help with this.
Real World: DHCP Options
There are four levels at which you can configure DHCP options in a Windows Server 2003 DHCP server:
Server options. These options apply to all clients of the DHCP server you’re managing. Because of this, use server options sparingly—specify server options only for parameters common across all scopes on the server.
Scope options. These are the most often used type of options—they apply to all clients within a scope and override any server options set on the DHCP server.
Client options. These options are specified for individual clients. This is useful if specific computers need special options. Client options override all other options, including class options.
Class options. These options provide DHCP parameters to clients based on the type of client they are—either using vendor classes such as all Microsoft Windows 95 or Windows 98 clients, or with user classes that specify clients with particular needs, such as RRAS clients, "mobile clients," or any other user-defined class. For more information about creating and using class options, consult the Help system or the Microsoft Windows Server 2003 Resource Kit.
After installing the DHCP service, the next thing you must do to get the DHCP server up and running is create a new scope of IP addresses for the DHCP server to manage. (A scope is a range of IP addresses that the DHCP server can manage.) Before you do this, make sure you know which range of IP addresses is approved, which IP addresses need to be excluded for systems with static IP addresses, and which IP addresses need to be reserved for DNS or WINS servers.
Important
If you use the Manage Your Server Wizard to create a default first server, it will automatically create and activate a DHCP scope for your network. Carefully review the settings it made, and make any necessary changes. If there are already DHCP servers on your network do not run this wizard.
Real World: Scopes, Superscopes, and Multicast Scopes
A scope is simply the range of possible IP addresses on a network. To add more clients to a network where the scope is exhausted, you can add another scope as long as the scope doesn’t overlap with an existing scope. An excellent source of information about the complex subject of choosing subnet masks and other TCP/IP issues is Microsoft Windows Server 2003 TCP/IP Protocols and Services Technical Reference by Thomas Lee and Joseph Davies (Microsoft Press, 2003).
When you create multiple scopes, it’s important to understand that clients from one logical subnet aren’t able to obtain IP addresses from a different scope than the one they currently belong to, because the other scope is in a different logical subnet. If this is the behavior you want, great. However, if you want clients to be able to use addresses from other scopes, use a superscope.
A superscope is a collection of scopes grouped together into a single administrative whole. There are three primary reasons you might want to use superscopes:
One scope is running out of IP addresses.
You need to renumber the IP network, and therefore move clients from one set of addresses to another.
You want to use two DHCP servers on the same subnet for redundancy.
When you create a superscope, you enable clients to obtain or renew leases from any scope within the superscope, even if they contain addresses from a different logical subnet.
A multicast scope is simply a scope of multicast addresses (class D addresses) that are then shared by many computers (members of the multicast group).
To create the new scope, follow these steps (or if you’re using the Configure Your Server Wizard to set up DHCP, you can jump to Step 4):
Launch DHCP from the Administrative Tools folder on the Start menu.
If the DHCP server you want to administer isn’t listed in the DHCP console tree, choose the Add Server command from the Action menu to locate the server you want to administer.
Select the appropriate DHCP server in the console tree. Select the Action menu, and choose New Scope to launch the New Scope Wizard.
Click Next, and type a name and description for the scope to use for distinguishing this scope from others. (See Figure 17-1.) Click Next.
Type the IP address that the scope begins with in the Start IP Address field, and type the IP address that the scope ends with in the End IP Address field, as shown in Figure 17-2.
Type the network’s subnet mask in the Subnet Mask box, or use the Length box to adjust the length of the subnet mask. Then click Next.
To exclude a range of addresses from the scope, in the Start IP Address box, type the start IP address for the exclusion range; in the End IP Address box, type the end IP address for the exclusion range. (To add a single address, enter it in the Start IP Address box and then click Add.) Then click Add. Add as many exclusions as needed, and click Next when you’re finished.
Specify the lease duration for the clients, and then click Next. For more information, see the Setting Lease Durations sidebar.
To configure DHCP options, choose Yes; otherwise, choose No, and then click Next. If you select No, click Finish to complete the setup of the scope.
If you chose to specify DHCP options for this scope, type the routers (default gateways) you want clients to use in the Router (Default Gateway) page, clicking Add after typing each one. When you’re finished adding gateways, click Next.
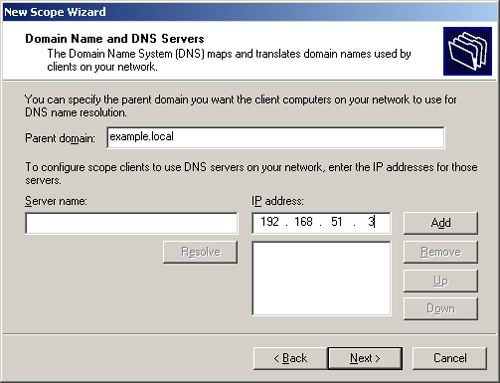
Type the domain name of the domain in the Parent Domain box, and add the IP addresses for the DNS servers in the IP Address box, as shown in Figure 17-3, clicking Add after entering each one. Click Next when you’re done.
In the WINS Server Address box, type the addresses of any WINS servers you configured on the network for resolving NetBIOS names into IP addresses for down-level clients. Click Next.
To activate the scope immediately, choose Yes; otherwise, choose No to activate the scope later. Click Next, and then click Finish to complete the scope configuration.


Real World: Setting Lease Durations
Use longer leases for networks without redundant DHCP servers to permit more time to recover an offline DHCP server before clients lose their leases, or to minimize network traffic at the expense of less frequent address turnover. You can also use longer leases if scope addresses are plentiful (at least 20 percent available), the network is stable, and computers are rarely moved.
In contrast, scopes that support dial-up clients or mobile clients such as laptops or personal digital assistants (PDAs) can have shorter leases and therefore function well with fewer addresses.
If you’re planning a major network change, change the scope lease duration to be quite short. This will allow you to make the changes you need to the DHCP Scope properties and have them rapidly deployed to all clients. After the network change is made, don’t forget to set the DHCP back to a more reasonable duration to minimize the amount of network traffic and resource utilization on the DHCP server.
Lease durations are set in the scope’s Properties dialog box. Scopes are listed in the DHCP administration console.
After you set up the DHCP server and create the scopes, you must authorize the server to give leases and activate the scopes. DHCP servers that are also domain controllers are automatically authorized when added to the DHCP Manager console.
Authorizing a DHCP server is an important step that Windows Server 2003 provides to reduce the occurrence of unauthorized (rogue) servers set up to hand out false IP addresses to clients. Although rogue DHCP servers that use UNIX or a hardware-based DHCP server can still be set up, Windows Server 2003–based and Windows 2000–based DHCP servers can’t be used in a Windows domain without authorization.
To authorize the DHCP server after installing the service, select the server in the DHCP console and then choose Authorize from the Action menu. To manage the list of authorized servers, right-click DHCP at the root of the console tree and choose Manage Authorized Servers from the shortcut menu.
To activate a scope, right-click the scope in the console tree, and then choose Activate from the shortcut menu. Don’t activate a scope until you finish selecting all the options you want. When you activate a scope, the Activate command on the menu changes to Deactivate.
Reservations are used to provide a consistent and unchanging IP address to servers and other hosts that need to be at a predictable IP address. The only servers that can’t use a reservation are DHCP servers—they must be at a fixed IP address. Using reservations instead of static addresses guarantees that a server has a consistent IP address, while giving you the ability to easily change settings as required, and to recover the IP address in the future if the server is decommissioned or moved.
To add an address reservation to a scope, right-click the Reservations folder under the desired scope, and choose New Reservation from the shortcut menu. Walk through the wizard, and add the new reservation. You’ll need to know the MAC address for the DHCP client you want a reservation for, and the IP address you want to assign to it.
Important
When reserving an address for a client, make the reservation on all DHCP servers that potentially service that client. You can create reservations outside the address range of the scope on the server, allowing you to use the same set of reservations even when you’re using multiple servers.
Note
To obtain the MAC address, go to the client computer (or make a remote desktop connection) and type ipconfig /all at the command prompt. The MAC address is listed as the physical address. Or check the current DHCP lease for the client—the MAC address is shown in the Unique ID column. Yet another way to get the MAC address is to use the new getmac command in Windows Server 2003. From a command prompt, type: getmac /s computer where computer is the IP address, hostname, or DNS name of the remote computer you want the MAC address for.
Microsoft Windows Server 2003, Windows XP, and Windows 2000 clients automatically update their forward lookup records with the DNS server after obtaining a new IP address from a DHCP server, while explicitly requesting that the DHCP server update their reverse lookup (PTR) records on the DNS server. This second step requires communication between the DHCP server and the DNS server.
Because legacy and non-Windows clients don’t automatically update their own resource records, you can configure the DHCP server to update the legacy client’s forward and reverse lookup records whenever the client obtains a new IP address.
To enable legacy client support for DHCP and dynamic DNS, use the following procedure:
Select the scope or DHCP server on which you want to permit dynamic DNS updates.
From the Action menu, choose Properties, and then click the DNS tab.
Select the Enable DNS Dynamic Updates option, as shown in Figure 17-4.

The other options available on the DNS tab are:
Dynamically Update DNS A And PTR Records Only If Requested By The DHCP Clients. This option allows Windows XP, Windows 2000, and other Windows clients to decide whether to update the DNS server themselves or have the DHCP server update their DNS address (A) and reverse lookup (PTR) records.
Always Dynamically Update DNS A And PTR Records. This option forces the DHCP server to update the A and PTR records for all DHCP clients, even if they request permission to update the DNS server themselves.
Discard A and PTR Records When Lease Is Deleted. This option forces the DHCP server to delete the A record as well as the PTR record of a client whose lease has expired or is deleted. (The PTR record is always deleted at lease expiration, regardless of this setting.)
Dynamically Update DNS A And PTR Records For DHCP Clients That Do Not Request Updates. This option enables the DHCP server to update the forward and reverse lookup records for clients that can’t update their own forward lookup records (Windows Me and all other versions of Windows prior to Windows 2000). If you don’t select this check box, the DNS records of pre–Windows 2000 clients aren’t dynamically updated.
Note
Although Windows Server 2003 can interoperate with Berkeley Internet Name Domain (BIND) DNS servers, mixing and matching DHCP and DNS servers can cause trouble, particularly when it comes to DHCP–DNS communication, secure dynamic updates, and updating DNS records for clients running earlier versions of Windows. Because of this, it’s best to use Microsoft DHCP and DNS servers for internal addressing and name resolution on Windows-based networks. (You can reference BIND DNS servers for external name resolution without issues.)
Real World: DHCP, Stale Records, and Secure Dynamic Updates
There is a problem that arises when using DHCP in combination with DNS zones that make use of secure dynamic updates. When DHCP creates a DNS record for a client running an earlier version of Windows, the DHCP server becomes the owner of the record. As the owner of the record in a zone with secure dynamic updates enabled, only the DHCP server is allowed to update the record. This is usually fine; however, the DNS records of clients running earlier versions of Windows become stale (outdated) and orphaned (unable to be updated by anyone) under the following conditions:
If the DHCP server is replaced by a backup server, or its scope is migrated to another server (in which case the records are still owned by the original server)
If the client is upgraded to Windows 2000, Windows XP, or Windows Server 2003 (in which case the records are still owned by the DHCP server, which will no longer update the records because the client is now theoretically capable of doing so)
The best solution is to upgrade all clients running earlier versions of Windows, but this is obviously impractical for some networks. Another solution is to add all DHCP servers to the DnsUpdateProxy group. When a member of this group creates or updates a DNS record, no security information is recorded. (The record is unsecured.) This prevents the record from becoming orphaned. When any other computer modifies one of these unsecured records, it then becomes the owner. (This is intended to allow upgraded clients to take possession of their DNS records.)
However, astute readers will notice that this means that all DNS records recorded by the DHCP servers are unsecured and can be modified by anyone who changes their DNS name to the name of an unsecured record. (They also acquire ownership in doing so.) This also includes the DNS record of the DHCP server itself. To protect against this risk, create a dedicated DHCP service account that is used exclusively for dynamic DNS updates. For more information about this, see Microsoft Knowledge Base Article 816592.
To add a DHCP server to the DnsUpdateProxy group, in the Active Directory Users And Groups snap-in, right-click the DHCP server, and then choose Properties from the shortcut menu. Click the Member Of tab, click Add, type DnsUpdateProxy in the box, and then click OK.
Windows Server 2003, Windows XP, and Windows 2000 clients are exempt from this issue. (They can directly communicate with the DNS server and securely update their DNS records.)
Computers don’t lose network connectivity immediately when a DHCP server goes down, but new computers, returning laptops, or little-used systems that haven’t recently logged on might not be able to obtain network access until a DHCP server is available.
To ensure that there will continue to be an available DHCP server, even if the primary DHCP server is down, configure multiple DHCP servers. The traditional solution is to set up redundant servers with a split scope across the servers. Windows Server 2003 Enterprise Edition gives you the option of configuring DHCP onto a cluster for high availability.
To employ two DHCP servers for load balancing and redundancy, use the following procedure:
Create identical scopes on each server for all valid IP addresses that the DHCP servers you’re setting up will manage. This might mean creating a single scope (if you have a single subnet), or multiple scopes encompassing a number of subnets.
Set up exclusions so that the primary DHCP server handles 80 percent of the address pool and the secondary server handles the other 20 percent of the addresses. Thus, each server excludes the addresses available on the other server so that no address appears in both servers’ address pools.
Create a superscope on both servers that contains all valid scopes for the physical subnet. To do so, select the appropriate DHCP server from the console tree, choose the New Superscope command from the Action menu, name the superscope, and then select the member scopes to include.
Note
You can delete a superscope without affecting the member scopes by selecting the superscope and pressing Delete. However, deactivating a superscope deactivates all member scopes as well.
Best Practices
If you have a routed network with DHCP relay agents or routers that forward DHCP broadcasts between the physical subnets, you can use DHCP servers on other subnets as secondary servers. However, unless the DHCP server has at least one scope with available addresses from the client’s own subnet, the client isn’t able to obtain or renew an IP address lease. To make sure this doesn’t happen, create two superscopes on each server, one for each logical subnet. Thus, each server owns 80 percent of the address pool for its local subnet, and 20 percent of the address pool for the other DHCP server’s local subnet.
Although splitting the address space between two DHCP servers is an adequate way to provide redundancy and load balancing, an even more powerful solution is to set up the DHCP service to run on a Windows Server 2003 cluster. The members of the cluster equally share the DHCP service workload, and if one of the servers fails, the other servers continue to provide addresses to clients as if nothing had happened. Instead of an address space split between servers, each server in the cluster has access to the complete address space.
Using the Windows Server 2003 Cluster service is discussed in detail in Chapter 19, but the basic steps to get a DHCP server up and running in a cluster are as follows:
Install DHCP (as described earlier in this chapter), and set up the server cluster (as described in Chapter 19).
Launch Cluster Administrator from the Administrative Tools folder on the Programs menu.
Select the cluster you want to use to host the DHCP service.
Choose the Configure Application command from the File menu to open the Configure Application Wizard.
Click Next in the first page, and then choose the Use An Existing Virtual Server option and select the appropriate group. If you haven’t already created a virtual server, choose the Create A New Virtual Server option and use the wizard to create a new virtual server (as discussed in Chapter 19).
In the Create Application Cluster Resource page, choose the Yes, Create A Cluster Resource For My Application Now option, choose the DHCP resource type, and then click Next.
Type a name and, optionally, a description for the DHCP resource and then click Next.
Click Advanced Properties, click the Dependencies tab, and then click Modify.
Double-click the IP address, physical disk, and network name you want to use for the DHCP server cluster. These resources then appear as dependencies. Click OK when finished, optionally modify the properties of the resource, and then click OK.
Click Next in the Application Resource Name And Description page, specify where the DHCP database should be stored (most likely the physical disk you specified in Step 9), and then click Next. If you select a different disk, make sure that it belongs to the group and that a dependency has been created for it.
Review the settings, and click Finish to complete the wizard.
Verify that the resource is displayed in the correct group, and then right-click the resource and choose Bring Online from the shortcut menu to enable the DHCP server to begin servicing clients.
Authorize the DHCP server in Active Directory (if on an Active Directory network), as discussed earlier in this chapter.
The DHCP snap-in provides a single point from which to administer all the properties and functionality of the DHCP servers.
Modify a scope’s properties by right-clicking the scope in the console tree and choosing Properties from the shortcut menu. This displays the Scope Properties dialog box shown in Figure 17-5.

To deactivate a scope, right-click the scope in the DHCP console and choose Deactivate from the shortcut menu. To return the scope to use, right-click the scope again and choose Activate.
Note
To temporarily stop distribution of leases from a scope, adjust the exclusion range so that no new addresses are available rather than deactivating the scope. This avoids forcing clients currently using addresses in the scope to prematurely obtain a new IP address from a different DHCP server or a different scope.
To exclude a range of IP addresses from a scope, right-click the Address Pool folder under the appropriate scope and choose New Exclusion Range from the shortcut menu. Type the range of addresses you want to exclude, and then click Add.
The Windows Server 2003 DHCP server provides the ability to enable server-based conflict detection, which is a technique that pings an IP address before leasing it to a client to ensure that it’s not already in use by a static IP client. Windows Server 2003, Windows XP, and Windows 2000 clients automatically verify that the IP address offered by the DHCP server is available before accepting it, so conflict detection is useful only for earlier clients. In the interest of conserving network bandwidth and reducing client startup times, leave this option disabled unless you’re having problems with duplicate IP addresses, as might be the case if you have undocumented static IP addresses on the network.
To enable server-based conflict detection, right-click the DHCP server in the console tree and choose Properties from the shortcut menu. Click the Advanced tab, and then set the Conflict Detection Attempts number to 1. Don’t increase this number beyond 2; this results in additional searches and needlessly increases the time it takes a client to obtain an IP address.
If you have a routed network, deploy DHCP servers on both sides of routers to maximize reliability and minimize bandwidth usage. However, there are instances in which you want to allow DHCP to work across a router; for example, if the routed network is very reliable and fast, as might be the case with a partitioned local network or municipal area network (MAN), you might want to simply allow clients to cross the router to reach a DHCP server.
You can configure most routers manufactured in the last several years to pass DHCP broadcasts (because they’re BOOTP-compliant), but if the router doesn’t support forwarding DHCP broadcasts, you can set up a server running Windows Server 2003 or Windows 2000 Server as a DHCP relay agent using the following procedure:
Launch Routing and Remote Access from the Administrative Tools folder on the Programs menu.
If the server you want to make a DHCP relay agent isn’t listed in the console tree, choose the Add Server command from the Action menu to locate the server you want to administer.
If the appropriate server isn’t already enabled, select it, choose the Configure And Enable Routing And Remote Access command from the Action menu, and then click Next (otherwise, skip to Step 5).
Choose Custom Configuration in the wizard, click Next, select LAN Routing, click Next, and then click Finish.
In the Routing and Remote Access window, select the IP Routing object on the desired server, right-click the General object, and then choose New Routing Protocol from the shortcut menu.
Select DHCP Relay Agent and then click OK.
Right-click the DHCP Relay Agent object, and then choose New Interface from the shortcut menu.
Select the network adapter connected to the network with the wayward DHCP clients, and then click OK. As shown in Figure 17-6, change the Hop-Count Threshold and Boot Threshold values, if necessary, and then click OK. (The hop count determines the maximum number of relay agents a DHCP request can pass through, and the boot threshold introduces a forwarding delay so that local DHCP servers can get first crack at servicing clients.)
Right-click the DHCP Relay object again, and choose Properties from the shortcut menu.
Type the address of a DHCP server you want to forward DHCP requests to, and then click Add.

Windows Server 2003 automatically backs up the DHCP database every 60 minutes to the %Systemroot%System32DhcpBackup folder. Everything but registry and configuration settings (such as audit log settings) are saved during this backup.
To manually force a backup, use the following procedure:
Select the DHCP server you want to back up from the console tree.
Choose Backup from the Action menu.
Select the folder you want to store the backup files in, and click OK.
Real World: Migrating and Consolidating with the Command Prompt
Windows Server 2003 provides an enhanced version of the Netsh command that you can use to migrate DHCP scopes. This technique can also be used to consolidate DHCP servers, because existing scopes are preserved on the destination server. (Simply export the scopes from the source servers and then import them all into the destination server.)
To do so, type the following command, where \servername is the source server, c:dhcpdatabase is the filename you want to use (no file extension needed), and 10.0.0.0 is the scope you want to export (noting that to export multiple scopes, separate with spaces, and to export all scopes, type all):
netsh dhcp server \servername export c:dhcpdatabase 10.0.0.0To import the scope on the destination server, copy the file to a local hard drive and then type the following command (noting that you can import all the exported scopes or just select scopes):
netsh dhcp server \servername import c:dhcpdatabase 10.0.0.0It is important to note that both export and import of very large DHCP databases can take a substantial amount of time. During the process, the DHCP service is stopped and the server cannot service DHCP requests.
To restore the DHCP database from a backup, either to the same system or a different one, use the following procedure:
Select the DHCP server you want to back up from the console tree.
Choose Restore from the Action menu.
Select the folder where the backup files are stored, and click OK.
Click Yes when asked whether you want to stop and restart the DHCP service. No clients are able to obtain or renew leases during this time.
Note
To change the folder in which the DHCP database is automatically backed up, right-click the DHCP server in the console tree, choose Properties from the shortcut menu, and then click the Advanced tab.
To back up DHCP’s configuration settings, open the HKEY_LOCAL_MACHINESYSTEMCurrentControlSetServicesDHCPServer subkey in the Registry Editor and save the desired keys to a registry file. To back up, restore, or move a Windows Server 2003 DHCP server, see Microsoft Knowledge Base article 325473.
On any Windows computer without a static IP address, you can run a command-line utility to release, renew, or verify the client’s address lease. At a command prompt, use one of the following commands:
To release a client’s lease, type ipconfig /release.
To renew a lease, type ipconfig /renew.
To verify the client’s lease, type ipconfig /all.
The Ipconfig program is useful when troubleshooting problems because it displays every detail of the current TCP/IP configuration. You can find more troubleshooting information in Chapter 40.
The DHCP server in Windows Server 2003 provides full command-line administration capabilities with the rather unfriendly, but powerful, netsh command. To use these capabilities, do the following:
Open a command prompt window.
Type netsh at the command prompt. The prompt changes to netsh>.
Type dhcp. The prompt changes to netsh dhcp>.
Type server followed by the server name or IP address to connect to the desired DHCP server—for example, server \srv1 or server 192.168.0.1.
Type list to view a list of the available commands. To obtain help with a particular command, type the command name followed by /?.
Modern TCP/IP networks use DNS for name resolution, and DNS is a requirement for Active Directory. Active Directory supports the DNS server included with Windows 2000 Server and Windows Server 2003, either standalone or integrated directly into Active Directory, and it also supports BIND version 8.2.2 or later. .
If you’re using Active Directory–integrated DNS, you can skip the next section because DNS is automatically set up during the Active Directory Setup Wizard. (See Chapter 14.)
To install DNS, use the Configure Your Server Wizard to set up Active Directory on the server and let Windows install DNS at the same time. (See Chapter 7.) This provides domain controller functionality and also lets DNS benefit from Active Directory integration. You can also use the Configure Your Server Wizard to set up DNS completely independent of Active Directory. If you want to set up DNS service the old-fashioned way (by installing the service), follow these steps:
Click Start, choose Control Panel, and then select Network Connections. Right-click the connection you want, and choose Properties from the shortcut menu.
Select the Internet Protocol (TCP/IP) entry, and then click Properties. To specify a static IP address, type the IP address, subnet mask, and default gateway that you’re using. Be sure the Use The Following DNS Server Addresses option is selected. In the Preferred DNS Sever box, type the computer’s assigned IP address.
Note
An alternative to using a static IP address is to use automatic addressing and make a client reservation with the DHCP server so that the DNS server is always guaranteed the same IP address. However, this can lead to problems if you forget to make the address reservation, and Windows Server 2003 strongly discourages you from using a dynamically assigned address, so proceed with caution.
Click Start, choose Control Panel, and then click System.
In the Computer Name tab, click Change. In the Identification Changes box, click More. (You aren’t able to perform this procedure on domain controllers.)
In the Primary DNS Suffix Of This Computer dialog box, type the DNS domain name and click OK. Reboot the server to implement the DNS suffix changes, if any. (Otherwise, no reboot is necessary.)
Open the Add/Remove Programs Control Panel tool, and then click Add/Remove Windows Components to launch the Windows Components Wizard.
Select Networking Services from the list of components, and then click Details.
Select the check box next to the Domain Name System (DNS) component, and then click OK.
Click Next to install the service. All the necessary files are copied to the hard disk.
Windows Server 2003 provides a handy wizard to help you set up a DNS server. The following sections guide you through the wizard, while later sections delve into more detail about individual tasks that the wizard accomplishes.
Both large and small networks have similar DNS requirements, although many small networks will usually function well without Reverse Lookup zones. If your internal domain name is different from your public, Internet domain name (that is, internally you use "example.local" or "example.lan", but externally you use "example.com"), you must configure an internal DNS server to support your internal network.
If your DNS domain name is the same on your local network as it is on the Internet (that is, example.com is your Active Directory domain name as well as your Internet domain name), you could, theoretically, have only external DNS records, but this is a bad practice because it exposes your internal network topology and names to the world. In this case, it is better to maintain an internal DNS server that supports your internal network, while the publicly visible DNS server or servers for your domain should only have records for publicly visible servers.
Real World: The Need (or Lack Thereof) for Secondary DNS Servers
Because of the pivotal role DNS plays in any TCP/IP-based network, it’s vital for it to be reliable. Small networks can often make do with a single DNS server, but medium and large networks must have fault-tolerant DNS service.
One way of providing DNS redundancy is to set up secondary DNS servers using standard zone files to provide redundancy if the primary DNS server (of which there can be only one) doesn’t respond to client queries. Secondary DNS servers can also be useful in reducing network traffic if placed in a location where the zone is heavily queried.
Another approach is to add another Active Directory–integrated DNS server. Because Active Directory uses a full multiple-master model, all DNS servers using Active Directory–integrated zones can be primary servers—no secondary zones are required.
If you are going to use standard primary and secondary DNS servers, set up secondary DNS servers for both forward and reverse lookup zones. Fewer secondary servers are required for reverse lookup zones because of their infrequent use. They are usually placed outside the network and subnet that the reverse zone serves.
The Configure A DNS Server Wizard makes it easy to set up a DNS server. To use the wizard, do the following:
Launch DNS from the Administrative Tools folder on the Programs menu.
Select the DNS server you want to configure. (Choose the Connect To Server command from the Action menu if the server isn’t displayed in the console tree.)
Choose the Configure A DNS Server command from the Action menu.
Click Next in the first screen. (Optionally, click DNS Checklists to review background material about DNS and the DNS configuration process.)
Choose the Create Forward And Reverse Lookup Zones option in the Select Configuration Action page as shown in Figure 17-7, and then click Next.
Select Yes, Create A Forward Lookup Zone Now and then click Next.
In the Zone Type page shown in Figure 17-8, choose one of the following options, and then click Next to continue:
Primary zone. Use this option if the DNS server is to be authoritative for the zone you want to create. Only authoritative servers can update the DNS database.
Secondary zone. Use this zone if the DNS server is hosted on UNIX servers. Also, use it if this server is to have read-only privileges in the zone with all data obtained from the primary DNS server.
Stub zone. Use this type of zone to create a pseudo-zone that allows the server to directly query DNS servers from a specific zone without having to locate the zone’s DNS servers by querying the root servers or Internet DNS servers.
If you’re creating an Active Directory–integrated zone, specify with which servers the zone information should be replicated and then click Next. (You’ll probably want to choose To All DNS Servers In The Active Directory Domain to reduce replication traffic.)
If you chose to create a secondary zone, type a name for the zone and then click Next. Then type the IP addresses of the master servers from which you want to copy the zone data. Click Add after typing or locating each one. Click Up and Down to arrange the IP addresses in the order you want to contact them. Click Next when you’re done.
If you’re creating a standard zone, type a filename for the zone file on the Zone File page. To use an existing file, copy the file to the %SystemRoot%System32Dns folder, select the Use This Existing File option, type the filename in the box provided, and then click Next.
On the Dynamic Update page (available only for primary zones), choose how you want to configure dynamic updates and then click Next. The options are:
Allow Only Secure Dynamic Updates. This is the default for Active Directory–integrated zones (and is available only for Active Directory–integrated zones), and it provides the best security. However, clients running earlier versions of Windows might end up with orphaned DNS records under certain circumstances. (See the DHCP, Stale Records, and Secure Dynamic Updates sidebar earlier in this chapter.)
Allow Both Secure and Unsecure Dynamic Updates. This is the recommended setting for standard zones.
Do Not Allow Dynamic Updates. This setting disables dynamic updates entirely.
To create a reverse lookup zone, click Next; otherwise, choose the No I Don’t Want To option first and then click Next.
If you chose to create a reverse lookup zone, choose the type of zone to create and then click Next.
If you’re creating an Active Directory–integrated zone, specify with which servers the zone information should be replicated and then click Next.
Type the address of the network in the Network ID box and then click Next. The wizard automatically creates the reverse lookup zone name for you from this information, as shown in Figure 17-9.
If you’re creating a standard zone, click Next to approve the filename provided.
On the Dynamic Update page, choose how you want to configure dynamic updates and then click Next.
To set up the server to forward unresolved DNS queries to another DNS server (which might either resolve the query from its cache or contact an external DNS server to resolve the query), type the IP address of the forwarding server and then click Next. Alternatively, choose the No, It Should Not Forward Queries option and then click Next.
Review the summary of the DNS server configuration, and then click Finish to complete the initial configuration of the DNS server.


Note
Use the Nslookup command from a command prompt to test the functionality of the DNS server. However, the command’s functionality is limited without a reverse lookup zone. (You aren’t be able to perform reverse lookups to obtain DNS names from IP addresses.) Consult online Help for command reference information.
Real World: DNS Poisoning Attacks
The standard setup for most DNS servers that supported only internal network clients was to set up your DNS server as a primary zone, and then configure it to forward all other requests to your ISP’s designated DNS servers. This resulted in fast and private support for internal name resolution, while providing the fastest resolution of names outside your private network and reducing overall traffic for your ISP and the Internet as a whole. Unfortunately, this exposes your network to DNS poisoning attacks such as the widespread cache corruption attack that affects all versions of BIND before version 9. If some malicious program manages to subvert the DNS servers maintained by your ISP because your ISP hasn’t gotten around to updating them, your DNS server would pass that problem on to your internal clients.
The problem is especially a concern if your ISP is somewhat slow to apply patches to its DNS servers, as seems to be the case for many ISPs, both large and small. BIND is the most common DNS server software used by ISPs, and several vulnerabilities have been identified against BIND, especially versions before BIND 9. Patches to correct these vulnerabilities are available, but if your ISP is slow to apply the patch, you could be exposed.
If you don’t specify a server to forward to, your DNS server will use root hints to directly resolve the address. This might be somewhat slower, and it certainly increases the overall traffic on the Internet, but if the root servers are poisoned then we’re all in trouble. If you trust your ISP to maintain its servers adequately, continue to forward to their servers. Personally, we’ve stopped doing so.
Zones allow you to store portions of the DNS namespace so that a single DNS server can serve a portion of the namespace.
Planning
When setting up the domains, start with the top-level domain. Then create subdomains and delegate control of the domains to other DNS servers as necessary.
The two types of zones concerned are forward lookup zones and reverse lookup zones. Forward lookup zones are the types of zones normally associated with DNS servers; they return an IP address when given a DNS name. Reverse lookups are used less often, but they are still important. They provide the ability to resolve an IP address into a DNS name, something that Internet Information Services (IIS) can use for its log files. (Troubleshooting tools such as Nslookup rely on reverse lookup zones as well.)
When you first set up a DNS server, you’ll probably want to use the Configure A DNS Server Wizard (discussed in the previous section), which guides you through creating the first forward lookup zone. However, if you didn’t use the wizard to set up the zones or you need to create additional zones, use the following procedure:
Launch DNS from the Administrative Tools folder on the Programs menu.
Select the DNS server you want to configure. (Choose the Connect To Server command from the Action menu if the server isn’t displayed in the console tree.)
Choose New Zone from the Action menu to start the New Zone Wizard. Click Next to start using the wizard. (See the Setting Up a DNS Server section for help with this.)
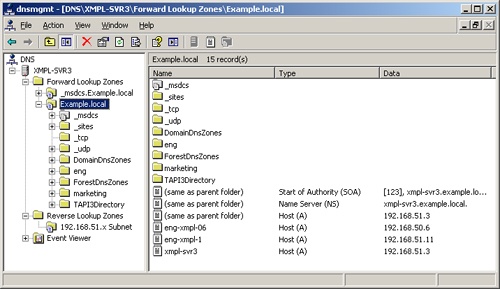
In most large network environments, you need to create subdomains and delegate their management to other DNS zones hosted by other DNS servers. Doing so eliminates the undesirable situation of having a large namespace hosted in a single zone by a single server. Thus, you might have a zone containing the root domain example.local as well as the subdomain marketing.example.local; however, you might have the subdomain eng.example.local and its subdomains delegated to a separate zone managed by another DNS server, as shown in Figure 17-10.
Important
Be sure you have a host record created for the DNS server in the forward lookup zone and a pointer record for the DNS server in the reverse lookup zone. DNS might not automatically create these (especially the pointer record), so double-check them—otherwise, the server might not work.
Note
Zones must have a contiguous namespace, so it isn’t possible to combine subdomains from different branches of the namespace and place them in a single zone. Create separate zones for each noncontiguous part of the domain.
To create a new subdomain in an existing zone and then delegate authority over the domain to another DNS server, perform the following steps:
Select the domain in which you want to create a new subdomain, and then choose New Domain from the Action menu.
Type the name of the subdomain in the dialog box that appears, and then click OK. This name must not be fully qualified. For example, if you were creating the subdomain eng.example.com under the domain example.com, type only eng in this dialog box.
To delegate authority over the subdomain, select the parent domain of the subdomain, choose New Delegation from the Action menu, and then click Next to start the New Delegation Wizard.
Type the name for the subdomain you want to delegate, as shown in Figure 17-11. Check that the fully qualified name of the subdomain displayed is correct and then click Next.
Click Add to specify the servers to which you want to delegate the subdomain.
Type the name of the server to which you want to delegate authority and then click Resolve, or click Browse to locate its resource record in the DNS server’s zone files. Alternatively, type the IP address or addresses for the server, clicking Add after typing each one. Click OK when you’re done.
Add any other DNS servers that will host the delegated subdomain. Click Next to continue.
Review the summary window, and click Finish to complete the delegation process.

After creating zones and subdomains, add resource records for the domain server and any other servers with static IP addresses or IP reservations (DHCP servers, WINS servers, routers, and so on). The steps that follow are for adding new host records, but the process to add new pointer records, Alias (CNAME) records, mail exchangers, or other resource records is similar. (Note that the DNS server doesn’t work properly without a host record and a pointer record, which might not be created automatically for you.)
Select the zone and domain or subdomain to which the host belongs, and then choose New Host from the Action menu. Alternatively, choose New Alias, New Mail Exchanger, or another type of record from the Action menu. Table 17-1 lists the records supported by Windows Server 2003 DNS server.
In the Name box, type the host name (and only the host name—the name must not contain any periods), or leave the Name box blank to use the name of the parent domain. Type the host’s IP address.
Select the Create Associated Pointer (PTR) Record to create a resource record for the host in the reverse lookup zone.
If you want to allow any authenticated user to update the resource record you’re creating, select the Allow Any Authenticated User To Update DNS Records With The Same Owner Name check box.
Click Add Host, and then fill out the fields for any additional host records you want to create, or click Done.
Real World: Changing DNS Records
When you make a change to the DNS records, make sure you choose the Update Server Data Files command from the Action menu after making the changes. This option increments the serial number, letting other DNS servers know that you made a change and that they need to update their information.
If you’re using conventional DNS zones, add or change DNS records only from the primary DNS server for a zone. If you’re using Active Directory–integrated DNS, you can make the changes to any Active Directory–based DNS and it propagates correctly to the other Active Directory DNS servers and notifies secondary servers that there are updated records.
Table 17-1. Supported DNS record types
Record Type | Common Name | Function | RFC |
|---|---|---|---|
A | Address record | Maps a fully qualified domain name (FQDN) to a 32-bit IPv4 address | |
AAAA | IPv6 Host | Maps an FQDN to a 128-bit IPv6 address | 1886 |
AFSDB | Andrews file system (AFS) or distributed computing environment (DCE) record | Maps a DNS domain name to a server subtype that is either an AFS version 3 volume or an authenticated name server (NS) using DCE or network computing architecture (NCA) | 1183 |
ATMA | Asynchronous Transfer Mode (ATM) address | Maps a host name to an ATM address | "ATM Name System Specification Version 1.0" |
CNAME | Canonical name or alias record | Maps a virtual domain name (alias) to a real domain name | 1035 |
HINFO | Host information record | Specifies the CPU and operating system type for the host | 1700 |
ISDN | ISDN information record | Maps an FQDN to an ISDN telephone number | 1183 |
KEY | Public key resource record | Contains a public key for a DNS zone | 2535 |
MB | Mailbox name record | Maps a domain mail server name to the actual host name of the mail server | 1035 |
MG | Mail group record | Maps a domain mailing group to the actual mailbox (MB) resource records of its members | 1035 |
MINFO | Mailbox information record | Specifies a mailbox for the person who maintains the mailbox or list, and can also specify a mailbox for related errors | 1035 |
MR | Mailbox renamed record | Maps an old mailbox name to a new mailbox name for forwarding purposes | 1035 |
MX | Mail exchange record | Provides routing information to reach a given mailbox | 974 |
NS | Name server record | Specifies that the name server listed has a zone starting with the owner name | 1035 |
NXT | Next record | Specifies the nonexistence of the specified name | 2035 |
OPT | Option resource record | Specifies optional data with a DNS request or reply | 2671 |
PTR | Pointer resource record | Points to another DNS resource record—most often used in reverse lookup to point to the A record | 1035 |
RP | Responsible person information record | Provides information about the person responsible for a server | 1183 |
RT | Route-through record | Provides routing information for hosts lacking a direct WAN address | 1183 |
SIG | Signature resource record | Digitally signs a host name | 2535 |
SOA | Start of authority | Specifies the beginning of a zone, and indicates the authoritative server | 1034 |
SRV | Service locator record | Provides a way of locating multiple servers providing similar TCP/IP services | 2052 |
TXT | Text record | Maps a DNS name to a string of descriptive text | 1035 |
WKS | Well-known services record | Describes the most popular TCP/IP services supported by a protocol on a specific IP address | 1035 |
X25 | X.25 information | Maps a DNS address to a public switched data network (PSDN) address number | 1083 |
Because the DNS service is so important to a modern TCP/IP-based network, and because it’s essential to the operation of Active Directory, always configure multiple DNS servers in each zone to provide fault tolerance.
Windows Server 2003 supports several ways of achieving zone transfers between DNS servers managing a zone. If the DNS servers are using Active Directory to store their zone data, Active Directory handles the zone replication, allowing for a full multimaster model in which all servers are peers and any can make changes to the DNS database. Additionally, zone transfers are incremental so that only changed records are synchronized.
Windows Server 2003 also supports RFC 1995–compliant incremental zone transfers when using standard zone files. This incremental zone transfer method permits a secondary DNS server to pull only the zone changes that it needs to synchronize its copy of the zone data with the primary server’s. If the serial number of the primary DNS server’s zone file matches that of the secondary DNS server’s serial number, no changes were made, so no zone transfer need take place.
Incremental zone transfers occur only if both servers support this feature. When performing zone transfers with Windows NT 4 DNS servers or other DNS servers that don’t support this feature, a full zone transfer occurs. In a full zone transfer, the entire contents of the zone file are pulled from the primary DNS server by the secondary server.
Real World: Controlling Zone Transfers
The default configuration for Active Directory-integrated DNS is to not allow zone transfers. It’s a potential security issue to allow uncontrolled zone transfers, but you do want to allow them to your secondary servers. If you use secondary DNS servers in a zone, you should first create a Name Server resource record for the secondary server, as described previously under Adding Resource Records. Then configure the properties of the zone to perform zone transfers only to servers listed in the Name Servers tab of the zone properties, as shown in Figure 17-12. This will ensure that a rogue DNS server can’t download records from your server.

Windows Server 2003 and Windows 2000 DNS servers perform fast zone transfers with data compression and multiple resource records sent in each message when transferring zones to other Windows DNS servers. This zone transfer method works with all Windows DNS servers, and BIND DNS servers version 4.9.4 or later. Note that Windows 2000 DNS servers must run Service Pack 3 or newer if receiving zone information from BIND 9.x servers.
Important
Although you can use Windows Server 2003 DNS servers and Active Directory in conjunction with Windows NT 4 Service Pack 4 DNS servers and BIND servers later than version 4.9.4, there are serious compatibility and security issues for all older versions of BIND. You should upgrade BIND to the latest version for maximum security, and in all cases you should be using version 8.4.4 or later. For the current state of BIND versions and vulnerabilities, see http://www.isc.org/index.pl?/sw/bind/bind-security.php.
WINS allows NetBIOS names to be resolved into IP addresses. This capability is important for networks that support large numbers of pre–Windows 2000 Microsoft clients. DNS can work with WINS to search the entire combined DNS and NetBIOS namespace, if necessary, when a client attempts to resolve a host name.
In Windows NT 4, enabling WINS resolution within DNS was essential to successfully resolving hosts that might have recently changed IP addresses—the dynamic WINS database provided an up-to-date IP address when the static DNS zone file couldn’t. However, with Windows Server 2003, Windows XP, and Windows 2000, dynamic updates to the DNS server have nearly eliminated the need to use WINS servers to keep the namespace up to date, and WINS is gradually being phased out. Not a moment too soon, in our opinion.
To enable WINS resolution in a zone, follow these steps:
Select the zone in which you want to enable WINS resolution, and then choose Properties from the Action menu.
Click the WINS tab, and select the Use WINS Forward Lookup check box.
If you’re not using Microsoft DNS servers as secondary servers, select the Do Not Replicate This Record check box to prevent compatibility problems. (Only Windows DNS servers support WINS records.)
Type the IP address of each WINS server you want to query, clicking Add after typing each one.
You find more about setting up WINS in the Setting Up a WINS Server section later in this chapter.
No name server is able to answer the queries of all clients; sometimes clients request a DNS name that isn’t in a zone managed by the DNS server, let’s say example.microsoft.com. The DNS server goes to the Internet to the top level of the DNS domain tree. The top-level DNS servers then provide the address of the DNS server for the first level (.com). This server in turn provides the address of the microsoft.com DNS server, which then provides the address of the example.microsoft.com DNS server.
This process is called recursion, and it takes time and a number of trips out to the Internet by the DNS server. In a network with multiple DNS servers and domains, it can be advantageous to have DNS servers forward their unresolved queries to another DNS server. This server then either replies with the desired record from its own DNS zone or hunts down the unresolved query and reports back to the DNS server that forwarded the request. This can reduce WAN link usage in two ways:
If the server is authoritative for the zone containing the requested DNS record, the DNS server can reply directly without having to hunt for the appropriate DNS server.
If the server isn’t hosting the zone with the requested record, it still might be able to answer the query from its cache of recent DNS queries.
Security Alert
See the DNS Poisoning Attacks sidebar earlier in this chapter before deciding whether to enable forwarders. There are serious security implications you should understand before taking this step.
To configure the DNS server to forward unresolved queries to another DNS server, follow these steps:
In the console tree, select the DNS server on which you want to enable forwarding, and then choose Properties from the Action menu and then click the Forwarders tab.
To forward all unresolved queries to another DNS server, select All Other DNS Domains in the DNS domain box, and then type the IP addresses of the DNS server or servers to which you want to forward unresolved queries, clicking Add after typing each one.
To change the default timeout before DNS will try the next forwarder in the list, change the Number Of Seconds Before Forward Queries Time Out from the default of 5 seconds.
To disable recursion for a particular domain, select the domain and then select the Do Not Use Recursion For This Domain check box. If the DNS server that is the target of the forwarded queries doesn’t respond and the Do Not Use Recursion For This Domain check box is selected, the DNS server fails the query, and the client fails over to a secondary DNS server if it’s configured to do so. A DNS server that’s configured to use forwarders and not perform recursion is called a slave server.
To enable forwarding queries for a specific domain to a specific DNS server (conditional forwarding) follow these steps:
In the console tree, select the DNS server on which you want to enable forwarding, choose Properties from the Action menu, and then click the Forwarders tab.
Click New in the DNS Domain, type the DNS domain for which to use conditional forwarding, and click OK.
With the domain highlighted, type the IP addresses of the DNS server or servers to which you want to forward unresolved queries, clicking Add after typing each one.
Click OK to close the dialog box and implement the changes.
Root hints tell a DNS server where to look to find the DNS servers authoritative for the top level of the domain structure. Root hints for the Internet’s root servers are automatically installed in the Cache.dns file located in the %SystemRoot%System32Dns folder.
If the DNS server needs only to resolve names in the private network, you must provide the locations of the top-level DNS servers for the network, either through the DNS console (as described next) or by manually editing the Cache.dns file. Alternatively, you can import root hints from another server.
Note
If the server is the root of the network’s namespace and doesn’t resolve Internet host names, you can delete the Cache.dns file.
To update root hints on the server, use the following procedure:
In the console tree, select the DNS server on which you want to update the root hints, and then choose Properties from the Action menu.
Click the Root Hints tab and then click Add to manually add a name server record for a root DNS server. Alternatively, click Copy From Server, type the IP address for the DNS server from which you want to copy root hints, and then click OK.
Caching-only servers are DNS servers that don’t host any zones and aren’t authoritative for any domains—they simply cache the queries that they perform on behalf of the clients that use the server. Caching-only servers are useful for sites that use a slow WAN link to other DNS servers. By simply caching queries instead of holding its own zone files, a caching-only server reduces network traffic because it never performs any zone transfers. To set up a caching-only server, follow these steps:
Install the DNS service, using the Add/Remove Windows Components section of the Add/Remove Programs tool.
Configure the caching server with a static IP address.
Launch DNS from the Administrative Tools folder on the Programs menu, select The Following Computer in the Select Target Computer dialog box, type the name of the DNS server from which you want to cache, and click OK. (If this dialog box doesn’t appear, choose Connect To Computer from the Action menu in the DNS window.)
The DNS server is added to the DNS console on the caching server. The caching server performs recursive queries on behalf of its clients and over time accumulates resource records for answering future queries. You can clear the cache on a caching server by right-clicking the server’s name in the DNS console and selecting Clear Cache from the shortcut menu.
WINS is an essential part of any large network with earlier Windows clients and network applications. It provides the equivalent function of a DNS server—except for the NetBIOS namespace. WINS servers resolve NetBIOS names into IP addresses by using the WINS dynamic database to call up the appropriate name records. If all your systems are Windows 2000 or later, it is possible for them to function without WINS.
If you’re asking yourself whether you need WINS at this point, the answer is probably yes. Most large networks need WINS to provide NetBIOS name resolution for their earlier Windows clients. There are two instances in which you don’t need WINS servers (though you might still choose to use one):
All clients on the network support name resolution through dynamic DNS. Windows XP, Windows 2000, and Windows Server 2003 are the only Microsoft operating systems that can rely exclusively on DNS for name resolution. If you have any down-level clients at all, you need WINS. If you have a mixed environment with other clients such as UNIX clients, make sure they’re all configured to properly use DNS.
The network is small (fewer than 50 clients) and not subnetted. If the entire network consists of a single network segment, clients that require NetBIOS name resolution can effectively resolve NetBIOS names by broadcast—a technique that doesn’t work across routers or on large networks where the NetBIOS broadcasts would generate too much network traffic.
The following WINS clients are supported by WINS in Windows Server 2003:
Non-WINS clients aren’t resolvable by WINS unless static entries are added for them—don’t do it. This practice is strongly discouraged because static entries are extremely difficult to eliminate from the WINS database after replication takes place. Instead, clients should be configured to use DNS to resolve names that aren’t in the WINS database.
After you determine that you need WINS on your network, it’s time to configure the server. The most common cause of WINS problems is improper TCP/IP configuration on the server. Follow these steps to properly configure the TCP/IP settings for the WINS server before you install the service:
Right-click the Local Area Connection icon in the Network Connections folder, and choose Properties from the shortcut menu.
Select the Internet Protocol (TCP/IP) component, and click Properties.
Configure the server to use a static IP address, or make sure that an address reservation for the server is configured on the DHCP server.
Click Advanced, and then click WINS.
Select any WINS servers listed on the tab, and click Remove. Failure to do this can cause the WINS server to register its own address with another WINS server instead of with itself, which you don’t want.
Click Add, and type the IP address of your own server. Do not use the loopback address, 127.0.0.1; use the real address. Then click OK.
After the TCP/IP settings are correct, you’re ready to install the WINS component. Use the Windows Component Wizard, accessible either from the Configure Your Server tool or from Add/Remove Programs in Control Panel. If you installed WINS during Windows Setup, you can skip this section. Otherwise, use these steps to install WINS:
Open the Add/Remove Programs Control Panel tool, and click the Add/Remove Windows Components icon in the frame on the left (the Places bar) to launch the Windows Component Wizard.
Click Next, select Networking Services from the list of components, and click Details.
Select the Windows Internet Name Service (WINS) component check box, click OK, and then click Next.
WINS servers are easy to set up and require little management, except for replication partners. WINS replication is an important and somewhat delicate issue that you must examine closely before setting up. Deploy as few WINS servers as possible to minimize management migraines. For example, the entire Microsoft Corporation used only 12 WINS servers worldwide during the height of NetBIOS. Just about every enterprise can get by with a handful of WINS servers at most. A good rule of thumb is one WINS server for every 10,000 users, plus one WINS server for redundancy.
Planning
Set up replication between WINS servers in a hub (star) pattern, with a single-master WINS server in the center and all other WINS servers replicating only with this server, using the push/pull method. Using a double hub with two master servers in the center can provide additional redundancy, but the replication problems that can arise generally outweigh the added reliability. For additional planning details, see the Windows Server 2003 Resource Kit (Microsoft Press, 2005).
To set up a replication partner and configure its settings after planning your WINS deployment, follow these steps:
Launch WINS from the Administrative Tools folder, and in the console tree expand the WINS server that you want to set up for replication.
Select the Replication Partners folder, and then choose New Replication Partner from the Action menu.
Type the IP address for the WINS server you want to enable replication with, and click OK.
To modify the replication parameters for the new replication partner, if necessary, double-click the server in the Replication Partners folder, and then click the Advanced tab.
To change the way you replicate with the server, choose an option from the Replication Partner Type drop-down list (Figure 17-13).
To configure a permanent connection for pull or push replication, select the Use Persistent Connection For Replication check box in the Pull Replication section, the Push Replication section, or both.
In the Start Time fields, type the time you want pull replication to begin in hours, minutes, and seconds.
In the Replication Interval fields, type the frequency—days, hours, and minutes—with which you want to replicate with the replication partner.
Use the Number Of Changes In Version ID Before Replication box to type the number of changes to the local copy of the WINS database that you will allow before the server pushes changes to the replication partner.

The WINS snap-in lets you manage all the functionality of WINS on multiple servers from the same application. The following are some functions you can perform with the WINS snap-in:
To view the status of your WINS servers, click Server Status in the console tree. The status of your servers appears in the pane on the right.
To view records in the WINS database, right-click the Active Registrations folder in the console tree under the desired server. Choose either Find By Name to search for a particular name or Find By Owner from the Action menu to display the Find By Owner dialog box, which shows all the records in the WINS database. When viewing records, you can use the Record Types tab of the Find By Owner dialog box to filter the type of records displayed.
To add a static entry to the database, right-click the Active Registrations folder and choose New Static Mapping from the shortcut menu.
To initiate scavenging, which purges the WINS database and does general cleanup on it, select the WINS server you want to scavenge and choose Scavenge Database from the Action menu. When initiating scavenging, don’t attempt to alter the scavenging parameters for WINS. These parameters have been extensively tested and optimized by Microsoft. Any change you make will be for the worse.
To modify the properties for the WINS server, select the server you want to work on, and then choose Properties from the Actions menu. This displays the Properties dialog box shown in Figure 17-14, which you can use to modify the path to the backup copy of the WINS database, change the length of name leases, and modify logging and other options.
More Info
If you’re fortunate enough to have outgrown WINS on your network, it’s time to decommission the WINS servers. For information about doing so, consult the Windows Server 2003 Help system or the Windows Server 2003 Resource Kit (Microsoft Press, 2005) for specific issues about working with a NetBIOS-less network.

DHCP and DNS servers are essential to any TCP/IP-based network with more than a few clients, as are WINS servers for routed TPC/IP networks with legacy Windows clients. Windows Server 2003 provides powerful, easy-to-use, and reliable DHCP, DNS, and WINS servers.
The next chapter covers the configuration of hard disks for maximum security and efficiency.