Microsoft Internet Security and Acceleration Server 2004 (ISA 2004) is the latest and most secure version of the outstanding software firewall from Microsoft. What started many years ago as Microsoft Proxy Server has come a long way.
This chapter introduces you to important concepts related to ISA 2004, covers some planning considerations, and then shows you how to set up and manage ISA 2004 on the network.
The main goals of ISA 2004 are to protect a network from hackers, improve Internet performance for clients on the network, provide secure access to internal resources for remote users and offices, and control client access to the Internet.
ISA 2004 maintains control of connectivity and isolates the internal network by having two (or more) completely separate physical connections—one to the Internet and one to the internal network. Each network is connected to a different network card, and all packets must pass through the ISA 2004 software to get from one connection to the other.
The mechanisms that ISA 2004 uses to achieve these aims are fairly straightforward. The following three basic techniques are used:
Network address translation
Packet filtering and application layer filtering
Caching
The following sections discuss each of these techniques, as well as the different methods available to support clients, how ISA 2004 works in a large enterprise environment, and how to plan your ISA 2004 deployment.
Note
There are two versions of ISA 2004: the Standard Edition and the Enterprise Edition. The Enterprise Edition adds integrated support for Network Load Balanced arrays, providing fault-tolerance, high-availability, load balancing, and distributed caching.
Real World: Methods of Sharing Internet Connections
There are two basic methods of providing Internet connectivity to clients on the network: using standalone devices such as a router or firewall device, and using software-based solutions running on a PC.
Microsoft offers a number of software-based solutions: Internet Connection Sharing (a simple method of sharing an Internet connection in a workgroup that is built into all versions of Windows newer than Microsoft Windows 98), Routing and Remote Access (a somewhat more sophisticated solution that comes integrated into Windows Server 2003 and Windows 2000 Server), and ISA 2004.
Although Routing and Remote Access is capable of sharing an Internet connection with multiple clients and providing limited security to the internal network using network address translation (NAT), ISA 2004 provides better security and user control, in addition to accelerating Internet access for users.
Network address translation (NAT) hides your actual IP address from machines beyond the device doing the translation. Only the device doing NAT needs to have a valid Internet IP address; all clients and servers on the internal network can be given addresses from the address ranges reserved for private networks. (See the IP Addresses for Internal Networks sidebar.)
To provide NAT, you can use a standalone router or firewall device, a proxy server or firewall software package such as ISA 2004, or the built-in NAT functionality of Windows Server 2003 (provided by either the Routing and Remote Access service or the Internet Connection Sharing service).
Although NAT is the backbone of any Internet connection-sharing technique, the security it provides is minimal. ISA 2004 uses stateful packet and application layer inspection to provide a robust firewall solution.
Real World: IP Addresses for Internal Networks
Back when folks were deciding how to parcel out IP addresses (and long before anyone figured out how to perform NAT), the need for addresses that could be used for test networks was recognized. A special set of IP addresses called private network addresses was defined in RFC 1918 for test or other networks not physically connected to the Internet.
These private network addresses allow a much larger address space than would be possible with officially assigned addresses, while protecting the integrity of the Internet. If a machine with one of these addresses were to connect to the Internet, it wouldn’t cause a conflict with another machine because routers automatically filter out these addresses.
The following addresses are designated for private networks that won’t be directly connected to the Internet. They can, of course, be connected to the Internet through ISA 2004 or another method that performs NAT:
10.0.0.0 through 10.255.255.255 (a single "Class A" network)
172.16.0.0 through 172.31.255.255 (16 contiguous "Class B" networks)
192.168.0.0 through 192.168.255.255 (256 contiguous "Class C" networks)
ISA 2004 automatically includes these addresses in its local address table (LAT) when you initially install the program.
Another byproduct of using ISA 2004 for address translation is that all the machines on a network appear to have the same single address to the outside world—the external address of ISA 2004 itself. This allows an entire organization to connect to the Internet with as little as a single public IP address, and even that one address doesn’t need to be a fixed IP address—ISA 2004 can handle a variable public IP address.
Packet Filtering and Application Layer Filtering
Because every packet that passes to or from the Internet must first pass through ISA 2004, ISA 2004 is in a perfect position to act as a gatekeeper. Besides performing simple NAT, ISA 2004 can inspect each packet and permit only packets that use approved protocols and ports to enter or leave the internal network. (This process is called packet filtering.) When packet filtering is enabled, you can also restrict access to specific external sites or enable only certain external sites to be seen. In addition, third-party ISA 2004 plug-ins can add other controls and functionality.
In addition to basic packet filtering, ISA provides Stateful Packet Inspection (SPI), which analyzes the origin of every packet and allows only unaltered packets from approved hosts or networks to pass through the firewall. This prevents hackers from tampering with packets, and it provides the ability to block incoming packets that aren’t specifically requested by network clients.
Stateful packet filtering is filtering that happens on layer 3 (the IP layer) of the OSI stack. As such, it is useful, but it can no longer be considered sufficient for all security needs because it must open ports based on a presumption that a packet is authorized, without being able to verify that the content isn’t malicious. ISA 2004 adds intelligent application filtering—stateful application-layer inspection—that inspects the actual application frames to determine the content and can filter based on that content. ISA 2004 ships with a number of intelligent application-layer filters, including HTTP, RPC, and SMTP.
Every organization has certain Web sites that users visit regularly. ISA 2004 can cache information from these frequently accessed sites so that when users connect to the site, much of the information is actually delivered by ISA 2004, not the remote site. Caching significantly improves the apparent speed of the connection to the Internet and leaves more Internet bandwidth available.
ISA 2004 can use off hours, when few users are connected to the Internet, to check frequently accessed sites to make sure the information it has stored for that site is current. This monitoring, called active caching, helps to balance and smooth out demand, providing improved throughput during busier times because fewer pages and images need to be downloaded.
ISA 2004 also performs fancy tricks such as splitting audio or video streams and sharing them with multiple users on the network, and performing reverse caching, which accelerates the perceived performance of Web servers to Internet clients.
Clients can connect to ISA 2004 using the Firewall client, SecureNAT client, or Web Proxy client.
For Microsoft Windows clients, install the Firewall client software. This lets you manage clients by user group. For Macintosh and UNIX clients and network devices, set up TCP/IP properties to use ISA 2004 as the default gateway. (This configuration is what a SecureNAT client is, a client that uses ISA 2004 as a gateway.) Set up all systems to use the Web proxy service for Web browsing. This is done automatically when installing the Firewall client software, but it needs to be done manually for SecureNAT clients. Table 34-1 describes each method.
In this section, we’ll cover the basic installation and initial configuration of ISA Server 2004 Standard Edition in a single perimeter configuration—the most basic firewall and caching configuration. This is certainly not the only installation or even the most common installation in an enterprise setting, but it demonstrates the basic concepts of installation, which can be extended to more complex requirements.
More Info
For a complete and comprehensive book on Microsoft Internet Security and Acceleration Server 2004, we highly recommend Configuring ISA Server 2004 by Schinder and Schinder (Syngress, 2004).
The system requirements for ISA 2004 are pretty basic, as shown in Table 34-2. Note the operating system requirement, however, for Enterprise Edition. It is supported only in Windows Server 2003.
Table 34-2. ISA Server 2004 system requirements
Component | Requirement |
|---|---|
Processor | Pentium III, 550 MHz or equivalent. |
RAM | 256 MB, minimum. |
Hard disk | 150 MB minimum on an NTFS partition. More for caching. |
Operating system | Microsoft Windows 2000 Server SP4 or Microsoft Windows Server 2003. Microsoft Windows Server 2003 is required for Enterprise Edition. |
Other | One network adapter for the internal network. One additional network adapter, modem, or ISDN adapter for each additional network connected to the ISA server. One additional network adapter for interarray communications when using a network load balancing (NLB) array of Enterprise Edition ISA servers. The usual operating system requirements of a CD/DVD, video monitor, keyboard, and mouse. |
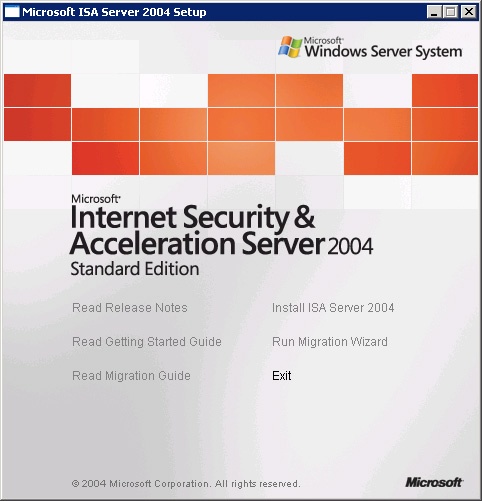
Installation of ISA 2004 is typical of many Microsoft installations. There’s an autostart menu program, as shown in Figure 34-1. Click Install ISA Server 2004 to start the actual installation.
The Installation Wizard opens, and you can click through the usual steps, including agreeing to the licensing agreement, entering your name and the serial number, choosing a typical, full, or custom installation. As always, you should choose the custom installation option to give yourself the most flexibility and control over what is installed and where. The default for a custom installation is shown in Figure 34-2.

You’ll probably want to add at least the Firewall Client Installation Share if this is a simple perimeter ISA 2004 installation. The Message Screener can be installed only if the SMTP Virtual Server is installed.
Next, you can specify the network addresses that are to be treated as being on the local network. Click Add here to specify the addresses, as shown in Figure 34-3.

You can manually enter the address range here, or choose the network adapter that is connected to your internal network by clicking Select Network Adapter, which will open the dialog box shown in Figure 34-4.

If your ISA 2004 server is connected to a device that also does network address translation such as a router or gateway, as ours is, you should deselect the box to automatically add private address ranges to your internal network. You’ll need to manually add the private address ranges that are not used by the router to your internal network.
Once you’ve entered the internal address range, you’ll get a chance to confirm it or make changes. As you click through the steps of the wizard, you’ll find it’s even smart enough to know whether you’re running the installation from a Remote Desktop session, and it will offer to set up a system policy to allow remote management from your current workstation. You can also allow earlier versions of the Firewall Client to connect.
Note
There is no publicly available 64-bit Firewall Client at the time of this writing, though one is expected "soon". If your network has to support x64 Edition clients, you’ll need to configure them as NAT clients. This may mean creating special rules for these computers.
The wizard will also disable several services if it finds them present, for security reasons. While you could go back and re-enable them, it’s a bad idea. Your ISA server should run nothing but ISA 2004. Really. Nothing else. Just ISA 2004.
If the ISA 2004 installation detects that you’re currently using the server as a Routing and Remote Access server, it will offer to migrate the existing rules or let you choose to start from scratch. If your existing Routing and Remote Access Service (RRAS) and virtual private network (VPN) connections are working right, by all means migrate them.
Finally, click Install to begin the actual installation. Once the installation completes, you’ll have a choice of exiting or starting the ISA Server Management console to continue the configuration, as shown in Figure 34-5.

Note
If you’re running the installation from a Remote Desktop session, even if it’s a console session, you will lose connectivity during the installation. Be patient. When the installation is finished, you can reconnect if the session has timed out, or your session will automatically come back to life.
ISA 2004 is a critical layer in the overall defense of your network. You need to take concrete steps to ensure that it is itself secure and protected against attack. If your firewall is compromised, it’s certain your network won’t be far behind.
The following are the key steps to securing your ISA 2004 server:
Download and install any Service Packs or security updates for ISA 2004, Windows Server 2003, and the components used by ISA 2004 before continuing with the initial configuration. This includes updates to Microsoft SQL Server Desktop Engine (MSDE) 2000 and the Office Web Components (OWC) 2003.
Ensure that the ISA 2004 server is in a physically secure location. If untrusted people have physical access to your firewall, you no longer have a secure network.
Use the Microsoft Baseline Security Analyzer 2.0 (MBSA2) to analyze your system security. This step should be regularly repeated to ensure that all appropriate updates have been applied.
Determine who should have the ability to logon to the ISA 2004 server, and restrict logon rights accordingly.
Disable any services that are not absolutely required, and do not add more applications or roles to the ISA 2004 server that aren’t absolutely required for ISA 2004 to function.
Require strong passwords on the network as a whole, but especially on all accounts that can log on to the ISA 2004 server.
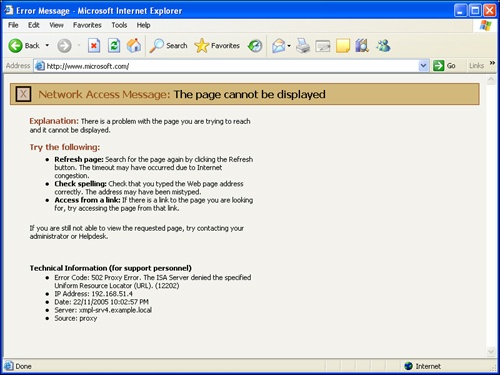
The installation of ISA 2004 creates an environment that does not allow any computers on your network to connect to the Internet—users attempting to browse will see the error message shown in Figure 34-6 if they have the Microsoft Firewall Client installed or have an explicit proxy setting in Internet Explorer. Otherwise, they’ll see an unhelpful 404 message. In either case, you’re going to get some calls to the help desk if you haven’t warned people or provided an alternative!
Before computers on your network can connect to the Internet, you need to do some initial configuration. You need to complete the following tasks:
Define your network topology
Create firewall policy rules
Define caching rules
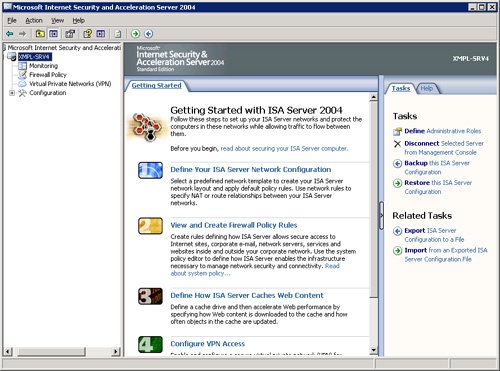
As you can see from the Getting Started page of ISA 2004, shown in Figure 34-7, you can also define VPN rules and set up monitoring, but neither of those tasks is necessary to get your network back online, so we’ll hold off on those for a bit.
The first step in getting your network back online and using ISA 2004 as its firewall and caching server is to define the network configuration that ISA 2004 should use. To do this, open the ISA management console, if it isn’t already open, and connect to the ISA 2004 server you want to manage. Then follow these steps:
Click the server name in the leftmost pane to open the Getting Started page shown in Figure 34-7.
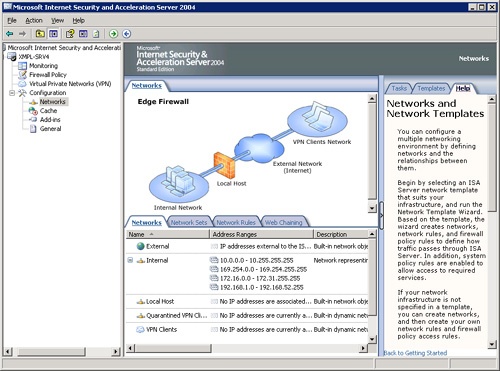
Select Define Your ISA Server Network Configuration to open the Networks page shown in Figure 34-8. The default Edge Network that we’re setting up is shown, but if your network topology is different, you’ll need to define it accordingly. Start by clicking on the Templates tab in the rightmost pane to see a list of typical network topologies, and pick the one that matches your network. If none of them is a good match, you can define your own network topology.
ISA 2004 creates definitions for several networks based on the answers you gave during initial installation. If you need to add more networks, network sets, or network rules, you can do that here, and you can come back to this page at any time to add or change the settings here.
If you want to enable automatic discovery of your ISA 2004 server by Firewall clients and Web proxy clients, now’s a good time to do it. Double-click the Internal network, and then click the Auto Discovery tab, shown in Figure 34-9.
Select the Publish Automatic Discovery Information box.
Modify the DNS records for your internal DNS domain to create an alias called WPAD that points to the fully qualified domain name (FQDN) of your ISA 2004 server, as shown in Figure 34-10.
More Info
For details on creating DNS aliases, see Chapter 17.
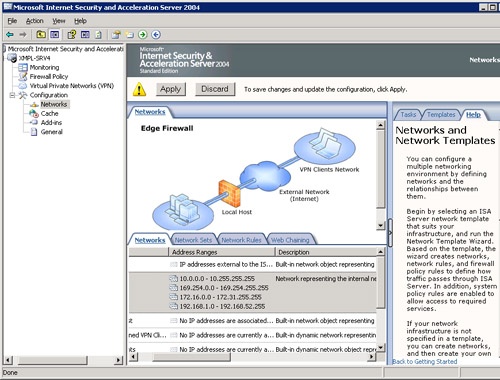
Close the Properties dialog box, and click the Apply button at the top of the center pane of the ISA management console, as shown in Figure 34-11.
Click Back to Getting Started at the bottom of the rightmost pane to return to the Getting Started page.


Next we need to define Firewall Policies that will allow clients from our internal network to connect to the outside world. By default, the only policy created during initial installation is the generic Deny policy that should always appear as the last policy in your rule list.
To allow basic Web browsing from computers in our network, we need to define an Allow policy to allow computers on the Internal network to use standard Web protocols to access computers on the External network. We’ll create just a simple "Allow All" rule that allows all computers on the Internal network to browse Web sites on the External network.
To create an Allow All Browsing Rule, follow these steps:
Open the ISA management console, and connect to the ISA 2004 server you want to manage, if you haven’t already done so.
Click the server name in the leftmost pane to open the Getting Started page shown in Figure 34-7.
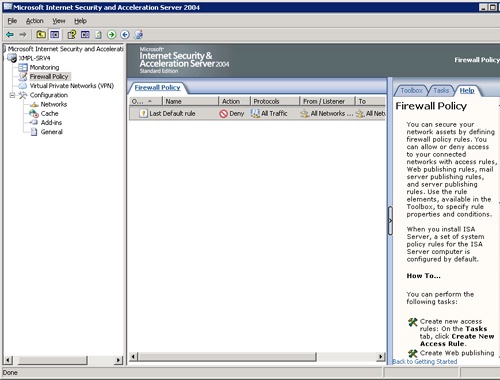
Select View And Create Firewall Policy Rules, to open the Firewall Policy page shown in Figure 34-12. As you can see, there is only a single policy defined—a Deny policy.
Click the Tasks tab in the rightmost pane, and then click Create New Access Rule to open the New Access Rule Wizard.
Type a name for the new Rule, such as Allow All Browsing, and click Next to open the Rule Action dialog box.
Select Allow, and click Next to open the Protocols page shown in Figure 34-13. Select Selected Protocols from the drop-down list.
Click Add to open the Add Protocols dialog box shown in Figure 34-14. Select the protocols you want to allow from the various categories. For our basic Web access rule, we’ll select the two browsing protocols, HTTP and HTTPS, the Ping protocol, POP3 so that our users can get mail, and MSN Messenger to allow instant messaging. Your choices might be different, of course.
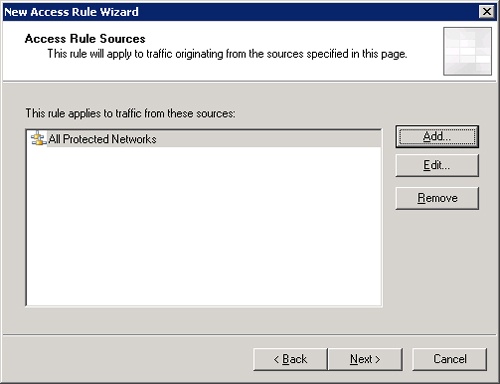
Click Close to close the Add Protocols dialog box, and then click Next to open the Access Rule Sources page.
Click Add to open the Add Network Entities dialog box. Here you’ll select All Protected Networks from Network Sets and click Add to add this network set to the Access Rule Sources page, shown in Figure 34-15. Close the Add Network Entities dialog box.
Click Next to open the Access Rule Destinations page. Click Add to open the Add Network Entities dialog box again, and this time add the External network from the Networks section. Close the Add Network Entities dialog box.
Click Next to open the User Sets page. It will show All Users already added, and you’ll leave that alone. Click Next and then Finish to complete the New Access Rule Wizard.
Click Apply to actually enable the changes. The new firewall policy isn’t actually enabled until you click the Apply button on the main ISA 2004 management page, as shown in Figure 34-11.
If you now try to connect to the Web from a machine on your internal network, instead of getting the Access Denied message shown earlier in Figure 34-6, you’ll be connected.


ISA 2004 is also a caching server that can save your organization significant time and money by caching frequently accessed Web sites locally. When a user browses to the site, they’re actually receiving the pages from the hard drive of the ISA 2004 server. Meanwhile, the server can be configured to proactively update pages during hours of low bandwidth usage, distributing the Internet bandwidth usage more evenly and reducing the need for additional bandwidth to provide acceptable speed during busy times.
To enable caching, follow these steps:
Open the ISA 2004 management console, and navigate to the Getting Started page.
Click Define How ISA Server Caches Web Content.
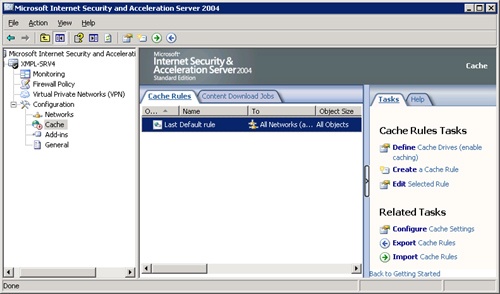
Click the Tasks tab of the rightmost pane, as shown in Figure 34-16.
Click Define Cache Drives (Enable Caching) to open the Define Cache Drives dialog box shown in Figure 34-17. ISA 2004 uses only NTFS drives for caching.
Select a drive, and enter the amount of space to use for caching on that drive in the Maximum Cache Size (MB) field and click Set. For optimum caching, you should choose a drive on a physically separate disk from the system drive, and ideally you should distribute the caching load across multiple physical disks if possible.
Once you’ve defined all your caching drives, click OK to close the Define Cache Drives dialog box.
Click Apply on the main ISA 2004 management console page to actually apply the changes. You’ll be warned that enabling caching will require restarting the Firewall service, as shown in Figure 34-18. If you choose to restart the service now, any current connections to or from the Internet will be dropped. You can, however, choose to save the changes but not actually apply them until you restart the service manually.
Restarting the service enables the caching and allocates the space on the cache drives.


The steps completed to this point will perform a basic installation and configuration to get ISA 2004 up and running as a perimeter firewall and caching server, with internal clients having basic Web access. For most installations, that is only the starting point. Most installations will need to have additional tasks completed, including setting up VPN access, configuring monitoring, and configuring additional Firewall policies to expand and fine-tune the rules that control access. And, finally, many installations will need to have reverse proxy set up or have internal servers published that need to be securely reachable from the Internet.
One of the common tasks for ISA 2004 is setting up VPNs. And it’s something that ISA 2004 does really well. Frankly, as an old time network administrator, I was dreading having to write the VPN section because I remember what a colossal pain it was in the old days.
To define VPN access, follow these steps:
Open the ISA 2004 management console, and navigate to the Getting Started page.
Click Configure VPN Access to open the VPN Clients tab of the Virtual Private Networks (VPN) page, shown in Figure 34-19.
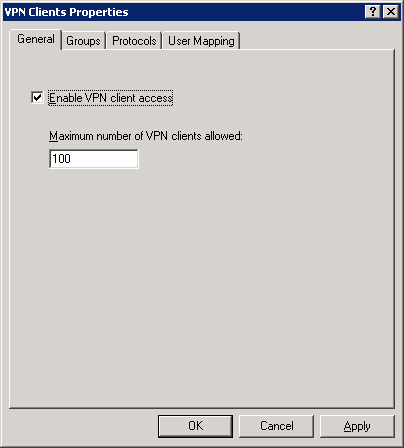
Click Verify That VPN Client Access Is Enabled to open the VPN Clients Properties dialog box shown in Figure 34-20.
Select the Enable VPN Client Access check box. Specify the maximum number of VPN clients that this ISA server will allow. The default is 100.
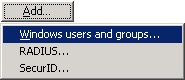
Click the Groups tab and then click Add to add the accounts you will allow to VPN in your network. Avoid specifying individual accounts; rather, create a specific security group that is allowed access, as shown in Figure 34-21.
Click the Protocols tab, and specify the VPN protocols you will support. The default is PPTP, but you can also use L2TP/IPSec for more secure access.
Click the User Mapping tab. If you will be using RADIUS to authenticate requests, you can simplify the configuration by setting a default Windows domain to use. For simple, Windows-managed VPN access that includes only Windows clients, you can leave User Mapping disabled.
Click OK to close the dialog box. Nothing has yet been actually enabled—we need to Apply the settings before they can take effect, and we’re not ready yet.
Click Remote Access Configuration to open the Virtual Private Networks (VPN) Properties dialog box shown in Figure 34-22.
The defaults are for only External networks to use VPN access, DHCP on the Internal network for IP address assignment, MS-CHAPv2 authentication, and no RADIUS server. Click the appropriate tabs to make any changes necessary, and then click OK to close the dialog box.
Optional: Click View Firewall Policy For The VPN Clients Network to configure the Firewall Policy rules for VPN clients if you want to create special policies that apply only to your VPN clients.
Optional: Click View Network Rules to verify the network rules for incoming VPN clients and to set up any special network rules that only apply to VPN clients.
When you’ve configured all the settings, click Apply in the main ISA 2004 VPN Clients page, and the new configuration will be applied and VPN access will be enabled.


ISA 2004 provides a diverse set of monitoring tools. The main front end to the monitoring is the Dashboard, shown in Figure 34-23, which has a capsule summary of connectivity, services, reports, alerts, sessions, and the overall system performance all on a single page. The biggest weakness of the dashboard is that it’s read only. If you want more information or detail about a particular report, alert, and so on, you need to drill down to the tab related to the type of element it is. No double-clicking or right-clicking to get more information.

The default installation provides a good starting point to add any additional reports or monitoring you need for your environment. To add a new alert or report, change the filtering of sessions, or make other monitoring changes, click the tab in the center pane for the kind of monitoring you want to modify, and then click the Tasks tab in the rightmost pane. You’ll have context-sensitive choices that are appropriate to the kind of monitoring you’re configuring.
In addition to firewall and caching features, ISA 2004 also supports "reverse proxy." Reverse proxy lets you keep your key network services inside your firewall perimeter but still be available from the Web, thus protecting the servers. The two most common examples of doing this are an extranet Web server and your e-mail server. ISA 2004 makes it easy to publish the servers and services you need to make available while protecting the servers from attack.
To publish a mail server, follow these steps:
Open the ISA 2004 management console, and navigate to the Firewall Policy page.
On the tasks pane, click Publish A Mail Server to open the New Mail Server Publishing Rule Wizard.
Enter a name for the rule, and click Next to open the Select Access Type dialog box, shown in Figure 34-24.
Select the type of access you’ll be providing to the mail server, and then click Next.
Select the services your e-mail server uses, and then click Next.
Specify the IP address of the server. This IP address will be on your internal network segment.
Click Next to open the IP Addresses dialog box shown in Figure 34-25.
Specify the IP addresses that should have access to the server, and click Next.
Click Finish to close the wizard, and then click Apply on the main Firewall Policy page to actually implement the changes.


The initial setup and configuration of ISA 2004 is fairly straightforward, as we’ve seen, in a basic configuration. Adding more features and specific rules and filters adds complexity, but doing this follows the same logic and steps as the basic configuration. We can’t begin to cover all the possibilities in a single chapter, but we want to highlight some typical configuration and management tasks. ISA 2004 has a logical consistency in the way it’s configured, and if you understand how to do one set of tasks in it, you’ll find it easy to extend that knowledge to additional tasks.
The Toolbox is where you create, modify, and delete all the various elements that make up the policies of ISA 2004. You can find the Toolbox tab in the rightmost pane of the Firewall Policy section. The elements you can add, delete, or edit here include:
Protocols
Users
Content Types
Schedules
Network objects
By combining these elements, you can create the rules and policies that you need for your network.
ISA 2004 has several predefined network entities, as we’ve seen in setting up our original access rule. But there might well be reasons you need to define additional entities. These might take the form of individual computers or specific subnets, and they can refer to either internal or external computers and networks.
Note
Because there is no 64-bit firewall client, you can define special rules for your 64-bit computers, allowing you to provide special access rules that apply only to them. Once a 64-bit client is available, you should remove special rules for 64-bit computers and apply consistent policies across your client network.
To define a new network entity, follow these steps:
Open the ISA 2004 management console if it isn’t already open.
Click Firewall Policy in the leftmost pane.
Click the Toolbox tab, and expand the Network Objects panel, as shown in Figure 34-26.
Select the kind of object you want to create from the New menu as shown in Figure 34-27. The kinds of network objects you can create are listed in Table 34-3.
Table 34-3. Network object types in ISA 2004
Object
Properties
Network
One or more contiguous ranges of IP addresses.
Network Set
One or more defined networks. Allows you to combine noncontiguous ranges of IP addresses into a logical grouping.
Computer
A single IP address. (Note: A computer object is defined by an IP address only and is not directly correlated to a computer name. If you’re using DHCP to distribute IP addresses, you should use a DHCP reservation if you need a specific computer to be defined for ISA purposes.)
Address Range
A single contiguous range of IP addresses.
Subnet
A single IP subnet (network ID and subnet mask).
Computer Set
One or more computers, address ranges, or subnets. Predefined computer sets in ISA 2004 are Anywhere, IPSec Remote Gateways, and Remote Management Computers.
Web Listeners
The addresses and ports on a network that will listen for Web requests.
URL Set
One or more URLs that can be used to define specific access rules.
Domain Name Set
Groups DNS domain names into a set. Specific firewall policies can then be applied to the set.
Fill in the wizard or dialog box necessary for the object type you’re creating. Figure 34-28 shows the dialog box for creating a computer object.
Once the new network entity has been added, you can use it in rules to either permit or deny specific access to the entity.


If your clients are running the ISA Firewall Client, you can manage access to and from the Internet by user and group, giving you much more flexibility and simplifying the maintenance of policies and access rules. Plus the user will have the correct level of access regardless of what computer she or he is logged on to.
To define a new set of users, follow these steps:
Open the ISA 2004 management console, and navigate to the Firewall Policy page.
Click the Toolbox tab in the leftmost pane, and expand the Users section. There are three sets of predefined users—All Authenticated Users, All Users, and System and Network Service.
Click New, and the New User Sets Wizard opens, as shown in Figure 34-29. Type a name for this set of users in the User Set Name field, and click Next.
Click Add, and the choice of types of users to add opens, as shown in Figure 34-30.
Select the user type, and the users or groups of users you want to add. You can choose from multiple source types here. When you have added all the users you want, click Next.
Click Finish to close the wizard, and then Apply in the main Firewall Policy pane to implement the change.

The ISA Firewall Client software provides a uniform Winsock service provider that Winsock applications can use. When an application makes a request, the Firewall Client software intercepts the request and determines whether the request needs to be routed to the ISA 2004 server. If the request is not considered local, it is routed to the ISA 2004 server for processing and further routing. Windows user information can be included in the request, allowing the ISA 2004 server to process rules and firewall policies that are user-specific.
The ISA Firewall Client is usually distributed directly from the ISA 2004 server. During initial installation, you can choose to create a distribution share for the Firewall Client. If you didn’t create the client distribution share during initial installation, just re-run the setup program to add the Firewall Client distribution share. The default share location is \isaservernameMSPClnt.
You can run the setup interactively, or you can perform an unattended setup to have it run without intervention. The unattended setup command line would be
\isaservernameMSPClntsetup /v "SERVER_NAME_OR_IP=isaservername /qn"
By installing the ISA Firewall Client on the computers on your network, you enable advanced firewall policies that make decisions based on the Windows user or group credentials. Without the Firewall Client, you won’t have the Windows user credentials available to make firewall policy decisions.
ISA 2004 provides both export/import capability, and full backup and restore capability. Both have their place in the defense and protection of your ISA 2004 server and should be performed regularly and on an as-appropriate basis.
Export and import can include the entire ISA 2004 configuration, but it’s most appropriate to save the partial configuration information after you’ve made a change or where you want to be able to propagate that configuration information to another server. You can choose during the export process whether to include confidential information, and apply an encryption password to the resulting .xml file that contains the configuration information.
Backup and restore are used when you want to save a complete backup of the server configuration. It includes user permissions and all confidential information, and an encrypting password is required. Use backup and restore when you want to clone the configuration of an ISA 2004 server.
To backup the configuration of an ISA 2004 server, follow these steps:
Open the ISA 2004 management console, and navigate to the Getting Started page.
Click Backup The ISA Server Configuration in the rightmost pane to open the Backup Configuration dialog box shown in Figure 34-31. Enter a descriptive file name for the backup, and click Backup.
The Set Password dialog box will open. Enter a password to encrypt the backup file. Passwords must be at least 8 characters and should follow strong password rules. Click OK, and the backup will start. When completed, click OK again.

To restore the configuration of an ISA 2004 server, follow these steps:
Open the ISA 2004 management console, and navigate to the Getting Started page.
Click Restore The ISA Server Configuration in the rightmost pane to open the Restore Configuration dialog box. Navigate to the saved configuration file, and click Restore.
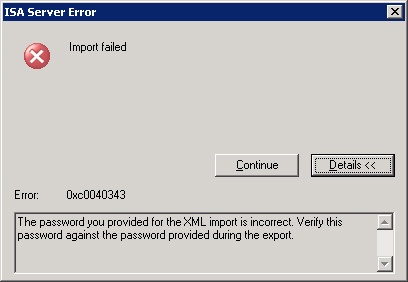
Enter the encrypting password, and click OK. If you type the wrong password, you’ll see the dialog box shown in Figure 34-32, and the restore operation will terminate. If the restore operation is successful, you’ll still need to click the Apply button on the main Getting Started page before the restored configuration will be implemented.
To export the configuration of an ISA 2004 server, follow these steps:
Open the ISA 2004 management console, and navigate to the main page of the portion of ISA 2004 configuration you want to export. To export the entire configuration, navigate to the Getting Started page. As an example of a partial export, navigate to the Firewall Policy page.
Click Export System Policy on the Tasks tab in the rightmost pane to open the Export Configuration dialog box shown in Figure 34-33. Enter a descriptive file name for the export. Select the Export Confidential Information box. If available, in this section, select the Export User Permission Settings box.
Click Export to open the Set Password dialog box, if you’ve chosen to export confidential information. Enter and confirm the password to encrypt the information.
Click OK to begin the export. Click OK again when the export completes.

To import the configuration of an ISA 2004 server, follow these steps:
Open the ISA 2004 management console, and navigate to the main page of the portion of ISA 2004 configuration you want to import. To import the entire configuration, navigate to the Getting Started page. As an example of a partial import, navigate to the Firewall Policy page.
Click Import System Policy in the rightmost pane to open the Import Configuration dialog box. Highlight the policy you want to import. Select Import Cache Drive Settings and SSL Certificates if you want.
Click Import. If the export was encrypted, you’ll be prompted to enter the password for the file. Enter the password and click OK.
Once the import completes, click OK to close the dialog box. The actual changes to the ISA 2004 server configuration won’t be implemented until you click the Apply button on the main System Policy page.
Every network that connects to the outside world needs a strong and flexible firewall to protect the network. Microsoft Internet Security and Acceleration Server 2004 provides a full-featured, highly configurable, and secure firewall and caching server that can be the cornerstone of the in-depth protection of your Windows network. In this chapter, we’ve covered some basic firewall and caching proxy concepts, along with the basic configuration to set up ISA 2004 on your Windows network. In the next section, we move on to tuning, maintenance, and repair. The first chapter in that section covers performance monitoring and tuning.