As we’ve said in previous chapters, the whole point of a network is to share resources among the users. Your goal as a system administrator is to make sure everyone can find and use the resources they need without compromising security. Sharing and permissions are extensions of the security features that begin with user accounts and passwords and are at the heart of an administrator’s responsibilities.
Windows Server 2003 supports four kinds of file resource sharing:
Shared Folders
Network File System (NFS) Shared Folders
Active Directory Shared Folders
Distributed File System (DFS) Folders
In this chapter, we’ll cover the basics of the first three of these, but we’ll leave the discussion of DFS for Chapter 20, where we talk about advanced storage technologies. For NFS shares, we’ll cover the mechanics of doing the actual file sharing here but leave the more in-depth discussion of setting up authentication and such for Chapter 27, where we cover interoperability. But first, let’s provide some basic descriptions of each of the types and note the situations in which they are important.
These are essentially the same old shared folders that we’ve all used and seen since at least Microsoft Windows for Workgroups. In Windows Server 2003 SP1 and later, there is an important change, however. The default share permissions for a folder are read-only for the Everyone group. And in Windows Server 2003, the Everyone group does not include anonymous users.
Starting in Windows Server 2003 R2, the Microsoft Services for NFS are an installable component of Windows. Services for NFS includes NFS Server and NFS Client, along with the various supporting utilities, including the User Name Mapping Server. The NFS Server component allows you to share folders using the platform-independent NFS protocol. NFS Server supports both NFSv2 and NFSv3 protocols. The default permissions for an NFS share are read-only, with no anonymous access and no root access.
Active Directory Shared Folders are any shared folders that are published in Active Directory. To create an Active Directory Shared Folder, the underlying folder must first be shared on the host machine.
DFS folders are another way to mask the underlying complexities of the network and file locations to simplify the user’s view of file resources. They are discussed in Chapter 20.
Before we explain the details of how to manage and configure shares in Windows Server 2003, let’s take a moment to understand how permissions work with shared folders.
There are two kinds of permissions involved in any shared folder—those on the actual share, and those imposed by the underlying file system. These permissions are subtractive. This means that only the most restrictive permission will win. Managing permissions on both the share and the file system at the same time can often be quite confusing, and it’s difficult to keep track of the details of both. We generally recommend using the underlying NTFS file permissions to control access and setting the share permissions to Full Control for everyone for most normal shares. The NTFS file permissions give much greater granularity and control over exactly what level of access is granted. However, there might be cases when using a more restrictive share permission is useful. We suggest, however, that when you do that you indicate in the share name that the share is restricted.
Shares can be entire volumes or a folder tree. Until a volume or folder is shared over the network, users can’t see it or gain access to it. By default, the Everyone group is granted read access to all files in the folder, to all subfolders of that folder, and so on, assuming they have sufficient file system permissions. After a volume or folder is shared, restrictions can be added or removed in the form of share permissions. These permissions apply only at the drive or folder level—not at the file level—and are limited to allowing or denying Full Control, Read, and Change, as shown in Table 10-1.
Table 10-1. Types of share permissions
Share Permission | Type of Access |
|---|---|
Read | Allows viewing of file and subfolder names, viewing data in files, running programs |
Change | Allows the access under Read, plus allows adding files and subdirectories to the shared folder, changing data in files, and deleting files and subdirectories |
Full Control | Allows all the access under Change, plus allows changing file permissions (NTFS volumes only) and taking ownership (NTFS volumes only) |
Share permissions determine the maximum access allowed over the network. They don’t affect a user who logs on locally or a terminal server user of the computer. Share permissions are the only restrictions available for shares on a FAT volume (yet another reason to convert your FAT volumes to NTFS).
File permissions, unlike share permissions, control user access regardless of where it originates. Local users, Terminal Services users, and network users are all treated equally. Because FAT and FAT32 file systems don’t support any restriction on access to files, you should always use NTFS file systems to protect sensitive information. NTFS uses access control lists (ACLs) to limit access to resources. NTFS permissions can be assigned to both files and folders, and they apply network-wide and locally.
On an NTFS volume, you can set permissions down to the file level. This means that for any file you can give individual users different types of access. Although you can set such detailed permissions, this way lies madness for all but the most meticulous control freaks (who are, arguably, already mad).
Always try to operate with the simplest possible permissions. Set as few restrictions as possible. Assign permissions to groups, not individuals. Don’t set file-by-file permissions unless doing so is unavoidable. Managing the minutiae of permissions can easily and quickly soak up all your time and much of your life’s blood as well, unless you guard against it.
As we noted earlier, the underlying ability to assign enforceable permissions to files and folders is part of the NTFS file system. As you work with files and folders on NTFS, you need to understand how the permissions work and how they are different for a file and for the folder that contains the file.
Windows 2003 Server has a set of standard folder permissions that are combinations of specific kinds of access. The individual permissions are Full Control, Modify, Read & Execute, List Folder Contents, Read, and Write. Each of these permissions consists of a group of special permissions. Table 10-2 shows the special permissions and the standard permissions to which they apply.
Table 10-2. Special permissions for folders
Special Permission | Full Control | Modify | Read & Execute | List Folder Contents | Read | Write |
|---|---|---|---|---|---|---|
Traverse Folder/Execute File | Yes | Yes | Yes | Yes | No | No |
List Folder/Read Data | Yes | Yes | Yes | Yes | Yes | No |
Read Attributes | Yes | Yes | Yes | Yes | Yes | No |
Read Extended Attributes | Yes | Yes | Yes | Yes | Yes | No |
Create Files/Write Data | Yes | Yes | No | No | No | Yes |
Create Folders/Append Data | Yes | Yes | No | No | No | Yes |
Write Attributes | Yes | Yes | No | No | No | Yes |
Write Extended Attributes | Yes | Yes | No | No | No | Yes |
Delete Subfolders and Files | Yes | No | No | No | No | No |
Delete | Yes | Yes | No | No | No | No |
Read Permissions | Yes | Yes | Yes | Yes | Yes | Yes |
Change Permissions | Yes | No | No | No | No | No |
Take Ownership | Yes | No | No | No | No | No |
Synchronize | Yes | Yes | Yes | Yes | Yes | Yes |
Standard file permissions include Full Control, Modify, Read & Execute, Read, and Write. As with folders, each of these permissions controls a group of special permissions. Table 10-3 shows the special permissions associated with each standard permission.
Table 10-3. Special permissions for files
Full Control | Modify | Read & Execute | Read | Write | |
|---|---|---|---|---|---|
Traverse Folder/Execute File | Yes | Yes | Yes | No | No |
List Folder/Read Data | Yes | Yes | Yes | Yes | No |
Read Attributes | Yes | Yes | Yes | Yes | No |
Read Extended Attributes | Yes | Yes | Yes | Yes | No |
Create Files/Write Data | Yes | Yes | No | No | Yes |
Create Folders/Append Data | Yes | Yes | No | No | Yes |
Write Attributes | Yes | Yes | No | No | Yes |
Write Extended Attributes | Yes | Yes | No | No | Yes |
Delete Subfolders and Files | Yes | No | No | No | No |
Delete | Yes | Yes | No | No | No |
Read Permissions | Yes | Yes | Yes | Yes | Yes |
Change Permissions | Yes | No | No | No | No |
Take Ownership | Yes | No | No | No | No |
Important
Any user or group assigned Full Control on a folder can delete files and subfolders no matter what the permissions are on the individual files or subfolders.
Any user or group assigned Take Ownership can become the owner of the file or folder and then change permissions and delete files or even entire subfolder trees, no matter what the permissions are before they become the owner.
If you take no action at all, the files and folders inside a shared folder have the same permissions as the share. Permissions for both directories and files can be assigned to the following:
Groups and individual users on this domain
Global groups, universal groups, and individual users from domains that this domain trusts
Special identities, such as Everyone and Authenticated Users
The important rules for permissions can be summarized as follows:
By default, a folder inherits permissions from its parent folder. Files inherit their permissions from the folder in which they reside.
Users can access a folder or file only if they were granted permission to do so or they belong to a group that has been granted permission.
Permissions are cumulative, but the Deny permission trumps all others. For example, if the Technical Writers group has Read access to a folder, the Project group has Modify permission for the same folder, and Alex is a member of both groups, Alex has the higher level of permission, which is Modify. However, if the Technical Writers group permission is changed to explicitly Deny, Alex is unable to use the folder despite his membership—and ostensibly higher level of access—in the Project group.
The user who creates a file or folder owns the object and can set permissions to control access.
An administrator can take ownership of any file or folder.
Members of the Administrators, Backup Operators, and Server Operators groups can take ownership and reassign ownership.
Just to complicate matters a bit more, there are two types of permissions: explicit and inherited. Explicit permissions are the ones you set on files or folders you create. Inherited permissions are those that flow from a parent object to a child object. By default, when you create a file or a subfolder, it inherits the permissions of the parent folder.
If you don’t want the child objects to inherit the permissions of the parent, you can block inheritance at the parent level or child level. Where you block inheritance is important. If you block at the parent level, no subfolders will inherit permissions. If you block selectively at the child level, some folders will inherit permissions and others will not.
To block a file or folder from inheriting permissions, right-click the folder, select Properties, and then click the Security tab. Click Advanced, and clear the check box for Allow Inheritable Permissions From The Parent To Propagate To This Object And All Child Objects.
If the check boxes for permissions appear shaded, the permissions are inherited from a parent object. If the boxes are shaded and have a check mark (as shown in Figure 10-1), some permissions are inherited and others have been added. There are three ways to change this situation:
Click Advanced, and clear the check box for Allow Inheritable Permissions From The Parent To Propagate To This Object And All Child Objects. When the check box is cleared, you can make changes to the permissions or change the users or groups in the list.
Select the opposite permission—Allow or Deny—to override the inherited permission.

Before sharing a folder on an NTFS volume, set all the permissions on the folder. When you set folder permissions, you’re also setting permissions on all the files and subfolders in the folder. To set the permissions on the folder, perform one or more of the following actions:
To assign permissions to a folder, right-click the folder in Explorer and choose Properties from the shortcut menu. Then click the Security tab.
To remove an individual or group from the list, just select the name and click Remove.
To add a user or group to the list of those with permissions, click Add. This opens the Select Users, Computers, Or Groups dialog box. Optionally, click Advanced to perform a more sophisticated search, as shown in Figure 10-2. Click OK when you’re done.

Permissions for individual files are assigned in the same way as permissions for folders. There are, however, some special considerations:
Remember to grant permissions to groups rather than to individuals.
Create domain-based groups, and assign file permissions to them rather than assigning permissions directly to local groups.
In some circumstances, you might find it necessary to set, change, or remove special permissions on either a file or folder. To access special permissions, follow these steps:
Right-click the file or folder, and choose Properties from the shortcut menu. For this example, we’re working on a folder named VCD, which will appear in the various steps and screen shots. Your folder name will be different.
Click the Security tab, and then click Advanced.
To add a user or group, click Add. Double-click the user or group name to open the Permission Entry dialog box.
To view or modify existing special permissions, select the name of the user or group and click Edit.
To remove special permissions, select the name of the user or group and click Remove. If the Remove button is dimmed, clear the check box for Allow Inheritable Permissions From Parent To Propagate To This Object, and skip to step 6.
In the Permission Entry For VCD dialog box shown in Figure 10-3, select from the Apply Onto drop-down list where you want the permissions applied. (See Table 10-4 and Table 10-5 for explanations of the choices in this drop-down box.) Apply Onto is available for folders only.
In Permissions, select Allow or Deny for each permission.
To prevent subfolders and files from inheriting these permissions, select Apply These Permissions To Objects And/Or Containers Within This Container Only.
Click OK to close the dialog box.

In the Permission Entry For VCD dialog box for folders, you can choose how and where the special permissions are applied. Table 10-4 and Table 10-5 demonstrate the application of the special permissions depending on whether Apply These Permissions To Objects And/Or Containers Within This Container Only is selected.
Table 10-4. Application of special permissions when Apply These Permissions To Objects And/Or Containers Within This Container Only is selected
Selected in Apply Onto | Applies to Current Folder? | Applies to Subfolders in Current Folder? | Applies to Files in Current Folder? | Applies to Subsequent Subfolders? | Applies to Files in Subsequent Subfolders? |
|---|---|---|---|---|---|
This folder only | Yes | No | No | No | No |
This folder, subfolders, and files | Yes | Yes | Yes | No | No |
This folder and subfolders | Yes | Yes | No | No | No |
This folder and files | Yes | No | Yes | No | No |
Subfolders and files only | No | Yes | Yes | No | No |
Subfolders only | No | Yes | No | No | No |
Files only | No | No | Yes | No | No |
Table 10-5. Application of special permissions when Apply These Permissions To Objects And/Or Containers Within This Container Only is not selected
Selected in Apply Onto | Applies to Current Folder? | Applies to Subfolders in Current Folder? | Applies to Files in Current Folder? | Applies to Subsequent Subfolders? | Applies to Files in Subsequent Subfolders? |
|---|---|---|---|---|---|
This folder only | Yes | No | No | No | No |
This folder, subfolders, and files | Yes | Yes | Yes | Yes | Yes |
This folder and subfolders | Yes | Yes | No | Yes | No |
This folder and files | Yes | No | Yes | No | Yes |
Subfolders and files only | No | Yes | Yes | Yes | Yes |
Subfolders only | No | Yes | No | Yes | No |
Files only | No | No | Yes | No | Yes |
As you’ve seen, Administrators and members of a few other select groups are the only ones who can grant and change permissions. The exception is when a user is the owner of the folder or file in question. Every object on an NTFS partition has an owner, and the owner is the person who created the file or folder. The owner controls access to the file or folder and can keep out anyone he or she chooses.
Here’s how it works. Let’s say a user named Maxwell creates a folder on his computer named Max’s Private Stuff. To check the settings on his new folder, Maxwell right-clicks the folder, chooses Properties, and then clicks the Security tab. (See Figure 10-4.)

He sees that the Administrators group has full access to his folder, but because Maxwell is the owner of the folder, he can change the permissions so that he has the folder all to himself. To do so, he clicks Advanced to open the Advanced Security Settings dialog box and clears the Inherit From Parent option. (See Figure 10-5.)

Maxwell gets a security warning, and he can choose to either copy the current (inherited) permissions to the folder, making them explicit, or remove all permissions from the folder. He clicks Copy and returns to the Security Properties dialog box, where he then highlights the Administrators group, and clicks Remove. After this is done, even the administrator sees an Access Denied message when trying to open the folder.
Of course, nothing on the network can be completely beyond the reach of administrators, so an administrator can right-click the folder and choose Properties from the shortcut menu. When the administrator clicks the Security tab, the information box shown in Figure 10-6 opens.

In the Security Properties dialog box, no changes can be made. However, if the administrator clicks Advanced and then clicks the Owner tab (shown in Figure 10-7), he or she can change the owner of the folder to an administrator.

Regardless of the status of the folder, the administrator can take ownership. When Maxwell logs on the next time, he still has access to Max’s Private Stuff, but when he clicks Advanced and then Owner, he sees that he’s no longer the owner of the folder. Changing the ownership of the folder doesn’t automatically give Administrators access to the contents of the folder, but ownership does grant the ability to read and change permissions. With that, an administrator can change permissions and attain access to the folder contents.
As with most things in Windows Server 2003, there are several ways to configure and administer shared folders. You can right-click a folder in Windows Explorer and choose Sharing And Security from the shortcut menu; you can use the Shared Folders snap-in, either stand alone or as part of the Computer Management MMC snap-in; you can use the new File Server Management MMC snap-in introduced in R2; or you can use the command line.
Note
For some useful shared folders script examples that you use as is, or modify for your own needs, see the Microsoft TechNet Script Center at: http://www.microsoft.com/technet/scriptcenter/scripts/storage/shares.
Each approach has its advantages, but we recommend that you use the command line when you want to quickly create or modify a share, or that you use the File Server Management MMC snap-in when you want access to more management functions in a single place. The File Server Management snap-in not only gives you a place to create and manage shared folders, it provides quick access to the Disk Defragmenter and Disk Management snap-ins. We’ll use the File Server Management snap-in and the command line in this section, and we’ll use Windows Explorer in the Creating an NFS Share section and when we cover NFS shares. The command prompt is actually our first choice for most share management tasks, so we’ll try to integrate command lines into the whole process.
The new File Server Management tool, introduced in Windows Server 2003 R2 is a useful addition to the administrator’s tool chest. It takes advantage of the improvements in the Microsoft Management Console introduced with MMC v3.0. Its biggest shortcoming, in our opinion, is that it fails to integrate NFS share management into the console. Ah, well, maybe in the next version.
To make the File Server Management tool available in R2, you need to add or upgrade the File Server role using Manage Your Server.
Note
An earlier version of the File Server Management snap-in was used in versions of Windows Server 2003 prior to R2. This snap-in is still available in R2, and it can be started by typing filesvr.msc from the Run dialog box or a command prompt.
To use the File Server Management tool, follow these steps:
Open the File Server Management MMC snap-in from the Administrative Tools folder on the Start menu, or type fs.msc in the Run dialog box or at a command prompt to open the File Server Management console shown in Figure 10-8.
Expand Share Folder Management, and expand Shared Folders in the tree pane.
Use the Shares, Sessions, and Open Files folders to view the current file shares on the system you’re managing and to see how much activity the shares are getting, as shown in Figure 10-9.
To see the same information from the command line, open a command window and type the following command, as shown in Figure 10-10:
net share


To share a folder or volume, open the File Server Management console and follow these steps:
Highlight the Shares folder, and click New Share from the More Actions menu in the Actions pane, as shown in Figure 10-11, to open the Share A Folder Wizard.
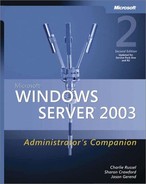
Click Next, and then type the folder path in the Folder Path box as shown in Figure 10-12, or click Browse to locate or create the folder you want to share. Click Next to continue.
Type the name you want to give the file share. For the best interoperability with earlier versions of Windows and non-Microsoft clients, choose a name that is both DNS and NetBIOS compatible.
Type a description for the shared folder in the Share Description box.
Optionally, click Change to control whether clients should use the offline files feature with the shared folder, and then click Next.
Specify the Share Level permissions for the folder, and then click Finish. (You can also set NTFS permissions here by choosing the Use Custom Share And Folder Permissions option and clicking Customize.)
To create the same share from the command line, open a command window and type
net share Docs=D:PubDocuments /grant:Everyone,Full
    /Remark:"Generally available documents" /cache:documents
as shown in Figure 10-13.


Real World: Setting Permissions
It is generally best to use NTFS file permissions instead of share-level permissions to control access to shared resources over the network. Using share-level permissions alone gives you significantly less control over the specific permissions being granted, and it’s less secure than file system permissions because it applies only to users connecting over the network.
However, there are some exceptions to this rule; for example, you might want to permit all authenticated users to access a volume in a certain subfolder but allow only a certain group to access the root directory. In this instance, you can create two file shares: one at the subfolder level with no share-level security (Full Control for Everyone), and one at the root folder level with share-level security to allow only the specified group access.
Somewhat more useful is the ability to hide file shares by adding the dollar sign ($) character to the end of the share name. This notation allows any user to connect to the share—provided he or she knows the share name. After users connect, they’re still bound by NTFS security permissions, but this approach can be handy for storing useful power tools so that an administrator can access them from a user’s system and user account. File security isn’t really an issue—you just don’t want users mucking around with the files.
It’s easy to stop sharing a folder without removing the underlying folder or files. From the File Server Management console, highlight the share, right-click, select Stop Sharing, and click Yes to confirm. Or, from the command line type
net share <sharename> /delete
From the command line, you won’t even get prompted to confirm. Use caution when you remove a share. It will disconnect any open files that users might be using and potentially cause loss of data.
If you need to disconnect users from the server for some reason—say, to close off the server while you update the files—follow these steps:
Open the File Server Management console, and then open the Sessions subfolder.
Right-click the user you want to disconnect, and click Close Session from the shortcut menu.
To disconnect all sessions, click Disconnect All Sessions.
To close an open file, click the Open Files folder, select the file you want to close, and then click Close Open File.
To close all open files, click Disconnect All Open Files.
To close sessions from the command line, type net session /delete.
To see what files are open on the network prior to closing a session, type net file.
You can limit the number of simultaneous user connections you want to allow to a shared folder so that a given shared folder doesn’t overburden the server with user connections. To do so, follow these steps:
Open the File Server Management console, and then open the Shares subfolder.
Right-click the shared folder you want to limit access to, and then choose Properties from the shortcut menu.
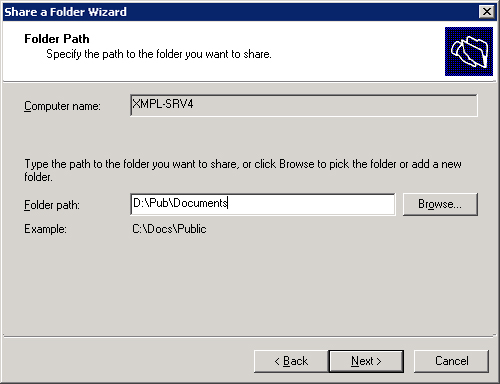
To place no limit on the number of connections you allow to the shared folder (other than the limit set by the number of licenses you have), select the Maximum Allowed option in the General tab, as shown in Figure 10-14.
To manually limit the number of connections you want to allow to the shared folder, type the maximum number of connections you want to allow in the Allow This Number Of Users box and then click OK.
To do this from the command line, type net share /users:<number>.
In addition to shares created by a user or administrator, the system creates a number of special shares that shouldn’t be modified or deleted. These include the administrative shares: the ADMIN$ share, and the hidden shares for each hard drive volume (C$, D$, E$, and so on). These shares allow administrators to connect to drives that are otherwise not shared. These shares are not visible by default and can be connected to only by an administrator.
Special shares exist as part of the operating system’s installation. Depending on the computer’s configuration, some or all of the following special shares might be present (and none of them should be modified or deleted):
ADMIN$. Used during the remote administration of a computer. The path is always the location of the folder in which Windows was installed (that is, the system root). Only Administrators, Backup Operators, and Server Operators can connect to this share.
driveletter$. The root folder of the named drive. Only Administrators, Backup Operators, and Server Operators can connect to these shares on Windows 2003 Server or a Windows 2000 server. On Microsoft Windows XP Professional and Windows 2000 Professional computers, only Administrators and Backup Operators can connect to these shares.
IPC$. Used during remote administration and when viewing shared resources. This share is essential to communication and can’t be deleted.
NETLOGON. Essential to all domain controllers. Do not remove.
SYSVOL. Required on all domain controllers. Do not remove.
PRINT$. A resource that supports shared printers.
To connect to an unshared drive on another computer, you need to be logged on using an account with the necessary rights. Use the address bar in any window and type the address using the syntax
\computer_name[driveletter]$
To connect to the system root folder (the folder in which Windows is installed) on another computer, use the syntax
\computer_nameadmin$
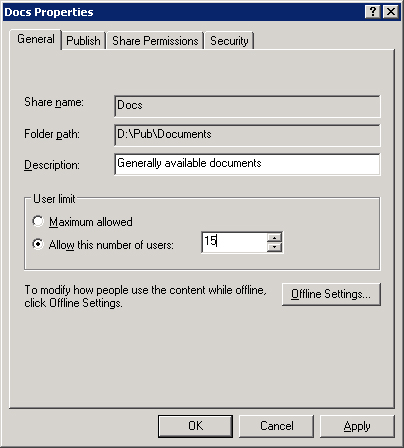
Figure 10-15 shows a connection made to the Windows directory on a client machine (xmpl-vpc-01) using the special share admin$.
Other special shares such as IPC$ and PRINT$ are created and used solely by the system. NETLOGON is a special share on Windows Server 2003, Windows 2000, and Windows NT servers and is used while processing domain logon requests.
As we’ve seen throughout this chapter so far, it’s easy to create and manage shares at the command line by using the net share command. The syntax of the net share command is
NET SHARE
sharename
          sharename=drive:path [/GRANT:user,[READ | CHANGE | FULL]]
                               [/USERS:number | /UNLIMITED]
                               [/REMARK:"text"]
                               [/CACHE:Manual | Documents| Programs | None ]
          sharename [/USERS:number | /UNLIMITED]
                    [/REMARK:"text"]
                    [/CACHE:Manual | Documents | Programs | None]
          {sharename | devicename | drive:path} /DELETE
Simply typing net share at the command line with no parameters will give you a list of currently shared folders. Typing net share <sharename> will give you the parameters in effect for the sharename.
Two other useful net commands for dealing with shares are net view and net session. Typing net view will give you a list of computers on the network or the resources available on a particular computer, while typing net session will list the sessions on the current computer or the details of a session with a particular computer. The syntax for these two net commands are
NET VIEW
[\computername [/CACHE] | /DOMAIN[:domainname]]
NET VIEW /NETWORK:NW [\computername]

NET SESSION
[\computername] [/DELETE]
For the first time in a Microsoft operating system, Windows Server 2003 R2 includes built-in support for NFS, the cross-platform choice for sharing of network resources. We’ll discuss the setup and configuration of NFS in greater detail in Chapter 27, but in this section we’ll show you how to share folders using the NFS protocol.
Before you can use Microsoft Server for NFS to share folders to NFS clients, you’ll need to make several configuration changes on your server. You’ll need to set up and specify a User Name Mapping server and open some ports on Windows Firewall if you’re using it, at a minimum. Well, actually, you can go ahead and share folders without doing any of that, but no one will be able to use them. The graphical tool for configuring and administering NFS is the %windir%msnfs fsmgmt.msc, and the command-line tool is %windir%msnfs fsadmin.exe.
Windows Server 2003 supports direct mapping of UNIX user ID (UID) and group ID (GID) in Active Directory using RFC 2307, as well as the User Name Mapping service. You can specify the User Name Mapping server to use from the command line:
nfsadmin mapping mapsvr=<servername>
To specify the User Name Mapping server graphically, open the MS NFS Administration console and follow these steps:
Right-click MSNFS Administration and select Properties, as shown in Figure 10-16.
Enter the name or IP address of the User Name Mapping server.
Optionally, select Active Directory Lookup and specify the Active Directory Domain to use.

To share folders using NFS on a computer that is protected by Windows Firewall, you must create port exceptions in the firewall. There is no automatic way to configure these exceptions, unfortunately. For more details on configuring Windows Firewall, see Chapter 22. The ports that need to be opened for NFS are shown in Table 10-6.
Table 10-6. Open ports for NFS
NFS Component | Port to Open | Protocols Used | Port Number |
|---|---|---|---|
Username Mapping Server and Server for NFS | Portmapper | TCP, UDP | 111 |
Server for NFS | Network Status Manager | TCP, UDP | 1039 |
Server for NFS | Nlockmgr (file locking manager) | TCP, UDP | 1047 |
Mountd (mounting daemon) | TCP, UDP | 1048 | |
Server for NFS | Server for NFS | TCP, UDP | 2049 |
More Info
For full information on configuring UNIX interoperability components—including NFS Server and Client, User Name Mapping, and UNIX ID Management—see Chapter 27.
The creation of NFS shares is directly integrated into Windows Explorer, and the steps are very similar to the steps for creating traditional Windows shares. To share a folder using NFS, open Windows Explorer and follow these steps:
Highlight the folder you want to share, right-click, and select Sharing And Security from the context menu.
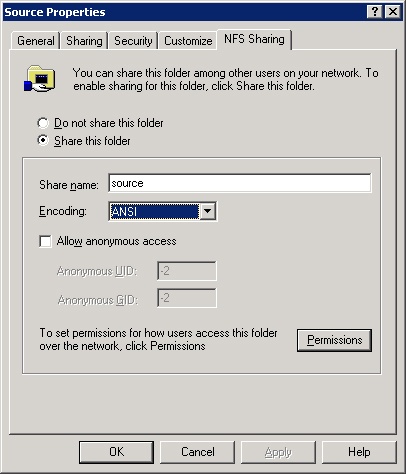
Click the NFS Sharing Tab, as shown in Figure 10-17.
Click Share This Folder, and type in a share name to use for the folder.
Optionally, change the encoding used. The default is ANSI, which is appropriate for most situations.
Select Allow Anonymous Access if you want to allow unauthenticated users to access the share.
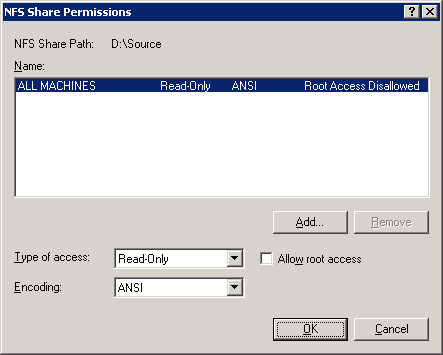
Click the Permissions button to set the share permissions on the new share, as shown in Figure 10-18.
You can specify different permissions for each machine that accesses the share, or you can specify by groups of machines. (See Chapter 27 for how to set up client groups.) The default permissions are Read-Only for all machines, with no root access.
Click your way out of the dialog boxes.
To configure the same share from the command line, open a command window and type
nfsshare source=d:Source -o ro -o noroot -o anon=yes
as shown in Figure 10-19.

Deleting or modifying an existing NFS share is essentially the same process as creating it in the first place. Open Windows Explorer, highlight the shared folder, and select Sharing And Security from the context menu. Make your changes on the NFS Sharing tab, and click OK the necessary number of times. You’re done. Existing connections will not see the changes until the next time they connect to the share.
The command line process is also the same. The full syntax of the nfsshare.exe command is
nfsshare
  sharename=drive:path
    [-o ro[=client[:client ...]]
        rw[=client[:client ...]]
        na
        root[=client[:client ...]]
        noroot[=client[:client ...]]
        anon=yes|no
        anonuid=[Unmapped UID]
        anongid=[Unmapped GID]
        encoding=euc-jp|euc-tw|euc-kr|
        shift-jis|big5|ksc5601|gb2312-80|ansi ]
        {euc-jp|euc-tw|euc-kr|shift-jis|big5|ksc5601
           |gb2312-80|ansi}=client1[:client2...]

  sharename
    [-o ro[=client[:client ...]]
        rw[=client[:client ...]]
        na
        root[=client[:client ...]]
        noroot[=client[:client ...]]
        anon=yes|no
        anonuid=[Unmapped UID]
        anongid=[Unmapped GID]
        encoding={euc-jp|euc-tw|euc-kr|
        shift-jis|big5|ksc5601|gb2312-80|ansi} ]
        {euc-jp|euc-tw|euc-kr|shift-jis|big5|ksc5601
           |gb2312-80|ansi}=client1[:client2...]
        removeclient=client[:client ...]

{sharename | drive:path} /deleteYou can publish relatively permanent file shares in Active Directory, making them easier for users to find in a large network. To do so, use the following steps:
Open the File Server Management console and then select Shares.
Right-click the shared folder for which you want to set permissions, and then choose Properties from the shortcut menu.
Click the Publish tab and then select the Publish This Share In Active Directory check box. (See Figure 10-20.)
In the Description box, type a description for the file share.
Type the e-mail address of the person responsible for the file share in the Owner box. (That would probably be you.)
Click Edit, add any keywords relevant to the share, and then click OK.

The success of a network is judged both by the availability of needed information and resources and by the restriction and protection of those using the network. This chapter has explored the options available to the administrator for managing the file resources of a network in Windows Server 2003. The next chapter covers day-to-day administrative tasks and how to simplify and streamline these tasks for maximum efficiency.