Managing software on client computers can be a tedious task. Fortunately, Microsoft Windows Server 2003 integrates several technologies that can make managing computers more efficient. You can use Group Policy to deploy applications automatically. You can use Software Restriction Policies to block unauthorized programs and scripts. Finally, you can use Remote Installation Services (RIS) to boot client and server computers from a network connection and easily install Microsoft Windows. Although these features are not as powerful as those provided by dedicated management programs such as Microsoft Systems Management Server (SMS), they are easy to use and provide a basic set of management capabilities.
Note
Because the Group Policy Software Installation extension, Software Restriction Policies, and Remote Installation Services all use Group Policy, it is important to understand Group Policy before using these tools. See Chapter 11 for more information about Group Policy.
The Group Policy Software Installation extension enables you to deploy applications to computers in the domain or forest using Group Policy and includes the capability to do the following:
Publish applications so that users can view and install programs from the network
Assign applications to users or computers so that the applications are installed automatically when users need them or on the next restart or logon
View installation status using Group Policy Results
To deploy an application, create or edit the appropriate Group Policy Object (GPO) and add the application’s Windows Installer package to either the user or computer policy, depending on whether you want it to apply to users or computers. The next time the user logs on or the computer restarts, Windows applies the relevant policy to the user or computer depending on the package settings you specify in the GPO. (See Table 28-1.)
Windows Installer handles the automatic installation or removal of all programs, as well as any upgrades or repairs.
Table 28-1. GPO settings needed for specific actions
Action | Setting Required |
|---|---|
Automatically install the application | Install This Application At Logon |
Add the application to a list of installable programs in Add/Remove Programs | Publish |
Add a shortcut to the application in the Start menu and install it on first use | Assign The Application (Note: Do not use the Install This Application At Logon setting.) |
Look at the following details of the technologies (and Table 28-2) to determine the best mix of services for your type of network:
RIS (Remote Installation Services) permits a user to start a computer (with or without an operating system) from a RIS server over the network and then automatically install Windows 2000 Professional, Windows XP Professional, or Windows Server 2003. RIS works much like using unattended answer files and disk imaging, but with greater ease of use.
Group Policy allows users to access their data, settings, and applications from any computer on the network running Windows 2000, Windows XP Professional, or Windows Server 2003. Group Policy distributes data, software, and settings using a pull approach, meaning that the client requests data from Active Directory as needed. This approach works best when connectivity between the client and the nearest domain controller or software distribution server is at LAN speeds.
SMS manages the deployment of software and operating systems on complex networks and networks with sophisticated software management requirements. SMS controls the deployment schedule, and it provides software inventorying and license tracking, as well as planning and diagnostic tools. SMS can push software to clients using almost any version of Windows. It can also push software to distribution points from which Group Policy either installs the software or allows users to do so. SMS includes rich reporting and inventory capabilities so that you can determine which installations were successful. SMS requires a significant investment of resources to install and configure on a complex network, so it is appropriate only for networks with sophisticated software deployment and management needs.
Microsoft Operations Manager (MOM) provides an overarching management layer to Microsoft servers (including SMS), allowing you to monitor the network and determine what tasks need to be done. MOM is a powerful tool to use when the network gets so large that you need a way to manage your management tools.
Note
Although most documentation insists that only SMS can perform managed Windows upgrades, you can also use Group Policy to perform them, as discussed in Chapter 23.
Table 28-2. Technologies to use based on network type and client environment
Simple LAN and Simple Requirements | Complex Network or Complex Requirements | |
|---|---|---|
Windows Server 2003, Windows XP, Windows 2000 | Group Policy, RIS | SMS, Group Policy, RIS, MOM |
Mixed Windows environment with some earlier systems | SMS, Group Policy | SMS, Group Policy, MOM |
Earlier Windows clients (Microsoft Windows 3.x, Microsoft Windows 95, Microsoft Windows 98, Microsoft Windows Me, Microsoft Windows NT) | SMS | SMS, MOM |
Note
For users with a persistent network connection and without processor-intensive or highly graphical applications, deploy Terminal Services to centralize application maintenance and make it easier to provide a reliable and secure desktop environment. For more information about Terminal Services, see Chapter 30.
A native Windows Installer package created by the software manufacturer for use with Group Policy is usually the best option for deploying software. Deployment is relatively simple and requires no user intervention, and natively authored Windows Installer packages can repair themselves if a key file is inadvertently deleted or corrupted. You can also create transform files for some packages. For example, you can create a transform file to customize a Microsoft Office installation so that only Microsoft Word and Microsoft Outlook are installed rather than the entire suite.
The easiest way to deploy applications that are not natively authored for Windows Installer is to create a .zap file. A .zap file is a text file that points to the 32-bit or 64-bit setup program for the application and can optionally run automated setup scripts. (Microsoft Windows Small Business Server 2003 uses a similar approach to application deployment.)
Although .zap files are simple and easy to create, .zap files cannot do the following:
Assign applications to particular users or computers, though you can use a .zap file to publish applications
Install applications with elevated permissions (Windows Installer gives higher permissions to installation programs so that a local administrator account isn’t needed to install software.)
Install applications automatically on first use
Perform partial installations of applications, with advanced features installed when needed
Perform a complete rollback of an unsuccessful installation or enable applications to repair themselves
Despite these limitations, most users find that using .zap files to deploy earlier applications is more reliable than repackaging applications, because .zap files make use of the original installation program. (It’s unlikely that you can write a better setup routine than the original, especially without access to more in-depth information about the program.)
If an application does not use Windows Installer to install itself, you can automate setup using an installation script and a .zap file, as discussed earlier, or repackage it into a Windows Installer package. When you repackage an application, you take "snapshots" of a computer before the application is installed using a commercial authoring package and then again after installing the application. The authoring package compares the two snapshots to determine what changes the application made during setup and then bundles the changes into a new Windows Installer package.
More Info
To repackage an application, use a commercial authoring package such as one from Macrovision (which acquired InstallShield) or WISE Solutions; or you can use the light version of the Veritas Software WinInstall program, which is included with Windows 2000 Server (but unfortunately not with Windows Server 2003). WinInstall LE is discussed in the Microsoft Windows 2000 Server Administrator’s Companion.
Repackaged applications convey many of the advantages inherent in natively authored Windows Installer packages; however, a number of hazards are involved as well. If the client system differs from the reference system used to repackage the application, problems can occur because the repackaged application has only very limited means of resolving differences. Repackaged applications occasionally copy .DLL files to the wrong locations or they break shortcuts. Additionally, the All Users folder can potentially be deleted after uninstalling a repackaged application. Technically speaking, poorly tested repackaged applications can trash the system. Also, repackaged applications aren’t easily upgraded—uninstall the existing version to install the new version.
Although there are potential problems, repackaging applications is a powerful way to deploy software if the repackaged application is thoroughly tested in a lab and pilot rollout before widespread deployment.
More Info
For more on the support boundaries and technical difficulties inherent in repackaging applications, see Microsoft Knowledge Base Articles 264478, 320539, and 305955.
An application published in Active Directory becomes available from Add/Remove Programs for the users to whom the Group Policy Object (GPO) applies. (As described earlier, applications are published to users, not computers.) An assigned application, on the other hand, can be assigned to either users or computers and is installed without any action on the user’s part. Assigned applications appear on the Start menu and are installed on first use, unless you specify that they should be fully installed at the next logon.
Assign essential applications to users or computers so that these applications are always available, and publish optional programs to make it easy for users to find applications when they need them. Do not assign or publish an application to both computers and users. Table 28-3 summarizes the differences between publishing and assigning applications.
Table 28-3. Differences between publishing and assigning deployed applications
Published Applications | Applications Assigned to Users | Applications Assigned to Computers | |
|---|---|---|---|
When after deployment is the software available for installation? | Immediately, or after replication to the nearest DC | After the next logon[a] | After the next reboot[a]. |
How is the software installed? | Through Add/Remove Programs in Control Panel | Automatically on first use, or after the next logon event (Icons are present on the Start menu or the desktop.) | The software is automatically installed on reboot[a]. |
Is the software installed when a file associated with the application is opened? | Yes | Yes | The software is already installed. |
Can the user remove the software? | Yes, by using Add/Remove Programs (Reinstallation is also supported.) | Yes, although the software becomes available again after the next logon event | No, although software repairs are permitted. Local administrators can uninstall software. |
What package types are supported? | Windows Installer packages and .zap files | Windows Installer packages | Windows Installer packages. |
[a] By default, Windows XP clients process Group Policy asynchronously as a background refresh during startup and logon, which shortens startup times but requires two restarts to install assigned software to computers, or two logons to install software to users. For more information, see the Windows XP Takes Two Restarts or Logons to Install Assigned Applications sidebar in the Setting Software Installation Options section of this chapter. | |||
The Group Policy Software Installation extension does not explicitly support updating applications. To update Microsoft applications, use Windows Server Update Services (WSUS). To update applications that WSUS does not support, use a third-party patch management application that supports the necessary applications, deploy the patches via login scripts, or instruct users to install the software updates from a network share (assuming the users are local administrators).
There are two other noteworthy methods of updating applications using Group Policy. The simplest method is to update the administrative installation or setup files in the software distribution point, and then redeploy the application (as discussed later in this chapter). However, this method can cause the client computers to become out of sync if users use the Install On Demand or Detect And Repair features before reinstalling the application. When using this method, promptly update Group Policy for all affected users and computers so that the application is reinstalled before it can get out of sync. Be prepared for a surge in network traffic as the computers reinstall the application from the network. When a client computer is out of sync with the software distribution point, Windows might prompt users for an installation CD and refuse to install the updated version. To resolve this condition, try logging off or restarting the computer, or use a local administrator account to uninstall the application and then reinstall it using Group Policy. You can also use the Install This Application At Logon setting when assigning applications to users.
Another way to update applications using Group Policy is to make a copy of the administrative install or folder in the software distribution point containing the setup files. Update this copy and then add the updated application to the GPO as an upgrade to the existing application. This enables existing clients to continue to access the original installation files until Windows applies the GPO and upgrades the application. When using this method, copy the original GPO and use the copy for testing and pilot deployment. (Make sure that the copy has a lower link order than the original so that Windows applies it instead of the original.) Once you verify that the upgrade works properly, disable the original GPO (and eventually delete it).
Whichever method is used to update applications, test the method thoroughly in a lab before implementing it on a production network, and perform pilot deployments of updates or staged rollouts to mitigate risk.
Before deploying software using Group Policy, create a shared folder or DFS folder to store the setup files, and create a GPO for application deployment, as discussed in this section.
To deploy applications using Group Policy, first create a software distribution point on the network that contains the setup files for the applications. (Make sure you have volume licenses for the applications.) The best way to do this is to create a folder structure in DFS. This allows you to alter the location of the software distribution point without breaking application deployment, add multiple folder targets for load balancing, and set up WAN-friendly replication, as discussed in Chapter 20.
To create a software distribution point, use the following steps:
Design and create a DFS or shared folder structure for software.
Create a DFS folder that contains other DFS folders that categorize software. The second (or third) level of DFS folders usually contains DFS folders with folder targets that store the actual installation files. For example, the DFS folder that contains the Microsoft Office 2003 setup files might be \example.localSoftwareProductivityMicrosoft Office 2003, with the \Srv2SoftwareProductivityMicrosoft Office 2003 folder target.
Set the following NTFS permissions on the software distribution folder. (Set the share permissions to Everyone = Full Control to prevent conflicting file and share permissions.)
Authenticated Users = Read
Domain Computers = Read
Administrators = Full Control
Copy the application setup files to the software distribution point, or use an administrative setup command to install the setup files to the software distribution point. Consult the software manufacturer for specific instructions and recommendations.
For example, to install Microsoft Office 2003 to a software distribution point, type D:Setup.exe/A Pro11.msi, substituting D: with the drive letter of the Office CD and Pro11.msi with the .MSI package appropriate for your version of Office. Do not simply copy the setup files.
Note
To publish the software distribution folder in Active Directory so that users can find the folder when searching Active Directory for shared folders, right-click the appropriate container in the Active Directory Users and Computers console, choose New, select Shared Folder, and then type the path of the DFS folder or shared folder in the Network Path box.
Before adding or administering deployed applications, create a new GPO for the applications. To do so, follow these steps:
More Info
For more information about Group Policy, the Group Policy Object Editor, and the Group Policy Management Console, see Chapter 11.
Install the Group Policy Management Console, if necessary, and then open the Group Policy Management Console from the Administrative Tools folder on the Start menu.
Create a new GPO, and then link it to the appropriate site, domain, or organizational unit (OU).
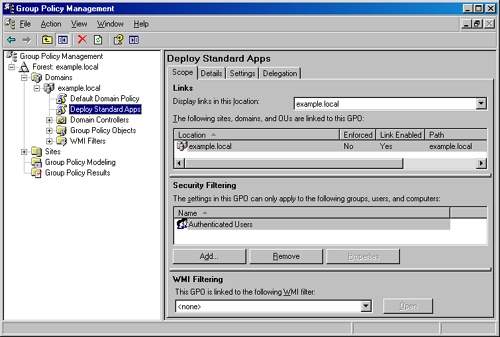
Use the Security Filtering section to apply the GPO to the appropriate groups of users or computers, as shown in Figure 28-1.
Note
Do not unlink or delete a GPO immediately after using it to uninstall applications; Windows applies the policy when users log on or restart their computers, so if you unlink or delete the GPO before these events occur, Windows does not uninstall the applications.
Real World: Planning Ahead
Use the following list to help plan software deployment via Group Policy:
To deploy applications to certain groups, create multiple GPOs and use the Security tab to apply each GPO only to the appropriate group. Or change the security settings for individual programs within a GPO so that only the appropriate groups have access to the applications (as discussed later in this chapter).
Assign GPOs as high up in the Active Directory tree as possible. If all users in a domain need Microsoft Word and Microsoft Excel, put those applications in a GPO that applies to that domain, not in a separate policy for each OU.
Test software deployment in a lab, and use OUs to pilot software deployment in a production network. For example, create a GPO and test it in a single OU. If the GPO functions properly, unlink it from the OU and link it to the appropriate domain. (Do not assign or publish the same applications to the same users or computers in multiple GPOs.)
Modify quotas to allow users enough disk space to install applications, and leave room for the temporary files created during software installations.
Enable Group Policy Results, formerly known as Resultant Set Of Policies (RSoP), on Windows XP Service Pack 2 clients by enabling the Windows Firewall: Allow Remote Administration Exception Group Policy setting. This enables you to remotely check which GPOs Windows has processed on clients. For more information, see Chapter 11.
A number of options control how Group Policy deploys and manages software packages. These options determine how packages are added to the GPO, the amount of control users have over an installation, and the default application for a given file extension, as well as which categories you can use for grouping applications. The following sections cover these options in detail.
Note
Software Installation settings for applications deployed to users are not shared with applications that are deployed to computers. Each type of deployment maintains its own set of applications and settings.
To change the default settings for the Group Policy Software Installation extension, first open the Software Installation Properties dialog box by performing the following steps:
Open the appropriate GPO, select either User Configuration or Computer Configuration, Software Settings, and then Software Installation.
Right-click the Software Installation container, and then choose Properties. The Software Installation Properties dialog box appears.
After completing these steps, use the Software Installation Properties dialog box to perform the following tasks:
To specify the default location for application packages, type the UNC path of the software distribution folder in the Default Package Location box of the General tab. This path must be a Uniform Naming Convention (UNC) name; it cannot be a direct reference to a local drive. To reduce the potential for name resolution problems, use a fully qualified Domain Name System (DNS) name—for example, \srv1.example.localsoftware.
To change the default action to perform on new packages, use the New Packages area of the General tab, as discussed in Table 28-4.
Table 28-4. Default behavior options when adding new packages
Option
What It Does
Display The Deploy Software Dialog Box
Displays a dialog box asking whether to publish (User Configuration only) or assign the application, or whether to customize the configuration
Publish (User Configuration only)
Automatically publishes the application, using the default settings
Assign
Automatically assigns the application, using the default settings
Advanced
Displays the application’s advanced properties, allowing a customized configuration
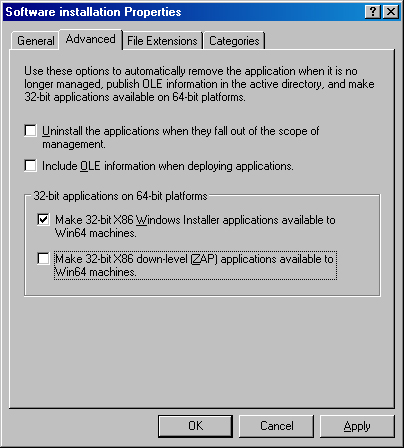
To uninstall applications automatically when the GPO no longer applies to the user or computer, select the Uninstall The Applications When They Fall Out Of The Scope Of Management check box on the Advanced tab (which is shown in Figure 28-2).
Important
Choosing the Uninstall The Applications When They Fall Out Of The Scope Of Management check box can lead to a user inappropriately losing an important application. For example, if a GPO is applied by site and a laptop user travels to a branch office, the user might lose software if the branch office’s GPOs do not include the same software applications. To avoid this, be careful when choosing this option and, if possible, do not deploy software by site.
To allow 64-bit Windows clients to install 32-bit Windows Installer applications, select the Make 32-Bit X86 Windows Installer Applications Available To Win64 Machines check box. To allow 64-bit clients to install applications published using a .zap file (as discussed in the Finding the Right Mix of Services section earlier in this chapter), select the Make 32-Bit X86 Down-Level (ZAP) Applications Available To Win64 Machines check box. Note that you cannot deploy applications written for x64 editions of Windows on Itanium-based versions of Windows, and vice versa.
To change which application Windows installs to open files of a given format, click the File Extensions tab, select a file extension from the Select File Extension list, select the default application for the extension, and then click Up to move it to the top of the list. Windows lists only the file extensions associated with packages already present in the GPO.
To set up a list of software categories, making it easier for users to find the application they want, click the Categories tab, click Add, and type the category name. Categories apply to the entire domain, not just the Group Policy object with which you are working.
Real World: Windows XP Takes Two Restarts or Logons to Install Assigned Applications
By default, Windows XP clients use the Fast Logon Optimization feature to process Group Policy asynchronously during startup and logon, which shortens startup times. However, because this means that Windows processes Group Policy in the same way as a background refresh, Windows requires two restarts to install assigned software to computers, or two logons to fully install or remove assigned packages assigned to users.
To apply a Group Policy to a computer or user without two restarts or logons, open a command prompt window, type Gpupdate, and then log off or restart the computer. To force Windows XP clients to always process Group Policy synchronously like Windows 2000 clients, open the appropriate GPO; select Computer Configuration, Administrative Templates, System; and then select Logon. Then enable the Always Wait For The Network At Computer Startup And Logon policy. For more information, see Microsoft Knowledge Base Article 305293.
Group Policy by default considers all connections slower than 500 Kbps (kilobits per second) to be slow links. When Windows detects a slow link, it disables logon and startup scripts, software installation, folder redirection, and disk quotas. To change the connection speed Windows considers slow, use the following procedure:
Open the appropriate GPO, select Computer Configuration or User Configuration, and then Administrative Templates, followed by System, and finally Group Policy.
In the details pane, double-click the Group Policy Slow Link Detection policy setting (shown in Figure 28-3). The Group Policy Slow Link Detection Properties dialog box appears.
Choose the Enabled option and then type the connection speed to define as slow. Enter 0 to disable slow link detection, forcing Group Policy to consider every connection a LAN connection.
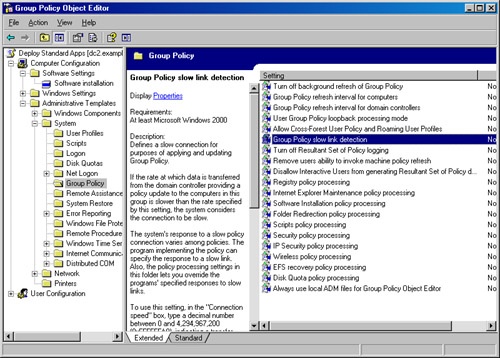
Besides changing what speed Group Policy considers slow, you can enable or disable the processing of the following policy items over a slow network link:
After creating the GPO and the general software installation options, you can start working with software packages—the setup files for a software application. The following sections help you add packages to the GPO, change their properties, upgrade and modify packages, and remove obsolete packages.
Before Group Policy can assign or publish applications that you copy to the software distribution point discussed earlier in this chapter, you must add the installation packages to the GPO. To add a package to a GPO, follow these steps:
Note
You must apply modifications (transforms) to a package when adding the package—you cannot add transforms to deployed packages.
Install the application to the software distribution point using an administrative setup command or by manually copying the setup files, as discussed in Creating a Software Distribution Point earlier in this chapter.
Open the appropriate GPO, select either User Configuration or Computer Configuration, and then Software Settings.
Right-click Software Installation, choose New and then Package.
Select either Windows Installer Package or ZAW Down-Level Application Packages (zap) from the Files Of Type list, depending on the type of application you want to deploy. (Note that you can deploy .zap files only to users, not computers.)
Real World: Not All Windows Installer Packages Work with Group Policy
Not all Windows Installer packages work properly with Group Policy. However, many companies provide Windows Installer Packages designed for use with Group Policy to licensed customers upon request. For example, Adobe and Macromedia both provide instructions on how to extract or obtain the appropriate files to deploy Adobe Reader and Macromedia Flash Player using Group Policy.
Type the path to the DFS folder or shared folder that stores the package you want to deploy, click Open, select the package, and then click Open again. Do not use a local file path.
Note
You can use Group Policy to assign Windows operating system upgrades to computers or publish a Windows upgrade to users. To do so, first verify that each computer in the GPO has sufficient disk space and is compatible with the version of Windows you want to deploy. Then copy the entire Windows CD-ROM to the software distribution point and add the Winnt32.msi package to the appropriate GPO, just like any other piece of software. After adding the package, modify the package or GPO security settings so that the upgrade applies only to the appropriate computers or users.
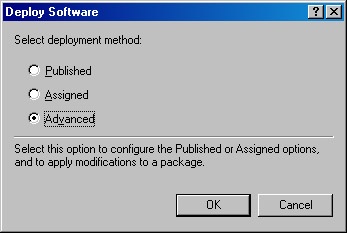
In the Deploy Software dialog box (shown in Figure 28-4), choose from the following options how to deploy the package and then click OK:
Select Published to publish the application in Active Directory with the default settings (available only with User Configuration).
Select Assigned to assign the application with the default properties.
Select Advanced to modify how Windows deploys the application. (The next section describes the deployment options.)
Note
Windows deploys packages after the second logon or restart for Windows XP clients, after the first logon or restart for Windows 2000 clients, and after the first logon or restart if you enable the Always Wait For The Network At Computer Startup And Logon policy. For more information, see the Windows XP Takes Two Restarts or Logons to Install Assigned Applications sidebar earlier in this chapter.
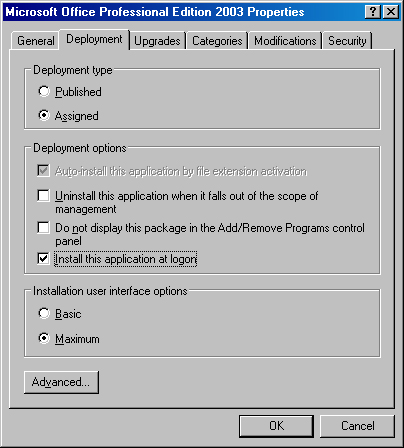
After you add a software package to a GPO, you might want to change the package’s application category, deployment type (assign or publish), or security settings.
To do so, double-click the software package in the Software Installation node of the Group Policy Object Editor console. The Properties dialog box appears, as described in the following list:
To change the name of the package and support information, use the General tab.
To assign the application or publish it, use the Deployment Type area of the Deployment tab (shown in Figure 28-5).
To automatically install the application when a user opens a file associated with the program, select the Auto-Install This Application By File Extension Activation check box on the Deployment tab.
To prevent users from installing or uninstalling the application from Add/Remove Programs, select the Do Not Display This Package In The Add/Remove Programs Control Panel check box on the Deployment tab.
To completely install the application the first time users log on after the application is assigned to them, select the Install This Application At Logon check box on the Deployment tab. This option allows clients with intermittent network connectivity (such as laptop users) to get the whole application when they log on rather than the first time they launch the program, which might occur when they’re offline.
To show users a limited amount of information about the installation progress, select Basic in the Installation User Interface Options section of the Deployment tab. To display all screens and messages to the user, select Maximum.
To make a 32-bit application available on 64-bit versions of Windows, uninstall previous installations of the product, or force Group Policy to ignore language settings when deploying the package, click Advanced on the Deployment tab.
To assign the application to a category, click the Categories tab, select a category, and click Select. You can assign an application to more than one category.
To allow only certain groups or users access to the program, use the Security tab.
You can use Group Policy to automatically upgrade software packages. For example, when you get a new version of an application, publish it as both an upgrade and a full installation (for those without an earlier version of the application) so that users can upgrade to it if they want. Later, assign the application to users, and require them to either upgrade or install the new version in parallel with the old version (if you make that option available). You can also prevent new installations of the old version. After all users are accustomed to the new version, remove the old software package and uninstall it from users’ systems to complete the transition.
Use the following procedure to install upgrades. See the Removing and Redeploying Packages section later in this chapter for information about how to complete the process and remove obsolete packages.
Note
You can apply a transform to the upgrade package—for example, to allow Microsoft Outlook 2000 users to upgrade to Microsoft Outlook 2003 without installing the rest of Office 2003. To do this, see the next section, Applying Package Modifications.
In the console tree of the appropriate GPO, select either User Configuration or Computer Configuration and then Software Installation.
After adding the upgrade package (if necessary), right-click the upgrade package (not the older version), and choose Properties from the shortcut menu.
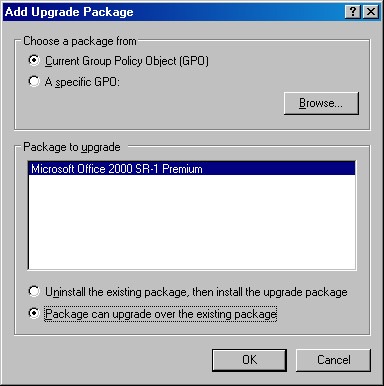
Click the Upgrades tab and then click Add (unless the older application was automatically detected and listed here). Windows automatically detects older packages located in the same GPO.
In the Add Upgrade Package dialog box (shown in Figure 28-6) select the package to upgrade from the list of packages provided, and choose whether to uninstall the existing package before installing the new package (which might discard user’s settings). Click OK when you are finished.
Select the Required Upgrade For Existing Packages check box to require users to upgrade to the new package. (Otherwise, users have a choice to not upgrade.)
Click OK. Windows applies the upgrade package after the second logon or restart for Windows XP clients, or after the first logon or restart if you enable the Always Wait For The Network At Computer Startup And Logon policy or for Windows 2000 clients. (For more information, see the Windows XP Takes Two Restarts or Logons to Install Assigned Applications sidebar earlier in this chapter.)
Package modifications, also called transforms, customize an installation package without completely re-authoring it. For example, instead of offering Microsoft Office only in its complete configuration, you can deploy a package with only Microsoft Word and Microsoft Outlook.
Because transforms are merely a way to modify a package for deployment, not a mechanism for allowing a single package to present multiple options to users and administrators, you still need to add the package multiple times—once for each transform configuration available to users. For example, to deploy Office in its entirety, first deploy the standard Office .MSI package. Then deploy transforms of this installation to allow users to quickly select a customized installation of Office.
To create a customized installation of Office, use the Custom Installation Wizard (Ork.exe) included in the Microsoft Office 2003 Editions Resource Kit tools and available for download at http://www.microsoft.com/office/orkarchive/2003ddl.htm. To add a transform, first create the transform (this process varies by program), and then follow these steps:
Open the appropriate GPO, select either User Configuration or Computer Configuration, and then Software Settings.
Right-click Software Installation, choose New and then Package.
Type the path to DFS folder or shared folder that stores the package you want to deploy, click Open, select the package, and then click Open again. Do not use a local file path.
Choose the Advanced option in the Deploy Software dialog box, and then click OK.
Note
If the Deploy Software dialog box does not appear, select the Display The Deploy Software Dialog Box option in the Software Installation Properties window, as described in the Setting Software Installation Options section of this chapter.
Click the Modifications tab and then click Add.
Use the Open dialog box to select the Windows Installer transform package to add.
Important
As soon as you click OK, Windows immediately deploys the package, potentially affecting a lot of users. If you realize you made a mistake after clicking OK, you can fix it either by upgrading the incorrectly configured package with a correct one or by removing the package from Active Directory and all users.
On the Modifications tab, add or remove any additional transforms and place them in the proper order, using the Move Up and Move Down buttons, as shown in Figure 28-7. Windows applies the transform at the bottom of the list last, and therefore this transform takes precedence over earlier transforms because it can overwrite files written by earlier transforms.
Review all tabs of the Properties dialog box to ensure that the settings are correct, and then click OK when you are finished.

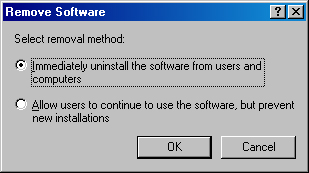
When an application outlives its usefulness in your company, it is time to remove it from all systems—or at least to stop deploying it on new systems. There are also times when you might want to reinstall an application on all clients, such as after adding a software update. Use the following steps to perform these tasks:
Open the appropriate GPO, select either User Configuration or Computer Configuration, and then Software Settings.
Right-click Software Installation, choose New and then Package.
Right-click the application you want to remove or redeploy, and choose All Tasks from the shortcut menu.
To redeploy the application, reinstalling it on all systems that already installed it, choose Redeploy Application. To remove the application, choose Remove from the submenu.
In the Remove Software dialog box, shown in Figure 28-8, choose the first option to remove the software immediately from all computers. Or choose the second option to prevent new installations of the software while allowing existing users to continue using it and to perform repairs.
Note
You can simulate the effects of Group Policy Objects using the Group Policy Modeling feature of the Group Policy Management Console. To check the actual state of a computer, use the Group Policy Results feature. To use Group Policy Results with computers running Windows XP Service Pack 2, enable the Windows Firewall: Allow Remote Administration Exception Group Policy setting, as discussed in Chapter 11.
Software restriction policies can be used in two ways:
To prevent users from running specific applications. This corresponds to the default policy of Unrestricted and is useful for typical users and computers.
To lock down systems so that users can run only applications that you specifically allow. This corresponds to the default policy of Disallowed and is useful for low-security user accounts, Terminal Servers, and public kiosks.
Software restriction policies are not a substitute for antivirus programs or firewalls. Imprudently used, they can add significantly to the workload of administrators and Help desk personnel and seriously irritate end users. So employ software restriction policies only when the increased security or reliability benefit outweighs the added administrative burden, and when extensive testing indicates that the policies do not adversely affect users.
Software restriction policies provide two security levels for programs—unrestricted, which allows programs to run, and disallowed, which blocks programs from executing. Use the following types of rules to control which programs to allow or disallow:
Hash rules. Identify software by the unique characteristics of files, translated into an algorithmic hash. This is useful for identifying a specific version of a program because each version has a unique hash, even if a user renames or moves it.
Certificate rules. Identify software by its digital signature. This is useful for scripts you digitally sign. (You can block all scripts that do not contain an approved digital signature.)
Path rules. Identify software by file path or registry location. This is useful for controlling programs, scripts, and viruses that are always located in a specific location or named a certain name.
Internet zone rules. Identify Windows Installer (.MSI) packages downloaded from various locations. This is useful for controlling from which Internet Explorer zones (Trusted Sites, Intranet, and so on) users can download and install programs.
Default rule. Applies to all software not identified by a rule. Usually this is set to Unrestricted, but you can set it to Disallowed to block all unidentified software from running (though this can partially cripple a system if you don’t create rules for every program needed by users and Windows itself).
Because there are usually multiple rules within a software restriction policy, Windows processes rules in the order listed above. (When conflicting rules apply to the same program, the more specific rule wins.) Windows downloads software restriction policies with other Group Policy Objects during Windows startup or user logon, and it checks software restriction policies each time a user starts a program.
Note
Software restriction policies do not apply to programs that use the common language runtime (the .NET Framework) because they are controlled separately using the Code Access Security Policy. Software restriction policies also do not apply to drivers, programs run by the SYSTEM account, and Microsoft Office macros. You must update Windows XP to Service Pack 1 or newer for software restriction policies to work with 16-bit applications.
To create a software restriction policy, use the following steps:
Create and open a new GPO for the software restriction policy. (This makes it easy to disable.) To apply the policy to only a single computer, open the computer’s Local Security Policy instead.
In the console tree, select User Configuration or Computer Configuration, and then Windows Settings, followed by Security Settings, and finally Software Restriction Policies (shown in Figure 28-9).
Right-click Software Restriction Policies, and choose New Software Restriction Policies.
Specify the default rule by selecting the Security Levels container, right-clicking the appropriate security level, and then choosing Set As Default from the shortcut menu.
Important
If you set the default security level to Disallowed, create path rules to allow all locations from which Windows runs login scripts, and do not delete the default path rules or change them to Disallowed. Doing so can inadvertently prevent users from logging on by blocking the execution of key Windows programs. When using the Disallowed security level, set the Apply Group Policy permission of the GPO to Deny for the Domain Admins group, pay attention to any application dependencies, and test the policy extensively in a lab. The Disallowed setting increases your workload, because every new program and many updates require changes to the software restriction policy. If you inadvertently lock yourself out, restart the computer in Safe Mode, log on as a local Administrator and then change or disable the software restriction policy.
Create rules to identify software. To do so, right-click the Additional Rules container and then choose one of the following options:
New Certificate Rule. Select the certificate to require or block.
New Hash Rule. Select the file to allow or block.
New Internet Zone Rule. Select the Internet Zone from which you want to permit or block program installation.
New Path Rule. Select or type the path to allow or block. Use the existing registry path rules as a guide for creating path rules that reference registry keys.
Double-click the Enforcement item in the Software Restriction Policies container to specify how to enforce the policies. Select the All Software Files Except Libraries option to reduce the risk of inadvertently blocking key files and to reduce the performance impact of the policy. Select the All Users Except Local Administrators option to allow local administrators to get around software restriction policies. (Local administrators can defeat software restriction policies anyway with a small amount of effort.)
Double-click the Designated File Types item to control which file types are included in the software restriction policies. Most of the essential types are listed, though you can add Perl (.PL) or another file type to the list, depending on what is in use on the network.
Double-click the Trusted Publishers item to control whether End Users, Local Computer Administrators, or Enterprise Administrators are allowed to determine which certificates are trusted when opening ActiveX controls or other digitally signed programs.

Remote Installation Services (RIS) is a Windows Server 2003 service that enables users to boot a bare-metal, functioning or nonfunctioning computer from the network and install Windows in a small number of simple steps. You can use RIS with the IntelliMirror technologies (User Settings Management, User Data Management, and Software Installation) to install Windows and then automatically add a user’s personalized work environment—complete with the user’s computer settings, software applications, and data.
This capability can come in handy. For example, you might want to purchase a new computer and give it to an existing user, or recycle an old server as a desktop. Using RIS and IntelliMirror, simply boot the computer from the network, log on and select the appropriate operating system image, which is then installed automatically. When a user logs on for the first time, Windows downloads settings and applications from the network, minimizing setup time and effort.
The sections that follow describe how RIS works, how to determine whether the network meets the requirements for RIS, and how to install and use RIS to set up client systems.
More Info
RIS is not the optimal Windows deployment technology for all scenarios. For information about choosing the best deployment methods for a network, see Chapter 5. For more in-depth information about RIS, see the Windows Server 2003 Deployment Kit, available on the Microsoft Web site at http://www.microsoft.com/windowsserver2003/techinfo/reskit/deploykit.mspx.
The following steps occur when installing an operating system using RIS:
The user or administrator turns the client computer on.
The client computer performs its power on self-test (POST) sequence and then uses a network card with Preboot Execution Environment (PXE) support (or the Remote Boot Disk) to obtain an IP address from a Dynamic Host Configuration Protocol (DHCP) server on the local subnet.
All RIS servers on the local subnet that receive the client computer’s DHCP request broadcast examine the globally unique identifier (GUID) of the client (also known as the universally unique identifier UUID), and then search Active Directory for a prestaged computer account with this GUID.
More Info
See the Prestaging a Client section of this chapter for information about prestaged computer accounts.
If the RIS servers find a computer account with the client computer’s GUID, or if the RIS servers are configured to respond to unknown client computers, the RIS servers query Active Directory to determine whether a particular RIS server is assigned to the client. If so, that server handles the request; if not, the first RIS server to respond handles the request.
If the RIS servers do not find a computer account with the client computer’s GUID and the RIS servers are configured to reply only to known client computers, the client computer request fails.
After the client computer receives a response from the RIS server, it uses the Trivial File Transfer Protocol (TFTP) to download Startrom.com.
Startrom.com prompts the user to press F12 to start the computer from the network. After pressing F12, the client computer uses TFTP to download the Client Installation Wizard pages from the RIS server.
Note
To start client computers from the network automatically without pressing F12, rename Startrom.com to Startrom.bak, and rename Startrom.n12 to Startrom.com. However, do not do this if the network adapter is listed first in the BIOS boot order of the client computers. Instead, list the hard drive first so that when the drive is blank the computer starts from the network adapter, but subsequently starts from the hard drive.
After the user authenticates with Active Directory by logging in, RIS uses Group Policy to determine which pages to display.
After the user selects an operating system image, RIS restarts the computer in text-mode Windows Setup, repartitions and formats the hard drive, and then proceeds with Setup using the RIS server as the installation source.
You can install RIS on any server running Windows Server 2003 or Windows 2000 server that is a member of a properly functioning Active Directory forest. Use the following guidelines to ensure adequate RIS server performance:
Place one or more RIS servers on each network segment that has RIS clients. RIS is not slow-link aware and relies on DHCP broadcasts that routers might not forward, so avoid deploying Windows over a WAN connection using RIS. If you have multiple sites, deploy one or more RIS servers to each site.
In environments where administrators centrally install large numbers of systems using RIS, create a build lab with an appropriate level of physical security and a dedicated high-speed network to maximize performance and security and to minimize impact on the production network.
Use one RIS server for every 75 simultaneous RIS clients at most. RIS ignores additional PXE client requests in most circumstances.
Use dedicated RIS servers in high-volume environments. If a RIS server becomes overloaded, it might affect any other services running on the server, such as DHCP. See Chapter 5 for information about sizing a server.
Use Windows Server 2003. The RIS service in Windows 2000 Server is slower and less robust.
Create a separate NTFS partition or use a separate physical disk or RAID subsystem with a minimum of 2 GB of free disk space (and 10 GB is better) for operating system images.
Do not use Encrypting File System (EFS), mount points, or DFS folder targets in the Remote Installation folder.
Do not use multiple network interface cards (NICs) on the RIS server.
Note
You can use DFS Replication to replicate images and answer files from one RIS server to another, though you must manually specify RIS settings on each server. To replicate images, create a replication group for the Images folder (for example E:ReminstSetupEnglishImages). See the Creating a Multipurpose Replication Group section of Chapter 20 for more information.
RIS clients also need to meet or preferably exceed the minimum system requirements for the operating system. In addition, the systems require a 10-Mbps or preferably 100-Mbps wired NIC that supports PXE remote boot or is explicitly supported by the remote boot disk. (See the Creating a Remote Boot Disk section later in this chapter for more information.)
Note
3Com 3C905 series network cards might generate unnecessary broadcast traffic in Windows if the BOOTP ROM chip is installed (which is necessary for PXE support). If you use these cards with the BOOTP ROM chip installed and see a decrease in network performance, use Network Monitor to determine whether the cards are generating unnecessary BOOTP/DHCP broadcasts. If they are, replace the affected network cards or pull the BOOTP ROM chips after installing Windows.
After choosing the RIS server, use the following procedure to install the service and run the initial setup wizard:
Open Add/Remove Programs from Control Panel, and then click Add/Remove Windows Components in the left pane to launch the Windows Components Wizard.
Select the Remote Installation Services check box, and then click Next to install it. Restart the server when prompted.
Launch Remote Installation Services Setup from the Administrative Tools folder using a user account that is a member of the Enterprise Admins group or has delegated permissions.
On the Remote Installation Folder Location page, type the folder path to use as the root for the RIS operating systems. The path cannot be on the system partition, and it must be an NTFS 5–formatted unencrypted partition or volume with enough free disk space for all the installations. You cannot use a DFS folder target either, although you can use DFS Replication to replicate the Remote Installation folder.
On the Initial Settings page, select the Respond To Client Computers Requesting Service check box to enable RIS immediately and optionally select the Do Not Respond To Unknown Client Computers check box to prevent computers that do not already have a computer account in Active Directory from receiving an operating system installation.
This limits the amount of information that rogue clients can obtain about the RIS server, and it can help mitigate the risk of rogue servers when combined with prestaged accounts that specify the RIS server. See the Prestaging a Client section later in this chapter for more information.
On the Installation Source Files Location page, type the path to the Windows installation files.
On the Windows Installation Image Folder Name page, type a name for the folder that stores this operating system image. The name cannot contain any special characters or spaces and must contain 39 characters or fewer. The total path cannot exceed 130 characters.
On the Friendly Description And Help Text page, type a user-friendly name and description for the operating system image. This is the description users see listed as an operating system choice when they boot from the network.
Review the settings on the next page, and then click Finish to set up the server. RIS configures a number of settings and copies the necessary files, and then the service starts, if you chose to enable it, allowing the server to begin serving client requests.
To install and configure RIS from a command prompt, you can use the Risetup command. For example use the following steps:
Create an answer file for the Windows Components Wizard by creating a text file named C:Sysocmgr.ini (for example) that includes the following text:
[Components]
Reminst = On
Insert the Windows Server 2003 CD-ROM or connect to the Windows installation share, open a command prompt window, and then type the following command: Sysocmgr /i:%WINDIR%InfSysoc.inf /u:C:Sysocmgr.ini
Create an answer file for the Remote Installation Services Setup Wizard by creating a text file named C:Risetup.ini that includes the following text:
[Version]
Signature = "$Windows NT$"

[Risetup]
RootDir = "E:RemoteInstall"
Source ="D:"
Directory = "Windows_XP_Pro"
Description = "Windows XP Professional"
HelpText = "Standard Windows XP Professional install for English-
speaking users."
Screens = "Overwrite"
Architecture = "x86"
Language = "English"
Open a command prompt window and then type the following command: Risetup /auto C:Risetup.ini.
Note
To use RIS to deploy Windows Server 2003 R2, you must perform some additional steps, as discussed in the Adding a Windows Server 2003 R2 Image section of this chapter.
The Remote Installation Services Setup Wizard sets basic options and installs a single operating system image. To deploy additional operating systems or to change settings, use the following sections.
Note
You can use DFS Replication to replicate images and answer files from one RIS server to another, though you must manually change RIS settings on each server. To do so, use the Creating a Multipurpose Replication Group section of Chapter 20 to create a replication group for the Images folder (for example, E:ReminstSetupEnglishImages).
To change RIS settings, view RIS clients, or verify the functionality of a RIS server, open the Active Directory Users and Computers console, right-click the server hosting RIS, choose Properties, and then click the Remote Install tab. Then use the following list to decide which options you should use:
Verifying Server Functionality. To quickly check the status of a RIS server and attempt to fix any problems, click Verify Server or type Risetup /check in a command prompt window to start the Check Server Wizard. Click Finish on the last page of the wizard to start or unpause the Remote Installation service if it is stopped or paused, or click Cancel to leave the service in its current state.
Note
The Check Server Wizard checks only that the RIS server is installed properly. It does not check the integrity of any operating system images on the server or the ability of clients to reach the server across the network. If you experience any problems, check the server’s event log and check the functionality of the DHCP, DNS, and Active Directory services.
Enabling or Disabling RIS. To enable the RIS server to respond to client requests, select the Respond To Client Computers Requesting Service check box. To prevent the RIS server from responding, clear the check box.
Ignoring Unknown Client Computers. To prevent computers that do not already have a computer account in Active Directory from installing an operating system using RIS, select the Do Not Respond To Unknown Client Computers check box. This limits the amount of information that rogue clients can obtain about the RIS server, and it can help mitigate the risk of rogue servers when combined with prestaged accounts that specify the RIS server. See the Prestaging a Client section later in this chapter for more information.
Ignoring unknown clients is also necessary if there is another remote boot/installation program on the network.
Viewing Clients. To view a list of clients that have used the server to install Windows or that are prestaged to install Windows from the server, click Show Clients.
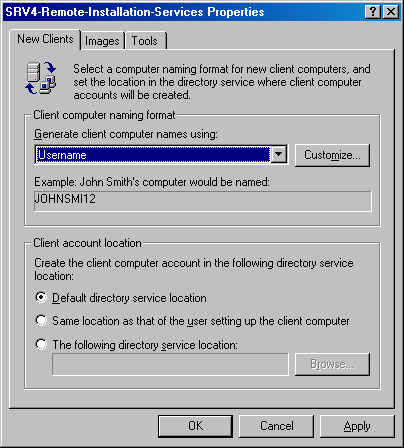
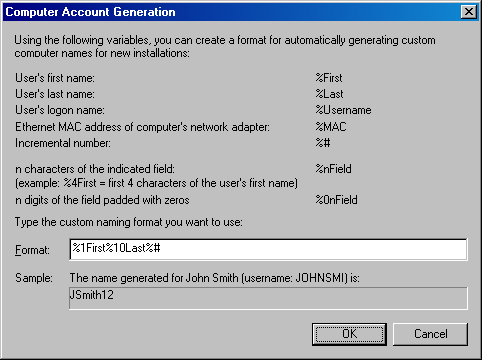
Changing How RIS Names Computer Accounts. To change how RIS creates computer names (perhaps to match your computer naming convention), click Advanced Settings, and then use the Generate Client Computer Names Using box in the Remote-Installation-Services Properties dialog box, as shown in Figure 28-10, or click Customize to create your own computer name format, as shown in Figure 28-11.
By default, RIS creates a computer name by appending a number to the user name of the account used to log on to Active Directory during the client installation. The user account used to log on during client installation must have sufficient permissions to create a computer account in the appropriate Active Directory container unless the system is prestaged, as described in Prestaging a Client later in this chapter.
Note
You can combine several fields when defining a computer-naming format. For example, the string %1First%10Last%# yields computer names using the first letter of a user’s first name and then 10 characters from the user’s last name, followed by a number—for example JSMITH11. This yields a NetBIOS-compliant computer name that is easily readable by legacy clients such as Windows NT and Windows 98.
Changing Where RIS Creates Computer Accounts. To change where RIS creates computer accounts, click Advanced Settings on the Remote Install tab, and then use the Client Account Location section of the Remote-Installation-Services Properties dialog box to specify where to create the clients’ computer accounts:
To create the clients’ computer accounts in the default Active Directory location (the Computers container in the RIS server’s domain), select the Default Directory Service Location option on the New Clients tab.
To create the computer accounts in the same place in Active Directory as the user’s user account (probably the Users container), select the Same Location As That Of The User Setting Up The Client Computer option.
To manually specify a location in Active Directory for the computer accounts, select The Following Directory Service Location, and then click Browse and locate the appropriate container. Click OK when finished.
You can regulate the level of control users have over RIS installations by using Group Policy. To do so, use the following procedure. (Note that you can also apply permissions to individual operating system images, as discussed in the Managing Operating System Images section later in this chapter.)
Create and link a new GPO to the appropriate domain or OU that contains the RIS users. Make sure that the link order for the GPO takes precedence (is lower) than the Default Domain Policy.
In the Group Policy Object Editor, select User Configuration, and then Windows Settings, followed by Remote Installation Services, and finally double-click Choice Options.
Enable, disable, or leave unconfigured the following client installation choices, which appear during client setup after the user logs on:
Automatic Setup. The easiest installation option, this option checks the GUID of the computer to see whether it has been prestaged, and if so, it keeps the previously created computer account. Otherwise, it creates a computer name based on the naming convention specified by the RIS server (as described earlier in this chapter) without prompting the user.
Custom Setup. This option provides users the ability to specify the computer name and the location within Active Directory used to store the computer account. When this option is enabled, administrators can prestage a client computer by using the Client Setup Wizard and canceling on the last page before beginning Windows Setup, after RIS creates the managed computer account.
Restart Setup. This option allows RIS to restart a failed setup attempt using the information already provided by the user (if applicable), without attempting to fix setup problems. For example, if the user typed her full name during the failed setup attempt, RIS would not prompt the user again, if possible.
Tools. This option displays any maintenance tools installed for network boot clients.
Important
Do not enable Custom Setup in a GPO that applies to end users when you are going to prestage the computers, because it presents the possibility of the users creating duplicate computer accounts if the GUID, computer name, and Active Directory location they choose do not exactly match those created when prestaging the computers.
Managing the operating systems available for install using RIS involves a few different tasks, such as adding operating system images, customizing existing images with answer files, and changing permissions and settings for existing images, as discussed in the following sections.
More Info
For information about adding device drivers, service packs, or software updates to the Remote Installation folder, see the Creating and Modifying a Distribution Share section of Chapter 5.
To use a Windows CD-ROM or installation source to add an Setup-based operating system "image" to a RIS server (not to be confused with a disk image solution such as that used by RIPrep), use the following procedure:
Open the Active Directory Users and Computers console.
In the applicable domain and OU, right-click the server hosting RIS, choose Properties, and then click the Remote Install tab.
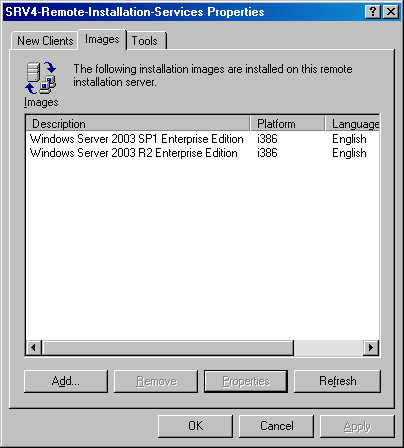
Click Advanced Settings, and then click the Images tab (as shown in Figure 28-12).
Click Add, select Add A New Installation Image on the New Answer File Or Installation Image page of the Add Wizard, and then click Next. The Remote Installation Services Setup Wizard appears.
Note
You install RIPrep images from the computer you create the image on, and you do so at the time you create the image. For more information, see the Using Remote Installation Preparation section later in this chapter.
On the Installation Source Files Location page, type the path to the i386 or amd64 folder.
On the Windows Installation Image Folder Name page, type a name for the folder to store this operating system image. The name cannot contain any special characters or spaces and must contain 39 characters or fewer. The total path cannot exceed 130 characters.
On the Friendly Description And Help Text page, type a user-friendly name and description for the operating system image. This is the description users see listed as an operating system choice when they boot from the network.
Note
To enable clients to install support for multiple languages, copy the contents of the i386Lang folder (and all subfolders) from the Windows CD-ROM to the \RISServerNameRemoteInstallSetupclientlanguageImagesimagenamei386Lang folder. (Use the amd64Lang folder for x64-based images.) To enable multiple languages during client setup, replace the Welcome.osc file on the RIS server with an appropriately modified and renamed Multilng.osc, and create Client Installation Wizard pages for any additional languages. For more information, see the Windows Server 2003 Deployment Kit, available on the Microsoft Web site at http://www.microsoft.com/windowsserver2003/techinfo/reskit/deploykit.mspx.
If the Previous Client Installation Screens Found page appears, choose whether to keep the existing client installation screens or overwrite them with the client installation screens provided by the operating system you are adding (even if they are older than the existing screens).
Keep the screens associated with the newest version of Windows you deploy, unless you make customizations to the client installation screens, in which case select Use The New Client Installation Screens, And Rename The Old Ones With A .bak Extension to make backup copies of the existing screens that you can later integrate with the newer screens.
Real World: Client Installation Screens for x64 Editions of Windows
Clean installations of Windows Server 2003 R2 and Windows Server 2003 with Service Pack 1 include the X8664.osc screen that enables users with x64-based computers to choose between x64 and x86 versions of an operating system. To enable this screen on a RIS server upgraded to Windows Server 2003 Service Pack 1 or Windows Server 2003 R2, add an x64-based Windows image and choose to overwrite the existing screens. Do not overwrite these newer screens with those of an older version of Windows, such as Windows XP Service Pack 2. Doing so disables or deletes the X8664.osc screen.
To force all new x64 RIS clients to see only x64 images, or only x86 images, use the following registry key: HKLMSystemCurrentControlSetServicesBINLSVCParameters. Set the DefaultPlatformforX8664 value to "amd64" or "i386". For more information, see Microsoft Knowledge Base Article 891128.
On the Review Settings page, click Finish to add the image to RIS.
To start the Add Installation Wizard from a command prompt, open a command prompt window and then type Risetup /Add. To automate the Add Installation Wizard, use the Risetup /Auto command with an answer file. For example, use the following steps:
Create (or edit) an answer file for the Remote Installation Services Setup Wizard by creating a text file named C:Risetup.ini (for example) that includes the following text:
[Version]
Signature = "$Windows NT$"

[Risetup]
RootDir = "E:RemoteInstall"
Source ="D:"
Directory = "Windows_XP_Pro"
Description = "Windows XP Professional"
HelpText = "Standard Windows XP Professional install for English-
speaking users."
Screens = "Overwrite"
Architecture = "x86"
Language = "English"
Open a command prompt window and then type the following command: Risetup /auto C:Risetup.ini.
Note
To use RIS to deploy Windows Server 2003 R2, you must perform some additional steps, as discussed in the Adding a Windows Server 2003 R2 Image section of this chapter.
To add a CD-based Windows Server 2003 R2 image to a RIS server, add a Windows Server 2003 with Service Pack 1 CD-Based image to the RIS server, and then modify the image to install Windows Server 2003 R2 automatically. No special steps are needed to create a Windows Server 2003 R2 RIPrep image.
To add a CD-based Windows Server 2003 R2 image to a RIS server, follow these steps:
Add a Windows Server 2003 with Service Pack 1 CD-Based image to the RIS server, as described in the previous section. This image must be of the same platform, edition, and language as the Windows Server 2003 R2 image you want to add.
Copy the Cmpnents folder from Windows Server 2003 R2 Disc 2 into the existing Windows Server 2003 with Service Pack 1 RIS image at the same level as the i386 or amd64 folder—for example, E:RemoteInstallSetupEnglishImagesWindowsServer2003R2EnterpriseCmpnents.
Create a copy of the RIS answer file (Ristndrd.sif by default), and add the following lines:
[GUIRunOnce]
"Cmd /C \%SERVERNAME%Reminst\%INSTALLPATH%CmpnentsR2Setup2.exe /Q /A"
Associate the new RIS answer file with the image (as described in the next section).
Real World: Forcing RIS to Log On Automatically
When installing a CD-based Windows Server 2003 R2 image using RIS, Windows installs Windows Server 2003 with Service Pack 1, disables the local Administrator account, and then stops. Disabling the local Administrator account is more secure than setting a shared Administrator password for all computers that use the plain-text RIS answer file. You cannot encrypt the Administrator password and use the Autologon feature.
After an administrator logs on using an account that is a member of the Domain Admins group, Windows Server 2003 R2 Setup runs automatically from the [GUIRunOnce] section of the answer file.
To force RIS to logon automatically using the local Administrator account, install Windows Server 2003 R2, disable the local Administrator account for proper security, and then restart, use the following steps:
Open the answer file and type a semicolon in front of the following line so that RIS does not disable the local Administrator account during Setup:
DisableAdminAccountOnDomainJoin=1
Add the following lines to the [GuiUnattended] section so that RIS logs on automatically without prompting for a password:
AdminPassword = "Password"
AutoLogon = Yes
AutoLogonCount = 1
Add the following [GuiRunOnce] section, where [email protected] is the name of a limited security domain account with Read And Execute permissions to the Remote Installation share, Password is the password for the user account, and EXAMPLE is the name of the domain. This section authenticates with the Remote Installation share, runs Windows Server 2003 R2 Setup, disables the local Administrator account, and then restarts the computer.
[GUIRunOnce]
"Cmd /C Net Use \%SERVERNAME%Reminst /User:[email protected] Password"
"Cmd /C \%SERVERNAME%Reminst\%INSTALLPATH%CmpnentsR2Setup2.exe /Q /A"
"Cmd /C WMIC UserAccount Where 'Name='Administrator' And Domain!='EXAMPLE' '
    Set Disabled=True" "Cmd /C Shutdown –R –T 0"
Answer files are small text files that provide answers to the questions asked by a program such as Windows Setup. Answer files can completely automate the Windows setup process, partially automate the process, or merely provide default settings.
Create additional answer files for RIS images by making copies of the existing answer files and then modifying the copies using the same techniques as for a standard Unattend.txt answer file (which are discussed at length in Chapter 5). After customizing an answer file, associate it with an operating system image in RIS. The answer file then appears as a new operating system image, both on the RIS server and to RIS clients, although very little additional disk space is consumed (just a couple of kilobytes for the answer file). The answer file simply modifies how clients use an existing image.
To associate an answer file with an existing image on a RIS server, use the following procedure:
On the Images tab of the Remote-Installation-Services Properties dialog box (shown in Figure 28-12), click Add. The Add Wizard appears.
On the New Answer File Or Installation Image page, select Associate A New Answer File To An Existing Image.
On the Unattended Setup Answer File Source page, choose whether to use a sample answer file provided by Windows (Ristndr.sif or Rinorprt.sif), an answer file from another RIS server, or an answer file in another location.
On the Select An Installation Image, select the operating system image to which you want to apply the answer file.
On the Select A Sample Answer File page that appears when you choose to use a sample answer file, choose the default answer file (Ristndr.sif) or the "no repartition" answer file (Rinorprt.sif).
On the Select A Remote Installation Server page that appears when you choose to use an answer file from another RIS server, specify the RIS server that contains the answer file.
On the Select An Answer File To Copy page that appears when you choose to use an answer file from another RIS server, select the appropriate answer file.
On the Friendly Description And Help Text page, type a user-friendly name and description for the operating system image. This is the description users see listed as an operating system choice when they boot from the network.
On the Review Settings page, click Finish to associate the answer file to the appropriate operating system image.
To add an answer file to an existing image from a command prompt, copy the answer file to the i386Templates and/or amd64Templates folder of the operating system image. For example, type the following command:
Copy E:R2ris.sif  \Srv4ReminstSetupEnglishImages
WindowsServer2003R2Enterprisei386Templates
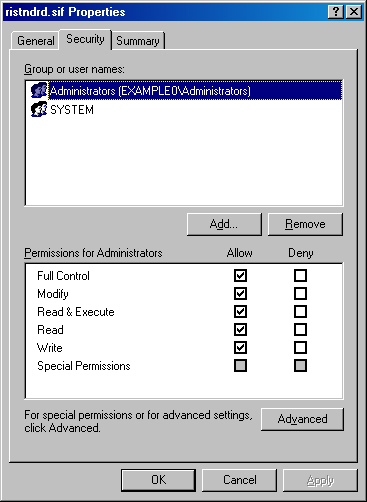
To control which groups of users can install an operating system image using RIS, use the following procedure to modify the security settings for the answer file associated with an operating system image:
Note
The default permissions for the Remote Installation folder (usually Reminst) allow members of the Authenticated Users group to perform installations, and members of the Administrators group to administer operating system images and answer files. The Reminst share permissions grant Everyone Full Control, but the folder permissions supersede the share permissions.
Right-click the Remote Installation folder (usually Reminst) in Windows Explorer, choose Properties, and then use the Security tab to set the appropriate general permissions for RIS:
Set the Read & Execute, List Folder Contents, and Read permissions to Allow for a group to enable members of the group to use RIS. Remove a group to prevent members of the group from using RIS.
Set the Full Control permission to Allow for a group to enable members of the group to administer RIS. Do not remove the System group.
On the Images tab of the Remote-Installation-Services Properties dialog box, select an operating system image from the list and then click Properties.
Click Permissions and then click the Security tab, as shown in Figure 28-13.
Set the Read permission and the Read & Execute permission to Allow for a particular group to enable members of the group to see this answer file in the Client Installation Wizard. Remove a group to prevent members of the group from seeing this answer file.
To rename operating system images, change their descriptions, or remove operating system images from a RIS server, on the Images tab of the Remote-Installation-Services Properties dialog box, select an operating system image from the list, click Properties and then use the following list:
To view or change the friendly description and help text associated with an image, select the image and click Properties. You can also see whether the image is CD-based (flat) or RIPrep-based here.
To remove an unattended answer file associated with an operating system image, select the image to remove and click Remove. (Make a copy of the answer file first so you don’t lose it.)
RIS provides the ability to add tools to a RIS server that client computers can download and execute over the network. One invaluable tool to add to a RIS server is Microsoft Windows PE. Start Windows PE from a RIS server and then use it to prepare the hard disk, perform hardware diagnostics, and run utilities. To obtain Windows PE, see the Microsoft Volume Licensing Web site at http://www.microsoft.com/licensing/programs/sa/support/winpe.mspx.
Note
To maximize RIS server scalability when using Windows PE, use a Windows Server 2003 RIS server and add a Windows PE 2005 or newer RAM disk image instead of a CD-based image. When using a RAM disk image, the client computer downloads the RAM disk image and then releases its connection with the RIS server, allowing the server to service more clients.
In addition to Windows PE, there are RIS "menu editors" that allow adding your own tools in the form of a boot image that downloads from the RIS server. This is useful for adding disk imaging programs to the Maintenance And Troubleshooting Tools page of the Client Installation Wizard, for example. Two companies that make RIS menu editors are Argon Technology (http://www.argontechnology.com) and emBoot Inc. (http://www.emboot.com).
The Remote Installation Preparation (RIPrep) Wizard allows you to create a Windows installation complete with applications and settings, image it, and then deploy it using RIS. This technique is similar to using the System Preparation (Sysprep) tool in combination with a third-party disk-imaging program. However, using RIPrep has a couple of advantages, such as built-in imaging and distribution software and greater tolerance for different hardware; and it has a couple disadvantages, such as slower performance and reliance on network adapters with PXE boot capabilities. For more information about the relative merits of RIPrep images, see Chapter 5.
Important
Install the operating system and all applications and files in a single boot partition on the C drive of the reference computer. RIPrep does not support multiple partitions.
Real World: RIPrep Cautions
Make sure the BIOS on both the reference system and the RIS clients have up-to-date Advanced Configuration Power Interface (ACPI) support. RIPrep does not support mixing systems with different hardware abstraction layers (HALs), such as ACPI, Standard PC, uniprocessor, and multiprocessor. You cannot include encrypted files in a RIPrep image.
Additionally, certain desktop shortcuts might not work properly on RIS clients made from RIPrep images. For example, the Microsoft Outlook 2000 desktop shortcut does not work after a RIPrep RIS installation unless you disable 8.3 name creation on the reference computer before running RIPrep. To do this, change the HKEY_LOCAL_MACHINESYSTEMCurrentControlSetControlFileSystemsNtfsDisable8dot3NameCreation registry key from 0 to 1. For more information, see Microsoft Knowledge Base Article 250642.
To create an operating system image using RIPrep, follow these steps:
Add a CD-based image of the operating system to the RIS server. The CD-based image must be of the same language, version, and SKU as the operating system you want to image using RIPrep, but it does not need to be the same service pack level.
Install Windows on the reference system, preferably using RIS. Create a single disk partition and make it only large enough to accommodate the operating system and any applications you install. During client setup, RIS uses the size of the reference system’s C partition to determine the required disk space for the Windows installation, and later expands the disk partition to fill the entire disk.
Install any applications that do not use Windows Installer.
Install any Windows Installer applications by using Group Policy, as described earlier in this chapter. This permits you to manage these applications through Group Policy after the RIS setup process installs Windows on client systems. (Make sure to apply the same GPOs to both the reference computer and the computers that eventually install Windows using the RIS image; otherwise, the software you install might be immediately uninstalled.)
Change the system settings as appropriate—for example, by changing the color scheme or desktop settings. To save the profile settings, copy the profile into the Default User profile. (See the sidebar Copying User Profiles for more information.)
Delete any local user accounts that you do not want to copy to RIS client computers, and delete any extra user profiles.
Close all applications, and stop all nonessential services running on the system.
Run Riprep.exe from the RIS server’s RemoteInstallAdmini386 folder. The Remote Installation Preparation Wizard appears.
On the Server Name page, type the name of the RIS server on which to store the image.
On the Folder Name page, type a name for the folder that will store this operating system image.
On the Friendly Description And Help Text page, type a user-friendly name and description for the operating system image. This is the description users see listed as an operating system choice when they boot from the network.
On the Report System Compatibility page, review any compatibility errors.
On the Stop Services page, review the list of services that must be stopped before the Remote Installation Preparation Wizard can image the system. When you click Next, the Remote Installation Preparation Wizard attempts to stop these services automatically.
On the Programs Or Services Are Running page, review the list of programs or services that the Remote Installation Preparation Wizard cannot stop, and then close these applications or stop these services manually using the Services MMC snap-in and Task Manager, if necessary.
Review the information presented after the image is created, and then click Next to copy the image to the RIS server. When this process is complete, the system shuts down.
After installing the RIPrep image on a new computer, Mini-Setup runs, prompting the user for a Product Key and his name before preparing the computer for use. To eliminate these prompts, see the The Default Ristndrd.sif and RIPrep.sif Answer Files sidebar, earlier in this chapter.
Note
When installing clients from a RIPrep image, RIS partitions the hard disk into one large partition on the first disk. If you prefer, RIS can create a partition on the first disk that is exactly the same size as the image partition and leave the rest of the disk unpartitioned. To do this, change the setting of the UseWholeDisk key in the Riprep.sif file from Yes to No. This file is located in the \RISServerNameRemoteInstallSetupclientlanguageImagesimagenamei386Templates folder.
After setting up the RIS servers, you can start deploying Windows to computers that meet the requirements for RIS (as discussed in the RIS Requirements and System Recommendations section of this chapter). This section describes how to prestage a client computer, create a remote boot disk, and perform a client installation using RIS.
Prestage a client by creating a managed computer account in Active Directory. A managed computer account is simply an account associated with the client system’s globally unique identifier (GUID) or universally unique identifier (UUID), which are unique to every network card and not as susceptible to theft by rogue clients as Media Access Control (MAC) Layer addresses are.
Prestaging client computers has the following benefits:
Helps protect a RIS server against rogue clients when combined with the Do Not Respond To Unknown Clients setting.
Helps protect RIS clients against rogue servers when combined with specifying in the managed computer account the RIS server to which the client computer can connect.
Enables users who do not have permissions to create computer accounts to use the Client Setup Wizard (when you grant the appropriate group permission to join the computer account to the domain, as discussed below).
Ensures that the computer name complies with the organization’s computer naming conventions.
Note
Many original equipment manufacturers (OEMs) will provide a spreadsheet containing a list of GUIDs for the computers you purchase. Use this list in conjunction with the sample scripts included in the Microsoft Windows Server 2003 Deployment Kit (available on the Microsoft Download Web site at http://www.microsoft.com/downloads) to prestage a large number of computers simultaneously.
There are two ways to prestage a client computer. The easiest way to prestage a computer is to boot the client computer into the Client Installation Wizard (as discussed later in this chapter), logon using an Administrator account, select an operating system image, and then power off the computer when the Installation Information page appears that displays the computer account name and GUID. This creates a managed computer account for the computer and joins it to the domain, but it does not install Windows. A user can use RIS later to install an operating system on the computer without requiring permissions to create a computer account or join the account to the domain, because these tasks are already complete.
You can also prestage a client from a server, which eliminates the need to touch the client computer. To do so, follow these steps:
Open the Active Directory Users and Computers console.
Open the domain or OU in which you want to create the new computer account.
Right-click the container in which you want to store the computer account, choose New, and then Computer.
On the New Object – Computer page (shown in Figure 28-14), type the name for the computer and, if necessary, a 15-character or shorter version of the name so that Pre-Windows 2000 clients can access the computer.
Click Change and then use the Select User Or Group dialog box to specify who can use this computer account during the Client Installation Wizard to install Windows and join the domain. This does not grant the specified user or group permissions to create or add other computer accounts.
Important
Prestaging a client computer does not automatically enable users to perform the RIS installation—you must explicitly grant the appropriate group permission to join the computer to the domain when creating the computer account. Otherwise, users receive an Access Denied message during the Client Installation Wizard.
On the Managed page, select the This Is A Managed Computer check box, and then type the GUID for the computer in the Computer’s Unique ID box, as shown in Figure 28-15.
On the Host Server page, choose whether you want the client to use the first RIS server to respond to the client request or a specific server. Specifying a server helps reduce the risk of the client computer connecting to a rogue RIS server created by an attacker on the internal network.
On the New Object—Computer page, review the settings and then click Finish to create the computer account.
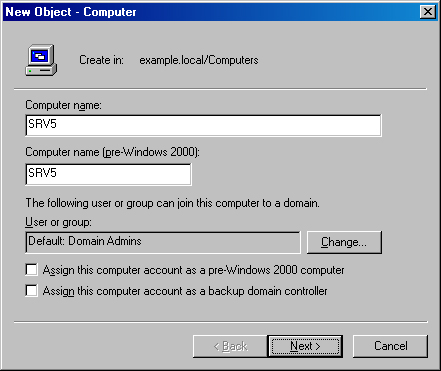
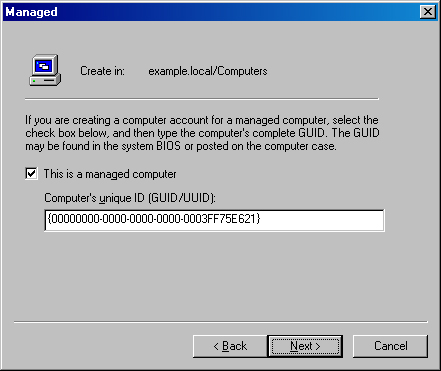
Real World: Working with GUIDs
RIS uses a computer’s GUID to keep track of client computers. The GUID comes from the PXE ROM on PXE-enabled network cards or from the network card’s MAC address when you boot with the Remote Boot Disk. (In this instance, it is the MAC address with 20 zeros appended to the beginning of the address.) The computer manufacturer often writes the GUID on a sticker located on or inside the computer’s case. It can also be located inside the system BIOS.
If you have trouble finding the GUID, there are a number of ways to locate it. The first way is to make a WMI query for the UUID property of the Win32_ComputerSystemProduct class. You can do this from a command prompt by typing Wmic/Node: "Computername" CSProduct Get UUID, where Computername is the name of the appropriate computer.
You can also set up a RIS server configured to answer all RIS client requests on a private subnet. Then connect any clients to prestage and have them perform a network boot, log on, and select an OS image. Just before the client performs the Windows installation, the Client Installation Wizard displays a summary page with the computer account name and GUID. At this point, the client is prestaged in Active Directory as long as the RIS server used is part of the Active Directory. Write down the GUID for reference.
If a client computer does not have a NIC that is PXE remote-boot compatible, you need to create a remote boot disk to use RIS. To do so, follow these steps:
Place a blank, 1.44-MB floppy disk in the computer’s floppy drive.
Connect to the RIS server, and launch Rbfg.exe from the server’s RemoteInstallAdmini386 folder.
In the Microsoft Windows Remote Boot Disk Generator dialog box, select the floppy drive.
To view a list of network cards supported by the remote boot disk, click Adapter List.
Click Create Disk to create the disk.
The actual process of installing an operating system remotely is easy, and you might choose to have users perform it themselves. To perform a remote OS installation, go to the client system and follow these steps:
If using a boot disk, place it in the floppy drive.
Turn on or restart the computer, and then set the appropriate boot order in the system BIOS, as described here:
If the hard disk is blank, set the BIOS to boot from the hard disk first and the Network second. This enables you to automatically boot into the Client Installation Wizard by renaming the Startrom.n12 file on the RIS server to Startrom.com, eliminating the press F12 prompt.
If the hard disk has an existing operating system that you want to overwrite, set the BIOS to boot from the Network first and the hard disk second (or third), or disable the boot partition on the client computer by typing the following commands from within Windows PE, Windows Server 2003, or Windows XP Professional Service Pack 1 or later:
Diskpart
Select Disk 0
Select Partition 1
Inactive
Exit
Press F12 when prompted to boot from the network. The Client Installation Wizard appears.
On the Logon page of the Client Installation Wizard, type a valid user name and password for the domain.
If you did not prestage the computer, use an account with sufficient privileges to create a new computer account. If you prestaged the account from a server but did not delegate permission to join the computer account to the domain, use an account with sufficient privileges to join the computer account to the domain.
Security Alert
An attacker that succeeds in creating a rogue RIS server on the network could use the Client Installation Wizard to harvest user names and passwords. To mitigate this risk, prestage computer accounts and specify a known RIS server for each account, take appropriate steps to physically secure the network, and check the server name on the Logon page to verify that you connect to a valid RIS server.
On the Main Menu page, choose Automatic Setup, Custom Setup, Restart A Previous Setup Attempt, or Maintenance And Troubleshooting Tools, and then press Enter.
Some or all of these options might not be available depending on the Group Policy settings that apply to the user. For more information about these settings, see the Changing Client Group Policy Settings section of this chapter.
If you choose to perform a custom setup, on the Custom Setup page type the computer name and directory service path to use for the computer account.
On the OS Choices page, choose the image to install.
On the Caution page, press Enter.
On the Installation Information page, optionally write down the computer’s account name and GUID and then press Enter, or turn off the computer to complete Setup later. At this point, the computer is staged (or prestaged if you complete Setup later).
Windows then installs automatically, pausing only for a user name and CD-key (unless you added this information to the answer file, as described earlier in this chapter). If installing Windows Server 2003 R2, the final step of Setup (Windows Server 2003 R2 Setup) takes place after you logon to the server for the first time and Windows executes Setup2.exe from the [GUIRunOnce] section of the answer file.
Windows Server 2003 provides several useful tools for managing software. You can use the Software Installation component of Group Policy to deploy applications to computers on the network. The Software Restriction Policies component of Group Policy makes it possible to control which applications and scripts users can execute. Finally, RIS makes it easy to perform automated clean installations of Windows over the network, reducing the time it takes to set up new computers for employees or reuse old computers.