
For the instances where you need to block the form from getting saved due to a user input error I have mentioned briefly, it's always a good idea to return a message to the user and notify them of the reason for such a decision. The option specified results in returning an alert message to the user.
In other situations, you will find that posting a message on the form itself can be much more efficient. For one, it does not require an additional click of the mouse. Also, you can create a tally of all the messages, and display them all in one single spot, formatted to stand out.
Note
This recipe describes a customization approach that is not officially supported. The reason for this is that referencing the form elements is done outside of the standard Dynamics CRM object model. We are using the HTML/JavaScript page object model. Even though it's not officially supported, this type of customization has been available and functional since version 4.0.
For the purpose of this recipe, we will be either reusing any one of the previous solutions or creating a new one. We will be making our changes on the Contact form. For simplicity, we will only validate a single field, and return an error message on the form. You can later expand that functionality to incorporate validation of multiple fields, and return all the custom error messages in the same dialogue box on the form.
To handle UI events perform the following steps:
- Open the Contact main form for editing.
- Create a new custom field named Message (
new_message) of the type Two Options. - Add it to the form.
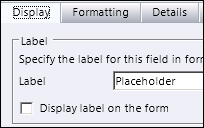
- Create a new single line of text field named Placeholder (
new_placeholder). - Place it on the form all the way at the top of the Name section of the General tab. Set its Formatting to Two Columns.
- Modify the field's properties. Uncheck the Display label on the form checkbox, as shown in the following screenshot:
- Save and publish the form.
- Add a new JScript web resource, named JS Message Box (
new_JSMessageBox). - Add a function that will launch on the form's load, named
contactLoad. This function will hide the Placeholder field we have created. The purpose of the Placeholder field is to define the location where our custom message will be displayed on the form:function contactLoad() { var _placeholder = document.getElementById("new_placeholder"); _placeholder.style.display = "none"; } - Add the following function, which sets the display message:
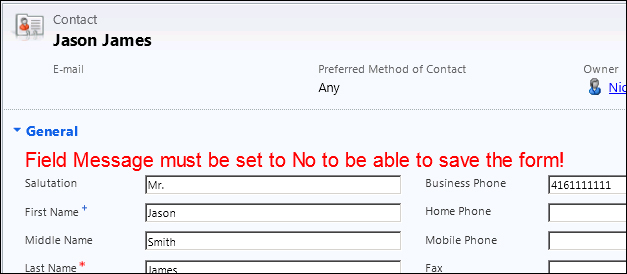
function ShowMessage() { var _placeholder = document.getElementById("new_placeholder"); if(_placeholder != null) { var _newDiv = document.createElement("div"); // style='overflow-y:auto; height:80px; border:1px #6699cc solid; background-color:#ffffff;' />"); _newDiv.id= 'divMessage'; _newDiv.innerHTML = "<label style='font-family:arial;color:red;font-size:20px'>Field Message must be set to No to be able to save the form!</label>"; _placeholder.style.display = "none"; var _previous = _placeholder.firstChild; if(_previous == null) { if(_placeholder.childNodes.length == 0) { _placeholder.parentNode.appendChild(_newDiv); } else { _placeholder.insertBefore(_newDiv, _previous); } } else { _placeholder.replaceChild(_newDiv, _previous); } } } - Add a base function that does the processing and determines when to show the message, and possibly, other logic:
function message(context) { var _isMessage = Xrm.Page.getAttribute("new_message").getValue(); if(_isMessage) { ShowMessage(); // other logic here } } - Save and publish your web resource.
- In the Contact main form properties, associate the
contactLoadfunction to the formOnOpenevent. - Also on the Contact main form associate the function message to the
OnSaveevent. You can alternatively associate this function at a field level if you want to do field validation and bring a message for invalid field value. - Save and publish your solution.
- Test your solution. The result will look similar to the following screenshot:
As mentioned previously, this customization falls in the unsupported category. The reason is that objects are accessed using standard HTML/JavaScript DOM and not the Dynamics CRM API. Although unsupported, this kind of customization has been used since previous versions of Dynamics CRM, and as long as the HMTL/JavaScript standards are being supported, it will work.
Message location is something you can easily determine by positioning your Placeholder field on the form at any location. For the purpose of this example, we have positioned the message at the top of the form, but that is not a mandatory location. Also, we have defined the placeholder to span the whole width of the page. You can decide to show the message only in one column if you desire so.
- Additional information on Document Object Model can be found by starting from the wiki page located at http://en.wikipedia.org/wiki/Document_Object_Model.
- w3schools has a good tutorial on using JavaScript to navigate the DOM in an XML file at http://www.w3schools.com/dom/dom_nodes_navigate.asp. For all intended purposes, HTML is following the standard XML format, thus making these same scenarios available when working with HMTL, XHTLM, and XML.
- Additional information on traversing the DOM can be found in W3C located at http://www.w3.org/wiki/Traversing_the_DOM.