
JQuery UI is an additional library based on jQuery. When using the jQuery UI, always load and reference the base jQuery library. The jQuery UI adds user interface interactions and effects to the standard jQuery library, along other features.
In order to use the jQuery UI library, proceed to the following URL and download the stable release:
At the time of writing, Version v1.9.1 was the most current version, and it required jQuery version 1.6 or above. Always make sure your jQuery library is in conformance with the requirements for jQuery UI.
One of the most used widget in this library is the tooltip widget. In this recipe we will look at how to use it in the context of Dynamics CRM.
For this recipe we will continue to use the previously created solution package. If you are starting fresh you can create a new solution package. We will implement our customization on the Contact entity.
If we are using the previously created solution, we already have the jQuery library loaded as a web resource. Otherwise, you have to load it.
- Open your existing solution.
- Add a new web resource. Name it
crm_jqueryui. Browse to the jQuery UI script file and load it. - Save and Publish your web resource.
- Add a new web resource of type CSS. The jQuery UI comes with an associated CSS file you need to also load. Name this web resource as
crm_jqueryuicss. - Save and Publish the web resource.
- In the same web resource where we added all the previous functions, add a new function as follows:
function MiddleNameTooltip() { var _css = "/WebResources/crm_jqueryuicss"; var cssref = document.createElement("link"); cssref.setAttribute("rel", "stylesheet"); cssref.setAttribute("type", "text/css"); cssref.setAttribute("href", _css); $("head").append(cssref); var _obj = document.getElementById("middlename_d").children[0]; _obj.title = ""; $("#middlename_d").tooltip({ content: "Enter your Middle Name" }); $("#middlename_d").tooltip({ position: {my: "left+15 center", at: "left center"} }); $("#middlename_d").tooltip("option", "content", "Enter your Middle Name" ); $("#middlename_d").tooltip("option", "position", {my: "left+15 center", at: "left center"} ); } - Add the jQuery and jQuery UI resources to the form library.
- Associate the
MiddleNameTooltipfunction with the form'sOnLoadevent of the main contact form. - Save the form and close it.
- Save and Publish your solution.
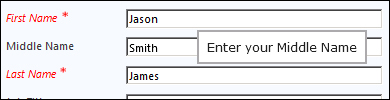
- Now test your changes by opening a contact and pointing your mouse at the Middle Name field. You should see a result as shown in the following screenshot:
First off, our function adds the reference to the CSS file that comes with the jQuery UI library. We load it in the head section of the form.
Next, using the standard HTML DOM we define a blank title to the field where we want to show a tooltip.
The following lines initialize and set the tooltip content and position. You can play around with the position to locate the tooltip at various locations relative to the page or the control with which you are associating the tooltip.
- For information on jQuery UI see the documentation at http://api.jqueryui.com/.
- For additional information on the tooltip widget see the detailed description at http://api.jqueryui.com/tooltip/#option-position.