
In the Creating a rating gauge field recipe of Chapter 7, Extended UI Manipulation, we described a simple method to place a rating gauge on a form and changing the image based on a business rule. Similar to that, this time we will look at placing that rating gauge in the ribbon. The advantage to putting this kind of information on the ribbon is that it's always visible to the user no matter what section of the form you scroll to. So let's see how we can achieve this.
For this example we can use either an existing solution, or we can create a new one. Make sure you have permissions to make customizations to the system. We will add this to the Account entity.
Perform the following steps to add this functionality:
- Create a new solution if one is not already available.
- Add the Account entity to your solution if not already added.
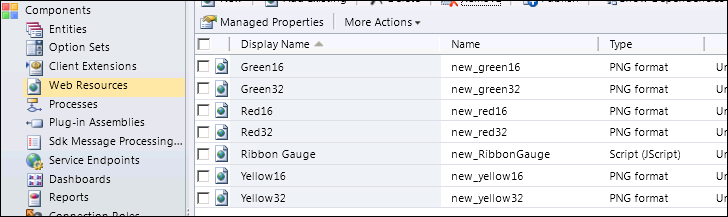
- Create three images to be used on the ribbon. I've made three circles, one red, one yellow, and one green.
- Scale the three images at 16 x 16 pixels, as well as at 32 x 32 pixels.
- Add your six images as web resources to your solution.
- Add a new JScript web resource. Add a function placeholder as follows:
function RibbonPlaceholder() { // empty placeholder } - Your listing of web resources should look like the following screenshot:
- Export your solution as Unmanaged.
- Unzip your solution.
- Open the
customizations.xmlfile for editing. - Find the
RibbonDiffXmlarea within. - Add the following custom actions:
<CustomActions> <CustomAction Id="OC.account.Form.Red.CustomAction" Location="Mscrm.Form.account.MainTab.Actions.Controls._children" Sequence="33"> <CommandUIDefinition> <Button Id="OC.account.form.Red.Button" Command="OC.account.form.Red.Command" LabelText=" " ToolTipTitle=" " ToolTipDescription=" " TemplateAlias="o3" Image16by16="$webresource:new_red16" Image32by32="$webresource:new_red32" /> </CommandUIDefinition> </CustomAction> <CustomAction Id="OC.account.Form.Yellow.CustomAction" Location="Mscrm.Form.account.MainTab.Actions.Controls._children" Sequence="34"> <CommandUIDefinition> <Button Id="OC.account.form.Yellow.Button" Command="OC.account.form.Yellow.Command" LabelText=" " ToolTipTitle=" " ToolTipDescription=" " TemplateAlias="o3" Image16by16="$webresourcenew_yellow16" Image32by32="$webresource:new_yellow32" /> </CommandUIDefinition> </CustomAction> <CustomAction Id="OC.account.Form.Green.CustomAction" Location="Mscrm.Form.account.MainTab.Actions.Controls._children" Sequence="35"> <CommandUIDefinition> <Button Id="OC.account.form.Green.Button" Command="OC.account.form.Green.Command" LabelText=" " ToolTipTitle=" " ToolTipDescription=" " TemplateAlias="o3" Image16by16="$webresource:new_green16" Image32by32="$webresource:new_green32" /> </CommandUIDefinition> </CustomAction> </CustomActions> - Next, find the command definitions and add the following code:
<CommandDefinition Id="OC.account.Form.Red.Command"> <EnableRules></EnableRules> <DisplayRules></DisplayRules> <Actions> <JavaScriptFunction Library="$webresource:new_ribbongauge" FunctionName="RibbonPlaceholder" /> </Actions> </CommandDefinition> <CommandDefinition Id="OC.account.Form.Yellow.Command"> <EnableRules></EnableRules> <DisplayRules></DisplayRules> <Actions> <JavaScriptFunction Library="$webresource:new_ribbongauge" FunctionName="RibbonPlaceholder" /> </Actions> </CommandDefinition> <CommandDefinition Id="OC.account.Form.Green.Command"> <EnableRules></EnableRules> <DisplayRules></DisplayRules> <Actions> <JavaScriptFunction Library="$webresource:new_ribbongauge" FunctionName="RibbonPlaceholder" /> </Actions> </CommandDefinition> - With that in place, re-package your solution.
- Import your solution.
- If all is correct, you will get a confirmation window. Click on Publish All Customizations.
- Once you have your customized ribbon buttons published, open up an account to make sure all three buttons appear as expected in the ribbon. We will have a red circle, a yellow circle, and a green circle in our Actions section.
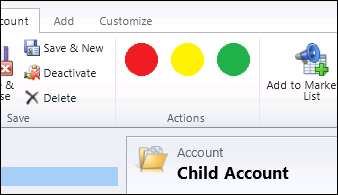
- Observe that we have not defined a button name. While we placed the buttons in the Actions tab for this example, you can create your own custom tab or place them in any other available tab as needed.
- Clicking any of the buttons on the ribbon will not result in any action. This is by design in this case, but the example shows a function associated with these buttons. You can add logic in that function to re-calculate the total that generates the field value that determines which flag is presented to the user.
- In order so simplify this example, we will create an option set which will drive the ribbon-selection value. You can do this by adding more complex logic based on multiple form elements.
- Add an option set named
new_ratinggauge. Add three values to it,Red,Yellow, andGreen. - Add the field to the Account form.
- Add a new web resource named
new_jsratinggauge. Set it of type Script. - Add the following function to your web resource to read the selection text:
function jsratinggauge() { var _fieldValue = ""; try { var _fieldValue = Xrm.Page.getAttribute("new_ratinggauge").getSelectedOption().text; } catch(err) { } if(_fieldValue == "Red") { HideButtons("Red"); } else if(_fieldValue == "Yellow") { HideButtons("Yellow"); } else if(_fieldValue == "Green") { HideButtons("Green"); } else { HideButtons("None"); } } - Once we have the selection text and we identify which action takes place, we call the following function, which hides the unnecessary ribbon buttons and only leaves the relevant one:
function HideButtons(validButton) { if(validButton == "Red") { var btnRed = top.document.getElementById("account|NoRelationship|Form|OC.account.form.Red.Button-Large"); btnRed.style.display = 'inline'; var btnYellow = top.document.getElementById("account|NoRelationship|Form|OC.account.form.Yellow.Button-Large"); btnYellow.style.display = 'none'; var btnGreen = top.document.getElementById("account|NoRelationship|Form|OC.account.form.Green.Button-Large"); btnGreen.style.display = 'none'; } else if(validButton == "Yellow") { var btnRed = top.document.getElementById("account|NoRelationship|Form|OC.account.form.Red.Button-Large"); btnRed.style.display = 'none'; var btnYellow = top.document.getElementById("account|NoRelationship|Form|OC.account.form.Yellow.Button-Large"); btnYellow.style.display = 'inline'; var btnGreen = top.document.getElementById("account|NoRelationship|Form|OC.account.form.Green.Button-Large"); btnGreen.style.display = 'none'; } else if(validButton == "Green") var btnRed = top.document.getElementById("account|NoRelationship|Form|OC.account.form.Red.Button-Large"); btnRed.style.display = 'none'; var btnYellow = top.document.getElementById("account|NoRelationship|Form|OC.account.form.Yellow.Button-Large"); btnYellow.style.display = 'none'; var btnGreen = top.document.getElementById("account|NoRelationship|Form|OC.account.form.Green.Button-Large"); btnGreen.style.display = 'inline'; } else { var btnRed = top.document.getElementById("account|NoRelationship|Form|OC.account.form.Red.Button-Large"); btnRed.style.display = 'none'; var btnYellow = top.document.getElementById("account|NoRelationship|Form|OC.account.form.Yellow.Button-Large"); btnYellow.style.display = 'none'; var btnGreen = top.document.getElementById("account|NoRelationship|Form|OC.account.form.Green.Button-Large"); btnGreen.style.display = 'none'; } } - Associate the
jsratinggauge()function to theOnChangeevent of the option set we created earlier. This will cause the ribbon to update dynamically once the selection changes. - Also associate the
jsratinggauge()function to the form'sOnLoadevent. This way, when we open a new record, the gauge updates. - Save and Publish your solution.
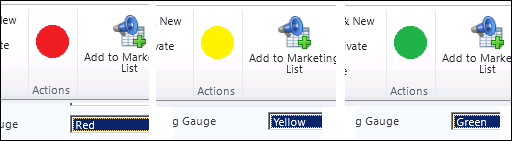
- To test the functionality, open an Account record. If no value is selected on the option set, no button is displayed on the ribbon.
- Change the option set selection from one option to another and observe the ribbon getting updated to reflect the selected color. Your ribbon will look like the images shown in the following screenshot:
The approach of this solution is similar to the way we customize a form. We add to the ribbon all the elements we use, and then, based on a specified value or business rule result, we hide or show specific ribbon buttons.
The reason I have split the execution onto two functions is because the first function called is using the CRM API, while the second function called from the previous one is done using the HTML DOM.
- Information on HTLM DOM can be found at w3schools http://www.w3schools.com/htmldom/default.asp.
- Using JavaScript with the HTML DOM is described also at w3schools http://www.w3schools.com/jsref/default.asp.
- Additional details on ribbon customization can be found on MSDN at http://msdn.microsoft.com/en-us/library/gg309639.aspx.