
For this example, we will look at using a button click to populate form fields. We can use such a scenario when we need a calculation to take place on the form, or when we need to bring data from a related record. For example, we have a sub-account, and we need to bring and populate the address of the parent account. Automating this task will save the user a few minutes per record and will create a much better user experience.
For the purpose of this recipe, we can either use one of the pre-existing solutions, or create a new one. Make sure you have the proper permissions to allow you to customize the system as required. This example will work in both Online and On-Premise environments.
In order to create this functionality, perform the following steps:
- Create a solution package in your environment or open an existing one.
- Add the Account entity to your solution, if not already added.
- Make sure you have a custom button image, or create a new one. Alternatively, you can use the default system image. For this example, I will use the default image.
- Add a new web resource, of type JScript, and name it
new_getaddress. - Within your web resource, add a function placeholder named
GetAddressFromParent. We will come back to the function content after the button is added to the ribbon. - Export your solution from CRM.
- Unzip the solution and remember the location.
- Open the
customizations.xmlfile for editing. - Find the Account entity section in the XML file.
- Open up the SDK and find the Account XML file as described in the previous recipes (
accountribbon.xml). - Find the section where you want to place your button. In this case, I want to place my custom button in the
Actionssection of theMaintab. So look for the tab defined with the following:<Tab Id="Mscrm.Form.account.MainTab …
- Next, look for the following group definition:
Mscrm.Form.account.MainTab.Actions.Control
- Back in our solution's
customizations.xmlfile change theCustomActionssection to look as follows:<CustomActions> <CustomAction Id="OC.account.Form.Main.CustomAction" Location="Mscrm.Form.account.MainTab.Actions.Controls._children" Sequence="15" > <CommandUIDefinition> <Button Id="OC.account.Form.Main.Button" Command="OC.account.Form.Main.Command" LabelText="Copy Address" ToolTipTitle="Copy from Parent" ToolTipDescription="Copy Address from Parent Account" TemplateAlias="o1" /> </CommandUIDefinition> </CustomAction> </CustomActions> - If you were to add the button images, you would add the following two lines after
TemplateAlias. You would add the two images to the solution as well.Image16by16="$webresource:new_btn_16.png" Image32by32="$webresource:new_btn_32.png"
- Next, add the corresponding command definitions. Find the
CommandDefinitionssection, and change it to look as follows:<CommandDefinitions> <CommandDefinition Id="OC.account.Form.Main.Command"> <EnableRules> </EnableRules> <DisplayRules> </DisplayRules> <Actions> <JavaScriptFunction Library="$webresource:new_getaddress" FunctionName="GetAddressFromParent" /> </Actions> </CommandDefinition> </CommandDefinitions> - Save your changes and close the file.
- Repack the solution as a ZIP file.
- Reload the solution onto your environment.
- If there are no errors on the import, then your customized package is correct.
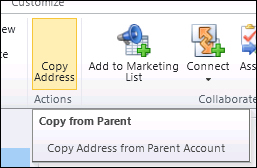
- You can now check and make sure that your button appears on the ribbon by opening a new or existing account record. Your button will show as follows if the images were not defined:
- Next, open your function placeholder you have created earlier. At this point, create your function that retrieves the parent account's address, and populates the current address with that information. Your function could look like the following:
function GetAddressFromParent() { try { var ParentAccount = Xrm.Page.getAttribute("parentaccountid"); if(ParentAccount != null) { var ParentAccountValue = ParentAccount.getValue(); if(ParentAccountValue != null) { var ParentAccountId = ParentAccountValue[0].id; var serverUrl = Xrm.Page.context.getServerUrl(); var odataSelect = serverUrl + "/XRMServices/2011/OrganizationData.svc/AccountSet(guid'" + ParentAccountId + "')?$select=Name,Address1_Line1,Address1_Line2,Address1_Line3,Address1_City,Address1_PostalCode"; $.ajax({ type: "GET", contentType: "application/json; charset=utf-8", datatype: "json", url: odataSelect, beforeSend: function (XMLHttpRequest) { XMLHttpRequest.setRequestHeader("Accept", "application/json"); }, success: function (data, textStatus, XmlHttpRequest) { var org = data.d; //Change form data // alert("TEST: Country: " + org.Address1_Country[0].name + "; Province: " + org.Address1_StateOrProvince[0].name); Xrm.Page.data.entity.attributes.get("address1_name").setValue(org.Name); Xrm.Page.data.entity.attributes.get("address1_line1").setValue(org.Address1_Line1); Xrm.Page.data.entity.attributes.get("address1_line2").setValue(org.Address1_Line2); Xrm.Page.data.entity.attributes.get("address1_line3").setValue(org.Address1_Line3); Xrm.Page.data.entity.attributes.get("address1_city").setValue(org.Address1_City); Xrm.Page.data.entity.attributes.get("address1_postalcode").setValue(org.Address1_PostalCode); }, error: function (XmlHttpRequest, textStatus, errorThrown) { alert('OData Select Failed: ' + odataSelect); } } ); } } } catch() {} } - Save and Publish your solution.
- Test it by opening an account, assigning a parent account, saving the record, and then clicking on your new custom button. You should see the address populated from the parent account.
There are two major steps in this recipe we followed. First off, we add a ribbon button. While adding the button, we define the button properties as well as the associated function that is called when the button is clicked. Secondly, we define a custom function. This function requires the OData and JSON libraries. Do make sure that these libraries are added to your solution. The function presented retrieves the ID of the parent account, and makes a call to get some of the address properties of the parent account. Once this information is retrieved, it is populated into the current account address fields.
- More information on the OData protocol can be found at http://www.odata.org/.
- OData JSON details are found at http://www.odata.org/developers/protocols/json-format.