
In this recipe, we'll explore how to go beyond the default network map, discussed in Chapter 8, Managing Network Layout, to get a lot of visualization power with the NagVis extension. NagVis can use the MK Livestatus backend to build custom maps in various styles.
NagVis is most likely of interest to you if you're interested in visualizing Nagios data more extensively, particularly if you're having problems with the scalability of the included Nagios Core status map. The default status map works well for smaller networks but can struggle with rendering larger ones in a timely fashion.
A complete survey of NagVis' functions would not be possible in one recipe, but this recipe will walk you through downloading, installing, and configuring the extension to give you a simple automap in order to get you started.
You should have a running Nagios Core server with version 4.0 or later and have the MK Livestatus backend successfully installed. This is discussed in the Reading status from a Unix socket with MK Livestatus recipe in this chapter. NDOUtils will also work as an alternative backend but may have performance problems.
In order for the automap to be of much use, you will need a network with at least a few parent-child relationships—refer to the Creating a network host hierarchy recipe in Chapter 8, Managing Network Layout, for more details on how this is done.
NagVis includes an installation script that deals quite well with different systems' installations of Nagios Core. However, it still requires certain dependencies, specifically the following ones:
- Apache with
mod_phpon the same server as Nagios Core - PHP 5.6 or newer with these modules:
gd,gettext,mbstring,mysql,pdo,session,sqlite, andxml - The Graphviz graph visualization software with these modules:
circo,dot,fdp,neato, andtwopi - SQLite 3
You may need to consult your system's documentation to install all of these dependencies; check your system's package manager, if any. For Ubuntu and other Debian-derived systems, the following packages generally suffice:
# apt-get install apache2 libapache2-mod-php5 libgd2-xpm libgd2-xpm-dev php5 php5-gd php5-mysql php5-sqlite graphviz sqlite3
On systems such as CentOS and Fedora, the following packages may work:
# yum install php php-gd php-gettext php-mbstring php-mysql php-pdo php-sqlite php-xml graphviz graphviz-gd graphviz-php
It is difficult to anticipate the exact packages needed for all systems; however, searching your package manager for keywords (for example php sqlite) may help.
We can install NagVis with an NDO backend as follows:
- Download the latest sources for NagVis from http://www.nagvis.org/downloads:
$ wget http://www.nagvis.org/share/nagvis-1.8.5.tar.gz - Inflate
.tar.gzand change into the uncompressed directory:$ tar -xzf nagvis-1.8.5.tar.gz $ cd nagvis-1.8.5
- Run the
install.shscript asroot:# ./install.sh - The script will attempt to find your Nagios Core installation and will ask you to specify a location for the new NagVis files. In our case, the defaults are correct and acceptable, so we can simply press Enter:
-- Checking paths --
Please enter the path to the nagios base directory [/usr/local/nagios]:
  nagios path /usr/local/nagios  found
Please enter the path to NagVis base [/usr/local/nagvis]:
- The script will attempt to find all the prerequisites needed and will alert you if any are not found. If this is the case, you should abort the installation with Ctrl + C and install them before trying again:
-- Checking prerequisites --
PHP 5.6                             found
  PHP Module: gd 5.6                found
  PHP Module: mbstring compiled_in  found
  PHP Module: gettext compiled_in   found
  PHP Module: session compiled_in   found
  PHP Module: xml compiled_in       found
  PHP Module: pdo compiled_in       found
  Apache mod_php                    found ...
  PHP Module: sockets compiled_in
Graphviz 2.38
  Graphviz Module dot 2.38.0     found
  Graphviz Module neato 2.38.0   found
  Graphviz Module twopi 2.38.0   found
  Graphviz Module circo 2.38.0   found
  Graphviz Module fdp 2.38.0     found
SQLite 3.8                       found
- The script will prompt you for an appropriate backend to configure as NagVis' data source. In this example, the only one we want is the ndo2db backend. Press n for all the others.
Checking Backends. (Available: mklivestatus,ndo2db,ido2db)
Do you want to use backend mklivestatus? [y]:
Do you want to use backend ndo2db? [n]:
Do you want to use backend ido2db? [n]:
  Livestatus Socket (/usr/local/nagios/var/rw/live)
- The script will attempt to detect your Apache HTTPD settings. It does a good job with most systems, but you should check the results are correct before you press Enter. It should also be safe to allow it to create an Apache configuration file for you.
-- Trying to detect Apache settings --
Please enter the web path to NagVis [/nagvis]:
Please enter the name of the web-server user [www-data]:
Please enter the name of the web-server group [www-data]:
create Apache config file [y]:
- The script will give you a summary of its intentions to install the software and will ask you to confirm. Do so by pressing Enter:
-- Summary --
NagVis home will be:           /usr/local/nagvis
Owner of NagVis files will be: www-data
Group of NagVis files will be: www-data
Path to Apache config dir is:  /etc/apache2/conf.d
Apache config will be created: yes
Installation mode:             install
Do you really want to continue? [y]:
- Restart the Apache HTTPD server:
# apache2ctl configtest
# apache2ctl restart
If all the preceding steps are taken correctly, once the installation is finished, you should be able to visit the NagVis configuration page on
http://olympus.example.net/nagvis/, substituting the hostname for your own Nagios Core server.
You can then log in with the default username admin and the password admin to take a look at some of the demo maps. There is a little more to be done before we can get our automap working:
- Log in to the NagVis web interface and click on Manage Maps under the Options menu.

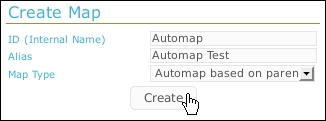
- Under Create Map, make the following settings:
- For ID (Internal Name), enter the Automap value.
- For Alias, enter Automap Test. For Map Type, select Automap based on parent/child relations.
- Then, click on Create.
With this done, the page should refresh and show you a map of your network, which is automatically generated from your configuration, in a similar style as the Nagios Core web interface status map. You should also be able to hover your mouse over individual nodes to see the details of the hosts.

NagVis' automap is generated from the data retrieved via the MK Livestatus backend. It generates the map in much the same way as the default status map in the Nagios Core web administration area does. However, it is much more versatile and more scalable for larger networks. The parent and child relationships defined in the configuration are used to make a tree-style map.
The uses of NagVis could fill an entire book and the automap is only one of many possible maps, including defining one's own backgrounds, icons, labels, and hover behavior. For more details on how to make customized maps as well as other styles of automap, consult the NagVis documentation at http://www.nagvis.org/doc.