
To give more geometric detail to each particle in a particle system, we can make use of OpenGL's support for
instanced rendering. Instanced rendering is a convenient and efficient way to draw several copies of a particular object. OpenGL provides support for instanced rendering through the functions glDrawArraysInstanced and glDrawElementsInstanced.
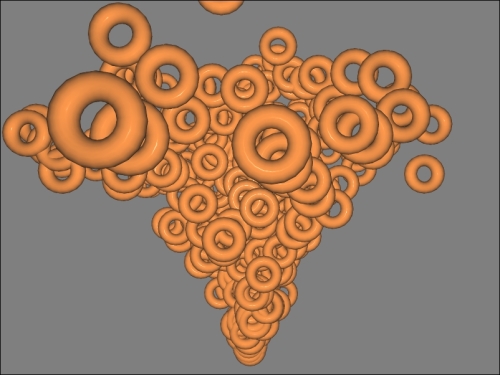
In this example, we'll modify the particle system introduced in the previous recipes. Rather than using point sprites, we'll render a more complex object in the place of each particle. The following image shows an example where each particle is rendered as a shaded torus.
Using instanced rendering is simply a matter of calling one of the instanced draw functions, providing the number of instances to draw. However, there is some subtlety to the way that we provide vertex attributes to the shader. If all particles were drawn with exactly the same attributes, it would be simple to draw, but would hardly be an interesting result because all particles would appear at the same location and in the same orientation. Since we'd like to draw each copy in a different position, we need some way of providing the needed information (in our case, the particle's start time) to the vertex shader separately for each particle.
The key to this is the function glVertexAttribDivisor. This function specifies the rate at which vertex attributes are advanced during instanced rendering. For example, consider the following setting.
glVertexAttribDivisor(1, 1);
The first argument is the vertex attribute index, and the second is the number of instances that will pass between updates of the attribute. In other words, the previous command specifies that all vertices of the first instance will receive the first value in the buffer corresponding to attribute one. The second instance will receive the second value, and so on. If the second argument was 2, then the first two instances would receive the first value, the next two would receive the second, and so on in the same way.
The default divisor for each attribute is zero, which means that vertex attributes are processed normally (the attribute advances once per vertex rather than some number per instance). An attribute is called an instanced attribute if its divisor is non-zero.
Start with a particle system as described in Creating a particle fountain. We'll just make a few modifications to that basic system. Note that you can also use this with transform feedback if desired, but to keep things simple, we'll use the more basic particle system. It should be straightforward to adapt this example to the transform feedback based system.
When setting up the vertex array object for your particle shape, add two new instanced attributes for the initial velocity and start time. Something similar to the following code should do the trick:
glBindVertexArray(myVArray);

// Set up the pointers for attributes 0, 1, and 2 (position,
//   normal, and texture coord.)
…

// Initial velocity (attribute 3)
glBindBuffer(GL_ARRAY_BUFFER, initVel);
glVertexAttribPointer(3, 3, GL_FLOAT, GL_FALSE, 0, NULL);
glEnableVertexAttribArray(3);
glVertexAttribDivisor(3, 1);

// Start time (attribute 4)
glBindBuffer(GL_ARRAY_BUFFER, startTime);
glVertexAttribPointer(4, 1, GL_FLOAT, GL_FALSE, 0, NULL);
glEnableVertexAttribArray(4);
glVertexAttribDivisor(4, 1);

// Bind to the element array buffer if necessary
Note the use of glVertexAttribDivisor in the previous code. This indicates that attributes 3 and 4 are instanced attributes (the values in the arrays are to be advanced only once per instance, rather than once per vertex). Therefore the size of the buffers must be proportional to the number of instances rather than the number of vertices in an instance. The buffers for attributes 0, 1 and 2 should (as usual) be sized in relation to the number of vertices.
Use the following steps:
- The vertex shader code is nearly identical to the code shown in the previous recipe Creating a particle fountain. The difference lies in the input and output variables. Use something similar to the following:
layout (location = 0) in vec3 VertexPosition;
layout (location = 1) in vec3 VertexNormal;
layout (location = 2) in vec3 VertexTexCoord;
layout (location = 3) in vec3 VertexInitialVelocity;
layout (location = 4) in float StartTime;

out vec3 Position;
out vec3 Normal;
- Within the
mainfunction, update the position of the vertex by translating it using the equation of motion:Position = VertexPosition + VertexInitialVelocity * t + Gravity * t * t; - Be sure to pass along the normal, and updated position (in camera coordinates) to the fragment shader.
- In the fragment shader, implement your favorite shading model.
- In the main OpenGL program, within the render function, render the instances using the following code:
glBindVertexArray(myVArray);
glDrawElementsInstanced(GL_TRIANGLES, nEls,
              GL_UNSIGNED_INT, 0, nParticles);
Recall that the first three input attributes to the vertex shader are not-instanced, meaning that they are advanced every vertex (and repeated every instance). The last two (attributes 3 and 4) are instanced attributes and only update every instance. Therefore, the effect is that each instance is translated by the result of the equation of motion.
The glDrawElementsInstanced function (step 5) will draw nParticles instances of the object. Of course nEls is the number of vertices in each instance.
OpenGL provides a built-in variable to the vertex shader named gl_InstanceID. This is simply a counter and takes on a different value for each instance that is rendered. The first instance will have an ID of zero, the second will have an ID of one, and so on. This can be useful as a way to index to texture data appropriate for each instance. Another possibility is to use the instance's ID as a way to generate some random data for that instance. For example, we could use the instance ID (or some hash) as a seed to a pseudo-random number generation routine to get a unique random stream for each instance.