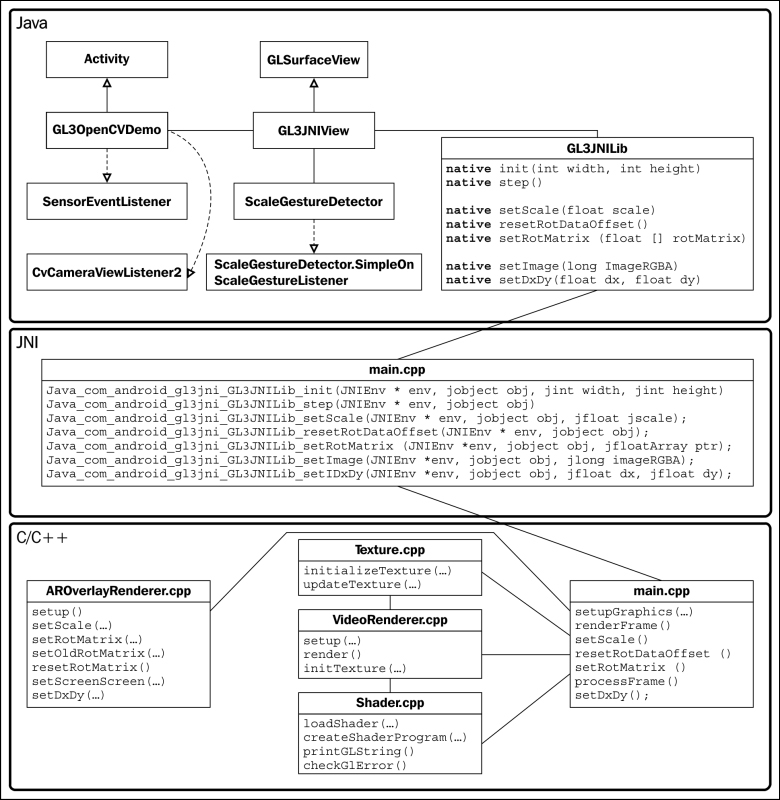
In our ultimate demo, we will introduce the basic framework for AR-based data visualization by overlaying 3D data on real-world objects and scenes. We apply the same GPU-accelerated simulation model and register it to the world with a sensor-based tracking approach. The following diagram illustrates the final architecture of the implementation in this chapter:
This final demo integrates together all the concepts previously introduced in this chapter and requires the capture (and possibly processing) of a real-time video stream using OpenCV on an Android-based phone. To reduce the complexity of the code, we have created the Augmented Reality layer (AROverlayRenderer) and we can improve the registration, alignment, and calibration of the layer with more advanced algorithms in the future.
Let's define a new class called AROverlayRenderer inside the AROverlayRenderer.hpp file:
#ifndef AROVERLAYRENDERER_H_
#define AROVERLAYRENDERER_H_

#include<Shader.hpp>

class AROverlayRenderer {
  public:
    AROverlayRenderer();
    virtual ~AROverlayRenderer();
    void render();
    bool setup();
    void setScale(float s);

    void setOldRotMatrix(glm::mat4 r_matrix);
    void setRotMatrix(glm::mat4 r_matrix);
    void resetRotMatrix();
    void setScreenSize(int width, int height);
    void setDxDy (float dx, float dy);
  private:
    //this renders the overlay view
    GLuint gProgramOverlay;
    GLuint gvOverlayPositionHandle;
    GLuint gvOverlayColorHandle;
    GLuint matrixHandle;
    GLuint sigmaHandle;
    GLuint scaleHandle;

  //vertices for the grid
  int grid_size;
  GLfloat *gGrid;
  GLfloat sigma;

  //for handling the object rotation from user
  GLfloat dx, dy;
  GLfloat rotX, rotY;

  //the view matrix and projection matrix
  glm::mat4 g_view_matrix;
  glm::mat4 g_projection_matrix;

  //initial position of the camera
  glm::vec3 g_position;
  //FOV of the virtual camera in OpenGL
  float g_initial_fov;

  glm::mat4 rotMatrix;
  glm::mat4 old_rotMatrix;

  float scale;
  int width;
  int height;

  Shader shader;
  void computeProjectionMatrices();
  void computeGrid();
};

#endif /* AROVERLAYRENDERER_H_ */
Now implement the AROverlayRenderer member functions inside the AROverlayRenderer.cpp file:
- Include the
AROverlayRenderer.hppheader file and define functions to print messages as well as the constructor and destructor:#include "AROverlayRenderer.hpp" #define LOG_TAG "AROverlayRenderer" #define LOGI(...) __android_log_print(ANDROID_LOG_INFO,LOG_TAG,__VA_ARGS__) #define LOGE(...) __android_log_print(ANDROID_LOG_ERROR,LOG_TAG,__VA_ARGS__) AROverlayRenderer::AROverlayRenderer() { //initial position of the camera g_position = glm::vec3( 0.0f, 0.0f, 0.0f ); //FOV of the virtual camera in OpenGL //45 degree FOV g_initial_fov = 45.0f*glm::pi<float>()/180.0f; /* scale for the panel and other objects, allow for zooming in with pinch. */ scale = 1.0f; dx=0.0f; dy=0.0f; rotX=0.0f, rotY=0.0f; sigma = 0; grid_size = 400; //allocate memory for the grid gGrid = (GLfloat*) malloc(sizeof(GLfloat)*grid_size*grid_size*3); } AROverlayRenderer::~AROverlayRenderer() { //delete all dynamically allocated objects here free(gGrid); } - Initialize the grid pattern for the simulation:
void AROverlayRenderer::computeGrid(){ float grid_x = grid_size; float grid_y = grid_size; unsigned int data_counter = 0; //define a grid ranging from -1 to +1 for(float x = -grid_x/2.0f; x<grid_x/2.0f; x+=1.0f){ for(float y = -grid_y/2.0f; y<grid_y/2.0f; y+=1.0f){ float x_data = x/grid_x; float y_data = y/grid_y; gGrid[data_counter] = x_data; gGrid[data_counter+1] = y_data; gGrid[data_counter+2] = 0; data_counter+=3; } } } - Set up the shader program to overlay graphics:
bool AROverlayRenderer::setup(){ // Vertex shader source code static const char g_vshader_code_overlay[] = "#version 300 es " "in vec4 vPosition; " "uniform mat4 MVP; " "uniform float sigma; " "uniform float scale; " "out vec4 color_based_on_position; " "// Heat map generator " "vec4 heatMap(float v, float vmin, float vmax){ " " float dv; " " float r=1.0, g=1.0, b=1.0; " " if (v < vmin){ " " v = vmin;} " " if (v > vmax){ " " v = vmax;} " " dv = vmax - vmin; " " if (v < (vmin + 0.25 * dv)) { " " r = 0.0; " " g = 4.0 * (v - vmin) / dv; " " } else if (v < (vmin + 0.5 * dv)) { " " r = 0.0; " " b = 1.0 + 4.0 * (vmin + 0.25 * dv - v) / dv; " " } else if (v < (vmin + 0.75 * dv)) { " " r = 4.0 * (v - vmin - 0.5 * dv) / dv; " " b = 0.0; " " } else { " " g = 1.0 + 4.0 * (vmin + 0.75 * dv - v) / dv; " " b = 0.0; " " } " " return vec4(r, g, b, 0.1); " "} " "void main() { " " //Simulation on GPU " " float x_data = vPosition.x; " " float y_data = vPosition.y; " " float sigma2 = sigma*sigma; " " float z = exp(-0.5*(x_data*x_data)/(sigma2)-0.5*(y_data*y_data)/(sigma2)); " " vec4 position = vPosition; " " position.z = z*scale; " " position.x = position.x*scale; " " position.y = position.y*scale; " " gl_Position = MVP*position; " " color_based_on_position = heatMap(position.z, 0.0, 0.5); " " gl_PointSize = 5.0*scale; " "} "; // fragment shader source code static const char g_fshader_code_overlay[] = "#version 300 es " "precision mediump float; " "in vec4 color_based_on_position; " "out vec4 color; " "void main() { " " color = color_based_on_position; " "} "; //setup the shader for the overlay gProgramOverlay = shader.createShaderProgram(g_vshader_code_overlay, g_fshader_code_overlay); if (!gProgramOverlay) { LOGE("Could not create program for overlay."); return false; } //get handlers for the overlay side matrixHandle = glGetUniformLocation(gProgramOverlay, "MVP"); shader.checkGlError("glGetUniformLocation"); LOGI("glGetUniformLocation("MVP") = %d ", matrixHandle); gvOverlayPositionHandle = glGetAttribLocation(gProgramOverlay, "vPosition"); shader.checkGlError("glGetAttribLocation"); LOGI("glGetAttribLocation("vPosition") = %d ", gvOverlayPositionHandle); sigmaHandle = glGetUniformLocation(gProgramOverlay, "sigma"); shader.checkGlError("glGetUniformLocation"); LOGI("glGetUniformLocation("sigma") = %d ", sigmaHandle); scaleHandle = glGetUniformLocation(gProgramOverlay, "scale"); shader.checkGlError("glGetUniformLocation"); LOGI("glGetUniformLocation("scale") = %d ", scaleHandle); computeGrid(); } - Create helper functions to set the scale, screen size, and rotation variables from the touch interface:
void AROverlayRenderer::setScale(float s) { scale = s; } void AROverlayRenderer::setScreenSize(int w, int h) { width = w; height = h; } void AROverlayRenderer::setRotMatrix(glm::mat4 r_matrix){ rotMatrix= r_matrix; } void AROverlayRenderer::setOldRotMatrix(glm::mat4 r_matrix){ old_rotMatrix = r_matrix; } void AROverlayRenderer::resetRotMatrix(){ old_rotMatrix = rotMatrix; } void AROverlayRenderer::setDxDy(float dx, float dy){ //update the angle of rotation for each rotX += dx/width; rotY += dy/height; } - Compute the projection and view matrices based on the camera parameters:
void AROverlayRenderer::computeProjectionMatrices(){ //direction vector for z glm::vec3 direction_z(0.0, 0.0, -1.0); //up vector glm::vec3 up = glm::vec3(0.0, -1.0, 0.0); float aspect_ratio = (float)width/(float)height; float nearZ = 0.01f; float farZ = 50.0f; float top = tan(g_initial_fov/2*nearZ); float right = aspect_ratio*top; float left = -right; float bottom = -top; g_projection_matrix = glm::frustum(left, right, bottom, top, nearZ, farZ); g_view_matrix = glm::lookAt( g_position, // camera position g_position+direction_z, //viewing direction up // up direction ); } - Render the graphics on the screen:
void AROverlayRenderer::render(){ //update the variables for animations sigma+=0.002f; if(sigma>0.5f){ sigma = 0.002f; } glUseProgram(gProgramOverlay); /* Retrieve the View and Model matrices and apply them to the rendering */ computeProjectionMatrices(); glm::mat4 projection_matrix = g_projection_matrix; glm::mat4 view_matrix = g_view_matrix; glm::mat4 model_matrix = glm::mat4(1.0); model_matrix = glm::translate(model_matrix, glm::vec3(0.0f, 0.0f, scale-5.0f)); //X,Y reversed for the screen orientation model_matrix = glm::rotate(model_matrix, rotY*glm::pi<float>(), glm::vec3(-1.0f, 0.0f, 0.0f)); model_matrix = glm::rotate(model_matrix, rotX*glm::pi<float>(), glm::vec3(0.0f, -1.0f, 0.0f)); model_matrix = glm::rotate(model_matrix, 90.0f*glm::pi<float>()/180.0f, glm::vec3(0.0f, 0.0f, 1.0f)); /* the inverse of rotational matrix is to counter- rotate the graphics to the center. This allows us to reset the camera orientation since R*inv(R) = I. */ view_matrix = rotMatrix*glm::inverse(old_rotMatrix)*view_matrix; //create the MVP (model view projection) matrix glm::mat4 mvp = projection_matrix * view_matrix * model_matrix; glUniformMatrix4fv(matrixHandle, 1, GL_FALSE, &mvp[0][0]); shader.checkGlError("glUniformMatrix4fv"); glEnableVertexAttribArray(gvOverlayPositionHandle); shader.checkGlError("glEnableVertexAttribArray"); glVertexAttribPointer(gvOverlayPositionHandle, 3, GL_FLOAT, GL_FALSE, 0, gGrid); shader.checkGlError("glVertexAttribPointer"); glUniform1f(sigmaHandle, sigma); shader.checkGlError("glUniform1f"); glUniform1f(scaleHandle, 1.0f); shader.checkGlError("glUniform1f"); //draw the overlay graphics glDrawArrays(GL_POINTS, 0, grid_size*grid_size); shader.checkGlError("glDrawArrays"); glDisableVertexAttribArray(gvOverlayPositionHandle); } - Finally, we only need to make minor modifications to the
main.cppfile used in the previous demo to enable the AR overlay on top of the real-time video stream (real-world scene). Only the relevant code snippets that highlight the required modifications are shown here (download the complete code from the Packt Publishing website):... #include <AROverlayRenderer.hpp> ... AROverlayRenderer aroverlayrenderer; ... bool setupGraphics(int w, int h) { ... videorenderer.setup(); aroverlayrenderer.setup(); ... videorenderer.initTexture(frame); aroverlayrenderer.setScreenSize(width, height); } void renderFrame() { ... videorenderer.render(frame); aroverlayrenderer.render(); } ... extern "C" { ... JNIEXPORT void JNICALL Java_com_android_gl3jni_GL3JNILib_setScale(JNIEnv * env, jobject obj, jfloat jscale); JNIEXPORT void JNICALL Java_com_android_gl3jni_GL3JNILib_resetRotDataOffset(JNIEnv * env, jobject obj); JNIEXPORT void JNICALL Java_com_android_gl3jni_GL3JNILib_setRotMatrix (JNIEnv *env, jobject obj, jfloatArray ptr); JNIEXPORT void JNICALL Java_com_android_gl3jni_GL3JNILib_setDxDy(JNIEnv *env, jobject obj, jfloat dx, jfloat dy); }; ... JNIEXPORT void JNICALL Java_com_android_gl3jni_GL3JNILib_resetRotDataOffset (JNIEnv * env, jobject obj){ aroverlayrenderer.resetRotMatrix(); } JNIEXPORT void JNICALL Java_com_android_gl3jni_GL3JNILib_setScale (JNIEnv * env, jobject obj, jfloat jscale) { aroverlayrenderer.setScale(jscale); LOGI("Scale is %lf", scale); } JNIEXPORT void JNICALL Java_com_android_gl3jni_GL3JNILib_resetRotDataOffset (JNIEnv * env, jobject obj){ aroverlayrenderer.resetRotMatrix(); } JNIEXPORT void JNICALL Java_com_android_gl3jni_GL3JNILib_setRotMatrix (JNIEnv *env, jobject obj, jfloatArray ptr) { jsize len = env->GetArrayLength(ptr); jfloat *body = env->GetFloatArrayElements(ptr,0); //should be 16 elements from the rotation matrix glm::mat4 rotMatrix(1.0f); int count = 0; for(int i = 0; i<4; i++){ for(int j=0; j<4; j++){ rotMatrix[i][j] = body[count]; count++; } } env->ReleaseFloatArrayElements(ptr, body, 0); aroverlayrenderer.setRotMatrix(rotMatrix); } JNIEXPORT void JNICALL Java_com_android_gl3jni_GL3JNILib_setDxDy(JNIEnv * env, jobject obj, jfloat dx, jfloat dy){ aroverlayrenderer.setDxDy(dx, dy); }
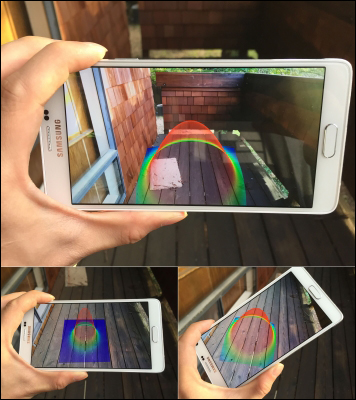
With this framework, one can overlay virtually any dataset on different real-world objects or surfaces and enable truly interactive applications, using the built-in sensors and gesture interface on mobile devices and emerging state-of-the-art wearable AR eyeglasses. Following are the results demonstrating a real-time, interactive, AR-based visualization of a 3-D dataset (in this case, a Gaussian distribution) overlaid on real-world scenes:
The key element for enabling an AR application is the ability is overlay information onto the real world. The AROverlayRenderer class implements the core functions essential to all AR applications. First, we create a virtual camera that matches the parameters of the actual camera on the mobile phone. Parameters such as the field of view (FOV) and aspect ratio of the camera are currently hard-coded, but we can easily modify them in the computeProjectionMatrices function. Then, to perform the registration between the real world and virtual world, we control the orientation of the virtual camera based on the orientation of the device. The orientation values are fed through the rotation matrix passed from the Java side (the setRotMatrix function) and we apply this directly to the OpenGL camera view matrix (view_matrix). Also, we use the multi-touch interface of the mobile phone to reset the default orientation of the rotation matrix. This is achieved by storing the rotational matrix value upon the touch event (the resetRotDataOffset function) and we apply the inverse to the rotational matrix to the view matrix (this is equivalent to rotating the camera in the opposite direction).
In terms of user interaction, we have enabled the pinch and drag option to support dynamic interaction with the virtual object. Upon the pinch event, we take the scale factor and we position the rendered object at a farther distance by applying the glm::translate function on the model_matrix variable. In addition, we rotate the virtual object by capturing the dragging action from the Java side (the setDxDy function). The user can control the orientation of the virtual object by dragging a finger across the screen. Together, these multi-touch gestures enable a highly interactive application interface that allows users to change the perspective of the rendered object intuitively.
Due to the underlying complexity of the calibration process, we will not cover these details here. However, advanced users may consult the following website for a more in-depth discussion: http://docs.opencv.org/doc/tutorials/calib3d/camera_calibration/camera_calibration.html.
Also, the current registration process is purely based on the IMU, and it does not support translation (that is, the virtual object does not move exactly with the real world). To address this, we can apply various image-processing techniques such as mean shift tracking, feature-based tracking, and marker-based tracking to recover the full 6 DOF (degree of freedom) model of the camera. SLAM, for example, is a great candidate to recover the 6 DOF camera model, but its detailed implementation is beyond the scope of this chapter.
Indeed, in this chapter, we have only covered the fundamentals of AR. The field of AR is becoming an increasingly hot topic in both academia and industry. If you are interested in implementing AR data visualization applications on the latest wearable computing platforms (such as the one provided by Meta that features 3D gesture input and 3D stereoscopic output), visit the following websites:
For further technical details on AR eyeglasses, please consult the following publications:
- Raymond Lo, Alexander Chen, Valmiki Rampersad, Jason Huang, Han Wu, Steve Mann (2013). "Augmediated reality system based on 3D camera selfgesture sensing," IEEE International Symposium on Technology and Society (ISTAS) 2013, pp. 20-31.
- Raymond Lo, Valmiki Rampersad, Jason Huang, Steve Mann (2013). "Three Dimensional High Dynamic Range Veillance for 3D Range-Sensing Cameras," IEEE International Symposium on Technology and Society (ISTAS) 2013, pp. 255-265.
- Raymond Chun Hing Lo, Steve Mann, Jason Huang, Valmiki Rampersad, and Tao Ai. 2012. "High Dynamic Range (HDR) Video Image Processing For Digital Glass." In Proceedings of the 20th ACM international conference on Multimedia (MM '12). ACM, New York, NY, USA, pp. 1477-1480.
- Steve Mann, Raymond Lo, Jason Huang, Valmiki Rampersad, Ryan Janzen, Tao Ai (2012). "HDRchitecture: Real-Time stereoscopic HDR Imaging for Extreme Dynamic Range," In ACM SIGGRAPH 2012 Emerging Technologies (SIGGRAPH '12).