
When the shading equation is evaluated within the vertex shader (as we have done in previous recipes), we end up with a color associated with each vertex. That color is then interpolated across the face, and the fragment shader assigns that interpolated color to the output fragment. As mentioned previously (the Implementing flat shading recipe in Chapter 2, The Basics of GLSL Shaders), this technique is often called Gouraud shading. Gouraud shading (like all shading techniques) is an approximation, and can lead to some less than desirable results when; for example, the reflection characteristics at the vertices have little resemblance to those in the center of the polygon. For example, a bright specular highlight may reside in the center of a polygon, but not at its vertices. Simply evaluating the shading equation at the vertices would prevent the specular highlight from appearing in the rendered result. Other undesirable artifacts, such as edges of polygons, may also appear when Gouraud shading is used, due to the fact that color interpolation is less physically accurate.
To improve the accuracy of our results, we can move the computation of the shading equation from the vertex shader to the fragment shader. Instead of interpolating color across the polygon, we interpolate the position and normal vector, and use these values to evaluate the shading equation at each fragment. This technique is often called Phong shading or Phong interpolation. The results from Phong shading are much more accurate and provide more pleasing results, but some undesirable artifacts may still appear.
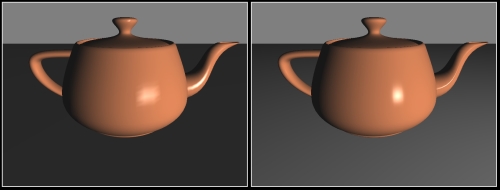
The following figure shows the difference between Gouraud and Phong shading. The scene on the left is rendered with Gouraud (per-vertex) shading, and on the right is the same scene rendered using Phong (per-fragment) shading. Underneath the teapot is a partial plane, drawn with a single quad. Note the difference in the specular highlight on the teapot, as well as the variation in the color of the plane beneath the teapot.
In this example, we'll implement Phong shading by passing the position and normal from the vertex shader to the fragment shader, and then evaluate the ADS shading model within the fragment shader.
Set up your OpenGL program with the vertex position in attribute location zero, and the normal in location one. Your OpenGL application must also provide the values for the uniform variables Ka, Kd, Ks, Shininess, LightPosition, and LightIntensity, the first four of which are the standard material properties (reflectivities) of the ADS shading model. The latter two are the position of the light in eye coordinates, and the intensity of the light source, respectively. Finally, the OpenGL application must also provide the values for the uniforms ModelViewMatrix, NormalMatrix, ProjectionMatrix, and MVP.
To create a shader program that can be used for implementing per-fragment (or Phong) shading using the ADS shading model, use the following steps:
- Use the following code for the vertex shader:
layout (location = 0) in vec3 VertexPosition; layout (location = 1) in vec3 VertexNormal; out vec3 Position; out vec3 Normal; uniform mat4 ModelViewMatrix; uniform mat3 NormalMatrix; uniform mat4 ProjectionMatrix; uniform mat4 MVP; void main() { Normal = normalize( NormalMatrix * VertexNormal); Position = vec3( ModelViewMatrix * vec4(VertexPosition,1.0) ); gl_Position = MVP * vec4(VertexPosition,1.0); } - Use the following code for the fragment shader:
in vec3 Position;
in vec3 Normal;

uniform vec4 LightPosition;
uniform vec3 LightIntensity;
uniform vec3 Kd;            // Diffuse reflectivity
uniform vec3 Ka;            // Ambient reflectivity
uniform vec3 Ks;            // Specular reflectivity
uniform float Shininess;    // Specular shininess factor

layout( location = 0 ) out vec4 FragColor;

vec3 ads( )
{
  vec3 n = normalize( Normal );
  vec3 s = normalize( vec3(LightPosition) - Position );
  vec3 v = normalize(vec3(-Position));
  vec3 r = reflect( -s, n );
  return
    LightIntensity *
      ( Ka +
      Kd * max( dot(s, n), 0.0 ) +
      Ks * pow( max( dot(r,v), 0.0 ), Shininess ) );
}

void main() {
  FragColor = vec4(ads(), 1.0);
}
The vertex shader has two output variables: Position and Normal. In the main function, we convert the vertex normal to eye coordinates by transforming with the normal matrix, and then store the converted value in Normal. Similarly, the vertex position is converted to eye coordinates by transforming it by the model-view matrix, and the converted value is stored in Position.
The values of Position and Normal are automatically interpolated and provided to the fragment shader via the corresponding input variables. The fragment shader then computes the standard ADS shading equation using the values provided. The result is then stored in the output variable, FragColor.
Evaluating the shading equation within the fragment shader produces more accurate renderings. However, the price we pay is in the evaluation of the shading model for each pixel of the polygon, rather than at each vertex. The good news is that with modern graphics cards, there may be enough processing power to evaluate all of the fragments for a polygon in parallel. This can essentially provide nearly equivalent performance for either per-fragment or per-vertex shading.
- The Implementing per-vertex ambient, diffuse, and specular (ADS) shading recipe in Chapter 2, The Basics of GLSL Shaders