
You have defined the Management Approval task and you need to define the participant type for the task. Means you will build a list of users, groups, and application roles to act upon the task (Management Approval). Simple or complex Routing Policies can be created by mixing and matching participant types. Stage organizes the blocks of participant types and participant types are grouped in a block under a stage. You can have one or more stages in sequence or in parallel. Within each stage, you can have one or more participant type blocks in sequence or in parallel.
For configuring the participant, there is an editor and the sequence in which assignees are added indicates the execution sequence. You can create parallel and sequential stages and participant types are created in these blocks.
Here you will learn how single participant type is created for management approval tasks. When the process token reaches management approval, you will build a chain of approval processes, and in this section, you will focus on creating a non-repeating stage, single name, and expression value-based participant type and you will specify a time limit for acting on a task, inviting additional participants to a task, bypassing a task participant, and implementing an escalation policy.
Here you will create stages and participants by carrying out the following steps:
- Go to BPM Navigator | SalesToContractDemo | Business Catalog| Human Tasks and click the
ManagementApproval.taskfile. This will open the Human Task editor. - Go to the Assignment section. You will find
stage1as default. - Double-click on Stage 1. The Edit dialog will appear. Enter Stage Name as
TerritoryManagerApproval.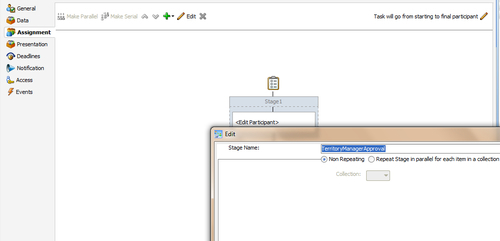
- Choose Non Repeating as it specifies that there is only one stage in parallel for each element in a collection. Repeat the stage in parallel for each item in a collection - specify that the stage is to repeat in parallel for each element in a collection.
- Click on the Participant Type block. It will open the Edit Participant Type dialog.
- Select Type = Single. This is the
Assignment Type. In this type of assignment list, only one user is required to act on the task. You can provide either a single user or a list of users, groups, or application roles for this pattern. - Enter the label for the task as TerritoryManagerApproval.
- Choose Build a list of participants using = Name and Expression.
- Check Value Based as the method to specify the Participant Type attributes.
- You can create several types of lists for the single user participant (and also for the parallel, serial, and FYI user participants). Value-based name and expression lists enable you to statically or dynamically select users, groups, or application roles as task assignees.
- Click on the green plus (+) icon, and from the Identification Type column of the Participant Names table, select Add User from the list.
- However, you can even use expressions and dynamically select values using the expression builder. Also, you can manually enter a value by clicking the field in the value column.
- Select Data Type by name as you will search for the username in Embedded LDAP.
- Click on the Browse button as directed by the 3 in the following screenshot, and the Identity Lookup dialog will appear.
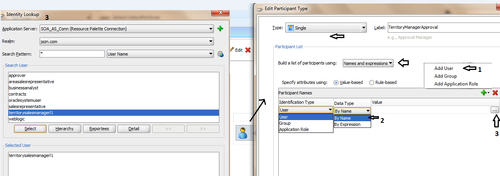
- Select the ApplicationServer name and select Realm as jazn.com and while keeping the Search Pattern as *(all) for User Name, click the Identity Lookup button.
- Choose the user territorymanagerl1 as Territory Manager Level 1.
- Click OK.
- Scroll down on the same dialog and expand the Advance button.
- You can specify the amount of time a user, group, or application role receives to act on a task. If the user, group, or role does not act in the time specified, the global escalation and renewal policies that you set in the Deadlines section (known as the routing slip level) of the Human Task editor are applied.
- Check Limit Allocated Duration to: and give the time limit of one day to the Territory Manager to approve the quote.
- If he/she doesn't approve in this time frame, the global escalation and renewal policies that you set in the Deadlines section will be applied.
- Check Allow this participant to invite other participants.
- You want to set the routing so that at runtime Territory Manager Level 1 should invite Territory Manager Level 2 before routing it to next assignee. This is also known as ad hoc routing. If this option is selected, Adhoc Route is added to the Actions list in Oracle BPM Worklist at runtime.
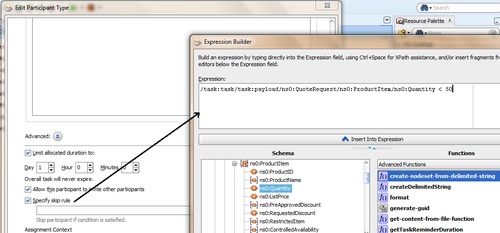
- Check Specify Skip Rule and click the Expression Builder ahead of it, as you also want to bypass this task participant if
Product Quantityis less than50. - Expand Task Payload as QuoteRequest | ProductItem | Quantity and enter the following:
/task:task/task:payload/ns0:QuoteRequest/ns0:ProductItem/ns0:Quantity < 50
Hence, if the incoming payload has a quantity of less than 50, then this Task participant will be skipped.
- Click OK twice to reach the Human Task editor.
- When you have finished, click Save.