A user can have many tasks assigned. Let's say he wants to prioritize tasks and work on those tasks which he wants to access at that instant. You can create a custom column in the task list and the user can see these custom column values in the task list after logging into the Process workspace; they can then decide which task to access.
How will these column values be populated? These column values will be populated from the task payload itself. Say you have a businessanalyst user. You will create a custom attribute in a task list which displays Account name from the quote payload. Account name has values such as FusionNX, APJSales, USASales, and so on, and businessanalyst has priorities for the day and he/she just wants to work on account name FusionNX for the day.
You can achieve this by using flex fields. Human Workflow flex fields store and query use case specific custom attributes. These custom attributes typically come from the task payload values. Storing custom attributes in flex fields provides the following benefits:
- They can be displayed as a column in the task listing
- They can filter tasks in custom views and advanced searches
- They can be used for a keyword-based search
- Log in to JDeveloper with the default role.
- Go to BPM navigator | Project | Business Catalog | Human tasks and click on BusinessAnalystUI.task.
- Click on the Data section to open the task editor.
- Click on the green plus (+) icon to add a data variable.
- Let the variable Type be string. Enter Parameter Name as VarAccountName and check Editable via worklist.
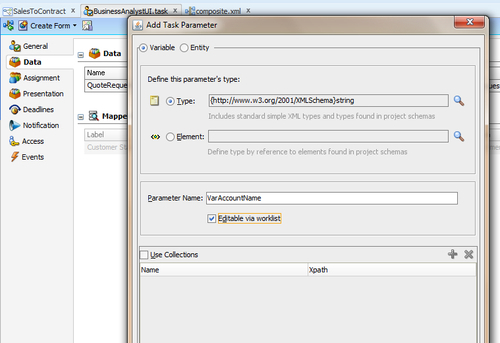
- Click OK.
- Click on the SalesToContract process and go to the Business Analyst swimlane.
- Double-click on the BusinessAnalystReview Human Task.
- Go to the Implementation tab and edit the Data association.
- Enter a simple Expression quote.summary.accountname from the quote payload as input to the VarAccountName variable as shown in the following screenshot:
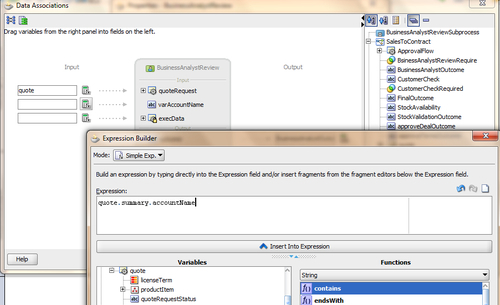
- Click OK on the Data association dialog.
- Click OK on the Properties dialog too.
- When you have finished the preceding steps, click Save.
- Deploy the project as per Chapter 3, Process Deployment and Testing.
II. Creating flex fields for BusinessAnalystUI tasks
- Log in to Oracle BPM workspace as the WebLogic user.
- Click on the Administrator tab and in the Administration Area, click Public Flexfields.
- In the Create Flexfields section, click on the green plus (+) icon. This will open a label box.
- Create a label AccountName as shown in the following screenshot and click on the Create button to create it:
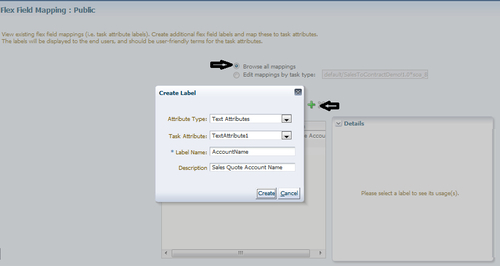
- Check Edit mappings by task type and click on the browse button as shown in the following screenshot.
- Select the BusinessAnalystUI task from the list.
- You can select VarAccountName from the drop-down list as the Map Payload Attributes.
- Select the AccountName label in the text box adjacent to the Map Payload Attributes drop-down list.
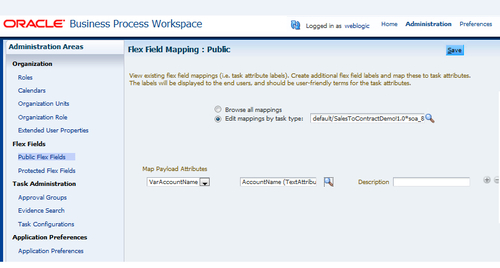
- Click on the Save button in the top-right corner.
- Click on the Home tab and go to Worklist Views section.
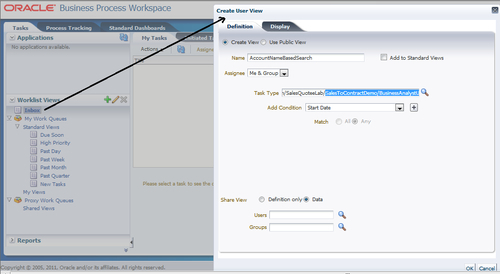
- Click on Inbox and click on the green plus (+) icon to add a user view.
This will open a Create User View dialog.
- Enter Name as AccountNameBasedSearch.
- Select the BusinessAnalystUI task in Task Type and keep the defaults for the rest.
- Click on the Display tab.
- Scroll through the Available column list and you will find the column label AccountName listed there.
- Add the column to the Selected section by clicking the> arrow.
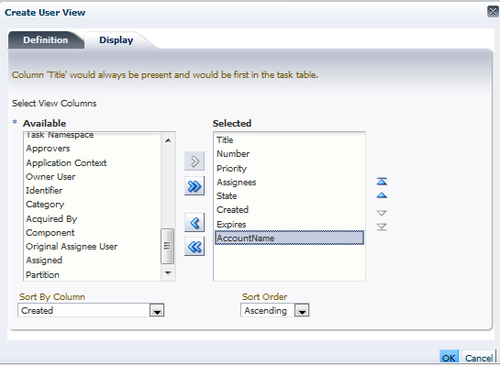
- Click OK.
- Initiate a process instance.
- Log in again to Oracle BPM as the WebLogic user.
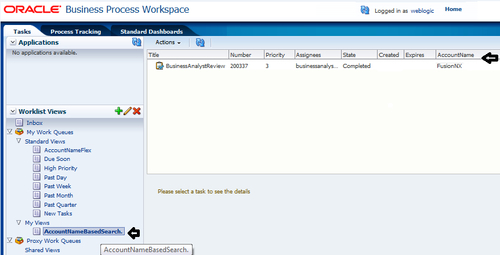
- In the Worklist Views, you will find the custom view AccountNameBasedSearch.
- You will find AccountName as the column and FusionNX as the value.
- You can log in to Oracle EM console and verify the value from the running process instance.
Flex fields will store the custom attribute values coming from the task payload and make them available to the custom view. For the mapped attribute to get populated, administrators create mapped attribute mappings by specifying a label for the mapped attribute to be populated and map the payload attribute, which contains the data, to the label.
After the mapping is complete and a new task is initiated, the value of the payload is transferred to the mapped attribute that has just been mapped. Tasks initiated before the mapping do not contain the value in the mapped attribute. Only top-level, simple type attributes in the payload can be transferred to a mapped attribute.
These mappings are valid for a certain task type.
You have witnessed that the Human Task editor is used only when defining the payload for a task. All other operations are performed at runtime by the administrator.
You created this custom view AccountNameBasedSearch in the Inbox earlier. And you have selected the BusinessAnalystUI task in the task type and kept the defaults for the rest.
You have noticed that there is a checkbox Add To Standard View, which you have kept as unchecked by default. You can create a custom view in Standard Views too.
Follow these steps to create a standard view:
- Go to Oracle BPM workspace and log in as the WebLogic user.
- Go to the Worklist Views section.
- Click on Inbox and then click on the green plus (+) icon to add a user view.
This will open a Create User View dialog.
- Enter Name as AccountNameFlex.
- Check Add To Standard View, to add this AccountNameFlex view to the standard view.
- Select BusinessAnalystUI task in the Task Type and keep the defaults for therest.
- Click OK.
- Log out of the WebLogic user.
- Run an instance on the process.
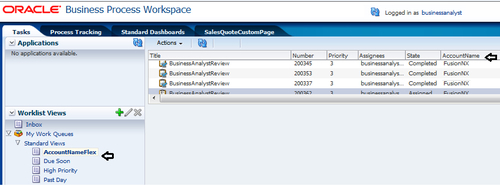
- Log in as BusinessAnalyst user in the Oracle BPM workspace.
- Go to Worklist Views and you can witness AccountNameFlex in Standard View.
- You will find the AccountName column and data from payload too.