
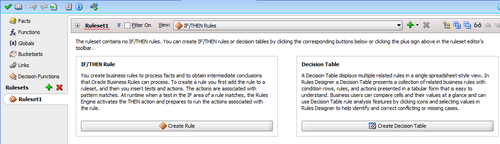
There are two ways you can define rules—either by using IF/THEN or by using Decision Tables. By using a Decision Table, you can create and use business rules in an easy-to-understand format that provides an alternative to the IF/THEN rule format, and it displays multiple related rules in a single spreadsheet-style view. In Rules Designer, a Decision Table presents a collection of related business rules with condition rows, rules, and actions, presented in a tabular form that is easy to understand.
You will use Decision Table for Check Customer rules and use if-then-else for DiscountCheck rules. For the Check Customer rule, you have following scenario :
- First case, if the input
Quote.customer typeisNewandQuantityis in the range of0to10, thenEffective Discountwill have a 10% increment and other values will be set as follows:If
Quote.CustomerType == NewandQuote.Quantityis between 0-10, thenSet ApprovalFlow.CustomerType = True Set ApprovalFlow.newEffectiveDiscount = Quote. EffectiveDiscount+10 Set ApprovalFlow..Number of Level for approval = 0 Set ApprovalFlow.Tier1ApprovalNeeded = False Set ApprovalFlow.Tier2ApprovalNeeded = False
- Second case, if the input,
Quote.customer typeisNewandQuote.Quantityis in the range of10to50, thenEffective Discountwill have a 10% increment and other values will be set as follows:Set ApprovalFlow.CustomerType = True Set ApprovalFlow.newEffectiveDiscount = Quote. EffectiveDiscount+10 Set ApprovalFlow..Number of Level for approval = 1 Set ApprovalFlow.Tier1ApprovalNeeded = False Set ApprovalFlow.Tier2ApprovalNeeded = False
- Third case, if the input,
Quote.customer typeisNewandQuantityis greater than50, Effective Discountwill have a 15% increment and other values will be set as follows:If
Quote.CustomerType == NewandQuote.Quantityis between > 50, thenSet ApprovalFlow.CustomerType = True Set ApprovalFlow .newEffectiveDiscount = Quote.EffectiveDiscount+15 Set ApprovalFlow..Number of Level for approval = 2 Set ApprovalFlow.Tier1ApprovalNeeded = False Set ApprovalFlow.Tier2ApprovalNeeded = True
In this section, you will define the Decision Table.
- Go to the Rule designer for
CheckCustomer.rulesand select Rulesets | Ruleset1. - Click on Create Decision Table, to create a Decision Table for this ruleset.
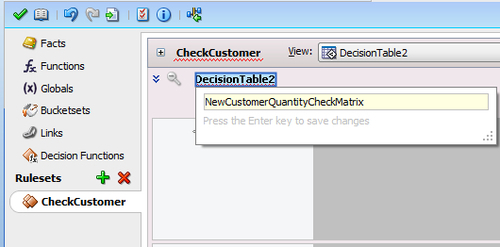
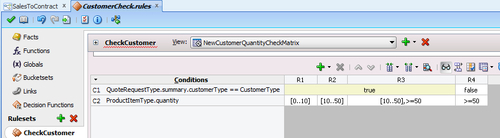
- Give the name CheckCustomer to the ruleset and enter NewCustomerQuantityCheckmatrix as name of the Decision Table:
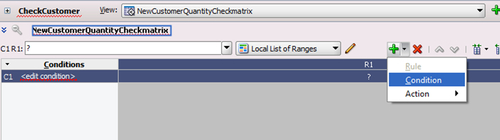
- Click the green plus(+) icon and select Condition to create a condition:
- Click on<edit condition> and select Expression Builder.
- Select QuoteRequestType | Summary | customertype and click Insert Into Expression.
- Equate the expression with the CustomerType global which holds the value
New.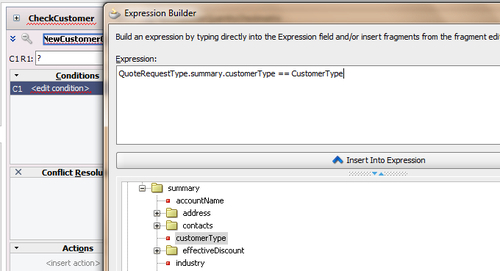
- Click OK.
- Click on the green plus (+) icon to add another condition to evaluate for quantity.
- Click Edit Condition.
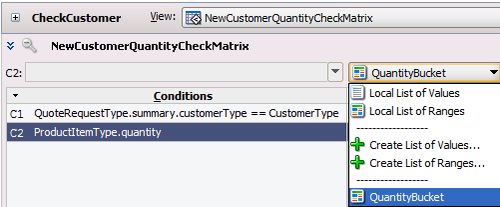
- In the Value Option, select ProductItemType | quantity.
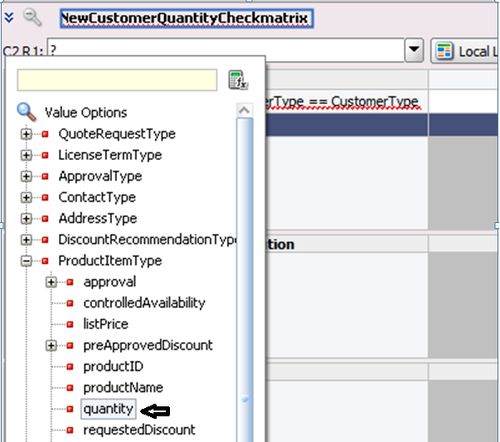
- ProductitemType.quantityUnder this option, click on the Local List of Ranges pull-down menu, and select the Bucketset that you have created, QuantityBucket. The Conditions row requires a Bucketset from which to draw the values for each cell.
- When finished, Save.
II. Define Rules
- Click the green plus (+) icon and select Rule, to create a condition.
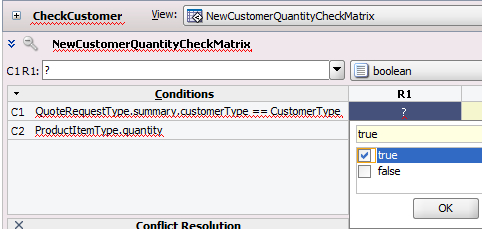
- Click on the condition cell in the R1 Rule column for the Customer Type row and you can find a pop-up with the Boolean values.
- Check True so that the rule is executed if CustomerType = New is true, and actions associated in the column of this rule will also get executed.
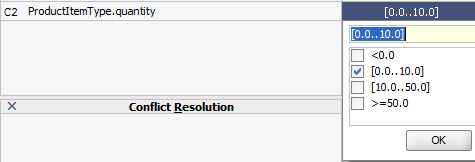
- Similarly, click on the empty tab in the R1 column for the Quantity row.
- Check the range 0-10. This means if along with CustomerType = New is True and the quantity falls in this range, the R1 rule will get activated, and actions specified in the condition tab for this R1 rule column will get executed.
- Repeat the preceding steps to create a Decision Rules table, as follows:
- When finished, Save.
III. Add Actions
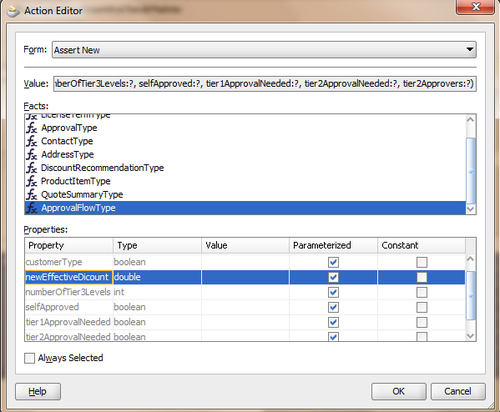
- Click the green plus (+) icon and select Action | Assert new, to create actions.
- Click on Edit Actions, and this will open Action Editor.
- Chose ApprovalFlowType, and in Properties, check the properties you need. Let's take all of them.
- Enter a value in each action cell, as shown in the following screenshot:
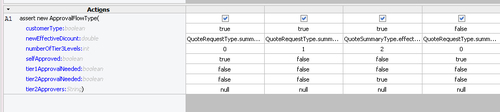
- The values for the Actions cell newEffectiveDiscount are as follows:
- R1: QuoteRequestType.summary.effectiveDiscount+10
- R2: QuoteRequestType.summary.effectiveDiscount+10
- R3: QuoteRequestType.summary.effectiveDiscount+15
- R4: QuoteRequestType.summary.effectiveDiscount+10
- When you have finished this, Save.
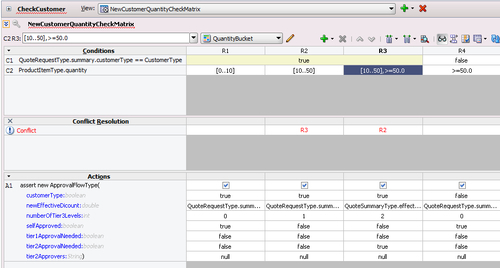
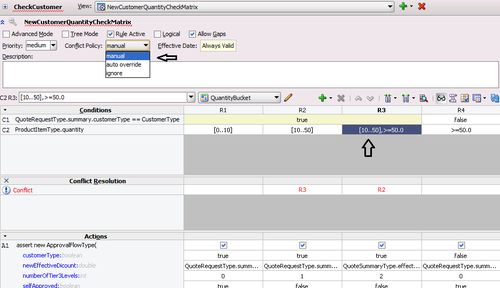
- The final Rule designer with Rules, Conditions cell, and Actions cell entries, along with the pop-up conflicts, looks like the following screenshot:
At runtime, when facts match the Conditions cells, the Rules Engine prepares to run the actions associated with the rule.
Each condition row has a condition expression, and for each rule, a Condition cell. A condition expression is an expression that you build in Rules designer. The condition expression is often a fact property or a function result, but it can be any expression that has a type that can be associated with a Bucketset. Test expressions are often used. These expressions are associated with the built-in Bucketset.
Actions are associated with rules in a Decision Table. In an action, you can call a function, assert a new fact, retract a fact, or modify a fact. In the Actions area, the cells corresponding to an individual action for a rule are called Action cells. When you add multiple actions, the actions that you add in the Actions area are ordered; actions appearing in the higher rows run before actions in the following rows.
Sometimes there may be conflicts in the rules in the Decision Table. Two rules conflict when they overlap and they have different actions. Two rules overlap when at least one of their condition cells has a bucket in common.
Rules designer finds conflicts and you can see the conflicts in the Conflict Resolution row in the Decision Table, when you click Show Conflicts. You can define conflict policy to handle and even resolve such conflicts.
Conflict resolution is done as follows:
- Define a conflict policy in the Decision Table conflict policy, as follows:
- Manual: Conflicts are resolved by manually specifying a conflict resolution for each conflicting rule.
- Auto-override: Conflicts are resolved automatically using an override conflict
- Resolution: When possible, solve conflicts using the Oracle Business rules' automatic conflict resolution policies
- ignore: Conflicts are ignored
You can find that a couple of conflicts are listed in the Conflict section in the Rule designer.
- Click R3 and select one of the conflict resolution methods.
- However, you will not follow any resolution, but will follow the strategy of Change the Decision Table to remove an overlap.
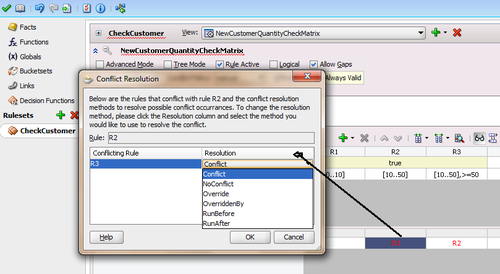
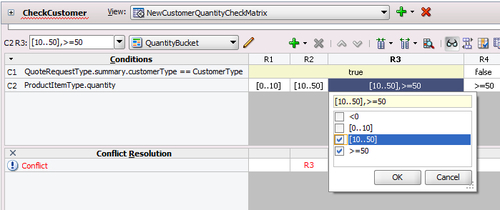
- Click Cancel in the Conflict Resolution dialog and change the Decision Table to remove overlap.
- Click the R3 condition cell, uncheck the [10..50] range, and keep>=50 checked.
The Rule designer is created without conflict and with Conditions cell and Actions cell values.
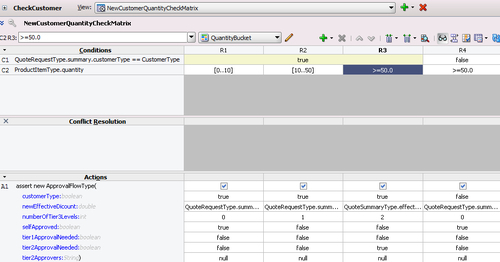
- When finished, Save.