
Oracle BPM projects may consist of many processes, and each project simulation can consist of one or more processes and their corresponding simulations. You need to create a simulation definition, as this is what actually determines which processes and process simulation models should be used and how resources should be configured for the simulation.
In simulation definition, you can also customize many parameters that influence the performance of your project, such as Starting Time and Duration of simulation.
Also, you can associate which process simulation models you want to include in the project simulation and can include the participant resources.
You will define a simulation definition to determine which simulation models should be used as follows:
- Go to JDeveloper | BPM Project Navigator and expand the SalesToContractDemo project.
- Click on Processes | SalesToContract.
- Go to the Simulation node, expand it, and select Simulation Definitions.
- Right-click Simulation Definitions and select New Simulation.
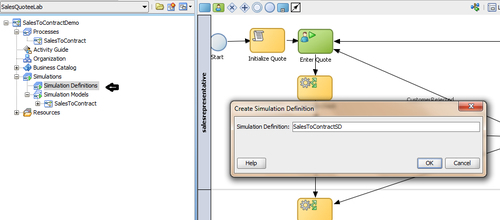
- Enter
SalesToContractSDas the Simulation Definitions name in the Create Simulation Definition dialog. - Click OK. A Simulation Definitions editor will open up.

- Let the Start Time be as it is. This time is used only for logging. It is not used for scheduling purposes.
- Enter 12 hours as the period the simulation runs for.
- Tick the option Let in-flight instances finish before simulation ends. This means simulation ends only when the specified number of instances complete. If unselected, simulation stops after the simulation duration is completed. At that point, all incomplete instances are shown in either "in-process" or "queue" status.
- Click the Project tab, and tick Include in Simulation. This specifies that the process must be included in the simulation. Here, you can find all the processes that belong to the listed project. As there is one process for this project, it will be listed.
- Go to the Resource tab and click on the green plus (+) icon to add the resources to use within the simulation.
- Enter the name of the Resource, say
salesrepresentative. Enter$50as Cost, for the cost of resource per hour. Set their Availability and Efficiency as 100%. Click the green plus (+) icon, to set the participants for the roles you already have included in this project. Set capacity to 5. - Click on the Roles cell and then the "browse" button to select a role, and assign it to a row, for example, assign the contracts role to the fourth row, and so on.
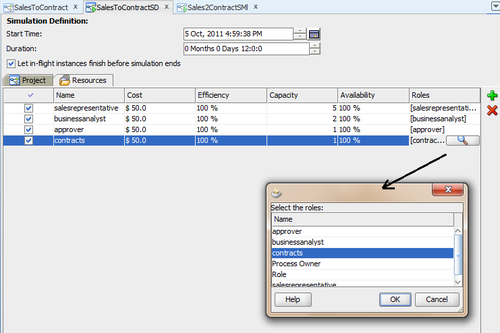
- Fill the table, as shown in the preceding screenshot.
- When you have finished, click on Save.