Comparative blending
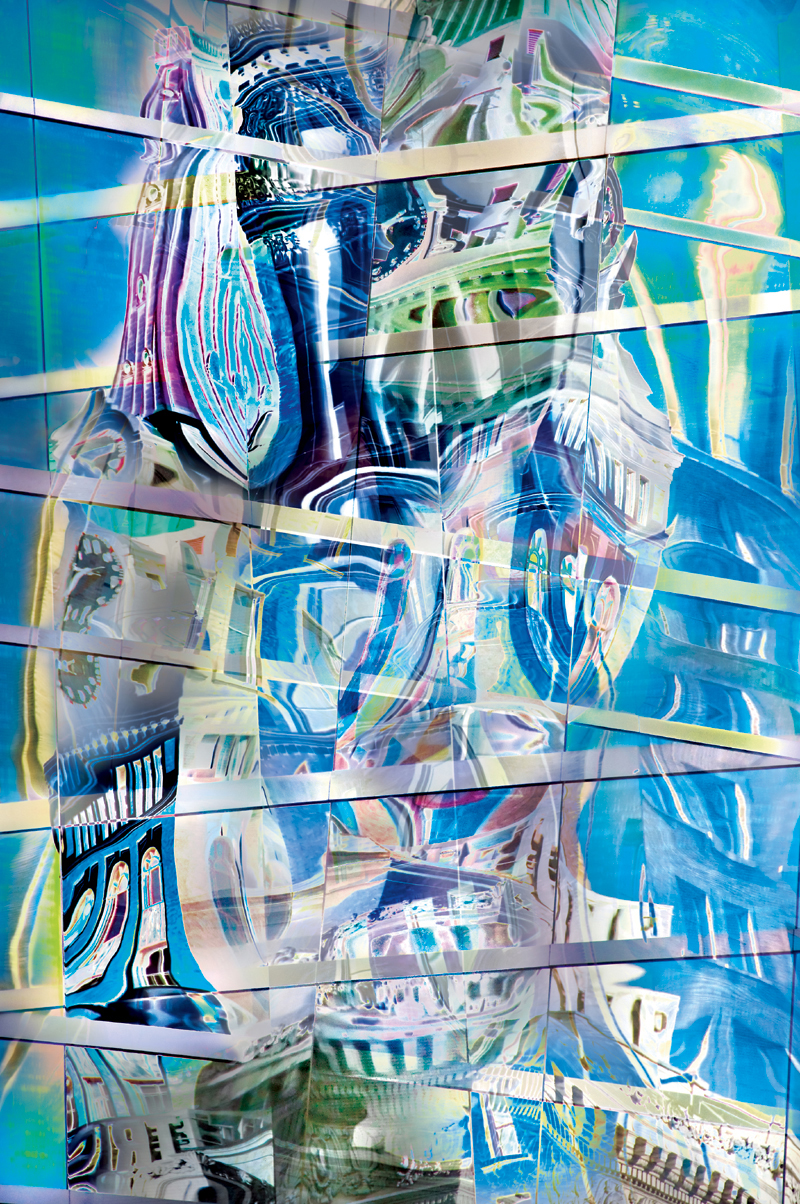
Across the Bay from San Francisco, Oakland, California—like the comparative blending modes—doesn’t get no respect. But Oakland is a significant city in its own right. It is one of the most important urban areas on the west coast of the United States.
One cold winter day, I was wandering the streets of downtown Oakland when I saw a series of reflections in the plate glass windows of an office high-rise.
These reflections showed architectural details, including clocks and pillars, and cornices and arched windows with divided lights, all from a bygone era.
Moving out to a small traffic island in the middle of a busy boulevard, I realized that my tripod was going to stay in my bag. There wasn’t enough room and the cars and trucks whizzing by would create enough tripod shake to ruin shorter exposures.
Setting a fast shutter speed and bracing my back against a streetlamp, I shot a number of exposures.
Back at my studio I used a series of comparative blending modes to combine the different exposures. My idea was to create a composition that showed a partially fractured society through the shapes in the reflections: architecture literal and present, but also at the same time not coherently possible.
170mm, circular polarizer, two exposures, each exposure at 1/250 of a second at f/7.1 and ISO 100, handheld; exposures combined in Photoshop.
Is not the eternal Tao
The name that can be named
Is not the eternal Name.
—Tao Te Ching (Stephen Mitchell translation)
If you look at how the comparative blending modes—Difference, Exclusion, Subtract, and Divide—work from a technical perspective, you’ll be hard put to intuitively know what they do. For example, the Difference blending mode compares the brightness of the pixels of the source and target layers and subtracts the brightest pixels. A white layer in Difference blending mode inverts the layer beneath it, and a black layer leaves the underlying layer unchanged.
Weird, huh? I should fully disclose right off the bat that comparative blending modes are not much beloved of Photoshop book authors. (“Psychedelic,” “freaky,” and “useful only on Hallowe’en” are the way one author puts it!)
I think that if you’ll bear with me, you’ll find quite a few artistic and creative uses for these comparative blending modes when it comes to your photography. Of course, like any tool they need to be used with discretion and taste—and possibly not at full opacity, with a layer mask to direct specific rather than overall application. (To find out more about applying blending modes to layers, turn to pages 71–89.)
Many of the blending mode examples I’ve shown you so far involved blending a layer with a duplicate of itself. However, when it comes to comparative blending modes, the rubber really meets the road when you blend a layer representing one photo with a layer representing a second photo.
By the way, when you do experiment with blending layers consisting of wildly different subjects, don’t limit yourself to the comparative blending modes. It’s true that the comparative blending modes have the most striking impact when you use them on imagery that is intentionally divergent—but it is also worth playing with blending modes across the board to see what the blending process comes up with.
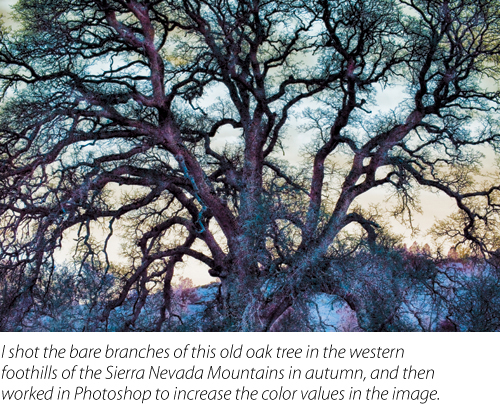
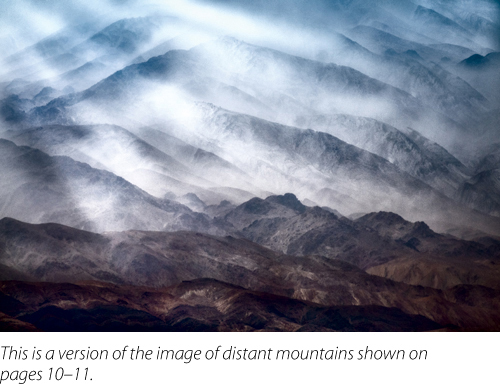
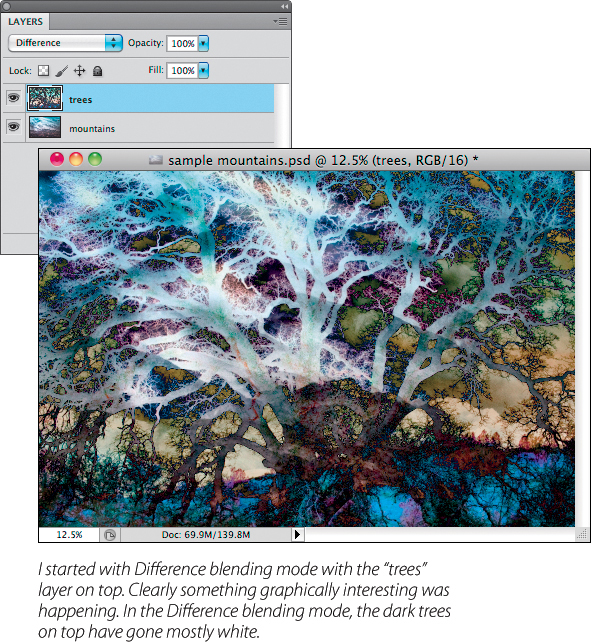
Looking through my files for divergent photos to use as source material for a comparative blending mode collage, I was struck by an image of an old oak tree (upper right), and distant mountain ranges near Death Valley (middle right). The two images seemed very different, but I had an idea that they might work together.
I started by duplicating the mountain image (page 44) and creating a layer stack with the tree image. Appropriately, I named the layers “mountains” and “trees” (below).
Then I started playing with the comparative blending modes. You can see the results below and on page 93.
Meditation
Visualize two of your images. Now, imagine how they would look as layers blended together with one of the blending modes other than Normal. With this in mind, how could you expose new photos specifically for the purpose of using with the blending mode you visualized?
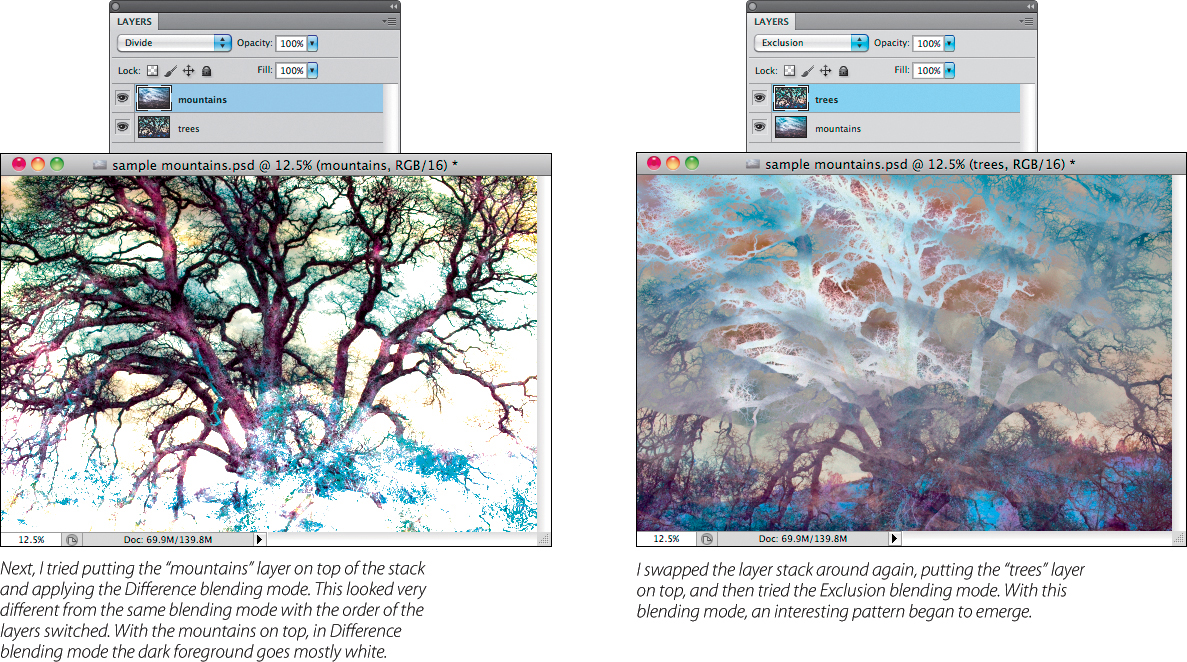

Using the comparative blends that I had been playing with, I worked to create the digital collage below. I started with two photos, and combined them using a number of comparative blending modes (see text for a full explanation).
Two photos: Tree, 95mm, 1/800 of a second at f/14 and ISO 200, handheld; Mountains, 300mm, 1/160 of a second at f/6.3 and ISO 320, handheld; images combined in Photoshop.
In point of fact, comparative blending modes have usefulness going beyond the abstract. Whenever I want to introduce an element in one of my compositions that seems like it might have a little to do with the supernatural, I start to think of comparative blending modes.
The image of the interior of Grand Central Station shown to the right was somewhat complex to make. The first hurdle was that I couldn’t use a tripod on the floor of Grand Central Station when it was busy with people bustling by. To solve this, I found a balcony with a railing where I could rest my camera.
I needed each exposure to be fairly long so that I could create the partially visible “ghostly” people in motion. Since there was a good deal of light in Grand Central Station, I added a neutral density filter and a polarizing filter to my camera and then shot four exposures, each at 4 seconds, with my lens stopped all the way down.
I processed the sequential images by placing them in two stacks. One stack used the Lighten blending mode, and the other stack used the Darken blending mode. I merged down each of the two stacks, and blended them with a layer mask and a gradient.
Finally, I amplified the ghostly pedestrian effect by merging LAB colored layers (see pages 155–163 for more on LAB color) back into the image using comparative blending modes. With each of these operations, I used a layer mask so I could be very selective. In other words, I used a specific layer and blending mode only on individuals and small groups of people, and not overall.
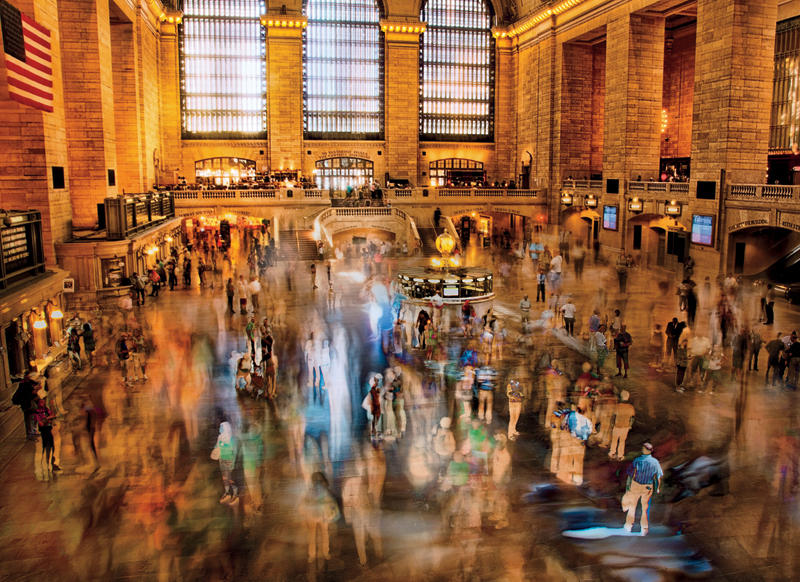
My idea in making this photo was to combine a number of long exposures with the hope of creating an image that showed both solid people and others that seemed more ghostly (see text for further details).
Four combined photos (see explanation in the text), each photo 18mm, 4 seconds at f/22 and ISO 100, circular polarizer and +4 ND filter, camera placed on an overlook balcony rail.