CHAPTER 11
Internet Information Services
IN THIS CHAPTER
![]() Understanding Internet Information Services 10
Understanding Internet Information Services 10
![]() Installing and Upgrading IIS 10
Installing and Upgrading IIS 10
![]() Installing and Configuring Websites
Installing and Configuring Websites
![]() Installing and Configuring FTP Services
Installing and Configuring FTP Services
Internet Information Services (IIS) has been going through continuous change for years. Although IIS 10 does not have many new features it is the most scalable, reliable, and secure web server to date. Version 10 is able to “shrink” down to a Nano of its standard footprint with the ability to operate on the new Nano Server instance on Windows Server 2016. And IIS 10 now also supports HTTP/2.0, which has been long anticipated.
Without a doubt, the fundamental capabilities of IIS 10 are exhilarating. The web server includes a plethora of features and functionality that provide numerous benefits to organizations hosting applications and developers creating web applications with the latest .NET Framework and its platform on the Azure cloud. Among other things, organizations can also simplify management, reduce attack surface areas, benefit from improved diagnostic and troubleshooting capabilities, and enjoy greater scalability.
To reap the full benefits of IIS 10, this chapter gives web administrators the knowledge base necessary to understand the management user interface in IIS 10. The first sections of the chapter focus on planning an IIS 10 infrastructure and installing or upgrading to IIS 10. The second sections focus on creating both web and File Transfer Protocol (FTP) sites, and discuss how to configure the new settings. The final sections of the chapter discuss how to secure IIS 10.
Understanding Internet Information Services 10
Organizations and web administrators must fully understand IIS 10 before installing, upgrading, or creating sites with the product. Specifically, they should be familiar with the new improvements, the new look and feel of the management tools and user interface, and be comfortable with the new working panes associated with administration. The next few sections examine these areas of interest.
IIS 10 Advanced Functionality
Several key features are responsible for the scalability, performance, security, and administration of IIS. Some of the major IIS functionality that IT professionals, web admins, and developers will take pleasure in having include the following:
![]() Dynamic IP restrictions—IIS 10 supports automatic blacklisting of IP addresses based on the number of requests. This feature is supported for both the website and FTP site functions of IIS. The FTP feature behaves somewhat differently in that IP addresses are blacklisted as a result of failed authentication attempts rather than a number of requests.
Dynamic IP restrictions—IIS 10 supports automatic blacklisting of IP addresses based on the number of requests. This feature is supported for both the website and FTP site functions of IIS. The FTP feature behaves somewhat differently in that IP addresses are blacklisted as a result of failed authentication attempts rather than a number of requests.
![]() SSL host header support—IIS 10 includes support for host headers to Secure Sockets Layer (SSL)-protected sites using Server Name Indication (SNI). This feature allows administrators to protect multiple websites with a single SSL certificate and improves security and scalability of the platform.
SSL host header support—IIS 10 includes support for host headers to Secure Sockets Layer (SSL)-protected sites using Server Name Indication (SNI). This feature allows administrators to protect multiple websites with a single SSL certificate and improves security and scalability of the platform.
![]() Central certificate store (CCS)—A welcome features for administrators who support large farms with multiple SSL protected websites is the central certificate store. The CCS resides on a file share accessible to all farm members and can contain all the certificates required for the operation of the web server. Certificate binding is performed automatically based on the name of the certificate (PFX) file in the CCS. The naming convention of the files supports wild-card and Unified Communication Certificates (UCC). Certificate upgrades become a simple matter of replacing the PFX file in the CCS and restarting each web server.
Central certificate store (CCS)—A welcome features for administrators who support large farms with multiple SSL protected websites is the central certificate store. The CCS resides on a file share accessible to all farm members and can contain all the certificates required for the operation of the web server. Certificate binding is performed automatically based on the name of the certificate (PFX) file in the CCS. The naming convention of the files supports wild-card and Unified Communication Certificates (UCC). Certificate upgrades become a simple matter of replacing the PFX file in the CCS and restarting each web server.
![]() CPU throttling—A much-desired and requested feature in recent years was to have a usable mechanism to control CPU load for each website. In older versions of IIS, throttled sites were disabled entirely, which was frequently unacceptable. With IIS 10, sites can be throttled to reduce performance but still provide service. Throttling control is even provided as a full-time configuration or only when the server load requires it.
CPU throttling—A much-desired and requested feature in recent years was to have a usable mechanism to control CPU load for each website. In older versions of IIS, throttled sites were disabled entirely, which was frequently unacceptable. With IIS 10, sites can be throttled to reduce performance but still provide service. Throttling control is even provided as a full-time configuration or only when the server load requires it.
![]() Application Initialization Module—IIS 10 provides administrator control over the initialization of a web application. Web applications can now be initialized in advance so that the first end user to access the application doesn’t experience a delay as the application is initialized. The new module can support a server wide setting or integration with URL Rewrite rules for more granular control. The module’s configuration also supports integration with load-balancer health pages to ensure that a node isn’t considered available for requests until the application is fully initialized.
Application Initialization Module—IIS 10 provides administrator control over the initialization of a web application. Web applications can now be initialized in advance so that the first end user to access the application doesn’t experience a delay as the application is initialized. The new module can support a server wide setting or integration with URL Rewrite rules for more granular control. The module’s configuration also supports integration with load-balancer health pages to ensure that a node isn’t considered available for requests until the application is fully initialized.
![]() Scalability—In addition to the features listed already, the SSL and configuration file-handling components of IIS further optimized to handle much higher scale and support thousands of website and certificates, if not more.
Scalability—In addition to the features listed already, the SSL and configuration file-handling components of IIS further optimized to handle much higher scale and support thousands of website and certificates, if not more.
![]() WebSocket support—It is possible to configure web socket support directly within IIS and establish two way, real-time communication between a client and server using HTTP.
WebSocket support—It is possible to configure web socket support directly within IIS and establish two way, real-time communication between a client and server using HTTP.
![]() HTTP/2.0 support—HTTP/2 changes how HTTP semantics flow over TCP connections. While the major advance of HTTP/1.1 was the use of persistent connections to service multiple requests in a row, HTTP/2 allows a persistent connection to be used to service multiple simultaneous requests. It is also a much more efficient HTTP that can meet the challenges of today’s Internet.
HTTP/2.0 support—HTTP/2 changes how HTTP semantics flow over TCP connections. While the major advance of HTTP/1.1 was the use of persistent connections to service multiple requests in a row, HTTP/2 allows a persistent connection to be used to service multiple simultaneous requests. It is also a much more efficient HTTP that can meet the challenges of today’s Internet.
Understanding the IIS Manager Tools
The centerpiece of IIS 10 is the now familiar IIS Manager user interface. The updated user interface, which was introduced with IIS 7 and Windows Server 2008, is the primary tool used to manage IIS and ASP.NET, health and diagnostics, and security.
In addition to the GUI management console, IIS 10 can also be managed using a variety of command-line tools. First and foremost, the PowerShell provider included with IIS is a powerful tool for common management tasks as well as for automation requirements. Although other command-line tools, such as iisreset, are still available, many other tools have been deprecated, especially VBS scripts such as iiscnfg, iisback, and others. The functionality of those tools is available with PowerShell. A number of new scripts have been made available for IIS 10.
Because understanding the console is a must to successfully administer IIS and know where to conduct each task, the next sections examine the layout of the user interface.
Exploring the IIS Manager Administration Panes
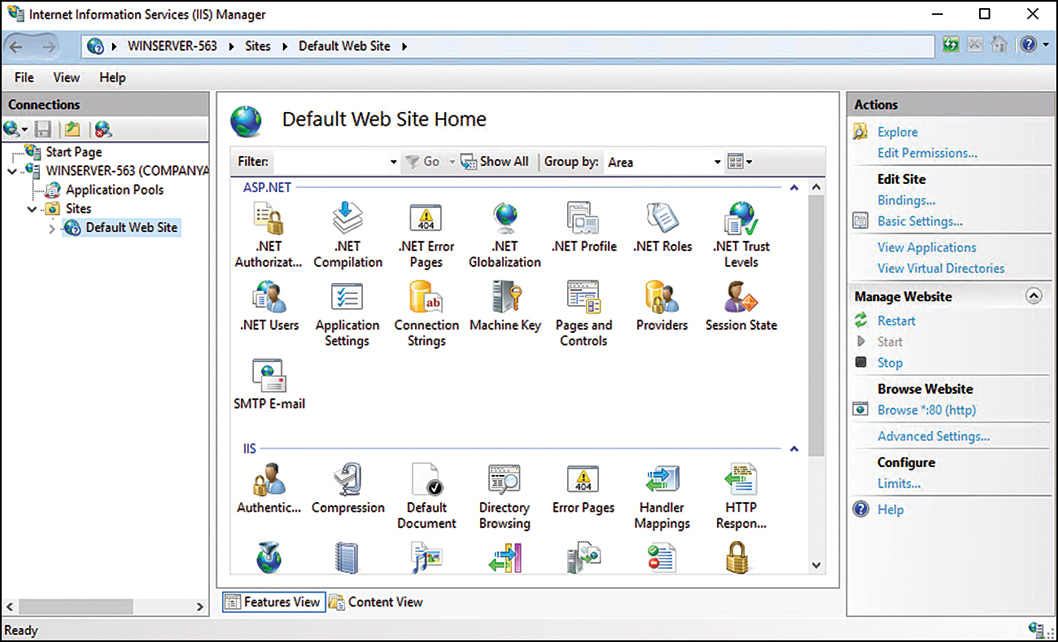
Each area within the IIS Manager console is referenced by a descriptive word, as shown in Figure 11.1. For example, the descriptive words associated with the areas or panes, such as the Connections pane, make it easier to identify the location of the IIS features. The following is a list of the panes included in the IIS Manager console and their respective functions:

FIGURE 11.1 The IIS Manager user interface.
![]() The Connections pane—The Connections pane is located on the left side of the console and displays the IIS console tree, which is also known as the node tree. Web administrators can conduct the following tasks from within this pane:
The Connections pane—The Connections pane is located on the left side of the console and displays the IIS console tree, which is also known as the node tree. Web administrators can conduct the following tasks from within this pane:
![]() View the start page
View the start page
![]() Connect to a server, site, or application
Connect to a server, site, or application
![]() Manage server settings
Manage server settings
![]() Configure IIS, application pools, FTP, and websites
Configure IIS, application pools, FTP, and websites
![]() Change view settings for the Central Details pane
Change view settings for the Central Details pane
![]() Central Details pane—Also known as the workspace, this large pane is located in the center of the IIS 10 management console. This pane can operate in one of two views: feature and content. The feature view displays the configuration options for each IIS feature installed. Each feature is represented by a new icon and replaces the legacy property sheets and tabs that most administrators in the industry were not too fond of in the past. The feature icons can be grouped by category or area; otherwise, grouping can be turned off. The content view displays the actual content files that are part of the selected node in the Connections pane.
Central Details pane—Also known as the workspace, this large pane is located in the center of the IIS 10 management console. This pane can operate in one of two views: feature and content. The feature view displays the configuration options for each IIS feature installed. Each feature is represented by a new icon and replaces the legacy property sheets and tabs that most administrators in the industry were not too fond of in the past. The feature icons can be grouped by category or area; otherwise, grouping can be turned off. The content view displays the actual content files that are part of the selected node in the Connections pane.
![]() Actions pane—The Actions pane is located on the right side of the console and displays common actions, including wizards associated with each task. This pane also usually contains multiple tabs for the different options available based on the node chosen.
Actions pane—The Actions pane is located on the right side of the console and displays common actions, including wizards associated with each task. This pane also usually contains multiple tabs for the different options available based on the node chosen.
IIS Manager Administration Nodes in the Connections Pane
Many web services components need to be configured to optimize IIS for security, functionality, and redundancy. The IIS snap-in is the interface used to administer IIS services. In the left pane of the snap-in, as shown in Figure 11.2, you will see folders or nodes similar to the following:
![]() Start Page—The Start Page is the first item within the Connections pane and is a digital dashboard for IIS. It provides users with a wealth of information by displaying IIS newsfeeds and links to online resources. In addition, the Start Page includes recent connection information and connection tasks.
Start Page—The Start Page is the first item within the Connections pane and is a digital dashboard for IIS. It provides users with a wealth of information by displaying IIS newsfeeds and links to online resources. In addition, the Start Page includes recent connection information and connection tasks.
![]() IIS Server—The main place to administer and manage server properties and features is the server node. After being selected, the IIS feature icons are displayed in the central pane. An administrator must double-click a feature to configure property settings specific to that feature. Examples of feature icons include Feature Delegation, Logging, and Configuration Editor.
IIS Server—The main place to administer and manage server properties and features is the server node. After being selected, the IIS feature icons are displayed in the central pane. An administrator must double-click a feature to configure property settings specific to that feature. Examples of feature icons include Feature Delegation, Logging, and Configuration Editor.
![]() Application Pools—Application pools are actually sections of physical memory dedicated to the applications running within a pool. Application pools segment applications from the rest of the memory resources used by other IIS services. This promotes higher reliability and security, but it also requires more memory to be configured on the web server. The application pool elements can be sorted based on name, status, .NET Framework version, managed pipeline mode, identify, and applications.
Application Pools—Application pools are actually sections of physical memory dedicated to the applications running within a pool. Application pools segment applications from the rest of the memory resources used by other IIS services. This promotes higher reliability and security, but it also requires more memory to be configured on the web server. The application pool elements can be sorted based on name, status, .NET Framework version, managed pipeline mode, identify, and applications.
![]() Sites—This folder contains all the websites and FTP sites being hosted on the web server. The Default Web Site is created during the installation of IIS 10.
Sites—This folder contains all the websites and FTP sites being hosted on the web server. The Default Web Site is created during the installation of IIS 10.
An Internet Information Services (10) Manager can be started from the Tools menu in Server Manager, or by typing start inetmgr at the command prompt.
Planning and Designing IIS 10
Two of the most important tasks to accomplish before implementing IIS 10 are thorough planning and designing. Planning and designing are the beginning phases to properly implementing IIS, and they can consist of the following:
![]() Defining goals and objectives of the IIS 10 project
Defining goals and objectives of the IIS 10 project
![]() Identifying and reviewing IIS application types and requirements
Identifying and reviewing IIS application types and requirements
![]() Designing the IIS infrastructure to support the goals and objectives
Designing the IIS infrastructure to support the goals and objectives
![]() Deciding on which IIS 10 features will be utilized during the installation process to meet the goals of the organization
Deciding on which IIS 10 features will be utilized during the installation process to meet the goals of the organization
![]() Defining fault-tolerance requirements
Defining fault-tolerance requirements
![]() Designing the back-end infrastructure, such as the database or application tier
Designing the back-end infrastructure, such as the database or application tier
![]() Defining security requirements to meet the goals and objectives and balancing the security methodologies between risks and end-user experience
Defining security requirements to meet the goals and objectives and balancing the security methodologies between risks and end-user experience
![]() Examining and designing disaster recovery plans, and monitoring requirements and maintenance practices
Examining and designing disaster recovery plans, and monitoring requirements and maintenance practices
![]() Documenting the current or new IIS infrastructure and the IIS design decisions
Documenting the current or new IIS infrastructure and the IIS design decisions
Determining Server Requirements
Hardware and software requirements are usually based on the information gathered and the requirements set forth in the design and planning stages of a project. The necessary hardware and software requirements should always match the goals and objectives of the project. This information is very detailed and describes all the resources necessary for hardware and software.
IIS 10 does not have specific minimum server requirements tailored toward running IIS on Windows Server 2016. The minimum server requirements are based on Windows Server 2016. It is a best practice, however, to stick with multiple dual- or quad-core processors; to use fault-tolerant disks such as RAID 1, RAID 5, or RAID 10; and to use as much RAM as needed, depending on how many sites and users you will be hosting as well as the complexity of the web applications. For more information about recommended Windows Server requirements, review Chapter 1, “Windows Server 2016 Technology Primer,” or for server performance tuning, network optimization, and SSL offloading, see Chapter 34, “Capacity Analysis and Performance Optimization.”
Determining Fault-Tolerance Requirements
Fault tolerance is a key aspect of any web infrastructure and should be addressed during planning and designing phases, regardless of whether an organization can afford downtime of its websites or requires 99.999% uptime. In view of this, service-level agreements (SLAs) are highly recommended and should be determined from the operational goals during the design and planning phase. After an SLA is in place, it will be easy to apply the appropriate fault tolerance to the web infrastructure because expectations and tolerances are clearly defined and previously agreed upon by everyone involved in the process.
Various technologies can be applied to a Windows Server 2016 web infrastructure to support even the most demanding SLAs. For example, Windows Server 2016 web servers can use Network Load Balancing (NLB) to distribute the load and client requests among multiple web servers and to provide fault tolerance. This is also known as scaling IIS by creating a web server farm. NLB is more suited to provide fault tolerance for scaling web servers than Windows failover clusters because the IIS components are not cluster aware.
NLB on Windows Server 2016 also offers many advanced features and functionality, which makes it more appealing. For instance, NLB offers support for multiple dedicated IP addresses per node. For a complete list of NLB features, benefits, and step-by-step procedures, see Chapter 29, “Operational Fault Tolerance (Clustering/Network Load Balancing).”
Installing and Upgrading IIS 10
The installation process and architecture for many recent and upcoming Microsoft product families are completely modularized like Internet Information Services 8 on Windows Server 2016. By providing a modularized approach, web administrators have complete control over the footprint of IIS when customizing the installation. This results in the surface area being reduced, which, in turn, drastically minimizes the chances of a security compromise.
NOTE
As part of the Microsoft Trustworthy security campaign, IIS 10, as was the case with prior versions is not installed on Windows Server 2016 by default. You have to add the Web Server (IIS) role via Server Manager if you want IIS installed.
Before installing or upgrading IIS, it is a best practice to fully understand the new modular installation process, including the features associated with the installation.
Understanding the Modular Approach to Installing IIS 10
The buzzword for Internet Information Services 10 modularized installation process is slim and efficient. The modular setup is made up of more than 40 separate role services and features allowing for complete customization when deploying IIS 10. This typically results in minimal surface area and more granularity compared with legacy editions of IIS. In addition, patching is also based on a component level, reducing the frequency of patching and overall patching time required to keep the system updated and secure. All of this translates to a customized footprint for each organization running IIS 10.
As illustrated in Figure 11.3, the modules that can be selected during the installation process of the Web Server (IIS) role are organized in the following categories:
![]() Management Tools
Management Tools
![]() Web Server
Web Server
![]() FTP Server
FTP Server
The following subsections cover these modular role services.
Management Tools Modular/Role Service
The first role service set associated with the Web Server (IIS) role installation is Management Tools. The management tools enable you to manage and administer the IIS 10 infrastructure. The following management tools are available for installation:
![]() IIS Management Console—If selected, the IIS Management Console role service installs the latest User Interface tool for managing, administering, monitoring, and securing IIS 10. The tool has been much improved and provides support for both IIS and ASP.NET.
IIS Management Console—If selected, the IIS Management Console role service installs the latest User Interface tool for managing, administering, monitoring, and securing IIS 10. The tool has been much improved and provides support for both IIS and ASP.NET.
![]() IIS 6 Management Compatibility—This set of role services provides the tools for backward compatibility when managing an IIS 6.0 infrastructure from a Windows Server 2016 system running IIS 10. In addition, it lets IIS 6.0 management scripts run on IIS 10, provides Windows Management Instrumentation (WMI) compatibility with IIS 6.0, and enables metabase compatibility.
IIS 6 Management Compatibility—This set of role services provides the tools for backward compatibility when managing an IIS 6.0 infrastructure from a Windows Server 2016 system running IIS 10. In addition, it lets IIS 6.0 management scripts run on IIS 10, provides Windows Management Instrumentation (WMI) compatibility with IIS 6.0, and enables metabase compatibility.
![]() IIS Management Scripts and Tools—It is possible to manage all the IIS settings and configurations based on automated script commands. This feature provides the infrastructure that allows IIS to be managed by scripts. This is great when you need to manage many IIS 10 servers within an infrastructure. Note that much of the functionality provided by these tools is also available with the IIS PowerShell provider.
IIS Management Scripts and Tools—It is possible to manage all the IIS settings and configurations based on automated script commands. This feature provides the infrastructure that allows IIS to be managed by scripts. This is great when you need to manage many IIS 10 servers within an infrastructure. Note that much of the functionality provided by these tools is also available with the IIS PowerShell provider.
![]() Management Service—This feature provides the foundation within the IIS 10 infrastructure for remote management.
Management Service—This feature provides the foundation within the IIS 10 infrastructure for remote management.
Web Server Modular/Role Service
The Web Server modular is the main service role within IIS 10. It can be considered the chief functionality for a web server because it provides the foundation for supporting websites and provides developers with a foundation for development. The Web Server role is further broken down into more types of features, which can be independently installed, which promotes further customization of the installation:
![]() Common HTTP Features—A set of role services that allow for static content to be delivered, the creation of customized HTTP errors, directory browsing, and selection of default documents are enabled by default. The HTTP Redirection and WebDAV publishing features are disabled by default.
Common HTTP Features—A set of role services that allow for static content to be delivered, the creation of customized HTTP errors, directory browsing, and selection of default documents are enabled by default. The HTTP Redirection and WebDAV publishing features are disabled by default.
![]() Health and Diagnostics—Select this feature to install the tools associated with monitoring, managing, and troubleshooting an IIS installation. The independent role services include HTTP Logging, Custom Logging, Logging Tools, Request Monitor, Tracing, and ODBC Logging.
Health and Diagnostics—Select this feature to install the tools associated with monitoring, managing, and troubleshooting an IIS installation. The independent role services include HTTP Logging, Custom Logging, Logging Tools, Request Monitor, Tracing, and ODBC Logging.
![]() Performance—Performance role services supporting compression for either static or dynamic content are available in this section. Static Content Compression and Dynamic Content Compression bolster website performance by managing bandwidth and compression.
Performance—Performance role services supporting compression for either static or dynamic content are available in this section. Static Content Compression and Dynamic Content Compression bolster website performance by managing bandwidth and compression.
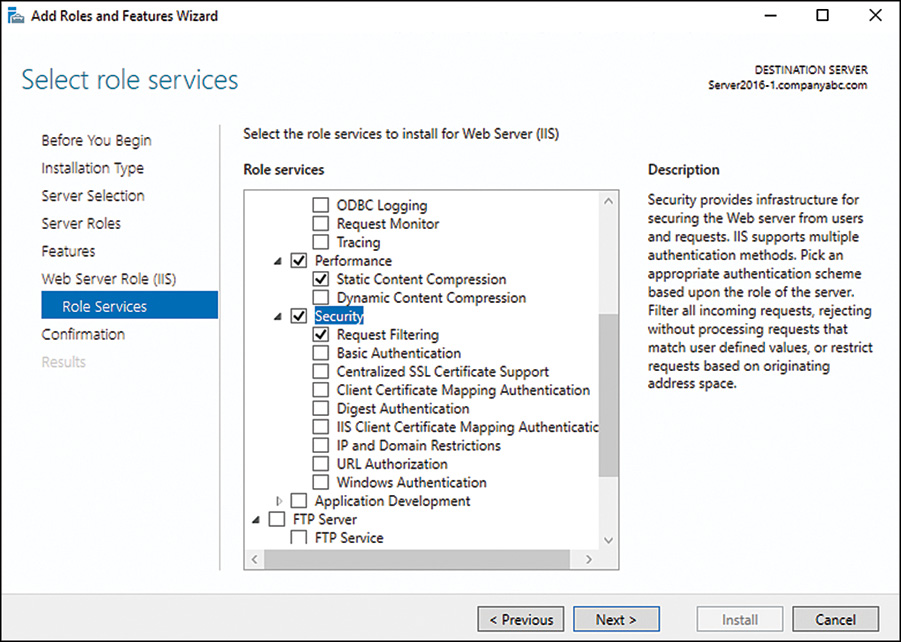
![]() Security—The Security role services includes security features for controlling website authorization based on a variety of authentication mechanisms and certificate-based solutions. In addition, it provides the infrastructure for securing IIS and the websites associated with the installation. The features that can be selected include Basic Authentication, Windows Authentication, Digest Authentication, Client Certificate Mapping Authentication, IIS Client Certificate Mapping Authentications, URL Authorization, Centralized SSL Certificate Support, Request Filtering, and IP and Domain Restrictions.
Security—The Security role services includes security features for controlling website authorization based on a variety of authentication mechanisms and certificate-based solutions. In addition, it provides the infrastructure for securing IIS and the websites associated with the installation. The features that can be selected include Basic Authentication, Windows Authentication, Digest Authentication, Client Certificate Mapping Authentication, IIS Client Certificate Mapping Authentications, URL Authorization, Centralized SSL Certificate Support, Request Filtering, and IP and Domain Restrictions.
![]() Application Development—This role service set is not enabled by default during the installation. If selected, the Application Development role service makes available features for creating and hosting web applications. These features include ASP. NET 3.5/4.6, .NET Extensibility 3.5/4.6, Application Initialization, ASP, CGI, ISAPI Extensions, ISAPI Filters, WebSocket Protocol, and Server-Side Includes.
Application Development—This role service set is not enabled by default during the installation. If selected, the Application Development role service makes available features for creating and hosting web applications. These features include ASP. NET 3.5/4.6, .NET Extensibility 3.5/4.6, Application Initialization, ASP, CGI, ISAPI Extensions, ISAPI Filters, WebSocket Protocol, and Server-Side Includes.
FTP Server Modular/Role Service
The last role service section is known as the FTP Server. It provides a reliable method for making files available for download and also offers a reliable place for users to upload files if needed. The two FTP features that can be installed are as follows:
![]() FTP Service—The FTP Service feature provides the infrastructure for creating and hosting FTP sites within IIS.
FTP Service—The FTP Service feature provides the infrastructure for creating and hosting FTP sites within IIS.
![]() FTP Extensibility—This features enables support for custom providers and ASP.NET/IIS Manager users.
FTP Extensibility—This features enables support for custom providers and ASP.NET/IIS Manager users.
![]() IIS Hostable Web Core Role Service—The last role service enables you (an administrator) to write custom code that will host core IIS functionality in your own application. The use of hostable web core (HWC) requires that IIS 10 be installed but uses a separate configuration file and only supports a single application pool and a single web site. Because HWC is embedded within an application, it does not integrate with IIS monitoring and process recovery features. Application developers are expected to write those features into their applications if needed.
IIS Hostable Web Core Role Service—The last role service enables you (an administrator) to write custom code that will host core IIS functionality in your own application. The use of hostable web core (HWC) requires that IIS 10 be installed but uses a separate configuration file and only supports a single application pool and a single web site. Because HWC is embedded within an application, it does not integrate with IIS monitoring and process recovery features. Application developers are expected to write those features into their applications if needed.
Installing the Web Server (IIS) Role
Now that you understand the installation process, including the modules, the next step is to install the Web Server (IIS) role. You must have Local User Administrator (LUA) security privileges on the Windows Server 2016 system to be able to install IIS. There are two ways to begin the installation: adding the Web Server (IIS) role via Server Manager or installing the services via PowerShell.
To install the Web Server (IIS) server role using Server Manager, follow these steps:
1. Start Server Manager using the taskbar icon.
2. From the Manage menu, select Add Roles and Features.
3. Click Next on the Before you Begin page after reading the notes provided.
4. Click Next to accept the default installation type of Role-Based or Feature-Based Installation.
5. Select the web server from the server pool and click Next.
6. On the Select Server Roles page, install IIS 10 by selecting Web Server (IIS) in the Roles section, as shown in Figure 11.4. A new section will be added to the Installation Wizard to allow selection of specific role services for the installation. Click Next.

7. Click Next to accept the existing features.
8. Review the introduction messages and notes on the Web Server Role (IIS) page, and then click Next.
9. Select the desired Web Server IIS role services to install. The default settings include Static Content, Default Document, Directory Browsing, HTTP Errors, HTTP Logging, Request Monitor, Request Filtering, Static Content Compression, and the IIS Management Console. Click Next.
NOTE
When installing some of the IIS role services, the wizard warns you that additional role services and features are required as dependencies. Click Add Features to install the dependencies.
10. On the Confirm Installation Selections page, review the roles, services, and features that have been selected for installation, and then click Install to commence the installation process.
11. Ensure the installation succeeded by reviewing the messages on the Installation Results page, and click Close.
NOTE
After the installation is complete, you can add or remove IIS role services and features by clicking either Add Role Services or Remove Role Services within Server Manager based on the Web Server (IIS) role.
Installing the Web Server (IIS) Role via PowerShell
Windows features and roles such as IIS 10 can be installed using the command line with Windows PowerShell. To install a default installation of IIS 10, run the following script from an elevated PowerShell window:
add-windowsfeature Web-Server,Web-WebServer,Web-Common-Http,web-Static-Content,
Web-Default-Doc,Web-Dir-Browsing,Web-Http-Errors,Web-Http-Logging,
Web-Log-Libraries,Web-Request-Monitor,Web-Http-Tracing,Web-Security,
Web-Filtering,Web-Stat-Compression, Web-Mgmt-Console
Alternatively, the following syntax installs all the IIS 10 features and functionality:
add-windowsfeature Web-Server, Web-Mgmt-Tools,Web-Mgmt-Console,Web-Mgmt-Compat,
Web-Metabase,Web-Lgcy-Mgmt-Console,Web-Lgcy-Scripting,Web-WMI,
Web-Scripting-Tools,Web-Mgmt-Service,Web-WebServer,Web-Common-Http,
web-Static-Content,Web-Default-Doc,Web-Dir-Browsing,Web-Http-Errors,
Web-Http-Redirect,Web-DAV-Publishing,Web-Health,Web-Http-Logging,
Web-Custom-Logging,Web-Log-Libraries,Web-ODBC-Logging,Web-Request-Monitor,
Web-Http-Tracing,Web-Performance,Web-Stat-Compression,Web-Dyn-Compression,
Web-Security,Web-Basic-Auth,Web-CertProvider,Web-Windows-Auth,Web-Digest-Auth,
Web-Client-Auth,Web-Cert-Auth,Web-Url-Auth,Web-Filtering,Web-IP-Security,
Web-App-Dev,Web-ASP,Web-Asp-Net,Web-Asp-Net45,Web-CGI,Web-Includes,
Web-WebSockets,Web-Net-Ext,Web-Net-Ext45,Web-ISAPI-Ext,Web-ISAPI-Filter,
Web-AppInit,Web-FTP-Server,Web-FTP-Service,Web-FTP-Ext,Web-WHC
NOTE
To get a list of available features and which role services in Server Manager they map to, use the Get-WindowsFeature commandlet.
Upgrading from Other Versions of IIS
In many situations, a fresh installation of IIS 10 and Windows Server 2016 will not occur because organizations might want to preserve the existing IIS settings and content. Therefore, organizations must upgrade their existing IIS infrastructure to IIS 10. With the upgrade of the earlier version of Windows to Windows Server 2016, IIS is also automatically upgraded, allowing web content to be preserved, translated, and, finally, transitioned. However, you should note early in the process that Windows Server 2016 only supports a direct upgrade path from Windows Server 2008 R2, which means only an in-place upgrade from IIS 7.5 is supported. Likewise, if legacy versions of IIS need upgrading, such as IIS 6.0 or 7.0, you must first upgrade the operating system to Windows Server 2008 R2 and then to Windows Server 2016.
The upgrade process for IIS is conducted in three major phases. In the first phase, the new operating system detects and performs an inventory of IIS components and features already installed on the operating system. The second phase of the upgrade process involves upgrading the legacy operating system to Windows Server 2016. After the Windows Server 2016 upgrade is complete, the final phase kicks in and automatically upgrades the legacy IIS components to IIS 10 and installs the appropriate IIS 10 features.
For more information about how to upgrade a system to Windows Server 2016, see Chapter 3, “Installing Windows Server 2016 and Server Core.”
As is typically the case with most revised products, Windows Server 2016 IIS is inherently superior to its earlier versions. In particular, it lays claim to being more secure. This is witnessed during upgrades of websites to IIS 10. Website services are stopped after the upgrade and must be manually restarted, thus minimizing IIS security vulnerabilities due to previous Windows defaults and configuration. To allow for more clarity, suppose you have a Windows server with IIS installed, but it isn’t hardened appropriately; the server will be more secure by default after you upgrade to IIS 10 because it will not be serving websites and FTP sites automatically and be a target for attacks.
Another appealing reason for upgrading from earlier versions of IIS is that IIS 10 includes improved security features such as dynamic IP restrictions and improved SSL support. After upgrading, it is best to review the security requirements of the organization and the application and implement any additional relevant features.
Installing and Configuring Websites
As mentioned earlier, IIS can support thousands of websites on a single web server. The number of websites that you can reasonably support depends on the way the system is configured, including the number of processors, the amount of RAM, bandwidth, and more. Historically, for every website that the system supports for the Internet, there must be a public IP address and registered domain name. With IIS 10, as with recent versions of the platform, if you have only one public IP address and you want to support multiple websites, you can also create virtual directories or leverage host headers to have those sites serving users on the Internet.
Creating a Website with IIS 10
The Default Web Site is located within the Web Sites folder in the IIS Management console. You can use the default website to publish content, but it is possible and typically advisable to create and configure a separate website.
To begin creating a new website, follow these steps:
1. In Internet Information Services (IIS) Manager, right-click the Sites node in the Connections pane, and click Add Website.
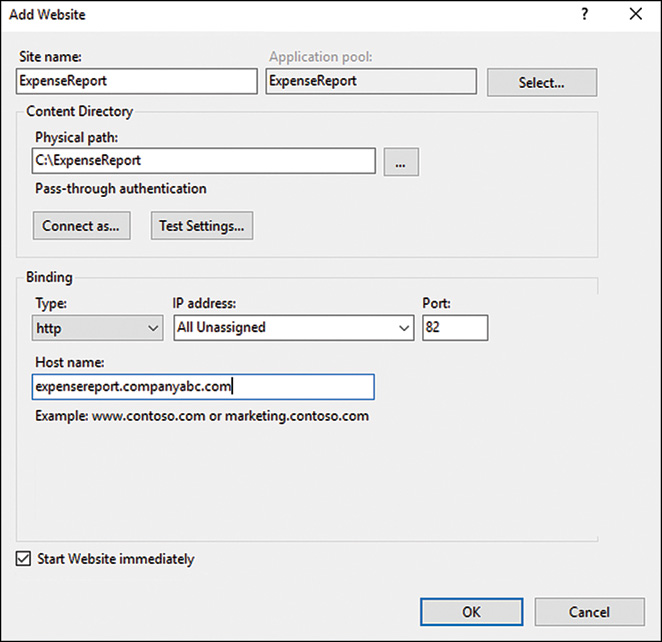
2. The Add Website page is opened; enter a website name such as ExpenseReport.
3. If desired, click the Select button in the Application Pool section to modify the application pool settings for this new site. The default application pool drop-down option available is DefaultAppPool.
4. In the Content Directory section, enter the physical path to where the Web Sites folder resides. Alternatively, navigate to the folder by clicking the ellipses button.
A user can also choose a remote share when providing the location of the content directory’s physical path. If a remote share is used, you must ensure IIS has access to that folder by clicking the Connect As button and specifying connectivity to the remote share by choosing a specific user account that has appropriate permissions or you can select the Pass-Through Authentication option.
5. You must now specify whether this new site will use HTTP or HTTPS, provide an IP address to the new site or leave the IP address setting unassigned, and indicate which port this new site will listen on. These settings are configured in the Binding section of the Add Website page.
6. An optional host header setting can be configured before completing the page. A user can enter a host header for the new site, such as expensereport.companyabc.com.
7. Check the option to start the website immediately.
8. Review all the configuration settings inputted, as illustrated in Figure 11.5, and then click OK to finalize the creation of the new website.
Creating a Virtual Directory
Virtual directories extend the home directory of your website by providing an alias linking another directory not contained within the home directory. This alias will appear to users as simply a subfolder to the website even though it might be located on an entirely different server.
The virtual directory can contain documents and other information for the website as well as a new website. For example, if CompanyABC’s website (www.companyabc.com) wants to host a temporary website for another organization, it could use a virtual directory to contain the website. In this scenario, CompanyXYZ would have its own website located at www.companyabc.com/companyxyz/. You must be a server, site or application administrator to create a virtual directory.
To create a virtual directory using the IIS Manager, follow these steps:
1. Start Server Manager using the taskbar icon. From the Tools menu, run Internet Information Services (IIS) Manager.
2. In the Connections pane, expand the IIS server, and then expand the Sites node within the tree.
3. Select the desired website that will contain the new virtual directory. Right-click the website and select Add Virtual Directory.
4. Enter the virtual directory’s alias, such as Images.
5. Enter the physical path to the content folder of the virtual directory, or alternatively, navigate to the folder by clicking the ellipses button.
6. Review the settings, as displayed in Figure 11.6, and click OK to finalize the creation of the virtual directory.

NOTE
If the content folder specified is a remote share, click Connect As and enter credentials for an account that has permissions to access the remote share. Alternatively, select the application user (Pass-Through Authentication) option.
Configuring IIS 8 Website Properties
In the not-so-recent past, right-clicking a website or the Default Web Site in IIS Manager and then selecting Properties gave you options for modifying the default settings and properties for a website. This is no longer the case because the property pages and tabs have been overhauled starting with IIS 7 and continuing with IIS 7.5 and later. In their place are feature icons in the Central Details pane and tasks in the Actions pane. For simplicity, this section describes only the feature icons associated properties pages in IIS 10.
The Features View tab is located in the Central Details pane. Some of the feature icons are connected to this tab for the purpose of configuring properties associated with a website. From here, you can control everything associated with application development, HTTP features, health, diagnostics, performance, and security. The specific features available in the Central Details pane depend on the role services installed and on the object selected in the Connections pane. By default, these options are organized into the following categories:
![]() ASP.NET features
ASP.NET features
![]() IIS features
IIS features
![]() Management features
Management features
ASP.NET Features
The following feature icons and respective configuration pages are associated with an ASP.NET configuration:
![]() .NET Authorization Rules—Use this page to control access to a website and application by configuring Allow and Deny rules and specifying users, roles, and user groups.
.NET Authorization Rules—Use this page to control access to a website and application by configuring Allow and Deny rules and specifying users, roles, and user groups.
![]() .NET Compilation—Use this page to configure ASP.NET configuration settings. Settings are configured based on the following high-level elements: Batch, Behavior, General, and Assemblies.
.NET Compilation—Use this page to configure ASP.NET configuration settings. Settings are configured based on the following high-level elements: Batch, Behavior, General, and Assemblies.
![]() .NET Error Pages—This page is used to configure HTTP error responses for when an error occurs on a website or application.
.NET Error Pages—This page is used to configure HTTP error responses for when an error occurs on a website or application.
![]() .NET Globalization—This page controls international settings tailored toward local language and cultural environments. As the world converges and the global reach of applications grows, this is a great feature to leverage to translate and format content by reutilizing the existing code and automatically presenting it to different geographic locations.
.NET Globalization—This page controls international settings tailored toward local language and cultural environments. As the world converges and the global reach of applications grows, this is a great feature to leverage to translate and format content by reutilizing the existing code and automatically presenting it to different geographic locations.
![]() .NET Profile—This feature page contains a list of profile properties is used to track custom data about an application.
.NET Profile—This feature page contains a list of profile properties is used to track custom data about an application.
![]() .NET Roles—This page is used to create predefined roles for managing authorization access for groups of users. This concept is also known as role-based security. To leverage this feature, a default provider must be configured. The two options available are AspNetWindowsTokenRoleProvider and AspNetSqlRoleProvider.
.NET Roles—This page is used to create predefined roles for managing authorization access for groups of users. This concept is also known as role-based security. To leverage this feature, a default provider must be configured. The two options available are AspNetWindowsTokenRoleProvider and AspNetSqlRoleProvider.
![]() .NET Trust Levels—This page is used to specify the trust level for managed objects, such as modules, handlers, and applications in the Web.config file.
.NET Trust Levels—This page is used to specify the trust level for managed objects, such as modules, handlers, and applications in the Web.config file.
![]() .NET Users—This feature page identifies and manages the identities of users for an application. The feature controls the identity management behavior for users defined for an application. When a user is created, the page displays name, email addresses, date created, and last logon.
.NET Users—This feature page identifies and manages the identities of users for an application. The feature controls the identity management behavior for users defined for an application. When a user is created, the page displays name, email addresses, date created, and last logon.
![]() Application Settings—To manage the variables associated with key/value pairs stored in the website’s .config file, this feature page is recommended. The application setting variables and value elements are created by selecting the Add from the Actions pane. These settings can be accessed from anywhere within the application.
Application Settings—To manage the variables associated with key/value pairs stored in the website’s .config file, this feature page is recommended. The application setting variables and value elements are created by selecting the Add from the Actions pane. These settings can be accessed from anywhere within the application.
![]() Connections Strings—This page is dedicated to creating and managing connections strings for managed web applications. By selecting the Add in the Actions pane, you can create connections strings to SQL Server or other data sources for database access. Typically, the credentials used to access the database are Windows Integrated; however, it is possible to specify a SQL Server account as well.
Connections Strings—This page is dedicated to creating and managing connections strings for managed web applications. By selecting the Add in the Actions pane, you can create connections strings to SQL Server or other data sources for database access. Typically, the credentials used to access the database are Windows Integrated; however, it is possible to specify a SQL Server account as well.
![]() Machine Key—Because IIS 10 is tightly integrated with .NET web services and security is a primary design factor, this page is available to manage encryption and hashing keys for applications. You can enter encryption and decryption methods, including key generations to secure forms-based authentication, cookie, and page-level view state data.
Machine Key—Because IIS 10 is tightly integrated with .NET web services and security is a primary design factor, this page is available to manage encryption and hashing keys for applications. You can enter encryption and decryption methods, including key generations to secure forms-based authentication, cookie, and page-level view state data.
![]() Pages and Controls—This page manages how the setting of ASP.NET pages and controls are compiled on the web server. New controls can be registered by selecting the task from the Actions pane. Additional elements can be configured, such as the behavior, user interface, view state, compilation, general, and services.
Pages and Controls—This page manages how the setting of ASP.NET pages and controls are compiled on the web server. New controls can be registered by selecting the task from the Actions pane. Additional elements can be configured, such as the behavior, user interface, view state, compilation, general, and services.
![]() Providers—This feature page is used to manage and administer a list of providers the web server can leverage. Providers are available for .NET Roles, .NET Users, and .NET Profiles. Default providers include AspNetSqlRoleProvider and AspNetWindowsTokenRoleProvider role providers, AspNetSqlMembershipProvider user provider, and AspNetSqlProfileProvider profile provider. In addition, providers can be added by users by selecting Add from the Actions pane.
Providers—This feature page is used to manage and administer a list of providers the web server can leverage. Providers are available for .NET Roles, .NET Users, and .NET Profiles. Default providers include AspNetSqlRoleProvider and AspNetWindowsTokenRoleProvider role providers, AspNetSqlMembershipProvider user provider, and AspNetSqlProfileProvider profile provider. In addition, providers can be added by users by selecting Add from the Actions pane.
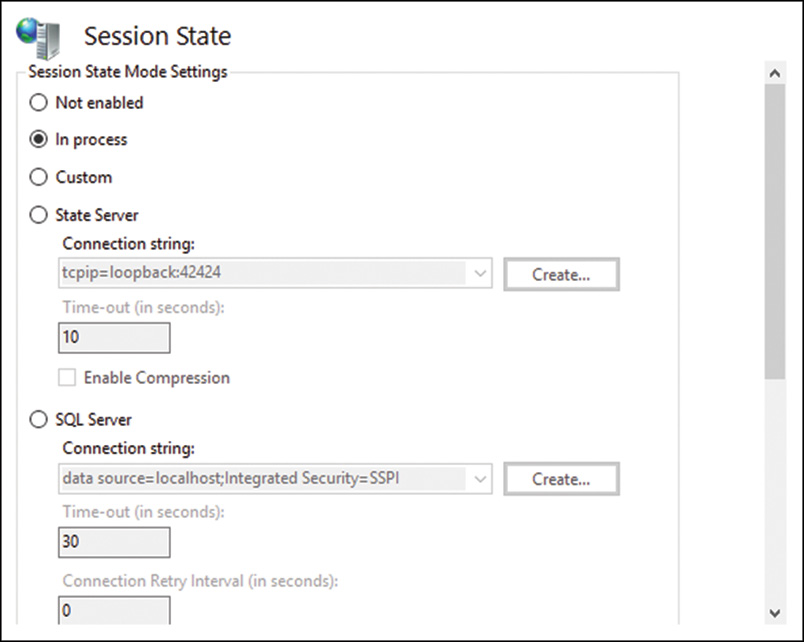
![]() Session State—This page, as displayed in Figure 11.7, is leveraged when it is necessary to control the behavior of information across browser sessions. It is possible to enable or disable a session state or store a session state in the web browser or in a SQL Server database. Additional elements include defining how cookies are processed when managing session states. Options are Auto Detect, Use Cookies, Use Device Profile, or Use URI.
Session State—This page, as displayed in Figure 11.7, is leveraged when it is necessary to control the behavior of information across browser sessions. It is possible to enable or disable a session state or store a session state in the web browser or in a SQL Server database. Additional elements include defining how cookies are processed when managing session states. Options are Auto Detect, Use Cookies, Use Device Profile, or Use URI.
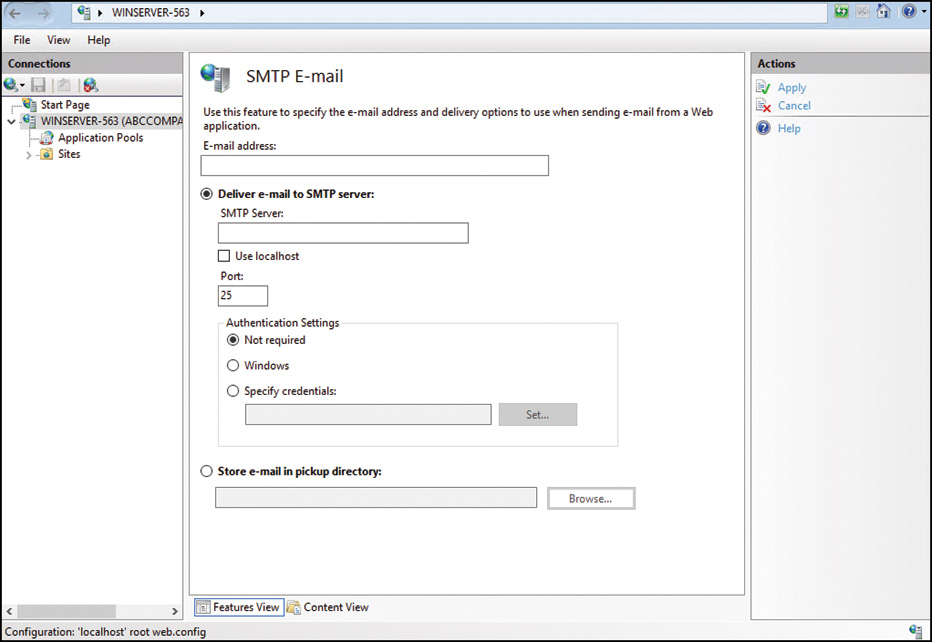
![]() SMTP E-Mail—The final ASP.NET feature is SMTP E-Mail, which uses the System. Net.Mail API. The feature page, as illustrated in Figure 11.8, includes properties that need to be specified, such as email address, SMTP server name, and port to control message-sending functionality from the web server.
SMTP E-Mail—The final ASP.NET feature is SMTP E-Mail, which uses the System. Net.Mail API. The feature page, as illustrated in Figure 11.8, includes properties that need to be specified, such as email address, SMTP server name, and port to control message-sending functionality from the web server.
IIS Features
The following feature icons and respective configuration pages are associated with IIS configurations:
![]() ASP—The first IIS feature page in the list is ASP. This page is meant for managing classic ASP settings, such as the following elements: Behavior, Compilation, Debugging, Services, Caching Properties, Com Plus Properties, and Sessions Properties.
ASP—The first IIS feature page in the list is ASP. This page is meant for managing classic ASP settings, such as the following elements: Behavior, Compilation, Debugging, Services, Caching Properties, Com Plus Properties, and Sessions Properties.
![]() Authentication—The Authentication page is synonymous with the legacy Security tab in IIS 6 and earlier. This page is used to configure security authentication methods. Security can be administered for a web server, website, or a specific page. Authentication methods such as anonymous, ASP.NET impersonation, Basic authentication, digest authentication, forms authentication, and Windows authentication can be configured. Take note as anonymous authentication is enabled by default and might have to be disabled before a different authentication method can be used. In legacy versions, these authentication types were installed and enabled out of the box. However, with the modularized installation approach and security-minded product design, each element now needs to be selected separately during the installation process and then enabled using this page.
Authentication—The Authentication page is synonymous with the legacy Security tab in IIS 6 and earlier. This page is used to configure security authentication methods. Security can be administered for a web server, website, or a specific page. Authentication methods such as anonymous, ASP.NET impersonation, Basic authentication, digest authentication, forms authentication, and Windows authentication can be configured. Take note as anonymous authentication is enabled by default and might have to be disabled before a different authentication method can be used. In legacy versions, these authentication types were installed and enabled out of the box. However, with the modularized installation approach and security-minded product design, each element now needs to be selected separately during the installation process and then enabled using this page.
![]() Authentication Rules—Use this page to enforce control of web content access by utilizing Allow or Deny rules. Other IIS features such as Users and Roles are associated with this feature as you can specify Allow and Deny rules to already created users and roles.
Authentication Rules—Use this page to enforce control of web content access by utilizing Allow or Deny rules. Other IIS features such as Users and Roles are associated with this feature as you can specify Allow and Deny rules to already created users and roles.
![]() CGI—IIS 8 supports CGI applications. This page is used to configure CGI properties, which allows these applications to run on an IIS 10 web server. Additional elements on this page control other aspects of CGI applications, including CGI timeout values, whether a CGI application runs in its own console, and, finally, the security context the application will utilize.
CGI—IIS 8 supports CGI applications. This page is used to configure CGI properties, which allows these applications to run on an IIS 10 web server. Additional elements on this page control other aspects of CGI applications, including CGI timeout values, whether a CGI application runs in its own console, and, finally, the security context the application will utilize.
![]() Compression feature page—Two options available on this page enhance transmission times between the server and browsers. The compression elements that can be configured consist of compressing static content and compressing dynamic content.
Compression feature page—Two options available on this page enhance transmission times between the server and browsers. The compression elements that can be configured consist of compressing static content and compressing dynamic content.
NOTE
For clients to leverage this feature, they must use a web browser that supports compression, such as Microsoft Internet Explorer 7.0 or later. In addition, the use of dynamic compression can increase processor utilization on the server.
![]() Default Document—Similar to the concept in earlier versions of IIS, the Default Document page is used to select the default web page that appears when a user connects to a site. An example is default.htm. Multiple default documents can be provided with an order-based precedence. This feature can be enabled or disabled via the Actions pane.
Default Document—Similar to the concept in earlier versions of IIS, the Default Document page is used to select the default web page that appears when a user connects to a site. An example is default.htm. Multiple default documents can be provided with an order-based precedence. This feature can be enabled or disabled via the Actions pane.
![]() Directory Browsing—This feature is disabled out of the box. By selecting the Enable task in the Actions pane, this page can be used to configure directory browsing functionality. The elements that can be selected include Time, Size, Extension, Date, and Long Date.
Directory Browsing—This feature is disabled out of the box. By selecting the Enable task in the Actions pane, this page can be used to configure directory browsing functionality. The elements that can be selected include Time, Size, Extension, Date, and Long Date.
![]() Errors feature page—The Errors feature page is similar to the Custom Errors tab on legacy versions of IIS. An administrator can use this page to create custom error messages for web server clients. It is possible to edit a default error or create a new error page.
Errors feature page—The Errors feature page is similar to the Custom Errors tab on legacy versions of IIS. An administrator can use this page to create custom error messages for web server clients. It is possible to edit a default error or create a new error page.
![]() Failed Request Tracing Rules—This setting is used to manage a list of tracing rules for failed requests. The Failed Request Tracing Rules Wizard is invoked by clicking Add in the Actions pane. The wizard walks you through the creation of the trace by first requesting information about what will be traced. The options include All Content, ASP.NET, ASP, and Custom. Trace Conditions are defined on the next page. Conditions include Event Severity, Status Codes, or Time Taken in Seconds. The final page is utilized to select the trace providers.
Failed Request Tracing Rules—This setting is used to manage a list of tracing rules for failed requests. The Failed Request Tracing Rules Wizard is invoked by clicking Add in the Actions pane. The wizard walks you through the creation of the trace by first requesting information about what will be traced. The options include All Content, ASP.NET, ASP, and Custom. Trace Conditions are defined on the next page. Conditions include Event Severity, Status Codes, or Time Taken in Seconds. The final page is utilized to select the trace providers.
NOTE
When configuring Failed Request Tracing Rules for a site, logging of failed requests must be enabled for the site. If it is not, Failed Request Tracing Rules will not generate a trace.
![]() FastCGI Settings—Use this server-level page to configure FastCGI applications that are used by the IIS servers and hosted websites.
FastCGI Settings—Use this server-level page to configure FastCGI applications that are used by the IIS servers and hosted websites.
![]() Handler Mappings—Use this page to specify resources that will handle responses for specific request types. Actions include Add Managed Handler, Add Script Map, Add Wildcard Script Map, and Add Module Mapping.
Handler Mappings—Use this page to specify resources that will handle responses for specific request types. Actions include Add Managed Handler, Add Script Map, Add Wildcard Script Map, and Add Module Mapping.
![]() HTTP Redirect—Sometimes there is a need to redirect incoming requests to an alternate uniform resource locator (URL) or website. To achieve this goal, the HTTP Redirect page can be used to redirect requests to a specific destination.
HTTP Redirect—Sometimes there is a need to redirect incoming requests to an alternate uniform resource locator (URL) or website. To achieve this goal, the HTTP Redirect page can be used to redirect requests to a specific destination.
![]() HTTP Response Headers—This feature should be used to configure HTTP headers based on entering name and values to responses from the web server.
HTTP Response Headers—This feature should be used to configure HTTP headers based on entering name and values to responses from the web server.
![]() IP Address and Domain Restrictions—This page is used to create and manage rules that grant or deny computer networks and IP addresses access to specific web content. The rules available consist of Allow or Deny, and it is possible to enter a single IP address, range of IP addresses, or domain name. Finally, rules can be added to a page, site, or inherited from the parent. New to IIS 10, dynamic restrictions can be edited using the appropriate task from the Action pane. Dynamic restrictions can automatically deny access to an IP address based on the number of concurrent requests or based on a number of requests over a period of time.
IP Address and Domain Restrictions—This page is used to create and manage rules that grant or deny computer networks and IP addresses access to specific web content. The rules available consist of Allow or Deny, and it is possible to enter a single IP address, range of IP addresses, or domain name. Finally, rules can be added to a page, site, or inherited from the parent. New to IIS 10, dynamic restrictions can be edited using the appropriate task from the Action pane. Dynamic restrictions can automatically deny access to an IP address based on the number of concurrent requests or based on a number of requests over a period of time.
![]() ISAPI Filters—ISAPI filters are programs that respond to certain events during HTTP request processing. You can add, enable, and disable filters for a website on this page.
ISAPI Filters—ISAPI filters are programs that respond to certain events during HTTP request processing. You can add, enable, and disable filters for a website on this page.
![]() Logging—The Logging feature page configures how IIS log requests will be handled for the web server. For more information about logging, see the section “Using IIS Logging” later in this chapter.
Logging—The Logging feature page configures how IIS log requests will be handled for the web server. For more information about logging, see the section “Using IIS Logging” later in this chapter.
![]() MIME Types—The MIME Types feature page is utilized for managing a list of Multipurpose Internet Mail Extensions (MIME) types for the web server or website. When creating or managing MIME types, the extension and MIME type must be entered.
MIME Types—The MIME Types feature page is utilized for managing a list of Multipurpose Internet Mail Extensions (MIME) types for the web server or website. When creating or managing MIME types, the extension and MIME type must be entered.
![]() Modules—This feature should be used when managing or adding managed code modules and configuring native modules to a web server or website. Authentication and compression are examples of native code modules.
Modules—This feature should be used when managing or adding managed code modules and configuring native modules to a web server or website. Authentication and compression are examples of native code modules.
![]() Output Caching—The Output Caching features page is leveraged when defining a set of rules associated with caching content. Some of the cache settings include defining file extensions, maximum cache response sizes, and cache size limit in megabytes (MB).
Output Caching—The Output Caching features page is leveraged when defining a set of rules associated with caching content. Some of the cache settings include defining file extensions, maximum cache response sizes, and cache size limit in megabytes (MB).
![]() Request Filtering—The page is used to configure filtering rules for a website or application. Components that can be allowed or denied using this feature are File Name Extensions, Rules (strings), Hidden Segments, URL, HTTP Verbs, Headers, and Query Strings.
Request Filtering—The page is used to configure filtering rules for a website or application. Components that can be allowed or denied using this feature are File Name Extensions, Rules (strings), Hidden Segments, URL, HTTP Verbs, Headers, and Query Strings.
![]() SSL Settings—This page helps an administrator require SSL for a website or virtual directory and configure support for client certificates. For more information about creating certificates and assigning them to a website, review the section “Using SSL Certificates.”
SSL Settings—This page helps an administrator require SSL for a website or virtual directory and configure support for client certificates. For more information about creating certificates and assigning them to a website, review the section “Using SSL Certificates.”
![]() Server Certificates—This feature page, which is available for the server only, provides an interface to install, manage, and configure SSL certificates used by IIS. For more information about creating certificates and assigning them to a website, review the section “Using SSL Certificates.”
Server Certificates—This feature page, which is available for the server only, provides an interface to install, manage, and configure SSL certificates used by IIS. For more information about creating certificates and assigning them to a website, review the section “Using SSL Certificates.”
![]() WebDav Authoring Rules—This feature page is used for managing a list of authoring rules that control access to content.
WebDav Authoring Rules—This feature page is used for managing a list of authoring rules that control access to content.
![]() Worker Processes—This server-level feature page provides information about worker processes running on the IIS server. Detailed information provided for each process includes Application pool name, process ID, state, CPU %, private bytes (KB), and virtual bytes (KB).
Worker Processes—This server-level feature page provides information about worker processes running on the IIS server. Detailed information provided for each process includes Application pool name, process ID, state, CPU %, private bytes (KB), and virtual bytes (KB).
Management Features
The following feature icons and respective configuration pages are associated with Management configurations:
![]() Central Certificates—This new server-level page allows an administrator to configure a location for where the central certificate store (CCS) is stored. A password for private keys can also be entered.
Central Certificates—This new server-level page allows an administrator to configure a location for where the central certificate store (CCS) is stored. A password for private keys can also be entered.
![]() Configuration Editor—This new page allows an administrator to access and manage configuration files affiliated with sections such as server, site, or application within IIS Manager.
Configuration Editor—This new page allows an administrator to access and manage configuration files affiliated with sections such as server, site, or application within IIS Manager.
![]() Feature Delegation—This server-level feature page is used to delegate configuration of various IIS features. Configuring feature delegation unlocks the appropriate section within the IIS configuration files to allow the configuration to be changed at a lower-level configuration file such as those for a site or application.
Feature Delegation—This server-level feature page is used to delegate configuration of various IIS features. Configuring feature delegation unlocks the appropriate section within the IIS configuration files to allow the configuration to be changed at a lower-level configuration file such as those for a site or application.
![]() IIS Manager Permissions—This feature page is used to allow or deny users access to various components in IIS, including websites and applications.
IIS Manager Permissions—This feature page is used to allow or deny users access to various components in IIS, including websites and applications.
![]() IIS Manager Users—This feature page is used for managing and provisioning IIS Manager users that can be assigned roles as well as access to a website or application.
IIS Manager Users—This feature page is used for managing and provisioning IIS Manager users that can be assigned roles as well as access to a website or application.
![]() Management Service—This server-level feature page is used to configure remote management access to the IIS server. The page allows for configuration of credentials, protocol information, logging, and IP address restrictions for remote management connections.
Management Service—This server-level feature page is used to configure remote management access to the IIS server. The page allows for configuration of credentials, protocol information, logging, and IP address restrictions for remote management connections.
![]() Shared Configuration—This server-level feature page is used for managing configuration files for farms of IIS servers. A shared configuration location can be configured for farms that are deployed using a centralized shared configuration model. IIS configuration files can also be exported using the Action pane tasks on this page.
Shared Configuration—This server-level feature page is used for managing configuration files for farms of IIS servers. A shared configuration location can be configured for farms that are deployed using a centralized shared configuration model. IIS configuration files can also be exported using the Action pane tasks on this page.
Installing and Configuring FTP Services
It’s hard to find an IT person today who hasn’t used File Transfer Protocol (FTP). FTP can be considered the backbone for transferring files to and from a website. The basic premise of an FTP server is based on placing files in directories and allowing users to access or publish information with an FTP client or an FTP-enabled web browser, such as Microsoft Internet Explorer. Depending on the placement and configuration of the FTP server, amateurs and professionals alike can either upload or download data from the Internet or intranet.
With Windows Server 2008 R2, Microsoft listened to the needs of its IT community and accordingly reengineered the FTP service for IIS after several years of neglecting the component. It is now more robust, dependable, and it supports SSL for data encryption. With Windows Server 2016, the revamped version of FTP Server services is included with the product as an optional component to be installed with IIS 10. It is fully integrated and can be managed with the same IIS 10 administrative interface. FTP Server Services with IIS 10 includes extended support for Internet standards, such as FTP over Secure Sockets Layer (SSL), support for extended character sets by including UTF-8 support, support for IPv6, and newly added with IIS 10, dynamic IP restrictions.
IIS 10 FTP Server Service Features
Microsoft made many improvements to the FTP Service for IIS. The following is a list of features for the FTP Service running on IIS 10 on Windows Server 2016:
![]() Tight integration exists with IIS 10 websites and IIS Manager.
Tight integration exists with IIS 10 websites and IIS Manager.
![]() It supports today’s demanding security needs by supporting FTP over SSL.
It supports today’s demanding security needs by supporting FTP over SSL.
![]() Organizations can now host multiple FTP sites with the same IP address, because the bindings support host headers.
Organizations can now host multiple FTP sites with the same IP address, because the bindings support host headers.
![]() Both web and FTP content can be hosted from the same site.
Both web and FTP content can be hosted from the same site.
![]() UTF8, IPv6, and integration with other repositories such as SQL Server are supported.
UTF8, IPv6, and integration with other repositories such as SQL Server are supported.
![]() Improved logging and diagnostics. Dynamic logon attempt restrictions provide protection against brute-force attacks by dynamically blacklisting IP addresses based on failed logon attempts.
Improved logging and diagnostics. Dynamic logon attempt restrictions provide protection against brute-force attacks by dynamically blacklisting IP addresses based on failed logon attempts.
Microsoft certainly realizes FTP is not going away and is still the preferred method for publishing content and exchanging large pieces of data between organizations.
Installing the FTP Server
Similar to the earlier version of IIS, the FTP publishing service is not installed by default. To add the FTP role service included with IIS 10 running on Windows Server 2016, complete the following steps in Server Manager after IIS has been installed:
1. From the Manage menu, select Add Roles and Features.
2. Click Next on the Before you Begin page after reading the notes provided.
3. Click Next to accept the default installation type of Role-Based or Feature-Based Installation.
4. Select the web server from the server pool and click Next.
5. On the Select Server Roles page, install FTP 10 by expanding Web Server (IIS) (Installed) in the Roles section and then expanding the FTP Server section and selecting the FTP Service role service below it as well as the FTP Extensibility role service if needed (see Figure 11.9). Click Next.

6. Click Next to accept the existing features.
7. On the Confirm Installation Selections page, review the FTP roles, services, and features selected for installation, and then click Install to initiate the installation process.
8. Ensure the installation succeeded by reviewing the messages on the Installation Results page, and then click Close.
Creating a Secure FTP 10 Site Using SSL
With IIS 10, it is not only possible to create a new FTP site or add FTP publishing to an existing website, but it is also possible to have both FTP and HTTP coexist. To create a new FTP site, in addition to the Default Web Site, follow these steps:
1. Start Server Manager using the taskbar icon.
2. From the Tools menu, select Internet Information Services (IIS) Manager.
3. In the Connections pane, expand the IIS server, and then expand the Sites node within the tree.
4. Right-click Sites and select Add FTP Site.
5. Enter the FTP site name and specify the physical path for the FTP site you will use. Click Next.
6. In the Binding section of the Binding and SSL Settings page, enter the IP address and port of the FTP server.
7. From within the Binding and SSL Settings page, specify a certificate and select the Require SSL option in the SSL section.
NOTE
When using SSL, an IIS 10 certificate should be created prior to these procedures. For more information about creating an IIS 10 certificate, review the “Using SSL Certificates” later in this chapter.
8. Select the Start FTP Site Automatically option, and click Next, as displayed in Figure 11.10.

9. On the Authentication and Authorization Information page, specify how users will authenticate to the site by choosing Anonymous or Basic in the Authentication section.
10. In the Authorization section, specify who has authorization to the site by selecting from the following: All Users, Anonymous Users, Specified Roles or Users Groups, and, finally, Specified Users.
11. The final setting on the Authentication and Authorization Information page is the Permissions section. Specify the permissions for the FTP site. You can choose from Read and/or Write.
12. Review the settings, as illustrated in Figure 11.11, and then click Finish to finalize the FTP site creation.

Configuring FTP 10 Features and Properties
The FTP Site Creation Wizard configures the basic settings for an FTP server; however, there is still a need to configure more advanced settings or refine the original ones. The FTP feature icons are installed during the installation process and are located in the Central Details pane, as shown in Figure 11.12. The new FTP features for configuring basic and advanced FTP properties consist of the following:
![]() FTP Authentication
FTP Authentication
![]() FTP Authorization Rules
FTP Authorization Rules
![]() FTP Current Sessions
FTP Current Sessions
![]() FTP Directory Browsing
FTP Directory Browsing
![]() FTP Firewall Support
FTP Firewall Support
![]() FTP IP Address and Domain Restrictions
FTP IP Address and Domain Restrictions
![]() FTP Logon Attempt Restrictions
FTP Logon Attempt Restrictions
![]() FTP Messages
FTP Messages
![]() FTP Request Filtering
FTP Request Filtering
![]() FTP SSL Settings
FTP SSL Settings
![]() FTP User Isolation
FTP User Isolation

FTP Authentication Feature Page
![]() The FTP Authentication feature page is used to configure authentication methods for FTP clients. By default, an FTP site does not have authentication configured, and all mechanisms are disabled out of the box. An administrator must grant the desired authentication to the FTP site. The authentication mechanisms for FTP consist of the following items:
The FTP Authentication feature page is used to configure authentication methods for FTP clients. By default, an FTP site does not have authentication configured, and all mechanisms are disabled out of the box. An administrator must grant the desired authentication to the FTP site. The authentication mechanisms for FTP consist of the following items:
![]() Anonymous authentication—This built-in authentication mechanism should be selected when you want to provide public access to an FTP site without having end users pass credentials.
Anonymous authentication—This built-in authentication mechanism should be selected when you want to provide public access to an FTP site without having end users pass credentials.
![]() Basic authentication—Another built-in authentication mechanism for FTP sites. Basic authentication requires the FTP clients to enter a valid Windows user account and password when gaining access to the FTP site. Basic authentication sends password credentials in clear text, which is a security hazard. Therefore, implement SSL when using this mechanism to encrypt passwords in transit.
Basic authentication—Another built-in authentication mechanism for FTP sites. Basic authentication requires the FTP clients to enter a valid Windows user account and password when gaining access to the FTP site. Basic authentication sends password credentials in clear text, which is a security hazard. Therefore, implement SSL when using this mechanism to encrypt passwords in transit.
![]() ASP.NET authentication—The FTP site will provide authorization to FTP clients by having them enter a valid ASP.NET user account and password. This is a custom authentication mechanism that requires a provider and connection string to an ASP. NET user database. This authentication mechanism must be added using the Custom Providers task in the Action pane.
ASP.NET authentication—The FTP site will provide authorization to FTP clients by having them enter a valid ASP.NET user account and password. This is a custom authentication mechanism that requires a provider and connection string to an ASP. NET user database. This authentication mechanism must be added using the Custom Providers task in the Action pane.
![]() IIS Manager authentication—This is another custom authentication mechanism similar to ASP.NET. An FTP client must provide a legitimate IIS Manager username and password to gain access to FTP content. Similar to basic authentication, the credentials are not encrypted, so it is recommended for this authentication to be used in conjunction with SSL. This authentication mechanism must be added using the Custom Providers task in the Action pane.
IIS Manager authentication—This is another custom authentication mechanism similar to ASP.NET. An FTP client must provide a legitimate IIS Manager username and password to gain access to FTP content. Similar to basic authentication, the credentials are not encrypted, so it is recommended for this authentication to be used in conjunction with SSL. This authentication mechanism must be added using the Custom Providers task in the Action pane.
NOTE
Don’t forget that to use these authentication mechanisms, the appropriate authentication role services must be installed prior to configuration.
FTP Authorization Rules Feature Page
This page is used to manage Allow and Deny authorization rules that control access to FTP sites. The Actions pane options Add Allow Rule and Add Deny Rule should be selected to invoke the Allow or Deny Authorization Rule page. After the page is invoked, rules can be applied to All Users, All Anonymous Users, Specified Roles or User Groups, and Specified Users. In addition, the rules are based on Read or Write permissions.
FTP Current Sessions Feature Page
This page is used to monitor current sessions for an FTP site. The following elements are displayed: User Name, Session Start Time, Current Command, Previous Command, Command Start Time, Bytes Sent, Bytes Received, Session ID, and Client IP Address.
FTP Directory Browsing Feature Page
The FTP Directory Browsing page, illustrated in Figure 11.13, is divided into two sections. The first section is called Directory Listing Style. The format presentation options include MS-DOS and UNIX. The second section, Directory Listing Options, controls how directory information is displayed. The display options include the following:
![]() Virtual Directories—With this option, you can specify whether to include virtual directories.
Virtual Directories—With this option, you can specify whether to include virtual directories.
![]() Available Bytes—This setting controls the display behavior of the available bytes remaining on the disk or in the quota when a disk quota is enabled.
Available Bytes—This setting controls the display behavior of the available bytes remaining on the disk or in the quota when a disk quota is enabled.
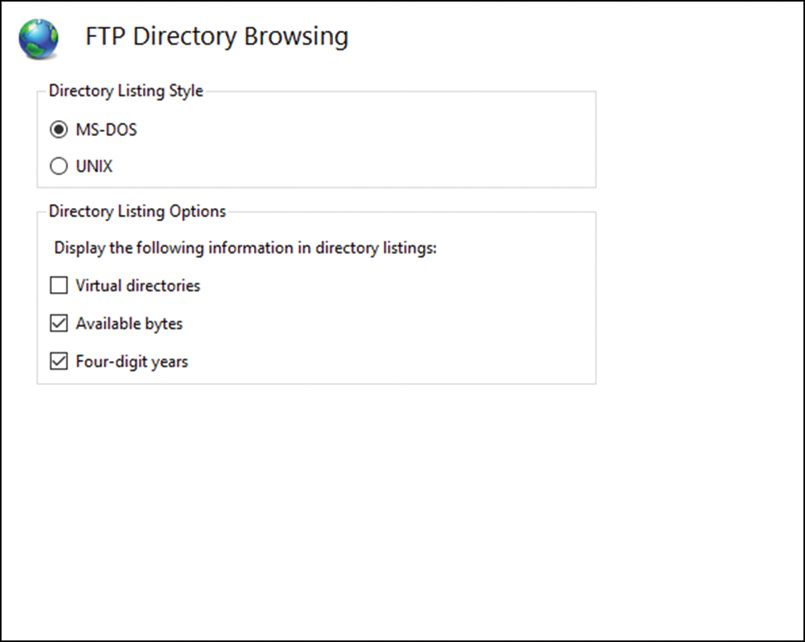
![]() Four-Digit Years—When enabled, this setting displays the last modified date for a file based on the four-year date, such as 1974, and not a two-year date format, such as 74.
Four-Digit Years—When enabled, this setting displays the last modified date for a file based on the four-year date, such as 1974, and not a two-year date format, such as 74.
FTP Firewall Support Feature Page
This feature allows the server to accept passive connections when the FTP client is behind a firewall. An administrator must enter the Data Channel Port Range and External IP Address of the Firewall settings and then click Apply in the Actions pane.
FTP IP Address and Domain Restrictions Feature Page
The FTP IP Address and Domain Restrictions feature page is used to create and manage rules that allow or deny computer networks and IP addresses access to the FTP site. Rules can be configured using a single IP address, a range of IP addresses, or a domain name. Finally, rules can be added to a page, site, or inherited from the parent.
FTP Logging Feature Page
The FTP Logging feature page includes the exact same logging settings as for a website. This page controls the type of log file to use, the location to be stored, and the log file rollover settings.
FTP Logon Attempt Restrictions Feature Page
This server-level only feature page was introduced with IIS 10 for Windows Server 2016 to assist with preventing brute-force attacks on the server. The feature can be configured to block IP addresses based on the number of failed authentication requests within a period of time. Blacklisted IP addresses are prevented from accessing the server until the FTP service is restarted. This feature can be configured to enforce the restriction or just to log IP address that violate the parameters.
FTP Messages Feature Page
The FTP Messages feature page illustrated in Figure 11.14 is a great way to create a series of banners that are presented when a user connects to the FTP server, authenticates successfully to the FTP server, disconnected from the FTP server or is prevented from connecting because the server has reached its connection limit.
The message behavior is controlled by the following elements:
![]() Suppress Default Banner—If enabled, this option suppressed the default welcome banner, including FTP server type and version. This option doesn’t impact the display of a custom banner message.
Suppress Default Banner—If enabled, this option suppressed the default welcome banner, including FTP server type and version. This option doesn’t impact the display of a custom banner message.
![]() Support User Variables in Messages—By enabling this setting, user variables such as
Support User Variables in Messages—By enabling this setting, user variables such as BytesReceived, BytesSent, SessionID, SiteName, and UserName can be included in the messages.
![]() Show Detailed Messages for Local Requests—This setting controls the behavior for displaying FTP error messages. If enabled, detailed FTP error messages are displayed for connections made locally on the server to facilitate troubleshooting.
Show Detailed Messages for Local Requests—This setting controls the behavior for displaying FTP error messages. If enabled, detailed FTP error messages are displayed for connections made locally on the server to facilitate troubleshooting.
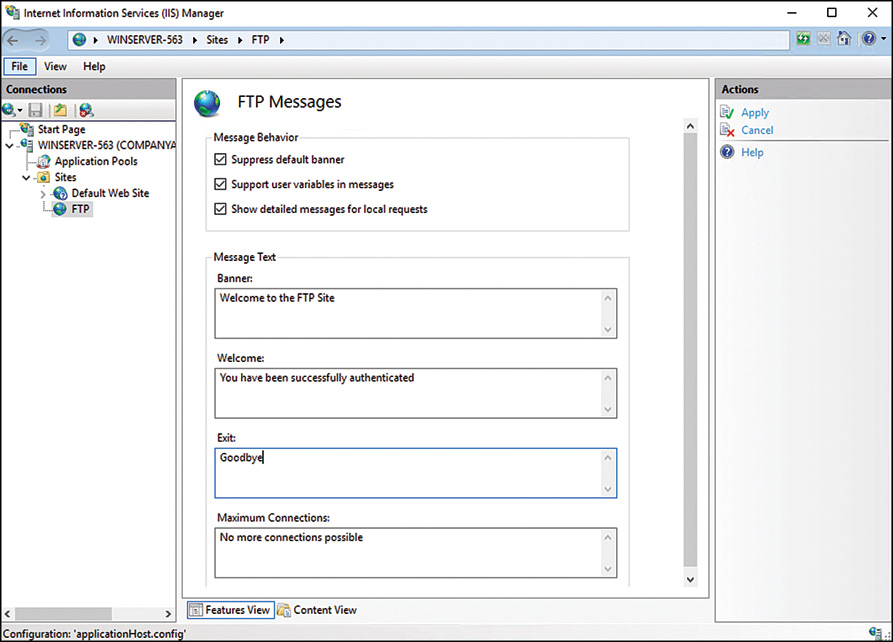
FTP Request Filtering
The FTP Request Filtering feature page is used to define the list of Allow or Deny rules based on the specific elements:
![]() File Name Extensions—This tab allows for the creation of filename extensions for which the FTP service will either allow or deny access to the site. For example, an administrator can prevent Internet clients from uploading any files with the extension of *.txt or *.com.
File Name Extensions—This tab allows for the creation of filename extensions for which the FTP service will either allow or deny access to the site. For example, an administrator can prevent Internet clients from uploading any files with the extension of *.txt or *.com.
![]() Hidden Segments—The Hidden Segments tab should be used if you want to hide specific areas of your FTP site. If hidden, the specific section will not be displayed in the directory listings.
Hidden Segments—The Hidden Segments tab should be used if you want to hide specific areas of your FTP site. If hidden, the specific section will not be displayed in the directory listings.
![]() Defined URL Sequences—This setting should be used to define the list of URL sequences for which the FTP service will deny access.
Defined URL Sequences—This setting should be used to define the list of URL sequences for which the FTP service will deny access.
![]() Commands—The final tab Commands defines the list of commands for which the FTP service will either allow or deny access to further tighten security.
Commands—The final tab Commands defines the list of commands for which the FTP service will either allow or deny access to further tighten security.
FTP SSL Settings Feature Page
This page should be utilized for enabling and configuring SSL settings for an FTP site. The options include a drop-down menu for selecting the SSL certificate you will use and SSL policy. The SSL Policy options include Allow SSL Connections, Require SSL Connections, and Advanced Custom Settings which provides for granular control over the control and data channels separately. You will also have the chance to choose whether to use 128-bit encryption for SSL connections.
FTP User Isolation Feature Page
Similar to legacy versions of FTP, IIS 10 can still isolate FTP users so FTP content is protected. This is an especially useful feature for Internet service providers (ISPs) and application service providers (ASPs) servicing a large number of users. FTP users can have their own separate directory to upload and download files to the web or FTP server. Users who connect see only their directory as the top-level directory and can’t browse other FTP directories. Permissions can be set on the FTP home directory to allow create, modify, or delete operations.
It is worth noting that FTP user isolation is based on an FTP site rather than at the server level and is either enabled or disabled. However, sites that need to enable FTP user isolation aren’t forced to strictly use this feature. You can enable anonymous access in conjunction with FTP user isolation by creating a virtual directory within the FTP site and allowing read-only access. The only limitation to mixing the FTP user isolation and anonymous access is that information can be downloaded only from the public or read-only virtual directory.
The configuration settings on the FTP User Isolation page, as shown in Figure 11.15, consist of the following options for where to start the user when they connect. The options include the FTP Root Directory or User Name Directory when users are not isolated. In addition, it is possible to isolate users by restricting them to following directories:
![]() User Name Directory (Disable Global Virtual Directories)
User Name Directory (Disable Global Virtual Directories)
![]() User Name Physical Directory (Enable Global Virtual Directories)
User Name Physical Directory (Enable Global Virtual Directories)
![]() FTP Home Directory Configured in Active Directory
FTP Home Directory Configured in Active Directory
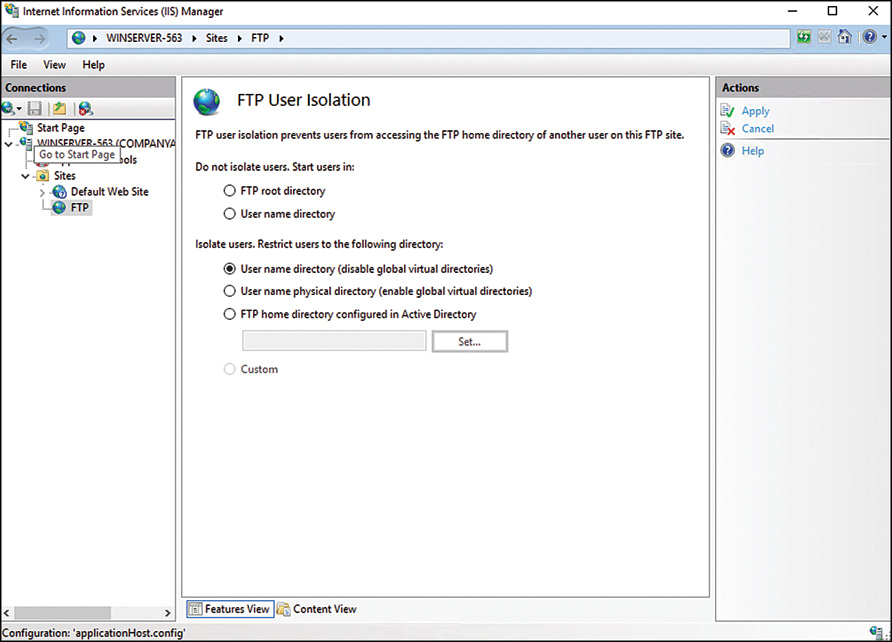
Securing IIS 10
IIS 10 is a very secure Web server. Several key enhancements made over the past several versions such as a reduced attack surface, minimum install by default, and enhanced application isolation deliver a robust and secure web platform. IIS 10 is also configured by default to present only static information. To use applications or other dynamic content, you must manually enable the required features individually.
However, Microsoft products are also very common and therefore present a common target for attacks. For this reason, it’s important to secure the web server as much as possible. The more barriers there are, the less inclined a hacker will be to try to gain unauthorized access. Each component on the web server must be secure; the server is only as secure as its weakest point.
Windows Server 2016 Security
Windows Server 2016 security actually begins during the planning and designing phases so that every conceivable security aspect is addressed. This can entail physical, logical (Windows Server 2016, applications, and so on), and communications security.
When you’re securing the Windows Server 2016 system with the Web Server (IIS) role, it’s important to keep the server updated and apply the latest service pack and security patches. Keeping up-to-date with service packs and patches ensures that Windows Server 2016 is operating with the greatest amount of protection.
Application security on the Windows Server 2016 system with the Web Server (IIS) role should be carefully reviewed, especially if it’s a custom-built application. If the application is developed by a vendor, make sure that you have an application that is certified to run on Windows Server 2016 and that all vendor recommendations for configuration and security have been reviewed, vetted and if appropriate, implemented.
IIS Authentication
Authentication is a process that verifies that users are who they say they are. IIS supports a multitude of authentication methods, including the following:
![]() Anonymous authentication—Users can establish a connection to the website without providing credentials.
Anonymous authentication—Users can establish a connection to the website without providing credentials.
![]() Active Directory client certificate authentication—Users can establish a connection by using their Active Directory client certificate for authentication.
Active Directory client certificate authentication—Users can establish a connection by using their Active Directory client certificate for authentication.
![]() ASP.NET impersonation—Users can utilize an impersonation context other than the ASP.NET account.
ASP.NET impersonation—Users can utilize an impersonation context other than the ASP.NET account.
![]() Windows authentication—This authentication method can be integrated with Active Directory. As users log on, the hash value of the password is sent across the wire instead of the actual password.
Windows authentication—This authentication method can be integrated with Active Directory. As users log on, the hash value of the password is sent across the wire instead of the actual password.
![]() Digest authentication—Similar to Integrated Windows authentication, a hash value of the password is transmitted. Digest authentication requires a Windows Server domain controller to validate the hash value.
Digest authentication—Similar to Integrated Windows authentication, a hash value of the password is transmitted. Digest authentication requires a Windows Server domain controller to validate the hash value.
![]() Basic authentication—Basic authentication sends the username and password over the wire in clear-text format. This authentication method offers little security to protect against unauthorized access by itself and is typically used in conjunction with SSL-based protection of the site or page.
Basic authentication—Basic authentication sends the username and password over the wire in clear-text format. This authentication method offers little security to protect against unauthorized access by itself and is typically used in conjunction with SSL-based protection of the site or page.
![]() Forms authentication—Users are redirected to a secure page where they enter their credentials. After they have been authenticated, they are redirected back to the page they originally requested.
Forms authentication—Users are redirected to a secure page where they enter their credentials. After they have been authenticated, they are redirected back to the page they originally requested.
These authentication methods can be enabled under the Authentication feature page, as illustrated in Figure 11.16. You can view this window by selecting the feature under the IIS section at the server, site, or virtual directory level.
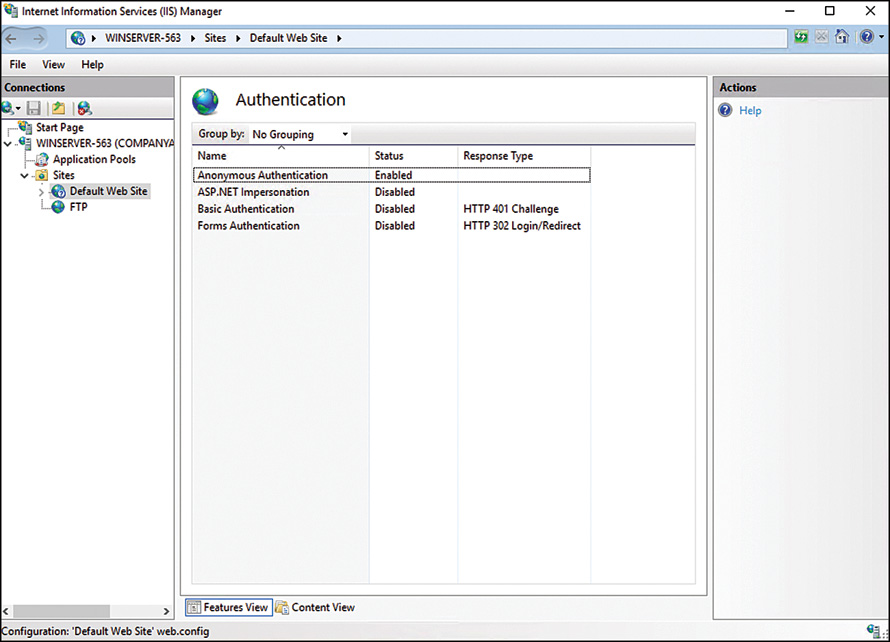
Auditing Web Services
Windows Server 2016 auditing can be applied to web and FTP sites to document attempts (successful and unsuccessful) to log on, gain unauthorized access to service accounts, modify or delete files, and execute restricted commands. These events can be viewed through Event Viewer. It’s also important to monitor IIS logs in conjunction with audited events to determine how, when, and if external users are trying to gain unauthorized access.
Using SSL Certificates
Secure Sockets Layer (SSL) encryption preserves user and content integrity and confidentiality so that communications between a client and the web server, containing sensitive data such as passwords or credit card information, are protected. SSL is based on the public key infrastructure (PKI, X.509) security standards that protect communication by encrypting data before being transmitted.
Earlier versions of IIS supported SSL, and IIS 10 is no different. IIS 10, however, introduces significant improvements to the use of SSL for securing websites, especially when it comes to scalability.
The use of certificates with IIS can serve three primary purposes, although they are typically used to encrypt connections:
![]() SSL server authentication—This allows a client to validate a server’s identity. SSL-enabled client software can use a PKI to check whether a server’s certificate is valid and has been issued by a trusted certificate authority (CA).
SSL server authentication—This allows a client to validate a server’s identity. SSL-enabled client software can use a PKI to check whether a server’s certificate is valid and has been issued by a trusted certificate authority (CA).
![]() Client authentication—This allows a server to validate a client’s identity. IIS can validate that a client’s certificate is valid as well as check whether the certificate is from a trusted CA.
Client authentication—This allows a server to validate a client’s identity. IIS can validate that a client’s certificate is valid as well as check whether the certificate is from a trusted CA.
![]() Encrypting SSL connections—The most common reason for deploying certificates is for SSL based encrypting of all traffic for a given website or virtual directory. This provides a high degree of confidentiality and security.
Encrypting SSL connections—The most common reason for deploying certificates is for SSL based encrypting of all traffic for a given website or virtual directory. This provides a high degree of confidentiality and security.
From an IIS perspective, SSL can be applied to an entire website, directories, or specific files within the website. SSL configuration can be done through IIS Manager.
The high-level steps for using certificates and SSL consist of the following: The first step is to obtain a certificate. The second step is to create an HTTPS binding for a specific site that needs to be encrypted. The final step is to configure SSL settings for a site, application, or physical directory.
To use SSL on a website, a certificate must first be requested and then installed. The request can be created to obtain a certificate either from an external, trusted CA or from an internal PKI. The types of server requests available in Internet Information Services include the following:
![]() Create certificate request—This option is typically used for creating a certificate request, which will be submitted to a trusted CA. The certificate’s distinguished name properties, cryptographic service provider, and bit-length information are entered into a file and then submitted to a public CA for approval.
Create certificate request—This option is typically used for creating a certificate request, which will be submitted to a trusted CA. The certificate’s distinguished name properties, cryptographic service provider, and bit-length information are entered into a file and then submitted to a public CA for approval.
TIP
When creating the certificate request to a public CA, it is recommended to use 2048 (the default) or higher as the bit length. Keep in mind that higher bit lengths enforce stronger security; however, a greater length can decrease performance due to additional CPU overhead.
![]() Create domain certificate request—A domain certificate request is used when providing a request to an internal certificate authority. Typically, the internal certificate authority would be an enterprise certificate authority associated with the company’s Active Directory domain. This approach reduces the cost of purchasing third-party certificates and also simplifies the certificate deployment.
Create domain certificate request—A domain certificate request is used when providing a request to an internal certificate authority. Typically, the internal certificate authority would be an enterprise certificate authority associated with the company’s Active Directory domain. This approach reduces the cost of purchasing third-party certificates and also simplifies the certificate deployment.
![]() Create Self-Signed Certificate Request—The final option available when creating a certificate request is to use a self-signed certificate. This method is usually only used for maintaining certificates for a testing environment because the certificates are not from a trusted CA.
Create Self-Signed Certificate Request—The final option available when creating a certificate request is to use a self-signed certificate. This method is usually only used for maintaining certificates for a testing environment because the certificates are not from a trusted CA.
This example illustrates the procedures to create a domain-based certificate request. To complete this task, this example requires an internal CA running within your domain. For more information about creating an internal CA, see Chapter 14, “Network Policy Server, Network Access Protection and Routing, and Remote Access.”
To create a domain-based certificate request, follow these steps:
1. Launch IIS Manager.
2. In the Connections pane, highlight the IIS server that will request an Internet Server Certificate.
3. In the Feature view, double-click the Server Certificates element.
4. In the Actions pane, select Create Domain Certificate Request.
5. On the Distinguished Name Properties page, specify the required information for the certificate, as displayed in Figure 11.17. The common name is typically the fully qualified domain name (FQDN) of the URL users will use to connect to the website (for example, www.companyabc.com). Click Next to continue.

6. Because this is a domain-based certificate request, the next page presented is the Online Certificate Authority. Specify the online certificate authority that will accept the request by selecting the CA from a list. In addition, a friendly name is also required. Click Finish to finalize the request.
When this process has been completed, either the administrator of the CA must approve the request or it can be automatically approved based on the auto-enrollment feature of the domain-based CA. The CA in this example automatically fulfilled the request; therefore, the certificate resides on the Server Certificates page and can be viewed by selecting it and clicking View Task in the Actions pane. If auto-enrollment is not available, the certificate is installed after an administrator approves the request on the CA.
Once the certificate is installed, the next step in the process is to bind the Internet server certificate for the desired website and enable SSL. To do this, follow these steps:
1. Open IIS Manager and select the website for which the certificate will be used.
2. In the Actions Pane, select Bindings to launch the Site Bindings configuration page.
3. In the Site Bindings dialog box, click Add.
4. In the Add Site Binding dialog box, select the HTTPS option from the Type drop-down menu, assign an IP address, and verify the port is 443, as shown in Figure 11.18.
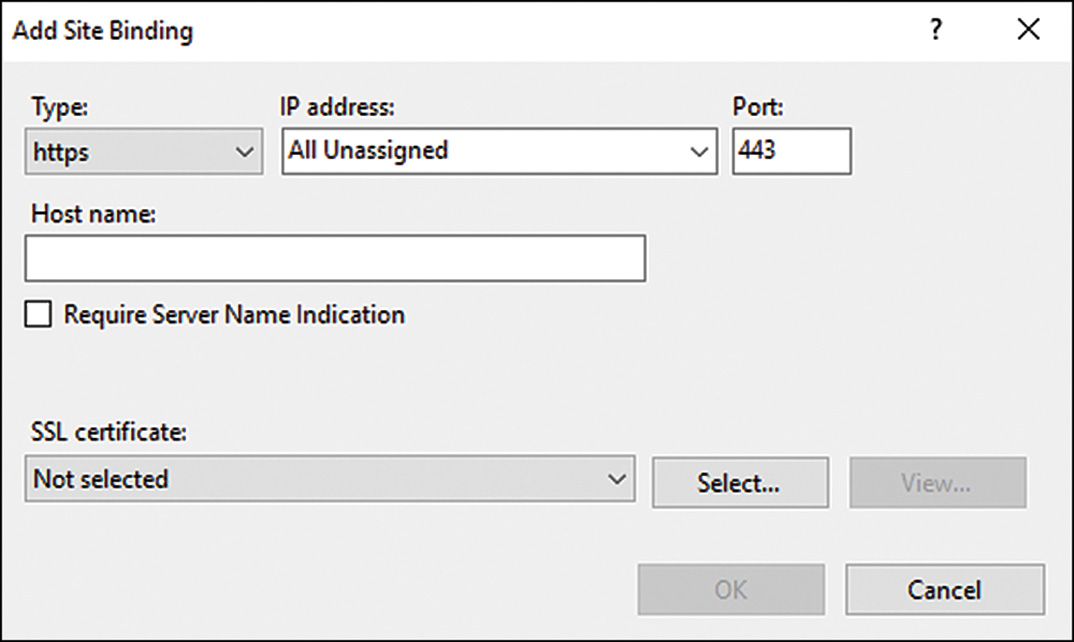
5. Select a certificate, such as the one that was created in the preceding section. You can view the certificate selected by clicking the View button. Click OK to return to the Site Bindings dialog box.
6. Click Close in the Site Bindings dialog box to finalize the binding process.
The final process when configuring a site to utilize SSL is to configure the SSL settings for the site, application, physical directory, or virtual directory. To configure SSL settings on the default website, follow these steps:
1. In IIS Manager, navigate to the Default Web Site.
2. Double-Click the SSL Settings icon in Features view.
3. On the SSL Settings page, enable the Require SSL option. Alternatively, select the Require 118-bit SSL option to force 128-bit encryption.
4. The final setting is to configure whether to accept, ignore, or require client certificates. Choose the appropriate Client Certificates option, and click Apply in the Actions pane to save the changes, as shown in Figure 11.19.

Administering IIS 10 Administrator and User Security
Administrative permissions for IIS 10 servers, websites, directory, applications and pages can be granted to Active Directory and to local Windows users. In addition, IIS specific accounts can be added and used for administration purposes. The use of Active Directory accounts is usually recommended as it is easier to manage and scales well when more than one or two IIS servers are used. Account and security management within IIS 10 requires installation of the Management Service role service.
Creating an IIS 10 User Account
In some situations, you might need to provide management capabilities and not want to use an Active Directory or Windows account. Examples of this scenario are often related to vendor support of an application. In this case, an IIS 10 user account is used. This IIS-only, non-Windows user can then be delegated permissions to manage components of the IIS infrastructure.
Follow these steps to enable support for IIS user accounts:
1. In IIS Manager, navigate to the Connections pane and select the IIS server.
2. Open the Management Service feature, which is located in the Central Details pane.
3. In the Identity Credentials section, select Windows Credentials or IIS Manager credentials.
4. Click Apply in the Action pane.
Follow these steps to create an IIS 10 user account:
1. In IIS Manager, navigate to the Connections pane and select the IIS server.
2. Open the IIS Manager Users feature, which is located in the Central Details pane.
3. On the IIS Manager Users feature page, click the Add User task, which is located in the Actions pane.
4. In the Add User dialog box, enter the new user account name and password, and then click OK.
For ongoing user account management, after the user account is created, use the additional tasks on the Actions pane to change the password, disable, or remove the account.
Assigning Permissions to an IIS 10 User Account
The next step in the user-creation process is to assign the appropriate permissions to the newly created user account. This process allows the user to configure delegated features for a specific website or application. Follow these steps to authorize a user account to connect to a site or an application:
1. In IIS Manager, navigate to the Connections pane, expand the IIS server, and then expand the Sites node.
2. Specify the site to which the user account will be granted authorization, and then open the IIS Manager Permissions feature, which is located in the Central Details pane.
3. On the IIS Manager Permissions feature page, click the Allow User task, which is located in the Actions pane.
4. In the Allow User dialog box, first select the IIS Manager option, then enter the account that was created in the previous steps, and then click OK.
NOTE
If the IIS Manager option is not available in the Allow User dialog box, the Management Service is not set to accept connections from IIS users. To do so, use the Management Service page to enable remote connections as outlined previously.
Configuring Feature Delegation
To allow users who have been granted permission to a site, application, directory, or page to make changes to configurations, feature delegation must be used to unlock the relevant portion of the configuration file for the element. Follow these steps to configure feature delegation for a newly created website:
1. In IIS Manager, navigate to the Connections pane and select the IIS server.
2. Select the Feature Delegation feature icon, which is located in the Central Details pane.
3. On the Features Delegation page, select the Custom Site Delegation task from the Actions pane.
4. Select the site to be delegated from the Sites drop-down menu on the Custom Website page.
5. Select the appropriate feature in the list and then set the desired feature delegation from the Actions pane. The delegations include: Read/Write, Read Only, Not Delegated, and Reset to Inherited.
NOTE
In some circumstances, you might need to reset delegation or restore the defaults. When you find this necessary, click the Reset All Delegation or Default Delegation in the Actions pane.
Using IIS Logging
IIS logging should be viewed as a necessity rather than an optional feature of IIS because it helps to ensure IIS security and is also extremely useful for maintenance and troubleshooting. For example, in the event of a system compromise, logs can be used and a forensic review performed on the extensive details contained in them. This information can then be used to review maintenance procedures and identify problems in the system. Equally important, many organizations now require logging because of regulatory compliance or other business policies.
IIS text-based logging, using formats such as the W3C Extended Log File Format, Microsoft IIS Log File Format, and NCSA Common Log File Format, is controlled by Http.sys, which is a kernel-mode process. This is a significant change from legacy versions where logging was a user-mode process. The only other log file format that comes close to legacy versions is Open Database Connectivity (ODBC) logging, because it is implemented using a user mode worker process.
Another bonus about logging is its ability to be implemented at the server, site, web application, file, and directory level. Specific scoping helps minimize the number of logs collected and simplifies log analysis. For organizations that want to configure IIS logging for a specific website, follow these steps:
1. Launch IIS Manager.
2. In the Connections pane, select the desired website for which you want to configure logging.
3. Double-click the Logging feature in the Actions pane.
4. On the Logging page, select the desired logging format to be used.
5. Specify the location of the log file by typing a log path into the Directory text box. Alternatively, click the Browse button and select a directory to store the files.
In the Log File Rollover section, select the method to create the new log file. The options include specifying an hourly, daily, weekly, or monthly schedule; entering a maximum file size (in bytes); or selecting the option that puts a stop to the creation of new log files.
The final option requires you to determine whether to use local time for file naming and rollover.
6. After all the log file settings have been entered, select Apply in the Actions pane to commit the changes.
NOTE
It is possible to either enable or disable a log file for a specific site by selecting Enable or Disable in the Actions pane of the Logging feature page. To enable logging for IIS 10, the HTTP Logging Module must be installed.
Summary
IIS 10 is a highly secure, reliable, and available server. Microsoft has incorporated both internal and customer-based feedback to provide a robust platform for providing web, application, and FTP services.
Key points in this chapter covered the planning and design of the new IIS 10 capabilities built in to Windows Server 2016. The features have been greatly enhanced to provide better management, scalability, modification, and reporting of web services operations.
Instead of having IIS installed on every installation of Windows server, an administrator now needs to add the IIS server role to the system and then go through a process of enabling functionality and configuring the web services function to meet the needs of the organization. This approach that starts out with a minimal configuration and requires the server administrator to configure all required functions provides better security for the server systems, but also requires a better understanding of which services to add, and which services to modify to meet the needs of the organization’s applications.
And even with IIS requiring deliberate installation and configuration, there are still key security practices that need to be performed to ensure that web services are not attacked and compromised, thus creating a security hole in the organization’s network security.
The IIS 10 server role is a robust, flexible, secure web server platform in Windows Server 2016, and one that administrators from early adopter organizations have found to be a welcome improvement for ongoing operations.
Best Practices
The following are best practices from this chapter:
![]() Use IIS 10 to improve performance and strengthen security.
Use IIS 10 to improve performance and strengthen security.
![]() Thoroughly design and plan the IIS 10 environment.
Thoroughly design and plan the IIS 10 environment.
![]() Define the goals and objectives of the IIS 10 project.
Define the goals and objectives of the IIS 10 project.
![]() Identify and review IIS application types and requirements.
Identify and review IIS application types and requirements.
![]() Define security requirements to meet the goals and objectives.
Define security requirements to meet the goals and objectives.
![]() Balance the security methodologies to be used with the associated risks and end-user experience.
Balance the security methodologies to be used with the associated risks and end-user experience.
![]() Examine and design disaster recovery plans, and monitor requirements and maintenance practices.
Examine and design disaster recovery plans, and monitor requirements and maintenance practices.
![]() Document the current IIS infrastructure and the IIS design decisions.
Document the current IIS infrastructure and the IIS design decisions.
![]() Build fault tolerance in to the web infrastructure based on how much downtime can be afforded and existing SLAs.
Build fault tolerance in to the web infrastructure based on how much downtime can be afforded and existing SLAs.
![]() Use IIS to monitor applications such as pinging worker processes after a specified period of time, monitoring for failed applications, and disabling the application pool after a certain number of failures or a set number of failures within a given time frame.
Use IIS to monitor applications such as pinging worker processes after a specified period of time, monitoring for failed applications, and disabling the application pool after a certain number of failures or a set number of failures within a given time frame.
![]() Isolate FTP users so that FTP content is protected.
Isolate FTP users so that FTP content is protected.
![]() Carefully review application security on the Windows Server 2016 web server, especially if using a custom-built application.
Carefully review application security on the Windows Server 2016 web server, especially if using a custom-built application.
![]() Choose an authentication method carefully depending on business and technical requirements.
Choose an authentication method carefully depending on business and technical requirements.
![]() Apply auditing to web and FTP sites to document successful and unsuccessful attempts to log on, gain unauthorized access to service accounts, modify or delete files, and execute restricted commands.
Apply auditing to web and FTP sites to document successful and unsuccessful attempts to log on, gain unauthorized access to service accounts, modify or delete files, and execute restricted commands.
![]() Use SSL to ensure confidentiality.
Use SSL to ensure confidentiality.
![]() Monitor disk space and IIS logs to ensure that a hacker isn’t attempting to gain unauthorized access.
Monitor disk space and IIS logs to ensure that a hacker isn’t attempting to gain unauthorized access.
![]() Use logging not only to review IIS security, but also to assist with maintenance and troubleshooting.
Use logging not only to review IIS security, but also to assist with maintenance and troubleshooting.