CHAPTER 27
File System Management
IN THIS CHAPTER
![]() Windows Server 2016 File System Overview
Windows Server 2016 File System Overview
![]() File System Access Services and Technologies
File System Access Services and Technologies
![]() Adding the File and Storage Services Role
Adding the File and Storage Services Role
![]() Managing Data Access Using Windows Server 2016 Shares
Managing Data Access Using Windows Server 2016 Shares
![]() Installing and Configuring DFS
Installing and Configuring DFS
![]() Using the Volume Shadow Copy Service
Using the Volume Shadow Copy Service
Computer networks were developed for the sharing of data and collaboration. Some of the first ways to share data, of course, is by simply accessing files and folders stored on networked systems or central file servers, such as Windows Server 2016 or other types of file servers.
This chapter covers the file system features and services included with Windows Server 2016. The goal of this chapter is to introduce administrators to Windows Server 2016 file services and to give them the tools they require to deploy reliable enterprise file services for their organizations using Windows Server 2016.
Windows Server 2016 provides many services that can be leveraged to deploy a highly reliable, manageable, and fault-tolerant file system infrastructure. This section of the chapter provides an overview of these services.
File System Access Services and Technologies
Windows Server 2016 provides administrators with many different options to present file data to end users. These, of course, include the traditional file sharing methods, but they also include presenting file data using web services. By default, Windows Server 2016 systems running the File Services role support Windows 2000 clients and later. Supporting legacy Windows clients, UNIX clients, or legacy Macintosh clients may require additional services and security modifications to the data. Several of the options available for presenting file data to end users are included in the proceeding sections.
Windows Folder Sharing
This is the traditional and most commonly used method to access server data using the server message block (SMB) protocol over TCP/IP. Windows systems, many UNIX systems, and current Mac systems can access Microsoft servers using this protocol. The path to access the data uses the Universal Naming Convention (UNC) path of \serversharename.
DFS Namespaces and Replication
This method utilizes Windows folder sharing under a unified namespace. The main difference between standard Windows Server folder sharing and DFS shares is that the actual server name is masked by a unified name, commonly the Active Directory domain name, but in some cases a single server name and share can be used to access data stored on several servers. Also with DFS, the underlying data can be replicated between servers. One limitation of DFS is that the client accessing the DFS namespace must be a DFS-aware client so that it can utilize the benefits of DFS or, in some cases, just to locate and access the data.
WWW Directory Publishing
Using this method, administrators can make folders and files available through a web browser for read/write operations. This can be a useful tool to make files available to remote users with only Internet access. Some common types of files typically published in websites include employee handbooks, time sheets, vacation requests, company quarterly reports, and newsletters. In addition, web-based file access can be performed using Windows SharePoint Services, Microsoft Office SharePoint Server, and Microsoft Exchange 2007 and later.
File Transfer Protocol Service
The File Transfer Protocol (FTP) service is one of the oldest services available to transfer files between systems. FTP is still commonly used to make large files available and to present remote users and customers alike with a simple way to send data to the organization. FTP is very efficient, and that is why it still has a place in today’s computer and network infrastructure. Standard FTP, however, is not secure by default and should be used only with secure and monitored connections. FTP is compatible with most web browsers, making it very easy to include and utilize links to FTP data within websites to improve file transfer performance. Some common types of files typically made available using FTP sites include company virtual private network (VPN) clients, software packages, product manuals, and to present a repository for customers and vendors to transfer reports, large databases, and other types of data.
Server and Client for NFS
Server and Client for NFS are included in Windows Server 2016 to allow for storage interoperability with the Network File System commonly used with the UNIX and LINUX compatible operating systems. Server for NFS presents the windows storage to NFS clients for use, and Client for NFS acts as a gateway for the Windows server to access NFS data stored on UNIX type servers.
Volume Shadow Copy Service
Windows Server 2003 introduced a file system service called the Volume Shadow Copy Service (VSS). The VSS allows administrators and third-party independent software vendors to take snapshots of the file system to allow for faster backups and, in some cases, point-in-time recovery without the need to access backup media. VSS copies of a volume can also be mounted and accessed just like another Windows volume, if that should become necessary.
Shadow Copies of Shared Folders
Volume shadow copies of shared folders can be enabled on Windows volumes to allow administrators and end users to recover data deleted from a network share without having to restore from backup. The shadow copy runs on a scheduled basis and takes a snapshot copy of the data currently stored in the volume. In versions of Windows prior to Windows Server 2003, any mistakenly deleted data in a network shared folder was immediately deleted from the server and that had to be restored from backup. A Windows server running Windows Server 2003 or a later Windows server operating system with an NTFS volume that has shadow copies enabled, allows a user with the correct permissions to restore deleted or overwritten data from a previously stored shadow copy backup. It is important to note that shadow copies are stored on local volumes and if the volume hosting the shadow copy becomes inaccessible or corrupted, so does the shadow copy. Shadow copies are not a replacement for backups and should not be considered a disaster recovery tool.
Volume Shadow Copy Service Backup
VSS in Windows Server 2016 also provides the ability for Windows Backup and third-party software vendors to utilize this technology to improve backup performance and integrity. A VSS-compatible backup program can call on the VSS to create a shadow copy of a particular volume, database or application, and then the backup can be created using that shadow copy. A benefit of utilizing VSS-aware backups is that the reliability and performance of the backup is increased as the backup window is shorter and the load on the system disk is reduced during the backup. More information about volume shadow copy backups is detailed in Chapter 29, “Backing Up the Windows Server 2016 Environment.”
BranchCache for Network Files
BranchCache is a feature of Windows Server and Windows workstations that enable the intelligent synchronization and data access of centrally stored data to be accessible in remote branch offices. When a file is accessed in a branch office, the workstation searches the local network for a current copy of that file before traversing the network to download from the central site. The BranchCache for Network File service is the server side portion of the BranchCache infrastructure. More information about installing BranchCache is highlighted later in this chapter. You can also find additional information in Chapter 31, “Optimizing Windows Server 2016 for Branch Office Communications.”
Data Deduplication Service
The Data Deduplication service is not data duplication. In fact, it is just the opposite, because the Deduplication service removes duplicate data. In short, the Data Deduplication service optimizes file storage by breaking down files into smaller chunks, identifying duplicate chunks and retaining only a single copy of that chunk. This results in less required storage space for the same amount of data previously required on older operating systems.
Continuously Available File Shares
Continuously Available File Shares is a new Windows Server 2016 Failover Cluster feature. In earlier Windows Server failover cluster file servers, when file services were transferred between cluster nodes, client connections would be disrupted or completely disconnected. With Windows Server 2016, when clustered file servers are configured with continuous availability, client connections are not disrupted or disconnected during group transfers between cluster nodes. This functionality is named SMB2 transparent failover. You can find more information about Continuously Available File Shares in Chapter 28, “Operational Fault Tolerance (Clustering / Network Load Balancing)
Distributed File System
In an effort to create highly available file services that reduce end-user impact and simplify file server management, Windows Server 2016 includes the Distributed File System (DFS) service. DFS provides access to file data from a single namespace that can be used to represent a single server or a number of servers that store unique or replicated sets of the data. For example, when using DFS in an Active Directory domain, a DFS namespace named \companyabc.comUserShares could redirect users to \FILESERVER1UserShares or to a replicated copy of the data stored at \FILESERVER2UserShares.
Users and administrators both can benefit from DFS because they only need to remember a single server or domain name to locate all the necessary file shares. DFS is detailed later in this chapter.
Distributed File System Replication
With the release of Windows 2003 R2 and continuing through Windows Server 2016, DFS is constantly improving. In previous versions, DFS Replication was performed by the File Replication Service (FRS). Starting with Windows Server 2003 R2, DFS Replication is now performed by the Distributed File System Replication service, or DFSR. DFSR uses the Remote Differential Compression (RDC) protocol to replicate data. The RDC protocol improves upon FRS with better replication stability, more granular administrative control, and additional replication and access options. DFSR and RDC are discussed in detail in the section “The Distributed File System,” later in this chapter.
iSCSI Target Server Service
The iSCSI Target Server Service in Windows Server 2016 provides the ability for a Windows server to host iSCSI storage and make this storage available to iSCSI initiators (clients) to mount this storage as local drives. iSCSI storage is accessed across the Ethernet and when connected, iSCSI storage can be assigned a drive letter and used just like local storage. Many applications on a server can leverage iSCSI storage, but be sure to check the system requires of any particular application before deploying it on iSCSI storage. Also, Windows backup and other backup software treat iSCSI storage differently so before iSCSI is used be sure to verify full functionality.
Adding the File and Storage Services Role
Windows Server 2016 systems, out of the box, can be used to share folder data right after installation. To get the most out of the system, the File Services role should be added. Adding the File Services role not only configures settings to optimize the system for file sharing, but also allows the administrator to choose which additional file server role services will be installed. To install the File Services role and services, follow these steps:
1. Log on to the Windows Server 2016 system with an account with administrator privileges and open Server Manager.
2. In Server Manager, click Number 2 in the Dashboard to add roles and features.
3. On the Before You Begin page, if the system meets the recommendations to have a strong administrator password, static IP address, and be updated with the latest Windows security updates, click Next to continue.
4. On the Select Installation Type page, select the Role-Based or Feature-Based Installation radio button and click Next to continue.
5. On the Select Destination Server page, the local server should already be listed in the server pool section. Click the local server to select it, and then click Next to continue.
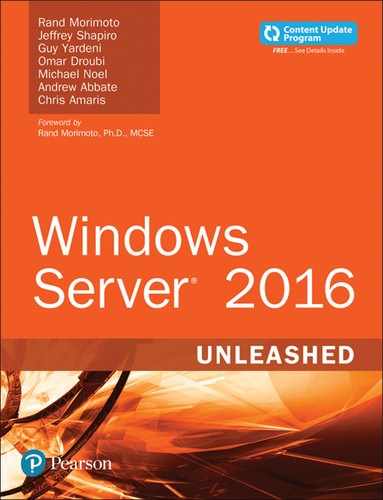
6. On the Select Server Roles page, expand the File and Storage Services node and expand the File and iSCSI Services node beneath it. Note how the File and Storage Services node is already checked. Underneath the File and iSCSI Services node, check the file services that you want to install, as shown in Figure 27.1.
7. When selecting certain file services, a pop-up window opens, giving the option to also install the role administration tools. Click the Add Features button to accept the prompts and install the tools. Click Next to continue.
8. On the Select Features page, you have the option to also install the Client for NFS, if this file server also accesses NFS data on UNIX type systems. Click Next to continue.
9. On the Confirm Installation Selections page, review the selections, and if desired, check the checkbox to Restart the Destination Server Automatically. Then, click the Install button to start the File Server role service installation.
10. After the services are installed, click the Close button to return to Server Manager. Close Server Manager.
After the installation, many of the role services require additional configuration before they can be of use. This post-installation configuration is covered in later in this chapter.
Managing Data Access Using Windows Server 2016 Shares
Providing access to data stored on a Windows Server 2016 server can be very simple to configure using Windows shares. Existing folders and entire volumes can be shared with a few clicks, but understanding who can access that data is critical to security and, in some cases, licensing. Shares are accessed using the UNC or Universal Naming Convention of \serversharename or when configured within domain-based DFS names spaces the shares can be accessed at \companyabc.comsharename for the example companyabc.com domain. Administrators can configure a few different settings when creating or updating shares. Share options or features include the following:
![]() Determining whether the share will be visible or hidden, based on the share name ending with a $ symbol
Determining whether the share will be visible or hidden, based on the share name ending with a $ symbol
![]() Setting the description of the share
Setting the description of the share
![]() Configuring the type of share; if Server for NFS is installed, there will be two options
Configuring the type of share; if Server for NFS is installed, there will be two options
![]() Configuring the number of simultaneous connections allowed through the share
Configuring the number of simultaneous connections allowed through the share
![]() Configuring the cache or offline sync settings of the share
Configuring the cache or offline sync settings of the share
![]() Enabling or disabling BranchCache
Enabling or disabling BranchCache
![]() Configuring access-based enumeration to control folder and file visibility based on NTFS permissions
Configuring access-based enumeration to control folder and file visibility based on NTFS permissions
![]() Configuring share permissions to manage whether users can read, change, or have full control over a share
Configuring share permissions to manage whether users can read, change, or have full control over a share
![]() Configuring NTFS permissions on the folder or volume hosting the file share
Configuring NTFS permissions on the folder or volume hosting the file share
Share Permissions
The first line of security for shares is in the share permissions. Share permissions are limited as shares can be enabled on CD/DVD drives, FAT volumes, NTFS volumes, and reFS volumes. The configurable share permissions are limited to Full Control, Change, and Read. Full Control permissions allow users to manage all data and to reset permissions. Change allows users to manage all data, and Read just allows users to read the data. Because share permissions are not very granular, as a best practice shares should be created only on NTFS and reFS volumes to allow for increased data security.
When shares are created on NTFS or reFS volumes, both the Share and NTFS folder and file permissions are applied to the user. Windows Server 2016 combines the permissions, and the most restrictive permissions will apply. For example, if a folder located at C:UserShare is shared and testuser1 is granted Read permission at the share and Change or Modify NTFS permissions on the folder, testuser1 will only have Read permission when accessing the data across the network through the share. If testuser1 logs on to the system console and accesses the C:UserShare folder directly, testuser1 will have Change or Modify permissions.
Access-Based Enumeration
A share feature included with Windows Server 2008 and later server operating systems is Access-based enumeration. Access-based enumeration, when enabled on a share, hides the folders or files within the share from view for users who do not have access to the data. Access-based enumeration, however, does not hide the share itself. This feature can simplify data access for end users because they only see what they can access; however, on the flip side, users who are collaborating and trying to instruct their coworkers on where to locate the data might be confused when the folders cannot be located.
Share Caching and Offline Files
To provide flexibility for mobile users and to provide centralized storage for end-user data, Windows Server 2016 shares can be configured to allow or disable client-side caching of shared server data. Client-side caching (CSC) is a feature that enables data shared on a server to be synchronized between the server and end-user workstations. This enables end users to access data when the server is unavailable or when the workstation is not connected to the company network. This feature also can be used to ensure that any data stored in a synchronized end-user workstation folder is copied to the server for centralized storage and backup and recoverability.
For CSC to function properly, both the workstation and the server must be configured to support it. CSC from the workstation and server side is more commonly referred to as offline files. Depending on the workstation operating system version, different synchronization options are available. A common usage of offline files is to couple offline files with a Group Policy setting called Folder Redirection.
Folder Redirection can be used to redirect the end user’s My Documents or Documents folder to a server share. When an end user’s My Documents or Documents folder is redirected to a server share with caching enabled, enforced or not, the folder is automatically configured to synchronize with the server. This functionality ensures that any file an end user saves to their default documents folder will be copied up to the server during synchronization. Folder Redirection is covered in Chapter 25, “Group Policy Management for Network Clients.” The default offline file synchronization settings for Windows 10 and Windows Server 2016 will synchronize with the server at logon, logoff, and when a file is opened or saved. In addition, synchronization can be configured to run when a computer has been idle or when a user locks or unlocks a workstation.
Caching can be configured on a per-share basis using the shared folder’s share property page. By default, all shares allow end users to cache data as they desire. Certain folders (for example, the My Documents or Documents folders) when redirected to a Windows Server 2003 or later server operating system, automatically enable and configure the folder to be synchronized. To enable or disable share caching functionality, follow these steps:
1. Log on to the Windows Server 2016 system with the share that will be modified and open Server Manager.
2. In the tree pane, click File and Storage Services link, and when that opens, click Shares on the left.
3. In the Shares pane, select and right-click the desired share.
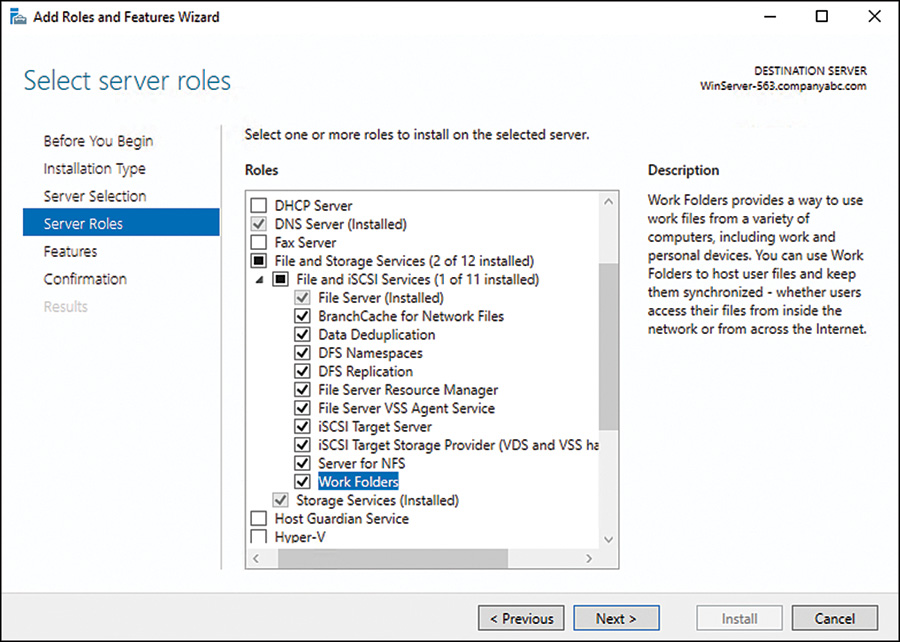
4. When the Share Properties window opens, click Properties, then click the Settings link, and in the Settings pane check or uncheck the Allow Caching of Share checkbox, as shown in Figure 27.2.
5. Note that in this window access-based enumeration and encryption of data access can also be enabled. Click OK to complete any setting changes.
To enable caching from the workstation, simply right-click the desired share or folder beneath a share and select the Always Available Offline link. This performs the initial sync and sets up the sync relationship.
BranchCache
BranchCache is a feature for Windows Server 2008 R2, Windows 7, and later client and server operating systems. BranchCache enables a branch office workstation to locate and locally store copies of files and folders hosted on remote Windows Server 2016 BranchCache file servers. When BranchCache is installed on a Windows Server 2016 file server, and BranchCache is enabled on a particular file share, when a remote branch office user on a Windows 7 or later workstation requests the file from the file server, it broadcasts the request on the local network. If no copy exists, it pulls a copy to the local machine. The updates to that file are sent across the network as changes are made. When the next workstation attempts to access this same file from across the network, the broadcast for that file is sent on the local network, and in this particular example, the file is referenced from the original workstation that copied the file over during the initial request, thus improving access performance to the file and reducing network traffic. You can find more detailed information about BranchCache in Chapter 31, “Optimizing Windows 2016 for Branch Office Communications.”
To enable BranchCache on a Windows Server 2016 system, install the BranchCache for Network Files service as outlined earlier in this chapter. After the service is installed, open the share properties from the Server Manager File and Storage Services link and in the share settings property page check the Allow Caching of Share checkbox and also check the Enable Branch Cache on the File Share checkbox, and click OK to save the settings.
Before BranchCache functionality is enabled, network administrators need to understand the service in greater detail, especially based on the fact that it is currently only supported on Windows 7, Windows Server 2008 R2, and later client and server operating systems. Any lower-level client cannot make use of this feature. In cases where Windows Vista or older clients still exist on remote or branch office networks, administrators should continue to deploy remote file servers with replicated DFS file shares when access to large or numerous files are required.
File Server Resource Manager
Windows Server 2016 includes a file system management and reporting configuration tool named the File Server Resource Manager (FSRM). This service and tool was first introduced in Windows Server 2003 R2 and enables administrators to configure quota management at the volume and folder level, create and apply file screening policies, generate alert notifications and reports on a schedule and in real time, and to classify files and folders based on administratively defined criteria.
With the volume-level quota management, previously included with Windows Server versions, administrators were very limited on how quotas could be applied and several issues were encountered. With the quota management functionality included with the FSRM service in Windows Server 2016, administrators can create quotas at a volume or folder level and create exceptions or tighter restrictions in specific subfolders. With this level of functionality, a standard quota size can be established, and different quota policies can be applied on a per-group or per-user basis if different quota settings are required.
With the file screening functionality of FSRM, organizations can restrict all users from storing certain types of files on server storage (for example, music and video files or executable files are common files that are screened for end users). Of course, this can be overridden using file screen exceptions as required.
Windows Server 2016 FSRM includes the File Classification Infrastructure (FCI) that can be used to run scheduled tasks that identify and tag or classify files based on their storage location or the content of the file itself. Of course, FCI can only search through the content of certain file types, which cannot include encrypted files. The FCI is also leveraged when Dynamic Access Control (DAC) is deployed on a network. On overview of DAC is included later in this chapter.
Uses of File Server Resource Manager
FRSM allows administrators to set quotas on volumes and folders as well as implementing file screening functionality or file classification by location or content. Even though in today’s market disk storage is much more affordable than in previous years, the amount of time required to back up and restore the data still needs to be managed. Furthermore, many more organizations need to ensure that their file systems meet certain security and regulatory compliance policies and FSRM can assist with these tasks. Some of the most common uses of FSRM are as follows:
![]() Setting limits on storage—An administrator can set the limit on how much disk space a user or group of users can store within a system volume or folder. This is the traditional quota limit item that can limit users to store (for example, 10GB of files on the network).
Setting limits on storage—An administrator can set the limit on how much disk space a user or group of users can store within a system volume or folder. This is the traditional quota limit item that can limit users to store (for example, 10GB of files on the network).
![]() Providing storage limit flexibility of group data—When a user or group of users need to have different storage limits, instead of allowing these users unlimited access, FSRM can be configured to allow the extension of storage usage beyond the default within specific, designated folders. This can be achieved by applying a strict quota policy on a parent folder and either disabling the quota on a subfolder or applying a less-restrictive quota policy on the necessary folder or folders.
Providing storage limit flexibility of group data—When a user or group of users need to have different storage limits, instead of allowing these users unlimited access, FSRM can be configured to allow the extension of storage usage beyond the default within specific, designated folders. This can be achieved by applying a strict quota policy on a parent folder and either disabling the quota on a subfolder or applying a less-restrictive quota policy on the necessary folder or folders.
![]() Enforcing storage policies—FSRM does more than just define storage policies. It also helps administrators enforce the policies by creating reports and generating notifications of policy violations and predefined storage threshold limits, on a real-time or scheduled basis, that can be sent via email, stored in event logs, or stored in designated report folders.
Enforcing storage policies—FSRM does more than just define storage policies. It also helps administrators enforce the policies by creating reports and generating notifications of policy violations and predefined storage threshold limits, on a real-time or scheduled basis, that can be sent via email, stored in event logs, or stored in designated report folders.
![]() File screen policies—Administrators can block the storing of a particular type of file or sets of files. In previous years, many organizations were surprised to discover that a significant source of increased data storage requirements had to do with end users downloading and storing music, videos and personal picture files on file servers. File screen exceptions can be created and applied to subfolders as necessary.
File screen policies—Administrators can block the storing of a particular type of file or sets of files. In previous years, many organizations were surprised to discover that a significant source of increased data storage requirements had to do with end users downloading and storing music, videos and personal picture files on file servers. File screen exceptions can be created and applied to subfolders as necessary.
![]() File classification—Administrators can define file classification properties and rules that can be manually run or run on a schedule to check files and tag files based on administratively defined rules. This can be useful in identifying data based on usage characteristics or identifying data based on content to ensure higher security and management of sensitive data.
File classification—Administrators can define file classification properties and rules that can be manually run or run on a schedule to check files and tag files based on administratively defined rules. This can be useful in identifying data based on usage characteristics or identifying data based on content to ensure higher security and management of sensitive data.
Leveraging the FSRM Features
Before FSRM features can be configured, the FSRM services and management tools must be installed. The File Server Resource Manager services and tools can be installed separately or can be installed during the installation of the File Services role as outlined previously in this chapter.
FSRM Global Options
After the FSRM services and management tools are installed, the global options should be configured. FSRM global options include settings such as the SMTP server to use for email notifications, notification limits, the default location of reports, and enabling file screen auditing. The global options can be configured can be configured as follows:
1. Log on to the Windows Server 2016 system with the share that will be modified and open Server Manager.
2. In the tree pane, click the File and Storage Services link, and when that opens, click Servers on the left.
3. In the Servers pane, right-click the desired server and select File Server Resource Manager to open the FSRM console.
4. When the console opens, in the tree pane right-click File Server Resource Manager (servername) and select Configure Options.
5. In the File Server Resource Manager Options window, review and configure the desired settings in each of the option pages, and then click OK save the changes.
Configuring Quotas with File Server Resource Manager
To create and configure FSRM quotas, follow these steps:
1. Log on to the Windows Server 2016 system with the share that will be modified and open Server Manager.
2. In the tree pane, click the File and Storage Services link, and when that opens, click Servers on the left.
3. In the Servers pane, right-click the desired server and select File Server Resource Manager to open the FSRM console.
4. Double-click the Quota Management node under the FSRM console.
5. Select the Quotas node in the tree pane.
6. In the actions pane, click the Create Quota link to begin the process.
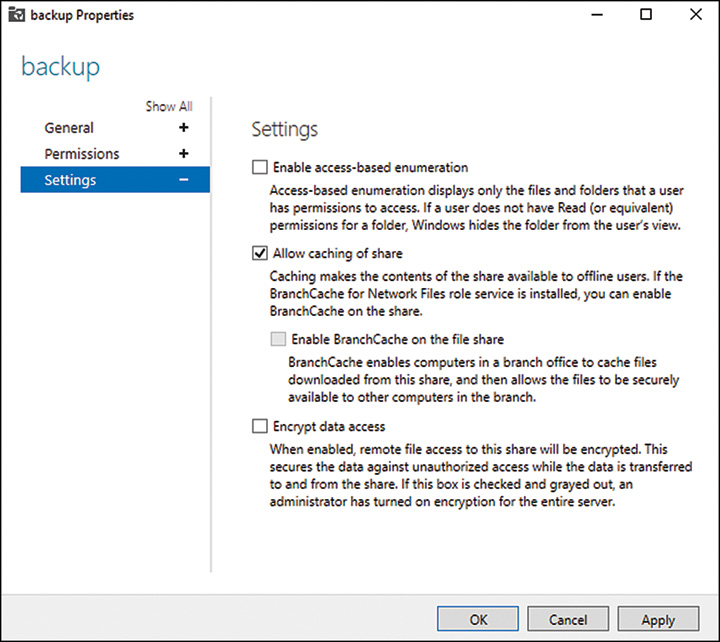
7. When the Create Quota window opens, specify the path for the quota, such as E:GroupShare.
8. Select the Auto Apply Template and Create Quotas on Existing and New Subfolders option button.
9. In the Quota properties section of the widow, select the Derive Properties from This Quota Template option button, and from the drop-down menu, select the 200 MB Limit Reports to User, and then click Create, as shown in Figure 27.3.
10. After the quota is created, click the Refresh link in the actions pane.
11. In the Tasks pane, the new quota is listed, along with the quotas applied to all existing subfolders and the current status of each quota.
Adjusting Quotas
When a quota is created on a folder, all subfolders of that parent folder inherit the quota. In some cases, it might be necessary to exclude a particular subfolder from the parent folder quota or to modify the quota of that particular subfolder. When this is necessary, an administrator simply needs to right-click the quota of the particular folder and select Edit Quota Properties. In the Quota Properties window, the quota can be disabled by checking the Disable Quota checkbox or the quota space limit can be adjusted.
Creating a Quota Template
When working with quotas, rather than defining the storage limits on each and every folder being issued a quota, an administrator can create a quota template and apply the template to the folder, simplifying the quota policy creation process. Within the quota template, the administrator can define the following:
![]() Amount of disk space of the quota—The administrator can define in kilobytes (KB), megabytes (MB), gigabytes (GB), or terabytes (TB) the amount of space to be set as the quota for the template.
Amount of disk space of the quota—The administrator can define in kilobytes (KB), megabytes (MB), gigabytes (GB), or terabytes (TB) the amount of space to be set as the quota for the template.
![]() Hard limit or soft limit—A hard limit does not allow a user to extend beyond the hard limit for storage, whereas a soft limit gives the user a warning they have exceeded the policy limit; however, it allows the user to continue to save files beyond the limit.
Hard limit or soft limit—A hard limit does not allow a user to extend beyond the hard limit for storage, whereas a soft limit gives the user a warning they have exceeded the policy limit; however, it allows the user to continue to save files beyond the limit.
![]() Notification thresholds—When the storage limit nears or reaches the quota limit, a series of events can occur, such as the automatic generation of an email warning, event log entry, or a script can be executed.
Notification thresholds—When the storage limit nears or reaches the quota limit, a series of events can occur, such as the automatic generation of an email warning, event log entry, or a script can be executed.
To create a new quota template, click the Quota Templates node beneath Quota Management in the FSRM console and follow these steps:
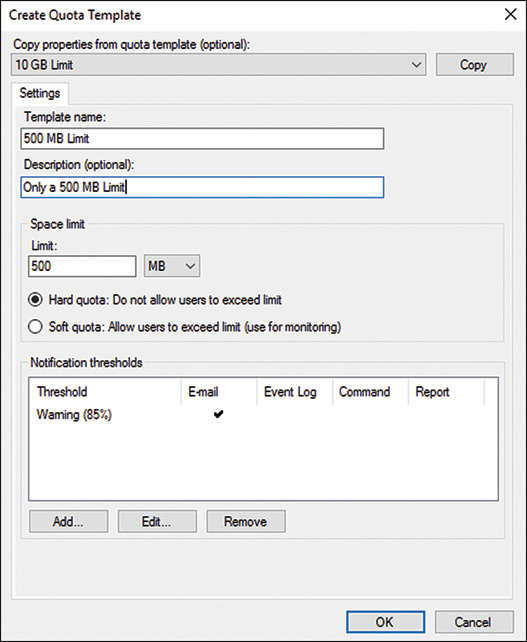
1. Open the FSRM console and click Create Quota Template in the Actions pane to open the Create Quota Template window.
2. Type in a name of the template (for example, 500mb Hard Limit for Sales), and enter a description (Template for Sale Staff Users).
3. Specify the storage limit for the quota; for this example, enter 500 and choose MB from the list.
4. Pick whether you want a hard limit or soft limit for the quota; for this example, select Hard Quota: Do Not Allow Users to Exceed Limit.
5. Create notification thresholds by clicking the Add button and defining limits. A common threshold is an 85 percent limit that notifies users via email that they have achieved 85 percent of their limit and to consider deleting files so that they do not exceed their limit.
6. The quota limit looks similar to Figure 27.4. Click OK when you are satisfied with your settings.
The administrator can now create quotas and apply this template or other templates to the quota settings.
Creating File Screens
File Server Resource Manager also enable you to create file screens. A file screen applied to a folder inspects the file to be written and either allows or disallows a user from saving the file based on the screen. A file screen blocks files from being written within a folder and all subfolders. For example, an organization can allow the storage of all undefined documents and deny the storage of *.mp3 audio files and *.mpg video files by applying a file screen that contains these two file types to a particular folder or set of folders.
To create a file screen, follow these steps:
1. Open the File Server Resource Manager and expand it.
2. Double-click File Screening Management.
3. Select the File Screens node. In the actions pane, click Create File Screen.
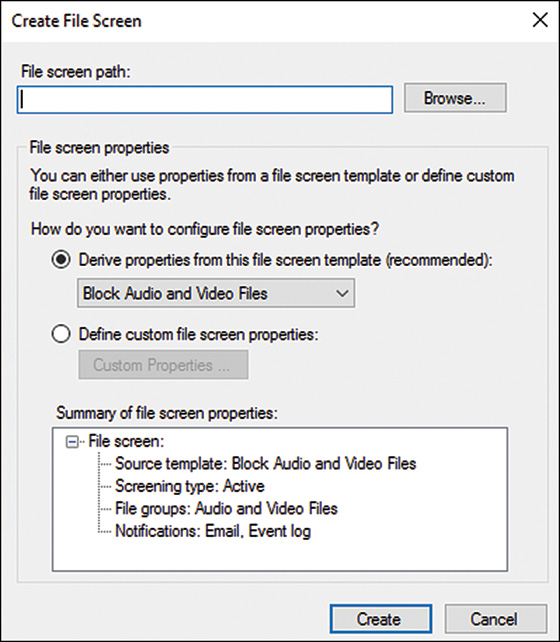
4. In the Create File Screen window, specify the path for the file screen, such as E:UserShare.
5. In the File screen properties section of the windows, select the Derive properties from This File Screen Template option button, or choose Define Custom File Screen Properties, depending on whether you want to apply a template or create a custom screen. For this example, choose the Derive Properties from This File Screen Template option button, and select Block Audio and Video Files from the drop-down menu, as shown in Figure 27.5. Click Create to create the new file screen.
Generating Storage Reports with FSRM
The File Server Resource Manager enables you to create or automatically generate general storage reports as well as quota and file screen activity reports. The various reports that can be generated include the following:
![]() Duplicate Files
Duplicate Files
![]() File Screening Audit
File Screening Audit
![]() Files by File Group
Files by File Group
![]() Files by Property
Files by Property
![]() Folders by Property
Folders by Property
![]() Large Files
Large Files
![]() Least Recently Accessed Files
Least Recently Accessed Files
![]() Most Recently Accessed Files
Most Recently Accessed Files
![]() Quota Usage
Quota Usage
Generating Reports in Real Time
Reports can be generated on a real-time basis to view the file storage information on demand. To generate a report, right-click the Storage Reports Management node of the FSRM console, and choose Generate Reports Now. Then do the following:
1. On the Settings tab, choose which report or reports will be generated by checking the desired checkboxes for the particular report type.
2. On the Settings tab, also select the report formats to generate by checking the appropriate checkboxes in the Report formats section of the tab.
3. Click the Scope tab and click Add button to define the scope of the volumes or folders that the report will be based on (for example, E:UserShare), and then click OK to return to the Storage Report Task Properties window.
4. Click OK when the report options are configured.
5. A new window opens prompting you to decide to wait for the report to generate and automatically display the report or to generate the report in the background and store it in the default report location. Select the Wait for Reports to be Generated and Then Display Them option, and then click OK.
6. When completed, the folder containing the reports is opened for review.
Scheduling Reports to Be Generated on a Regular Basis
Reports can also be generated on a regular basis (such as weekly or monthly), typically for the purpose of reporting file storage information to management. To schedule a report, right-click the Storage Reports Management node of the FSRM console, and choose Schedule a New Report Task. Define the report name, formats, scope of the report, the schedule, and whether the report will be delivered via email or just stored in the default folder.
File Classification Management
File classification allows an organization to define properties and rules that add specific file properties to better define the characteristics of the classified files. File classification properties are supported on Windows Server 2016 NTFS volumes. When files are classified, they are tagged, and this information is stored within the actual file for Microsoft Office 2007/2010 files and SharePoint files. For all other files, however, the FCI data is stored on an NTFS volume where the files are stored. When classified or tagged files are moved to other Windows Server 2016 NTFS volumes, these properties follow the files.
File classification allows administrators to create file properties and automatically classify files with these properties based on the file location and, in some cases, also based on the content stored within the file. The steps to file classification include: first, enabling and defining file properties that can be used for classification, and second, creating classification rules that actually classify files according to the criteria defined within the rule. After files are classified, file management tasks can be created to perform tasks upon classified files, such as moving files to designated folders or performing custom tasks such as running automated scripts to perform any number of tasks related to the particular file classifications.
The best way to understand file classification is to start defining file classification properties, file classification rules, and file management tasks on data that has been copied from a server share to an isolated lab server running Windows Server 2016.
CAUTION
After a file is classified and has properties defined, these properties cannot be removed, they can only be overwritten or merged with other properties.
To begin using the file classification features of Windows Server 2016, install the File Server Resource Manager service and tool as previous described in this chapter, and then complete the steps outlined in the proceeding sections.
Classification Properties
Classification properties are used to categorize files to be used later for file management tasks or reporting. A classification property, as included with Windows Server 2016, includes the following classification property types:
![]() Yes/No
Yes/No
![]() Date-time
Date-time
![]() Number
Number
![]() Multiple Choice List
Multiple Choice List
![]() Ordered List
Ordered List
![]() Single Choice
Single Choice
![]() String
String
![]() Multi-string
Multi-string
Two properties are created by default: Folder Usage and Folder Owner Email. The Folder Usage property has been created to enable administrators to quickly classify folders to simplify running reports based on the three types of predefined folder usage: Application Data, Group Data, and User Data. This can be modified to include additional types such as software or something else. The Folder Owner Email property has been created to enable administrators to tag folders with email addresses to create reports and send notifications to designated email addresses without having to define this for each folder.
To get a good understanding of how classification can be used, this section and the following sections provide an example of how to classification can be used to classify files based on content that includes the word password. To do this, create a file property type of Yes/No and create a classification rule to search the E:GroupShare folder for any files containing the word and classify these files as necessary. To perform this task, we must first create the classification property. Follow these steps to create the classification property:
1. Open the FSRM console and double-click Classification Management and select the Classification Properties node.
2. In the actions pane, click the Create Local Property link to start the creation of the classification property.
3. In the Create Local Classification Property window, type Password Property in the Property Name section, enter a description, and choose the property type of Yes/No, as shown in Figure 27.6.

When the new classification property is created, we can create a classification rule that uses this property to classify files that the rule determines to meet the criteria.
Classification Rules
After the file administrator has created the necessary file classification properties, they can proceed in creating classification rules that actually processes and classifies the files that meet the rule criteria, by applying the necessary classification property values to the file collections. To create a new classification rule, follow these steps:
1. Log on to the same Windows Server 2016 system that the Password Property classification property was previously defined on, and open the FSRM console.
2. Double-click Classification Management and select the Classification Rules node.
3. In the actions pane, click the Create Classification Rule.
4. In the Create Classification Rule window, type in the name of the rule as Classify files with passwords and be sure to check the Enabled checkbox. Do not close the window or click OK yet.
5. Select the Scope tab and click the Add button to add the folder or volume that this classification rule will be applied to. For our example, apply this rule to E:GroupShare folder. When the location is specified, all subfolders will also be included. Do not close the window or click OK yet.
6. Select the Classification tab and select Content Classifier from the Classification Mechanism drop-down menu.
7. In the Property Name section, select the Password Property and set the property value to be assigned as Yes, as shown in Figure 27.7.
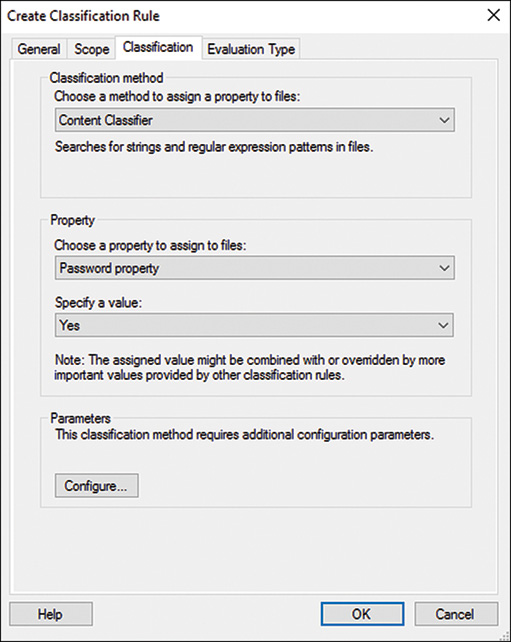
8. Click the Configure button in the Parameters section of the Classification tab.
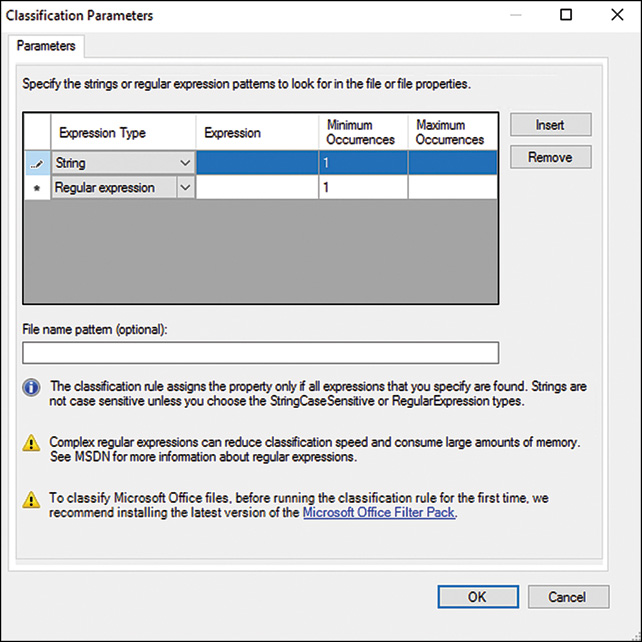
9. In the Classification Parameters window, the administrator can define three different types of criteria used to search for specific file content:
![]() RegularExpression—The RegularExpression is the same as is used with .NET programming and can be used to find complex or multiple types of data formats, for more complex searches.
RegularExpression—The RegularExpression is the same as is used with .NET programming and can be used to find complex or multiple types of data formats, for more complex searches.
![]() String (case-sensitive)—The StringCaseSensitive is the same as the string, in that the entire string must be an exact match but the case must also match. For example, the StringCaseSensitive string of Password will not match the string password.
String (case-sensitive)—The StringCaseSensitive is the same as the string, in that the entire string must be an exact match but the case must also match. For example, the StringCaseSensitive string of Password will not match the string password.
![]() String—The String type is used to find a very specific string, such as password that will not be dependent on the case of the string, although the string must be an exact match. For example, the string password will not match passwords, because that is a different string.
String—The String type is used to find a very specific string, such as password that will not be dependent on the case of the string, although the string must be an exact match. For example, the string password will not match passwords, because that is a different string.
10. For our example, we specifically look for the string of password and ignore the case. Pull down the Expression Type menu and select String. In the Value field, type in password, as shown in Figure 27.8. Click OK after doing so.
11. Back in the Create Classification Rule window, click OK to complete the rule creation.
After the rule is created, it can be scheduled or run manually. To run all the rules manually, in the Tasks pane, right-click the Classification Rules node and select Run Classification with All Rules Now. Follow the steps to select the type of report that will be generated and whether the administrator will wait for the classification to complete and display the window or to have the process run in the background. If a schedule or a manual run is performed, any files that meet the properties of any enabled classification rules will be classified, unless these files have been previously classified.
File Management Tasks
File management tasks can be run on a Windows Server 2016 system to expire classified files that meet certain criteria (by moving these files to a designated folder location), perform RMS encryption, or a custom task can be performed. To perform any related RMS-related tasks, the RMS infrastructure needs to be deployed and configured on this system, and this is beyond the scope of this book.
File management tasks can be handy to automatically move files that have not been accessed in an extended period of time, or in the case of sensitive data, it can be moved to a secured folder or protected by RMS. To create a new file management task to move expired files that have not been accessed in over a year, for example, follow these steps on a Windows Server 2016 system with the FSRM services and tool installed:
1. Log on to the FSRM Windows Server 2016 system and open the FSRM console.
2. Double-click the File Management Tasks node beneath the File Server Resource Manager node.
3. In the actions pane, click the Create File Management Task link to start the process.
4. In the Create File Management Task window, on the General tab, type in a task name of Move Data not accessed in 1 year, and enter a description as desired.
5. On the Scope tab, click Add to locate and add the folder, folders, or volumes to this task.
6. Click the Action tab, and for Action Type choose File Expiration, and in the Expiration directory, type or browse to a volume and folder location to where the files that meet this criteria should be moved.
7. Click the Notification tab and click the Add button to add notifications to users and administrators so that they can be notified of when particular files will be considered expired and moved to the expiration directory, as shown in Figure 27.9.
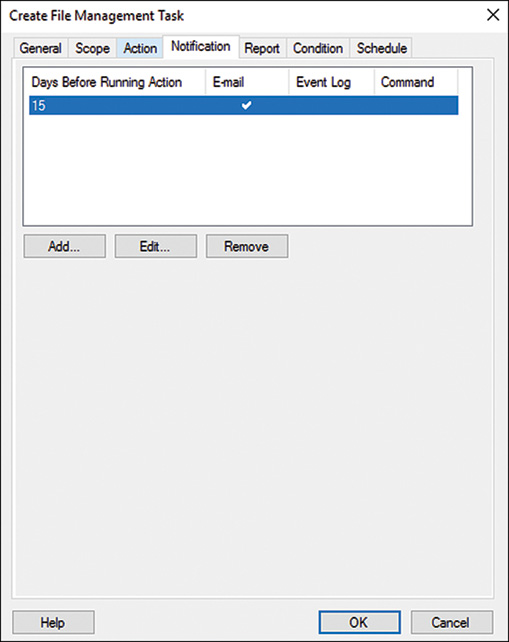
8. Back in the Create File Management Task window, click the Condition tab and check the Day Since File Was Last Accessed checkbox and enter a value of 365.
9. Click the Schedule tab and configure the desired schedule, and then click OK to complete the creation of the task.
When the task is completed, it will run on the designated schedule and will begin notifying administrators and users when files will be moved. One important point to consider is that after a file is expired and moved, there will be no indication of where or when that file was moved when users go to the original location of the expired file.
The Distributed File System
To improve the reliability and availability of file shares in an enterprise network, Microsoft has developed the Distributed File System (DFS). DFS improves file share availability by providing a single, unified namespace to access shared folders hosted across one or more servers. A user needs to only remember a single server or domain name and share name to connect to a DFS shared folder.
DFS has many benefits and features that can simplify data access and management from both the administrator and end-user perspective. DFS provides four main functions:
![]() Unified namespace—DFS data is located under a single server name or a single domain name.
Unified namespace—DFS data is located under a single server name or a single domain name.
![]() Data redundancy—DFS can provide access to a single share that is hosted on multiple servers. This allows clients to get referred to or fail over to a different server if the primary server cannot be contacted.
Data redundancy—DFS can provide access to a single share that is hosted on multiple servers. This allows clients to get referred to or fail over to a different server if the primary server cannot be contacted.
![]() Automated data replication—DFS can be configured to utilize the Distributed File System Replication (DFSR) service, and can be configured to automatically synchronize folders between DFS servers to provide data redundancy or centralized storage of branch office data.
Automated data replication—DFS can be configured to utilize the Distributed File System Replication (DFSR) service, and can be configured to automatically synchronize folders between DFS servers to provide data redundancy or centralized storage of branch office data.
![]() Distributed Data Consolidation—DFS can be used to provide a single namespace that can contain several distinct or unique datasets, that can be hosted on separate servers. This allows administrators to provide access to existing file shares hosted many different file servers, from the single name space, without adding replication or redundant data sets.
Distributed Data Consolidation—DFS can be used to provide a single namespace that can contain several distinct or unique datasets, that can be hosted on separate servers. This allows administrators to provide access to existing file shares hosted many different file servers, from the single name space, without adding replication or redundant data sets.
DFS Namespaces
DFS can be used in a few different ways, but it always requires the creation of a DFS namespace. A DFS namespace can be the name of a single server and share folder or the DNS and NetBIOS name of an Active Directory domain and share folder. The DFS namespace has also historically been referred to as the namespace root. The namespace allows connections to automatically be redirected to different servers without user knowledge. When a client connects to the domain-based DFS namespace \Companyabc.comUsers, the client is redirected to \FILESERVER1Users, and the client will be unaware of this redirection.
For DFS to function properly with regard to client redirection and just basic connectivity, a compatible DFS client is required. In a network that supports different versions of Windows, Mac, and UNIX clients, DFS should be tested on all clients before it is released to production. DFS-compatible clients are currently available for the following Microsoft Windows operating systems:
![]() Windows 2000 Professional and Server
Windows 2000 Professional and Server
![]() Windows XP Professional
Windows XP Professional
![]() Windows Server 2003 and later server operating systems
Windows Server 2003 and later server operating systems
![]() Windows Vista Business, Ultimate and Enterprise
Windows Vista Business, Ultimate and Enterprise
![]() Windows 7 Professional, Ultimate and Enterprise
Windows 7 Professional, Ultimate and Enterprise
![]() Windows 8 Pro
Windows 8 Pro
![]() Windows 10 Pro
Windows 10 Pro
![]() Windows NT Server and Workstation 4.0 with Service Pack 6a and the Active Directory Client Extension found on the Windows 2000 Server CD
Windows NT Server and Workstation 4.0 with Service Pack 6a and the Active Directory Client Extension found on the Windows 2000 Server CD
![]() Windows 98 with the Active Directory Client Extension found on the Windows 2000 Server CD
Windows 98 with the Active Directory Client Extension found on the Windows 2000 Server CD
Because DFS clients do not connect to the actual server by name, administrators can move shared folders to new servers and user logon scripts and mapped drive designations never need to be changed. In fact, DFS data presented in a single namespace can be hosted on multiple servers to provide redundancy and distribution of large amounts of data.
Standalone DFS Namespace
A standalone DFS namespace uses the name of the server hosting the DFS namespace. Standalone DFS namespaces should be used when file system access needs to be simplified and the amount of data exceeds the capacity of a single server. Also, standalone DFS namespaces are good if an old file server needs to be replaced but the paths should remain fully functional. Also, if no Active Directory domain exists, a standalone DFS namespace is still supported. When a standalone DFS namespace is created on a Windows Server 2016 server that is a member of an Active Directory domain, DFSR can be configured.
Domain-Based DFS Namespace
A domain-based DFS namespace utilizes the name of the Active Directory domain the DFS namespace server is a member of. A domain-based DFS namespace is created upon deployment of an Active Directory domain at the location of \domainSYSVOL to replicate the domain group policies and logon script folders. Domain-based DFS namespaces support replication using either the File Replication Service or the new DFSR service.
Domain-Based DFS Namespace Windows 2008 Mode
When a new domain-based DFS namespace is created on a Windows Server 2016 system, an option to enable Windows Server 2008 mode is presented. This option is available on Windows Server 2008 and later server operating systems when the namespace is hosted on a server where the domain is running in Windows Server 2008 domain functional level or higher. Also, the forest must be running in at least Window Server 2003 forest functional level. This means that the domain must have only Windows Server 2008 or later domain controllers and the entire forest must have only Windows 2003 or later domain controllers.
Windows Server 2008 mode enables the namespace to contain more than 5000 DFS folders, and it also enables access-based enumeration within the DFS namespace. It is important to note that the same functionality enabled for a Windows 2008 mode domain-based namespace exists on standalone DFS namespaces when the namespace server is hosted on a Windows Server 2016 server, so this functionality can be leveraged immediately, even in organizations that are far from meeting the requirements for Windows 2008 mode domain-based namespaces.
DFS Replication
When an Active Directory domain exists, standalone and domain-based DFS namespaces support the replication of DFS data stored on multiple servers. This can be a valuable tool used to distribute company applications to each site or to provide centralized storage of remote office data for redundancy, centralized backup, and to support users who travel and work in different offices.
With the release of Windows Server 2003 R2 and further improved in Window 2008 R2, a new service to extend the functionality and optimize DFS Replication has been created. This new service is called the Distributed File System Replication (DFSR) service, which utilizes the new Remote Differential Compression (RDC) protocol. DFSR replaces the legacy File Replication Service (FRS) that was previously used to replicate DFS data. As long as all the DFS servers defined in a DFSR group are running Windows Server 2003 R2 or later, the DFSR service will be used to replicate the data. If any of the systems are running an earlier version of the operating system, DFS data will be replicated using the FRS. There is one exception to this rule: The domain system volume (SYSVOL) will be replicated between domain controllers using the FRS, even if all the domain controllers are running Windows Server 2016, until the domain functional level is raised to the Windows Server 2016 level and the SYSVOL is migrated from FRS to DFSR.
DFSR and DFS namespaces are independent of one another, but they can be used together, as they are commonly deployed in this fashion. Replication of folders can be set up between servers that do not host any DFS namespaces or namespace folders but the DFSR service must be installed on all systems participating in the replication. Windows Server 2016 increases DFSR security and performance as all DFSR is compressed and encrypted. And just so you know, the data stream cannot be set to run without encryption.
DFS Terminology
A number of technical terms are used when referring to deploying, configuring, and referencing DFS. The DFS namespace and DFSR have already been described, but the remaining terms should also be understood before reading the remainder of this chapter or deploying a new DFS infrastructure:
![]() DFS namespace—A unified namespace that presents a centralized view of shared folder data in an organization.
DFS namespace—A unified namespace that presents a centralized view of shared folder data in an organization.
![]() DFS namespace server—A Windows server that hosts a DFS namespace.
DFS namespace server—A Windows server that hosts a DFS namespace.
![]() DFS namespace root—The top level of the DFS tree that defines the namespace for DFS and the functionality available. The namespace root is also the name of the DFS namespace. A domain-based root adds fault-tolerant capabilities to DFS by allowing several servers to host the same DFS namespace root.
DFS namespace root—The top level of the DFS tree that defines the namespace for DFS and the functionality available. The namespace root is also the name of the DFS namespace. A domain-based root adds fault-tolerant capabilities to DFS by allowing several servers to host the same DFS namespace root.
![]() DFS folder—A folder that is presented under the root when a DFS client connects. When a root is created, folders can be created within the file system, but DFS folders allow the system to redirect clients to different systems other than the namespace server hosting the root.
DFS folder—A folder that is presented under the root when a DFS client connects. When a root is created, folders can be created within the file system, but DFS folders allow the system to redirect clients to different systems other than the namespace server hosting the root.
![]() Folder target—A share hosted on a Windows server. The DFS folder name and the share name do not need to be the same, but for troubleshooting purposes, it is highly recommended. Multiple folder targets can be assigned to a single DFS folder to provide fault tolerance. If a single folder target is unavailable, clients will be connected to another available target. When DFS folders are created with multiple folder targets, replication can also be configured using DFSR groups to keep the data across the targets in sync. Folder targets can be a share name or a folder beneath a share. For example, \server1userdata or \server1userdataFinance are both valid folder targets.
Folder target—A share hosted on a Windows server. The DFS folder name and the share name do not need to be the same, but for troubleshooting purposes, it is highly recommended. Multiple folder targets can be assigned to a single DFS folder to provide fault tolerance. If a single folder target is unavailable, clients will be connected to another available target. When DFS folders are created with multiple folder targets, replication can also be configured using DFSR groups to keep the data across the targets in sync. Folder targets can be a share name or a folder beneath a share. For example, \server1userdata or \server1userdataFinance are both valid folder targets.
![]() DFS tree—The hierarchy of the namespace. For example, the DFS tree begins with the DFS root namespace and contains all the defined folders below the root.
DFS tree—The hierarchy of the namespace. For example, the DFS tree begins with the DFS root namespace and contains all the defined folders below the root.
![]() Referrals—A configuration setting of a DFS namespace/folder that defines how DFS clients connect to the namespace server, a folder in the namespace, or a particular folder target server. Referral properties include limiting client connections to servers in the local Active Directory site and how often to check the availability of a DFS server. Disabling a target’s referral keeps it from being used by clients. Target referral can be disabled when maintenance is performed on a server.
Referrals—A configuration setting of a DFS namespace/folder that defines how DFS clients connect to the namespace server, a folder in the namespace, or a particular folder target server. Referral properties include limiting client connections to servers in the local Active Directory site and how often to check the availability of a DFS server. Disabling a target’s referral keeps it from being used by clients. Target referral can be disabled when maintenance is performed on a server.
DFS Replication Terminology
DFS uses either the FRS or the DFSR service to automatically replicate data contained in DFS folder targets. To understand the replication concepts, you must understand some key DFSR terminology. Here are some important terms:
![]() Replication—The process of copying data from a source server folder to a destination server folder.
Replication—The process of copying data from a source server folder to a destination server folder.
![]() Replication connection—The directory object that defines and manages the replication between a sending and receiving replication member server. The replication connection defines the replication schedule, which service will replicate the data, the sending and receiving members, and any bandwidth restrictions for the connection. Each replication connection has only a single sending and receiving replication member.
Replication connection—The directory object that defines and manages the replication between a sending and receiving replication member server. The replication connection defines the replication schedule, which service will replicate the data, the sending and receiving members, and any bandwidth restrictions for the connection. Each replication connection has only a single sending and receiving replication member.
![]() Replication member—A server that shares a common replication connection. The receiving replication server receives data from a sending member server specified in the replication connection. The sending replication partner sends data to the receiving member specified in the replication connections.
Replication member—A server that shares a common replication connection. The receiving replication server receives data from a sending member server specified in the replication connection. The sending replication partner sends data to the receiving member specified in the replication connections.
![]() Read-only replication folders—Windows Server 2016 supports read-only replication sets. This can be useful for auditing or centralized backup or managing datasets. Only the replication members that are not defined as the primary source can host read-only replication folders made read-only. Read-only domain controllers host the SYSVOL as a read-only replication folder. When read-only replication folders exist, it is a best practice to ensure that replication is only one way to the read-only replication folder.
Read-only replication folders—Windows Server 2016 supports read-only replication sets. This can be useful for auditing or centralized backup or managing datasets. Only the replication members that are not defined as the primary source can host read-only replication folders made read-only. Read-only domain controllers host the SYSVOL as a read-only replication folder. When read-only replication folders exist, it is a best practice to ensure that replication is only one way to the read-only replication folder.
![]() Replication group—All the servers, folders, and connections that define a replication set of data.
Replication group—All the servers, folders, and connections that define a replication set of data.
![]() Multimaster replication—This defines two-way replication between multiple servers in a replication group. With multimaster replication, data changed on any server in the group is replicated to every other server in the group.
Multimaster replication—This defines two-way replication between multiple servers in a replication group. With multimaster replication, data changed on any server in the group is replicated to every other server in the group.
Planning a DFS Deployment
Planning for a DFS implementation requires an administrator to understand the different types of DFS namespaces and the features and limitations of each type, including which operating system versions and domain functional levels are required to enable certain functionality. Also, the administrator must understand which tasks can be automated using DFS and which must be configured manually. For instance, DFS can create the file share for namespace roots, folders, or folder targets, including setting share permissions, but the NTFS permissions would be set to match the share permissions and advanced share features cannot be configured during this process. As a best practice, DFS administrators should create and define shares, share permissions, and NTFS permissions on the shared folder before defining these shares as DFS folder targets.
When an organization wants automated file replication, domain-based DFS and standalone DFS namespaces deployed in an Active Directory domain can use Windows Server 20012 DFSR using the RDC to replicate shared folders if all the participating DFS servers are running Windows Server 2016.
Choosing a DFS Namespace Type
As mentioned previously, DFS namespaces can be based on the server name (standalone) or the domain name hosting the namespace (domain based). Both provide a single namespace, but only domain-based namespaces can provide redundancy at the namespace root level.
Standalone DFS Namespace
A standalone DFS namespace provides the characteristic DFS single namespace. The namespace is defined by the name of the server that hosts the root target and the share. Standalone roots can support only a single root target, but an administrator can configure multiple folder targets. Data stored within multiple folder targets must be kept in sync manually unless the standalone namespace server and all the folder target servers are members of a single Active Directory domain and use DFSR.
Domain-Based DFS Namespace
For an administrator to create a domain DFS root, the initial namespace root server must be a member of an Active Directory domain. A domain-based DFS namespace provides a single namespace that is based on the DNS and NetBIOS domain name plus a root name, when the namespace is created. Domain-based DFS namespaces can use DFSR to replicate data between multiple folder targets.
Windows Server 2008 Mode for DFS Domain-Based DFS Namespace
Windows 2008 mode for domain-based namespaces enables the namespace to contain more than 5,000 folders, and access-based enumeration can also be enabled. To enable this functionality, the forest must be set to Windows 2003 or later forest functional level, and the domain that contains the namespace servers must be in Windows Server 2008 domain functional level. After a namespace is created, it cannot be changed to Windows Server 2008 mode, so this option must be configured during creation.
Planning for DFS Replication
When an organization wants to replicate data stored on Windows Server 2016 systems published in DFS namespaces, administrators must create the namespaces on servers that are members of an Active Directory domain. Replication can be configured between multiple targets on a DFS folder or on Windows Server 2008 or later server operating systems that do not participate in a DFS namespace. When multiple targets are defined for a folder, DFS can use the FRS or the DFSR service to create replication connection objects and automatically synchronize data between each target.
Initial Master
When replication is first configured using the DFS console and the New Replication Group Wizard, the administrator can choose which target server will be the initial master. The data contained on the initial master is replicated to the remaining targets. For targets on servers other than the initial master, existing data is moved to a hidden directory, and the current folder is filled with the data contained only in the initial master folder. After initial replication is complete, the administrator can restore data moved to the hidden folder back to the working directory, where it can trigger replication outbound to all the other replicas in the replica set, if replication is two-way and neither target is set to read-only. As a best practice, when adding additional targets to a replica set, try to start with empty folders.
The Staging Folder
The staging folder is the location where a DFSR member stores the data that will be replicated to other replication members within a replication group. In a fully synchronized replication group, the staging folder on all servers is empty. Because replication data travels through this folder, the drive hosting the staging folder must have sufficient free space to accommodate the maximum size of the staging folder, and should be able to handle the additional disk load. The default location for the staging folder will be located in the target share folder in a hidden directory named E:UsersDfsrPrivateStaging, if the target is located in E:Users, for example. The staging folder of any DFSR group is set to 4GB by default. Be sure to understand the data that will be replicated and adjust the staging folder size as necessary to avoid filling up the staging folder.
Determining the Replication Topology
Windows Server 2016 DFS provides a number of built-in replication topologies to choose from when an administrator is configuring replication between DFS folder targets or replication group members; they’re described next. As a general guideline, it might be prudent to configure DFSR connections and a schedule to follow current Active Directory site replication topology connections or the existing network topology when the organization wants true multimaster replication.
Hub and Spoke
A hub-and-spoke topology is somewhat self-descriptive. A single target is designated as the replication hub server, and every other target (spoke target) replicates exclusively with it. The hub target has two replication connections with each spoke target: sending and receiving. A hub-and-spoke topology requires three or more servers and when the hub target is unavailable, replication updates stop between all replication members. Windows Server 2016 includes the ability to specify more than one hub when creating a hub-and-spoke replication topology.
Full Mesh
Using a full-mesh topology, each target has a connection to every other target in the replication group. This enables replication to continue among available replication members when any member becomes unavailable. Because each member has a connection to every other member, replication can continue with as few as two replication members. Using this topology with read/write replication sets can lead to data conflicts if data is being changed in multiple sites, so this topology should be used with caution.
No Topology
During the creation of a replication group, one of the topology options is the No Topology option. Selecting this option allows an administrator to create a custom replication topology after the replication group is created. A custom topology allows an administrator to define specific replication connections for each target. This option can be useful if an organization wants to define one-way replication for centralized backup or to optimize read only replicated folders. Also, this can be most useful when creating a topology for a network that is connected using different speed WAN links or each connection needs to have a specific schedule and bandwidth setting.
Replication Schedule and Bandwidth Throttling
Windows Server 2003 R2 and later server operating systems support scheduling replication as well as restricting the amount of bandwidth a replication connection can utilize. For large datasets that initially replicate across the WAN, the initial replication connections can be configured to run limited bandwidth during business hours and full bandwidth after hours until replication has completed and restrictions can be removed if desired.
Installing and Configuring DFS
To install DFS, an administrator of a file server on the network needs to install the File System role and select the necessary DFS-related role services. Also, when the DFS role services are selected, the necessary DFS tools are installed as part of the installation.
Creating the DFS Namespace and Root
When creating a DFS namespace, the administrator requires local administrator group access on each of the servers hosting the namespace, and if a domain namespace is selected, domain administrator rights are also required to either create or delegate permissions to create as the domain-namespace information is stored in Active Directory.
A DFS namespace requires a file share. When the DFS root is created, the name can be matched to an existing file share name or a custom name can be selected. The wizard searches the specified server for an existing file share matching the DFS root name; if it does not locate one, the wizard can create the share as part of the process.
As a best practice, the file share should be created and have share and NTFS permissions configured prior to the DFS namespace creation. One thing to keep in mind, though, is that the share name must match the DFS namespace name. Preconfiguring the NTFS permission helps simplify troubleshooting and administration of the namespace.
To create a DFS namespace, follow these steps:
1. Log on to the Windows Server 2016 system with an account with local server Administrator privileges. If a domain-based DFS namespace will be created, ensure that the account is also a member of the Domain Admins group.
2. Pre-create the share and set share and NTFS permissions on the servers and the shares that will host the DFS namespace root.
3. Open Server Manager, and in the tree pane click the File and Storage Services link, and when that opens, click Servers on the left.
4. In the Servers pane, right-click the desired server and select DFS Management.
5. In the DFS Management console, expand DFS Management and select the Namespaces node. In the actions pane, click the New Namespace link.
6. When the New Namespace Wizard opens, type in the name of the server that will host the namespace, and then click Next.
7. On the Namespace Name and Settings page, type in the name of the share previously created, and then click Next. For our example, use the root share named CorpShares on a folder named C:CorpShares.
8. A pop-up window opens asking whether the existing share should be used, as shown in Figure 27.10. Click Yes to use the previously configured share and configured security.

9. On the Namespace Type page, to create a domain-based namespace, select the appropriate option button and check the Enable Windows Server 2008 Mode checkbox to enable scalability and allow for access-based enumeration within the namespace. Click Next to continue.
10. On the Review Settings and Create Namespace page, review the namespace settings, and if everything looks correct, click Create to start the namespace creation.
11. On the Confirmation page, if the result status is reported as a Success, click Close to complete the process. If the creation failed, select the Errors tab to review the issues, repair the problems, and attempt the namespace creation again.
Adding an Additional Namespace Server to a Domain-Based Namespace
After a domain namespace has been successfully created, it is a best practice to add an additional server to host the namespace. To add an additional server to an existing domain-based namespace, follow these steps:
1. On the same server used to create the original namespace, open the DFS Management console as previously outlined.
2. Pre-create the share and configure the desired share and NTFS permissions on the additional server that will also host the DFS namespace root.
3. Back in the DFS Management console, expand DFS Management, and then expand the Namespaces node. If the existing \companyabc.comCorpShares namespace is listed, select it. If the desired namespace is not listed, right-click the Namespaces node, select Add Namespaces to Display, and follow the steps to locate and add the namespace.
4. Select the desired existing domain namespace, and in the actions pane, click the Add Namespace Server link to begin the process.
5. Type in the name of the server, and click OK to continue.
6. If the share already exists, click Yes on the pop-up window to use the existing share and existing configured security. If the share does not exist, it will be created under c:DFSRoots by default.
7. In the Tasks pane, select the Namespace Servers tab to verify that the additional namespace server was successfully added, as shown in Figure 27.11. Also note that in the top of the pane it shows that the namespace is a domain-based in Windows Server 2008 mode.

Creating a DFS Folder and Replication Group
Creating a DFS folder is similar to creating the DFS namespace. A folder can be created to target existing shares, folders beneath existing shares, or a new share can be created on the desired server or servers. As recommended previously, pre-create the file share on an NTFS folder and properly configure the share and NTFS permissions for each folder target that will be added to the DFS folder.
When a new folder is created with multiple folder targets, a replication group can be created at the same time. To create a folder within an existing namespace, follow these steps:
1. On the same server used to create the original namespace, open the DFS Management console as previously outlined.
2. Pre-create and set NTFS permissions on the servers and shares that will host the DFS namespace folder targets.
3. In the DFS Management console, expand DFS Management, and then expand the Namespaces node to expose the existing namespaces and select the desired namespace. If the desired namespace does not appear, in the actions pane click the Add Namespaces to Display link and follow the steps to search for and add an existing namespace to the console view.
4. Select the desired existing namespace, and in the actions pane, click the New Folder link. For our example, use the CorpShares name space and create a folder named UserShares, which is already shared and hosted on two servers at E:UserShare. For this example, use two servers named FILESERVER1 and FILESERVER2.
5. When the New Folder window opens, type in the name of the folder and click the Add button to locate the folder targets.
6. After all the folder target servers have been added to the New Folder window, click OK to continue, as shown in Figure 27.12.
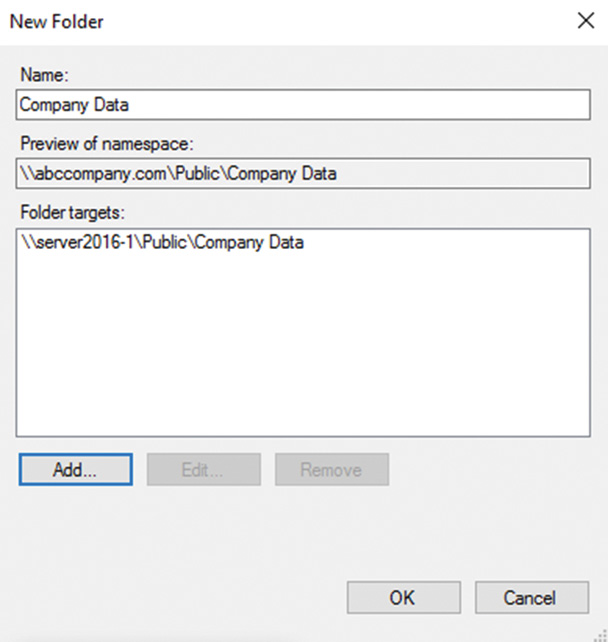
7. When a new folder is created and multiple targets are specified, a Replication pop-up window opens asking whether a replication group should be created. Click Yes to create a new replication group for the folder targets.
8. When the Replication Folder Wizard opens, on the Replication Group and Replicate Folder Name Window page, review the name of the proposed replication group and the replicated folder name, and click Next to continue. The prepopulated names will match the namespace folder path and folder names, as shown in Figure 27.13.

9. The Replication Eligibility page displays whether each of the folder targets are or aren’t capable of DFSR. If all targets are eligible, click Next to continue.
10. On the Primary Member page, click the Primary Member drop-down list arrow and select the folder target server that will be used to populate the remaining member folder targets. The data that exists in the folder of the primary target member will be replicated to each of the other targets. After selecting the desired primary server, click Next to continue.
11. On the Topology Selection page, select the desired replication topology. For this example, select the Full mesh radio button and click Next to continue.
12. On the Replication Group Schedule and Bandwidth page, select the desired bandwidth limitation or set the Hours Replication setting to Allowed, and click Next to continue.
13. On the Review Settings and Create Replication Group page, review the selections, and if everything looks correct, click Create.
14. On the Confirmation page, if the replication group creation tasks were all completed successfully, click Close. Otherwise, select the Errors tab and review and repair the errors, and rerun the Replication Group Creation Wizard. A Replication Delay pop-up window opens stating that replication will begin after replication is picked up by all members. Click OK to close this window and return to the DFS Management console.
15. Back in the DFS Management console, double-click the Replication node to reveal the new replication group and select it.
16. In the Tasks pane, select the Connections tab to review the connections created from the previous steps.
Configuring the Staging Folder Size
When a DFSR group server replicates large amounts of data or large files, increasing the size of the staging folder may be required to optimize replication. To adjust the staging folder size in a replication group, follow these steps:
1. Open the DFS Management console, double-click the Replication node to reveal the desired replication group and select it.
2. In the Tasks pane, select the Membership tab to list the replicated folders.
3. Expand the desired replication folder to reveal the member servers. Right-click one member and select Properties.
4. Select the Staging tab and update the staging path and quota as desired. The default path is within the members shared folder. After the changes are updated, click OK to save the settings, as shown in Figure 27.14.
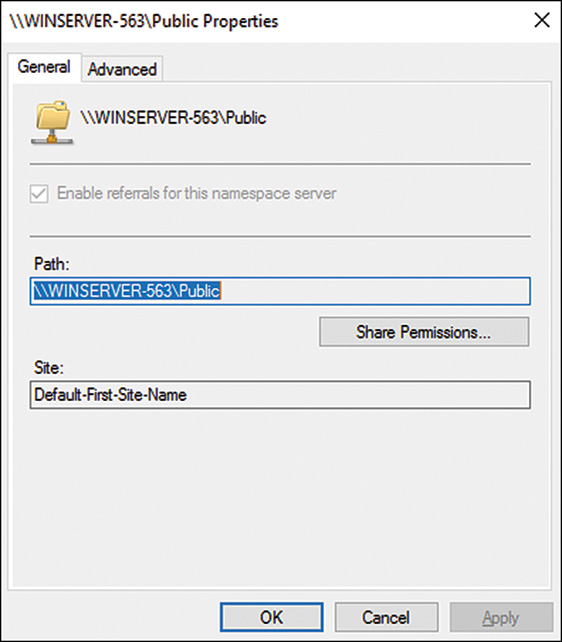
5. Back in the DFS Management console, right-click each of the other member servers in the replicated folder group and adjust the staging folder quota to match the first server.
Enabling Access-Based Enumeration on a Domain-Based Namespace in Windows Server 2008 Mode
When a domain-based namespace is created and Windows 2008 mode is enabled, access-based enumeration can be enabled, but it is not by default. To enable access-based enumeration on a domain-based namespace in Windows Server 2008 mode, locate the namespace in DFS Management. Right-click the namespace and select Properties. Select the Advanced tab and check the checkbox at the bottom of the Enable Access-Based Enumeration for this Namespace window, and then click OK to complete the change. One thing to keep in mind is that this applies to the entire namespace and any and all folders and folder targets defined in the namespace.
Disabling Replication for Extended Downtime
When a server containing a replicated folder target will be offline for an extended period of time, for upgrades or due to unexpected network downtime, removing that server’s targets from all replication groups is recommended. Doing this relieves the available replica servers from having to build and store change orders and staging files for this offline server. Because the staging folder has a quota limit, an offline server might cause the active server’s staging folders to reach their limit, essentially shutting down all replication.
When the server is again available, the administrator can add this server back to the list of targets and configure replication. The data will be moved to the preexisting folder where it can be compared with file IDs sent over on the change orders from the initial master. If the file ID is the same, it will be pulled from the preexisting folder instead of across the WAN to reduce network traffic.
Using the Volume Shadow Copy Service
The Windows Server 2016 Volume Shadow Copy Service (VSS) is a feature available for NT File System (NTFS) and Resilient File System (reFS) volumes. VSS is used to perform a point-in-time backup of an entire volume to the local disk. This backup can be used to quickly restore data that was deleted from the volume locally or through a network-mapped drive or network file share. VSS is also used by Windows Server Backup and by compatible third-party backup applications to back up local and shared NTFS volumes.
Using VSS and Windows Server Backup
When the Windows Server Backup program runs a backup of a local NTFS volume, VSS is used by default to create a snapshot or shadow copy of the volume’s current data. This data is saved to the same or another local volume or disk. The Backup program then uses the shadow copy to back up data, leaving the disk free to support users and the operating system. When the backup is complete, the shadow copy is automatically deleted from the local disk. For more information about VSS and Windows Server Backup, see to Chapters 29 and 30, “Backing Up the Windows Server 2016 Environment,” and “Recovering from a Disaster,” respectively. One important point is that for VSS backups to work properly, shadow copies should be enabled on every volume and enough free space should exist to store the shadow copies. Even if the schedule is set to once a year, enabling shadow copies on the volume enables shadow copies with the Volume Shadow Copy provider and reduces VSS errors on backups.
Configuring Shadow Copies
Enabling shadow copies for a volume can be very simple. Administrators have more options when it comes to recovering lost or deleted data and, in many cases, can entirely avoid restoring data to disk from a backup tape device or tape library. In addition, select users can be given the necessary rights to restore files that they’ve accidentally deleted.
From a performance standpoint, it is best to configure shadow copies on the same volume as recommended by Microsoft and required to be compliant for certain VSS backup support scenarios. The VSS is already installed and is automatically available using NTFS-formatted volumes.
To enable and configure shadow copies, follow these steps:
1. Log on to the Windows Server 2016 system with an account with administrator privileges.
2. Open Windows Explorer from the taskbar.
3. Navigate to the Computer node to list all local volumes/drives. Right-click any NTFS drive and select properties.
4. Select the Shadow Copies tab, and in the Select a Volume section, click the desired volume, and click the Settings button, or you can also simply right-click the volume and select the Shadow Copies option.
5. The Settings page allows you to choose an alternate volume to store the shadow copies. Select the default of storing the shadow copies on the same volume and set the storage space limit for the volume. The default is usually set to 10 percent of the volume size, accepting the defaults is recommended.
6. After the location and maximum size are configured, click the Schedule button and define the schedule. The defaults create a shadow copy at 7:00 a.m. and 12:00 p.m., but for this example, set up an additional shadow copy to run at 5:00 p.m., as shown in Figure 27.15.

7. Click OK to close the Schedule window and click OK again to close the Volume Shadow Copy Settings window. The shadow copy for the originally selected volume is now enabled.
8. If necessary, select the next volume and enable shadow copies; otherwise, click the Create Now button to create the initial shadow copy.
9. If necessary, select the next volume and immediately create a shadow copy by clicking the Create Now button.
10. After the shadow copies are created, click OK to close the disk volume window and close the Windows Explorer window.
For more detailed information concerning the VSS and how to recover data using previously created volume shadow copies, see Chapters 29 and 30, “Backing Up the Windows Server 2016 Environment,” and “Recovering from a Disaster,” respectively.
Recovering Data Using Shadow Copies
The server administrator or a standard user who has been granted permissions can recover data using previously created shadow copies. The files stored in the shadow copy cannot be accessed directly, but they can be accessed by connecting the volume that has had a shadow copy created.
To recover data from a file share, follow these steps:
1. Log on to a Windows Server 2016 system or Windows XP SP1 or later workstation with either administrator rights or with a user account that has permissions to restore the files from the shadow copy.
2. Click Start and select Run or type in the server and share name in the Search pane (for example, \ servername sharename, where servername represents the NetBIOS or fully qualified domain name of the server hosting the file share). The share must exist on a volume in which a shadow copy has already been created.
3. When the folder opens, right-click the folder that contains the data that will be restored and select Properties
4. When the window opens, if necessary, select the Previous Versions tab, and select the desired folder version and click the Open button.
5. An Explorer window then opens, displaying the contents of the folder when the shadow copy was made. If you want to restore only a single file, locate the file, right-click it, and select Copy.
6. Open the server share location the restored file will be placed in, right-click, and choose Paste. Overwrite the file as required and close all the windows as desired.
Configuring Data Deduplication
The Data Deduplication service removes duplicate data stored on file server storage. It can perform this task by breaking down file and folder storage into chunks and then identifying duplicate chunks and replacing duplicates with pointers and retaining only a single copy of that chunk. To get a detailed overview of how this process actually works, review the online Microsoft Technical information about data deduplication.
Before attempting to leverage data deduplication, administrators should run the evaluation tool to determine whether there is a benefit to enabling deduplication on the data volume. Deduplication is not available for the system volume. To check the impact of data deduplication, the administrator can run the Data Deduplication Savings Evaluation Tool as follows:
1. Open and command prompt on a Windows Server 2016 system with the Data Deduplication service installed.
2. Browse to C:WindowsSystem32. Type the command DDPEval.exe and press Enter. The tool loads, as shown in Figure 27.16.
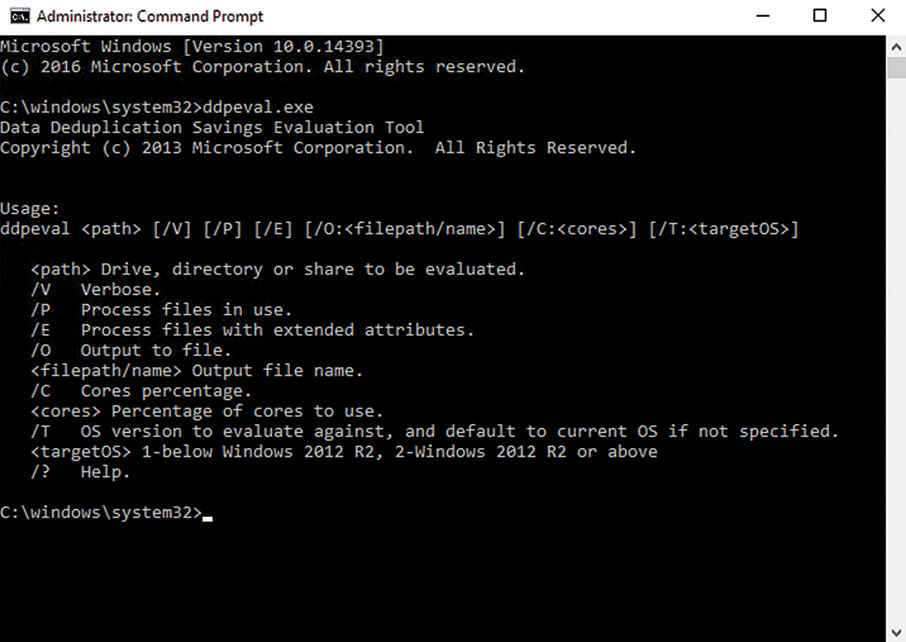
3. For this example, examine the E:GroupShareIT folder. Type the command DDPEval.exe e:GroupShareIT and press Enter When the process completes, the calculated results display in the window.
NOTE
Even though the DDPEval.exe tool can examine individual folders, data deduplication can only be enabled at a volume level.
To enable data deduplication on a desired data volume, follow these steps:
1. Log on to the Windows Server 2016 system with the Data Deduplication service installed and open Server Manager.
2. In the tree pane, click the File and Storage Services link, and when that opens, click Volumes on the left.
3. In the Volumes pane, right-click the desired volume and select Configure Data Deduplication.
4. Check the Enable Data Deduplication checkbox.
5. Adjust the Duplicate Files Older Than (In Days) Setting as desired. This setting ensures that new files that may be changing regularly are not modified until they have been stored on the system for a reasonable duration. The default is 30 days.
6. Add in any necessary file extension exclusions and add any excluded folders.
7. Click the Set Deduplication schedule button. Enable Background Optimization is the default and provides the least amount of server performance impact. Select the Enable Throughput Optimization to set a hard schedule, such as after-hours or weekends, to keep tighter controls on when deduplication processing occurs. Click OK to close the Deduplication Schedule window, and click OK again to close the Deduplication Settings window.
8. After deduplication processing occurs, right-click the volume and select Properties to reveal the deduplication settings.
Dynamic Access Control
A new feature for Windows Server 2016 is Dynamic Access Control (DAC). DAC is an entirely new way to control access to file share data. Whereas share permissions and NTFS permissions manage share, folder, and file access by referencing the user account and security group membership, DAC extends that functionality by adding in an additional layer of security. This layer includes, as one example, comparing additional user attribute values with folder classification property values, and then granting or denying access based on central access policies and their associated policy rules. To provide an illustration of this, consider the following example.
Jamil and Colby are both in the Human Resources department of a global organization. Jamil is located in the Brazil office, and Colby is located in the United States office. To meet some Human Resources compliance requirements, Human Resources departmental data from the United States should not be accessible to department members in other countries. Traditionally this would be accomplished by creating several security groups, managing the membership of these groups, and appropriately securing the folder data with NTFS permissions based on these groups. An example of the security groups could be as follows:
![]() Human Resources Global—This group would contain all the country-specific security groups and no users.
Human Resources Global—This group would contain all the country-specific security groups and no users.
![]() Human Resources United States—This group would contain the specific U.S. Human Resource departmental employees.
Human Resources United States—This group would contain the specific U.S. Human Resource departmental employees.
![]() Human Resources Brazil—This group would contain the specific Brazil Human Resource departmental employees.
Human Resources Brazil—This group would contain the specific Brazil Human Resource departmental employees.
When data storage for the Human Resources department is created, it needs to be designated and secured as available for the global department or specifically for each country’s department. This can be challenging, and it periodically involves IT support to configure the permissions appropriately, but the Human Resource users, or content owners, may be able to identify and group this data more easily.
Now enters DAC and folder classification properties. For the previously cited scenario, the following chapter sections detail the configuration of a sample Active Directory DAC infrastructure to restrict access to a shared folder to users with the Human Resources department in the United States. Instead of security groups, the actual user attributes are used to evaluate and grant/deny access to the data. This DAC sample scenario requires that the domain controllers, file servers, and clients are all running Windows Server 2016 and Windows 10. The following processes include steps that build the DAC infrastructure from the bottom up, specifically for this scenario, but these same steps can be updated to meet many different scenarios.
1. Creating DAC claim types—A claim is simply a stated condition supported with a matching attribute value. An example is that the user Colby is in the Human Resources department in the United States. This claim is supported by the configured attributes in Colby’s user account matching the values stated in the claim for the Department and Country attribute.
2. Configuring DAC resource properties—The resource properties that we configure and enable will be made available to define folder classification properties. These resource property values will be used to compare against the user claims to control access to the data in the folder.
3. Adding configured resource properties to a Resource Property list—File servers only download Resource Property lists and not individual resource properties. The list allows for the grouping and segmentation of only the desired resource properties required for the classification design.
4. Creating a central access rule—The central access rule defines the criteria for allowing or denying access to DAC secured data.
5. Creating a central access policy—A central access policy can contain one or many central access rules and will be applied or assigned to file servers as a single unit using group policies.
6. Creating and assigning a central access policy GPO to file servers—This step involves creating a new Group Policy object, configuring that object, and then applying the policy to designated Windows Server 2016 file servers.
7. Enabling Kerberos armoring for domain controllers—This step involves updating the domain controller Kerberos configuration to include DAC information when generating Kerberos tickets for users and computers.
8. Creating and updating a file share to Leverage Dynamic Access Control—This step involves updating the security configuration of a file server’s shared folder to support the classification data and criteria desired by the organization.
9. Configuring user accounts and testing data access—This step involves configuring the user account and testing access to the DAC secured folder.
Creating DAC Claim Types
At the heart of the DAC infrastructure are the claims that will be made available to present options for folder classification and processing access requests. To create a new DAC claim type, follow these steps:
1. Log on to a Windows Server 2016 domain controller with an account in the Domain Admins and Enterprise Admins security groups.
2. Open Server Manager, click Tools, and open the Active Directory Administrative Center console.
3. When the console opens, in the tree pane on the left, click Dynamic Access Control, and in the center pane, double-click Claim Types.
4. In the Tasks pane, click New Claim Type.
5. When the Create Claim Type window opens, scroll down in the Source Attribute list and locate the source attribute with the display name of C, which is the Country field. Select this source attribute, and in the Display Name field in the top-right corner type in Country, and then click OK in the bottom-right corner, as shown in Figure 27.17.
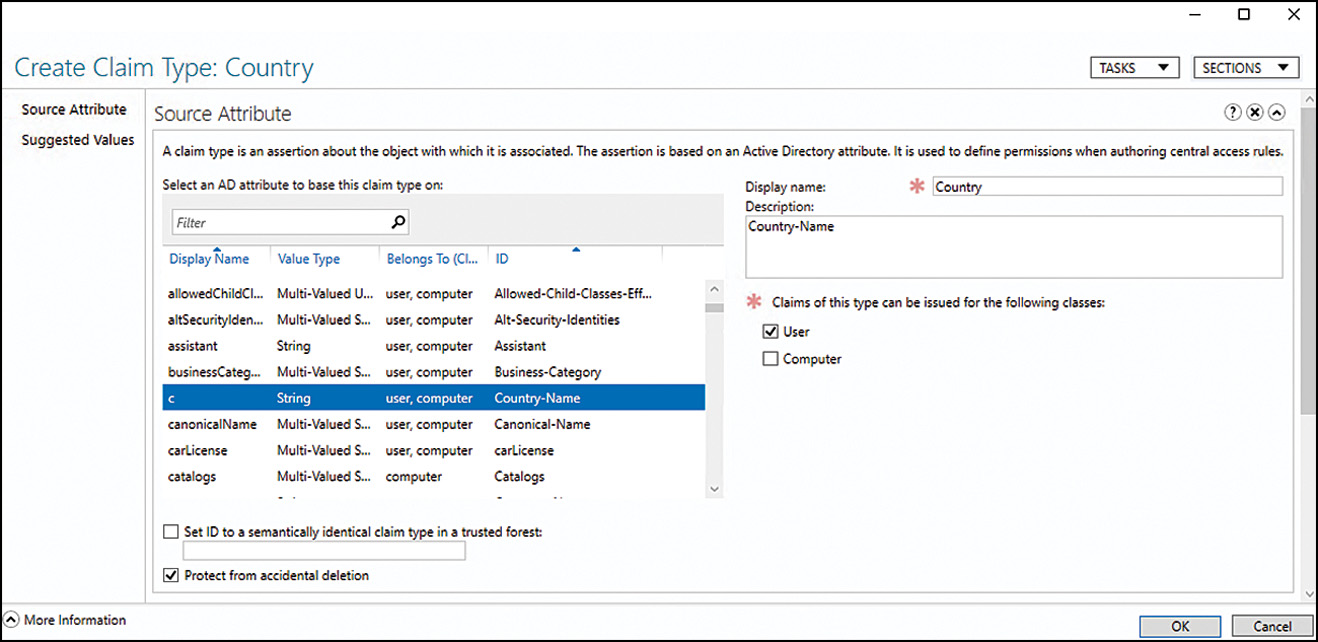
6. Back in the Claim Type window, click New Claim Type to create another. When the Create Claim Type window opens, scroll down in the Source Attribute list and locate the source attribute with the display name of Department, and select this attribute. In the Display Name field, in the top-right corner, change the name to Department, and then click OK in the bottom-right corner to create the claim type.
Configuring DAC Resource Properties
After the two claim types are created, we can define the resource properties that will be compared to the user claims to allow or deny DAC secured data access. To configure the resource properties, follow these steps:
1. Log on to a Windows Server 2016 domain controller with an account in the Domain Admins and Enterprise Admins security groups.
2. Open Server Manager, click Tools, and open the Active Directory Administrative Center console.
3. When the console opens, in the tree pane on the left, click Dynamic Access Control, and in the center pane, double-click Resource Properties.
4. Unlike the claim types, Windows Server 2016 Active Directory already includes several predefined resource properties. Existing resource properties can be used or modified, and new properties can also be created. In the Resource Properties pane, scroll down and select the property with the ID of Department_MS, and then in the Tasks pane in the top right of the window, click the Enable link, as shown in Figure 27.18.

5. The Department_MS resource type has been pre-created by Microsoft, hence the trailing _MS, and this resource has existing values. Click the Properties link in the Tasks pane to review the existing list of Departmental values. If the organization leverages different departments, they can be added into the Suggested Values section of the resource property, or existing values can be edited. Click Cancel to close the Department_MS resource property.
6. Back in the Resource Property window, in the Tasks pane, click New Resource Property, as shown in Figure 27.19.
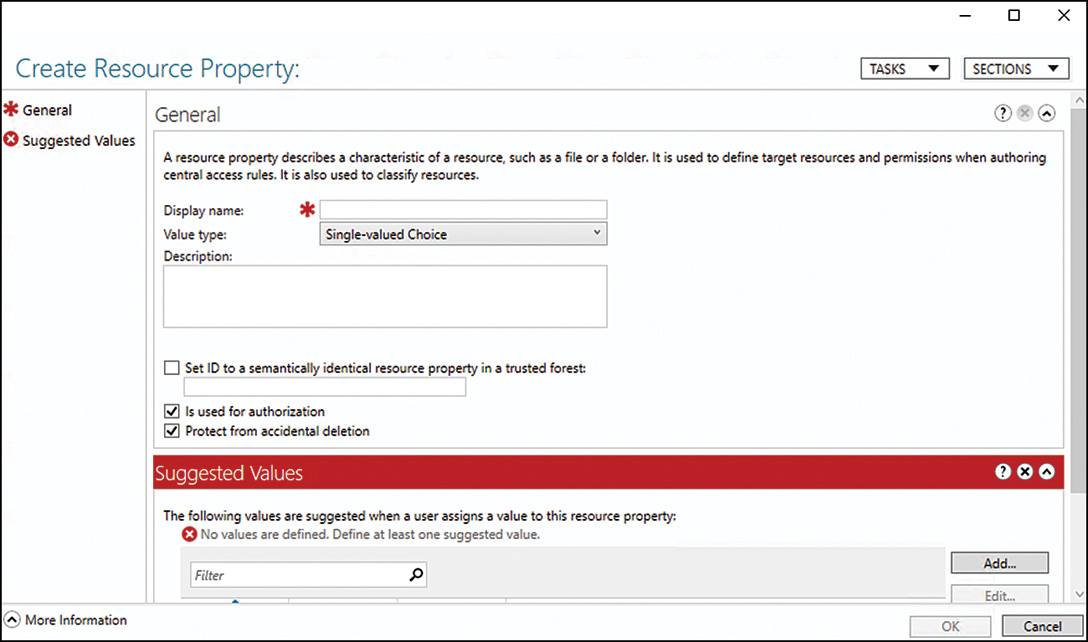
7. When the Create Resource Property window opens, type Country in the Display Name field and in the lower Suggested Values section, and then click the Add button.
8. When the Add Suggested Value window opens, type US in the Value and Display Name fields and click OK. Click Add again, and create another value with BR in the Value and Display Name fields, and then click OK to return to the Create Resource Property window.
9. Back in the Create Resource Property window, click OK to create the resource property, as shown in Figure 27.20.
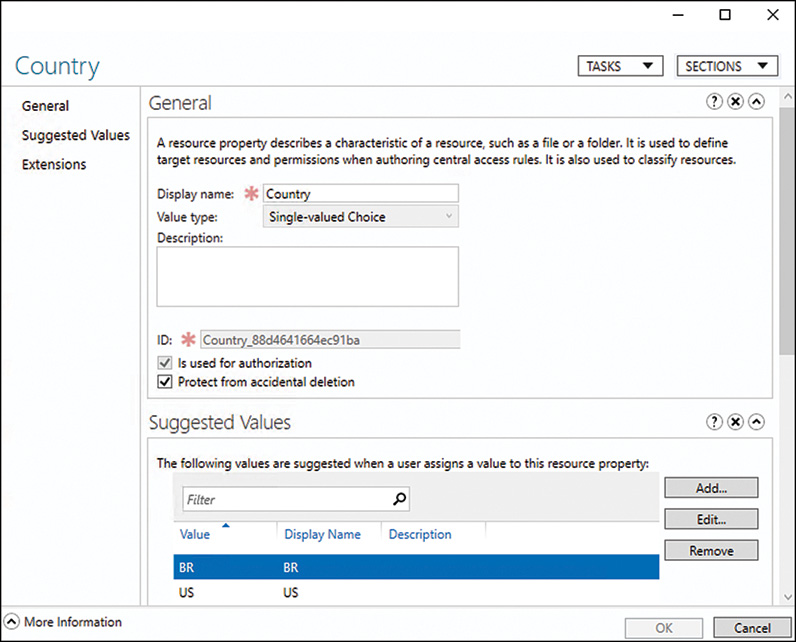
10. Back in the Resource Properties window, select the new Country resource property and verify that it is enabled, which it should be by default after creation.
Adding Configured Resource Properties to a Resource Property List
After the necessary resource properties are enabled, edited, or created, as outlined in the previous section, the properties can be added to a Resource Property list. To add the desired resource properties to a list, follow these steps:
1. Open the Active Directory Administrative Center console, and in tree pane on the left, click Dynamic Access Control, and in the center pane, double-click Resource Property List.
2. In the Resource Property List pane, one list already exists by default. This is the Global Resource Property List, and it contains all the resource properties defined in Active Directory, including the new Country resource property.
3. At this stage, a new Resource Property list can be created and the Department and Country resource properties can be added to the list. For this example, we leverage the Global Resource Property List, and we don’t create a new one.
Creating a Central Access Rule
A central access Rule defines the criteria the user claims must meet to access the DAC secured data on the file server. To create a new central access rule, follow these steps:
1. Open the Active Directory Administrative Center console, and in the tree pane on the left, click Dynamic Access Control, and in the center pane, double-click Central Access Rules.
2. In the Tasks pane, click New Central Access Rule.
3. In the Create Central Access Rule window, type in a name, such as HR -USCentralAccessRule, but do not click OK yet.
4. In the Target Resources section, click the Edit button and in the pop-up window click the Add a Condition link near the bottom left. Create a condition where the Country resource property is equal to US, but do not click OK yet.
5. Click the Add a Condition link again and add another condition where the Department resource property is equal to Human Resources, as shown in Figure 27.21. When completed, confirm that the conditions are joined with an AND condition expression, meaning that both conditions must be met for the rule to true. Click OK to close the pop-up condition window and return to the Central Access Rule window.
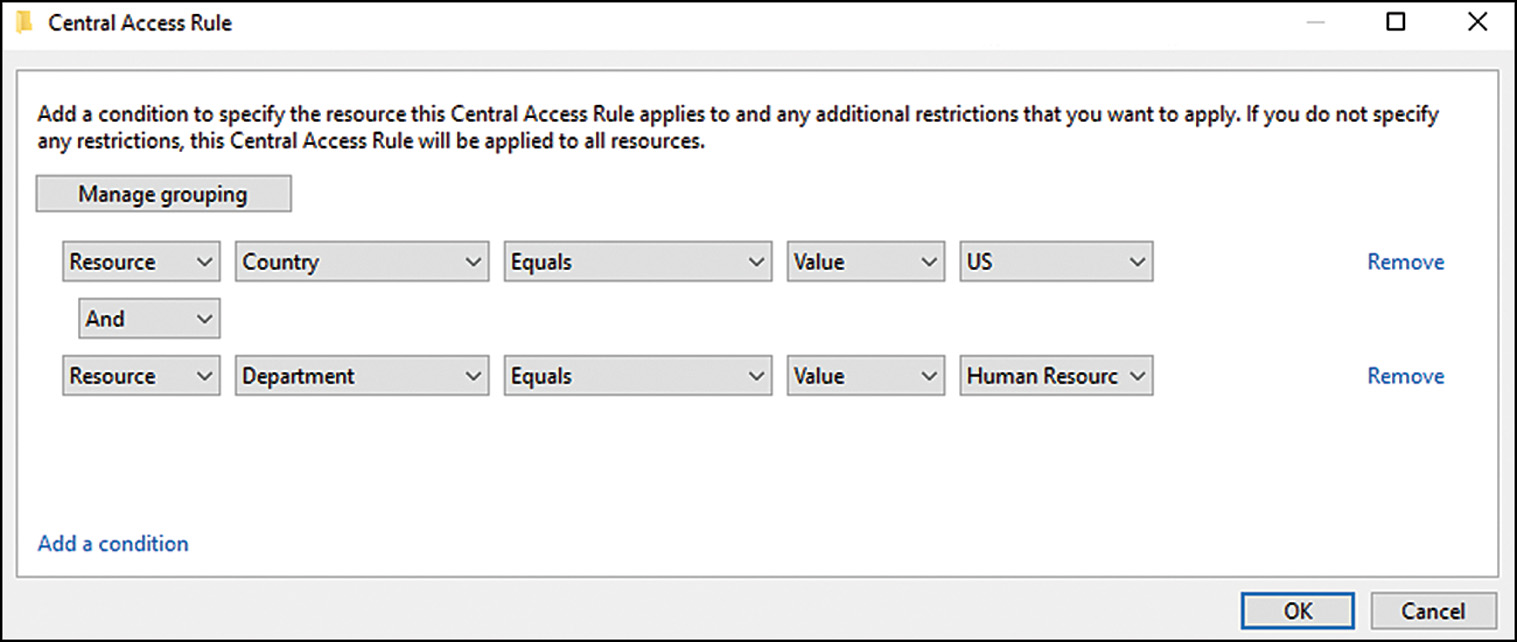
6. Back in the Central Access Rule window, in the Permissions section, there are two radio buttons. The top button, Use the Following Permissions as Proposed Permissions, enables the rule as an auditing-only rule. Select the second radio button labeled Use the Following Permission as Current Permissions and then click OK to save the new rule, as shown in Figure 27.21.
Creating a Central Access Policy
After the rule is created, it can be added to a central access policy as follows:
1. Open the Active Directory Administrative Center console, and in the tree pane on the left, click Dynamic Access Control, and in the center pane, double-click Central Access Policies.
2. In the Tasks pane, click New Central Access Policy.
3. In the Create Central Access Policy window, type in a name for the policy, such as DAC Central Access Policy, but do not click OK yet.
4. In the Member Central Access Rules section, click Add on the right. In the Add Central Access Rules pop-up window, double-click the previously created rule to add it, and then click OK to return to the Central Access Policy window. Click OK again to close the policy window.
At this stage, the DAC infrastructure configuration has been completed, and we can proceed to configuring the file servers and the domain controller to support DAC.
Creating and Assigning a Central Access Policy GPO to File Servers
To allow file servers to leverage the DAC infrastructure, a few tasks need to be performed. One requirement is that the desired file servers are running Windows Server 2016 and the File Server Resource Manager file role service has already been installed. The service installation is covered earlier in this chapter. Another requirement is that the file server is configured to use a central access policy. This can be performed by creating and assigning a group policy to delivers the required settings, as outlined in the following steps:
1. Log on to a Windows Server 2016 domain controller with an account in the Domain Admins group.
2. Open Server Manager, click Tools, and open the Group Policy Management Console.
3. In the GPMC, expand the Forest and Domains node to reveal the desired domain and the Group Policy objects container within.
4. Select the Group Policy Objects container and create a new GPO named DACFileServerGPO.
5. After the new GPO is created, select it, and in the Security Filtering section, remove the Authenticated Users security group and add in the desired file server computer objects (for our example, file server FILESERVER1 and FILESERVER2).
6. When the Security Filtering is configured properly, right-click the GPO and open it for editing.
7. In the Group Policy Management Editor window, navigate to Computer ConfigurationPoliciesWindows SettingsSecurity SettingsFile System, and then click the Central Access Policy node.
8. Right-click the Central Access Policy node and select Manage Central Access Policies. When the Central Access Policies window opens, the previously created policy should be listed. Double-click the policy to move it from the Available Policies to the Application Policies section of the window, as shown in Figure 28.32, and then click OK.
9. The central access policy previously created should now be listed in the right-hand pane of the GPO. Close the Group Policy Management Editor window.
10. When the policy has been defined, link the new policy to the OU that contains the desired file servers, or link the policy to the domain because the security filtering is configured to only include the desired file servers.
After this policy has been created and linked, the desired file server should be forced to update group policy, or the administrators should give ample time for background policy processing to run so this new policy can be applied.
Enabling Kerberos Armoring for Domain Controllers
The next step is to configure the domain controllers to include DAC information in the Kerberos authentication tickets that are granted to users for data access and authorization. The basis for DAC is Kerberos authentication and authorization, and DAC will not function if organizations’ Active Directory infrastructures rely on third-party Kerberos realm trusts or NTLM as the primary authentication and authorization systems. To enable DAC functionality for Kerberos, known as Kerberos armoring, on the organization’s domain controllers, all domain controllers will require this change.
This change will be applied to all domain controllers by creating a new GPO and linking it to the domain controllers Organizational Unit. To enable Kerberos armoring on all the domain controllers, follow these steps:
1. Log on to a Windows Server 2016 domain controller with an account in the Domain Admins group.
2. Open Server Manager, click Tools, and open the Group Policy Management Console.
3. In the GPMC, expand the Forest and Domains node to reveal the desired domain and the Group Policy Objects container within.
4. Select the Group Policy Objects container, create a new GPO named KerberosArmoringGPO and open it for editing.
5. In the Group Policy Management Editor window, navigate to the Computer ConfigurationPoliciesAdministrative TemplatesSystemKDC node and open the Support Dynamic Access Control and Kerberos Armoring setting.
6. Select the Enabled radio button, and in the Options leave the default option of Supported and then click OK to save the setting changes. Then close the Group Policy Management Editor window.
7. After the policy setting has been updated and the policy has been closed, back in the GPMC window and link the new GPO to the Domain Controllers OU.
8. Navigate to the Domain Controllers OU, right-click the OU, and select Group Policy Update. Then, click Yes in the confirmation window to kick off Group Policy processing on all the domain controllers. Close the results window and close the GPMC.
Creating and Updating a File Share to Leverage Dynamic Access Control
Now the only remaining configuration steps include configuring the data on the file servers themselves. To configure a shared folder on a file server to leverage DAC, follow these steps:
1. Log on to a Windows Server 2016 file server that has the FSRM file role service installed and the previously created Central Access Policy GPO applied to it. Make sure the logon account is a domain user and is a member of the local administrators group on the file server.
2. Open the desired NTFS volume, and as an example, on the F drive create a root folder named DeptShare and share it with default share and NTFS permission to give administrators Full Control and Users Read/Write Access.
3. Create a subfolder name HR-US-DATA beneath the F:DeptShare folder. Right-click the new folder and select the Classification tab.
4. On the Classification tab, if group policy processing has already occurred, the resource properties previously assigned to the central access rule should be listed. Select the Country property in the top of the window, and in the Value section below, select US. Select the Department property, and in the Value section, select Human Resources, and then click Apply.
The previous four steps assigned the property values to the folder. Now we configure the security settings of the folder to force uses to match their claims to the folder’s classification properties, as follows:
1. On the same folder that was previously configured, open the properties of the folder and select the Security tab and click the Advanced button.
2. Select the Central Policy tab and click the Change link. Pull down the Central Policy menu and select the DAC Central Policy that was previously created, and the rule is listed below.
This completes the file server configuration steps. Repeat these steps on any other folders and on additional file servers as required.
Configuring User Accounts and Testing Data Access
After the file servers are configured, the user accounts need to be configured. For our example, we had a user name Colby in the Human Resources department in the United States, and a user named Jamil in the Human Resource department in Brazil. To configure the user account attributes to enable the user claims to match the folder resource properties and the rules, follow these steps:
1. Log on to a Windows Server 2016 domain controller with an account in the Domain Admins and Enterprise Admins security groups.
2. Open Server Manager, click Tools, and open the Active Directory Administrative Center console.
3. In the tree pane, click Global Search, and in the Search pane, type in the username and press Enter (for this example, we search for Colby).
4. When the user is located, double-click the user to open the user account property pages.
5. Add in the desired value for the department attribute and pull down and select the desired country and click OK. Repeat this process for other users.
6. Log on to a Windows Server 2016 or a Windows 10 system with the user account and try to access the DAC secured data to verify that users with the correct matching attributes can access the data, and that those not matching are denied.
One important point to note with the previously outlined scenario and solution is that the department value is a string that needs to match exactly, and using attributes like this can become problematic if the data is entered manually. Also, certain user contact attributes can be edited by the end user. So, when configured central access rules are going to compare resource properties against user claims based on attributes, ensure that the user attributes selected are not editable by the end users themselves.
Summary
Windows Server 2016 file services give administrators several options when it comes to building fault-tolerant servers, configuring data storage, and securing access to data. Through services such as the Volume Shadow Copy Service, deleted or overwritten files can be restored automatically or by an administrator without restoring from backup. Using services such as the Distributed File System and Distributed File System Replication, administrators have more flexibility when it comes to deploying, securing, and providing high-availability file services. Through the new Storage Spaces feature, administrators have a lot of flexibility with building and expanding fault-tolerant virtual disks. Through the Data Deduplication service, administrators can maximize storage usage by removing duplicate data. And finally, with this first release of Dynamic Access Control, administrators and organizations can easily add in additional layers of security to control access to sensitive data. Using just one or a combination of these file system services, organizations can truly make their file systems optimized, fault tolerant, easy to recover, very scalable, and tightly secured.
![]() Use the Volume Shadow Copy Service to provide file recoverability and data fault tolerance to minimize the number of times you have to restore from backup.
Use the Volume Shadow Copy Service to provide file recoverability and data fault tolerance to minimize the number of times you have to restore from backup.
![]() Try to provide disk fault tolerance for your operating system and data drives, preferably using hardware-based RAID sets, through the use of Windows fault-tolerant volumes or by deploying resilient mirrored or parity virtual disks on storage pools that include multiple physical disks.
Try to provide disk fault tolerance for your operating system and data drives, preferably using hardware-based RAID sets, through the use of Windows fault-tolerant volumes or by deploying resilient mirrored or parity virtual disks on storage pools that include multiple physical disks.
![]() Use NTFS or reFS on all volumes to enable additional file system functionality and security. Only use NTFS on system drives and on drives that leverage file classification and Dynamic Access Control.
Use NTFS or reFS on all volumes to enable additional file system functionality and security. Only use NTFS on system drives and on drives that leverage file classification and Dynamic Access Control.
![]() Always define share permissions for every share regardless of the volume format type.
Always define share permissions for every share regardless of the volume format type.
![]() Replace the Everyone group with the Domain Users group when shares are created on domain servers and anonymous or guest access is not required, and set the share permissions accordingly.
Replace the Everyone group with the Domain Users group when shares are created on domain servers and anonymous or guest access is not required, and set the share permissions accordingly.
![]() Use domain-based DFS roots whenever possible.
Use domain-based DFS roots whenever possible.
![]() Use DFS to provide a unified namespace to file data.
Use DFS to provide a unified namespace to file data.
![]() Use Window Server 2008 mode on domain-based namespaces to enable access-based enumeration and more scalability.
Use Window Server 2008 mode on domain-based namespaces to enable access-based enumeration and more scalability.
![]() Start with an empty DFS root folder to keep from having to replicate any data at the root level, and do not create any replication groups based on the namespace root folder.
Start with an empty DFS root folder to keep from having to replicate any data at the root level, and do not create any replication groups based on the namespace root folder.
![]() When deploying domain-based DFS namespace, add additional namespace servers for redundancy.
When deploying domain-based DFS namespace, add additional namespace servers for redundancy.
![]() Replicate DFS data only during off-peak hours to reduce network congestion or restrict replication with bandwidth constraints if WAN links are heavily used during business hours.
Replicate DFS data only during off-peak hours to reduce network congestion or restrict replication with bandwidth constraints if WAN links are heavily used during business hours.
![]() Back up at least one DFS folder target, and configure the backup to not update the archive bit to avoid possible unnecessary replication.
Back up at least one DFS folder target, and configure the backup to not update the archive bit to avoid possible unnecessary replication.
![]() Test antivirus programs thoroughly to ensure that no adverse effects are caused by the scanning of files on a replicated DFS folder target.
Test antivirus programs thoroughly to ensure that no adverse effects are caused by the scanning of files on a replicated DFS folder target.
![]() Verify that the drive containing the staging folder for a replication connection contains ample space to accept the amount of replicated data inbound and outbound to this server and adjust the staging folder quote for each replication group as required.
Verify that the drive containing the staging folder for a replication connection contains ample space to accept the amount of replicated data inbound and outbound to this server and adjust the staging folder quote for each replication group as required.
![]() When creating virtual disks within storage pools, create resilient disks by selecting either a mirror or parity disk layout.
When creating virtual disks within storage pools, create resilient disks by selecting either a mirror or parity disk layout.
![]() If user claims based on attributes will be used to compare against resource properties assigned to folder classifications, ensure that the user attributes selected are not editable by the end users themselves.
If user claims based on attributes will be used to compare against resource properties assigned to folder classifications, ensure that the user attributes selected are not editable by the end users themselves.