CHAPTER 25
Group Policy Management for Network Clients
IN THIS CHAPTER
![]() Planning Workgroup and Standalone Local Group Policy Configuration
Planning Workgroup and Standalone Local Group Policy Configuration
![]() Planning Domain Group Policy Objects
Planning Domain Group Policy Objects
![]() Managing Computers with Domain Policies
Managing Computers with Domain Policies
![]() Configuring Preference Item-Level Targeting
Configuring Preference Item-Level Targeting
![]() Managing Active Directory with Policies
Managing Active Directory with Policies
The management and configuration of Windows Server 2016, Windows 10, and some legacy Windows systems can be simplified and standardized with the use of group policies. Microsoft has added a number of new Group Policy settings to the operating system, but for the most part, the fundamentals of Group Policy, its applications, and the tools used to manage it remain unchanged. There is only one product in the Windows Server 2016 offering that is not managed with Group Policy, and that product is Nano Server. To configure and administer a Nano Server installation, see Chapter 36, “Containers.”
Group policies are designed to centralize the administration of Windows systems and the users who log on to these systems. Group Policy management is divided into two policy nodes: Computer Configuration and User Configuration. The settings contained in the Computer Configuration node can be used to configure Registry and file system permissions, define user password policies, restrict the use of removal media, change network configuration and firewall settings, manage system services, define and control power profiles, and much more. The User Configuration node contains settings that can manage desktop environment settings, including automatically enforcing a standard screensaver and lockout duration, installing printers, running logon scripts, adding shortcuts to desktops, redirecting user folders to a network share and configuring folder synchronization, securing down the desktop environment, and much more.
Windows systems can be managed individually with local group policies, and when the systems are members of Active Directory domains, they can also be managed using domain group policies. Local group policies and domain group policies are similar in function, but domain group policies provide additional functionality because many of the settings included within the group policy templates apply only to Active Directory domain members. One of the reasons many organizations deploy Active Directory domains is to leverage the capabilities of domain Group Policy Objects. Chapter 18, “Windows Server 2016 Group Policies and Policy Management,” details Group Policy infrastructure concepts and how to create, link, back up, and manage Group Policy Objects.
This chapter provides an overview and examples of how local and domain Group Policy Objects can be used to manage and configure Windows systems and users.
The Need for Group Policies
Many businesses today are challenged and short-staffed when it comes to managing the configuration and security of their information technology (IT) systems. For IT staff, managing the infrastructure involves standardizing and configuring application and security settings, keeping network resources readily available, and having the ability to effectively support end users. Providing a reliable computer and network infrastructure is also a key task for these administrators, and part of that requirement includes deploying reliable servers and end-user workstations.
Providing reliable servers and workstations often includes tuning the system settings, installing the latest security updates and bug fixes, and managing the end-user desktop. For small environments, performing these tasks manually can be effective, but in most cases, this can result in inconsistent configurations and an inefficient use of the technical staff member’s time.
Using group policies to control the configuration of computer and user settings and centrally managing these settings can help stabilize the overall computer network and greatly reduce the total number of hours required to manage the infrastructure. For example, if a network printer is replaced, the new printer can be deployed using Group Policy; the next time a user logs on, the printer can be automatically installed and the original can be automatically removed. Without Group Policy, each user desktop would need a visit to manually install and replace the printers.
Almost two decades ago, the bulk of computer and user configuration and management tasks were performed on a per-user and per-computer basis. Organizations that required higher efficiency had to hire specialized staff to develop and support standard desktop building and cloning procedures and had to create their own applications and scripts to perform many of the management functions that are now included with Windows Server 2016 and Windows 10 group policies. With more specialized technical staff members, the ratio of technical staff to end users commonly ranged from 5 to 8 technical resources for every 200 employees. Even at this ratio, however, when corporatewide changes were necessary, outside consultants and contractors were commonly brought onboard to provide expertise and extra manpower to develop custom applications or processes and to implement the necessary changes.
In many of today’s organizations, with the advancements in systems and end-user management, it is not uncommon to find organizations able to support an average of 100 to 250 users with 1 to 2 technical resources. This is only possible when desktop and end-user management policy and procedural standards are developed and group policies are leveraged to support these standards.
Windows Group Policies
Windows Server 2016 and Windows 10 provide several different types of policies that can be used to manage computer systems and user accounts. Depending on the security groups a user account is a member of, and whether or not the computer system is a member of an Active Directory domain or a Windows workgroup, the number of policy settings applicable will vary.
Local Computer Policy
Every Windows system contains a default local computer policy. The local computer policy is a Local Group Policy Object (LGPO). The local computer policy contains separate Computer and User Configuration nodes. The local computer policy applies configured settings only to the individual local computer system and to the users who log on. The local computer policy on a new system is blank except for the default settings defined within the Computer ConfigurationWindows SettingsSecurity Settings policy node. The Security Settings policy node is also the local security policy.
Local Security Policy
The local security policy of a system contains the only configured policy settings on newly deployed Windows systems. Settings such as user rights assignments, password policies, Windows Firewall with advanced security settings, and system security settings are managed and configurable within the local security policy. Furthermore, the local security policy can be exported from one system as a single text file and imported to other systems to simplify security configuration in workgroup environments and to customize security for new system deployments.
Local Administrators and Non-Administrators User Policies
Windows Server 2016 and Windows 10 support multiple local group policies for user accounts. If any settings are configured in the User Configuration node of the local computer policy, the settings are applied to all users who log on to the system, including the local Administrators group. In earlier versions of Windows, if the local computer policy restricted an administrator from performing a specific function, the policy would need to be changed and reapplied before the administrator could perform the function. Starting with Windows Vista and Windows Server 2008, including continued support in Windows 10 and Windows Server 2016, additional user-only policies can be created to provide override settings either to further restrict or to reduce security so that the particular user may perform their tasks. As an example, if the local computer policy setting was enabled to restrict read and write access to removal disks, no users would be able to access externally connected disks or thumb drives. This is a great setting to maintain both system and data security. If an Administrators local group policy was created, this same setting could be set to Disabled, and any administrator would be able to connect and read and write to external drives.
For local administrators, the Administrators local group policy can be configured as stated previously. In addition, separate local user policies can be created for the Non-Administrator users. If the system has local user accounts, specific local user policies can be created for each user. This allows for a very granular assignment of rights and functionality for systems that use local accounts but require specific configurations and security settings on a per-user basis.
By default, users logging on to Windows Server 2008 or to Windows Vista and later operating systems will apply the local computer policy, followed by either the Administrators or Non-Administrators policy and any specific local user policy. To clarify how multiple policies will be processed, using the previous example, the local computer policy could be configured to restrict read and write access to all removable media for all users and the Administrators local user policy that allows read and write access to removable storage. Because the Administrators local user policy is applied after the local computer policy, only administrators will be able to write to removable storage media.
Domain Group Policies
Domain group policies are very similar to local group policies, but many additional settings are included and these policies are managed and applied within an Active Directory environment. For clarification, documentation might refer to local policies as Local Group Policy Objects and group policies as domain-based policies. For the remainder of this chapter, they will be referred to as local policies and domain policies.
Local policies are very close to domain policies, but there are several key differences. Domain policies are managed using the Group Policy Management Editor, which allows administrators to view all available settings or to filter out only configured settings when managing a policy. Many settings that only apply to a domain environment are still available in a local policy but when configured will not function if the computer is not a member of an Active Directory domain. One of the biggest differences between domain and local group policies is the separation of settings into the Policies and Preferences nodes, which is detailed later in this chapter in the “Policies and Preferences” section.
Security Configuration Wizard
Windows Server 2016 contains a tool called the Security Configuration Wizard (SCW). The SCW contains different templates that can be applied to systems that meet specific criteria.
For example, on a system running only the Windows Server 2016 File Services role, when examined and secured by the SCW, a File Server role template is applied that configures the firewall, disables unnecessary services, and tunes the system to provide access to the necessary functions of the File Services role but not much else. The SCW should be used only when properly tested because the security changes can impact functionality if incorrect settings are applied to a system. Also, it is highly recommended to configure the server to be 100-percent ready for production then run the security configuration wizard to perform the final lock down. Alternatively, the SCW can be used to create the necessary security template, which can then be exported, and later imported into a domain policy and applied to the necessary servers that match the appropriate configuration. Finally, if the SCW is used as a standard, it must be run again if the roles and services of a system are changed, to ensure continued and proper functionality. Additional information about how to use the Security Configuration Wizard is detailed in Chapter 12, “Server-Level Security.”
Policy Processing Overview
When a Windows system contains multiple local policies or is a member of an Active Directory domain, more than one policy will be processed when the computer boots or when a user logs on. Each policy that applies to the particular computer or user is processed sequentially and it is important to understand the policy processing order. In cases where multiple policies have the same settings configured, but with different values, the resulting setting value will match the last policy processed.
Policy Processing for Computers
Policy settings are applied to computers during computer startup, shutdown, and background refresh intervals. Policy processing for computer objects is performed in the following order:
1. Local computer policy
2. Domain policies linked to the Active Directory site
3. Domain policies linked to the Active Directory domain
4. Domain policies linked to the organizational unit hierarchy in which the computer account is located
Policy Processing for Users
Policy settings are applied to users during user logon, logoff, and background refresh intervals. Policy processing for domain and local users is performed in the following order:
1. Local computer policy
2. Local Non-Administrators policy, or local Administrators policy if these policies exist
3. Local user-specific policy; this applies only if the user is a local user account and a policy exists for the user
4. Domain policies linked to the Active Directory site
5. Domain policies linked to the Active Directory domain
6. Domain policies linked to the organizational unit hierarchy in which the user account is located
Group Policy Order of Processing
When multiple policies are linked to a single Active Directory site, domain, or organizational unit, each policy is applied sequentially. The order of policy application or processing is based on the policy link order. The policy link with the number “1” associated to the policy name is the last policy applied at the container and, therefore, it takes precedence in the policy link order of processing.
Loopback Processing
When a user is processing domain policies, the policies that apply to that user are based on the location of the user object in the Active Directory hierarchy. The same goes for domain policy application for computers. There are situations, however, when administrators or organizations want to ensure that all users get the same policy when logging on to a particular computer or server. For example, on a computer that is used for training or on a Remote Desktop Session Host, when the user desktop environment must be the same for each user, this can be controlled by enabling loopback processing.
There are two different loopback configurations: replace and merge mode. Merge mode apply the user-based policies that normally apply to the user account as well as the user-based policies on the container that contains the computer account the user is logging on to. Replace mode only processes user policies applied to the computer the user is logging on to.
Group Policy Feature Set
The Group Policy Feature Set is the collection of all the available settings within a group policy. The available policy settings are created from the basic policy template, which includes the general hierarchy, the local security policy, and the default administrative templates stored in the local file system. The administrative templates that present their settings within a policy are referenced from the files stored in the c:windowspolicydefinitions folder or in the Active Directory domain central store.
The policy settings available within a particular policy or all policies can be extended by importing additional administrative templates. This can be accomplished either by simply adding the correct ADMX and ADML files to the PolicyDefinitions folder on the local system or in the central store, or by importing a legacy administrative template file with the ADM extension into a particular policy.
By default, the Windows Server 2016 group policies administrative templates contain almost 2,000 settings in the Computer Configuration node and more than 1,600 in the User Configuration node. Many more settings in the Windows Settings nodes and the Preferences node extend this number dramatically. This, of course, makes detailing each of the settings a very inconvenient and lengthy process. Instead of covering every setting, then, this section and many of the following sections in this chapter highlight the types of settings available that might be the most common and useful settings for managing Windows environments.
Many of the policy settings contained in both the Computer and User Configuration policy nodes apply only to specific Windows Server 2016 role services such as the Encrypting File System (EFS), Remote Desktop Services (RDS), Network Access Protection (NAP), or the Distributed File System (DFS) role services. For these particular services, as with any Group Policy settings, it is very important that the administrator understands the potential impact of configuring these settings. Before any production group policies are created, modified, or linked, the policy should be tested in an isolated environment and a rollback plan should be created and also tested. For more information about how to plan for Group Policy deployment, see Chapter 19, “Windows Server 2016 Management and Maintenance Practices.”
Computer Configuration Policy Node
The Computer Configuration node of a group policy contains settings designed to configure and manage a Windows system. Many of the settings found in this node also exist in the User Configuration node, and when both settings are configured, different outcomes will result. In some cases, computer policy settings will always be used even if the user configuration policy setting is configured as well. In other cases, the last policy setting applied will be used. For example, in a local group policy, within each node under Administrative TemplatesSystemScripts is a setting named Run Logon Scripts Synchronously, and if this setting is configured in the Computer Configuration section, it will be enforced regardless of how the setting is configured in the User Configuration policy node.
At the root of the Computer Configuration node are three policy nodes: the Software Settings node, the Windows Settings node, and the Administrative Templates node. In domain group policies, these three nodes are located beneath the Computer ConfigurationPolicies node.
Computer Configuration Software Settings Node
The Software Settings node is used to add software application packages to the computers that process the particular policy. Prepackaged or custom Windows Installer MSI software packages can be added to this Software Settings node and used to automatically install software on the computer during the next reboot cycle. This is known as an assigned software package.
Computer Configuration Windows Settings Node
The Windows Settings node provides administrators with the ability to manage the overall security and configuration of the Windows system. The settings contained beneath the Windows Settings node can be used to define how local and domain users can interact and manage the system and how the system will communicate across the network. The five nodes contained within the Windows Settings node are as follows:
![]() Name Resolution Policy—This node allows Group Policy administrators to create rules to build the content of the Name Resolution Policy Table to support DNSSEC implementations and to configure Windows Server 2016 Direct Access DNS Settings centrally.
Name Resolution Policy—This node allows Group Policy administrators to create rules to build the content of the Name Resolution Policy Table to support DNSSEC implementations and to configure Windows Server 2016 Direct Access DNS Settings centrally.
![]() Scripts (Startup/Shutdown)—The Scripts node allows administrators to add startup or shutdown scripts to computer objects.
Scripts (Startup/Shutdown)—The Scripts node allows administrators to add startup or shutdown scripts to computer objects.
![]() Deployed Printers—This node allows administrators to automatically install and remove printers on the Windows systems. Using the Group Policy Object Editor on Windows Server 2008 or Windows Server 2016 systems, this node might not appear unless the Print Management console is also installed.
Deployed Printers—This node allows administrators to automatically install and remove printers on the Windows systems. Using the Group Policy Object Editor on Windows Server 2008 or Windows Server 2016 systems, this node might not appear unless the Print Management console is also installed.
![]() Security Settings—This node is a replica of the local security policy although it does not sync or pull information from the local security policy. The settings in this node can be used to define password policies, audit policies, software restrictions, services configuration, Registry and file permissions, and much more.
Security Settings—This node is a replica of the local security policy although it does not sync or pull information from the local security policy. The settings in this node can be used to define password policies, audit policies, software restrictions, services configuration, Registry and file permissions, and much more.
![]() Policy-Based QoS—The Policy-Based QoS node can be configured to manage, restrict, and prioritize outbound network traffic between a source Windows system and a destination host based on an application, source, or destination IP address or source and destination protocols and ports.
Policy-Based QoS—The Policy-Based QoS node can be configured to manage, restrict, and prioritize outbound network traffic between a source Windows system and a destination host based on an application, source, or destination IP address or source and destination protocols and ports.
Security Settings
The Security Settings node allows a security administrator to configure security levels assigned to a domain or local Group Policy Object. This can be performed manually or by importing an existing security template.
The Security Settings node of the Group Policy Object can be used to configure several security-related settings, including file system NTFS permissions and many more settings contained in the nodes beneath Security Settings, as follows:
![]() Account Policies—These computer security settings control password policy, lockout policy, and Kerberos policy in Windows Server 2000 through Windows Server 2016 Active Directory domains.
Account Policies—These computer security settings control password policy, lockout policy, and Kerberos policy in Windows Server 2000 through Windows Server 2016 Active Directory domains.
![]() Local Policies—These security settings control audit policy, user rights assignment, and security options, including setting the default User Account Control settings for systems the policy applies to.
Local Policies—These security settings control audit policy, user rights assignment, and security options, including setting the default User Account Control settings for systems the policy applies to.
![]() Event Log—This setting controls security settings and the size of the event logs for the application, security, and system event logs.
Event Log—This setting controls security settings and the size of the event logs for the application, security, and system event logs.
![]() Restricted Groups—These settings allow the administrator to manage local or domain group membership from within this policy node. Restricted group settings can be used to add members to an existing group without removing any existing members or it can enforce and overwrite membership based on the policy configuration.
Restricted Groups—These settings allow the administrator to manage local or domain group membership from within this policy node. Restricted group settings can be used to add members to an existing group without removing any existing members or it can enforce and overwrite membership based on the policy configuration.
![]() System Services—These settings can be used to control the startup mode of a service and to define the permissions to manage the service configuration or state. Configuring these settings does not start or stop any services, but the state will be changed upon Group Policy application.
System Services—These settings can be used to control the startup mode of a service and to define the permissions to manage the service configuration or state. Configuring these settings does not start or stop any services, but the state will be changed upon Group Policy application.
![]() Registry—This setting is used to configure the security permissions of defined Registry keys and, if desired, all subkeys and values. This setting is useful in supporting legacy applications that require specific Registry key access that is not normally allowed for standard user accounts.
Registry—This setting is used to configure the security permissions of defined Registry keys and, if desired, all subkeys and values. This setting is useful in supporting legacy applications that require specific Registry key access that is not normally allowed for standard user accounts.
![]() File System—This setting is used to configure NTFS permissions on specified folders on NTFS formatted drives. Also, enabling auditing and configuring folder ownership and propagating these settings to subfolders and files is an option.
File System—This setting is used to configure NTFS permissions on specified folders on NTFS formatted drives. Also, enabling auditing and configuring folder ownership and propagating these settings to subfolders and files is an option.
![]() Wired Network (IEEE 802.3) Policies—This policy node can be used to configure additional security on wired network adapters to allow for or require smart card or computer-based certificate authentication and encryption.
Wired Network (IEEE 802.3) Policies—This policy node can be used to configure additional security on wired network adapters to allow for or require smart card or computer-based certificate authentication and encryption.
![]() Windows Firewall with Advanced Security—This policy node enables administrators to configure the Windows Firewall on Windows Vista, and Windows 2008 and later operating systems. The configured settings can configure specific inbound or outbound rules and can define how the firewall is configured based on the firewall profile. The configuration can overwrite the local firewall rules or the group policy and local rules can be merged.
Windows Firewall with Advanced Security—This policy node enables administrators to configure the Windows Firewall on Windows Vista, and Windows 2008 and later operating systems. The configured settings can configure specific inbound or outbound rules and can define how the firewall is configured based on the firewall profile. The configuration can overwrite the local firewall rules or the group policy and local rules can be merged.
![]() Network List Manager Policies—Windows Firewall on Windows Vista, and Windows Server 2008, and later operating systems use firewall profiles based on the network. This setting node can be used to define the permissions end users have regarding the identification and classification of a new network as public or private to allow for the proper firewall profile to be applied.
Network List Manager Policies—Windows Firewall on Windows Vista, and Windows Server 2008, and later operating systems use firewall profiles based on the network. This setting node can be used to define the permissions end users have regarding the identification and classification of a new network as public or private to allow for the proper firewall profile to be applied.
![]() Wireless Network (IEEE 802.11) Policies—These policies help in the configuration settings for a wide range of devices that access the network over wireless technologies, including predefining the preferred wireless network, including the service set identifier (SSID) and the security type for the network. This node includes Windows Vista and Windows XP compatible policies.
Wireless Network (IEEE 802.11) Policies—These policies help in the configuration settings for a wide range of devices that access the network over wireless technologies, including predefining the preferred wireless network, including the service set identifier (SSID) and the security type for the network. This node includes Windows Vista and Windows XP compatible policies.
![]() Public Key Policies—These settings are used to specify that computers automatically submit a certificate request to an enterprise certification authority and install the issued certificate. Public Key Policies are also created and are used in the distribution of the certificate trust list. Public Key Policies can establish common trusted root certification authorities. EFS settings use this policy node, as well.
Public Key Policies—These settings are used to specify that computers automatically submit a certificate request to an enterprise certification authority and install the issued certificate. Public Key Policies are also created and are used in the distribution of the certificate trust list. Public Key Policies can establish common trusted root certification authorities. EFS settings use this policy node, as well.
![]() Software Restriction Policies—These policies enable an administrator to control the applications that are allowed to run on the Windows system based on the file properties and not the filename. In addition, software restrictions can be created based on certificates or the particular network zone from which the application is being accessed or executed. For example, a rule can be created to block application installations from the Internet zone as defined by Microsoft Internet Explorer.
Software Restriction Policies—These policies enable an administrator to control the applications that are allowed to run on the Windows system based on the file properties and not the filename. In addition, software restrictions can be created based on certificates or the particular network zone from which the application is being accessed or executed. For example, a rule can be created to block application installations from the Internet zone as defined by Microsoft Internet Explorer.
![]() Network Access Protection—This setting can be used to deploy the configuration of the NAP client.
Network Access Protection—This setting can be used to deploy the configuration of the NAP client.
![]() Application Control Policies—This node enables Group Policy administrators to create rules that define which security groups or specific users can run executables, scripts or Windows Installer files and can also be used to granularly define which file paths, filenames, and digitally signed publishers of files will be allowed or denied on the computers these policy settings apply to.
Application Control Policies—This node enables Group Policy administrators to create rules that define which security groups or specific users can run executables, scripts or Windows Installer files and can also be used to granularly define which file paths, filenames, and digitally signed publishers of files will be allowed or denied on the computers these policy settings apply to.
![]() IP Security Policies on Active Directory—IP Security (IPsec) policies can be applied to the GPO of an Active Directory object to define when and where IPsec communication is allowed or required.
IP Security Policies on Active Directory—IP Security (IPsec) policies can be applied to the GPO of an Active Directory object to define when and where IPsec communication is allowed or required.
![]() Advanced Audit Policy Configuration—This node can be used to define more detailed and granular audit settings for use on Windows Server 2016 and Windows 10 systems.
Advanced Audit Policy Configuration—This node can be used to define more detailed and granular audit settings for use on Windows Server 2016 and Windows 10 systems.
Computer Configuration Administrative Templates Node
The Computer Configuration Administrative Templates node contains all the Registry-based policy settings that apply to the Windows system. These settings are primarily used to control, configure, and secure how the Windows system is set up and how it can be used. This is not the same as the security settings configuration where specific users or groups are granted rights because the configuration settings available within the administrative templates apply to the system and all users who access the system. Many settings, however, are not applied to users who are members of the local administrators group of a system.
User Configuration Policy Node
The User Configuration node contains settings used to configure and manage the user desktop environment on a Windows system. Unlike the computer configuration settings that define system settings and restrict what users can do on a particular system, the user configuration settings can customize the desktop experience for a user, including setting Start menu options, hiding or disabling Control Panel applets, redirecting folders to network shares, restricting write access to removable media, and much more. At the root of the User Configuration node are three policy nodes named the Software Settings node, the Windows Settings node, and the Administrative Templates node, but the settings contained within these nodes are different from the settings included in the Computer Configuration node, and in a domain group policy, these nodes are located beneath the User ConfigurationPolicies ode.
User Configuration Software Settings Node
The Software Settings node in the User Configuration section of a policy allows administrators to publish or assign software applications to individual users to which the policy applies. When a packaged software application is assigned to a user, it can be configured to be installed automatically at user logon or it can just be available in the Control Panel Programs applet for installation by the user the same as when it is published. When a packaged application is published to a user, it can be installed by that user by accessing the application in the following section of the Control Panel:
![]() Windows Server 2016—Control Panel, Get Programs
Windows Server 2016—Control Panel, Get Programs
![]() Windows Vista—Control Panel, Programs, Get Programs, and Features
Windows Vista—Control Panel, Programs, Get Programs, and Features
![]() Windows 7—Control Panel, Programs, Get Programs
Windows 7—Control Panel, Programs, Get Programs
![]() Windows 8/10—Control Panel, Programs, Get Programs
Windows 8/10—Control Panel, Programs, Get Programs
![]() Windows XP—Control Panel, Add or Remove Programs, Add New Programs
Windows XP—Control Panel, Add or Remove Programs, Add New Programs
User Configuration Windows Settings Node
The Windows Settings node in the User Configuration section of a policy allows administrators to configure logon scripts for users, configure folder redirection of user profile folders, define software restriction policies, automatically install and, if necessary, remove printers.
User Configuration Administrative Templates Node
User Configuration Administrative Templates are the most commonly configured policy settings in domain group policy deployments. Settings contained within the User Configuration Administrative Templates node can be used to assist administrators with the automated configuration of a user’s desktop environment. Of course, now with domain Group Policy preferences, many of these newly available settings will also be highly used when Group Policy administrators begin to explore and find the best ways to use preference settings.
Planning Workgroup and Standalone Local Group Policy Configuration
Many organizations deploy Windows servers and workstations in workgroup configurations and for these organizations, local group policies can play a vital role in simplifying Windows system administration. Some of the benefits of leveraging local group policies in workgroup deployments include the following:
![]() Standardizing workgroup and image deployments—Define the base local computer, Administrators, and Non-Administrators local policies on a machine that will be used as a template for a desktop or server image to reduce security exposure, improve standardization, and reduce user error when many systems are deployed.
Standardizing workgroup and image deployments—Define the base local computer, Administrators, and Non-Administrators local policies on a machine that will be used as a template for a desktop or server image to reduce security exposure, improve standardization, and reduce user error when many systems are deployed.
![]() Standardizing User Configuration settings—The User Configuration section of the local computer policy can be configured to install specific printers for users, customize the Start menu and display settings, predefine settings for Windows programs such as Remote Desktop Connection, and much more. For the most part, however, the settings are standardized to give every user the same experience.
Standardizing User Configuration settings—The User Configuration section of the local computer policy can be configured to install specific printers for users, customize the Start menu and display settings, predefine settings for Windows programs such as Remote Desktop Connection, and much more. For the most part, however, the settings are standardized to give every user the same experience.
![]() Preconfiguring policies for shared or public Windows systems—Systems that are made available for public use or are utilized by several different users require more restrictive configurations to increase the security and reliability of the system. In these types of deployments, Windows administrators can configure tight security settings in the local computer policy, very restrictive settings in the Non-Administrators policy, and less-restrictive settings in the Administrators policy to allow for updates and management. Also, audit settings can be enabled to track logon/logoff, file and folder access, and much more.
Preconfiguring policies for shared or public Windows systems—Systems that are made available for public use or are utilized by several different users require more restrictive configurations to increase the security and reliability of the system. In these types of deployments, Windows administrators can configure tight security settings in the local computer policy, very restrictive settings in the Non-Administrators policy, and less-restrictive settings in the Administrators policy to allow for updates and management. Also, audit settings can be enabled to track logon/logoff, file and folder access, and much more.
![]() Preconfiguring security updates and remote administration settings—Windows systems that are deployed in workgroups can be difficult to remotely support and administer if the proper configurations are not created prior to deployment. Using the local computer policy, firewall rules can be created to allow for remote management, Remote Desktop can be enabled and enforced, and Windows Update settings can also be configured to enable automated security update installation and remote management options.
Preconfiguring security updates and remote administration settings—Windows systems that are deployed in workgroups can be difficult to remotely support and administer if the proper configurations are not created prior to deployment. Using the local computer policy, firewall rules can be created to allow for remote management, Remote Desktop can be enabled and enforced, and Windows Update settings can also be configured to enable automated security update installation and remote management options.
Creating Local Administrators and Non-Administrators Policies
When a Windows system is first deployed, only the local computer group policy is created. Local group policies for Administrators, Non-Administrators, and individual local users need to be manually created if they are to be utilized. The process of creating the Administrators or Non-Administrators policy must be performed from the local machine using the Group Policy Object Editor. In the following example, create a local group policy for the Administrators group. To create a local user group policy for administrators, follow these steps:
1. Log on to the Windows Server 2016 system with an account with administrator privileges.
2. Click the Windows icon in the lower-left corner of the GUI. Right-click and select Run. Type MMC in the Run Open text box; click OK and the Microsoft Management Console shows up.
3. When the Microsoft Management Console opens, click File on the menu bar, and select Add/Remove Snap-in.
4. In the Add or Remove Snap-ins window, scroll down the Available Snap-Ins pane on the left, select the Group Policy Object Editor, and click the Add button.
5. The Select Group Policy Object window opens and defaults to the local computer policy. Click the Browse button to choose a different policy.
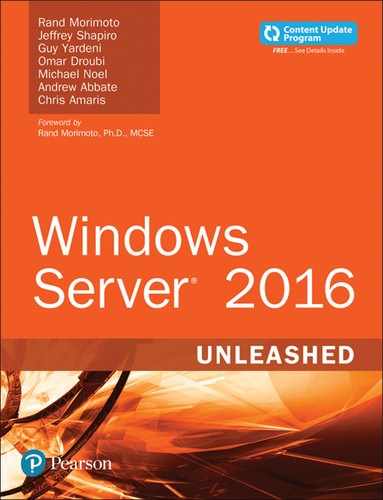
6. In the Browse for a Group Policy Object window, select the Users tab.
7. On the Users tab, each local user account is listed, as well as Administrators and Non-Administrators. Select Administrators and click OK, as shown in Figure 25.1.
8. Back in the Select Group Policy Object window, the Group Policy Object name should reflect Local ComputerAdministrators. If the name matches, click Finish to return to the Add or Remove Snap-Ins window.
9. In the Add or Remove Snap-Ins window, click OK to complete adding snap-ins to this console window.
10. In the MMC window, the Local ComputerAdministrators policy will be available for editing. Because this policy only applies to users in the Administrators group, only the User Configuration node is present.
Configure at least one setting in this policy to create it and close the MMC window when the configuration of the local user group policy for administrators is complete.
11. When prompted to save the console, click No and proceed to sign off (log off) of the server.
12. Log back on to the server with an account with local Administrator rights.
13. Click the Windows icon in the lower-left corner of the GUI. Right-click and select Search.
14. Type gpresult /h LGPO-Administrators.html into the Search text field and press Enter. The gpresult command with the /h option generates an HTML file that will be used to determine whether the local user group policy for administrators has been applied. This option is available only on all operating systems from Windows Vista and Windows Server 2008, but the tool can be run against remote systems with the proper permissions and firewall settings configured.
15. After gpresult completes, in the command prompt, type the name of the file created, in this example, LGPO-Administrators.html, and press Enter.
16. This launches Microsoft Edge. Notice that the browser might require permission to allow the ActiveX content to load. Click the Show Blocked Content button if presented.
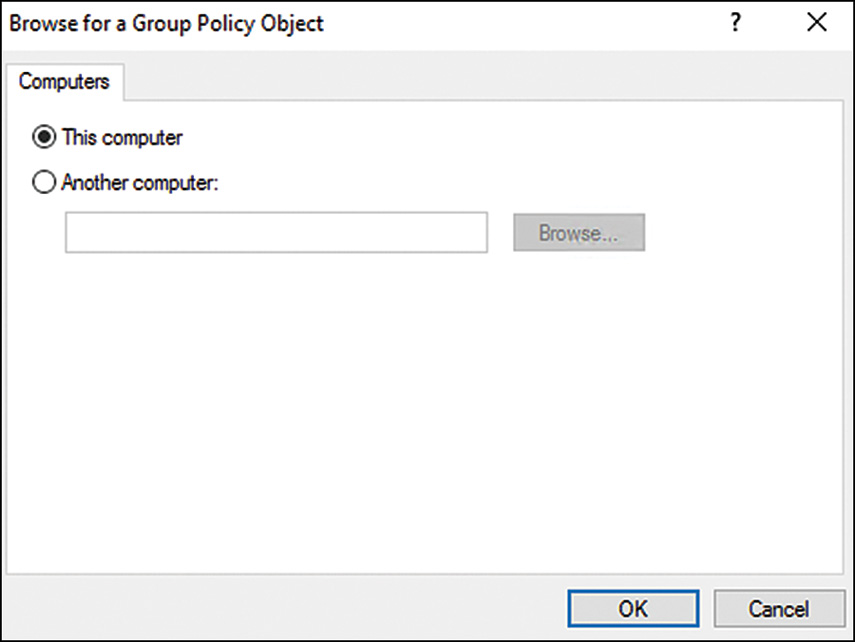
17. Scroll down to the User Configuration Summary section and click the Group Policy Objects link.
18. Click Applied GPOs and Denied GPOs to reveal which policies were applied to the user, as shown in Figure 25.2.
19. Review the HTML report; when finished, close Internet Explorer and log off.
The same procedure can be used to create local group policies for Non-Administrators or individual local user accounts.
Planning Domain Group Policy Objects
Group Policy Objects (GPOs) can be used to perform many functions across a diverse or standard computer and network infrastructure built on Microsoft Windows and Active Directory Domain Services (AD DS). Considering how to best utilize group policies to manage any one particular environment and deciding which GPO settings to leverage can be a lengthy process. To simplify this process and to keep from rethinking GPO usage each time, create a base set of GPOs and store them as starter GPOs.
A starter GPO is a feature of the Group Policy infrastructure that first became available with the release of the Windows Server 2008 Group Policy Management Console. A starter GPO can contain a set of Group Policy administrative template settings that have been preconfigured or defined to meet an organization’s security or configuration requirements. When a new GPO is created, a starter GPO can be leveraged to prepopulate the defined settings into the new GPO. The benefit is that each time a new GPO is needed, it does not have to be created from scratch and the administrator does not need to search for each of the settings that are necessary to meet the specific object of the new GPO. Windows Server 2016 provides several starter GPOs for Windows XP and Windows Vista systems that have been created to provide preconfigured security settings to meet the best practice recommendations outlined in the Windows Vista and Windows XP security guides. For more information about starter GPOs, see Chapter 19, “Windows Server 2016 Management and Maintenance Practices.” The remainder of this section outlines common scenarios for GPO usage to assist administrators with the planning, deployment, and configuration of GPOs across an organization’s Active Directory infrastructure.
Policies and Preferences
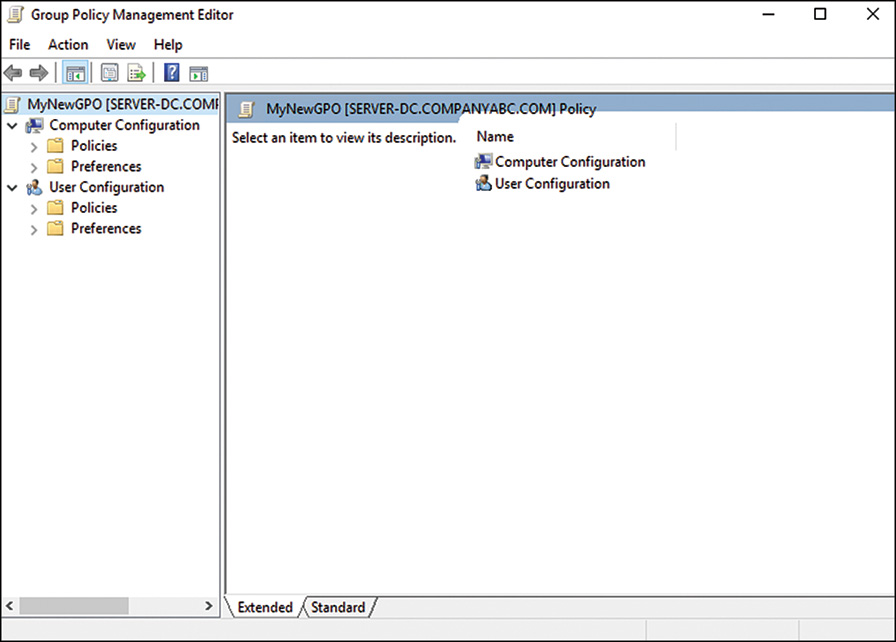
GPOs are segmented into policy settings and preference settings for both Computer and User objects, as shown in Figure 25.3. Preferences provide many of the features that the Group Policy infrastructure was lacking in earlier versions, and preferences also provide many functions that were commonly handled with complex logon and startup scripts, with Registry file import tasks, and by administrators configuring the default user profile on workstations and servers. Many preference settings, such as the Registry and Drive Maps settings, would have previously been applied with scripts that required the workstation to be logged on to or started up on the internal network. With preference settings in domain group policies, these settings can now be applied during the Group Policy refresh interval, which can greatly increase the successful application of these types of settings.
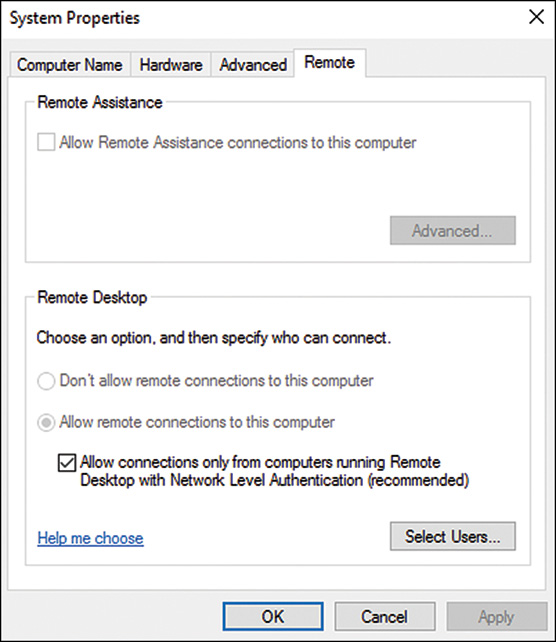
Policy settings and preference settings have different characteristics. Policy settings are enforced and all users are commonly restricted from changing any configured policy setting. If a policy setting contains a graphic interface, the setting, when configured, is normally grayed out to the end user for the policy-configured Remote Desktop settings, as shown in Figure 25.4. Policy settings such as software installations and computer or user scripts are only processed during computer startup or shutdown and user logon and logoff cycles.
Preference settings are applied to computers and users the same as policy settings: during startup, shutdown, and refresh cycles for computers and logon, logoff, and refresh cycles for users. Preferences settings, however, are configured but not enforced. As an example of this, using a user printer preference, a printer can be installed in a user profile and set to be the default printer, but the end user will still retain the ability to define a different default printer if necessary. Preference settings are applied during refresh intervals, but certain settings, such as creating Registry keys and values, might require a computer reboot or user logoff/logon cycle to actually apply the new setting. One important point to note is that the domain group policy preferences are supported on Windows 7, 8, Windows Server 2008, 2008 R2, and Windows Server 2016, but all other operating systems, including Windows Vista, need an update or the latest service pack to support preference settings.
Preference settings are all different, but they each share common administrative functionality. Each preference setting is presented in a graphic interface similar to, if not exactly the same as, what the end user can see and access within the user profile. This is one distinction between preference and policy settings, as most policy settings are enabled, disabled, or not configured whereas a preference setting can contain several configuration features. Furthermore, each preference setting can have multiple items defined within it, each with a separate configuration value. For example, a drive map preference can have a setting item of a mapped drive P and a mapped drive U defined within the single domain group policy preference setting.
In addition to the specific setting options that are unique to each preference, such as the drive letter designation for a map drive or a folder path to a network share preference, each setting also contains a set of common options, and many also include a preference action.
Preference Actions
Many preference settings contain an option called the preference action. Preference actions determine how a preference setting is applied to a user or computer. The most common preference actions are Create, Replace, Update, and Delete:
![]() Create—The Create action creates or configures the preference setting if the setting does not already exist. If the setting already exists, no action is taken.
Create—The Create action creates or configures the preference setting if the setting does not already exist. If the setting already exists, no action is taken.
![]() Replace—The Replace action deletes and recreates the setting on the computer or within the user profile.
Replace—The Replace action deletes and recreates the setting on the computer or within the user profile.
![]() Update—The Update action creates the setting if it does not exist, but if the setting already exists, part or all of the setting configurations are updated to match the preference setting. Update is the default action and is less intrusive than the Replace action. It can be used to ensure that the setting is configured as desired, but processing speed will be optimized because if the setting already matches it will be skipped.
Update—The Update action creates the setting if it does not exist, but if the setting already exists, part or all of the setting configurations are updated to match the preference setting. Update is the default action and is less intrusive than the Replace action. It can be used to ensure that the setting is configured as desired, but processing speed will be optimized because if the setting already matches it will be skipped.
![]() Delete—The Delete action simply deletes the preference setting from the computer or user profile. For example, a Delete action can remove a mapped drive, delete a Registry key, or delete a printer from a computer or a user profile.
Delete—The Delete action simply deletes the preference setting from the computer or user profile. For example, a Delete action can remove a mapped drive, delete a Registry key, or delete a printer from a computer or a user profile.
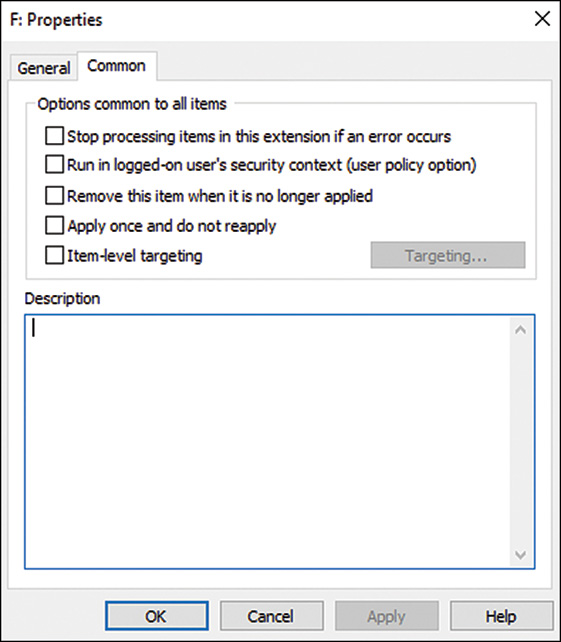
Preference Common Options
Each preference setting contains a common tab with several options that can be enabled for the particular setting. A list of the common options is shown in Figure 25.5. Common options include the ability to process the setting only once, which is great for setting default configurations for new user profiles or new preference settings on existing domain group policies.
Item-Level Targeting
One of the most functional preference common options is the item-level targeting option. Item-level targeting enables administrators to define the scope of application for a particular preference setting item such as a drive map. So with item-level targeting, an administrator can create a single domain group policy and define a single drive map preference that applies different preference setting items to subsets of computers or users based on the specifications of the item-level target. For example, a drive map preference that defined the G drive for a group-based network drive, can be configured to map \FileServer1GroupShareSales to members of the domain security group named sales, based on the item-level targeting option configuration settings for security groups. The same preference can also define the G drive to \FileServer1GroupShareHR for members of the domain Human Resources group based on a different configuration for item-level targeting.
Domain GPOs
When an Active Directory domain is deployed, a default domain policy and a default domain controller policy are created. The default domain policy defines the password and account policies for all domain user accounts and local user accounts for domain member servers and workstations. A few additional settings are also defined within the default domain policy regarding the EFS, Kerberos authentication, and a few other network-related security settings.
As a best practice, the only changes that should be made to the default domain policy should be modifying the password and account policy settings and nothing else. Additional settings that are required at the domain level should be defined in separate policies linked to the domain. The settings configured on domain-linked GPOs will be applied to all computer and user accounts in the domain, including all domain controllers. Settings configured at the domain level should be deployed as default settings and not as organizational standards. For example, as a domain default, the organization might want to configure all computers to enable Windows Update and get updates from the Windows Software Update Services (WSUS) at headquarters and to configure a few default firewall exceptions to allow for remote administration from the IT department. Common default settings applied at the domain level, but not in the default domain policy, include the following:
![]() Default screensaver settings
Default screensaver settings
![]() Default Windows Update settings
Default Windows Update settings
![]() Default firewall profile and rule configurations
Default firewall profile and rule configurations
![]() Default EFS settings and recovery agent
Default EFS settings and recovery agent
![]() Trusted root certification authorities
Trusted root certification authorities
![]() Certificate enrollment configurations
Certificate enrollment configurations
All Windows systems that are members of an Active Directory domain inherit the user password and account policies from the domain and apply this policy to local accounts on these systems. In some cases, it might be necessary to leverage local user accounts on systems with a less-restrictive password policy to support a particular service or application. This task can be accomplished by adding a GPO at the organizational unit that defines a less restrictive password and account lockout policy. This particular password and account lockout policy only applies to local user accounts on the computers contained within the linked organizational unit. Enforcing the default domain policy is the only thing that will break this configuration. For more information about domain policy enforcement, see Chapter 18, “Windows Server 2016 Group Policies and Policy Management.”
In situations when special or specific domain user accounts cannot adhere to the domain password policy, if the domain is operating in Windows Server 2008 or greater domain functional level, a fine-grained password policy can be created and applied to the necessary user accounts. Fine-grained password policies are detailed later in this chapter in the section “Fine-Grained Password Policies.”
Domain Controller GPOs
When an Active Directory domain is deployed, a default domain controller policy is created. This is different from the default domain policy in many ways, but the most prevalent distinction is that this policy is applied to the Domain Controllers organizational unit and not the entire domain. The default domain controller policy only applies to objects in this organizational unit, which should contain all of domain controllers of the specific domain, and no other objects.
The Domain Controllers organizational unit inherits all policies linked to the domain, and each domain controller also inherits any site-linked GPOs if any exist. These policies will be applied by the domain controllers, which might not be desirable. As a best practice, to avoid impacting domain controller security and reliability, try to limit the configuration settings defined within domain-linked policies or specifically deny the application of these group policies to the Enterprise Domain Controllers security group within each domain of the forest.
NOTE
Moving a domain controller out of the Domain Controllers organizational unit is not recommended because adverse effects could result, including compromising the security of the entire domain and breaking authentication and replication functionality.
The default domain controller policy defines user rights assignment settings for domain controller management as well as settings to control the security of network communication. Most organizations do not require any changes made to the default domain controller policy or any additional policies linked to the Domain Controllers organizational unit. Common settings applied at the domain controller organizational unit level can include the following:
![]() User rights assignment updates for domain controllers (commonly used for backup agent accounts)
User rights assignment updates for domain controllers (commonly used for backup agent accounts)
![]() Event Viewer settings
Event Viewer settings
![]() Audit settings for domain controllers
Audit settings for domain controllers
![]() Domain controller-specific Windows Update settings
Domain controller-specific Windows Update settings
![]() Remote administration settings for domain controllers
Remote administration settings for domain controllers
Active Directory Site GPOs
By default, no group policies are created for Active Directory sites. Policies linked to Active Directory sites will be applied to all computers that connect to the domain from the particular subnets associated with the site and, of course, the users who log on to these site associated computers. If computers are moved to new sites, these computers will pick up and process any policies linked to the new site and none from the original site. For example, if an Active Directory site is created for the virtual private network (VPN) network, when a computer is connected to the corporate network using the VPN, any policies linked to the VPN site will be applied to the computer.
Site policies can be a very effective way to simplify administration of mobile users, but if used incorrectly, site policies can cause a lot of issues. For example, using site policies to deploy printers can simplify end-user management for visiting employees. However, installing software for all computers in a site or enforcing networking settings might impact mobile computers if these settings are not overwritten or restored when the user and the system return back to the main office or disconnect from the corporate network. Site GPOs are not commonly used, but when they are, some of the common settings can include the following:
![]() Wireless and Wired Network Policies
Wireless and Wired Network Policies
![]() Deployed Printers (User Configuration)
Deployed Printers (User Configuration)
![]() Internet Explorer Proxy Configuration
Internet Explorer Proxy Configuration
Small Business
Many small businesses run Windows Server systems and Active Directory domains. Unless these businesses run an edition of Small Business Server, most small business Active Directory infrastructures do not effectively leverage local or domain group policies using the default configuration. Many of these Active Directory deployments are flat and all computers and users remain in the default containers and only apply the default domain policy. For small businesses with limited IT resources and budget, aside from updating the password and account lockout settings in the default domain policy, there are a few GPO settings that can enhance management and reliability. Please keep in mind that the following small business group policies are not recommended for Small Business Server (SBS) because SBS includes a number of preconfigured policies that provide some of the features included in the following policies and much more.
Group Policy management for small businesses should be kept simple. The following list of recommendations should be considered for small business Group Policy configurations:
![]() Review and, if necessary, adjust the password and account lockout policy in the default domain policy to match the requirements of the organization.
Review and, if necessary, adjust the password and account lockout policy in the default domain policy to match the requirements of the organization.
![]() Create a new policy named Company Computer Policy and disable the User Configuration section of this policy. Within this policy, configure Windows Update settings, deploy network printers, enable remote administration and configure firewall exceptions or rules to allow for proper communication between the servers and workstations on the network. If necessary, also configure Internet Explorer Security Zone settings. Link this policy to the domain.
Create a new policy named Company Computer Policy and disable the User Configuration section of this policy. Within this policy, configure Windows Update settings, deploy network printers, enable remote administration and configure firewall exceptions or rules to allow for proper communication between the servers and workstations on the network. If necessary, also configure Internet Explorer Security Zone settings. Link this policy to the domain.
![]() Create a new policy named Company User Policy and disable the Computer Configuration section of this policy. Within this policy, configure user mapped drives, default screensaver settings, and, if necessary, lock down the desktop, Start menu, and Control Panel. In some cases, folder redirection configuration would also be recommended, but this is an advanced configuration and might not be feasible for small businesses. Link this policy to the domain.
Create a new policy named Company User Policy and disable the Computer Configuration section of this policy. Within this policy, configure user mapped drives, default screensaver settings, and, if necessary, lock down the desktop, Start menu, and Control Panel. In some cases, folder redirection configuration would also be recommended, but this is an advanced configuration and might not be feasible for small businesses. Link this policy to the domain.
![]() Create a new policy named Company Domain Controller Policy and configure the Windows Update settings to download and notify the administrator when updates are ready. Many organizations configure Windows Update on workstations to autoinstall and auto-reboot, but on a domain controller (or any server for that matter), this might be risky. For a small business, allowing for auto-install and auto-reboot might present more of a risk than having a tech regularly perform a manual update task.
Create a new policy named Company Domain Controller Policy and configure the Windows Update settings to download and notify the administrator when updates are ready. Many organizations configure Windows Update on workstations to autoinstall and auto-reboot, but on a domain controller (or any server for that matter), this might be risky. For a small business, allowing for auto-install and auto-reboot might present more of a risk than having a tech regularly perform a manual update task.
Delegated Administration
Delegating administration to perform Active Directory functions is becoming a very common task in medium- and large-size organizations. Delegation tasks, such as allowing the telecom group to update telephone numbers for all Active Directory user accounts or allowing help desk staff to unlock user accounts and reset user passwords, are simple to implement using the Active Directory Users and Computers snap-in. To configure delegation of Active Directory objects such as user accounts, security and distribution groups, and computer objects, this task is not best handled with domain policies. Instead, these delegation tasks are handled by configuring security permissions at the domain level, organizational unit level, or on the particular object itself. One way to simplify or clarify this concept is to remember that if the task will be performed using the Active Directory Administrative Center console, this is delegated by configuring security permissions on a container or object. If the task would normally be performed by logging on to a computer and configuring settings or configuring the profile of a user or group of users, most functions related to this type of task can be performed using domain policies.
GPOs are, in fact, Active Directory objects, and delegating Group Policy administration rights is also performed by configuring security access on Active Directory containers, such as domains and organizational units. Group Policy management includes several tasks, which can be delegated in the following configurations:
![]() New domain group policy creation—This is performed by adding the user account or security group to the domain Group Policy Creator Owners security group or delegating this right using the Group Policy Management Console (GPMC) at the Group Policy Objects container. Although delegating this right allows the user to create new policies and GPO creation delegation allows the added user or group to create new GPOs, this user or group is not granted the right to edit settings or modify security on existing GPOs.
New domain group policy creation—This is performed by adding the user account or security group to the domain Group Policy Creator Owners security group or delegating this right using the Group Policy Management Console (GPMC) at the Group Policy Objects container. Although delegating this right allows the user to create new policies and GPO creation delegation allows the added user or group to create new GPOs, this user or group is not granted the right to edit settings or modify security on existing GPOs.
![]() Edit settings on an existing GPO—After a GPO is created, the right to edit that particular GPO can be delegated using the GPMC.
Edit settings on an existing GPO—After a GPO is created, the right to edit that particular GPO can be delegated using the GPMC.
![]() Edit settings, modify security, and delete a GPO—These tasks are delegated using the GPMC on a single GPO at a time. The Modify security right allows the designated user to change the security filtering, basically defining which users and computer objects will apply the policy if these objects are in containers linked to that particular GPO.
Edit settings, modify security, and delete a GPO—These tasks are delegated using the GPMC on a single GPO at a time. The Modify security right allows the designated user to change the security filtering, basically defining which users and computer objects will apply the policy if these objects are in containers linked to that particular GPO.
![]() Link existing GPOs—The ability to link GPOs to Active Directory containers is performed by editing the security settings on the particular Active Directory site, domain, or OU. This is known as the Manage Group Policy Links security right.
Link existing GPOs—The ability to link GPOs to Active Directory containers is performed by editing the security settings on the particular Active Directory site, domain, or OU. This is known as the Manage Group Policy Links security right.
![]() Create and edit WMI filters—The right to create new WMI filters or have full control over all WMI filters in a domain can be delegated at the WMI Filters container using the GPMC. Also, the right to edit or grant full control over an existing WMI filter can be delegated to a user or group. Delegating the right to edit or to grant full control does not enable linking WMI filters to GPOs as that requires edit rights permissions on a particular GPO.
Create and edit WMI filters—The right to create new WMI filters or have full control over all WMI filters in a domain can be delegated at the WMI Filters container using the GPMC. Also, the right to edit or grant full control over an existing WMI filter can be delegated to a user or group. Delegating the right to edit or to grant full control does not enable linking WMI filters to GPOs as that requires edit rights permissions on a particular GPO.
![]() Perform GPO modeling using GPMC—GPO modeling delegation is performed by editing the security settings on the particular Active Directory site, domain, or OU. This task allows a designated user the ability to perform dry runs or simulated tests to determine the results of linking a policy to a particular container or moving a user or computer object to a different container in Active Directory. This is also known as the Generate Resultant Set of Policy (Planning) security right. If the user running GPMC is not running GPMC on the domain controller, the user needs to be added to the domain’s Distributed COM Users security group to run Group Policy Modeling from another system.
Perform GPO modeling using GPMC—GPO modeling delegation is performed by editing the security settings on the particular Active Directory site, domain, or OU. This task allows a designated user the ability to perform dry runs or simulated tests to determine the results of linking a policy to a particular container or moving a user or computer object to a different container in Active Directory. This is also known as the Generate Resultant Set of Policy (Planning) security right. If the user running GPMC is not running GPMC on the domain controller, the user needs to be added to the domain’s Distributed COM Users security group to run Group Policy Modeling from another system.
![]() Perform GPO results using GPMC—This task can be performed on local machines if the user is a local administrator and the GPMC is installed. It can also be run by using the GPresult.exe from the command line or by loading the rsop.msc Microsoft Management Console snap-in. By default, local administrators can run this tool against all users on a machine. To delegate this right in Active Directory, edit the security settings on the particular Active Directory domain or OU that contains the computer and user accounts. This task allows the user to remotely connect to the computer to query the Group Policy logs to generate a historical report of previously logged Group Policy processing events. This is also known as the Generate Resultant Set of Policy (Logging) security right. To run this task against a remote computer, aside from having this right in Active Directory, the user also needs to be a member of the computer’s local Distributed COM Users security group or the local administrators group, or the domain Distributed COM or Administrators group if running modeling or results against a domain controller. Additional configuration might also include possible firewall policy changes on the required computers to enable the remote administration firewall exception.
Perform GPO results using GPMC—This task can be performed on local machines if the user is a local administrator and the GPMC is installed. It can also be run by using the GPresult.exe from the command line or by loading the rsop.msc Microsoft Management Console snap-in. By default, local administrators can run this tool against all users on a machine. To delegate this right in Active Directory, edit the security settings on the particular Active Directory domain or OU that contains the computer and user accounts. This task allows the user to remotely connect to the computer to query the Group Policy logs to generate a historical report of previously logged Group Policy processing events. This is also known as the Generate Resultant Set of Policy (Logging) security right. To run this task against a remote computer, aside from having this right in Active Directory, the user also needs to be a member of the computer’s local Distributed COM Users security group or the local administrators group, or the domain Distributed COM or Administrators group if running modeling or results against a domain controller. Additional configuration might also include possible firewall policy changes on the required computers to enable the remote administration firewall exception.
Managing Computers with Domain Policies
Managing the configuration and settings of domain servers and workstations can be standardized using domain group policies. Domain group policies offer the advantage of taking user error and mistakes out of the loop by pushing out the configuration and security of computers from a single or a set of group policies. Of course, with this much control it is essential that group policies are tested to verify that the correct configuration and desired results are achieved with the policies before they are released to production systems. In the early days of Active Directory domain-based group policies, a few organizations, which will go unnamed in this book, found themselves locked out of their own computers and Active Directory domain controllers because of over restrictive Group Policy security settings and application of these settings to all computers and users, including the domain administrators. When this situation occurs, a domain controller can be rebooted into Directory Services Restore Mode (DSRM), and an authoritative restore of Active Directory might be required.
Before domain group policies can be created and managed, the Group Policy Management Console needs to be installed. Also, if printers will be installed using the Deploy Printer function of Group Policy, the Print Services Tools should also be installed. To install the GPMC and Print Services Tools, follow these steps:
1. Log on to a designated administrative system running Windows Server 2016.
2. Open the Windows PowerShell from the taskbar
3. Type Add-WindowsFeature GPMC, RSAT-Print-Services and press Enter.
4. After the process completes, close the Windows PowerShell window.
Creating a New Domain Group Policy Object
To create a new domain GPO, follow these steps:
1. Log on to a designated Windows 10 or Windows Server 2016 administrative system.
2. Open the Group Policy Management Console tile from the Start menu.
3. Expand the forest node, expand the domain node, and expand the domain to expose the Group Policy Objects container and select it.
4. Right-click the Group Policy Objects container, and select New.
5. Type in a name for the new GPO (for example, MyFirstGPO). If the starter GPO functionality in the domain is enabled and if a suitable starter GPO exists, click the Source Starter GPO drop-down list arrow, and select either (None) or the desired starter GPO and the click OK to create the GPO.
6. In the tree pane of the Group Policy Management Console windows expand the Group Policy Objects container to reveal the newly created GPO.
7. After the GPO is created, it can be edited by right-clicking the GPO and selecting Edit.
8. Close Group Policy Management Console and log off of the server.
Creating and Configuring GPO Links
After a GPO is created and configured, the next step is to link the GPOs to the desired Active Directory containers. To link an existing GPO to an Active Directory container, follow these steps:
1. Log on to a designated Windows 10 or Windows Server 2016 administrative system and open the Group Policy Management Console.
2. Expand the forest node, expand the domain node, and expand the domain to expose the Group Policy Objects container and all the other domain containers and organizational units.
3. Right-click the desired site, domain, or organizational unit, and select Link an Existing GPO.
4. In the Select GPO window, select the desired domain and GPO, and click OK to link it.
Managing User Account Control Settings
Windows Vista, Windows Server 2008 and later workstation and server operating systems contain a security feature named User Account Control (UAC). UAC was created primarily to provide greater control over changes to the operating system configuration or file system. UAC interacts with both Non-Administrators and administrators in their desktop environment and runs almost all applications in Standard User mode. When an administrator, regular user, or application attempts to perform an action that can result in a system configuration change or require access to sensitive areas of the operating system or file system, UAC stops the change and prompts for authorization or credentials to validate the change. The response requires the user to approve the change by clicking the Allow button and administrative credentials may or may not be required.
UAC settings are pretty flexible in allowing applications to run as desired but can require some tuning on the part of the desktop administrator. Many independent software vendors have been able to produce applications that can interact with UAC but in some cases where functionality or usability of a PC is impacted by UAC, some administrators or organizations may decide to disable UAC completely or just certain UAC settings to optimize the user experience. For situations when UAC is causing undesired issues with applications, if adjusting file security, user rights assignments, or running applications in legacy mode do not work, it may be necessary to adjust or disable User Account Control functions. The likely candidates are applications that formerly required the end user to be a member of the local Power Users or Administrators group.
UAC settings should not adversely affect the functionality and operation of standard users. On the contrary, UAC actually allows standard users to be prompted for credentials to allow elevation of rights to install software or components that would have failed with previous operating systems with an Access Denied message. If, for some reason, the end user requires local administrator rights to run a legacy application and all other options have failed, changing UAC security settings in a local computer policy or domain GPO is required. When UAC security setting changes are required, follow these steps:
1. Log on to a designated Windows 10 or Windows Server 2016 administrative system and open the Group Policy Management Console.
2. Expand the forest node, expand the domain node, and expand the domain to expose the Group Policy Objects container and select it.
3. Either create a new GPO or edit an existing GPO.
4. After the GPO is opened for editing in the Group Policy Management Editor, expand the Computer Configuration node, expand the Policies node, select the Windows Settings node, and expand it.
5. Expand the Security Settings node, expand Local Policies, and select Security Options.
6. In the Settings pane, scroll to the bottom of the pane to locate the UAC settings. The following list displays the default UAC settings in the Local Computer Policy for Windows Server 2016, as an example:
![]() Admin Approval mode for the Built-in Administrator account—Disabled
Admin Approval mode for the Built-in Administrator account—Disabled
![]() Allow UIAccess applications to prompt for elevation without using the secure desktop—Disabled
Allow UIAccess applications to prompt for elevation without using the secure desktop—Disabled
![]() Behavior of the elevation prompt for administrators in Admin Approval mode—Prompt for consent for non-Windows binaries
Behavior of the elevation prompt for administrators in Admin Approval mode—Prompt for consent for non-Windows binaries
![]() Behavior of the elevation prompt for standard users—Prompt for credentials
Behavior of the elevation prompt for standard users—Prompt for credentials
![]() Detect application installations and prompt for elevation—Enabled
Detect application installations and prompt for elevation—Enabled
![]() Only elevate executables that are signed and validated—Disabled
Only elevate executables that are signed and validated—Disabled
![]() Only elevate UIAccess applications that are installed in secure locations—Enabled
Only elevate UIAccess applications that are installed in secure locations—Enabled
![]() Run all administrators in Admin Approval mode—Enabled
Run all administrators in Admin Approval mode—Enabled
![]() Switch to the secure desktop when prompting for elevation—Enabled
Switch to the secure desktop when prompting for elevation—Enabled
![]() Virtualize file and Registry write failures to per-user locations—Enabled
Virtualize file and Registry write failures to per-user locations—Enabled
7. To disable all UAC functionality, using domain policies, create and link a new GPO for UAC and edit the setting named Run All Administrators in Admin Approval mode, and configure the setting value to Disabled. If this setting is configured as Disabled, all other UAC settings are ignored. Also, this setting change will be applied during startup, shutdown, and background refresh, but a reboot is required to complete the setting change.
8. To disable UAC prompts when logged on with an account with local administrator rights and leave all other settings functional, using domain policies, create and link a new GPO for UAC and edit the setting named Behavior of the Elevation Prompt for Administrators in Admin Approval Mode, and configure the setting value to Elevate Without Prompting, as shown in Figure 25.6. Click OK to save the setting and close the Group Policy Management Editor window.
FIGURE 25.6 Configuring User Account Control to allow administrators to elevate privileges without prompting.
9. After the GPO is configured as desired, save the GPO and link it to an organizational unit that has a test Windows Vista, Windows Server 2008, or later workstation or server operating system to verify that the desired functionality has been achieved. Remember that a reboot is required before the results of this setting change will take effect.
10. After the testing is completed, configure security filtering and possibly also WMI filtering to limit the application scope of this policy and link it to the desired organizational units.
Creating Application Control Policies (AppLocker)
Application control policies implement software restriction on computers and user profiles to prevent users from running undesired programs that might impact system configuration and reliability. Application control policies are supported on workstation systems from Windows 7 and later and on all editions of Windows Server from Windows Server 2008 R2 through Windows Server 2016. Application control policies or AppLocker, when enabled, will not allow users to run any executables except those defined as allowed. This can of course cause serious functionality issues if deployed improperly so Microsoft has developed an audit-only mode that can be used to test a policy with AppLocker settings to start gathering a list of applications end users need to run in order to perform their job.
Before AppLocker policies can function and be applied to the desired Windows 10 and Windows Server 2016 systems, the Application Identity service needs to be running. This service can be set to automatic startup on the desired systems by configuring and applying domain policy. To configure this service to automatic startup on the desired systems, create a new domain policy and in the Computer Configuration node beneath Windows Settings and System Services, locate the Application Identity service, define the policy setting and set the startup mode to Automatic. Apply this policy to the desired systems but understand that the service, even when set to Automatic, will not start until the next reboot or until the service is started by a local user, through a remote management console or script, or through the use of a scheduled or immediate task, which is discussed later in this chapter.
AppLocker policies are based on rules. These rules include the following:
![]() Publisher rules—Rules based on the digital signature of the application the rule is defined for.
Publisher rules—Rules based on the digital signature of the application the rule is defined for.
![]() File hash rules—Rules based on the specifics of the actual application file itself.
File hash rules—Rules based on the specifics of the actual application file itself.
![]() Path rules—Rules based on the location of the applications the rule is define for.
Path rules—Rules based on the location of the applications the rule is define for.
File hash rules are the most specific, but publisher rules and path rules can include all applications signed by the same software vendor and certificate or the if all applications fall under a specific pat they also can be grouped together.
To configure AppLocker settings, follow these steps:
1. Log on to a designated Windows 10 or Windows Server 2016 administrative system and open the Group Policy Management Console.
2. Expand the forest node, expand the domain node, and expand the domain to expose the Group Policy Objects container and select it.
3. Either create a new GPO or edit an existing GPO.
4. After the GPO is opened for editing in the Group Policy Management Editor, expand the Computer Configuration node, expand the Policies node, expand the Windows Settings node, and select the Security Settings node.
5. Expand the Security Settings node, and select Application Control Policies.
6. Expand the Application Control Policies node and select AppLocker.
7. In the Settings pane, click the Configure Rule Enforcement link in the center of the page.
8. In the AppLocker Properties window, check the four checkboxes for Executable, Windows Installer, Script, and Packaged App rules and select the Audit Only option from the pull-down menus, as shown in Figure 25.7. Then, click OK to define the rule enforcement properties.
9. Now, before any auditing can be logged, new rules will need to be created. For this example, right-click the Executable Rules node beneath AppLocker and select Automatically Generate Rules.
10. On the Folders and Permissions page, leave the default group of Everyone and the default path of C:Program Files and rule name of Program files as it and then click Next to continue.
11. On the Rules Preferences page, leave the defaults of creating publisher rules for files that are digitally signed and grouping similar rules together as shown in Figure 25.8, but choose whether your organization desires to use file hash or path rules for unsigned applications. The default creates file hash rules, which are more secure. Click Next to continue.
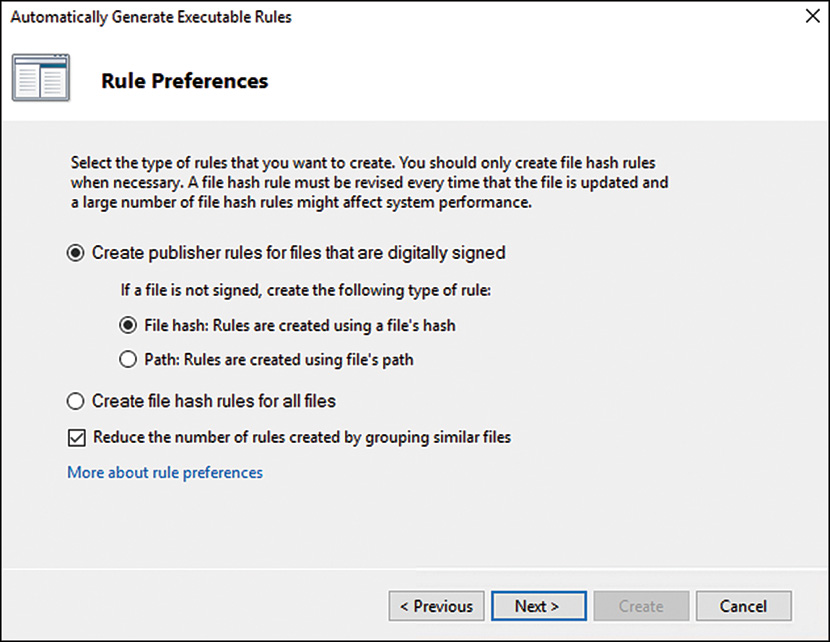
NOTE
If the APP Locker GPO will be applied to Windows 7 or Windows Server 2008 Publishing rules are not compatible and file hash rules should always be used.
12. In the Rules Review page, review the proposed rules and click Create to actually create the rules within the group policy. A pop-up window will open asking to also create the default rules, click Yes to complete the task.
13. When this is completed, save the domain policy and link it to an organizational unit that contains Windows 10 Pro or Ultimate or Windows Server 2016 systems.
14. Log on to the desired test system, verify that the new AppLocker policy has been applied and that the Application Identity service is set to Automatic and is running on the desired machine. Reboot the machine.
15. Log back on to the test machine and run Internet Explorer or any other executable that is located beneath the C:Program Files folder.
16. Now open the Event Viewer console using an elevated account so the audit events can be reviewed.
17. In the Event Viewer window, expand Applications and Services Logs, expand Microsoft, and expand AppLocker.
18. Select the EXE and DLL log and in the Settings pane and review the AppLocker events, as shown in Figure 25.9. Warning events are logged for executables that would have been blocked by the rule. If no events are logged, the Application Identity service may not be running or a reboot might not have been performed after the initial AppLocker policy was applied.

19. Close the event log on the test machine to complete this exercise.
AppLocker rules applied to a computer can be defined or configured to apply on a per-user or per-security group basis. Specific AppLocker policies can be configured to block all executables, Windows Installer files, and scripts after each of those rules are enforced. Applocker is broken into four different policy rule groups including Executable rules, Windows Installer rules, Script rules and Packaged App rules. Each of these policy rule groups support administrator created rules or rules can be generated automatically. As an example, the C:program files folder can be scanned for Executable files and rules will be generated based on the contents of that folder. Also, administrators can choose to add in a default rule set when creating Applocker policy rules. The default executable rules, for example, will define that everyone can run executables in the program files and Windows folders, including all subfolders, but only administrators can run executables without path restrictions. To create or populate the default rules for executables, in the tree pane under AppLocker, expand AppLocker and right-click the Executable Rules node and click Create Default Rules. This will generate the three rules described previously.
Configuring Preference Item-Level Targeting
There are many instances in Group Policy deployments when an administrator desires to apply a particular preference setting to only a subset of computers or users. When this is the case, preference item-level targeting can be used. For example, a Group Policy administrator can create a single domain policy named UserDriveMapGPO and leave the policy filtering set to authenticated users, and it can be linked to the domain. In this case, if a drive map preference is defined, all users in the domain will map the same drive. Now within this single policy several drive maps can be created, but each drive map can be applied to only specified users or security groups using item-level targeting with the drive map preference options. The following steps detail segmenting the application of a drive map setting to a security group named sales, using item-level targeting:
1. Log on to a designated Windows Server 2016 administrative server and open the GPMC.
2. Expand the tree view to reveal the desired domain and expand the domain to reveal the Group Policy Objects container.
3. Create a new GPO named UserDriveMapGPO and open it for editing.
4. In the Group Policy Management Editor window, select and expand the User Configuration node in the tree pane, and expand the Preferences node and Windows Settings node.
5. Select the Drive Maps preference setting in the tree pane and in the Drive Maps pane right-click and select create New Mapped Drive.
6. When the New Drive Properties window opens, leave the Action setting as Update and type in the appropriate UNC path to the network share folder (in this example, \FILESERVER1GroupShareSales). Check the box to reconnect and label as Sales.
7. Select the drive letter G, as shown in Figure 25.10.
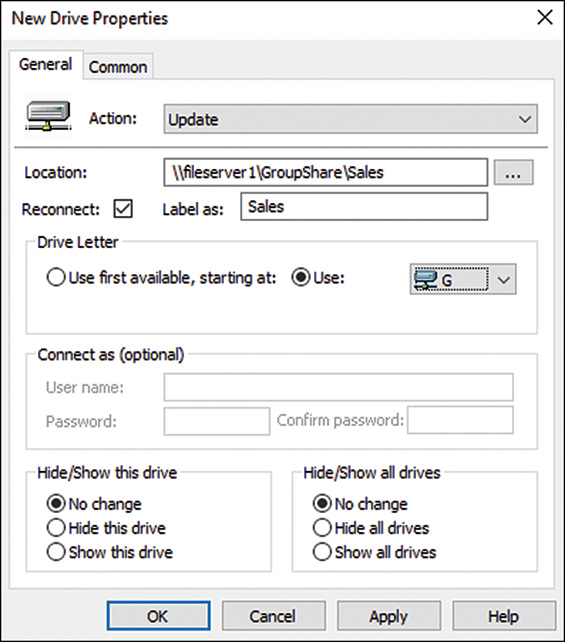
8. Select the Common tab and check the Item-Level Targeting checkbox and click the Targeting button to open the Targeting Editor.
9. In the Targeting Editor window, click the arrow in the New Item pull-down menu to reveal each of the different options that can be used for item-level targeting and select Security Group.
10. When the security group item is added to the window, in the lower pane next to the group form field click the ellipsis (...) button to locate and add a security group from the domain; for this example, it is the companyabcsales security group, as shown in Figure 25.11.
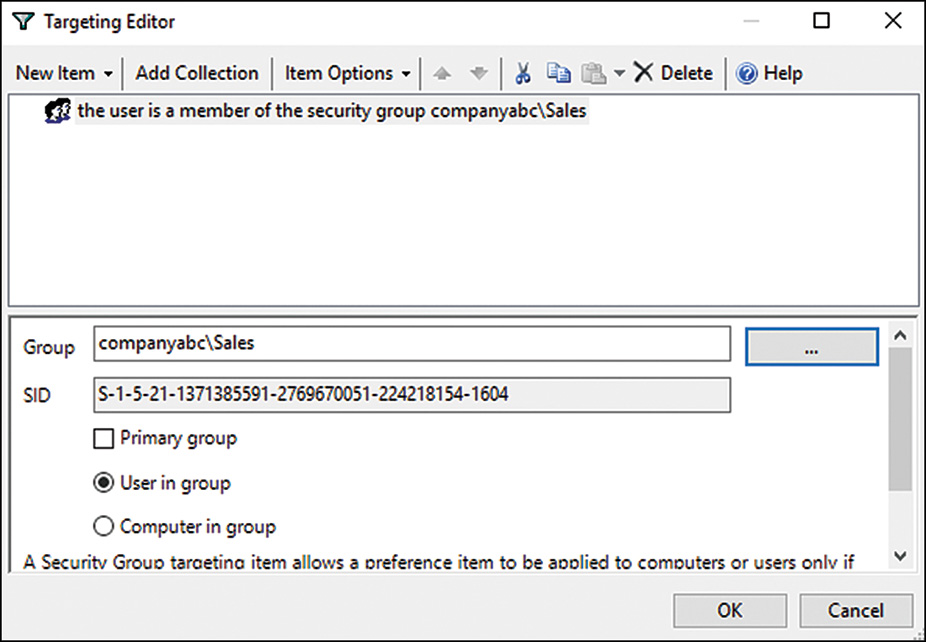
11. Click OK to close the item-level targeting windows, and click OK in the New Drive Properties window.
12. Back in the Group Policy Management Editor window, additional drive maps can be created, even with the same drive letter, as long as they all have a different item-level target configuration, such as the security group targeting as created in this example.
13. Close the Group Policy Management Editor window and test the application of the policy on a test system with a test user account that is in the security group.
Configuring Remote Desktop and Remote Administration Support
A common Group Policy request from IT administrators who need to support Windows XP, Windows Server 2003, and later workstation and server operating systems is to enable and allow for remote administration. Group Policy can manage this task with minimal configuration. To enable Remote Desktop on Windows XP, Windows 2003, Windows Vista, or Windows Server 2008 systems, enable the Allow Users to Connect Remotely Using Remote Desktop Services setting. This setting is located in Computer ConfigurationPoliciesAdministrative TemplatesWindows ComponentsRemote Desktop ServicesRemote Desktop Session HostConnections node, as shown in Figure 25.12. When this GPO is saved and linked to a GPO with computers in it, all the computers will have Remote Desktop enabled. By default, only members of the Administrators group will be able to connect using Remote Desktop. If this needs to be changed, additional users can be added to the local Remote Desktop Users group.
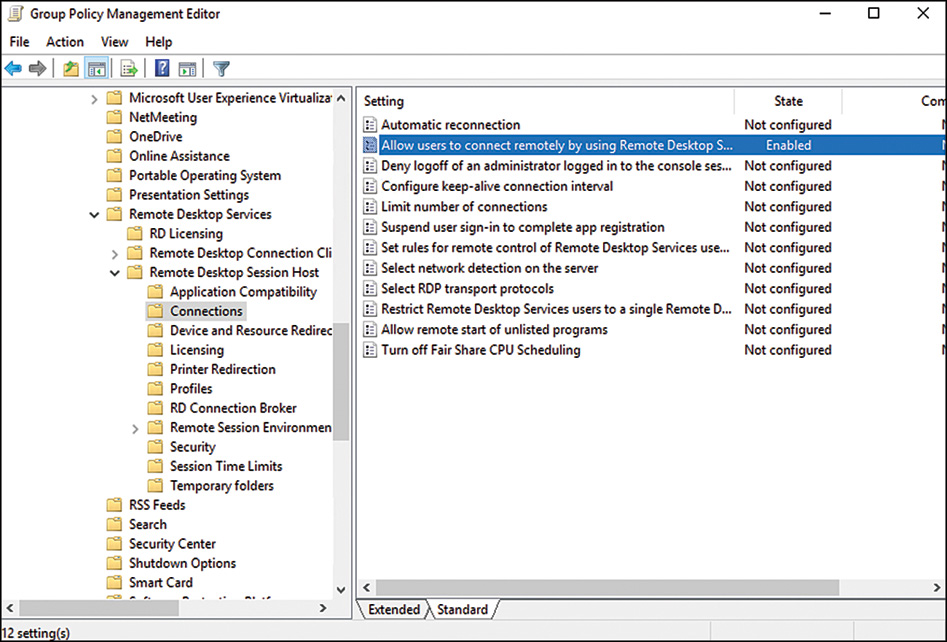
After Remote Desktop is enabled on a system with the previous setting, administrators will also need to configure the authentication security level as well as the firewall exceptions. To configure the authentication level (e.g., to allow older clients to connect to the server or workstation using any version of remote desktop), configure the setting named Require User Authentication for Remote Connections by Using Network Level Authentication to Disabled. With this setting set to Disabled, any version of Remote Desktop can connect to the system. This may be ideal for support scenarios that contain older clients such as thin clients or third-party Remote Desktop implementations, but in general this setting should be set to Enabled to require higher authentication security. This setting is located in the Computer ConfigurationPoliciesAdministrative TemplatesWindows ComponentsRemote Desktop ServicesRemote Desktop Session HostSecurity node.
The Remote Desktop firewall exceptions still need to be configured; otherwise, Remote Desktop is not possible. Remote Desktop is a built-in exception in the Windows XP, Windows Server 2003, and later client and server basic and advanced firewall rule sets. In addition, remote administration is a built-in exception. To configure these exceptions, see the following section, “Configuring Basic Firewall Settings with Group Policy.”
Configuring Basic Firewall Settings with Group Policy
In many organizations, part of the responsibility of supporting end users requires the ability to remotely manage the desktop. Many organizations leverage the built-in Windows tools for remote management, whereas many others utilize third-party products. Remote management tasks of workstations can include installing custom software for a particular user, computer or set of computers, installing Windows Updates, assisting with the installation of local printers, adding local user accounts, changing local group membership, or troubleshooting reported issues with or without the end user’s interaction and approval.
The Microsoft Windows Firewall includes multiple firewall profiles that contain separate firewall rules and firewall exceptions. In many situations, remote administration included, the Windows Firewall rules can block the undesired as well as the desired traffic from passing through. In the case of remote desktop and remote administration, Windows XP, Windows Server 2003, and later client and server operating system firewalls contain pre-created rules to quickly enable this functionality.
When managing firewall rules through group policies, administrators need to consider several configuration options, including which firewall profiles require the rule changes, does the rule need to be filtering by the source IP address, and should certain systems be targeted with these changes. For example, with Remote Desktop and Remote Administration, organizations may want to allow this functionality through the firewall only on the domain profile and only from certain IP ranges or subnets where the company servers and administrator workstations reside. This reduces the security exposure of the system when connected to public network and even tightly control who can remotely connect to these systems when on the company network.
Windows XP and Windows Server 2003 include a standard and domain firewall profile. The domain profile is activated when the desktop is on a network that is defined in Active Directory Sites and Subnets and can communicate with a domain controller. The standard profile is activated when the desktop is on a remote or public network; in many cases, however, if the machine is connected to a VPN that does not support proper communication, it might also remain in the standard firewall profile. Windows Vista, Windows Server 2008, and later workstation and server operating systems contain three firewall profiles: the domain profile, the private profile, and the public profile. The domain profile remains the same, but the previous standard profile has now been segmented into the private and public profiles. Any network that is different from the domain network is initially categorized as an untrusted network, and the public firewall profile is activated. End users, with the appropriate rights, can re-categorize a public network as a private network, which can then activate the private firewall profile and the appropriate firewall rule set, which is likely to be less restrictive. Private networks can be used in workgroup settings and for users to define their home networks as well. Windows Firewall design and configuration planning is a very important task for Windows administrators to execute and should not be taken lightly. Also, disabling firewalls in any profile is not recommended and is a poor approach to enabling systems and applications to function on an organization’s network.
To allow Windows administrators to continue to manage and administer Windows server and desktop systems remotely, certain firewall exceptions should be defined. Aside from enabling Remote Desktop, as outlined in the previous section, remote administrators might need to copy files to and from systems and utilize Microsoft Management Console snap-ins such as Windows Backup, Event Viewer, Computer Management, and many others from remote administrative workstations. To enable the Remote Desktop and Remote Administration exceptions in the Windows Firewall using domain group policies, follow these steps:
1. Log on to a designated Windows Server 2016 administrative server and open the GPMC.
2. In the GPMC, expand the forest and domains node to reveal the desired domain and the Group Policy Objects container within.
3. Select the Group Policy Objects container and either create a new GPO or edit an existing GPO.
4. After the GPO is opened for editing in the Group Policy Management Editor, expand the Computer Configuration node, expand the Policies node, and select the Administrative Templates.
5. Expand the Administrative Templates node, expand the Network node, expand the Network Connections node, and select the Windows Firewall node. Configurations made in this section apply to Windows XP, Windows Server 2003, and greater client and server operating systems, but this section is really created for Windows XP and Windows Server 2003. For more granular firewall configuration for Windows Vista, Window Server 2008, and greater operating systems, the Windows Firewall with Advanced Security settings can be used.
6. In the tree pane, expand the Windows Firewall node to reveal the Domain Profile node, and select it.
7. In the Settings pane, locate the setting named Windows Firewall: Allow Inbound Remote Administration Exception, and double-click it to open the setting for editing.
8. In the Setting window, click the Enabled option button, and type in the network from which inbound remote administration will be allowed. For this example, consider an organization that utilizes the 10.0.0.0 network with a subnet mask of 255.0.0.0. This would be defined as 10.0.0.0/8 in the properties of this exception, as shown in Figure 25.13. When finished, click OK to update the setting.
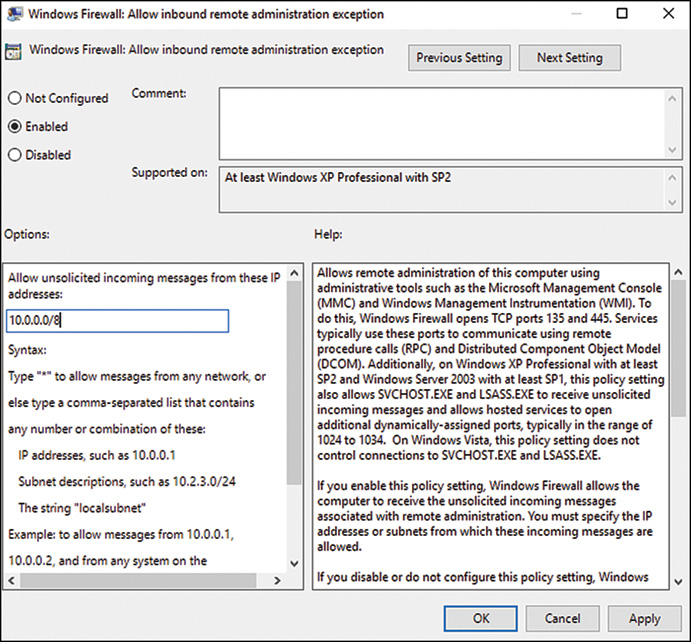
9. After the previous setting has been configured, back in the Settings pane, select the Windows Firewall: Allow Inbound Remote Desktop Exceptions, and double-click it to open the setting for editing.
10. In the setting window, click the Enabled option button, and type in the network from which inbound Remote Desktop connections will be allowed. When finished, click OK to update the setting.
11. If necessary, repeat the process of configuring the inbound remote administration and Remote Desktop exception in the standard profile to ensure that remote management from the defined network functions regardless of the firewall profile currently activated on the client.
If the network defined within a Windows firewall exception is a common network, such as 192.168.0.0/24, the configuration of these exceptions in the standard profile are considered risky and should not be performed. Instead, work with the networking group and VPN configurations to ensure that when users connect remotely to the network from remote sites and through VPN connections, the system always recognizes and applies the domain profile.
12. Back in the GPMC, link the new remote administration firewall exception GPO to an OU with a computer that can be used to test the policy.
13. After the testing is completed, configure security filtering and possibly also WMI filtering to limit the application scope of this policy and link it to the desired organizational units.
Configuring Advanced Firewall Settings
Windows Vista, Windows Server 2008, and later client and server operating systems have a new and improved firewall that enables administrators to manage granular inbound and outbound firewall rules within the three the default firewall profiles. Even though the Windows Firewall is enabled and active by default on Windows Server 2016, when the Add Roles Wizard is run and a role, role service, or feature is added to the Windows Server 2016 system, the necessary firewall exceptions are also configured as part of the process. This is a major advantage compared with what was included in Windows Server 2003. However, be aware that when adding additional applications or services (that are not included with the product) to a Windows Server 2016 system, unless the installation of that product also has a built-in feature to enable and configure the necessary exceptions in the firewall, the exceptions need to be defined and configured manually. When custom firewall rules, exceptions, and changes to the default behavior and configuration of the firewall profiles are required, the settings need to be defined using the Windows Firewall with Advanced Security console. If these settings need to be defined using a domain policy, access to these policy settings are included in the Computer ConfigurationPoliciesWindows SecuritySecurity SettingsWindows Firewall with Advanced Security settings node. One advantage of using Windows Firewall with Advanced Security is that when a system is configured manually and all the necessary exceptions and rules are defined within the firewall, these rules can be exported from the firewall and imported into a domain policy and applied from the central location to all the desired servers. You can find more information about creating Windows Firewall rules in Chapter 12, “Server-Level Security.”
Configuring Windows Update Settings
Many organizations utilize the Internet services provided by Microsoft known as Windows Update and Microsoft Update. The main difference between the two is that Microsoft Update also includes updates for other products such as Microsoft Office, Microsoft Exchange Server, Microsoft SQL Server, and many more. Starting with Windows XP and Windows Server 2003, all Windows systems are now capable of downloading and automatically installing Windows Update out of the box. To upgrade the Windows Update client to support updates for other Microsoft applications through Microsoft Update, these machines might need to be upgraded manually, upgraded using a GPO software installation, or upgraded using Microsoft Windows Server Update Services (WSUS). A WSUS server can be configured to auto-update the client software automatically, which is the preferred approach. Depending on whether the organization utilizes an internal WSUS server running on Windows Server 2016 or wants to utilize the Windows/Microsoft Internet-based services to configure these settings using group policies, the settings are located in the following sections:
![]() Computer ConfigurationPoliciesAdministrative TemplatesWindows ComponentsWindows Update
Computer ConfigurationPoliciesAdministrative TemplatesWindows ComponentsWindows Update
![]() User ConfigurationPoliciesAdministrative TemplatesWindows ComponentsWindows Update
User ConfigurationPoliciesAdministrative TemplatesWindows ComponentsWindows Update
For more information and recommendations on best practices for configuring Windows Updates, see the section, “Using Windows Server Update Services,” in Chapter 13.
Configuring Power Options Using Domain Policies
Using group policies to manage the power profiles on Windows systems is a feature that was introduced with Windows Vista and Windows Server 2008 Group Policy preference templates and continues. Computer preferences for power include three types:
![]() Power Options (Windows XP)—This preference item can be used to define the action of pressing the power button or closing the lid of a notebook on an XP system.
Power Options (Windows XP)—This preference item can be used to define the action of pressing the power button or closing the lid of a notebook on an XP system.
![]() Power Schemes (Windows XP)—This preference item can be used to set the power usage scenario that controls when an XP system goes to sleep.
Power Schemes (Windows XP)—This preference item can be used to set the power usage scenario that controls when an XP system goes to sleep.
![]() Power Plan (At Least Windows 7)—This preference item applies to Windows Vista, 7, and 8 clients, Windows Vista, 7, 8 clients, as well as Windows Server 2008, and contains all the settings necessary to configure the power button actions, closing the lid on notebooks, and power management of the hardware components of the system, as well as the sleep and hibernation settings.
Power Plan (At Least Windows 7)—This preference item applies to Windows Vista, 7, and 8 clients, Windows Vista, 7, 8 clients, as well as Windows Server 2008, and contains all the settings necessary to configure the power button actions, closing the lid on notebooks, and power management of the hardware components of the system, as well as the sleep and hibernation settings.
Starting with Windows Server 2008 and Windows Vista, power plans can be defined and applied using domain policies using computer preference settings. To configure a centrally managed power plan for Windows Vista, Windows Server 2008, and later client and server operating systems follow these steps:
1. Log on to a designated Windows Server 2016 administrative server and open the GPMC.
2. In the GPMC, expand the forest and domains node to reveal the desired domain and the Group Policy Objects container within.
3. Select the Group Policy Objects container and create a new GPO named PowerProfileGPO and open it for editing.
4. After the PowerProfileGPO is opened for editing in the Group Policy Management Editor, expand the Computer Configuration node, expand the Preferences node
5. Expand the Control Panel Settings, right-click the Power Options node, and select New-Power Plan (At Least Windows 7).
6. On the Advanced Settings page, leave the default Action on Update and change the power plan from Balanced to High Performance. Also, check the Set as the Active Power Plan checkbox, and then click OK to complete the settings, as shown in Figure 25.14. If you want to, change any of the default settings to other values.
7. Close the Group Policy Management Editor and link the policy in the Group Policy Management Console to a test organizational unit.
8. After the new policy passes validation testing, link it to a production organizational unit as desired.
This makes the High Performance power plan the default for the computer and for all users who log on, although power plans are in fact unique to the user logon and some implementations of such a policy require the user-based power plan preference settings.
Managing Scheduled Tasks and Immediate Tasks with Domain Policies
There are many times when Group Policy administrators would have liked to run an application or a command on a remote machine without having to reboot or log on to that particular system. For example, there may be a critical security or application update that needs to be rolled out and executed immediately. Historically, this would require a new group policy with a script or software package assigned, and the machine would need to be rebooted to run the script or install the application. With Windows Server 2016, this can be accomplished with the Scheduled Task and Immediate Task preference settings for both Windows XP and Windows 7 and later operating systems. As an example of this, one that ties to the previous section on AppLocker, the policy administrators can create a policy that immediately starts the Application Identity Service to automatic startup mode, because this is required to support Applocker policy rules. This can be accomplished by creating a group policy that defines the Scheduled TasksImmediate task computer preference and runs the Net Start AppIDSvc command. To perform the previously cited example, create a new domain policy, open the policy for editing, and navigate to the Computer ConfigurationPreferencesControl PanelScheduled Tasks node. Right-click the node and select New-Immediate Task (At Least Windows 7). Configure and save the task settings as shown in Figures 25.15 and 25.16. Save the policy and test it out to verify it works as desired, and then deploy it in production or save it as a quick policy that can be updated and used for a different purpose later.

Managing Users with Policies
Group Policy enables administrators to define how the end user experience and desktop are configured. Also, with user-based group policies, end users can be granted or denied access to certain Windows applications and features and even can be limited from reading or writing to removable media. Common user Group Policy configurations include the following:
![]() Start menu configuration
Start menu configuration
![]() Restricting Control Panel and display settings
Restricting Control Panel and display settings
![]() Internet Explorer settings
Internet Explorer settings
![]() Software restrictions
Software restrictions
![]() Microsoft Management Console restrictions
Microsoft Management Console restrictions
![]() Screensaver settings
Screensaver settings
![]() Mapping network drives
Mapping network drives
![]() Installing printers
Installing printers
![]() Application-specific configurations, including customizing Microsoft Office if the administrative templates are loaded and used in the policy
Application-specific configurations, including customizing Microsoft Office if the administrative templates are loaded and used in the policy
![]() Network configuration settings
Network configuration settings
![]() Power plans
Power plans
![]() Folder redirection and offline file settings
Folder redirection and offline file settings
Managing the user environment and desktop with group policies, for the most part, can be used to configure the GUI for the user and to impose security restrictions to increase the reliability of the computer systems in use. In some cases, application shortcuts can be added to the desktop and applets can be hidden from view in the Control Panel or Start menu, but in more restrictive cases, they can be hidden and restricted from execution. Many organizations would like the end-user desktop to be very simple and present the end users with only the necessary applications relevant to their job. Although this is an extreme case, it can be performed by configuring the settings located in the User ConfigurationPoliciesAdministrative TemplatesStart Menu and Taskbar settings node. A more functional start menu GPO extension can also be used to manage the configuration of the start menu for XP, Vista, Windows 7, Windows 10, and Windows 10 clients by configuring settings located in the User ConfigurationPreferencesControl Panel SettingsStart Menu settings node.
Desktop security is a big concern for companies, now more than ever. One easy configuration organizations can use to better secure end-user desktops is to implement a password-locking screensaver. Automatic desktop locking with screensavers can be a very handy configuration, but sales and remote users should be granted extended computer idle time to prevent a password protected screensaver from executing in the middle of a sales presentation or a web-based meeting. Screensaver settings can be configured in the User ConfigurationPoliciesAdministrative TemplatesControl PanelPersonalization settings node. To enable a password-protected screensaver with a blank screen screensaver that works on every version of Windows, the following four settings must be configured:
![]() Enable Screen Saver—Enabled
Enable Screen Saver—Enabled
![]() Password Protect the Screen Saver—Enabled
Password Protect the Screen Saver—Enabled
![]() Force Specific Screen Saver—Enabled scrnsave.scr
Force Specific Screen Saver—Enabled scrnsave.scr
![]() Screen Saver Time Out—Enabled 900, to go to screensaver after 15 minutes of inactivity
Screen Saver Time Out—Enabled 900, to go to screensaver after 15 minutes of inactivity
Another of the biggest pain points for companies is being able to back up end-user data, which, by default, is stored on the local profile folder on the local drive of the computer. When users log on to multiple computers or Remote Desktop Services systems, administrators can configure users with roaming profiles and/or specific Remote Desktop Services profiles, which follow them between systems and are stored on server shares. This configuration is set on the actual user object and is not necessarily a Group Policy setting.
Remote Desktop Services profiles are great for Remote Desktop Services systems, but implementing roaming profiles for an entire company on every computer is not the best solution because each time the user logs on to a system, the entire profile is copied to the local computer and when the user logs off, the profile is copied back to the server. The larger the profile gets, the longer it takes to copy the profile between the server shares and the computer system. On Remote Desktop Services systems, it is very easy for administrators to remotely log off and complete the copy of the profile back to the server share. However, for end-user workstations, when roaming profiles get large, many users may not wait for the profile copy to complete and manually shut down the system, or they unplug it from the network or put it to sleep and take it with them. This, of course, can cause profile corruption and, even worse, data loss. To improve Remote Desktop Services profile and standard roaming profile performance, administrators can use Group Policy to redirect user folders to server shares using folder redirection.
Configuring Folder Redirection
Folder redirection can be used to redirect certain special folders in the end-user’s profile to server shares. Special folders such as the Documents, which is the default folder for users to store and access their data, can be redirected to server shares. The following are some basic rule-of-thumb guidelines when using this Group Policy extension:
![]() Allow the system to create the folders—If the folders are created by the administrator, they will not have the correct permissions. But properly configuring the share and NTFS permissions on the server share is essential in providing a functional folder redirection experience.
Allow the system to create the folders—If the folders are created by the administrator, they will not have the correct permissions. But properly configuring the share and NTFS permissions on the server share is essential in providing a functional folder redirection experience.
![]() Enable client-side caching or offline file synchronization—This is important for users with portable computers but is not the desired configuration for folder redirection on Remote Desktop Services systems. Furthermore, when storing data on end-user workstations, it may violate regulatory or security requirements to allow for cached local copies.
Enable client-side caching or offline file synchronization—This is important for users with portable computers but is not the desired configuration for folder redirection on Remote Desktop Services systems. Furthermore, when storing data on end-user workstations, it may violate regulatory or security requirements to allow for cached local copies.
![]() Use fully qualified (UNC) paths or DFS paths for server share locations—For example, use \Server1.companyabc.comUserProfiles or \companyabc.comUserProfiles if DFS shares are deployed.
Use fully qualified (UNC) paths or DFS paths for server share locations—For example, use \Server1.companyabc.comUserProfiles or \companyabc.comUserProfiles if DFS shares are deployed.
Before folder redirection can be expected to work, share and NTFS permissions must be configured appropriately. For folder redirection to work properly, configure the NTFS as follows:
![]() Configure the share folder to not inherit permissions and remove all existing permissions.
Configure the share folder to not inherit permissions and remove all existing permissions.
![]() Add the file server’s local member server’s Administrators group with Full Control of This Folder, Subfolders, and Files.
Add the file server’s local member server’s Administrators group with Full Control of This Folder, Subfolders, and Files.
![]() Add the Domain Admins domain security group with Full Control of This Folder, Subfolders, and Files.
Add the Domain Admins domain security group with Full Control of This Folder, Subfolders, and Files.
![]() Add the System account with Full Control of This Folder, Subfolders, and Files
Add the System account with Full Control of This Folder, Subfolders, and Files
![]() Add the Creator Owner with Full Control of Subfolders and Files only.
Add the Creator Owner with Full Control of Subfolders and Files only.
![]() Add the Authenticated Users group with both List Folder/Read Data and Create Folders/Append Data—This Folder Only rights. To set these two permissions, you need to configure the permissions using the advanced permission dialog box. The Authenticated Users group can be replaced with the desired group, but, as a best practice, do not choose the Everyone group.
Add the Authenticated Users group with both List Folder/Read Data and Create Folders/Append Data—This Folder Only rights. To set these two permissions, you need to configure the permissions using the advanced permission dialog box. The Authenticated Users group can be replaced with the desired group, but, as a best practice, do not choose the Everyone group.
The share permissions of the folder can be configured to grant administrators Full Control or owner and Authenticated Users Read/Write permissions.
To redirect the Documents folder to a network share for Windows Vista, Windows Server 2008, and later client and server operating systems, follow these steps:
1. Log on to a designated Windows Server 2016 administrative server and open the GPMC.
2. In the GPMC, expand the forest and domains node to reveal the desired domain and the Group Policy Objects container within.
3. Select the Group Policy Objects container and create a new GPO named UserFolderRedirectGPO and open it for editing.
4. After the UserFolderRedirectGPO is opened for editing in the Group Policy Management Editor, navigate to User ConfigurationPoliciesWindows Settings and select the Folder Redirection node to display the user profile folders that are available for redirection, as shown in Figure 25.17. Keep in mind that the folders in this section and detailed in Figure 25.17 represent the folders available in Windows Vista, Windows Server 2008, and later client and server operating systems user profiles. If Windows 2000, Windows XP, or Windows Server 2003 profiles require folder redirection, configuring the Documents folder for redirection should work but will require additional testing against each edition and service pack level of the legacy operating system that this policy applies to.
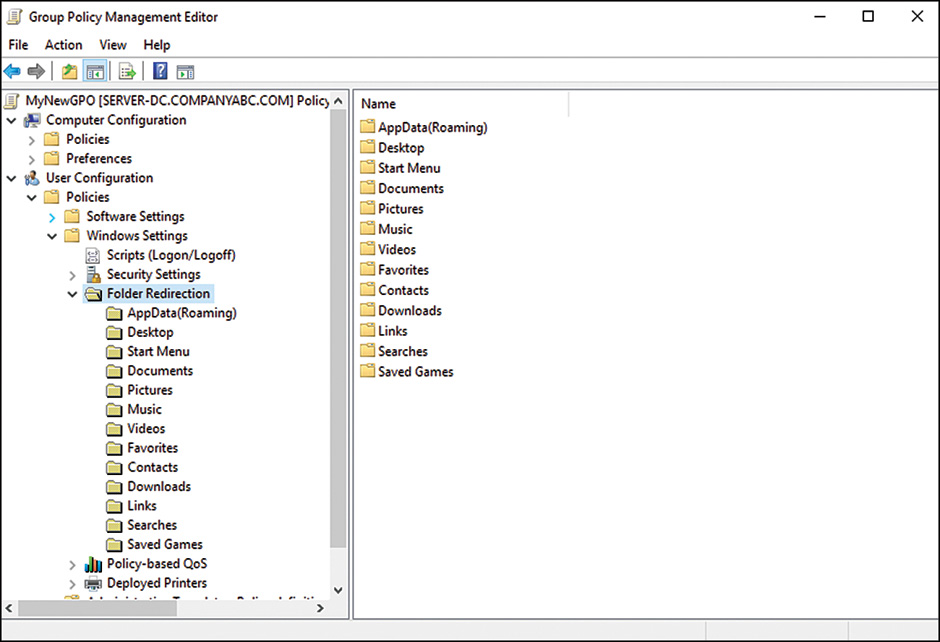
5. In the Settings pane, right-click the Document folder and select Properties.
6. On the Target tab, click the Setting drop-down list arrow, and select Basic-Redirect Everyone’s Folder to the Same Location, which reveals additional options. There is another option to configure folder redirection to different locations based on group membership, but for this example, select the basic redirection option.
7. In the Target Folder Location section, there are several options to choose from and each should be reviewed for functionality; for this example, select Create a Folder for Each User Under the Root Path. This is very important if multiple folders will be redirected; more details are explained in the following steps.
8. In Root Path field, type in the server and share name (for example, \ CompanyABC.comUserShare), as shown in Figure 25.18. Notice how the end-user name and Document folder will be created beneath the root share folder. This requires that the end users have at least Change rights on the share permissions, and they must also have the Create Folder NTFS permission on the root folder that is shared.

9. Select the Settings tab and uncheck the Grant the User Exclusive Rights to Documents checkbox. If necessary, check the checkbox to also apply redirection to Windows 2000, XP, and Windows Server 2003 operating systems.
10. Click OK to complete the folder redirection configuration. A warning pop-up opens that states that this policy will not display the Folder Redirection node if an administrator or user attempts to configure or view this group policy using policy management tools from Windows 2000, Windows XP, or Windows Server 2003. Click Yes to accept this warning and configure the folder redirection.
11. Back in the Group Policy Management Editor window, close the GPO.
12. In the GPMC, link the new UserFolderRedirectGPO policy to an OU with a user account that can be used to test this policy.
13. Log on to a Windows Vista, Windows Server 2008 or greater client or server operating systems with the test user account. After the profile completes loading, click the Start button, and locate and right-click the Documents folder. Select the Location tab and verify the path. For example, for a user named Jamil, the path should be \companyabc.comUserShareJamilDocuments.
If the folder is not redirected properly, the Windows Vista or greater operating system might need to have a domain policy applied that forces Synchronous Foreground Refresh of group policies. Also a very common configuration error is incorrect NTFS and share permissions on the share’s root folder. In most cases, however, a few logons by the particular user will get the settings applied properly.
Each of the folder redirection folders will automatically be configured to be synchronized with the server and be available offline. When additional server folders need to be configured to be available offline, follow these steps:
1. Locate the shared network folder that should be made available offline.
2. Right-click the folder and select Always Available Offline.
As long as the server share allows offline synchronization and the client workstation also supports this, as they both do by default, that is all that is necessary.
Removable Storage Access
Windows Vista, Windows Server 2008, and later client and server operating system group policies provide several settings that can be used control how removable devices and removable storage can be used. Some of these settings apply to CD and DVD drives and media, but many are designed to control the read and write permission to removable disks such as external USB drives and memory sticks. These settings can be configured in a computer group policy but can also be configured in the User Configuration node to deny write access to removable media, as shown in Figure 25.19. The settings are located in User ConfigurationPoliciesAdministrative TemplatesSystemRemovable Storage Access.

Managing Microsoft Management Console Access
Microsoft has standardized the deployment of management and configuration tools to use Microsoft Management Console (MMC) snap-ins. By default, all users can open a blank MMC and add snap-ins to the console. Which snap-ins are loaded on a particular machine determines or limits which snap-ins can be added. Having access to each snap-in can unnecessarily expose configuration information to undesired individuals. Also, depending on the function of the snap-in, functions might be available to standard users that can impact the performance of production systems. For example, a user can add the Active Directory Users and Computer snap-in to an MMC console and can then create queries that run against the domain controller, causing unnecessary load on the system. To restrict access to the MMC or specific MMC snap-ins using domain group policies, follow these steps:
1. Log on to a designated Windows Server 2016 administrative server and open the GPMC.
2. In the GPMC, expand the forest and domains node to reveal the desired domain and the Group Policy Objects container within.
3. Select the Group Policy Objects container and create a new GPO named MMCManagementGPO and open it for editing.
4. After the GPO is opened for editing in the Group Policy Management Editor, navigate to UserConfigurationPoliciesAdministrative TemplatesWindows Components, select the node and scroll down and select Microsoft Management Console in the tree pane.
5. Expand the Microsoft Management Console node, and then select the Restricted/Permitted snap-ins node and select it.
6. With the Restricted/Permitted snap-ins node selected in the tree pane, a list of well-known snap-ins is displayed in the Settings pane. Select and open the Active Directory Users and Computers snap-in. Configure the setting to Disabled to block the use of this snap-in for the users to whom this policy applies, and then click OK.
7. After the snap-in is disabled, close the policy and link it to the desired OU that contains the users who need to be restricted from using the disabled snap-in.
If this policy is to also be applied to administrators, the default security filtering of the GPO may need to be changed. For example, if an organization wants to restrict all administration to certain workstations or servers, this GPO could be applied to the domain and even domain admins, and loopback processing could be enabled for designated administrative workstations and servers, and a policy that enables MMC consoles could be linked to it, also with security filtering applying to administrators. Using a configuration like this can be great for security management and auditing.
Managing Active Directory with Policies
Many Group Policy settings detailed in the previous sections of this chapter for computer and user management apply only to domain environments. Group Policy can and is also used to manage security and configuration settings within Active Directory. Many settings apply to server role configurations to standardize security and configurations, but one main configuration of the Active Directory domain group policies is to set the password policy for all the users in the domain. To configure the setting values for the domain password policy, the default domain policy needs to be edited. The password policy settings are contained in the Computer ConfigurationPoliciesWindows SettingsSecurity SettingsAccount PoliciesPassword Policy settings node. Figure 25.20 displays the default password policy settings for Windows 2016 domains.
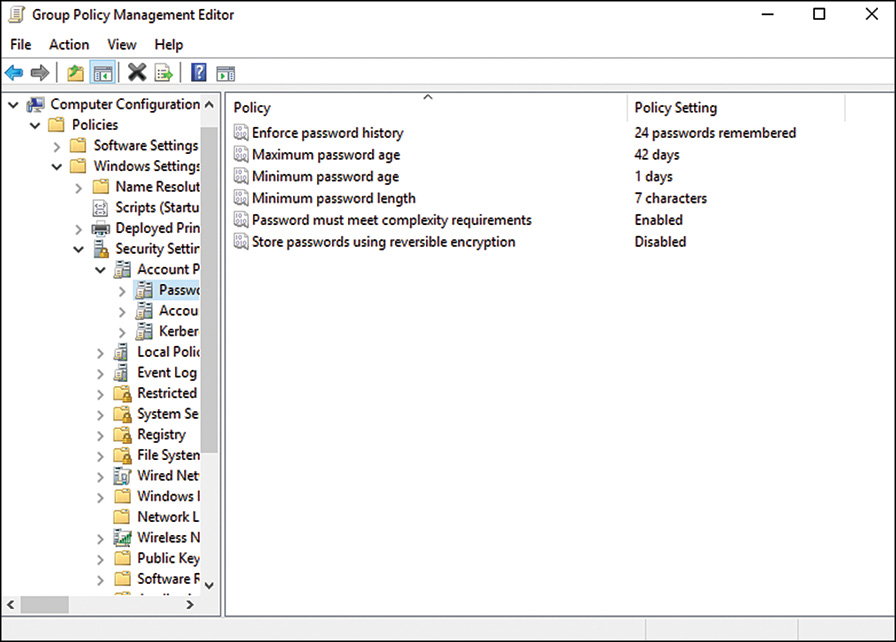
When administrators review or need to update the domain password policy, an account lockout policy should be defined. The account lockout policy determines how many failed password attempts will be tolerated before a user account is locked, and whether the account will be automatically unlocked. The following list contains the three account lockout settings:
![]() Account Lockout Duration—This setting defines how many minutes an account remains locked out before it is automatically unlocked by the system.
Account Lockout Duration—This setting defines how many minutes an account remains locked out before it is automatically unlocked by the system.
![]() Account Lockout Threshold—This setting defines the number of failed logon attempts that are allowed before the user account is locked out.
Account Lockout Threshold—This setting defines the number of failed logon attempts that are allowed before the user account is locked out.
![]() Reset Account Lockout Counter After—This setting defines the number of minutes before the bad logon count is returned to zero.
Reset Account Lockout Counter After—This setting defines the number of minutes before the bad logon count is returned to zero.
Fine-Grained Password Policies
New for Windows Server 2008 and also included with Windows Server 2016 domains is a feature called fine-grained password policies. This feature is only available in domains operating in Windows 2008 or greater domain functional level. A fine-grained password policy is a password policy that can be defined and applied to a single domain user or a set of domains users that require looser or tighter password policies that the organization’s current domain password policy. This can be a very valuable feature for organizations that require interoperability with legacy systems or applications that require service accounts that cannot adhere to the standard domain password policy. Fine-grained password policies are stored in the domain Password Settings Container and are defined as Password Settings Objects. To create a new password settings object, follow these steps:
1. Log on to the designated Windows Server 2016 system with the AD DS tools installed.
2. Open Server manager from the taskbar and from the Server Manager tools menu select Active Directory Administrative Center (ADAC).
3. When the ADAC window opens, in the tree pane double-click on the desired domain, for this example, the companyabc.com domain.
4. In the center pane scroll down and double-click on the System container.
5. In the center pane scroll down and select the Password Settings Container.
6. When the Password Settings Container is selected, in the Task pane on the right, select New and then select Password Settings to create a new Password Settings Object.
7. In the Create Password Settings Window give the Password Settings object a name and enter a value for the precedence.
8. Configure the desired Password Settings Object settings to the desired values.
9. Under the Directly Applies to section, click the Add button and specify the users and/or security groups that this Password Settings Object applies to, as shown in Figure 25.21.
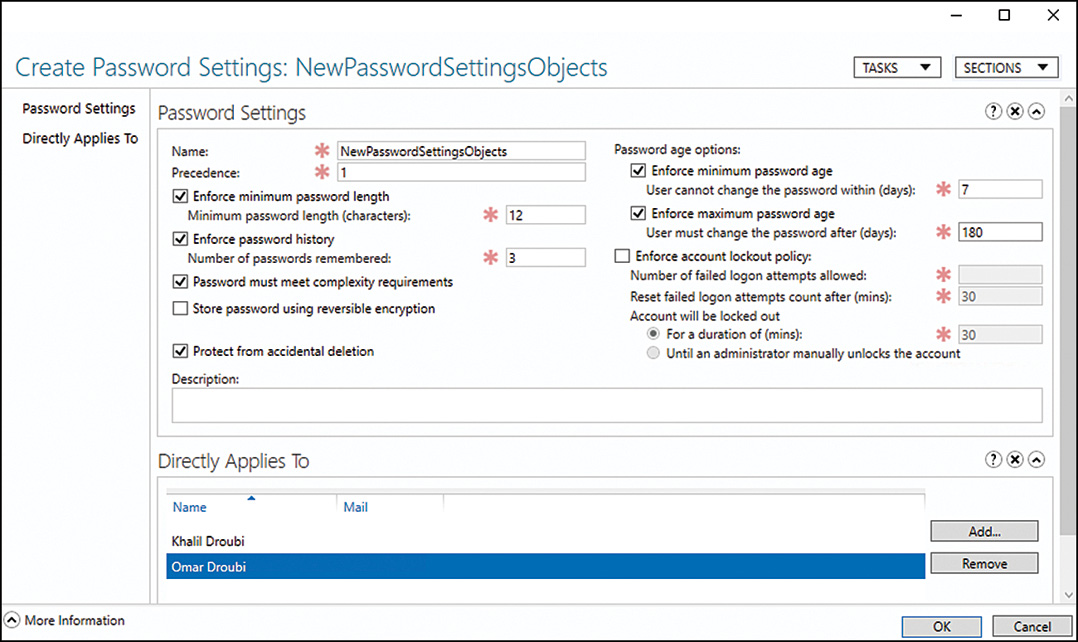
10. Click Ok to save the new Password Settings Object. If a user account needs to be checked to see if a fine-grain Password Settings object is applied to it, simply right-click on a user account from within Active Directory Administrative Center and select View Resultant Password Settings as shown in Figure 25.22.
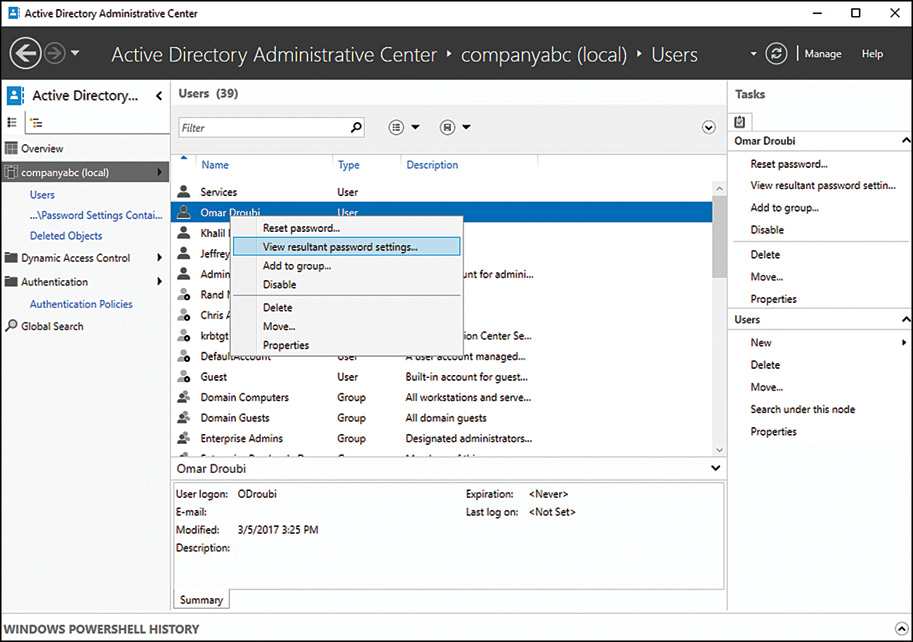
11. Log on to a workstation or server with a user account added to the policy, change the password to verify that the Fine-Grained PSO has been applied properly.
Even though fine-grained password policies should only be used if necessary and sparingly, after administrators know about it, many accounts will suddenly need to be added to a PSO that is less restrictive than the domain password policy. To audit the users to whom PSOs apply, the PSOs in the Password Settings Container should be reviewed regularly.
Configuring Restricted Groups to manage Computer Local Groups
A great feature of group policies that commonly goes unused is restricted groups. Restricted groups Group Policy settings enable an administrator to manage the membership of local groups on domain member servers and workstations.
NOTE
Unless the impact is completely understood and desired, never link a group policy with restricted group settings to a domain or a site object because the settings will be inherited by all computers in the domain or site, including domain controllers and Active Directory security groups. Managing Active Directory security groups using Group Policy restricted groups is not supported by Microsoft.
Restricted groups can be used to populate and control the members of a designated local group, or they can be used to add members to a specific group. Using restricted groups requires a deep understanding of how the settings work. Testing should always be performed before linking a restricted group GPO to an domain organizational unit in a production environment. There are a few scenarios that Group Policy administrators and organizations commonly utilize restricted groups domain policies for, including the following:
![]() Define and restrict the membership of a local security group by adding users or other groups using the members setting of restricted groups.
Define and restrict the membership of a local security group by adding users or other groups using the members setting of restricted groups.
![]() Add Universal and Global Domain groups to local computer or local domain groups using the member of setting of restricted groups.
Add Universal and Global Domain groups to local computer or local domain groups using the member of setting of restricted groups.
Controlling Group Membership Using Restricted Groups
Restricted groups can be used to control the membership of a group using the member setting, which is detailed next. When this setting is defined for a group, only the members added to this list will be a member of the group, and any existing members will be removed when the policy is applied or refreshed. The only exception to this rule is when the local Administrator user account is a member of a server Administrators local group or the Administrators domain security group. This does not apply to any other security group that the Administrator account is a member of.
The restricted groups Administrator account exception was added as a fix with specific service pack revisions in a legacy operating systems, so if the computers in the organization are not up-to-date on supported operating systems and current service pack revisions, the Administrator account may be removed by a restricted groups member policy. As a best practice, when the local or domain Administrator account needs to be a member of a restricted group, do not count on the GPO to leave it in; instead, define it within the member policy setting. As an example of how to control membership of a local group on a member server or workstation using restricted groups, follow these steps:
1. Log on to a designated Windows Server 2016 administrative server and open the GPMC.
2. In the GPMC expand the forest and domains node to reveal the desired domain and the Group Policy Objects container within.
3. Select the Group Policy Objects container and create a new GPO named NetCfgOpsRestrictedGroupGPO and open it for editing.
4. Open the NetCfgOpsRestrictedGroupGPO policy for editing and in the Group Policy Management Editor, navigate to the Computer ConfigurationPoliciesWindows SettingsSecurity Settings node, and select Restricted Groups beneath it.
5. In the tree pane, right-click the Restricted Groups node and select Add Group.
6. When the Add Group window opens, do not browse; just type in Network Configuration Operators and click OK.
7. When the Network Configuration Operators window opens, click the Add button in the Members of This Group section.
8. When the Add Member window opens, type in the name of a user or group and click OK for local user accounts, or click the Browse button to locate and select users or groups from the domain, click OK, and click OK again. Domain accounts should be entered as domainusername and multiple entries should be separated by semicolons or they can be added one by one.
9. After all the entries are added, click OK to finalize the settings, as shown in Figure 25.23.
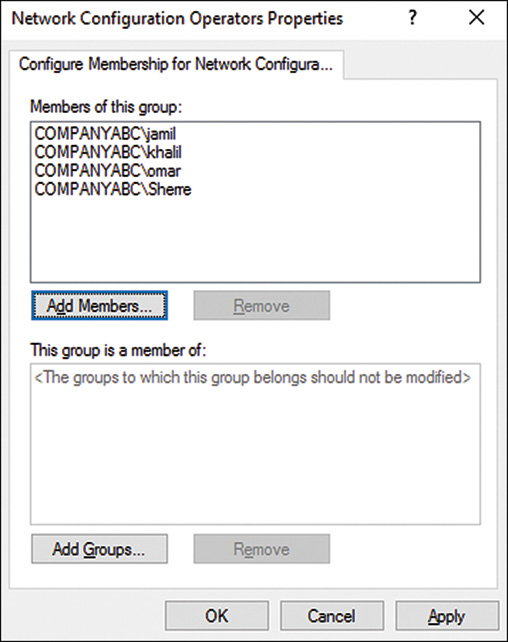
10. Back in the Group Policy Management Editor window, close the GPO.
11. In the GPMC, link the new NetCfgOpsRestrictedGroupGPOpolicy to an OU with a computer account that can be used to test this policy. Network Configuration Operators groups exist in Windows XP, Windows Server 2003 and later client and server operating systems.
12. Log on to a system to which the policy applies with an account with administrator group membership and verify the membership of the group. If the policy has not yet been applied, run the gpdate.exe /force command in a command prompt window.
13. Add additional users to the group and reapply the GPO by running the gpupdate. exe /force command in a command prompt window. Verify that the new users have been removed by the domain group policy.
14. Log off of the workstation and log back on to the Windows Server 2016 system. Link the GPO to the appropriate organizational unit to complete this task.
Using this function of restricted groups is not recommended for the Administrators local group on domain workstations unless the organization is certain that no users have been added to allow for legacy application or other additional rights. For this example, the Network Configuration Operators group membership has been defined by the policy. This group has the rights to completely manage and configure network settings of the computer.
Augmenting Group Membership Using Restricted Groups
When strictly controlling the membership of a group is not the desired change, the restricted group’s Member Of function can be used. This is a less-invasive method of updating or modifying group membership using domain policies. For example, if an organization wants to add the COMPANYABCIT domain security group to the local Administrators group of all computers in the Local Workstations organizational unit, the following process can be followed:
1. Create an OU named Local Workstations and place all the necessary computer accounts into the OU.
2. Create a new domain group policy called LocalWorkstationsRestrictedGroupGPO and open it for editing.
3. In a GPMC windows, open the Computer ConfigurationPoliciesWindows SettingsSecurity SettingsRestricted Groups node. Right-click the node and select Add Group.
4. Type in or browse to locate the desired domain group; for this example, use the COMPANYABCIT group. Click OK when the group is designated.
5. In the properties of the COMPANYABCIT restricted group, click the Add button in the This Group Is a Member Of section. In the Add window, do not browse; simply type in Administrators and click OK. The properties of the group should appear, as shown in Figure 25.24.
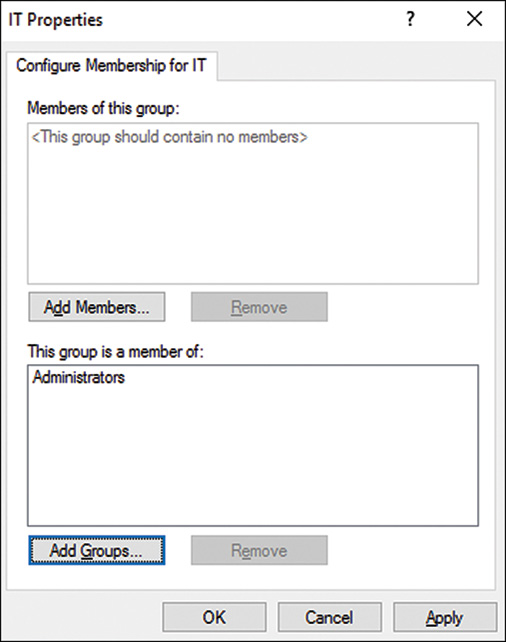
FIGURE 25.24 Adding members to the local Administrators group using the restricted group Member of function.
6. Click OK again to close the COMPANYABCIT Restricted Group Properties window.
7. Back in the Group Policy Management Editor window, close the GPO.
8. In the Group Policy Management Console, link the new LocalWorkstationsRestrictedGroupGPO policy to an OU with a computer account that can be used to test this policy.
9. Log on to a system that the policy applies to using an account with Administrators group membership, and verify the membership of the local Administrators group includes the designated domain group as configured in the GPO.
10. Log off of the workstation and log back on to the Windows Server 2016 system. Link the GPO to the appropriate organizational unit.
Synchronous Foreground Refresh
Group Policy processing occurs at computer startup, shutdown, and periodically at during the background refresh interval for computers. Processing for users occurs at user logon and logoff and periodically during the background refresh interval. Certain functions of Group Policy, including software installation, user folder redirection, computer startup and shutdown scripts, and user logon and logoff scripts require the network to be available during processing. Windows XP and greater client operating systems do not wait for the network during computer startup and user logon by default and by design. This feature provides faster computer reboots and faster user logon processes but can also cause some Group Policy processing issues. When software installations, folder redirection, computer startup, and/or user logon scripts are defined within domain group policies, it might be required to also enable the Always Wait for the network at Computer Startup and Logon setting within group policies. The setting is stored in the Computer Configuration node and can be configured as follows:
1. Log on to a designated Windows Server 2016 administrative server and open the GPMC.
2. In the GPMC, expand the forest and domains node to reveal the desired domain and the Group Policy Objects container within.
3. Select the Group Policy Objects container and create a new GPO named WaitForNetworkGPO and open it for editing.
4. When the Group Policy Management Editor opens, navigate to Computer ConfigurationPoliciesAdministrative TemplatesSystem node.
5. Expand the System node and select Logon in the tree pane.
6. In the Settings pane, double-click the Always Wait for the Network at Computer Startup and Logon setting.
7. On the Setting tab, select the Enabled option button, and click OK.
8. Close the Group Policy Management Editor, and return to the GPMC.
9. In the GPMC, if necessary, adjust the links to the updated GPO, and close the GPMC when finished.
There is also a corresponding setting in the User Configuration section of GPOs, but if this setting is configured in the Computer Configuration section, it will run for all users who log on to the system.
GPO Modeling and GPO Results in the GPMC
When an organization decides to perform administrative and management tasks using group policies, it is essential that the system administrators understand how to check to see whether Group Policy processing is working correctly. In the case when Active Directory hierarchies are being reconstructed or if new policies are being deployed, performing a simulated application of group policies to review the results can help avoid unexpected issues. To perform Group Policy simulations, an administrator can use Group Policy modeling, available in the GPMC. Group Policy modeling is the equivalent of Resultant Set of Policies (Planning), which is the name of the administrative right that must be delegated in Active Directory to run this tool. To perform Group Policy modeling, complete the following steps:
1. Log on to a designated Windows Server 2016 administrative server and open the GPMC.
2. In the tree pane, select the Group Policy Modeling node, right-click the node, and select Group Policy Modeling Wizard.
3. On the Welcome page, click Next to continue.
4. On the Domain Controller Selection page, specify a domain controller or accept the default of using any domain controller, and click Next.
5. On the User and Computer Selection page, the Group Policy Modeling Wizard can be used to run a simulation based on a specific user and computer in their current locations, or containers can be specified for either the user or computer to simulate GPO processing of a specific user, logging on to a Computer in a specific container. For this example, use root OUs named Corporate Users for users, and for computers use the Local Workstations OU, as shown in Figure 25.25. Click Next to continue.
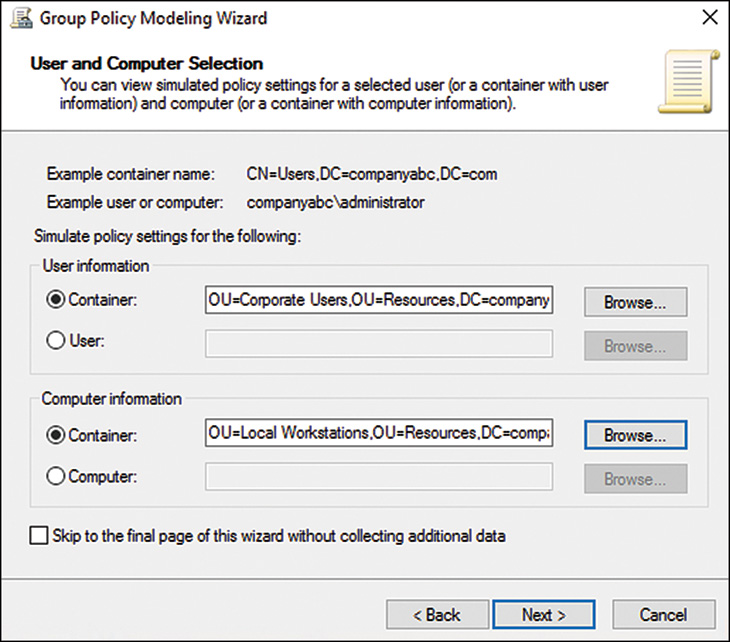
6. On the Advanced Simulations page, loopback processing, slow network connections, and site-specific testing can be specified. Accept the defaults and click Next to continue.
7. On the User Security Groups page, specific security groups can be specified to run policy modeling against. Accept the defaults and click Next to continue.
8. On the Computer Security Groups page, specific security groups can be specified to run policy modeling against. Accept the defaults and click Next to continue.
9. On the WMI Filters for Users page, select the All Linked Filters option button, and click Next to continue.
10. On the WMI Filters for Computers page, select the All Linked Filters option button, and click Next to continue.
11. On the Summary of Selections page, review the choices and if everything looks correct, click Next to run the GPO modeling tool.
12. When the process completes, click Finish to return to the GPMC and review the modeling results.
13. In the Settings pane, the summary of the computer and user policy processing is available for view. Review the information about this page, and then click the Details tab to review the final GPO settings that would be applied, as shown in Figure 25.26.
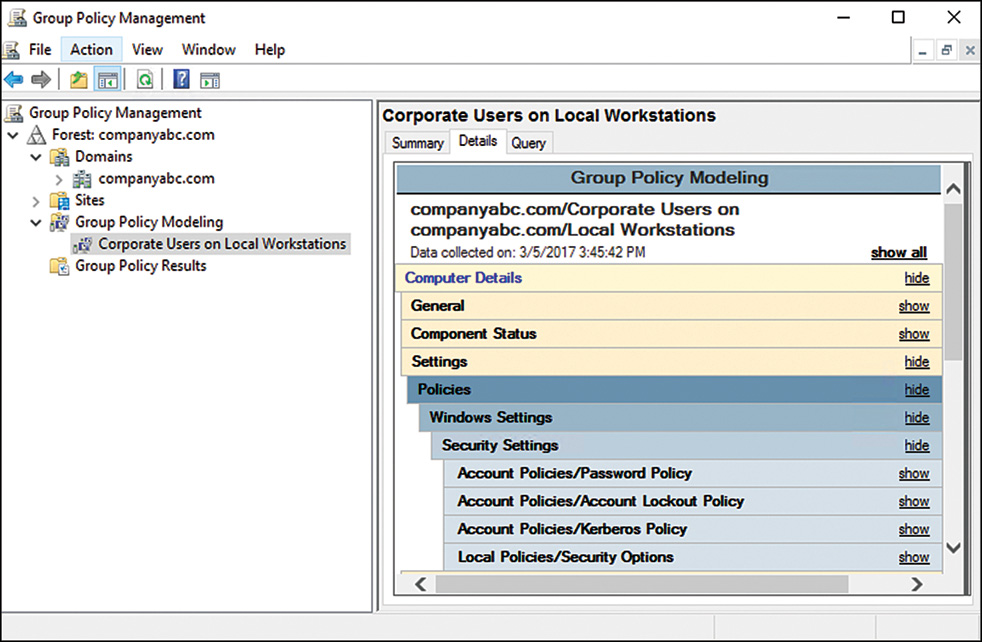
In situations when Group Policy is not delivering the desired results, GPO results can be run to read and display the Group Policy processing history. GPO results are run against a specific computer, but can also be used to collect user policy processing. For the following example, use an existing system named WS1 and an existing user named Jamil. To run GPO results to review the GPO processing history, follow these steps:
1. Log on to a designated Windows Server 2016 administrative server and open the GPMC.
2. In the tree pane, select the Group Policy Results node, right-click the node, and select Group Policy Results Wizard.
3. On the Welcome page, click Next to continue.
4. On the Computer Selection page, choose to run the policy against Another Computer and locate a Windows 10 system that a user has already logged on to such as WS1 for our example. Also be sure to uncheck the Do Not Display Policy Settings for the Selected Computer in the Results checkbox, and click Next. For this example, we only want to display user processing results.
5. On the User Selection page, select the Display Policy Settings For option button, and then select the Select a Specific User option button. Select a user from the list, and click Next to continue. Only users who have previously logged on to the selected computer will be listed and they will only be listed if the user running the tool is a domain admin or has been granted the right to run Resultant Set of Policies (Logging) for the particular users.
6. On the Summary of Selections page, review the choices and click Next to start the GPO Results collection process.
7. When the process completes, click Finish to return to the GPMC.
8. When the process completes, the results are displayed in the Settings pane on the Summary, Settings, and Policy Events tabs. Review the results and close the GPMC when finished.
Managing Group Policy from Administrative or Remote Workstations
It is common for Windows system administrators to manage group policies from their own administrative workstations. To manage a Windows Server 2016 environment properly, domain Group Policy administration should only be performed using a Windows Server 2016 system with the Group Policy Management tools and the Print Services tools installed or a Windows 10 system with the Group Policy and Print Services tools installed. The main reason for this is that only the Windows Server 2016 and Windows 10 GPMC exposes the Starter GPOs node and functions and the Print Services tools provide more functional management of network shared printers and GPO deployed printers. Of course, Windows Server 2008 GPMC can also be used, but the Vista GPMC does not provide the Starter GPO node if needed.
Group Policy management, aside from creating and managing policies, enables administrators to simulate policy processing for users and computers in specific containers in Active Directory using the Group Policy Modeling node in the GPMC. Furthermore, the previous application of Group Policy for users and computers can be collected and reviewed in the Group Policy Management Console using the Group Policy Results node in the GPMC. For an administrator, even a member of the Domain Admins group, to perform remote Group Policy modeling using the GPMC from a machine other than a domain controller, the following requirements must be met:
![]() The administrator must be a member of the domain Distributed COM Users security group.
The administrator must be a member of the domain Distributed COM Users security group.
![]() The administrator must be delegated the Generate Resultant Set of Policy. This right must be applied to the domain, OU, container, or site that contains all the computers and users the administrator will run simulated GPO processing against.
The administrator must be delegated the Generate Resultant Set of Policy. This right must be applied to the domain, OU, container, or site that contains all the computers and users the administrator will run simulated GPO processing against.
![]() The administrator must have the right to read all the necessary group policies, and this should be allowed by default.
The administrator must have the right to read all the necessary group policies, and this should be allowed by default.
To perform remote Group Policy results tasks using the GPMC from a machine other than a domain controller, the following requirements must be met:
![]() The administrator must be a member of the computer’s local Distributed COM Users security group for Windows XP, Windows Server 2003, and later client and server operating systems.
The administrator must be a member of the computer’s local Distributed COM Users security group for Windows XP, Windows Server 2003, and later client and server operating systems.
![]() The administrator must be a member of the computer’s local Administrators security group for the remote system and the remote system must be live on the network.
The administrator must be a member of the computer’s local Administrators security group for the remote system and the remote system must be live on the network.
![]() The Windows Firewall must be configured to allow the inbound Remote Administration exception, and the remote workstation must be on a network that is defined within this exception.
The Windows Firewall must be configured to allow the inbound Remote Administration exception, and the remote workstation must be on a network that is defined within this exception.
![]() The administrator must be delegated the Generate Resultant Set of Policy (Logging) right in Active Directory. This right must be applied to the domain, OU, container, or site that contains all the computers and users the administrator will run simulated GPO processing against.
The administrator must be delegated the Generate Resultant Set of Policy (Logging) right in Active Directory. This right must be applied to the domain, OU, container, or site that contains all the computers and users the administrator will run simulated GPO processing against.
![]() The administrator must have the right to read all the necessary group policies, and this should be allowed by default.
The administrator must have the right to read all the necessary group policies, and this should be allowed by default.
Summary
Windows Server 2016 Group Policy provides administrators with many options to standardize configuration and management of users and computer settings. Management policies can be fine-tuned based on the function, location, and the security requirements of the organization. This chapter offers many suggestions and examples of how Group Policy can be leveraged in any organization. Although group policies are very functional and can be a very attractive option for user and computer management, the planning and testing of group policies is essential in delivering the desired configuration and security settings to users and computers in an Active Directory or Windows workgroup environment.
Best Practices
The following are best practices from this chapter:
![]() The only changes that should be made to the default domain policy should be modifying the password and account policy settings and nothing else.
The only changes that should be made to the default domain policy should be modifying the password and account policy settings and nothing else.
![]() When the local or domain Administrator user account is a member of a group that will be managed with domain group policy restricted groups, do not count on the GPO to leave it in; instead, define it within the member policy setting of a restricted group.
When the local or domain Administrator user account is a member of a group that will be managed with domain group policy restricted groups, do not count on the GPO to leave it in; instead, define it within the member policy setting of a restricted group.
![]() When naming group policies, try to use naming conventions that easily identify the function of the policies for the organization.
When naming group policies, try to use naming conventions that easily identify the function of the policies for the organization.
![]() When using folder redirection for user profile folders, allow the system to create the folders and ensure that the share and root folder permissions are set up appropriately to allow this.
When using folder redirection for user profile folders, allow the system to create the folders and ensure that the share and root folder permissions are set up appropriately to allow this.
![]() Configure policies with application control policies to be processed by machines only running Windows 7 Enterprise and Ultimate, Windows 10 Professional client operating systems, and Window Server 2008 R2 or later server operating systems.
Configure policies with application control policies to be processed by machines only running Windows 7 Enterprise and Ultimate, Windows 10 Professional client operating systems, and Window Server 2008 R2 or later server operating systems.
![]() When defining network paths to scripts, software or shared folders, always use fully qualified domain names in the path, such as \server.companyabc.comshare or DFS links such as \companyabc.comshare.
When defining network paths to scripts, software or shared folders, always use fully qualified domain names in the path, such as \server.companyabc.comshare or DFS links such as \companyabc.comshare.
![]() Limit the computer configuration setting GPOs linked to the domain to avoid making undesired changes to domain controllers, or specifically deny the application of those policies to the Enterprise Domain Controllers security group.
Limit the computer configuration setting GPOs linked to the domain to avoid making undesired changes to domain controllers, or specifically deny the application of those policies to the Enterprise Domain Controllers security group.
![]() Have systems administrators use standard user accounts to do their day-to-day tasks and use User Account Control to allow for prompting of elevation when administrator privileges are required.
Have systems administrators use standard user accounts to do their day-to-day tasks and use User Account Control to allow for prompting of elevation when administrator privileges are required.