CHAPTER 22
Server-to-Client Remote and Mobile Access
IN THIS CHAPTER
![]() RAS System Authentication OptionsRAS
RAS System Authentication OptionsRAS
![]() DirectAccess in Windows Server 2016
DirectAccess in Windows Server 2016
![]() Choosing Between Traditional VPN Technologies and DirectAccess
Choosing Between Traditional VPN Technologies and DirectAccess
![]() Connection Manager
Connection Manager
As the Internet grows year after year, so does the need to work productively away from the office. Companies are always looking for alternative cost-effective methods of connecting their remote and mobile users without sacrificing performance or security. Windows Server 2016 offers Remote Access Service (RAS) in the form of traditional virtual private network (VPN) or dial-up services, as well as an improved DirectAccess as a modern alternative method of remote connectivity.
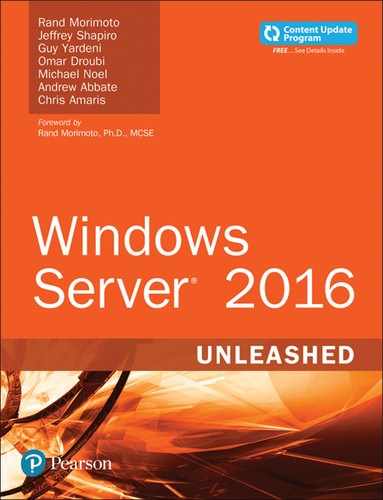
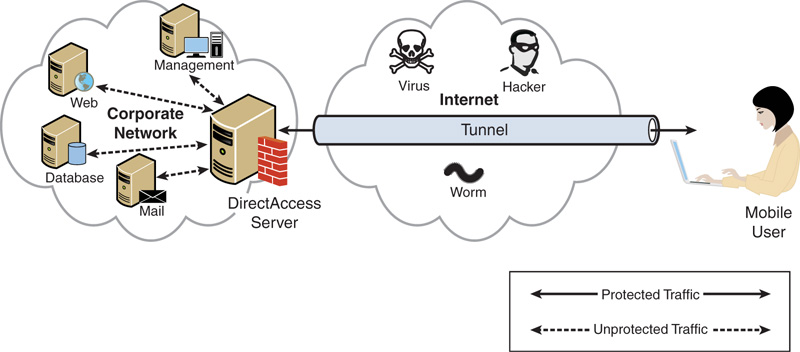
As the Internet has evolved and become ubiquitous, the vast majority of users have high-speed Internet connections at home, while on the road at hotels, and even while sipping a latte in a coffee shop. The Internet to which they are connecting is full of hackers, worms, and viruses from which the connections need to be protected. These users use remote access in the form of tunnels (shown in Figure 22.1) that connect from their workstation in the coffee shop through the dangerous Internet to the corporate resources. This chapter discusses the traditional VPN components of server-to-client remote and mobile access. This chapter also discusses DirectAccess, which makes this process even simpler for the remote worker, allowing application-level access without requiring a traditional VPN.
A huge problem is ensuring that the resources that are connecting to the internal network are healthy and will not infect internal resources. When the remote and mobile clients are connected to the internal network, they have direct network connectivity to internal resources, such as the database server, file servers, and directory server. This can present a huge risk if not managed and mitigated properly.
Windows Server 2008 provided a vastly improved access control mechanism for validating and controlling access to sensitive network resources via the Network Policy Server (NPS). Network Policy Server introduced key features to detect unhealthy systems, control what internal resources they can access, and even remediate the problems on the remote clients.
Windows Server 2008 R2 extended NPS functionality with templates for NPS configuration, SQL logging for RADIUS, and support for non-English languages. DirectAccess seamlessly connects users to the corporate network anywhere they have Internet access. DirectAccess loads as the system boots, extending access into the “office.” Remote systems are treated just as if they are on the local network and can be managed in a similar manner with the added quarantine and remediation functionality of the NPS system. However, in Windows Server 2008 R2, DirectAccess had stringent requirements and constraints that made it difficult to implement for many organization.
The Remote Access Services role provides a single role that encompasses the client-to-server remote-access features. This allows for holistic administration and management of the remote-access services. Windows Server 2016 further improves DirectAccess and facilitates organizations adopting DirectAccess technology.
This chapter focuses on client-to-server connectivity in Windows Server 2016, rather than on server-to-server security or site-to-site connectivity. See Chapter 13, “Securing Data in Transit,” for a detailed discussion on the server-to-server and site-to-site connectivity features of Windows Server 2016.
Remote Access in Windows Server 2016
Remote Access in Windows Server 2016 includes ease of deployment features, technical improvements, and management features. The server platform has received a huge improvement in the remote capability, scalability, both down and up, and it has now been highly optimized for cloud deployment, particularly Azure. In the Azure area, RAS and VPN fully integrates with Azure AD, and the user logon experience has been revamped to allow thousands of simultaneous logins to occur without significant wait times.
Windows Server 2016 makes it easier to deploy the Remote Access role and configure the DirectAccess feature in particular.
Important platform ability for remote access includes the following:
![]() DirectAccess and RAS coexistence—RAS and DirectAccess run on the same server.
DirectAccess and RAS coexistence—RAS and DirectAccess run on the same server.
![]() Simplified DirectAccess deployment—The Windows Server 2016 DirectAccess has few requirements. Even an understanding of IPv6 is not required, and is handled by the wizard behind the scenes. The simpler deployment wizard makes it easier for administrators to deploy DirectAccess quickly. This is especially true for small and medium-sized organizations that might not have dedicated resources for these tasks.
Simplified DirectAccess deployment—The Windows Server 2016 DirectAccess has few requirements. Even an understanding of IPv6 is not required, and is handled by the wizard behind the scenes. The simpler deployment wizard makes it easier for administrators to deploy DirectAccess quickly. This is especially true for small and medium-sized organizations that might not have dedicated resources for these tasks.
![]() Optional PKI deployment for DirectAccess—A public key infrastructure (PKI) is no longer a requirement for deploying DirectAccess, although it is still recommended. The wizard can use a server authentication certificate from a public certificate authority (CA) or even use self-signed certificates in small deployments.
Optional PKI deployment for DirectAccess—A public key infrastructure (PKI) is no longer a requirement for deploying DirectAccess, although it is still recommended. The wizard can use a server authentication certificate from a public certificate authority (CA) or even use self-signed certificates in small deployments.
![]() Windows PowerShell—Windows Server 2016 provides full support for the Remote Access role through PowerShell, including setup, configuration, monitoring, and troubleshooting.
Windows PowerShell—Windows Server 2016 provides full support for the Remote Access role through PowerShell, including setup, configuration, monitoring, and troubleshooting.
Additional features worth noting include the following:
![]() Integrated NAT64 and DNS64 for accessing IPv4-only resources—While Direct Access is an IPv6 technology, supporting only clients that support IPv6, in most organizations, these clients need to access resources that only support IPv4. Windows Server 2016 DirectAccess now includes protocol translation with NAT64 and name resolution with DNS64, allowing DirectAccess clients to access IPv4 resources seamlessly. In previous versions, this would have required deployment of Microsoft Forefront Unified Access Gateway.
Integrated NAT64 and DNS64 for accessing IPv4-only resources—While Direct Access is an IPv6 technology, supporting only clients that support IPv6, in most organizations, these clients need to access resources that only support IPv4. Windows Server 2016 DirectAccess now includes protocol translation with NAT64 and name resolution with DNS64, allowing DirectAccess clients to access IPv4 resources seamlessly. In previous versions, this would have required deployment of Microsoft Forefront Unified Access Gateway.
![]() NAT support—DirectAccess supports configurations where the server is not directly connected to the Internet. This is the typical configuration for small and medium-sized organizations, where the DirectAccess server is behind a firewall that is using NAT to provide access to the Internet. In this configuration, DirectAccess will use IP over HTTPS to tunnel through the firewall.
NAT support—DirectAccess supports configurations where the server is not directly connected to the Internet. This is the typical configuration for small and medium-sized organizations, where the DirectAccess server is behind a firewall that is using NAT to provide access to the Internet. In this configuration, DirectAccess will use IP over HTTPS to tunnel through the firewall.
![]() High-availability support—The Windows Server 2016 DirectAccess includes high availability by supporting both Network Load Balancing (NLB) and third-party hardware load balancers.
High-availability support—The Windows Server 2016 DirectAccess includes high availability by supporting both Network Load Balancing (NLB) and third-party hardware load balancers.
![]() Multidomain support—The Windows Server 2016 allows a single DirectAccess server to support multiple domains, simplifying the infrastructure for multi-domain organizations.
Multidomain support—The Windows Server 2016 allows a single DirectAccess server to support multiple domains, simplifying the infrastructure for multi-domain organizations.
![]() Support for RSA SecureID—Windows Server 2016 supports third-party One-Time Password (OTP) two factor authentication, such as RSA Secure ID.
Support for RSA SecureID—Windows Server 2016 supports third-party One-Time Password (OTP) two factor authentication, such as RSA Secure ID.
![]() Integrated force tunneling support—Normally, DirectAccess creates a split tunnel so that corporate communications travel over the DirectAccess tunnel. However, Internet traffic normally goes over the local Internet connection. This can be a security risk, so all traffic can be administratively forced over the DirectAccess tunnel, ensuring that all traffic is secured by the corporate infrastructure at the cost of bandwidth.
Integrated force tunneling support—Normally, DirectAccess creates a split tunnel so that corporate communications travel over the DirectAccess tunnel. However, Internet traffic normally goes over the local Internet connection. This can be a security risk, so all traffic can be administratively forced over the DirectAccess tunnel, ensuring that all traffic is secured by the corporate infrastructure at the cost of bandwidth.
![]() Manage-out only support—Windows Server 2016 allows administrators to configure DirectAccess to provide corporate support of workstations only. This ensures that the corporate IT can always remotely manage the workstations in the field, without needing to provide users access.
Manage-out only support—Windows Server 2016 allows administrators to configure DirectAccess to provide corporate support of workstations only. This ensures that the corporate IT can always remotely manage the workstations in the field, without needing to provide users access.
![]() Server Core support—The Windows Server 2016 Remote Access role supports both RAS and DirectAccess on the default Server Core installation option as well as the full installation option. This allows the remote-access services to be deployed in the most secure and performing manner possible. When installed on server core, the Remote Access role can be managed via PowerShell or via remote server management.
Server Core support—The Windows Server 2016 Remote Access role supports both RAS and DirectAccess on the default Server Core installation option as well as the full installation option. This allows the remote-access services to be deployed in the most secure and performing manner possible. When installed on server core, the Remote Access role can be managed via PowerShell or via remote server management.
The Remote Access role makes it easier for administrators to understand what activity is taking place over the remote access connections and troubleshoot issues. Windows Server 2016 also includes the following:
![]() Health monitoring—The Windows Server 2016 Remote Access role has user and server health monitoring, which is a greatly expanded set of metrics including summary connections, user connections, and even resources being accessed by users. This is displayed in a dashboard for quick access.
Health monitoring—The Windows Server 2016 Remote Access role has user and server health monitoring, which is a greatly expanded set of metrics including summary connections, user connections, and even resources being accessed by users. This is displayed in a dashboard for quick access.
![]() Diagnostics—The Windows Server 2016 Remote Access role includes diagnostic tools that are integrated into the monitoring dashboard. This includes detailed event logging, trace logs, packet capture, and log correlation to activities and actions.
Diagnostics—The Windows Server 2016 Remote Access role includes diagnostic tools that are integrated into the monitoring dashboard. This includes detailed event logging, trace logs, packet capture, and log correlation to activities and actions.
These features make it easier to deploy, support, and use the Windows Server 2016 remote access services, especially in the virtual server environment of Azure. In fact, with Azure AD in the background and the VPN or DirectAccess server in the Azure cloud, the user can be located anywhere on the planet and connect to a VPN server into the corporate network at an Azure address. The RAS or VPN server no longer needs to be a physical server in a corporate data center somewhere.
VPN in Windows Server 2016
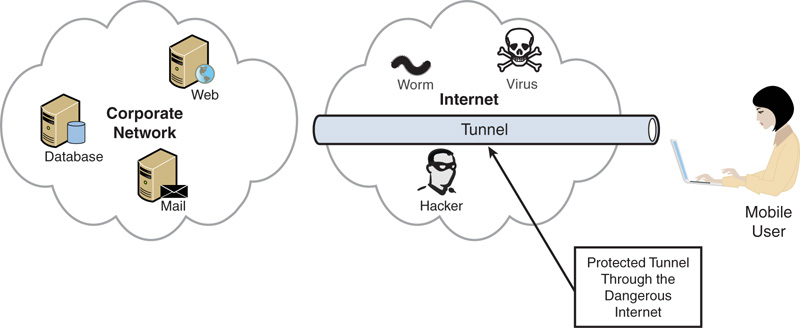
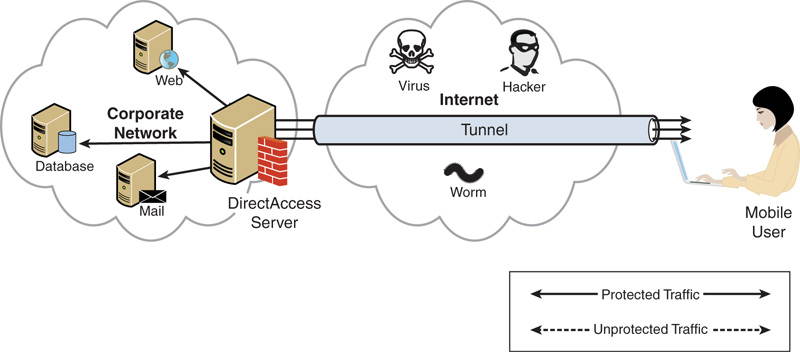
A virtual private network (VPN) is the extension of a private network that encompasses links across shared or public networks like the Internet. A VPN allows data to be sent between two computers across the Internet in a manner that emulates a point-to-point private link. With a VPN, illustrated in Figure 22.2, a private link is created between the client and the VPN server by encrypting the data for confidentiality; data packets that are intercepted while traveling through the Internet are unreadable without the proper encryption keys.
VPN technology provides corporations with a scalable and low-cost solution for remote access to corporate resources, such as database, file, and directory servers. VPN connections allow remote users to securely connect to their corporate networks across the Internet. Remote users would access resources as if they were physically connected to the corporate local-area network (LAN).
Later in the chapter, a Windows Server 2016 Remote Access service called DirectAccess is discussed. Microsoft positioned DirectAccess as being different from a traditional VPN. This positioning is based mainly on the automated nature of DirectAccess, rather than on technical or architectural differences. DirectAccess is technically a VPN, but we’ll focus on key differences from traditional VPNs later in this chapter.
Components Needed to Create a Traditional VPN Connection
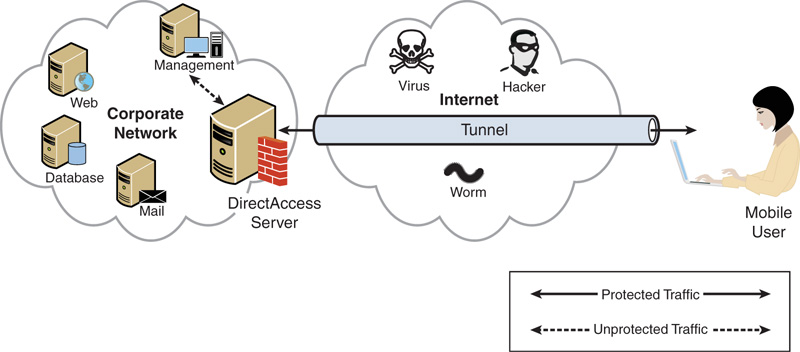
A point-to-point link, or tunnel, is created by encapsulating or wrapping the data with a header that provides routing information that allows the data to travel through the Internet. A virtual private network connection requires a VPN client and a VPN server or infrastructure. A secured connection is created between the client and server through encryption that establishes the tunnel, as shown in Figure 22.3.
The tunnel is the portion of the connection in which data is encapsulated. The VPN connection is the portion of the connection where the data is encrypted. The data encapsulation, along with the encryption, provides a secure VPN connection.
NOTE
A tunnel that is created without the encryption is not a VPN connection because the private data is sent across the Internet unencrypted and can be easily read. This violates the P for private in a virtual private network (VPN).
The figure also depicts the roles in a typical Windows Server 2016 VPN infrastructure. The roles in Windows Server 2016 consist of the following:
![]() VPN client
VPN client
![]() RAS server (VM or actual machine)
RAS server (VM or actual machine)
![]() NPS server (VM or actual machine)
NPS server (VM or actual machine)
![]() Certificate server (VM or actual machine, or an Azure-based certificate provider)
Certificate server (VM or actual machine, or an Azure-based certificate provider)
![]() Active Directory server on the corporate network or an Azure AD access service
Active Directory server on the corporate network or an Azure AD access service
These roles work together to provide the VPN functionality.
A shared or public internetwork is required to establish a VPN connection. For Windows Server 2016, the transit internetwork is always an IP-based network that includes the Internet as well as a corporation’s private IP-based intranet.
The topics and examples in this chapter utilize Certificate Services and Network Policy Server to secure VPN access. The details of the CA and the NPS are covered in Chapter 14, “Network Policy and Access Services, Routing and Remote Access, and DirectAccess.”
As you are well aware by now the Network Access Policy feature is no longer supported by Windows Server 2016. See Chapter 37 “Integrating System Center Operations Manager 2016 with Windows Server 2016” for systems configuration and network protection.
The VPN Client
A VPN client is a computer that initiates a VPN connection to a VPN server. Microsoft clients such as Windows 8 and Windows 10 and earlier versions can create a remote-access VPN connection to a Windows Server 2016 system.
VPN clients can also be any non-Microsoft PPTP client or L2TP client using IPsec.
The RAS Server
An RAS server is a Windows Server 2016 server with the Remote Access role services installed. This is the server that accepts VPN connections from VPN clients. The RAS server name or IP address must be resolvable as well as accessible through corporate firewalls, which could be by either having a network interface connected to the demilitarized zone (DMZ) or by providing the appropriate access rule on the firewall.
The NPS System
The Network Policy Server (NPS) provides the authentication, authorization, auditing, and accounting for the VPN clients. The NPS system is a Windows Server 2016 server with the Network Policy Server role service installed.
The NPS is used to enforce client authentication and client authorization. NPS also has multiple templates for larger-scale deployments or configuring multiple NPS servers identically.
Certificate Server
The certificate server is a certificate authority (CA) that issues certificates for the servers and clients to use in the authentication and encryption of tunnels. In Windows Server 2016, this is a Windows Server 2016 server with the Active Directory Certificate Services role installed with the Certification Authority and the Certification Authority Web Enrollment role services installed. These roles also require some other supporting roles to be installed, such as the Web Server (IIS) role and the File Services role.
Using Windows Server 2016 allows the administrator to issue and control certificates for the VPN infrastructure. This could also be handled by a third-party CA such as VeriSign, thereby not requiring a server, albeit at a steep annual cost.
Although not a requirement for all configurations of the VPN infrastructure, certificates are considered a best practice to enhance the security of the VPN infrastructure.
Active Directory
Active Directory provides the authentication database for the VPN client users. In Windows Server 2016, this is a server with the Active Directory Domain Services role installed. Azure AD provides this service as well.
RAS System Authentication Options
Authentication in any networking environment is critical for validating whether the individual wanting access should be allowed access to network resources. Authentication is an important component in the Windows Server 2016 security initiative. Windows Server 2016 can authenticate a remote access user connection through a variety of PPP authentication protocols, including the following:
![]() Password Authentication Protocol (PAP)
Password Authentication Protocol (PAP)
![]() Challenge-Handshake Authentication Protocol (CHAP)
Challenge-Handshake Authentication Protocol (CHAP)
![]() Microsoft Challenge–Handshake Authentication Protocol (MS-CHAP)
Microsoft Challenge–Handshake Authentication Protocol (MS-CHAP)
![]() MS-CHAP version 2 (MS-CHAP v2)
MS-CHAP version 2 (MS-CHAP v2)
![]() Extensible Authentication Protocol (EAP)
Extensible Authentication Protocol (EAP)
![]() Protected Extensible Authentication Protocol (PEAP)
Protected Extensible Authentication Protocol (PEAP)
Authentication Protocols for PPTP Connections
For PPTP connections, only four authentication protocols (MS-CHAP, MS-CHAP v2, EAP, and PEAP) provide a mechanism to generate the same encryption key on both the VPN client and VPN server. Microsoft Point-to-Point Encryption (MPPE) uses this encryption key to encrypt all PPTP data sent on the VPN connection. MS-CHAP and MS-CHAP v2 are password-based authentication protocols.
Without a CA server or smart cards, MS-CHAP v2 is highly recommended because it provides a stronger authentication protocol than MS-CHAP. MS-CHAP v2 also provides mutual authentication, which allows the VPN client to be authenticated by the VPN server and the VPN server to be authenticated by the VPN client.
If a password-based authentication protocol must be used, it is good practice to enforce the use of strong passwords (passwords longer than eight characters) that contain a random mixture of uppercase and lowercase letters, numbers, and punctuation. Group policies can be used in Active Directory to enforce strong user passwords.
EAP and PEAP Authentication Protocols
Extensible Authentication Protocol (EAP) and Protected Extensible Authentication Protocol (PEAP) are designed to be used along with a certificate infrastructure that uses user certificates or smart cards.
With EAP, the VPN client sends its user certificate for authentication, and the VPN server sends a computer certificate for authentication. This is the strongest authentication method because it does not rely on passwords. Third-party CAs can be used as long as the certificate in the computer store of the NPS contains the server authentication certificate purpose (also known as a certificate usage or certificate issuance policy). A certificate purpose is identified using an object identifier (OID). If the OID for server authentication is 1.3.6.1.5.5.7.3.1, the user certificate installed on the Windows remote access client must contain the client authentication certificate purpose (OID 1.3.6.1.5.5.7.3.2).
PEAP does not specify an authentication method, but rather secures EAP by creating an encrypted channel between the client and the server. As such, it provides additional security on top of EAP. PEAP can even be used with MS-CHAP v2 to provide additional security to the password authentication protocol.
Authentication Protocols for L2TP/IPsec Connections
For L2TP/IPsec connections, any authentication protocol can be used because the authentication occurs after the VPN client and VPN server have established a secure connection known as an IPsec security association (SA). The use of a strong authentication protocol such as MS-CHAP v2, EAP, or PEAP is recommended to provide strong user authentication.
Choosing the Best Authentication Protocol
Organizations typically spend very little time choosing the most appropriate authentication protocol to use with their VPN connections. In many cases, the lack of knowledge about the differences between the various authentication protocols is the reason a selection is not made. In other cases, the desire for simplicity is the reason heightened security is not chosen as part of the organization’s authentication protocol decisions. Whatever the case, we make the following suggestions to assist you in selecting the best authentication protocol for VPN connections:
![]() Using the EAP or PEAP authentication protocol for PPTP, L2TP, and SSTP connections is highly recommended if the following conditions exist in an organization. If a smart card will be used, or if a certificate infrastructure that issues user certificates exists, EAP is the best and most secure option. Note that EAP is supported only by VPN clients running Windows XP and later and by Windows 2000 Server and later.
Using the EAP or PEAP authentication protocol for PPTP, L2TP, and SSTP connections is highly recommended if the following conditions exist in an organization. If a smart card will be used, or if a certificate infrastructure that issues user certificates exists, EAP is the best and most secure option. Note that EAP is supported only by VPN clients running Windows XP and later and by Windows 2000 Server and later.
![]() Use PEAP with EAP-MS-CHAP v2 as a method of easing the deployment burden. In this configuration, certificates are required only for the VPN server infrastructure and not for the clients. However, the key generation is done using Transport-Level Security (TLS) with mutual authentication for greatly enhanced security.
Use PEAP with EAP-MS-CHAP v2 as a method of easing the deployment burden. In this configuration, certificates are required only for the VPN server infrastructure and not for the clients. However, the key generation is done using Transport-Level Security (TLS) with mutual authentication for greatly enhanced security.
![]() Use MS-CHAP v2 and enforce strong passwords using Group Policy if you must use a password-based authentication protocol. Although not as strong of a security protocol as PEAP or EAP, MS-CHAP v2 is supported by computers running Windows XP and later. Very old systems still needed for applications that were never ported might include Windows NT 4.0 with Service Pack 4 and higher, Windows Me, Windows 98, and Windows 95 with the Windows Dial-Up Networking 1.3 or higher Performance and Security Update.
Use MS-CHAP v2 and enforce strong passwords using Group Policy if you must use a password-based authentication protocol. Although not as strong of a security protocol as PEAP or EAP, MS-CHAP v2 is supported by computers running Windows XP and later. Very old systems still needed for applications that were never ported might include Windows NT 4.0 with Service Pack 4 and higher, Windows Me, Windows 98, and Windows 95 with the Windows Dial-Up Networking 1.3 or higher Performance and Security Update.
VPN Protocols
PPTP, L2TP, and SSTP are the communication standards used to manage tunnels and encapsulate private data. It is important to note that data traveling through a tunnel must also be encrypted to be a VPN connection. Windows Server 2016 includes PPTP, L2TP, and SSTP tunneling protocols.
To establish a tunnel, both the tunnel client and tunnel server must be using the same tunneling protocol. Tunneling technology can be based on either a Layer 2 or Layer 3 tunneling protocol that corresponds to the Open System Interconnection (OSI) reference model. Layer 2 protocols correspond to the Data-link layer and use frames as their unit of exchange. PPTP and L2TP are Layer 2 tunneling protocols that encapsulate the payload in a PPP frame before it is sent across the Internet. Layer 3 protocols correspond to the Network layer and use packets. IPsec tunnel mode is a Layer 3 tunneling protocol that encapsulates IP packets in an additional IP header before sending them across the Internet.
Windows 10, Windows 8, Windows 7, Windows Vista, Windows XP, and Windows 2000 workstation VPN client and server computers support both L2TP/IPsec and PPTP by default. Both PPTP and L2TP/IPsec use PPP to provide an initial envelope for the data and then append additional headers for transport through the Internet. PPTP and L2TP also provide a logical transport mechanism to send PPP payloads and provide tunneling or encapsulation so that PPP payloads based on any protocol can be sent across the Internet. PPTP and L2TP rely on the PPP connection process to perform user authentication and protocol configuration.
There are a few differences between the three protocols. First, when using PPTP, the data encryption begins after the PPP connection process is completed, which means PPP authentication is used. With L2TP/IPsec, data encryption begins before the PPP connection process by negotiating an IPsec security association. In SSTP, the session is encrypted by SSL before authentication begins.
Second, PPTP connections use MPPE, a stream cipher that is based on the Rivest-Shamir-Adleman (RSA) RC-4 encryption algorithm and uses 40-, 56-, or 128-bit encryption keys. Stream ciphers encrypt data as a bit stream. L2TP/IPsec connections use the Data Encryption Standard (DES), which is a block cipher that uses either a 56-bit key for DES or three 56-bit keys for 3DES. Block ciphers encrypt data in discrete blocks (64-bit blocks, in the case of DES). SSTP uses SSL with RC4 or AES. DirectAccess uses 3DES or AES.
Finally, PPTP connections require only user-level authentication through a PPP-based authentication protocol. L2TP/IPsec connections require the same user-level authentication as well as computer-level authentication using computer certificates or pre-shared keys. In contrast, SSTP and DirectAccess may only require computer-level certificates and user account name and password credentials for the VPN servers.
Table 22.1 compares some of the characteristics of the three tunneling protocols.
TABLE 22.1 Comparing VPN Protocols
Characteristics |
PPTP |
L2TP/IPsec |
SSTP |
Encapsulation |
Generic routing encapsulation (GRE) |
L2TP over UDP |
SSTP over TCP |
Encryption |
Microsoft Point-to-Point Encryption (MPPE) with RC4 |
IPsec ESP with Triple Data Encryption Standard (3DES) or Advanced Encryption Standard (AES) |
SSL with RC4 or AES |
Tunnel maintenance protocol |
PPTP |
L2TP |
SSTP |
When user authentication occurs |
Before encryption begins |
After the IPsec session is established |
After the SSL session is established |
Certificates needed |
None |
Computer certificates on both the VPN client and VPN server |
Computer certificate on the VPN server and root CA certificate on the VPN client |
Client |
Windows 9x and later |
Windows 2000 and later |
Windows Server 2008 and later, Windows XP SP3 and later (Windows Vista SP1) |
Tunneling Within a Windows Server 2016 Networking Environment
For Layer 2 tunneling technologies, such as PPTP, L2TP, and SSTP, a tunnel is similar to a session; both of the tunnel endpoints must agree to the tunnel and must negotiate configuration variables, such as address assignment or encryption or compression parameters. In most cases, data transferred across the tunnel is sent using a datagram-based protocol. A tunnel maintenance protocol is used as the mechanism to manage the tunnel.
Layer 3 tunneling technologies generally assume that all the configuration settings are preconfigured, often by manual processes. For these protocols, there might be no tunnel maintenance phase. For Layer 2 protocols (PPTP, L2TP, and SSTP), however, a tunnel must be created, maintained, and then terminated.
After the tunnel is established, tunneled data can be sent. The tunnel client or server uses a tunnel data transfer protocol to prepare the data for transfer. For example, as illustrated in Figure 22.4, when the tunnel client sends a payload to the tunnel server, the tunnel client first appends a tunnel data transfer protocol header to the payload. The client then sends the resulting encapsulated payload across the internetwork, which routes it to the tunnel server. The tunnel server accepts the packets, removes the tunnel data transfer protocol header, and forwards the payload to the target network. Information sent between the tunnel server and tunnel client behaves similarly.

Point-to-Point Tunneling Protocol
The Point-to-Point Tunneling Protocol (PPTP) is a Layer 2 protocol that encapsulates PPP frames in IP datagrams for transmission over the Internet. PPTP can be used for remote access and router-to-router VPN connections. It uses a TCP connection for tunnel maintenance and a modified version of GRE to encapsulate PPP frames for tunneled data. The payloads of the encapsulated PPP frames can be encrypted/compressed. Figure 22.5 shows the structure of a PPTP packet containing user data.

Layer 2 Tunneling Protocol
Layer 2 Tunneling Protocol (L2TP) is a combination of the Point-to-Point Tunneling Protocol (PPTP) and Layer 2 Forwarding (L2F), a technology proposed by Cisco Systems, Inc. L2TP encapsulates PPP frames that are sent over IP, X.25, Frame Relay, and ATM networks. The payloads of encapsulated PPP frames can be encrypted/compressed. When sent over the Internet, L2TP frames are encapsulated as User Datagram Protocol (UDP) messages, as shown in Figure 22.6.
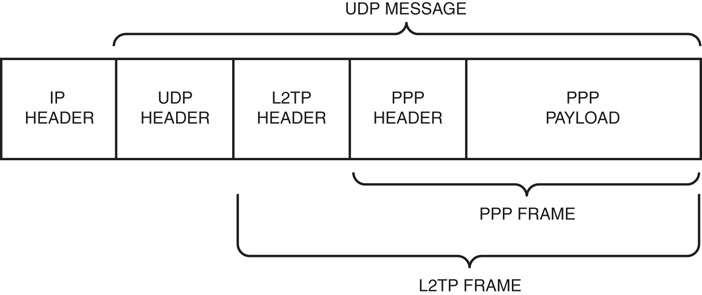
L2TP frames include L2TP connection maintenance messages and tunneled data. L2TP connection maintenance messages include only the L2TP header. L2TP tunneled data includes a PPP header and PPP payload. The PPP payload can be encrypted or compressed (or both) using standard PPP encryption and compression methods.
In Windows Server 2016, L2TP connections do not negotiate the use of PPP encryption through Microsoft Point-to-Point Encryption (MPPE). Instead, encryption is provided through the use of the IP Security (IPsec) Encapsulating Security Payload (ESP) header, and trailer.
IP Security
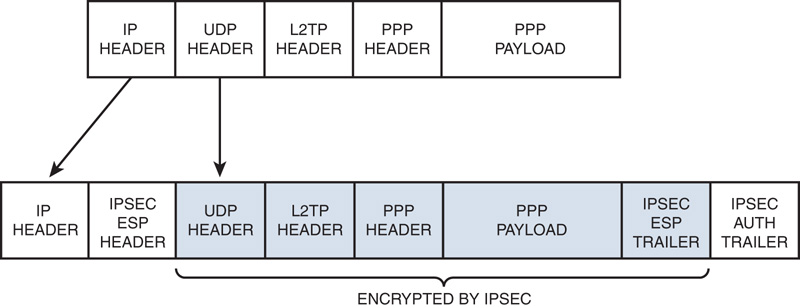
IPsec was designed as an end-to-end mechanism for ensuring data security in IP-based communications. Illustrated in Figure 22.7, the IPsec architecture includes an authentication header to verify data integrity and an encapsulation security payload for both data integrity and data encryption. IPsec provides two important functions that ensure confidentiality: data encryption and data integrity. IPsec uses an Authentication Header (AH) to provide source authentication and integrity without encryption and the Encapsulating Security Payload (ESP) to provide authentication and integrity along with encryption. With IPsec, only the sender and recipient know the security key. If the authentication data is valid, the recipient knows that the communication came from the sender and that it was not changed in transit.
NOTE
IPsec also plays a key role in another remote-access technology, Windows Server 2016 DirectAccess.
Secure Sockets Tunneling Protocol
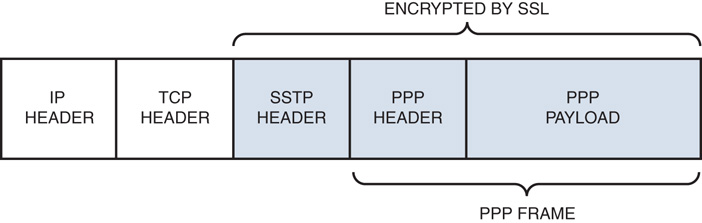
Introduced in Windows Server 2008, Secure Sockets Tunneling Protocol (SSTP) was specifically developed to get around the difficulties of setting up VPN tunnels through corporate firewalls, which block many of the ports and protocols used by PPTP and L2TP. The SSTP tunnel uses the HTTP over SSL (HTTPS) protocol, which is widely supported for secure web traffic. SSTP uses port 443 for the connection.
The tunneling protocol functions by encapsulating the original IP packet with a PPP header and then an SSTP header. The SSTP header, the PPP header, and the original IP packet are all encrypted by the SSL session. Finally, an IP header is added to the packet and it is routed to the destination. The structure of the packet is shown in Figure 22.8.
NOTE
Interestingly, even though SSTP is based on the HTTPS web protocol, the VPN server does not have to be configured with Internet Information Services (IIS). The RAS VPN server listens for SSTP connections on the uniform resource identifier (URI)/sra_{BA195980-CD49-458b-9E23-C84EE0ADCD75}/. This does not conflict with or require IIS, so IIS can be installed if needed for other purposes.
Unfortunately, SSTP does not support tunneling through web proxies that require authentication. Another limitation of SSTP is that it does not support site-to-site connections in Windows Server 2016, which both PPTP and L2TP do.
DirectAccess in Windows Server 2016
DirectAccess is a remote-access protocol introduced in Windows Server 2008 and now, a much-improved service is supported in Windows Server 2016. It provides network node connectivity to remote systems without any user login requirements. DirectAccess addresses several challenges with traditional VPN, including the following:
![]() The need for the user to manually connect to the VPN.
The need for the user to manually connect to the VPN.
![]() The delay the user experiences when connecting to the VPN while health checks are completed during the connection process.
The delay the user experiences when connecting to the VPN while health checks are completed during the connection process.
![]() The need for the user to reconnect manually if an established VPN connection is lost.
The need for the user to reconnect manually if an established VPN connection is lost.
![]() The slow performance when all traffic (intranet and Internet) is routed through the VPN connection.
The slow performance when all traffic (intranet and Internet) is routed through the VPN connection.
These challenges can cause users to limit the use of traditional VPN solutions. DirectAccess has been designed from the ground up to address those challenges. DirectAccess hides all the connection processes from the users and intelligently routes intranet versus Internet traffic, thereby alleviating the challenges of traditional VPNs. It connects as soon as the computer starts up and conducts the health checks, rather than when the user is logging in. The connection process is transparent to the user and the user never needs to explicitly connect to DirectAccess. Finally, DirectAccess has built-in options to control how DNS requests are handled, effectively bifurcating the Internet and intranet traffic to avoid burdening the remote access connection and improving performance.
DirectAccess creates an encrypted point-to-point tunnel from a remote user—in this case, specifically a remote user on Windows 7 or Windows 8—to the internal “enterprise” network. The difference is that the connection is transparent to the user. Once configured, the computer will automatically connect to the office from any available Internet connection. The user experience is almost identical to being in the office. In addition, through the use of the Windows Server 2016 NPS server, remote-connected clients can be securely managed similarly to internal client systems.
NOTE
Although positioned as an alternative to a VPN, the DirectAccess technology has all the elements of a VPN. It establishes a secure private tunnel through public networks using IPsec and certificates, with an end result functionally not much different from L2TP. The differences are mainly administrative rather than technical.
DirectAccess uses IPv6, IPsec, and if needed certificates to establish secure connections from the DirectAccess clients to intranet resources via the DirectAccess server. To traverse public IPv4 networks, DirectAccess uses IPv6 transition technologies such as ISATAP, Teredo, and 6to4.
DirectAccess in Windows Server 2008 R2 had some specific requirements, as follows:
![]() The server running DirectAccess needed to have two network cards: one attached to the intranet and one attached to the Internet.
The server running DirectAccess needed to have two network cards: one attached to the intranet and one attached to the Internet.
![]() The Internet network card had to have two consecutive public IPv4 addresses.
The Internet network card had to have two consecutive public IPv4 addresses.
![]() The intranet resources and applications must support IPv6 unless there was a NAT64 device present.
The intranet resources and applications must support IPv6 unless there was a NAT64 device present.
![]() The DirectAccess clients needed to be running Windows 7; older clients are not supported.
The DirectAccess clients needed to be running Windows 7; older clients are not supported.
![]() A domain controller and domain name system (DNS) server that the systems are connected to needed to be running Windows Server 2008 SP2 or later.
A domain controller and domain name system (DNS) server that the systems are connected to needed to be running Windows Server 2008 SP2 or later.
![]() A PKI needs to be available to issue certificates with a published Internet available certificate revocation list (CRL).
A PKI needs to be available to issue certificates with a published Internet available certificate revocation list (CRL).
These requirements are somewhat stringent and prevented many organizations from deploying Windows Server 2008 R2 DirectAccess.
DirectAccess have been relaxed to make it simpler for organizations to deploy DirectAccess. Specifically:
![]() The server running Windows Server 2016 can have a single network card and can be located behind a firewall.
The server running Windows Server 2016 can have a single network card and can be located behind a firewall.
![]() The Internet network card must have a single public IPv4 address only if Teredo support is needed.
The Internet network card must have a single public IPv4 address only if Teredo support is needed.
![]() The DirectAccess server can act as a gateway between IPv4 and IPv6, allowing
The DirectAccess server can act as a gateway between IPv4 and IPv6, allowing
![]() DirectAccess clients to access IPv4-only resources.
DirectAccess clients to access IPv4-only resources.
![]() The DirectAccess clients can either be Windows 7 or Windows 8; older legacy clients still are not supported.
The DirectAccess clients can either be Windows 7 or Windows 8; older legacy clients still are not supported.
![]() A domain controller and DNS server that the systems are connected to need to be running Windows Server 2008 SP2 and later.
A domain controller and DNS server that the systems are connected to need to be running Windows Server 2008 SP2 and later.
![]() Client authentication requests can be via Kerberos through the Kerberos proxy service versus requiring server and client certificates.
Client authentication requests can be via Kerberos through the Kerberos proxy service versus requiring server and client certificates.
![]() The DirectAccess server can also issue self-signed certificates if needed, rather than requiring a PKI solution be in place.
The DirectAccess server can also issue self-signed certificates if needed, rather than requiring a PKI solution be in place.
These changes make it easier for small and medium-sized organizations to deploy Windows Server 2016 DirectAccess, as well as provide flexibility to larger organizations. The Configuration Wizard is even intelligent and will examine the configuration of the DirectAccess server and then choose the best DirectAccess deployment options automatically.
DirectAccess and IPv6
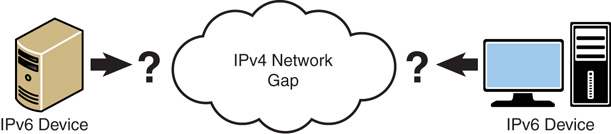
DirectAccess is designed on top of IPv6 and requires that all endpoint devices support IPv6. It is one of the first services to require this modern protocol.
DirectAccess is most likely to be deployed in an IPv4 world, given the prevalence of IPv4 on the Internet today. This creates an IPv4 gap (shown in Figure 22.9) across which IPv6 devices like DirectAccess clients need to communicate.
Most organizations will need to use IPv6 transition technologies to bridge the IPv4 gap from their IPv6 enlightened devices to communicate. This, in effect, routes the IPv6 communications through the IPv4 protocol stack, as shown in Figure 22.10. The packets traveling down the IPv6 protocol stack take a sharp turn and move across the protocol stack to the IPv4 protocol stack, allowing them to transit the IPv4 network. On the other side, the same packets come in via the IPv4 protocol stack, but are routed to the IPv6 stack.

Communications between IPv6 devices like DirectAccess clients over IPv4 networks is accomplished with IPv6 over IPv4 tunneling. In tunneling, the IPv6 packets are encapsulated in an IPv4 packet by the source device and routed through the IPv4 network. When the encapsulated packet arrives at the boundary between the IPv4 and IPv6 networks, the IPv4 encapsulation is stripped off and the IPv6 packet continues on its way. The most common tunneling protocols are ISATAP, 6to4, and Teredo.
For organizations, the IPv6 tunneling protocols are used for the following purposes:
![]() ISATAP—This protocol is used to automatically assign IPv6 addresses within the organization’s IPv4 intranet.
ISATAP—This protocol is used to automatically assign IPv6 addresses within the organization’s IPv4 intranet.
![]() 6to4—This protocol is used to automatically assign IPv6 addresses and route across the public IPv4 Internet.
6to4—This protocol is used to automatically assign IPv6 addresses and route across the public IPv4 Internet.
![]() Teredo—This protocol is used to automatically assign IPv6 addresses and route across the public IPv4 Internet to devices behind NAT firewalls. This is the protocol that requires two consecutive public IPv4 addresses.
Teredo—This protocol is used to automatically assign IPv6 addresses and route across the public IPv4 Internet to devices behind NAT firewalls. This is the protocol that requires two consecutive public IPv4 addresses.
For organizations that have not deployed IPv6 natively, Microsoft Windows Server 2016, Windows 7, and Windows 8 support ISATAP, 6to4, and Teredo transition protocols. However, even while DirectAccess clients are using IPv6 transitional technologies like Teredo or 6to4, it is ultimately communicating from IPv6 clients to IPv6 hosts.
Internally, DirectAccess can use Network Address Translation-Protocol Translation (NAT-PT) devices, which can be used to provide access to IPv4 resources. Resources that don’t support IPv6 natively can be accessed through the use of a NAT-PT device. Microsoft Windows Server 2016 has NAT64 and DNS64 functionality built in, so DirectAccess clients can seamlessly access both IPv6 and IPv4 resources.
For organizations that have not deployed IPv6, the deployment of DirectAccess is an excellent project to test the IPv6 waters with. The infrastructure can be deployed in parallel with existing remote-access solutions and without impacting the existing IPv4 addressing scheme, providing IT personnel with a chance to learn IPv6 and its integration with IPv4 in a low-impact production setting.
See Chapter 10, “DHCP, IPv6 IPAM,” for a detailed discussion of the IPv6 protocol and the transition technologies needed to bridge the IPv4 gap.
A Tale of Two Tunnels
The DirectAccess client establishes two tunnels that are key to the versatility of this method of remote access. These tunnels are IPsec ESP tunnels that are authenticated and encrypted to ensure the confidentiality. These tunnels are as follows:
![]() Computer tunnel—The computer tunnel is established first when the DirectAccess client starts up. This tunnel is authenticated with the computer certificate only and provides access to the intranet DNS and domain controllers. This tunnel is also used to download the computer group policy and request user authentication.
Computer tunnel—The computer tunnel is established first when the DirectAccess client starts up. This tunnel is authenticated with the computer certificate only and provides access to the intranet DNS and domain controllers. This tunnel is also used to download the computer group policy and request user authentication.
![]() User tunnel—This tunnel is authenticated with the computer certificate and the user credentials and provides access to the intranet resources. This tunnel is used to download user group policy as well.
User tunnel—This tunnel is authenticated with the computer certificate and the user credentials and provides access to the intranet resources. This tunnel is used to download user group policy as well.
Both these tunnels are established transparently to the user. The user does not have to present credentials above and beyond the normal Windows logon to establish remote access. The two tunnels are shown in Figure 22.11.

These tunnels allow for the transparent establishment of remote access, essentially allowing the computer to connect to the intranet even when no user is logged on. This allows the DirectAccess client to receive Group Policy remotely and be managed by the management servers in the intranet. When a user logs on, they are authenticating to the intranet and, thus, ensuring that users are subject to the latest requirements, password changes, and policies. In contrast, other VPN solutions typically have users authenticating using cached credentials against the local machine and then establishing the remote-access connection.
End-to-Edge DirectAccess Model
The end-to-edge model of DirectAccess has the DirectAccess client establish an IPsec tunnel to the DirectAccess server. The DirectAccess server then forwards unprotected traffic to the intranet resources. This is the most common form of DirectAccess and closely follows a standard remote access methodology.
Figure 22.12 shows the end-to-edge connection model. Note that there is a single protected (solid line) connection through the tunnel to the DirectAccess server, which then is forwarded to each of the application servers in three separate unprotected (dashed line) connections.
The end-to-edge model requires no IPsec support within the intranet, although the intranet resources still need to support IPv6.
End-to-End DirectAccess Model
The end-to-end model of DirectAccess has the DirectAccess client establish an IPsec tunnel with each application server that they connect to. This ensures that traffic is protected end to end (hence the name) by the IPsec encryption, including while traversing the intranet.
Figure 22.13 shows the end-to-end connection model. Note that there is a protected (solid line) connection through the tunnel and the DirectAccess server to each of the application servers. This indicates that there are separate IPsec connections to each server, which are protected by encryption not only through the Internet but also through the intranet.
The end-to-end model requires that each application server run on Windows Server 2008 and later versions, as well as use IPv6 and IPsec. There is also some additional overhead for the IPsec connections.
The requirement that all application servers be Windows Server 2008 or later is a difficult hurdle to overcome in today’s heterogeneous IT environments. This makes the end-to-end model of DirectAccess less common than the end-to-edge model.
Managed-Out Support Model
The managed-out support model is used to manage devices in the field without providing user access. This deployment model only allows the DirectAccess computer access to the designated management servers. The management servers can also access the DirectAccess computers. This is illustrated in Figure 22.14. Note that the connection is only to the management server and that it is bidirectional.
This option is useful for providing remote management of computers for patching, inventory, and software distribution and facilitates the use of Microsoft System Center 2016 products such as Configuration Manager and Operations Manager.
Internet Versus Intranet Traffic with DirectAccess
One of the benefits of DirectAccess is the ability to separate the Intranet traffic (destined for internal servers) from the Internet traffic (destined for external servers). This conserves the corporate bandwidth for access to corporate resources. By specifying the domains and subdomains for which the DirectAccess server provides access, traffic for those domains is directed through the DirectAccess connection. Other traffic is routed through the default routes and bypasses the DirectAccess connection. This is the highest performance configuration and is the default mode of operation.
However, in some cases, administrators might want to have all traffic route through the DirectAccess connection. Examples of this include organizations that want to control or monitor their client communications or prevent access to certain Internet sites. In these cases, the DirectAccess client can be configured to route all traffic through the DirectAccess connection with the force tunneling option in the DirectAccess client setup.
DirectAccess Components
DirectAccess leverages IPv6 technology to provide a seamless secure connection to the enterprise network. DirectAccess runs at boot and connects as soon as Internet connectivity is established. There’s no need for a user to configure a VPN client or logon. From an administrative perspective, this technology allows system administrators to manage and monitor remote systems through tools like Microsoft System Center Configuration Manager (SCCM) and Group Policy. DirectAccess finally puts remote workers on equal ground with traditional office employees.
The following list depicts the components found in a DirectAccess deployment:
![]() DirectAccess server—This is the server that connects to the internal network and the Internet. It has to be running Windows Server 2012 and later.
DirectAccess server—This is the server that connects to the internal network and the Internet. It has to be running Windows Server 2012 and later.
![]() DirectAccess client—This is a computer running Windows 7 or later, and it must be a domain member.
DirectAccess client—This is a computer running Windows 7 or later, and it must be a domain member.
![]() Corporate IPv6 network—The IPv6 network to which DirectAccess clients will be connecting remotely.
Corporate IPv6 network—The IPv6 network to which DirectAccess clients will be connecting remotely.
![]() Certificate server—This server issues the certificates that support the tunnel creation, authentication, and security. This certificate server must have a published CRL that is available internally and externally.
Certificate server—This server issues the certificates that support the tunnel creation, authentication, and security. This certificate server must have a published CRL that is available internally and externally.
![]() Network Location Server (NLS)—This is an HTTPS site that serves as the indicator to the DirectAccess client if it is connected to the Internet or the intranet.
Network Location Server (NLS)—This is an HTTPS site that serves as the indicator to the DirectAccess client if it is connected to the Internet or the intranet.
![]() Active Directory and DNS server—This server must be running Windows Server 2008 SP2 or later. The AD and DNS role can be separate servers, although most organizations will have these services on the same server.
Active Directory and DNS server—This server must be running Windows Server 2008 SP2 or later. The AD and DNS role can be separate servers, although most organizations will have these services on the same server.
Figure 22.15 shows the components and their connections.

Smart cards, One-Time-Password (OTP) devices such as RSA SecureID, or NAP protection can also be implemented for additional security if desired.
DirectAccess uses IPv6, but can transparently provide access to IPv4 resources on the internal enterprise network through NAT64 and DNS64. It leverages conversion technology like Teredo, 6to4, and also the new IP-HTTPS for remote clients using IPv4 to connect to the IPv6 enterprise network. These new technologies are described in the following list:
![]() Teredo is the most common method for DirectAccess. It allows IPv6 traffic to pass through NAT devices that transition out to an IPv4 public network. A good example is many “hot spot” connections at coffee shops and many home networks.
Teredo is the most common method for DirectAccess. It allows IPv6 traffic to pass through NAT devices that transition out to an IPv4 public network. A good example is many “hot spot” connections at coffee shops and many home networks.
![]() 6to4 directly translates IPv6 addresses into IPv4 addresses. If remote clients are directly connected to the Internet and have only IPv4 public IP addresses, 6to4 is the preferred method for connectivity.
6to4 directly translates IPv6 addresses into IPv4 addresses. If remote clients are directly connected to the Internet and have only IPv4 public IP addresses, 6to4 is the preferred method for connectivity.
![]() IP-HTTPS is a new protocol that arrived with Windows 7 and Windows Server 2012. It tunnels IPv6 traffic over an IPv4 HTTPS tunnel between a DirectAccess client and a DirectAccess server. Although this might seem like the simplest option, it comes at a large performance cost due to network overhead and should be used only as a last resort.
IP-HTTPS is a new protocol that arrived with Windows 7 and Windows Server 2012. It tunnels IPv6 traffic over an IPv4 HTTPS tunnel between a DirectAccess client and a DirectAccess server. Although this might seem like the simplest option, it comes at a large performance cost due to network overhead and should be used only as a last resort.
The DirectAccess protocol is very robust and will transparently attempt multiple methods of access to establish a connection.
Network Location Service
The Network Location Service (NLS) is a critical component for the DirectAccess architecture. This is a website that clients attempt to connect to determine if they are currently connected to the Internet or to the intranet. It is the URL of a highly available website in the corporate intranet.
There are two behaviors that would be experienced for the DirectAccess client system. They are as follows:
![]() If the DirectAccess client can reach the NLS URL, it assumes that it is connected to the corporate network and no further action is necessary.
If the DirectAccess client can reach the NLS URL, it assumes that it is connected to the corporate network and no further action is necessary.
![]() If the DirectAccess client cannot reach the NLS URL, it assumes that it is not connected to the corporate network and then begins the DirectAccess connection process.
If the DirectAccess client cannot reach the NLS URL, it assumes that it is not connected to the corporate network and then begins the DirectAccess connection process.
The NLS service is normally a highly available website, such as servers in a Network Load Balanced (NLB) cluster or a Windows cluster.
NOTE
As you can see, if the NLS website is down, this can result in the disastrous situation of all the DirectAccess clients suddenly thinking they are on the Internet, even though they are really in the intranet. They would all then begin the DirectAccess connection process. That’s why the NLS website must be highly available.
In Windows Server 2016, the DirectAccess server can act as the NLS. This is typically done for the managed-out model.
DirectAccess Connection Process
The DirectAccess client is very robust and will try a variety of methods to connect to the corporate network. The connection process is started when the DirectAccess client detects that it is connected to a network—that is, a network transition such as the connection to a LAN, wireless access point, or other connection becomes active.
The DirectAccess client goes through the following connection process when it detects that it is connected to a network:
1. The DirectAccess client attempts to connect to the NLS website. If it can reach the site, it determines that it is connected to the intranet and stops the DirectAccess process. If it cannot reach the NLS website, it determines that it is connected to the Internet and continues with the DirectAccess process.
2. The DirectAccess client establishes an IPsec tunnel to the DirectAccess server using IPv6. If there is an intervening IPv4 network, the client uses the Teredo or 6to4 protocols to tunnel IPv6 over IPv4.
3. If the DirectAccess client is unable to connect using the Teredo or 6to4 protocols, the client will attempt to connect using the IP-HTTPS protocol.
4. The DirectAccess client establishes an IPsec tunnel to the DirectAccess server using IPv6. The DirectAccess client and the DirectAccess server mutually authenticate using certificates in the process of setting up the IPsec computer tunnel.
5. The DirectAccess client contacts the domain controller and obtains the computer group policy.
NOTE
The user does not have to be logged on to the computer for this process to complete to this point in the process.
6. The DirectAccess user logs on or the logged-on credentials are used in conjunction with the certificates to establish the IPsec user tunnel. The user group policy is applied to the DirectAccess client.
7. The DirectAccess server begins forwarding traffic from the DirectAccess client to authorized intranet resources.
This entire process is transparent to the user and requires no user interaction. In the event of an interruption in network connectivity, the DirectAccess client will reestablish the connection through this process when it detects network connectivity again.
Choosing Between Traditional VPN Technologies and DirectAccess
One of the choices to make when you’re deploying Windows Server 2016-based remote access is the choice between a traditional VPN technology and the new DirectAccess.
Within the VPNs technologies are a number of choices, primarily whether to use L2TP/IPsec or PPTP.
Advantages of L2TP/IPsec
Although PPTP users significantly outnumber L2TP/IPsec users, because of a higher level of security in L2TP/IPsec as well as several other benefits, organizations that are seeking to improve secured remote connectivity are beginning to implement L2TP/IPsec VPN as their remote and mobile access standard. The following are the advantages of using L2TP/IPsec over PPTP:
![]() IPsec provides per-packet data authentication (proof that the data was sent by the authorized user), data integrity (proof that the data was not modified in transit), replay protection (prevention from resending a stream of captured packets), and data confidentiality (prevention from interpreting captured packets without the encryption key). PPTP provides only per-packet data confidentiality.
IPsec provides per-packet data authentication (proof that the data was sent by the authorized user), data integrity (proof that the data was not modified in transit), replay protection (prevention from resending a stream of captured packets), and data confidentiality (prevention from interpreting captured packets without the encryption key). PPTP provides only per-packet data confidentiality.
![]() L2TP/IPsec connections provide stronger authentication by requiring both computer-level authentication through certificates and user-level authentication through a PPP authentication protocol.
L2TP/IPsec connections provide stronger authentication by requiring both computer-level authentication through certificates and user-level authentication through a PPP authentication protocol.
![]() PPP packets exchanged during user-level authentication are never sent unencrypted because the PPP connection process for L2TP/IPsec occurs after the IPsec security associations are established. If intercepted, the PPP authentication exchange for some types of PPP authentication protocols can be used to perform offline dictionary attacks and determine user passwords. If the PPP authentication exchange is encrypted, offline dictionary attacks are possible only after the encrypted packets have been successfully decrypted.
PPP packets exchanged during user-level authentication are never sent unencrypted because the PPP connection process for L2TP/IPsec occurs after the IPsec security associations are established. If intercepted, the PPP authentication exchange for some types of PPP authentication protocols can be used to perform offline dictionary attacks and determine user passwords. If the PPP authentication exchange is encrypted, offline dictionary attacks are possible only after the encrypted packets have been successfully decrypted.
Advantages of PPTP
Although L2TP/IPsec is more secure than a PPTP VPN session, there are significant reasons organizations choose PPTP over L2TP/IPsec. The following are advantages of PPTP over L2TP/IPsec:
![]() PPTP does not require a certificate infrastructure. L2TP/IPsec, SSTP, and DirectAccess require a certificate infrastructure for issuing computer certificates to the VPN server computer (or other authenticating server) and all VPN client computers.
PPTP does not require a certificate infrastructure. L2TP/IPsec, SSTP, and DirectAccess require a certificate infrastructure for issuing computer certificates to the VPN server computer (or other authenticating server) and all VPN client computers.
![]() PPTP can be used by all Windows desktop platforms. Windows Server 2016, Windows Server 2012, Windows Server 2008, Windows Server 2003, Windows 2000 Server, Windows 7, Windows Vista, Windows XP, and Windows 2000 Workstation VPN clients are the only clients that support L2TP/IPsec and the use of certificates. Windows 7 and later are the only clients that support DirectAccess.
PPTP can be used by all Windows desktop platforms. Windows Server 2016, Windows Server 2012, Windows Server 2008, Windows Server 2003, Windows 2000 Server, Windows 7, Windows Vista, Windows XP, and Windows 2000 Workstation VPN clients are the only clients that support L2TP/IPsec and the use of certificates. Windows 7 and later are the only clients that support DirectAccess.
IPsec functions at a layer below the TCP/IP stack. This layer is controlled by a security policy on each computer and a negotiated security association between the sender and receiver. The policy consists of a set of filters and associated security behaviors. If a packet’s IP address, protocol, and port number match a filter, the packet is subject to the associated security behavior.
Advantages of SSTP
The SSTP protocol in Windows Server 2016 enables administrators to establish tunnels across the majority of corporate networks, bypassing many of the technical hurdles that stop PPTP and L2TP.
The advantages of SSTP are as follows:
![]() SSTP helps lower administrative costs by reducing the technical steps needed to tunnel between organizations. Because HTTPS is allowed through most firewalls and proxy servers, there is no additional infrastructure changes needed to support SSTP.
SSTP helps lower administrative costs by reducing the technical steps needed to tunnel between organizations. Because HTTPS is allowed through most firewalls and proxy servers, there is no additional infrastructure changes needed to support SSTP.
![]() SSTP is certificate-based security implemented via SSL. However, certificates only need to be issued to the servers rather than the clients. This provides the security benefits of L2TP, but with almost the ease of configuration of PPTP.
SSTP is certificate-based security implemented via SSL. However, certificates only need to be issued to the servers rather than the clients. This provides the security benefits of L2TP, but with almost the ease of configuration of PPTP.
The benefits are offset by the requirement that the client CA requirements and the operating system requirement. The client requirement is that it trusts the CA issuing the certificates and that it can access the certificate revocation list.
Support for SSTP in clients is available in server operating systems Windows Server 2008 and later, client operating systems from Windows Vista SP1 or later.
Advantages of DirectAccess
DirectAccess was introduced with Windows Server 2008 R2. Essentially, DirectAccess is a transparent always-on remote access. It allows users to always appear to be on the corporate network and appear as if they are in the office. In addition, it allows administrators to manage systems as local systems through tools like Group Policy and Microsoft System Center Configuration Manager (SCCM). From a user perspective, this is the easiest remote access solution. Once configured, they don’t need to perform any action; it just works. From an administrator point of view, however, this solution is the most complex due to the IPv6 and certificate requirements.
The advantages of DirectAccess are as follows:
![]() DirectAccess provides seamless connectivity wherever a remote system has an Internet connection. No user interaction is required.
DirectAccess provides seamless connectivity wherever a remote system has an Internet connection. No user interaction is required.
![]() System administrators can manage remotely connected systems as if they were internal systems.
System administrators can manage remotely connected systems as if they were internal systems.
![]() DirectAccess allows folder redirection so that all critical data is maintained inside the corporate network and backed up using enterprise tools.
DirectAccess allows folder redirection so that all critical data is maintained inside the corporate network and backed up using enterprise tools.
![]() DirectAccess uses Name Resolution Policy Table (NRPT), to determine the appropriate DNS server for connection requests. Combined with split tunneling, this makes for a truly transparent solution.
DirectAccess uses Name Resolution Policy Table (NRPT), to determine the appropriate DNS server for connection requests. Combined with split tunneling, this makes for a truly transparent solution.
DirectAccess relaxes many of the constraints deploying remote access and simplifying its deployment.
Ports Affecting the VPN Connectivity
Frequently, RAS servers operating as VPN servers have two network cards, one of which is plugged into the external network or DMZ. This is simpler because there are usually few restrictions on communicating with that external-facing interface. The RAS server is firewalled and the external-facing interface is hardened as a matter of best practice to mitigate the potential risks. In fact, this is a requirement for DirectAccess servers.
However, even with mitigation steps, this external-facing interface can present an unacceptable level of risk to some organizations. In those cases, the VPN infrastructure must remain entirely within the internal network. In that configuration, the firewall must be configured to allow the appropriate traffic to the RAS server.
Table 22.2 and Table 22.3 list the relevant firewall rules needed for the PPTP and L2TP protocols. The IP address for each of the rules is the RAS server address, which is the destination if the direction is inbound and the source if the direction is outbound.
NOTE
Interestingly, because the DirectAccess server must be a dual-homed server with a network interface on the public network, no ports are needed on the firewall for DirectAccess. In effect, it bypasses the firewall completely.
The SSTP protocol is simple and only requires that TCP port 443 be permitted inbound to the RAS server.
TABLE 22.2 Firewall Rules for the RAS Server for PPTP
Direction |
Protocol |
Port or ID |
Why? |
Inbound |
TCP |
1723 |
Allows PPTP tunnel maintenance traffic from the PPTP client to the PPTP server |
Inbound |
IP |
47 |
Allows tunneled PPTP data from the PPTP client to the PPTP server |
Outbound |
TCP |
1723 |
Allows PPTP tunnel maintenance traffic from the PPTP server to the PPTP client |
Outbound |
IP |
47 |
Allows tunneled PPTP data from the PPTP server to the PPTP client |
TABLE 22.3 Firewall Rules for the RAS Server for L2TP
Direction |
Protocol |
Port or ID |
Why? |
Inbound |
UDP |
500 |
Allows IKE traffic to the VPN server |
Inbound |
UDP |
4500 |
Allows IPsec NAT-T traffic to the VPN server |
Inbound |
IP |
50 |
Allows IPsec ESP traffic to the VPN server |
Outbound |
UDP |
500 |
Allows IKE traffic from the VPN server |
Outbound |
UDP |
4500 |
Allows IPsec NAT-T traffic from the VPN server |
Outbound |
IP |
50 |
Allows IPsec ESP traffic from the VPN server |
Setting Up the Unified Remote Access Role
Windows Server 2016 has a unified Remote Access role, which supports both DirectAccess and VPN services on the same server. This allows small and medium-size organizations to deploy a single server that will support all their remote-access services.
To add and configure the Remote Access role to the remote-access server, follow these steps:
1. Launch Server Manager on the VPN server, and select Manage, then Add Roles and Features.
2. Click Next on the Before You Begin screen.
3. At the Installation Type screen, leave the default Role-Based or Feature-Based Installation and click Next.
4. Select the server, in this case RAS1, and click Next.
5. Select the Remote Access role check box.
6. If the Add Features That Are Required for Remote Access box appears, click the Add Features button.
7. Click Next at the Server Roles screen.
8. Click Next at the Features screen.
9. At the Remote Access screen, click Next.
10. Leave the default DirectAccess and VPN (RAS) role service selected and click Next.
11. At the Web Server Role (IIS) screen click Next, and then click Next again on the following Role Services screen.
12. Click Install at the Confirmation screen to install the role.
13. Click Close to exit the Add Roles and Features Wizard.
The Remote Access role has been installed, but still needs to be configured for the appropriate services. This will be done in the DirectAccess scenario and the VPN scenario.
DirectAccess Scenario
Although the prerequisites and associated technologies for DirectAccess can be difficult to implement, DirectAccess configuration is fairly straightforward through a simple wizard. The example walks through the DirectAccess Wizard in Windows Server 2016.
The goal of this scenario is to show that DirectAccess in Windows Server 2016 is very simple and straightforward to setup and can easily coexist with the traditional VPN services. This would be the typical configuration for a small to medium-sized organization. The scenario demonstrates the following:
![]() Remote Access Wizard—This is an easy-to-run wizard that analyzes the system and automatically chooses the best settings for the configuration.
Remote Access Wizard—This is an easy-to-run wizard that analyzes the system and automatically chooses the best settings for the configuration.
![]() DirectAccess—This will allow workstations to seamlessly access intranet resources as they move from the internal network to a public network.
DirectAccess—This will allow workstations to seamlessly access intranet resources as they move from the internal network to a public network.
![]() VPN coexistence—This will allow a single server to support both DirectAccess services and traditional VPN services on a single Windows Server 2016 server. The VPN features will be configured in the “VPN Scenario” section later in this chapter.
VPN coexistence—This will allow a single server to support both DirectAccess services and traditional VPN services on a single Windows Server 2016 server. The VPN features will be configured in the “VPN Scenario” section later in this chapter.
![]() Use of self-signed certificates—Rather than require a complex PKI infrastructure for issuing and maintaining certificates, the scenario will use self-signed certificates.
Use of self-signed certificates—Rather than require a complex PKI infrastructure for issuing and maintaining certificates, the scenario will use self-signed certificates.
![]() Tunneling using IP-HTTPS—The scenario will demonstrate the IT-HTTPS tunneling protocol, which is the most portable tunneling protocol. This will allow DirectAccess to function across many different networks, including NAT firewalls.
Tunneling using IP-HTTPS—The scenario will demonstrate the IT-HTTPS tunneling protocol, which is the most portable tunneling protocol. This will allow DirectAccess to function across many different networks, including NAT firewalls.
Figure 22.16 shows the DirectAccess scenario components and their connections. This is a straightforward example, with a domain controller (DC1), the DirectAccess server (RAS1), and the Windows 10 workstation (WS1).
There are two servers and a client in the scenario shown in Figure 22.16. These are the systems that will be configured and tested against during the scenario. The systems are as follows:
![]() DC1—Domain controller and DNS server running Windows Server 2016. The Active Directory domain is companyabc.com. The DC1 IP address is 10.1.1.10.
DC1—Domain controller and DNS server running Windows Server 2016. The Active Directory domain is companyabc.com. The DC1 IP address is 10.1.1.10.
![]() RAS1—DirectAccess server domain member running Windows Server 2016, with two network interface cards, and a public IP address (75.25.156.217) assigned. The internal IP address is 10.1.1.210. This server should also have the Web Server role installed to support IP-HTTPS.
RAS1—DirectAccess server domain member running Windows Server 2016, with two network interface cards, and a public IP address (75.25.156.217) assigned. The internal IP address is 10.1.1.210. This server should also have the Web Server role installed to support IP-HTTPS.
In Windows 2008 R2, DA required two consecutive public IP addresses, which was frequently an issue. The reason for two consecutive public IPv4 addresses on the DirectAccess server’s public Internet interface is so that Teredo-based DirectAccess clients can detect the type of NAT that they are located behind. In this example using Windows Server 2016, we won’t be using Teredo tunneling, and so can use a traditional single IP address.
![]() WS1—DirectAccess client domain member running Windows 8. This system will travel between the intranet and Internet networks.
WS1—DirectAccess client domain member running Windows 8. This system will travel between the intranet and Internet networks.
The scenario assumes that split-brain DNS is being used—that is, that there is an internal companyabc.com zone and an external companyabc.com zone. There should be a DNS A record for ras.companyabc.com (75.25.156.217) in the external companyabc.com zone.
It is important to note that the scenario does not require that you have deployed IPv6 throughout the internal network to begin using DirectAccess. The scenario leverages the technologies that will automatically enable and configure IPv6 using transitional technologies like ISATAP, 6to4, and Teredo.
This scenario assumes that Windows Server 2016 Active Directory and DNS are already deployed. The DirectAccess server must have two physical network interfaces. The first is connected directly to the Internet, no NAT, and must have two consecutive public IP addresses. The second interface is connected to the internal network. This scenario also assumes you have an internal enterprise PKI deployment with CRLs published on the Internet.
There are two networks in the scenario. The DirectAccess client is WS1 and will be roaming between these networks, but must be able to access the application server no matter which network they are in. The two networks are as follows:
![]() Intranet network—This is the corporate network and is using an IPv4 address in the 10.1.x.x range.
Intranet network—This is the corporate network and is using an IPv4 address in the 10.1.x.x range.
![]() Internet network—This is a public network and the IP address range is not known in advance, as it could easily be an Internet cafe.
Internet network—This is a public network and the IP address range is not known in advance, as it could easily be an Internet cafe.
The client WS1 will be tested while connected to the internal network, the public network, and, finally, to the home network. In all cases, the client WS1 will seamlessly transition between the networks with no interruption in access to internal resources.
Configuring the Infrastructure
Create a security group for DirectAccess client computers. This allows the DirectAccess clients to be specified. The group will be named Remote Access Computers. To create the group, follow these steps:
1. On the domain controller, launch Server Manager.
2. Select Tools and then Active Directory Users and Computers, expand the companyabc.com domain, and select the Users container.
3. Right-click Users, select New, and then click Group.
4. In the Group Name field, type Remote Access Computers and click OK.
This group will be used later to assign Group Policy to the DirectAccess clients.
Configuring the DirectAccess Feature
Next, run the DirectAccess Setup Wizard to configure DA1 and the Group Policy settings for DirectAccess clients.
To run the DirectAccess Setup Wizard, complete the following steps:
1. On the DirectAccess server RAS1, launch Server Manager.
2. Select Tools and then Remote Access Management to launch the console.
3. Click the Run the Getting Started Wizard link.
4. Select the Deploy Both DirectAccess and VPN option to launch the configuration analysis. The VPN configuration will be done in the “VPN scenario” section later in the chapter.
NOTE
The wizard scans the configuration and automatically detects the best configuration based on the number of interfaces, the assigned IP address (public or private), and other factors.
5. Leave the Automatically Detected Edge option selected, enter the FQDN address of the public interface of the DirectAccess server (in this example, ras.companyabc.com), and then click Next.
6. The wizard automatically selects the most common settings based on the analysis and the basic information given. Click the Click Here to Edit the Wizard Settings link to adjust the settings.
7. Click the Step1 Remote Clients Change Edit link.
8. Select the Domain Computers group and click Remove.
9. Click Add and locate the security group that was set up previously, the Remote Access Computers group.
10. Uncheck the Enable DirectAccess for Mobile Computers Only option. Rather than use the WMI filter, we’ll be adding the computers to the security group.
11. Click Next and then Finish to save the Remote Client edits.
12. Click OK to save the edits.
13. Click Finish to apply the DirectAccess configuration. The DirectAccess server will be configured, and the Group Policy objects will be created.
14. Click Close to exit the wizard.
The console will be at the Remote Access Setup screen for the server, with a diagram of the Remote Access server configuration.
There will be two new Group Policy objects: one named DirectAccess Client Settings, and one named DirectAccess Server Settings. The DirectAccess Client Settings GPO has security filtering that applies it only to the DirectAccess clients in the DirectAccessClients security group (in this example, Remote Access Computers). The DirectAccess Server Settings GPO has security filtering that applies it only to the DirectAccess server by computer name (RAS1. The DirectAccess server (RAS1) and the DirectAccess clients (WS1) will need to be rebooted or have gpupdate.exe/force run to have their group policies applied.
NOTE
The Windows 2016 DirectAccess setup is very easy. In Windows Server 2008 R2, setting up DirectAccess would have taken more than 100 steps in 4 different consoles with a lot of data entry. In Windows Server 2016, it takes just 14 easy steps in a single console.
Testing DirectAccess
To test the DirectAccess functionality, the WS1 computer will be added to the Remote Access computer group. This applies the DirectAccess client group policy, DirectAccess Client Settings, to the members of the group.
To add WS1 to the DirectAccess client computers security group, complete the following steps:
1. On the DC1 domain controller, launch Server Manager.
2. Select Tools, Active Directory Users and Computers, the domain companyabc.com, and select the container Users.
3. Right-click the group Remote Access Computers and select Properties.
4. Select the Members tab, and then click the Add button.
5. In the Select Users, Contacts, Computers, or Groups dialog box, click Object Types, check Computers, and click OK.
6. Under Enter the Object Names to Select (Examples), type WS1, and click OK.
7. Click OK to save.
8. Restart the WS1 computer to have the changes take effect.
NOTE
The WS1 computer needs to reboot to add the computer group SID to its token.
The DirectAccess group policies will now be in effect on the WS1 computer.
You might need to run gpupdate.exe/force on the DirectAccess server DA1 to get the group policies to take effect on it.
As shown in the arrows in Figure 22.17, we will test (A) the connection to the internal network (intranet) and (B) the connection to the public network (Internet).
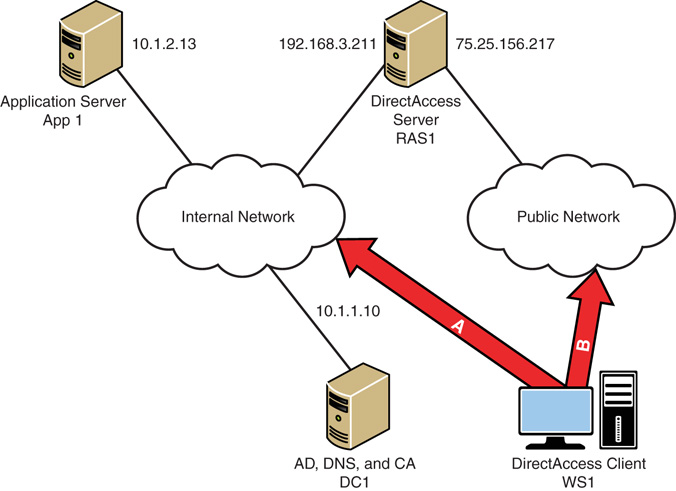
For Test A, the connection to the internal network, follow these steps:
1. Connect the DirectAccess client WS1ipconfig to the internal network.
2. Select Start, type cmd and press Enter.
3. At the command prompt, type ipconfig and press Enter. The result will show that WS3 has been assigned an IPv4 address (10.1.2.19) on the internal network
4. Launch Explorer and access a share (\APP1DATA) on the application server to demonstrate access.
5. Right-click the taskbar and select Taskbar settings.
6. Click home, click the Network & Internet icon.
7. Click Network and Sharing Center.
8. In the Networks, there will be an inactive network labels as Media disconnected. This is the DirectAccess connection, which is inactive because WS1 is connected to the intranet.
This demonstrates that WS1 is connected to the internal network and is able to access resources.
For Test B, which tests the connection to the public network, follow these steps:
1. Connect the DirectAccess client WS1 to the public network.
2. Select Start, type cmd and press Enter.
3. At the command prompt, type ipconfig and press Enter. This will show you that WS3 has been assigned an IPv4 address (192.168.2.126) and that an IP-HTTPS tunnel has been established automatically.
4. Launch Explorer and access a share (\APP1DATA) on the application server to demonstrate access.
5. Right-click the taskbar and select Taskbar settings.
6. Click home, click the Network & Internet icon.
7. Click Network and Sharing Center.
8. In the Networks, there will now be an active network named Workplace Connection. This is the DirectAccess connection, which is now active since WS1 is connected to the Internet
This demonstrates that WS1 is connected to the public network and is able to access resources and that the IPv6 transitional technologies are working publicly, specifically IP-HTTPS.
In the course of the testing, no additional configuration was needed, no logon credentials needed to be supplied, and resources were transparently available. This is the seamless nature of DirectAccess, which completely hides the connection complexity from the end user.
VPN Scenario
The best way to illustrate the concepts in this chapter is to walk through a sample VPN scenario. The scenario demonstrates the following:
![]() The setup and testing of a VPN infrastructure
The setup and testing of a VPN infrastructure
![]() Coexisting with the DirectAccess feature (set up in the previous section)
Coexisting with the DirectAccess feature (set up in the previous section)
![]() Health checks and remediation of a client on and during connection Figure 22.18 shows the VPN scenario architecture.
Health checks and remediation of a client on and during connection Figure 22.18 shows the VPN scenario architecture.
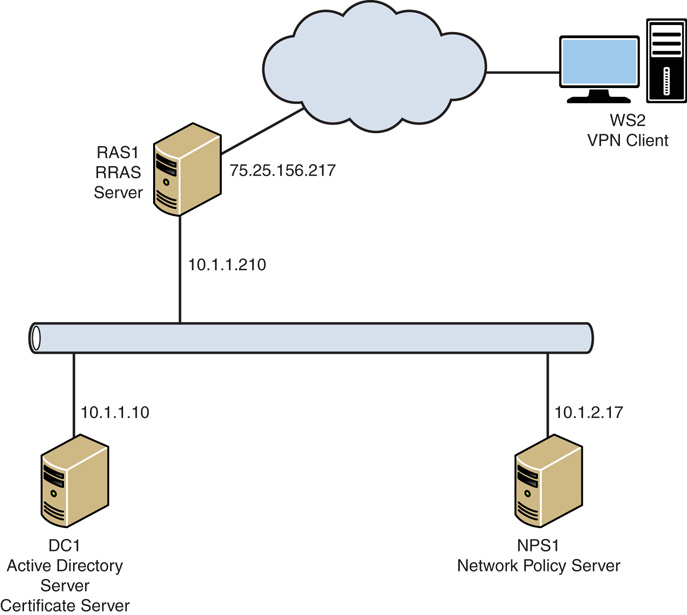
Figure 22.18 shows the VPN scenario architecture.
The scenario will use the systems with the basic configuration shown in Table 22.4. These examples assume that an Active Directory domain companyabc.com has been created and that DC1 is the domain controller.
TABLE 22.4 VPN Scenario Servers
Server |
Roles |
Operating System |
IP Address |
DC1 |
Directory server Certificate server |
Windows Server 2016 |
10.1.1.10 |
NPS1 |
Network Policy Server |
Windows Server 2016 |
10.1.2.17 |
RAS1 |
RAS server |
Windows Server 2016 |
10.1.1.210 (internal) 75.25.156.217 (external) |
WS2 |
VPN client |
Windows 10 |
|
The steps to configure the VPN architecture are as follows:
![]() Configure the NPS.
Configure the NPS.
![]() Set up the RAS.
Set up the RAS.
![]() Set up the VPN client.
Set up the VPN client.
![]() Test the VPN connection.
Test the VPN connection.
![]() Control unhealthy VPN clients.
Control unhealthy VPN clients.
In Windows Server 2016 Active Directory, the users would need to be enabled on the Dial-In tab of the account properties. As you can see in Figure 22.19, the default option is Control Access Through NPS Network Policy.
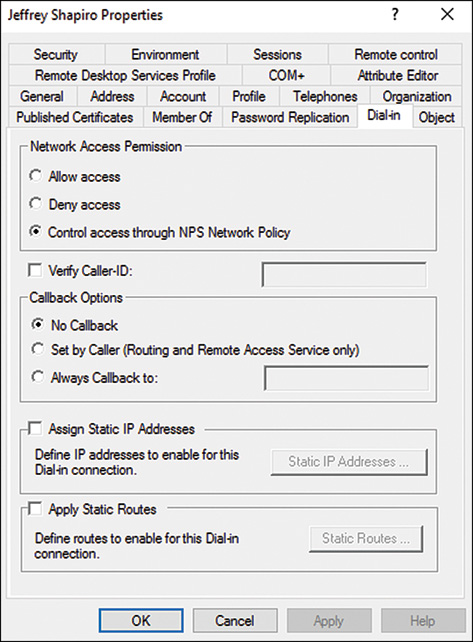
We’ll now step through the setup, configuration, and testing of a Windows Server 2016 traditional VPN infrastructure.
The following sections assume the Remote Access role has been installed and the Configuration Wizard run, configuring the RAS1 server to support both DirectAccess and VPN. The DirectAccess configuration has been completed and tested, so the following steps configure the VPN portion of the Remote Access role.
Certificate Auto-Enrollment
Configure the root CA so that computer certificates are issued automatically through a group policy using a GPO named Cert Auto Enrollment Group Policy Object. This assumes that a Windows Server 2016 Enterprise CA has been set up and configured. See Chapter 1 “Migrating to Active Directory 2016” for details.
To configure the computer certificate auto-enrollment using the enterprise CA, follow these steps:
1. On the domain controller DC1, launch Server Manager.
2. Select Tools, Group Policy Management, and expand Forest: companyabc.com, Domains, and select companyabc.com.
3. In the console tree, right-click the domain companyabc.com and select Create a GPO in the Domain and Link It Here.
4. Enter the name Cert Auto Enrollment Group Policy Object and click OK.
5. Right-click the Cert Auto Enrollment Group Policy Object and select Edit.
6. In the console tree of the Group Policy Management Editor, open Computer Configuration, Policies, Windows Settings, Security Settings, and select Public Key Policies.
7. In the details pane, right-click Automatic Certificate Request Settings, point to New, and then click Automatic Certificate Request.
8. In the Automatic Certificate Request Wizard, click Next.
9. On the Certificate Template page, click Computer (shown in Figure 22.20), click Next, and then click Finish.
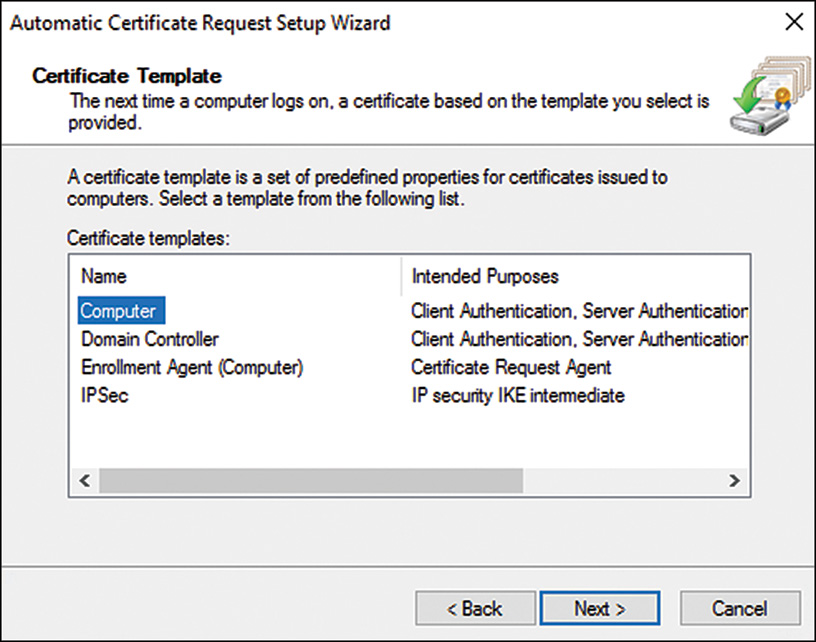
10. Close the Group Policy Management Editor and Group Policy Management Console.
Now each computer that is a member of the domain will be enrolled automatically with a computer certificate.
The certificate will be issued when the computer next reboots or can be trigger by running the command gpupdate/force.
Configuring the Network Policy Server
The next step is to configure the NPS with the appropriate policies to validate and enforce security. This assumes that a Windows Server 2016 NPS has been set up and configured. See Chapter 14, “Network Policy and Access Services, Routing and Remote Access, and DirectAccess” for details.
The process consists of the following elements:
![]() Network policy
Network policy
![]() Connection request policies
Connection request policies
![]() RADIUS client
RADIUS client
To configure the connection policy, follow these steps:
1. In the Network Policy Server console, expand the Policies folder, and select the Connection Request Policies folder.
2. Highlight the Use Windows Authentication for All Users policy, and select Action, Disable.
3. Select Action, New to create a new connection request policy.
4. Enter RAS connections for the policy name.
5. Select Remote Access Server (VPN Dial-Up) for the type of network access server and click Next.
6. In the Specify Conditions window, click the Add button to create a new condition.
7. Select Access Client IPv4 Address and click the Add button.
8. Enter the IP address of the RADIUS client, which is the VPN server RAS1 in this example (10.1.1.210), and click OK.
9. Click Next.
10. Leave the default Authenticate Requests on This Server, and click Next.
11. In the Specify Authentication Methods window, check the Override Network Policy Authentication Settings check box.
12. Click the Add button in the EAP Types window.
13. Select Microsoft: Protected EAP (PEAP) and click OK.
14. Click the Add button again in the EAP Types window.
15. Select Microsoft: Secured Password (EAP-MS-CHAP v2) and click OK.
16. Select Microsoft: Protected EAP (PEAP) in the EAP Types window, and click Edit.
17. Verify that the certificate requested earlier in the section is selected based on the FQDN in the friendly name.
18. Click OK to close the window. Click Next.
19. Click Next at the Configure Settings window.
20. Verify settings to ensure that they look similar to Figure 22.21.

21. Click Finish to create the connection request policy.
The next step is to configure the RAS server as a RADIUS client on the NPS system. This requires using a shared secret password, which in this example is Secret Password. To configure the RADIUS client, complete the following steps:
1. In the Network Policy Server MMC on NPS1, expand the RADIUS Clients and Servers folder.
2. Select the RADIUS Clients folder and select Action, New RADIUS Client.
3. Enter the friendly name for the client (in this example, RAS1).
4. Enter the FQDN or IP address for the client (in this example, 10.1.1.210).
5. In the Shared Secret text box, enter the secret password Secret Password.
6. In the Confirm Shared Secret text box, enter the secret password again, as shown in Figure 22.22.
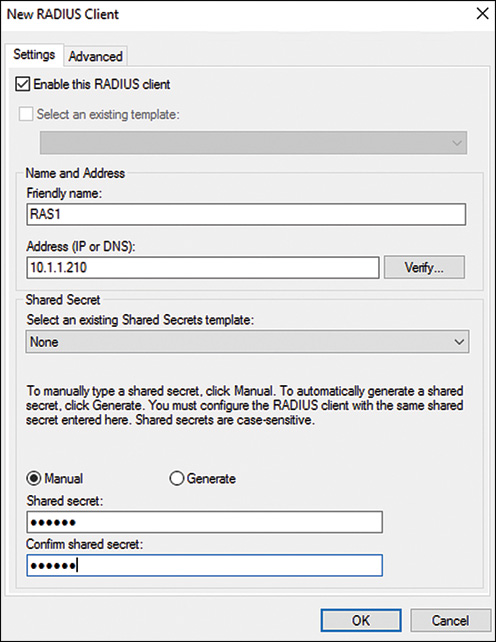
7. Select the Advanced tab and check the RADIUS Client Is NAP-Capable check box.
8. Click OK to create the RADIUS client.
The Network Policy Server configuration is now complete on NPS1. The next step is to create the RAS server.
Setting Up the RAS Server
The RAS server is the entity that will actually connect to the Internet or DMZ, providing the direct communications with the VPN clients, although the NPS system will be authenticating and authorizing those connections.
The following steps assume that Windows Server 2016 is already installed, that the RAS1 server is configured with an internal network interface card (NIC; 10.1.1.210) and an external NIC (75.25.156.217), and that the server is a member of the companyabc.com Active Directory domain. In addition, the Remote Access role has been installed and the Configuration Wizard run, configuring the RAS1 server to support both DirectAccess and VPN.
The DirectAccess configuration has been completed and tested, so the following steps configure the VPN portion of the Remote Access role.
To configure the VPN, follow these steps:
1. On the Remote Access server (RAS1), launch Server Manager and select Tools, Remote Access Management.
2. Select the CONFIGURATION section, which will show a diagram of the configuration.
3. In the Step 2—Remote Access Server portion of the diagram, click the Edit link.
4. Select the VPN Configuration section.
5. Select the Authentication tab.
6. Check the Use RADIUS Authentication option.
7. In the RADIUS servers box, right-click the first line and click New.
8. Enter the name of the Network Policy Server configured earlier (NPS1.companyabc. com) in the Server Name field.
9. Click the Change button to change the Shared Secret.
10. In the New Secret and Confirm Secret text boxes, enter the secret password Secret Password. This was set earlier in the RADIUS client setup.
11. Click OK to save the shared secret.
12. Click OK to save the new RADIUS server configuration.
13. Click Finish to save the VPN settings.
14. In the bottom of the diagram, click Finish to update the Remote Access server with the changed settings.
15. After reviewing the changes, click Apply to apply the changes.
16. Click Close to exit the wizard.
The RAS server is now configured and ready to accept VPN client connections.
Setting Up the VPN Client
The next step is to set up the VPN client. For this example, the client will be a Windows 7 system named WS2 that is a member of the companyabc.com domain. The four major tasks in this process are as follows:
![]() Enable Security Center
Enable Security Center
![]() Enable the system health agent (SHA)
Enable the system health agent (SHA)
![]() Configure certificate trusts
Configure certificate trusts
![]() Configure the VPN client
Configure the VPN client
These tasks prepare the client to connect and also validate, enforce, and remediate health policies.
If the client is a domain member, the Security Center will be disabled. This can be enabled in the local security policy by executing the following steps:
1. On the VPN Client computer, select Start, Run.
2. Enter gpedit.msc and click OK.
3. Expand Local Computer, Computer Configuration, Administrative Templates, Windows Components, and select Security Center.
4. Double-click Turn on Security Center (Domain PCs Only).
5. Select Enabled and click OK.
6. Close the Group Policy Edit tool.
The Remote Access Quarantine Enforcement Client is normally disabled, so it will need to be enabled on the client. This is done with the NAP Client Configuration MMC (napclcfg.msc), as follows:
1. On the client, select Start, Run.
2. Enter napclcfg.msc and click OK.
3. Select the Enforcement Clients folder.
4. Select the EAP Quarantine Enforcement Client.
5. Select Action, Enable to enable the client.
6. Exit the NAP Client Configuration MMC.
The Network Access Protection Agent service is normally set to Manual, so it will need to be started and set to start automatically by executing the following steps:
1. On the client, select Start, Run and then enter Services.msc.
2. Highlight the Network Access Protection Agent service and select Action, Properties.
3. Change the Startup Type to Automatic and click Start.
4. Click OK to exit the service properties.
The next task is to set up and configure the VPN connection on the VPN client:
1. On the client, select Start, Control Panel.
2. Click Network and Internet.
3. Click Network and Sharing Center.
4. Click Set Up a New Connection or Network.
5. Select Connect to a Workplace, and click Next.
6. Click Use My Internet Connection (VPN).
7. Enter the Internet address (in this case, 75.25.156.217).
8. Enter a destination name, such as Company ABC VPN Connection.
9. Check the Don’t Connect Now check box, as we will need to configure additional settings.
10. Click Next.
11. Enter the username, the password, and the domain, and check the Remember This Password check box.
12. Click Create to create the connection.
13. Click Close.
14. Click Change Adapter Settings.
15. Right-click the Company ABC VPN Connection and select Properties.
16. Select the Security tab.
17. In the Authentication section, select the Use Extensible Authentication Protocol (EAP) option button.
18. Select Protected EAP (PEAP) (Encryption Enabled) from the drop-down list and click the Properties button.
19. Uncheck the Connect to These Servers check box.
20. Check the box next to the previously imported CA certificate in the Trusted Root Certification window (in this example, companyabc-DC1-CA).
21. Verify that Secured Password (EAP-MS-CHAP v2) is selected in the Select Authentication Method drop-down list.
22. Uncheck the Enable Fast Reconnect check box.
23. Check the Enforce Network Access Protection check box. The result should look like Figure 22.23.
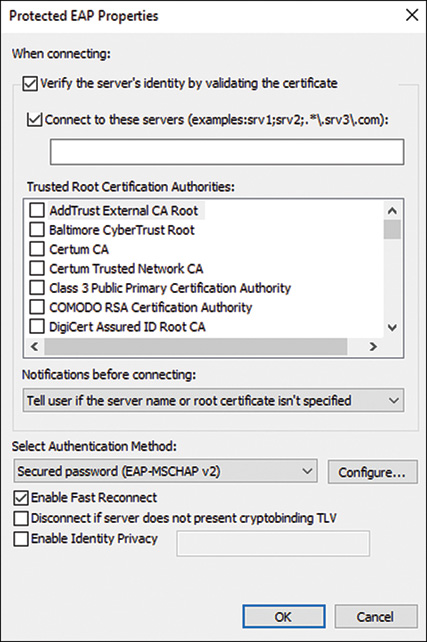
24. Click OK to close the Protected EAP Properties dialog box.
25. Click OK to close the connection properties.
The connection is now ready for use. The next step is to test the connection.
Testing the VPN Connection
The next step in the working with a VPN connection is to test the configuration to make sure the system can properly VPN into the network. To test the VPN connection, do the following:
1. On the client, right-click the Company ABC VPN Connection, and select Connect.
2. Click the Connect button.
3. Click OK to accept the credentials. The connection will be established.
The connection can be tested by pinging the domain controller dc1.companyabc.com. Because the system passed the health validation checks, the connection is granted full access to all intranet resources. To test the connection, complete the following steps:
1. With the Company ABC VPN Connection connected, select Start, All Programs, Accessories, and click Command Prompt.
2. Enter ping dc1.companyabc.com and press Enter.
3. You should get a reply from the IP address of DC1.
4. Select Start, Connect To and choose to open the Connections window.
5. Select the Company ABS VPN Connection and click Disconnect.
6. Click Close.
The NPS system presents a wealth of information on the connection that was sorely lacking in previous versions of Windows. With Windows Server 2016, troubleshooting traditional VPN connection issues is a straightforward endeavor.
Monitoring the Remote Access Server
The Remote Access Management Console includes excellent tools to monitor the activity of the remote clients, including both DirectAccess and traditional VPN remote clients. The console has been completely redesigned to provide administrators with better insight on the overall health of the remote access services, how clients are connecting, and what those clients are doing.
The console has five sections: four for management (Dashboard, Operations Status, Remote Client Status, and Reporting) and one for configuration (aptly named Configuration).
Dashboard
The Dashboard view in the Remote Access Management Console shows a summary of the remote access server. The view shows the
![]() Operations Status—The operational state of the Remote Access role, the state of the services it is supporting (DirectAccess and VPN), and the state of their subcomponents.
Operations Status—The operational state of the Remote Access role, the state of the services it is supporting (DirectAccess and VPN), and the state of their subcomponents.
![]() Configuration Status—This is the last time the configuration was updated.
Configuration Status—This is the last time the configuration was updated.
![]() Remote Client Status—These are very useful summary statistics like total active clients, total cumulative connections, maximum number of clients, and total transferred data. The statistics are reset whenever the server is restarted.
Remote Client Status—These are very useful summary statistics like total active clients, total cumulative connections, maximum number of clients, and total transferred data. The statistics are reset whenever the server is restarted.
There is also a task to generate a usage report. This functionality requires some configuration and will be discussed in the Reporting section.
From the dashboard, tracing can be started to capture packets for analysis. The tracing logs are stored in C:WindowsDirectAccessRemoteAccessLog.etl. The Enterprise Tracing for Windows (ETW) is a framework for implementing tracing providers, which output files with the extension ETL. These are not natively readable and need to be accessed with a utility such as the Log Parser 2.2 (www.microsoft.com/en-us/download/details.aspx?id=24659) from Microsoft.
Operations Status
The Operations Status view in the Remote Access Management Console shows a more state and detailed status for each remote access server, services on the server, and the components for each service.
Each component can be selected to give a detailed status and analysis. For example, if a network adapter is in a critical state simply select the problem to determine the cause.
Remote Client Status
The Remote Client Status view shows a detailed view of the connected clients. This includes the user name, machine name (for DirectAccess), ISP address, the connection protocol (for VPN) or tunneling protocol (for DirectAccess), and the duration of the connection.
For the selected client, there are two details panes in the bottom of the view. The Access Details pane shows the most recent packets with the protocol, port and destination IP address. The Connection Details pane shows the details for the client connections including the connection type (VPN or DirectAccess), total bytes in and out, the connection start time, and the authentication method.
These details are very useful for seeing real-time what the traffic and connections are going through the Remote Access server. There is even a task to Disconnect VPN Clients, which as the name implies, only works for disconnecting VPN client connections. DirectAccess connections cannot be disconnected in this way.
Reporting
The final view is the Reporting view or Remote Access Reporting. However, this view requires some configuration before being used. Specifically, Inbox Accounting must be configured to be able to view reports.
To configure Inbox Accounting, follow these steps:
1. On the Remote Access server (RAS1), launch Server Manager and select Tools, Remote Access Management.
2. Select the Reporting section, which will show a warning: “Inbox accounting must be configured before reporting can be used.”
3. Click the Configure Accounting link.
4. Check the Use Inbox Accounting box.
5. Click the Apply button. The DirectAccess Server Settings GPO will be modified and applied to the Remote Access server.
6. Click Close to exist the wizard.
The server will now begin to gather data.
The reporting feature will allow administrators to review statistics for specific periods of time, rather than just relying on statistics as of the last restart of the server. The reports are also searchable, allowing administrators to do some forensic analysis of clients and activities.
Summary
Remote and mobile connectivity has increased over the years because the extended office now includes hotels, airports, client sites, other campus buildings, and even wireless coffee shop users. With the expansion of the network from which users need to connect to a Windows Server 2016 environment, the improvement of security, reliability, compatibility, and performance becomes extremely important for an organization. The Windows Server 2016 Remote Access technologies meet the needs of these increasingly mobile and remote users.
Windows Server 2016 DirectAccess is a compelling solution for enterprises with extensive infrastructure already in place, allowing seamless and transparent access to corporate resources while users are in the field. Windows Server 2016 still contains all the legacy VPN technologies from the previous version of Windows.
Best Practices
The following are best practices from this chapter:
![]() Use DirectAccess to provide remote users a simpler no-touch method of securely connecting back to the office.
Use DirectAccess to provide remote users a simpler no-touch method of securely connecting back to the office.
![]() Use the Network Policy Server to validate and remediate the health of clients.
Use the Network Policy Server to validate and remediate the health of clients.
![]() Use certificates for authentication where possible.
Use certificates for authentication where possible.
![]() For increased security, choose DirectAccess, SSTP, or L2TP with IPsec as the VPN protocol.
For increased security, choose DirectAccess, SSTP, or L2TP with IPsec as the VPN protocol.
![]() Use PEAP as the preferred authentication protocol.
Use PEAP as the preferred authentication protocol.
![]() Use the more secure MS-CHAP v2 if password authentication must be used.
Use the more secure MS-CHAP v2 if password authentication must be used.
![]() Use the Remote Access Management Console to troubleshoot and monitor remote access clients.
Use the Remote Access Management Console to troubleshoot and monitor remote access clients.