CHAPTER 29
Backing Up the Windows Server 2016 Environment
IN THIS CHAPTER
![]() Understanding Your Backup and Recovery Needs and Options
Understanding Your Backup and Recovery Needs and Options
![]() Creating the Disaster Recovery Solution
Creating the Disaster Recovery Solution
![]() Windows Server Backup Overview
Windows Server Backup Overview
![]() Managing Backups Using the Command-Line Utility Wbadmin.exe and Windows PowerShell Cmdlets
Managing Backups Using the Command-Line Utility Wbadmin.exe and Windows PowerShell Cmdlets
![]() Backing Up Windows Server 2016 Roles
Backing Up Windows Server 2016 Roles
![]() Extending Server Backup to the Enterprise with Data Protection Manager 2016
Extending Server Backup to the Enterprise with Data Protection Manager 2016
Windows Server 2016 is a very powerful and feature-rich operating system that can provide many organizations with the tools they require from their computer and network infrastructure. Some of the functions a Windows Server 2016 system can provide include centralized directory and authentication services, file and print services, web services, networking services, virtual private network (VPN) services, and many more. Of course, before any new system, service, or application is deployed in an organization’s computer and network infrastructure, the responsible parties should understand how to set up, optimize, administer, and properly back up and recover data and functionality in the event of a failure.
A valid backup and recovery plan should be created for any new server or system that will be deployed on a production network. Unfortunately, some organizations deploy systems without a tested backup and recovery plan, and as a result of this, when a critical business system unexpectedly fails or when disasters strike, it could result in data loss, lost employee productivity, and even loss or revenue.
This chapter provides IT decision makers and their technical staff with the information they require to start planning and implementing viable backup strategies for a Windows Server 2016 infrastructure.
Understanding Your Backup and Recovery Needs and Options
A key to creating a valuable backup and recovery plan is to have a clear understanding of how the computer and network infrastructure is configured as well as having an understanding of how the business operates and utilizes the infrastructure. This discovery process involves mapping out both the computer and network systems in place and also documenting and understanding the business services and processes that depend on the infrastructure. For example, an organization might fulfill orders and create quotes through a central application that sales reps can access from the field on their tablets. If this application is hosted on Windows Server Internet Information Services (IIS) or on remote desktop host systems, an offline server or an inability a server or an inability to access those systems in real time could directly impact business. This is just one example, but there are several different outage scenarios that can severely affect day-to-day business operations in any company. Understanding which systems and services are most important to the business can help IT staff set the order or prioritize which systems will be recovered first and where redundancy is most important.
Identifying the Different Services and Technologies
Each deployed role, role service, feature, or application hosted on a Windows Server 2016 system can provide a key system function. Each of these roles and services should be clearly documented so that the IT group can better understand the complexity of the environment, for the purposes of developing and maintaining backup and recovery plans.
Identifying Single Points of Failure
A single point of failure is a device, application, or service on a computer and networking infrastructure that provides an exclusive function with no redundancy. A common single point of failure in smaller organizations is a network switch that provides the connectivity between all the servers, client workstations, firewalls, wireless access points, and routers on a network. Within a Windows Server 2016 Active Directory infrastructure as an example, Active Directory Domain Services (AD DS) inherently comes with its own set of single points of failure, with its Flexible Single Master Operations (FSMO) roles. These roles provide an exclusive function to the entire Active Directory forest or just a single domain and if the designated domain controller hosting that role fails, the FSMO roles become unavailable. Even though the FSMO roles are single points of failure, recovering a domain controller can be very simple if proper backup and recovery planning is performed. For more information about FSMO roles, see Chapter 7, “Active Directory Infrastructure.”
Evaluating Different Disaster Scenarios
Before a backup and disaster recovery plan can be formulated, IT managers and administrators should meet with the business owners to discuss and decide on which types of failures or disasters should be planned for. This section of the chapter provides a high-level description of common disaster scenarios to consider. Of course, planning for every disaster scenario is nearly impossible or, more commonly, will exceed an organization’s backup and recovery budget, but discussing each scenario and evaluating how the scenario can impact the business is necessary.
Physical Disaster
A physical disaster is anything that can keep employees or customers from reaching their desired office or store location. Examples include natural disasters such as floods, fires, earthquakes, hurricanes, or tornadoes that can destroy an office. A physical disaster can also be a physical limitation, such as a road closure or highway blockage caused by a car accident. When only physical access is limited or restricted, a remote-access solution could reestablish connectivity between users and the corporate network. See Chapter 22, “Server-to-Client Remote and Mobile Access,” for more information in this area.
Power Outage or Rolling Blackouts
Power outages can occur unexpectedly at any time. Some power outages are caused by bad weather or other natural disasters, but other times they can be caused by high power consumption that causes system overloads or damaged power equipment. When power systems are overloaded, rolling blackouts may occur. A rolling blackout is when a power company shuts off power to certain power subscribers or areas of service, so that it maintains power to critical services, such as fire departments, police departments, hospitals, and traffic lights. The rolling part of rolling blackouts is that the blackout is managed; after a predetermined amount of the time, the power company shuts down a different power grid and restore power to a previously shutdown grid. Of course, during power outages, many businesses are unable to function because the core of their work is conducted on computers or even telephone systems that require power to function.
Network Outage
Organizations that share data and applications between multiple offices and require access to the Internet as part of their daily business operations are susceptible to network and Internet outages. These outages can cause loss of employee productivity and possibly loss of revenue. Network outages can affect just a single computer, the entire office, or multiple offices depending on the cause of the outage. IT staff must take network outages into consideration when creating the backup and recovery plans.
Hardware Failures
Hardware failures seem to be the most common disaster encountered and coincidentally are the most common type of problem organizations plan for. Server hardware failures include failed motherboards, processors, memory, network interface cards, network cables, fiber cables, disk and HBA controllers, power supplies, and, of course, the hard disks in the local server or in a storage-area network (SAN). Each of these failures can be dealt with differently, but to provide system- or server-level redundancy, critical systems should be deployed in a redundant clustered configuration, such as is provided with Windows Server 2016, Failover Clustering, and Network Load Balancing (NLB).
Hard Drive Failure
Hard drives are indeed the most common type of computer and network-related hardware failure organizations have to deal with. Windows Server 2016 supports hot-swappable hard drives and two types of disks: basic disks, which provide backward compatibility; and dynamic disks, which allow software-level disk arrays to be configured without a separate hardware-based disk array controller. Also, both basic and dynamic disks, when used as data disks, can be moved to other servers easily to provide data or disk capacity elsewhere if a system hardware failure occurs and the data on these disks needs to be made available as soon as possible. Windows Server 2016 also includes new storage services known as storage spaces, storage pools, and virtual disks. Virtual disks in storage pools can be made up of different disks deployed in a redundant or resilient configuration are more flexible in terms of how they can be utilized. Storage spaces is covered in Chapter 27, “File System Management and Fault Tolerance”
Software Corruption
Software corruption can occur at many different levels. Operating system files could be corrupted, antivirus software can interfere with the writing of a file or database causing corruption, or a new application or driver installation could overwrite a critical file leaving a system unstable or in a failed state. Also, more commonly found in today’s networks, a security or system update conflicts with an existing application or service causing undesirable issues.
Prioritizing the Recovery
After all the computer services and applications used on a network are identified and you have decided which typical disaster scenarios will be considered in the backup and recovery plan, the next step is to organize or prioritize how to recover critical systems and restore services. The prioritization usually involves getting the most critical services up and running first, and this always requires networking services such as domain name system (DNS) and Dynamic Host Configuration Protocol (DHCP) as well as Active Directory domain controllers on many corporate networks that use Microsoft Windows servers and client operating systems.
Maintaining up-to-date backup and recovery plans requires following strict processes when changing an organization’s computer and network infrastructure. With an up-to-date technology priority list, administrators can tackle the planning for the most important services first to ensure that if a disaster strikes sooner than later, the most important systems are always protected and recoverable.
Identifying Bare Minimum Services
The bare-minimum services are the fewest possible services and applications that must be up and running for business operations to continue. Only the top few services and applications in the technology prioritized list will become part of the bare-minimum services list. For example, a bare-minimum computer service for a retail outlet could be a server that runs the retail software package and manages the register and receipt printer. For a web-based company, it could be the web and e-commerce servers that process online orders.
Creating the Disaster Recovery Solution
When administrators understand what sorts of failures can occur and know which services and applications are most critical to their organization, they have gathered almost all the information necessary to create a preliminary high-level, disaster recovery solution. Many different pieces of information and several documents will be required even for the preliminary solutions. Some of the items required within the solution are listed in the following sections.
Disaster Recovery Solution Overview Document
The Disaster Recovery Solution Overview document is short narrative of the solution in action, including presentations with quality graphics/Microsoft Visio diagrams. This document first provides an executive summary that includes only high-level details to provide executives and management with enough information to understand what steps are being taken to provide business continuity in the event of a disaster. The remainder of the document should contain detailed information about the plan, including the following:
![]() Current computer and network infrastructure review
Current computer and network infrastructure review
![]() Detailed history of the planning meetings and the information that was presented and discussed in those meetings
Detailed history of the planning meetings and the information that was presented and discussed in those meetings
![]() The list of which disaster and outage scenarios will be mitigated by this plan, and which scenarios will not be addressed by this plan
The list of which disaster and outage scenarios will be mitigated by this plan, and which scenarios will not be addressed by this plan
![]() The list of the most critical applications, systems, and services for the organization and the potential impact to the business if these systems encounter a failure or are not available
The list of the most critical applications, systems, and services for the organization and the potential impact to the business if these systems encounter a failure or are not available
![]() Description of the high-level solution, including how the proposed disaster recovery solution will enhance the organization by improving the reliability and recoverability
Description of the high-level solution, including how the proposed disaster recovery solution will enhance the organization by improving the reliability and recoverability
![]() Defined service-level agreements (SLAs) and recovery time objective (RTO) time estimates this solution provides to each failure and disaster scenario
Defined service-level agreements (SLAs) and recovery time objective (RTO) time estimates this solution provides to each failure and disaster scenario
![]() Associated computer and network hardware specifications, including initial purchasing and ongoing support and licensing costs
Associated computer and network hardware specifications, including initial purchasing and ongoing support and licensing costs
![]() Associated software specifications and licensing costs for initial purchase and ongoing support, licensing, and maintenance costs
Associated software specifications and licensing costs for initial purchase and ongoing support, licensing, and maintenance costs
![]() Additional wide-area network (WAN) or wireless link costs
Additional wide-area network (WAN) or wireless link costs
![]() Additional outside services costs, including hosting services, data center lease costs, offsite disk and tape storage fees, consulting costs for the project, technical writing, document management, and ongoing support or lease costs
Additional outside services costs, including hosting services, data center lease costs, offsite disk and tape storage fees, consulting costs for the project, technical writing, document management, and ongoing support or lease costs
![]() Estimated internal staffing resource assignment and utilization for the solution deployment as well as the ongoing utilization requirements to support the ongoing backup and recovery tasks
Estimated internal staffing resource assignment and utilization for the solution deployment as well as the ongoing utilization requirements to support the ongoing backup and recovery tasks
![]() The initial estimated project schedule and project milestones
The initial estimated project schedule and project milestones
Getting Disaster Recovery Solutions Approved
Prioritizing and identifying the bare-minimum services is not only the responsibility of the IT staff; these decisions belong to management, as well. The IT staff is responsible for identifying single points of failure, gathering the statistical information of application and service usage, and possibly also understanding how an outage can affect business operations.
Before the executives budget for an organization’s disaster recovery plan, they should be presented with as much information as possible, so that they can make the most informed decision. As a general guideline, when presenting the preliminary disaster recovery solution, make sure to also do some preliminary planning for a lower-cost alternate plan highlighting different costs and differences in the solutions.
Getting the budget approved for a secondary disaster recovery solution is better than getting no budget for the preferred solution. The staff should always try to be very clear on the SLA for a chosen solution and to document or have a paper trail concerning all disaster recovery solutions that have been accepted or denied. If a failure that could have been planned for occurs but budget was denied, IT staff members or IT managers should make sure to have all their facts straight and documentation to prove it. In the end, regardless of who denied the budget and who chose which failure or disaster to plan for, IT staff will always take the blame, so always push to get the best plan approved.
Documenting the Enterprise
So far, in the backup and recovery preparation, a computer and network discovery has been performed, different failure scenarios have been considered, and the most critical services have been identified and prioritized. Now, it is time to start actually building the backup and disaster recovery plan that a qualified individual will use in the event of a failure. To begin creating the plan, the current computer and network infrastructure must be documented. You can find information about documenting a Windows Server 2016 system in Chapter 21, “Documenting a Windows Server 2016 Environment.” Documentation should include the following:
![]() Server configuration document—This document details which services and applications each server provides, in addition to the network settings, software installed, and hardware specifications.
Server configuration document—This document details which services and applications each server provides, in addition to the network settings, software installed, and hardware specifications.
![]() Server build document—This document contains step-by-step instructions on how to build a Windows Server 2016 system for a specific role, such as domain controller or file server, including which software is required and hardware specifications. This document also includes specific security configurations, hardware and software configurations, and other organizational server configuration standards.
Server build document—This document contains step-by-step instructions on how to build a Windows Server 2016 system for a specific role, such as domain controller or file server, including which software is required and hardware specifications. This document also includes specific security configurations, hardware and software configurations, and other organizational server configuration standards.
![]() Network diagrams—Network diagrams should contain network configurations and the hardware included in the infrastructure and the WAN links.
Network diagrams—Network diagrams should contain network configurations and the hardware included in the infrastructure and the WAN links.
![]() Network device configuration—These documents contain the configurations of the network devices, including the switches, firewall, and routers on the network.
Network device configuration—These documents contain the configurations of the network devices, including the switches, firewall, and routers on the network.
![]() SAN configuration—Most medium- and large-size organizations utilize one form of centralized storage or another. When storage devices are utilized, these device configurations should be documented so that they can be recovered in the event of a device issue.
SAN configuration—Most medium- and large-size organizations utilize one form of centralized storage or another. When storage devices are utilized, these device configurations should be documented so that they can be recovered in the event of a device issue.
![]() Software documentation—including the licensing information and the storage location.
Software documentation—including the licensing information and the storage location.
![]() Service accounts and password document—A master list of user accounts and network device usernames and passwords should be created and kept in a sealed envelope in a secured location (both onsite and offsite).
Service accounts and password document—A master list of user accounts and network device usernames and passwords should be created and kept in a sealed envelope in a secured location (both onsite and offsite).
![]() Hosted or cloud service documentation—Most organizations today leverage cloud services for one application or another. Documenting how to manage the service, including account and contact information, is critical to IT operations and to backup and disaster recovery planning.
Hosted or cloud service documentation—Most organizations today leverage cloud services for one application or another. Documenting how to manage the service, including account and contact information, is critical to IT operations and to backup and disaster recovery planning.
![]() Contact and support documentation—This document should contain all IT staff and vendor contact information required to support the infrastructure.
Contact and support documentation—This document should contain all IT staff and vendor contact information required to support the infrastructure.
Developing a Backup Strategy
Determining not only what needs to be backed up, but also how the backups will be performed and stored, is an important task. Many organizations back up data to tape media and have that media shipped to offsite storage locations on a weekly basis. Windows Server 2016 Server Backup is built to support backup to local internal and externally connected disks and network shares for scheduled backups. Windows Server Backup does not natively support tape devices for backup. Windows Server Backup for Windows Server 2016 includes a new online backup option that organizations can leverage as part of Microsoft’s cloud-based solutions. For organizations that want to leverage Windows Server Backup online options, tape backup solutions, or obtain enterprise-level backup, Microsoft System Center Data Protection Manager or a third-party backup suite is recommended.
Assigning Tasks and Designating Team Members
To make sure that Windows Server 2016 systems are getting backed up properly, IT staff should train and assign at least two IT staff members to monitor and manage backups when using Windows Server Backup. Windows Server 2016 systems, by default, allow users in the local Administrators or Backup Operators security groups to back up and restore data. On domain controllers, the domain-based security groups have these same rights on the Active Directory domain controllers in the respective domains.
Creating Regular Backup Procedures
Creating a regular backup procedure helps ensure that the entire enterprise is backed up consistently and properly. When a regular procedure or checklist is created, the assigned staff members will soon become accustomed to the procedure, and it will become second nature. If there is no documented procedure, certain items or systems might be overlooked or might not be backed up, which can turn out to be a major problem if a failure occurs. An example of a backup checklist or procedure could be as simple as configuring backups on Windows systems to run a full backup of a server every night, reviewing the backup status of each system every morning, regularly swapping backup managed disks, and rotating the disks to offsite disk and tape storage facilities. Additional steps in the backup checklists could include performing test restores of data and applications hosted on Windows Server 2016 systems.
Windows Server Backup Overview
Windows Server 2016 contains a built-in powerful backup program appropriately named Windows Server Backup. Windows Server Backup is installed as a system feature, and it enables administrators to back up and restore system, file, folder, and application data for Windows Server 2016 systems.
Windows Server Backup includes a graphical user interface (GUI) Microsoft Management Console (MMC) snap-in and a very functional command-line utility and several Windows PowerShell cmdlets.
Backup Storage Support and Media Management
Windows Server Backup enables administrators to back up to locally attached disks, network shares, and DVD writable media. Tape devices are not supported by Windows Server Backup, and to back up to DVD media, the system requires a local writable DVD drive.
Windows Server Backup handles all the media management itself. When leveraging local backup storage, it performs the labeling of the media and efficiently stores backup data by using block-level backups that only back up new and changed blocks. The backup on a single disk may contain several days’ or weeks’ worth of backups, depending on the disk size and the size of the backup datasets. Free space is also managed, and when additional space is required, the backup program deletes the oldest backup sets as required.
External Disks
Windows Server Backup supports backup data to be stored on locally attached disks and writable DVD media located in local writable DVD drives. Locally attached disks include internal disk drives, hot-swappable disk drives, and drives externally connected via USB 2.0 or IEEE 1394 interfaces. Also, SAN attached disks can be used as backup destinations. Storing backups on SAN storage enables faster rotation or replication of backup disks volumes to other SAN storage without impacting Windows system performance.
CD/DVD Writer Drives
Windows Server 2016 contains many features that can take advantage of DVD writer drives. These include the Windows Server Backup feature to capture backups to DVD and Windows Deployment Services, which can be used to create boot, capture, and discover images on DVD media. With regard to Windows Server Backup and DVDs, a manual backup can be created to contain server volumes only. Backups of system state or applications cannot be stored on DVDs.
Remote Shared Folder and Folder on Local Volume
Shares on remote servers or folders on local volumes can be designated as backup targets for manual and scheduled backup jobs. If designating a remote shared folder, this allows an administrator to create a backup not stored on media physically mounted to the system, and also allows for the backup of multiple servers to be stored on a central server. When choosing to back up using a folder on a local volume, this removes the restriction of having to dedicate an entire volume for backup usage. However, when using remote shared folders and folders on local volumes, you need to be aware of a few things:
![]() The remote shared folder path, as defined by the Universal Naming Convention.
The remote shared folder path, as defined by the Universal Naming Convention.
![]() (UNC) path, cannot be changed; otherwise, the data will become unrecoverable unless a complete PC restore is initiated on a failed system and the new UNC is referenced.
(UNC) path, cannot be changed; otherwise, the data will become unrecoverable unless a complete PC restore is initiated on a failed system and the new UNC is referenced.
![]() Only one copy of the backup can be stored within the folder, and each backup will perform a full overwrite backup.
Only one copy of the backup can be stored within the folder, and each backup will perform a full overwrite backup.
![]() When a folder on a local volume is selected as a backup destination, the performance of that volume will be severely impacted during backup, which could cause poor system performance if any user data is stored and accessed on the same volume.
When a folder on a local volume is selected as a backup destination, the performance of that volume will be severely impacted during backup, which could cause poor system performance if any user data is stored and accessed on the same volume.
Tape Devices
Tape devices are not supported in Windows Server Backup. Administrators who want to back up data to tape will require Microsoft System Center Data Protection Manager or third-party backup applications or they will be forced to create manual backups to disk and then copy the data to tape drives.
Online Backup
Windows Server Backup on Windows Server 2016 now includes an online backup option. This option leverages a Windows Live account and sends backup data to Microsoft cloud-based services. This service only works for data drives so another backup method would be required for the system drive and system state, but it can prove to be very valuable for offsite data backup. For more information about the Windows Server Backup online option, refer to Microsoft documentation.
Backup Media Files
Windows Server Backup stores system backup data in a folder named WindowsImageBackup. Beneath this folder is subfolder named after the server that was backed up. Included in the server folder is a set of Extensible Markup Language (XML) files that detail the backup history, catalog, and system configuration details of the media. Also included in the server folder are one or more Virtual Hard Disk (VHD) files. The VHD files are close to exact duplicates of the backed-up server volumes.
The VHD file can quickly be added and viewed in a virtual machine, so protecting the backup folders is critical to server security.
Backup Options
Windows Server 2016 has made creating and managing backups simple within the Windows Server Backup interfaces. Using either the GUI-based console, the Wbadmin command-line utility, or through the Windows PowerShell cmdlets, backups can be run at the volume level, full system backup, or system-state only; alternatively, individual files, folders, or applications can be backed up or excluded from a backup.
Manual Backup Options
Windows Server Backup allows for backups to be created on a recurring schedule or manually using the Backup Once option available in the Windows Server Backup console. Manual backups can be stored on local disks, burned to DVD media, or stored on remote shares. Manual backups on remote shares can be used for complete PC restore operations if the system to be recovered can access the network location during the restore operation.
Scheduled Backup Options
Scheduled backup operations allow administrators to create a backup that recurs, to add backup automation to a Windows Server 2016 system. Scheduled backups can be configured to run multiple times per day to provide additional layers of recoverability.
Windows Server Backup Console
The Windows Server Backup feature includes an MMC snap-in. You can perform most backup-related tasks using this console, including creating backups, reviewing backup history, and restoring data. The Windows Server Backup console can also be used to connect and manage backups on remote Windows Server 2016 systems with the Windows Server Backup feature installed.
Windows Backup Command-Line Utility
All editions of Windows Server 2016 include the Windows Server Backup command-line tool. The wbadmin.exe tool provides granular control of backup and recovery related tasks. Wbadmin enables administrators to start backups and recoveries of systems, get information, and configure new backup storage and scheduled backup policies.
Windows Server Backup PowerShell Cmdlets
Windows Server Backup for Windows Server 2016 includes many new and functional PowerShell cmdlets. Leveraging the cmdlets, as well as the Wbadmin tool, administrators can perform all the backup and restore functions without ever using the graphical interface. To get a list of the available cmdlets from a PowerShell window on a system that has the Windows Server Backup feature installed, enter the following command:
get-command–module WindowsServerBackup
Using Windows Server Backup
When an organization decides to use Windows Server Backup, the type of backup and the storage media for the backups must be determined. For example, if scheduled backups will be used, an organization must determine the correct storage destination for their Windows Server 2016 backups because each destination has its own set of locally attached disks that must be available and dedicated for the backup.
Installing Windows Server Backup
The easiest way to install the Windows Backup tools is to use the Add Roles and Features function within Server Manager or by installing it using Windows PowerShell. Upon installation, you get the backup feature as well as the console, command-line tools, and PowerShell cmdlets.
Installing Windows Server Backup Using Server Manager
If the Windows Server 2016 GUI is installed, you can install the Windows Server Backup feature using Server Manager. To install the Windows Server Backup feature, follow these steps:
1. Log on to the Windows Server 2016 system with an account with administrator privileges.
2. Open Server Manger and click the Add Roles and Features link.
3. Click Next on the Before You Begin page.
4. On the Select Installation Type page, select the Role-Based or Feature-Based Installation option and click Next.
5. On the Select Destination Server page, select the local server and click Next.
6. Click Next on the Select Server Roles page.
7. On the Select Features page, choose the Windows Server Backup feature and click Next.
8. On the Confirm Installation Selections page, review the summary, and click Install to continue.
9. On the Installation Progress page, review the results, and click Close to complete the installation.
Installing Windows Server Backup Using Windows PowerShell ServerManager Module
In many cases, administrators might choose to use the Windows PowerShell environment to manage a server and as a preference when installing roles, role services, or features. To install the Windows Server Backup feature using Windows PowerShell, follow these steps:
1. Log on to the Windows Server 2016 system with an account with administrator privileges.
2. Open Windows PowerShell from the taskbar.
3. Type the command Add-WindowsFeature Windows-Server-Backup and press Enter.
4. After the installation completes, the results will be displayed in the PowerShell Window. Type exit in the PowerShell window and press Enter.
Scheduling a Backup Using Windows Server Backup and Allocating Disks
After Windows Server Backup has been installed, no backups will be automatically scheduled. The fastest way to get a backup configured and define any dedicated disks for backups is to run the Backup Schedule Wizard. This wizard enables administrators to not only select and exclude which backup items will be contained within a backup, it also allows the administrator to configure a recurring backup schedule and allocate dedicated disks for scheduled backups. One thing to keep in mind is that if the configuration will support backing up to multiple dedicated disks, to provide some level of backup media rotation it is recommended that all the disks be available during the initial running of the wizard.
When dedicated disks will be used for Windows Server Backup jobs, these disks will be wiped out, reformatted, and from there on, assigned and managed by Windows Server Backup. The disk-allocation process creates a single NTFS-formatted volume that spans the entire disk and sets the disk volume label to include the server name, the date and time the disk is allocated, and the disk number for each disk. To create a full server scheduled backup and allocate disks, follow these steps:
1. Log on to the Windows Server 2016 system with an account with administrator privileges.
2. Ensure that the disks slated for dedicated backup usage are connected and configured as initialized and online. This can be performed using disk management in the computer management console or by using diskpart.exe from the PowerShell or command prompt.
3. Open Server Manager from the taskbar and click Windows Server Backup from the Server Manager Tools menu.
4. When Windows Server Backup opens, click Local Backup in the tree pane.
5. In the actions pane, click the Backup Schedule link to start the Backup Schedule Wizard. Selecting the Backup Schedule link is the only way multiple disks can be allocated to Windows Server Backup in one process.
6. Click Next on the Getting Started page.
7. On the Select Backup Configuration page, select the Full Server (Recommended) option, and click Next to continue.
8. On the Specify Backup Time page, select the time to run the scheduled backup from the Once a Day or the More Than Once a Day selections, and click Next to continue. Figure 29.1 details a backup that will run every day at 12:30 p.m. and 10:30 p.m.

9. On the Specify Destination Type page, select the Back Up to a Hard Disk That Is Dedicated for Backups (Recommended) option and click Next.
10. Because we selected to use dedicated backup disks, the next page is the Select Destination Disk page. Click the Show All Available Disks button to select the desired disks.
11. In the Show All Available Disks window, check each of the disks that will be dedicated to the scheduled backup, and click OK to save the settings.
NOTE
When multiple disks are assigned to a single scheduled backup, any disk might be used, and that is not under the control of the administrator. If a disk is removed for offsite storage, the remaining disks are used for the next scheduled backup.
12. Back on the Select Destination Disk page, check all the disks that have been added, and click Next to continue.
13. A Windows Server Backup warning window opens requiring confirmation that the selected disks will be reformatted and used by Windows Server Backup exclusively; click Yes to assign the disks for backup.
14. On the Confirmation page, verify the settings, and click Finish to save the new scheduled backup and backup settings and to reformat and label each of the assigned disks.
15. On the Summary page, review the results, and click Close to complete the process.
Creating a scheduled backup using Windows Server Backup allows an administrator to automate the backup process, and with the backup and Volume Shadow Copy Service (VSS) managing the dedicated disks, the administrator only needs to verify that backups have been run successfully.
Manually Running a Scheduled Backup
After the scheduled backup is created for a server, an administrator can let the backup run as scheduled, or the backup can be run manually using the Backup Once link. To manually run a scheduled backup, simply use the Backup Once link and click the Scheduled Backup button on the Backup Options page. Click Next and click Backup on the confirmation page to start the backup. One important point to note is that if multiple disks are allocated to a scheduled backup, running a manual backup does not allow the administrator to select which disk to use. The only way to control which disk is used for scheduled backup is to either remove all the other allocated disks from the system or mark the disks as offline using Disk Management or Diskpart.exe.
Running a Backup to a Shared Network Folder
Windows Server Backup on Windows Server 2016 supports backups to a shared network folder. When a shared network folder is chosen as the backup destination, a system administrator can store full backups on alternate locations to allow for different recovery scenarios. Also, something important to consider is that if a dedicate disk or specific folder on a local volume is selected and is the only backup option, this offers no automated offsite backup. Using a shared network folder can enable offsite backup if the destination system is located in a remote datacenter or if that central server replicates its storage data offsite. To select a shared network folder as a backup destination for a manual backup as an example, follow these steps:
1. Log on to the Windows Server 2016 system with an account with administrator privileges.
2. Open Server Manager from the taskbar and click Windows Server Backup from the Server Manager Tools menu.
3. When Windows Server Backup opens, click Local Server in the tree pane.
4. In the actions pane, click the Backup Once link to start the Backup Once Wizard.
5. On the Backup Options page, select either the Scheduled Backup Options or the Different Options radial button and click Next.
6. On the Select Backup Configuration page, click the Full Server (Recommended) button, and click Next to continue.
7. On the Specify Destination Type page select Remote Shared Folder, and then click Next, as shown in Figure 29.2.
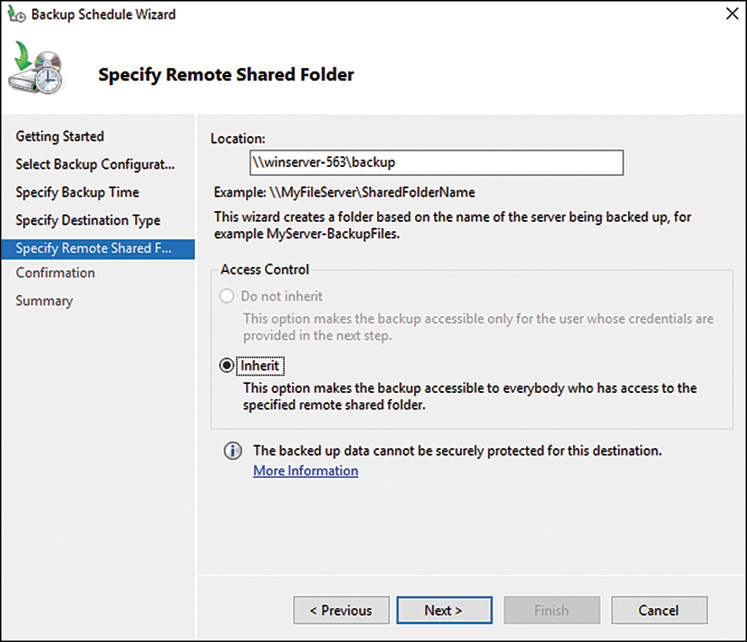
8. On the Specify Remote Folder page, type in the UNC path of the remote server share, and click the Inherit Option button to leave the permissions on the folder the same as currently configured.
9. Click Next on the Specify Remote Folder page.
NOTE
Selecting a shared network folder will overwrite any previous backup in that folder for the particular server. Also, because it is an overwrite job, it will always run a full backup of the selection, and backups might take longer.
10. On the Confirmation page, review the settings, and then click Backup to start the manual backup.
11. On the Backup Progress page, you can view the progress in real time or click the Close button and track the progress in the tasks pane back in the Windows Server Backup console. Click Close when the backup completes.
Storing a Backup on DVD
On a Windows Server 2016 system with a local DVD writer drive, backups can be directed to a DVD for storage. Backups stored on DVD media can be used to back up and restore entire volumes only. To create a backup on DVD media, follow these steps:
1. Log on to the Windows Server 2016 system with an account with administrator privileges and open Server Manager.
2. Click the Tools menu of Server Manager and select Windows Server Backup.
3. Select Local Backup in the tree pane, and in the actions pane, click the Backup Once link to start the Backup Once Wizard.
4. When the Backup Once Wizard opens, click the Different Options button, and click Next. Running a manual backup and selecting the Different Options option is the only way to store a backup on DVD.
5. On the Select Backup Configuration page, click the Custom button and click Next.
6. On the Select items for backup page, click the Add Items button, and in the Select Items window, check the box next to the volumes you want to back up to DVD and click OK. Click Next in the Select Items for Backup window.
7. On the Specify Destination Type page, click the Local Drives button, and click Next.
8. On the Select Backup Destination page, select the DVD drive from the pull-down menu, check the Verify After Writing (Recommended) check box, and click Next.
9. On the Confirmation page, review the selections and click Backup to start the manual backup to DVD.
10. On the Backup Progress page, a shadow copy of the volumes is created first. After the shadow copy is created, a window opens prompting the administrator to insert a labeled DVD in the drive. Label the DVD with the name presented in the window, and then insert the blank DVD and click OK to continue.
11. If additional DVDs are required, label and place them in the drive as prompted.
12. Overall backup progress should be viewed in real time, and the window can be closed after the backup completes.
Managing Backups Using the Command-Line Utility Wbadmin.exe and Windows PowerShell Cmdlets
Windows Server 2016 systems running Server Core installations only contain the Windows Server Backup command-line and Windows PowerShell tools. For systems with the GUI installed, the Windows PowerShell cmdlets can also be used. The command-line backup tool used for this example is named wbadmin.exe and can be accessed using a command prompt window. The windows PowerShell cmdlets are accessed in the PowerShell windows. Both tools are very functional and can be used to perform most of the functions available in the GUI.
NOTE
A Windows Server 2016 system with the GUI installed can be used to manage the Windows Server Backup on a remote Server Core installation, if the graphics-based backup tools are preferred.
The following sections detail a few common tasks you can accomplish using wbadmin.exe and the PowerShell cmdlets.
Viewing Backup History
To view the backup history of a system, follow these steps:
1. Log on to the Windows Server 2016 system with an account with administrator privileges with the As Administrator command and open a command window.
2. Type wbadmin.exe Get Versions and press Enter to list the backup history.
To perform the same task using Windows PowerShell, follow these steps:
1. Open a Windows PowerShell window and type Get-WbBackupSet and press Enter. If the cmdlet cannot be located, you might first need to add in the module by typing import-module WindowsServerBackup and pressing Enter.
2. To get a list of all WindowsServerBackup PowerShell cmdlets, type get-command– module WindowsServerBackup and press Enter.
Running a Manual System-State Backup to Remote Storage Using Wbadmin.exe and PowerShell
Using wbadmin.exe to run backups can be tedious. To understand each of the options available for a manual backup in a command prompt window, type wbadmin.exe Start Backup /? and press Enter. For this example, the data will be stored on the remote server share \FileServer1CentralBackupNLBNODE2, and we will back up the Bare Metal Recovery item, referred to as the AllCritical option. This item includes all volumes in use by the system, including volumes that contain application and share data folders and the system state. For this example, the companyabcadministrator account will be used to connect to the remote share. To run the manual backup using the preceding criteria, follow these steps:
1. Log on to the Windows Server 2016 system with an account with administrator privileges and open a command prompt.
2. Type in the following command:
wbadmin.exe Start Backup–Backuptarget:\FileServer1CentralBackup
NLBNODE2–SystemState -user:companyabcadministrator–
password:My$3cretPW!
Then, press Enter to start the backup.
3. The backup window will state that the network share cannot be securely protected. Press Y, and then press the Enter key to allow the backup to run to this network share.
4. The backup progress will be detailed in the command prompt window. After the backup completes, type exit to close the command prompt window.
To perform the previous backup task using Windows PowerShell we need to create a backup policy that includes the what will be backed up, the backup destination and the credentials we will use to connect to the backup destination. To run the backup, follow these steps:
1. Log on to the Windows Server 2016 system with an account with administrator privileges and open Windows PowerShell.
2. Type in $BackupPolicy = New-WbPolicy and press Enter.
3. Type in $BackupCred = Get-Credential and press Enter.
4. When a Windows dialog box opens, enter the username and password combination that will be used to connect to the network share and click OK to save the credentials and return back to the PowerShell window.
5. Back in the PowerShell window, type in $NetShareBackup = New-WbBackupTarget–NetworkPath \FileServer1CentralBackupNLBNODE2 -Credential $BackupCred and press Enter.
6. Type in the following:
Add-WbBackupTarget–policy $BackupPolicy–Target $NetShareBackup
7. Then, press Enter. A warning message will be listed stating that the backup cannot be secured at this location, and the window will show the information related to the new backup target.
8. Type in Add-WBSystemState–policy $BackupPolicy and press Enter.
9. Type in Start-WbBackup–policy $BackupPolicy and press Enter. The backup should start.
Backing Up the System State Using the GUI
The system state of a Windows Server 2016 system contains, at a minimum, the system Registry, boot configuration files, and the COM+ class registration database. Backing up the system state creates a point-in-time backup that can be used to restore a server to a previous working state. Having a copy of the system state is essential if a server restore is necessary. A system-state backup is included in a full server backup, it is included in the Bare Metal Recovery selection, and it can also be backed up separately. To create a separate system-state backup using the GUI, follow these steps:
1. Log on to the Windows Server 2016 system with an account with administrator privileges and open Server Manager from the taskbar.
2. In Server Manager, click the Tools menu and select Windows Server Backup.
3. Click Backup Once in the actions pane.
4. On the Backup Options page, click the Different Options button, and then click Next to continue.
5. On the Select Backup Configuration page, click the Custom button, and then click Next to continue.
6. On the Select Items for Backup page, click the Add Items button. In the Select Items window, check System-State check box, as shown in Figure 29.3, and then click OK.

7. Back on the Select Items for Backup page, click Next to continue.
8. On the Specify Destination Type page, select either the local drive or Remote Shared Folder button and click Next.
9. On the Select Backup Destination page, select a local drive or the specify the path for the remote shared folder, and then click Next to continue.
10. On the Confirmation page review the selections, and then click Backup to continue.
Backing Up Active Directory
Active Directory domain controllers contain a copy of the database that stores all Active Directory-related information. This is stored by default on the C: drive, but to back it up properly administrators need to back up the domain controller’s system state. Also critical to an Active Directory backup is the backup of the SYSVOL folder, which contains all of the Group Policy-related files and folders. To properly back up a domain controller, a full backup should be scheduled to run nightly or multiple times per day. In addition to scheduled backups, text file exports and securing the most important objects can assist with reliability and recovery efforts. If full backups cannot be performed daily, performing system-state backups would be sufficient for Active Directory recovery, but that would not be enough to recover the entire domain controller if a bigger issue is encountered.
Active Directory backup and restore tasks are required for the purposes of restoring a deleted object, reverting a configuration change, or to restore a database to a specific domain controller if disk or database corruption occurs.
Exporting Active Directory Object Data Using PowerShell
Windows Server 2016 includes many PowerShell cmdlets for managing Active Directory. To get all the Active Directory-related cmdlets, open a PowerShell window and enter Get-Command–Module ActiveDirectory.
Common Active Directory PowerShell cmdlets for reading or exporting data from Active Directory, creating objects, or updating object values are as follows:
![]() Get-AdObject—This cmdlet is used to read AD object data and return it to the screen for reading, exporting, or piping into another cmdlets as a variable value. Some other useful closely related functionality cmdlets include Get-AdUser, Get-ADComputer, Get-AdGroup, Get-AdGroupMember, and several more.
Get-AdObject—This cmdlet is used to read AD object data and return it to the screen for reading, exporting, or piping into another cmdlets as a variable value. Some other useful closely related functionality cmdlets include Get-AdUser, Get-ADComputer, Get-AdGroup, Get-AdGroupMember, and several more.
![]() Set-AdObject—This cmdlet enables administrators to update attribute values on specified Active Directory objects. Some other useful closely related functionality cmdlets include Set-AdUser, Set-ADComputer, Set-AdOrganizationalUnit, and several more.
Set-AdObject—This cmdlet enables administrators to update attribute values on specified Active Directory objects. Some other useful closely related functionality cmdlets include Set-AdUser, Set-ADComputer, Set-AdOrganizationalUnit, and several more.
![]() Remove-ADObject—This cmdlet can be used to delete an object or several objects from Active Directory, provided of course that Deletion Protection is not configured for the desired objects. Some other useful closely related functionality cmdlets include Remove-AdUser, Remove-ADGroupmember, Remove-AdOrganizationalUnit, and several more.
Remove-ADObject—This cmdlet can be used to delete an object or several objects from Active Directory, provided of course that Deletion Protection is not configured for the desired objects. Some other useful closely related functionality cmdlets include Remove-AdUser, Remove-ADGroupmember, Remove-AdOrganizationalUnit, and several more.
![]() New-AdObject—This cmdlet can be used to create new Active Directory objects. Some other useful closely related functionality cmdlets include New-AdUser, New-ADGroup, New-AdOrganizationalUnit, and several more.
New-AdObject—This cmdlet can be used to create new Active Directory objects. Some other useful closely related functionality cmdlets include New-AdUser, New-ADGroup, New-AdOrganizationalUnit, and several more.
![]() Restore-AdObject—This cmdlet can be used to restore an Active Directory object that has been previously deleted as long as the Active Directory Recycle Bin has been enabled before the object was deleted. You can find more information about this cmdlet in Chapter 30, “Recovering from a Disaster.”
Restore-AdObject—This cmdlet can be used to restore an Active Directory object that has been previously deleted as long as the Active Directory Recycle Bin has been enabled before the object was deleted. You can find more information about this cmdlet in Chapter 30, “Recovering from a Disaster.”
More AD cmdlets that can be used for common tasks include Unlock-AdAccount and Search-AdAccount. All in all, there are more than 130 Active Directory-related cmdlets included with Windows Server 2016 PowerShell. To perform a few basic Active Directory export tasks using PowerShell, follow these steps:
1. Log on to the Windows Server 2016 system with an account with domain administrator privileges and open Windows PowerShell from the taskbar.
2. Type in Get-ADObject–Filter * and press Enter. This will return all the Active Directory objects to the PowerShell window with a default list of attributes.
3. Type in Get-ADObject–Filter * | Export-csv All-ADObjects.csv and press Enter. This will return all the Active Directory objects and write the output to a CSV file instead of the window and will include a default list of attributes.
4. Type in Get-ADObject–Filter * -Properties *| Export-csv All-ADObjects.csv and press Enter. This will return all of the Active Directory objects and write the output to a CSV file, but this file will include all populated attributes for each object.
The previous command is similar to ldifde–F allobjects.ldf, which some administrators may have become accustomed to using to export Active Directory data to text files. For more granular exports, the following list provides a few more examples of Active Directory cmdlet commands that can be run in a PowerShell window with the Active Directory Module loaded:
![]() et-adobject -LdapFilter “(&(objectcategory=person)(objectclass=user))” -properties * |export-csv all-users.csv
et-adobject -LdapFilter “(&(objectcategory=person)(objectclass=user))” -properties * |export-csv all-users.csv
![]() get-adobject–LdapFilter “(&(objectcategory=person)(objectclass=user))” -properties * |FT
get-adobject–LdapFilter “(&(objectcategory=person)(objectclass=user))” -properties * |FT
![]() get-adobject -LdapFilter “(&(objectcategory=person)(objectclass=contact))” |export-csv all-contacts.csv
get-adobject -LdapFilter “(&(objectcategory=person)(objectclass=contact))” |export-csv all-contacts.csv
![]() get-adobject -LdapFilter “(&(objectcategory=computer)(objectclass=computer))” |export-csv all-computers.csv
get-adobject -LdapFilter “(&(objectcategory=computer)(objectclass=computer))” |export-csv all-computers.csv
![]() get-adobject -LdapFilter “(&(objectcategory=group)(objectclass=group))” |export-csv all-groups.csv
get-adobject -LdapFilter “(&(objectcategory=group)(objectclass=group))” |export-csv all-groups.csv
Accidental-Deletion Protection
A feature first released with the Windows Server 2008 Active Directory Users and Computers and Administrative Center consoles and included in the Windows Server 2016 edition is an option to protect an object from accidental deletion. Setting this option defines a Deny permission to object deletion, so the result is not new, just the simple way to protect the object. To protect an object from accidental deletion, follow these steps:
1. Log on to the Windows Server 2016 domain controller system with an account with domain administrator privileges and open Server Manager.
2. Click the Tools menu and select Active Directory Administrative Center.
3. In the tree pane, select the Users container link beneath the domain.
4. In the user’s pane in the center, locate the Administrator account, and double-click the user account to open the property pages.
5. Check the Protect from Accidental Deletion box, and click OK to apply the changes.
Using the Directory Services Restore Mode Password
When a Windows Server 2016 system is promoted to a domain controller, the Directory Services Restore Mode (DSRM) password is created. This password is used only when booting into DSRM. Restore mode is used when the Active Directory database is in need of maintenance or needs to be restored from backup. Many administrators have found themselves without the ability to log on to DSRM when necessary and have been forced to rebuild systems from scratch to restore the system-state data. Many hours can be saved if this password is stored in a safe place, where it can be accessed by the correct administrators.
Now with Windows Server 2016, if a full authoritative restore of the entire Active Directory database and SYSVOL folder is required, this can be performed using the Windows Server Backup GUI. If a single object or a container with objects within is accidentally deleted, it can be granularly restored by restoring a backed copy of the domain controller’s system state and booting that domain controller into DSRM and performing an authoritative restore of the desired objects. There is an impact, however. When the domain controller is running DSRM, it is offline to domain requests. To avoid this, Windows Server 2016 has a new feature called the AD Recycle Bin, which allows for object recovery while the domain controller is running in normal mode. This is detailed in the next section.
Sometimes restores still require booting a domain controller into DSRM, and the DSRM password is required. To make sure this password is known, the password can be updated regularly on all domain controllers. The Restore mode password is server specific and created on each domain controller. If the password is forgotten, and the domain controller is still functional, it can be changed using the command-line tool NTDSutil.exe from the command prompt. To update the DSRM password on a domain controller named dc1.companyabc.com, follow these steps:
1. Log on to the Windows Server 2016 domain controller with an account with domain administrator privileges and open a command prompt or PowerShell window.
2. Type NTDSutil.exe and press Enter.
3. Type Set DSRM Password and press Enter.
4. Type Reset Password on Server dc1.companyabc.com and press Enter.
5. Type in the new DSRM password, and press Enter.
6. Type in the new DSRM password again for confirmation, and press Enter.
7. Repeat the previous three steps for any additional domain controllers that will have the DSRM password updated. To close out from NTDSutil.exe, type quit, press Enter, type quit again, and press Enter.
8. Back at the command prompt or PowerShell window, type exit to close the window.
Active Directory Recycle Bin
Windows Server 2016 Active Directory includes a feature that can be enabled called the Active Directory Recycle Bin. When enabled, this feature can allow for a deleted Active Directory object to be restored without having to restore the system state of a domain controller and boot to DSRM to perform a selective authoritative restore of that object. Enabling the Active Directory Recycle Bin requires that all domain controllers are running at least Windows Server 2008 R2 or Windows Server 2016. Also, the forest functional level must be set to Windows Server 2008 R2 or greater, and then functionality can be manually enabled. To enable the Active Directory Recycle Bin, follow these steps:
1. Log on to a Windows Server 2016 domain controller and open Active Directory Administrative Center (ADAC) from the Server Manager Tools menu.
2. In the ADAC window, right-click the domain in the tree pane and select properties. Verify that the Forest functional level is set to Windows Server 2008 R2 or Windows Server 2016. Click cancel to close the domain properties window.
3. If the Forest functional level is lower than Windows Server 2008 R2 or Windows Server 2016, in the tree pane right-click the domain and select Raise the forest functional level. In the Raise Forest functional level window select the desired level and click ok.
4. To enable the Active Directory Recycle bin, in the tree pane right-click the domain and select Enable Recycle Bin. Click OK in the confirmation pop-up window to enable the Active Directory recycle bin and press OK one more time in the window that states to that the recycle bin is enabled and the ADAC window should be refresh to reflect the changes.
Backing Up Windows Server 2016 Roles
Many Windows Server 2016 role services store configuration and status data in separate files or databases located in various locations on the boot volume. If a scheduled backup is configured to run a full backup or a bare metal recovery backup, this includes all boot, system, and data volumes used by the system as well as any application data and the system state necessary for a complete PC restore. A few services also provide alternative backup and restore options, and should be leveraged to provide additional recovery options in the event of a service failure, as opposed to a full system failure.
Distributed File System Backup
The Distributed File System (DFS) is a Windows Server 2016 service that improves file share availability by providing a single unified namespace to access shared folders hosted across different servers. When DFS domain namespaces are used, DFS folders can be configured to replicate with one another using the DFS Replication service. Domain namespace servers store the DFS folders, targets, and replication group configurations in Active Directory. When a standalone namespace is used, the configuration is stored in the namespace server’s Registry. Backing up the system state of a standalone DFS server backs up the DFS configuration. For domain DFS namespaces, backing up the system state of a domain controller accomplishes this task. You can find more information about DFS in Chapter 27 “File System Management and Fault Tolerance.”
Internet Information Services
Internet Information Services (IIS) 10 is Windows Server 2016’s web application and FTP server. It is included on every version of the Windows Server 2016 platform, but it is not installed by default. IIS stores configuration information for web and FTP site configurations and security in a set of XML files stored in the system root folder. The IIS configuration is automatically backed up with full system backups and with separate system-state backups.
Volume Shadow Copy Service
Window Server 2016 Volume Shadow Copy Service (VSS) provides some great features that can be used to enhance backup and recovery for Windows disks. One great feature of VSS is called Shadow Copies for Shared Volumes; it captures and stores copies of the files and folders at a specific point in time.
Administrators and end users with the correct permissions can browse the shadow copies based on the time and date of creation and essentially restore a specific folder, file, or entire volume without restoring from tape. The shadow copies are very space efficient because the first copy is a complete compressed version of the data on the volume, and subsequent copies store only the changes made since the last shadow copy was created.
Another great feature of the VSS is the tight integration it provides for third-party software vendors and to Windows Server Backup. VSS is used by all Windows Server 2016-compliant backup systems.
Enabling Shadow Copies for Shared Volumes
Enabling shadow copies on a volume can be very simple. Administrators have more options when it comes to recovering lost or deleted data and, in many cases, can entirely avoid restoring data to disk from a backup tape device or tape library. In addition, select users can be given the necessary rights to restore files that they’ve accidentally deleted.
The VSS is already installed and is automatically available on NTFS-formatted volumes. For best backup performance it is recommended to enable shadow copies on all volumes and reserve at least 10 percent of free space of that volume for shadow copies.
To enable and configure shadow copies, follow these steps:
1. Log on to the Windows Server 2016 system with an account with administrator privileges and open Server Manager.
2. From the Tools menu in Server Manager, select Computer Management.
3. In the tree pane, expand the Storage node, and select Disk Management.
4. In the tasks pane, scroll down to locate the desired disk and volume, right-click the volume, and select Properties.
5. Select the Shadow Copies tab; in the Select a Volume section, click the desired volume, and click the Enable button. A pop-up window will open stating that the default schedule and settings will be used. Click the Yes button. This will enable shadow copies with the default schedule and will create the initial shadow copy.
6. Select the next volume and click the Enable button and Yes in the pop-up window. Repeat for each volume as necessary.
7. To change the schedule, select the desired volume, and then click the Settings button.
8. The Settings page allows you to set the storage space limit for the volume and change the schedule. The default is usually set to 10 percent of the volume size.
9. Click the Schedule button and define the schedule. The defaults create a shadow copy at 7:00 a.m. and 12:00 p.m.
10. Click OK to close the Schedule window, and click OK again to close the Volume Shadow Copy Settings window.
11. After the shadow copies are created, click OK to close the Shadow Copies page, close the Server Manager, and log off of the server.
To learn how to recover lost or overwritten data using Shadow Copies for Shared Folders, see Chapter 30.
Extending Server Backup to the Enterprise with Data Protection Manager 2016
Windows Server 2016 includes a very powerful backup tool with Windows Server Backup. However, this built-in tool lacks many features when it comes to managing the backup of multiple servers and different applications. Microsoft System Center Data Protection Manager 2016 fills the gaps where Windows Server Backup comes up short. For example, Data Protection Manager 2016 includes support for tape backup and tape libraries, disk-to-disk-to-tape backup and cloud-based backup services provided by Microsoft online services and by third-party Microsoft partners. Data Protection Manager also enables large organizations to back up locally and replicate backup sets across WAN links, without leveraging hosted backup services. For more information about Microsoft System Center Data Protection Manager 2016, refer to the Microsoft System Center website.
Summary
When it comes to disaster recovery planning and backing up Windows Server 2016 systems, you have many options to consider. Specialized utilities can be leveraged for specific backup tasks, but for complete server backup, the GUI, command line, and PowerShell cmdlets of Windows Server Backup take care of all the Windows Server 2016 role services requirements.
Best Practices
The following are best practices from this chapter:
![]() Make sure that disaster recovery planning includes considerations for the physical site, power, entire system failure, server component failure, and software corruption.
Make sure that disaster recovery planning includes considerations for the physical site, power, entire system failure, server component failure, and software corruption.
![]() Identify the different services and technologies, points of failure, and critical areas; then prioritize in order of importance.
Identify the different services and technologies, points of failure, and critical areas; then prioritize in order of importance.
![]() Make sure that the disaster recovery solution contains costs associated with additional hardware, complex configurations, and a service-level agreement estimating how long it will take to recover the service should a failure occur. Different options should also be presented.
Make sure that the disaster recovery solution contains costs associated with additional hardware, complex configurations, and a service-level agreement estimating how long it will take to recover the service should a failure occur. Different options should also be presented.
![]() Document the server configuration for any environment, regardless of size, number of servers, or disaster recovery budget.
Document the server configuration for any environment, regardless of size, number of servers, or disaster recovery budget.
![]() Verify that any backup disks or remote server shares used to store backups are both physically secure and secured by NTFS and share permissions to reduce the risk of compromising or losing company data.
Verify that any backup disks or remote server shares used to store backups are both physically secure and secured by NTFS and share permissions to reduce the risk of compromising or losing company data.
![]() Enable shadow copies on all Windows volumes and dedicate at least 10 percent of the volume size to shadow copies.
Enable shadow copies on all Windows volumes and dedicate at least 10 percent of the volume size to shadow copies.
![]() To avoid performance issues on highly utilized systems that will be backed up with Windows Server Backup or Data Protection Manager, set the shadow copies’ backup schedule to once a month, and only leave the default schedule for file servers with frequently changing user data.
To avoid performance issues on highly utilized systems that will be backed up with Windows Server Backup or Data Protection Manager, set the shadow copies’ backup schedule to once a month, and only leave the default schedule for file servers with frequently changing user data.