CHAPTER 26
Storage
IN THIS CHAPTER
![]() Windows Server 2016 Storage
Windows Server 2016 Storage
![]() Disk Hardware and Storage
Disk Hardware and Storage
![]() Storage Spaces Deployment Overview
Storage Spaces Deployment Overview
Data storage and computer service needs have evolved in the past 30 or so years. Many different methods have become available to present, access, secure, and manage data. For example, data can be accessed through a web browser in SharePoint document libraries, through network shares, through external media such as USB drives, floppy disks, CDs, and DVDs, tape devices, and by accessing data stored on any of the other types of media for the many different operating systems, network storage devices, and file systems available.
The goal of this chapter is to introduce administrators to Windows Server 2016 storage services and devices and give them the tools they require to deploy reliable enterprise storage services for their organizations using Windows Server 2016. This chapter introduces new storage technologies in general and both the new Storage Spaces enhancements in particular.
Storage Spaces and Storage Pools
Storage Spaces first arrived with Windows Server 2012. It is a service that enables the pooling of storage on a server to deliver essentially virtual disks that look like a Storage Area Network (SAN) to the server operating system.
Storage Spaces obviate the need for a SAN and all the dedicated disks and storage networking hardware that comes with it . . . requiring very specialized knowledge. SANs are one of the most expensive components of the data center. The equipment is expensive and the costs of configuration and administration are very high. A small SAN can easily cost you a high five-figure number, if not hundreds of thousands of dollars.
Microsoft released Storage Spaces to eliminate the need for the separate SAN infrastructure that many organizations were forced into adopting. Storage Spaces let you install much cheaper passive disc cabinets and cheaper discs and off-the-shelf hardware that you buy from your average online store, rather than a specialized supplier or integrator. With your data and networking going over the same high Gigabit Ethernet pipe, you no longer need to install separate expensive Fiber Channel or the iSCSI network.
With Storage Spaces, the SAN controller and fabric have been ported into the Windows Server operating system, which enables you to use cheap disks bunched together and aptly called “just a bunch of disks,” or JBODs, which are not housed in a sophisticated fault-tolerant array. Windows Server sees the disk cluster or “bunch” as a single hard drive. Instead of SAN fabric handling all the striping and fault tolerance, Windows now takes control.
Unlike VHD or VHDX virtual disk, which is a file on single volume, and unlike a striped or fault-tolerant volume that requires several dynamic disks, Storage Spaces leverages storage pools and allows administrators to create and present a single virtual disk that can reside on a single or several Windows Server machines.
Storage pools can be easily extended to include new disks and can be created in fault tolerance or resilient configurations. Another great feature is that a storage pool can be configured as a thin provisioned pool that will grow as necessary. Storage spaces are not new, and the concepts and features are not complicated. Storage and server administrators will be able to quickly come up to speed and learn this service quickly. No installation is necessary to leverage storage spaces and create a storage pool because it is a service installed by default, and administrators only require a minimum of one unused disk to create their first storage pool.
NOTE
With the introduction of storage pools, there may be some confusion with the terms virtual disk and virtual hard disk. Administrators should use caution and always define virtual hard disks as VHD or VHDX files, and virtual disks should be defined as part of a particular storage pool for clarity.
Storage Spaces Direct
In Windows Server 2016, Storage Spaces technology been enhanced and is now known as Storage Spaces Direct. The new enhancements eliminate the need to have each enclosure requiring its own redundant serial attached SCSI connectors to each scaled-out file server node.
This caused some scaling issues because the number of dual-channel SAS host bus adapters in a server is limited. That meant that you were limited in how many enclosures you could connect to. With Storage Spaces Direct, that limitation is gone because you no longer depend on direct SAS connections.
With Storage Spaces Direct, you can build highly available and scalable storage with nothing but servers with local storage. You can also use the new classes of disk devices in your enclosure, such as SATA SSD and NVMe disk devices. These new media were not available to clustered Storage Spaces with shared disks in previous versions of the software.
You also do not need shared SAS fabric, which simplifies deployment and configuration. You can now use your network as the storage fabric and leverage SMB3 and SMB Direct (RDMA) for high-speed, low-latency storage that is also CPU-efficient. When you need more storage and redundancy, you simply add more servers to increase storage capacity and I/O performance. See the section “Configuring Storage Spaces Direct” later in this chapter.
NOTE
SMB has been hardened in Windows Server 2016. In both Windows 10 and Windows Server 2016, client connections to the Active Directory Domain Services default SYSVOL and NETLOGON shares on domain controllers now require SMB signing and mutual authentication (such as Kerberos). In other words, if SMB signing and mutual authentication are absent, a Windows 10 or Windows Server 2016 computer will simply not process domain-based Group Policy and scripts. Hardening rules are applied until overridden by Group Policy or other registry values.
Storage Replicas
Storage Replica (SR) is a new feature in Windows Server 2016. It enables storage-agnostic, block-level, synchronous replication between clusters or servers for disaster preparedness and recovery. It is also used for stretching a geographical failover cluster across sites for high availability. Synchronous replication enables mirroring of data in physical sites with crash-consistent volumes, ensuring zero data loss at the file system level. Asynchronous replication allows site extension beyond metropolitan ranges.
The Storage Replica allows you to deploy storage-agnostic, block-level, synchronous replication between servers or clusters. You can implement these replicas for disaster recovery and you can use them to implement geographical clusters that span multiple sites in the cloud. Storage replicas replication enables the mirroring of data in the actual sites. Thus, a disk crash will result in no data loss at the file system level.
Storage Replication lets you implement a file system level disaster recovery solution that can cater to both planned and unplanned outages of mission critical work.
In Windows Server 2016, Storage Replication technology allows you to implement the following:
![]() Use an SMB3 transport to obtain the highest degrees of reliability, scalability, and performance.
Use an SMB3 transport to obtain the highest degrees of reliability, scalability, and performance.
![]() Deploy Windows failover clusters anywhere in close or on premise data centers or between multiple sites spread around the world.
Deploy Windows failover clusters anywhere in close or on premise data centers or between multiple sites spread around the world.
![]() Deploy a solution that is hardware agnostic, with no requirement for a specific storage configuration like a DAS.
Deploy a solution that is hardware agnostic, with no requirement for a specific storage configuration like a DAS.
![]() Manage a system through the familiar Windows Server 2016 GUI with easy graphical management for individual nodes and clusters using the Failover Cluster Manager.
Manage a system through the familiar Windows Server 2016 GUI with easy graphical management for individual nodes and clusters using the Failover Cluster Manager.
![]() At the script interface, you have a comprehensive high-end scripting options available to you through the Windows PowerShell
At the script interface, you have a comprehensive high-end scripting options available to you through the Windows PowerShell
The Windows Server 2016 Storage Replica technology ensures zero data loss in the enterprise. Finally, you can now synchronously protect data no matter where it resides. The data can be in different racks, on different floors, in building on the same campuses, or all over the world.
No matter where a disaster strikes, all your data will still exist somewhere else without any possibility of loss. Storage Replica technology protects against sudden data loss, however, the same technology lets you plan for disaster events. With Storage Replica, you have the ability to offload work to alternate and more safe locations prior to catastrophes, such as a hurricane or a tornado.
If you are managing data centers the Storage Replica allows more efficient use of your data repositories. You can use it to stretching your clusters or replicating clusters. Your workloads can also be deployed across multiple datacenters so that user data affinity is achieved. In other words, the data can be deployed close to the users who need them the most for quicker access. This is also important for applications. You now get better load distribution and use of compute resources. With Storage Replicas, it’s a cinch to recover from a disaster. When the data center goes down, you simply move the data workload to another location.
Storage Replica also replaces legacy replication systems like DFSR. Such services are low-end disaster recovery solutions. DFSR works very well over extremely low bandwidth networks, but its latency is very high and it can sometimes take hours or days for data to replicate. The drawback from DFSR is the requirement for files to close. DFSR also employed artificial throttles that were put there to prevent network congestion. This meant that the most recent files, which are usually the ones needed the most, were the least likely to replicate. This is no longer an issue because Storage Replica operates below the file level and thus comes with none of the above mentioned restrictions.
Storage Replica is also an asynchronous replication system, so it’s more suited for longer ranges and higher latency networks. It is a continually replicating system that does not employ checkpoints, so the delta of changes much lower than snapshot-based technology. In additions, Storage Replica operates at the partition layer and therefore replicates all VSS snapshots created by Windows Server or backup software. So you get application-consistent data snapshots for point-in-time recovery.
Storage Quality of Service (QoS)
Windows Server 2016 now includes the storage quality of service (QoS) that is used to centrally monitor end-to-end storage performance. You can use the service to create policies that mesh with Hyper-V. The service is also used to scale file servers in Windows Server 2016.
QoS lets you create policies on a scale-out file server. You then assign them to one or more virtual disks on Hyper-V virtual machines. The storage performance is then monitored and automatically readjusted to meet the policies as the storage load fluctuates.
You can configure a policy to specify a reserve (the minimum threshold) and a limit (maximum threshold) that can then be applied to a collection of data flows. Your data flows could be virtual hard disks, a single virtual machine, or many virtual machines in a collection or a service or customer.
Windows PowerShell or the WMI let you create and manage policies. For example, you can perform the following tasks:
![]() Create policies on a Scale-Out File Server.
Create policies on a Scale-Out File Server.
![]() Enumerate policies available on a Scale-Out File Server.
Enumerate policies available on a Scale-Out File Server.
![]() Assign a policy to a virtual hard disk on a server running Hyper-V.
Assign a policy to a virtual hard disk on a server running Hyper-V.
![]() Monitor the performance of each flow and status within the policy.
Monitor the performance of each flow and status within the policy.
When you create a QoS policy, you configure it to represent a virtual machine, or multiple virtual machines that have been combined to create a service, or all virtual machines in the account of a customer. For example, multiple virtual hard disks can share the same policy, which can be configured to ensure that performance is evenly distributed to meet demand within the set minimum and maximum limits.
You can use Storage QoS in Windows Server 2016 to accomplish the following:
![]() Prevent a single virtual machine form consuming all the storage resources, which would drain storage bandwidth away from other virtual machines.
Prevent a single virtual machine form consuming all the storage resources, which would drain storage bandwidth away from other virtual machines.
![]() Fully monitor and manage the performance of your storage. Storage services are captured for QoS control as soon as virtual machines are started. The service has access to all storage locations in the enterprise; thus, storage can be monitored from a single location.
Fully monitor and manage the performance of your storage. Storage services are captured for QoS control as soon as virtual machines are started. The service has access to all storage locations in the enterprise; thus, storage can be monitored from a single location.
![]() Manage Storage I/O per workload according to your business needs. You set your minimum and maximum thresholds for your virtual machines and configure your Storage QoS policies ensure that they are met. This provides consistent performance to virtual machines, even in dense and overprovisioned environments. If policies cannot be met, alerts are available to track when VMs are out of policy or have invalid policies assigned.
Manage Storage I/O per workload according to your business needs. You set your minimum and maximum thresholds for your virtual machines and configure your Storage QoS policies ensure that they are met. This provides consistent performance to virtual machines, even in dense and overprovisioned environments. If policies cannot be met, alerts are available to track when VMs are out of policy or have invalid policies assigned.
Windows Disk Properties
Before file services can be leveraged in Windows Server 2016, disks must be added and configured in the Windows server operating system. When a new disk is added to a Windows Server 2016 system, it must be configured by choosing what type of partition style, type of disk, type of volume, and volume format type will be used. To introduce some of the file system services available in Windows Server 2016, you must understand each of these disk properties.
Windows Server 2016 allows administrators to format Windows disk volumes by choosing either the file allocation table (FAT) format, FAT32 format or NT File System (NTFS) format. FAT format is legacy and provides no security, whereas the NTFS format has been available since Windows NT 3.51 and enables administrators to secure files and folders as well as the ability to leverage many of the services provided with Windows Server 2016.
Master Boot Record Partition Style
Master Boot Record (MBR) disks utilize the traditional disk configuration. The configuration of the disk, including partition configuration and disk layout, is stored on the first sector of the disk in the MBR. Traditionally, if the MBR became corrupted or moved to a different part of the disk, the data became inaccessible. MBR disks have a limitation of three primary partitions and a single extended partition that can contain several logical drives. Choosing to create an MBR disk should provide administrators with a more compatible disk that can easily be mounted or managed between different operating system platforms and third-party disk management tools.
GUID Partition Table Partition Style
GUID Partition Table (GPT) disks were first introduced in Windows with Windows Server 2003 Service Pack 1. GPT disks are recommended for disks that exceed 2TB in size. GPT disks can support an unlimited number of primary partitions and this can be very useful when administrators are leveraging large external disk arrays and need to segment data for security, hosting, or distributed management and access. GPT disks are only recognized by Windows Server 2003 SP1 and later Windows operating systems. Attempting to manage a GPT disk using a previous operating system or third-party MBR disk management tool will be blocked and inaccessible.
Basic Disk
A Windows disk is defined as a basic or a dynamic disk regardless of whether the disk is an MBR or a GPT disk. A basic disk supports only simple volumes or volumes that exist on a single disk and partition within Windows. Basic disks contain no fault tolerance managed by the Windows operating system, but can be fault-tolerant if the disk presented to Windows is managed by an external disk controller and is configured in a fault-tolerant array of disks.
Basic disks are easier to move across different operating systems and usually are more compatible with Windows and third-party disk and file system services and management tools. Basic disks also support booting to different operating systems stored in separate partitions. Furthermore, and most importantly, if the disk presented to Windows is from a storage-area network (SAN) that include multiple paths to the disk, using a basic disk will provide the most reliable operation: A different path to the disk may not be recognized if the disk is defined within windows as a dynamic disk.
Dynamic Disk
Dynamic disks extend Windows disk functionality when managing multiple disks using Windows Server 2016 is required. Windows administrators can configure dynamic disks to host volumes that span multiple partitions and disks within a single system. This allows administrators to build fault-tolerant and better performing volumes when RAID controllers are not available or when a number of smaller disks need to be grouped together to form a larger disk.
In some server deployments, dynamic disks are required as the disk controllers do not support the necessary performance, fault-tolerance, or volume size requirements to meet the recommended system specifications. In these cases, dynamic disks can be used to create larger volumes, fault-tolerant volumes, or volumes that can read and write data across multiple physical disks to achieve higher performance and higher reliability. Dynamic disks are managed by the operating system using the Virtual Disk Service (VDS).
Simple Volume Type
A simple volume is a single partition created on a single basic or dynamic disk. On a basic disk, simple volumes can be extended to include free, unallocated space that exists in a sequential section of the disk. To extend a simple volume to a noncontiguous, unallocated space on the same disk or a different disk, the disk must be upgraded to a dynamic disk.
Spanned Volume Type
A spanned volume is treated as a single drive, but the volume spans two or more disks or different noncontiguous areas of the same disk. Spanned volumes provide no disk fault tolerance, but can be used to meet disk storage needs that exceed the capacity of a single disk or volume. Spanned volumes are slowest when it comes to reading and writing data and are recommended only when the space of more than a single disk is necessary, or when an existing simple volume needs to be extended to add disk space and there is no available, unallocated space located next to the volume. For instance, if an application, file share, or service is dependent on the drive letter, does not support the moving of data or system files to another drive, and the current drive is nearly full, a simple volume can be upgraded to a spanned volume and extended with unallocated space on the same or another disk to add additional disk space. A simple volume that has been extended with unallocated space on the same disk is still considered a simple volume. If the simple volume is extended to a different disk, it is automatically converted to a spanned volume. The allocated space on each of the disks can be different sizes and there is no space lost when creating a spanned volume. One thing to keep in mind, however, is that a spanned volume can never be reverted to a simple volume.
Striped Volume Type
A striped volume or RAID-0 compatible volume requires two or more Windows dynamic disks and provides the fastest of all disk configurations. Striped volumes read and write data from each of the disks simultaneously, which improves disk access time. Striped volumes utilize all the space allocated for data storage but provide no disk fault tolerance. If one of the disks should fail, the entire data set would become inaccessible. Stripe sets require the exact amount of disk space on each of the allocated disks. For example, to create a 15GB stripe set array with three disks, 5GB of unallocated space would be required on each disk.
Mirrored Volume Type
Mirrored or RAID-1 compatible volumes require two separate disks to create. Furthermore, the size of the volume must be equal and available in one contiguous, unallocated section of each of the disks. Mirrored volumes duplicate data across each disk and can withstand the failure of a single disk. Because the mirrored volume is an exact replica of the first disk, the total space capacity is the capacity of the smallest member disk.
RAID-10 Volume Type
RAID-10 volumes are now considered the most desirable RAID configurations. A RAID-10 volume consists of two RAID-1 volumes that are striped together to extend the total usable volume. A typical configuration includes four disks, and the total usable space is the equivalent of two disks. The set provides high performance for read and write operations and also provides high redundancy as the volume can suffer the failure of one of the RAID-1 disk from each set.
RAID-5 Volume Type
Software-based RAID-5 volumes require three or more Windows dynamic disks and can provide faster read disk access than a single disk because all disks in the set can be read at the same time. Write performance is slower than a striped set with the same number of disks because of the parity stripe that must be generated and written. The space allocated to the RAID-5 volume on each disk in the volume must be equal and contiguous unallocated space. For example, to create a RAID-5 volume that requires 100GB on each disk, a disk with two separate areas of 50GB of unallocated space cannot be used to participate in the volume.
RAID-5 sets can withstand the failure of a single disk in the volume. During a disk failure, the remaining disks in the volume will continue to provide access to data but at a slower or degraded rate. This capability is achieved by reserving a small portion of each disk’s allocated space to store data parity information that can be used to rebuild a failed disk and to continue to provide data access. This is called a parity stripe. RAID-5 parity information requires the total space of a single disk in the array. For example, if five 10GB dynamic disks are used to create a single RAID-5 volume, 40GB would be available for data storage. The reserved 10GB would be spread evenly across all five disks. The formula for usable capacity of a RAID-5 array is (N - 1) * S, where N is the total number of drives in the array and S is the capacity of the smallest drive in the array.
Partition or Volume
When referring to Windows disks, administrators might consider partitions and volumes interchangeable. In fact, even though the graphical user interface makes no clear distinction and might refer to everything as a volume, volumes only exist on dynamic disks and partitions only exist on basic disks. This is especially important when managing disks using the diskpart.exe command-line utility, which defines a clear delineation between partitions and volumes.
Mount Point
When a new volume is created in Windows, it can be assigned a drive letter or mounted into an existing empty folder on an existing volume. When a volume is mounted into a folder, this is known as a mount point or junction point. Mount points can be very useful in situations where administrators want to simplify disk access for end users, but must also make use of a number of small disks versus a single large disk. For example, on a database server with three disks, an administrator might assign disk1 the D drive, disk2 would be mounted in d:data, and disk3 would be mounted in d:logfiles. Any administrator would only need to connect to the D drive to access the databases or log files. One thing that administrators must test before using mount points is to see that all clients, applications, and backup agents support the use of mount or junction points and can successfully access and back up data stored within them. With many backup applications, enabling a backup job to back up data stored on a mounted volume is not the default and can cause major problems if the right backup configuration is not selected before a failure occurs.
FAT, FAT32, and exFAT Formatted Volume Features
FAT-formatted volumes are legacy-type volumes used by older operating systems and floppy disk drives. FAT volumes are limited to 2GB in size. FAT32 is an enhanced version of FAT that can accommodate partitions up to 2TB and is more resilient to disk corruption. Data stored on FAT or FAT32 partitions are not secure and does not provide many features. exFAT format is the same as FAT32, but it can accommodate file sizes larger than 4GB, which is a FAT32 limitation. Also, exFAT format was designed with flash drives in mind.
NTFS Formatted Volume Features
NTFS enables many features that can be leveraged to provide a highly reliable, scalable, secure, and manageable file system. Base features of NTFS formatted partitions include support for large volumes, configuring permissions or restricting access to sets of data, compressing or encrypting data, configuring per-user storage quotas on entire partitions or specific folders, and file classification tagging, which will be discussed later in this chapter.
Several Windows services require NTFS volumes; as a best practice, we recommend that all partitions created on Windows Server 2016 systems are formatted using NT File System (NTFS).
reFS Formatted Volume Features
Windows Server 2016 supports the reFS, or the Resilient File System. The resilient file system may in fact be the next-generation file system to replace NTFS and has been developed to work in conjunction with storage spaces. The reFS will retain many of the same features as NTFS, but will also add in the ability to locate and repair data corruption on volume or storage pools, while keeping the unaffected data storage available to clients. The reFS file system was developed in conjunction with the Storage Spaces service and is the back-end infrastructure that provides the fault tolerance and reliability included with the new service.
File System Quotas
File system quotas allow administrators to configure storage thresholds on particular sets of data stored on server NTFS volumes. This can be handy in preventing users from inadvertently filling up a server drive or taking up more space than is designated for them. Also, quotas can be used in hosting scenarios where a single storage system is shared between departments or organizations and storage space is allocated based on subscription or company standards.
The Windows Server 2016 File System Quota service provides more functionality than included in versions older than Windows Server 2008. Introduced in Windows 2000 Server as an included service, quotas could be enabled and managed at the volume level only. This did not provide granular control; furthermore, because it was at the volume level, to deploy a functional quota-managed file system, administrators were required to create several volumes with different quota settings. Windows Server 2003 also included the volume-managed quota system and some limitations or issues with this system included the fact that data size was not calculated in real time. This resulted in users exceeding their quota threshold after a large copy was completed.
Windows Server 2008 through Windows Server 2016 includes the volume-level quota management feature but also can be configured to enable/enforce quotas at the folder level on any particular NTFS volume using the File Server Resource Manager service. Included with this service is the ability to screen out certain file types as well as real-time calculation of file copies to stop operations that would exceed quotas thresholds. Reporting and notifications regarding quotas can also be configured to inform end users and administrators during scheduled intervals or when a quota threshold is nearing or, when the threshold is actually reached.
Data Compression
NTFS volumes allow administrators to enable data compression on an entire volume and enable all users to compress data at the folder and file level. Data compression reduces the required storage space for data. Data compression, however, does have some limitations:
![]() Additional load is placed on the system during read, write, and compression and decompression operations.
Additional load is placed on the system during read, write, and compression and decompression operations.
![]() Compressed data cannot be encrypted.
Compressed data cannot be encrypted.
Data Encryption
NTFS volumes support the ability for users and administrators to encrypt the entire volume, a folder, or a single file. This provides a higher level of security for the data. If the disk, workstation, or server the encrypted data is stored on is lost or stolen, the encrypted data cannot be accessed. Enabling, supporting, and using data encryption on Windows volumes and Active Directory domains needs to be considered carefully. If proper planning and testing is not performed, access to encrypted data may be lost forever.
File Screening
File screening enables administrators to define the types of files that can be saved within a Windows volume and folder. File screening is a feature of the File Server Resource Manager service and can be managed with templates. When a file screen is created for a folder or volume, all file write or save operations are intercepted and screened. Only files that comply with the screen settings are allowed to be saved to that particular volume or folder. File screening can also be passive and just report on the existing activity data on a volume.
File Classification Infrastructure
Windows Server 2016 includes a feature called the File Classification Infrastructure (FCI) first introduced with Windows Server 2008 R2. FCI can be managed by using the File Server Resource Manager console and allows file server administrators to identify and classify files by applying specific FCI property values onto these files based on their folder location or based on the content stored within the file itself. When a file is classified by FCI, if the file is a Microsoft Office file as an example, the FCI information will be stored within the file itself and will follow the file where ever it is copied or moved to. If the file is a different type of file, the FCI information will stored within the NTFS volume itself, but the FCI information will follow the file to any location it is copied or moved to, provided that the destination is an NTFS volume hosted on a Windows Server 2016 system. More information about FCI is detailed later in this chapter.
Virtual Hard Disks
Virtual hard disks (VHDs) are used by virtual machines to emulate Windows disks. VHDs can be created on an existing Windows Server 2016 system using the Hyper-V Management console, or they can be created directly using the Disk Management console. VHD are primarily created on the Windows host system as a file with a .vhd extension on an existing windows volume. VHD files can easily be moved across servers and between virtual machines, and also can be expanded quite easily, granted that the VHD is not in use and there is ample free space on the host volume. VHD files can be attached directly to a Windows Server 2016 host using the Disk Management console, unlike in previous releases which required scripts to mount the file. This added functionality is a needed improvement to the integrated VSS Hyper-V backup functionality, included with Windows Server Backup and available to third-party backup software vendors. Creating and attaching a VHD file to a Windows Server 2016 host is detailed later in this chapter, but for more information about VHD files and their management, see Chapter 35, “Deploying and Using Windows Virtualization.”
Windows Server 2016 VHDX Virtual Hard Disks
VHDX is a fairly new virtual disk format VHDX introduced several years ago. The older VHD file had a 2TB limit; VHDX file has a 64TB limit and is better protected again data corruption due to the way changes are logged within the file itself.
Fixed Size Disk
VHD disks can be created to be fixed size or dynamically expanding. A fixed-sized VHD that is 10GB in size will equate to a 10GB file on the Windows host server volume. With the new VHDX format, the actual fixed disk size may even be a bit smaller, but not by much. Fixed-size virtual disks should be used as a preference to deliver better performance for the virtual guest and host/parent system when used in production deployments of servers. The key benefit of a fixed disk related to performance is that the actual file itself will not become fragmented over time if the disk shares space on the same host/parent volume.
Dynamically Expanding
Dynamically expanding virtual disks are configured with a maximum value, but only take up the necessary space on the host/parent system. For example, if a 25GB dynamically expanding virtual disk is created on a host and added to a Hyper-V virtual guest system, the guest system will see a 25GB disk available. The host system file size for that disk will only be as large and the used space within the guest OS disk. These disks are best used for test machines and machines that do not require the highest performance.
Differencing Disk
With Hyper-V guest systems, disks can be created with a parent/child relationship. The parent disk is created with the base operating configuration and then it can have a single or multiple differencing or child disks attached it to. The differencing disk is used to isolate changes to the guest system, and the changes are kept in this disk while the parent disk remains unchanged. Differencing disks are also used/created when creating snapshots for Hyper-V guest systems.
Managing Windows Server 2016 Disks
Disks in Windows Server 2016 can be managed using a few different tools included with the operating system. Most disk-related tasks can be performed using the Disk management console, the Server Manager, PowerShell, or the diskpart.exe command-line utility. Windows Server 2016 ships with a number of disk management PowerShell cmdlets for use in your disk management arsenal.
The Disk Management MMC Snap-In
The Disk Management console, or snap-in, can be used to initialize and configure new disks; import previously configured disks; convert basic disks to dynamic disks; create, extend, and shrink disk volumes; format disk volumes; enable shadow copies; and many more disk-related tasks. Disk Management can also be used to create and attach or mount VHD and VHDX files to the host operating system for quick volume access and data management. This snap-in is included as part of the Computer Management console, but it can also be added to a separate Microsoft Management Console window. The Disk Management console can be used to manage disks on remote machines as well as local disks.
Diskpart.exe Command-Line Utility
Diskpart.exe is a command-line utility that administrators can use to manage Windows disks. Most disk tasks that can be performed using the Disk Management console can also be performed using this command-line utility except for initializing new disks. When issues are encountered with a Windows Server 2016 that won’t boot, diskpart.exe may be the only option available when booting into the recovery environment, so administrators should be well versed and comfortable with this tool.
PowerShell Disk Management Cmdlets
Windows Server 2016 and Windows 10 add to the already large supply of cmdlets developed to manage windows disks. In addition to the usual disk functions such as initializing, formatting, and assigning drive letters to windows disks, you can create new storage pools and virtual disks and create virtual iSCSI disks from within the PowerShell.
Server Manager File and Storage Services
In Windows Server 2016, the preferred method for managing server roles and features is firmly in PowerShell scripting, but for GUI management, Server Manager is the console to leverage. For file and storage management, Server Manager has integrated the management of storage pools, windows disks, virtual disks, iSCSI, and shares into one central location.
Adding New Disks and Volumes to Windows
When a disk is added to a Windows Server 2016 system, the disk must first be brought online and initialized before it can be configured for use within the operating system. Windows Server 2016 can detect most new disk additions most disks without a reboot, but this, of course, depends on the disk and controller type. For example, if a new disk is added to a system with a RAID-compatible disk controller, it will not be detected or available to Windows until the new disk is configured using the RAID controller configuration utility. When a new disk is ready to be added into the Windows Server 2016 operating system, follow these steps:
1. Log on to the Windows Server 2016 system with an account with administrator privileges.
2. Open Windows PowerShell, type in Get-Disk, and press Enter to show the list of detected disks. New disks will be listed with an offline operational status and a partition style of raw1 (Figure 26.1).

3. Now for this example, disks 2, 3, 4, and 5 need to be initialized. In the PowerShell window, type Initialize-Disk 2,3,4,5 –PartitionStyle GPT and press Enter.
After the disks are initialized, they will be configured as basic disks by default and can be configured with volumes and formatted for use.
If the disks will be configured with traditional advanced volume types such as striped, mirrored, or RAID-5, they must be converted to dynamic disks (which can be done automatically during volume creation if you are using the Disk Management console). If you are using diskpart.exe, however, they will need to be converted manually. To create a traditional Windows disk volume such as a simple, spanned, striped, mirrored, or RAID-5 volume, follow these steps:
1. In the Windows PowerShell Window, type in Diskpart.exe and press Enter.
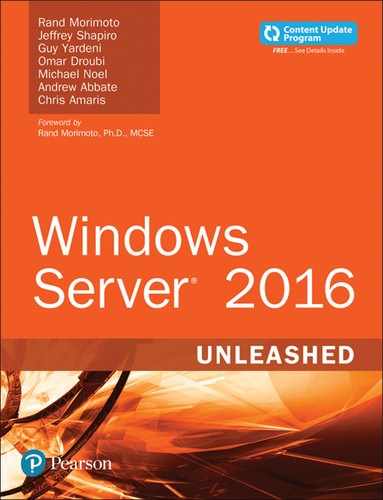
2. When you know the disk you will use (for this example, we use disks 2, 3, 4, and 5, and create a RAID-5 volume), type List Disk and press Enter. Note that all of our disks are not dynamic, as indicated with no * in the Dyn column.
3. Based on the disk configuration detailed in Figure 26.2, disk 2, 3, 4, 5 need to be converted to dynamic disks. In the PowerShell window, type select disk 2 and press Enter. Now type convert dynamic and press Enter. Repeat these steps for disks 3, 4, and 5.
4. Now that all the disks are initialized, online, and dynamic, we can create the RAID-5 volume. Type Select disk 2 and press Enter. Now type create volume RAID disk 2,3,4,5 and press Enter.
5. Now that the RAID-5 volume is created, we will format it, but the volume will need to be identified. In the command prompt window, type List volume and press Enter.
6. The new volume should be listed as a RAID-5 volume.
7. In the command prompt window, type Select volume 3 and press Enter.
8. In the command prompt window, type Format FS=NTFS label=New_RAID5_Volume and press Enter to format the volume. This will perform a full format of the volume.
9. When the format completes, the window details if the format completed successfully. When the volume is formatted, type Assign Letter=F and press Enter to assign the new volume the letter F.
10. When the drive letter is assigned, in the command prompt window, type exit and press Enter to close diskpart.exe and return to the PowerShell window.
11. In the PowerShell window, type get-volume and press Enter to see the complete list of volumes. Type exit to close the PowerShell window.
The new RAID-5 volume should now be accessible from the operating system.
TIP
To get a list of disk and volume management PowerShell cmdlets, open PowerShell and type get-command *disk* or get-command *volume* and press Enter. To get a list of commands when in diskpart, type ? and press Enter.
Working with Virtual Hard Disk Files
Virtual hard disks have been around since virtual machines appeared on the scene in the late 1990s. Windows Server 2016 can create and directly attach Microsoft virtual hard disks or VHD/VHDX files. VHD files are used in Windows Server 2008, Windows Server 2008 R2, and Windows Server 2016 Hyper-V guest systems as well as Microsoft Virtual Server 2005 and Microsoft Virtual PC, although not all VHD versions are 100% interchangeable. Starting with Windows Server 2012, Hyper-V guest systems also can use the new VHDX file format to leverage larger file sizes. VHD and VHDX files can be created and mounted into a Windows Server 2016 operating system using the disk manager console and also the Windows PowerShell. To create and attach a new virtual hard disk file using the Disk Manager console, follow these steps:
1. Log on to the Windows Server 2016 system, open Computer Management and select the Disk Management node under Storage.
2. Right-click the Disk Management node and select Create VHD. For this example, we will create a mount a file named F:Test1.VHDX that is a 50GB file using the VHDX format and defined as a dynamically expanding disk.
3. When the Create and Attach Virtual Hard Disk window opens, type in the full path and name in the Location field, type in the desired size and size increment, choose the desired virtual hard disk format and type, and then click OK.
4. After the process completes, scroll down in the disk management Tasks pane to locate the new virtual hard disk, which should be listed as the last disk and should be listed as Unknown and Not Initialized. Right-click the disk in the left section of the task pane and select Initialize Disk.
5. In the Initialize Disk window, choose to create an GPT partition style for the disk, ensure that the correct disk is checked in the window, and then click OK to initialize the disk.
6. When initialized, the disk will be listed as Basic and Online. Right-click the volume in the Tasks pane and select New Simple Volume.
7. Follow the steps to format the disk as NTFS and assign a drive letter.
8. After the process has completed, the virtual hard disk will be available in My Computer and Windows Explorer just as any other local drive.
9. After the usage of the disk is complete, from within Disk Manager, right-click the attached virtual hard disk and select Detach VHD.
10. In the Detach Virtual Hard Disk window, the disk that was selected will be listed. Click OK to detach the disk.
After the virtual hard disk is detached, it can be copied to any other Windows Server 2016 system and mounted or attached to the host operating system or a Hyper-V guest virtual machine.
Configuring Storage Spaces Direct
As mentioned earlier Storage Spaces Direct enables the pooling of disks on a server or workstation to deliver virtual disks to the operating system. Storage spaces are made up of storage pools, which include the physical disks, and virtual disks, which are hosted and defined within a storage pool.
Storage Spaces Direct is a significant step forward in Microsoft Windows Server software-defined storage (SDS). It simplifies the deployment and management of SDS systems and provides access to a much wider selection of disk devices, such as SATA and NVMe disk devices.
With Storage Spaces Direct, you can now build HA Storage Systems using storage nodes with only local storage, which is either disk devices that are internal to each storage node. This eliminates the need for a shared SAS fabric and its complexities, but also enables using devices such as SATA solid state drives, which can help further reduce cost or NVMe solid state devices to improve performance.
Storage pools are very flexible; they can be changed to add or replace physical disks as necessary. This is a unique feature because the storage pool can be changed, but the virtual disk can remain the same, and when additional disks are added to the storage pool, the virtual disks can be expanded quite easily.
A storage pool can be created with a single disk, but when a storage pool contains multiple disks, fault tolerant or resilient virtual disks can be created. Storage spaces need no special installation on Windows Server 2016, and to create a storage pool and virtual disks, administrators only need to add new disks to the system and perform a few simple tasks. To create a storage pool and a virtual disk, follow these steps:
1. Connect additional disks to the Windows Server 2016 system. Do not configure the disks.
2. Log on to the Windows Server 2016 system with the new unconfigured disks and open Server Manager.
3. In the tree pane, click the File and Storage Services link, and when that opens, click Storage Pools on the left.
4. In the Storage Pools pane, note the existing Primordial storage pool, which includes all server disks. Right-click a blank spot underneath the Primordial storage pool and select New Storage Pool.
5. When the New Storage Pool Wizard window opens, review the information on the Before You Begin page, and then click Next to continue.
6. On the Specify a Storage Pool Name and Subsystem page, enter the desired name for the pool, and then click Next to continue.
7. On the Select Physical Disks for Storage page, check the check box next to the disks that will be added to the pool. Also, in the Allocation column, pull down the menu and choose if each disk will be allocated as a data store, manually or as a hot spare.
8. On the Confirm Selections page, review the settings and click Create to create the new storage pool.
9. After the storage pool has been created, click Close in the View Results page to return to Server Manager.
Creating Virtual Disks
After a storage pool is created, virtual disks can be added to it. Virtual disks can be configured with a striped, mirror, or parity storage layout. Striped virtual disks can be created on storage pools that contain only a single physical disk because it includes no fault tolerance or resilience. Mirror and parity storage layout disks require that the storage pool contains multiple physical disks. Mirror virtual disks will be configured to replicate data to two or more physical disks. Parity disks will store parity information about the data stored on all disks within the storage pool. The parity information is stored across all disks in the set and is used to maintain data integrity when data is written to, or moved within, the disk set. Parity information is also used to recover data and rebuild data in the event of a physical disk failure. To create a virtual disk, follow these steps on a system with a storage pool created:
1. Log on to the Windows Server 2016 system with the new storage pool and open Server Manager.
2. In the tree pane, click the File and Storage Services link, and when that opens, click Storage Pools on the left.
3. In the Storage Pools pane, note the new storage pool storage pool. In the lower-left corner is the Virtual Disks pane. Right-click the Tasks menu and select New Virtual Disk.
4. When the New Virtual Disk Wizard window opens, review the information on the Before You Begin page and click Next to continue.
5. On the Select the Server and Storage Pool page, click the desired server in the top pane, and the desired storage pool in the lower pane, and then click Next to continue.
6. On the Specify the Virtual Disk Name page, type in the desired name and optionally a description, and then click Next to continue.
7. On the Select the Storage Layout page, select the Simple, Mirror, or Parity storage layout, and then click Next to continue.
8. On the Select the Provisioning Type page, select to create a thin or fixed type and click Next to continue. Similar to VHD files, a thin-provisioned virtual disk only takes up the needed space, whereas a fixed type will claim all the space defined for the maximum virtual disk size.
9. On the Specify the Size of the Virtual Disk page, enter the size in GB for the disk and click Next to continue.
10. On the Confirm the Selections page, review and the settings, and then click Create to create the disk.
11. On the View Results page, review the creation results, and click Close to complete the virtual disk creation process.
Creating Volumes on Virtual Disks
After a virtual disk is created, a volume must also be created on it before the operating system can make it usable for users and applications. To create a volume on a new virtual disk, follow these steps:
1. Log on to the Windows Server 2016 system with the new virtual disk and open Server Manager.
2. In the tree pane, click the File and Storage Services link, and when that opens, click Storage Pools on the left.
3. In the Storage Pools pane, select the new storage pool. In the lower-left corner is the Virtual Disks pane. Right-click the desired virtual disk and select Create Volume.
4. Review the information on the Before You Begin page, and then click Next to continue.
5. On the Select Server and Disk page, select the desired server and disk, and then click Next to continue.
6. On the Specify the Size of the Volume page, accept the default to create the maximum volume size in the virtual disk, and then click Next to continue.
7. On the Assign a Drive Letter or Folder page, configure the desired settings and click Next.
8. In the Select file system settings page, choose to format the drive as NTFS or reFS and give the volume a label, then click Next to continue.
9. Review the settings in the Confirm selections page and click Create to create the new volume on the virtual disk.
10. On the View Results page, if the volume is created successfully, click Close to return to Server Manager.
As mentioned earlier Storage Spaces Direct extends the existing Storage Spaces technology that was already in Windows Server 2012. The technology shipping with Windows Server 2016 leverages SMB3 for all intra-node (also known as east-west) communication, including SMB Direct and SMB Multichannel . . . specifically, for low-latency and high-throughput storage.
Storage Spaces Direct complements what is typically referred to as the Windows Server software defined storage stack. This includes Scale-Out File Server (SOFS), Clustered Shared Volume File System (CSVFS), Storage Spaces, and Failover Clustering.
The Storage Spaces Direct stack includes the following elements:
![]() Networking hardware: Storage Spaces Direct uses the network to communicate between hosts. RDMA-capable NIC (or a pair of NIC ports) are required for production deployments.
Networking hardware: Storage Spaces Direct uses the network to communicate between hosts. RDMA-capable NIC (or a pair of NIC ports) are required for production deployments.
![]() Storage hardware: The storage system comprises a minimum of three storage nodes containing local storage. The storage nodes are populated with internal disks. They can also be provisioned with disks in an external SAS connected JBOD enclosure. Disks can be a combination of SATA disks, NVMe disks, or SAS disks.
Storage hardware: The storage system comprises a minimum of three storage nodes containing local storage. The storage nodes are populated with internal disks. They can also be provisioned with disks in an external SAS connected JBOD enclosure. Disks can be a combination of SATA disks, NVMe disks, or SAS disks.
![]() Software Storage Bus: The Software Storage Bus is the Storage Spaces Direct-specific software component. This bus connects all the storage nodes and the local storage in each node.
Software Storage Bus: The Software Storage Bus is the Storage Spaces Direct-specific software component. This bus connects all the storage nodes and the local storage in each node.
![]() Storage Pool: The storage pool is a combination of the local storage across all the nodes.
Storage Pool: The storage pool is a combination of the local storage across all the nodes.
![]() Storage Spaces: Storage Spaces—basically your virtual disks—provides the resilience by storing replicas of data on the different storage nodes.
Storage Spaces: Storage Spaces—basically your virtual disks—provides the resilience by storing replicas of data on the different storage nodes.
![]() Resilient File System (ReFS): The ReFS provides the underlying file system that holds the Hyper-V VM files. The ReFS is the file system for virtualized environments. It cates to Storage Spaces with services such as error detection and automatic correction. The ReFS also provides accelerations for VHD(X) operations. These include operations like fixed VHD(X) creation, dynamic VHD(X) growth, and VHD(X) merge.
Resilient File System (ReFS): The ReFS provides the underlying file system that holds the Hyper-V VM files. The ReFS is the file system for virtualized environments. It cates to Storage Spaces with services such as error detection and automatic correction. The ReFS also provides accelerations for VHD(X) operations. These include operations like fixed VHD(X) creation, dynamic VHD(X) growth, and VHD(X) merge.
![]() Clustered Shared Volumes: CSVFS sits atop ReFS and gathers all the mounted volumes into a single namespace accessible through any node.
Clustered Shared Volumes: CSVFS sits atop ReFS and gathers all the mounted volumes into a single namespace accessible through any node.
![]() Scale-Out File Server: The SOFS is the very top layer of the storage stack. It provides the remote access to the storage system via the SMB3 access protocol. The SOFS layer is only needed in disaggregated configurations. It is not implemented in hyper-converged configurations (in other words, the configuration where the virtual machines and the Storage Spaces Direct on are hosted on the same cluster).
Scale-Out File Server: The SOFS is the very top layer of the storage stack. It provides the remote access to the storage system via the SMB3 access protocol. The SOFS layer is only needed in disaggregated configurations. It is not implemented in hyper-converged configurations (in other words, the configuration where the virtual machines and the Storage Spaces Direct on are hosted on the same cluster).
The following two storage scenarios are typically recommended for this technology:
![]() Primary storage of Hyper-V VM file, secondary storage for Hyper-V Replica virtual machine files, or as backups or archives of virtual machine files.
Primary storage of Hyper-V VM file, secondary storage for Hyper-V Replica virtual machine files, or as backups or archives of virtual machine files.
![]() Disaggregated and Hyper-converged Configurations: Here we can deploy storage for Hyper-V, specifically focusing on Hyper-V IaaS (Infrastructure as a Service) for Service Providers and Enterprises.
Disaggregated and Hyper-converged Configurations: Here we can deploy storage for Hyper-V, specifically focusing on Hyper-V IaaS (Infrastructure as a Service) for Service Providers and Enterprises.
When you deploy the disaggregated model, the Hyper-V servers are deployed in their own cluster and not as part of the cluster from the Storage Spaces Direct servers. Here the virtual machines are configured to store their instance files on the Scale-Out File Server, which is accessed through the network using the SMB3 protocol.
So in this case, you can scale your Hyper-V clusters, the compute tier, and Scale Out File Server cluster, your storage tier, independently. To give you an idea how this works, the compute nodes hold at near-capacity for the number of VMs that they can host while the storage tier continues to operate with excess capacity, terms of storage, and throughput. So you can continue to add more compute nodes without having to add additional storage nodes.
The hyper-converged deployment scenario has the Hyper-V, the compute tier, and Scale Out File Server cluster, your storage tier, on the same cluster. The VM’s files are stored on the local CSVs and do not implement a Scale-Out File Server. This lets you scale Hyper-V compute clusters and storage together while removing the requirement to configure the file server’s access and permissions.
Configuring and provisioning Hyper-V is the same process and uses the same tools that you would use with any other Hyper-V deployment on a failover cluster. Your VMs will see the CSV volumes as soon as Storage Spaces Direct is configured.
PowerShell is used to deploy and manage Storage Spaces Direct. You have limited utility using Server Manager or Failover Cluster Manager to manage Storage Spaces Direct.
You can implement a pilot Storage Spaces Direct project using at least four generation 2 Hyper-V virtual machines configured with at least four data disks per virtual machine. Be aware that Storage Spaces Direct does not support disks connected via multiple paths and the Microsoft Multipath MPIO software stack.
Storage Space Configuration with Mixed Disk Types
Storage Spaces Direct supports use of locally connected disks. These include SAS HBA and SATA connected disks, SATA SSD disk, NVMe disks, and so on. They can be used in a variety of different configurations, which gives you the ultimate flexibility to decide on what you can afford and what performance or throughput you are looking for.
Storage Space Configuration with Different Disk Types
Windows Server 2016 optimizes the storage pool to balance data equally across the set of physical disks in the pool. In a legacy implementation of disk bunches, as physical disks are added or removed over time and as data is written or deleted, the data among the disks in the pool would become uneven across all the disks in the pool. It was even possible for some disks in the pool to fill up while other disks in the pool were left with a lot of space available.
With Windows Server 2016, as more storage is added to the pool the new disk will be optimized and merged into the pool where it immediately comes under the control of the optimizer. You will immediately notice improved performance in the pool and the newly available physical storage becomes available and the throughput is adjusted. The optimization of the pool is a maintenance task that is handled by you, the administrator.
To optimize the pool, open PowerShell and issue the following commands:
Optimize-StoragePool <PoolName>
The output of the Optimize-StoragePool command includes a progress bar that measures the progress of the rebalance operation.
You can monitor the progress of the optimize job with the following command:
Get-StorageJob | ? Name -eq Optimize
Storage Spaces Fault Tolerance
Storage Spaces Direct was developed to enable virtual disks and the storage to be more resilient and thus reduce the possibility of node failures. This resiliency is provided is in addition to the existing disk and enclosure resiliency.
When using Storage Spaces Direct, the storage pools and virtual disks will, by default, be resilient to node failures. When you create a storage, the so-called FaultDomainAwarenessDefault property is set to StorageScaleUnit. This sets the default for virtual disk creation. If you need to check the storage pool property, run the following command:
Get-StoragePool -FriendlyName <PoolName> | FL FriendlyName, Size,
FaultDomainAwarenessDefault
FriendlyName : <PoolName>
Size: <Size>
FaultDomainAwarenessDefault : StorageScaleUnit
When a virtual disk is created in a pool, it automatically assumes the default value of the pool and thus its FaultDomainAwareness property will be set to StorageScaleUnit. You can check this property by running the following command:
Get-VirtualDisk -FriendlyName <VirtualDiskName>| FL FriendlyName, Size,
FaultDomainAwareness, ResiliencySettingName
FriendlyName : <VirtualDiskName>
Size : <Size>
FaultDomainAwareness : StorageScaleUnit
ResiliencySettingName : Mirror
Do not change the FaultDomainAwarenessDefault and FaultDomainAwareness values in a Storage Spaces Direct deployment because the property on the virtual disk controls data placement in all scenarios. The scenarios include all initial data allocations when creating the virtual disk, when repairing a virtual disk from a disk failure, and enclosure or node failure, and when rebalancing virtual disks in a storage pool. All of these operations will take into account the StorageScaleUnit fault domain and ensure that copies of data are placed on different nodes.
Virtual Disks 101
A virtual disk consists of extents, each of which are 1GB in size. So if you take a 100GB virtual disk it will thus consist of 100 1GB extents. When you mirror this disk, setting the ResiliencySettingName, you provide multiple copies of each extent.
The number of copies of the extent (using NumberOfDataCopies) can be two or three. Thus a 100GB mirrored virtual disk with three data copies will consume 300 extents. The placement of extents is governed by the fault domain, which in Storage Spaces Direct is nodes (StorageScaleUnit), so the three copies of an extent (A) will be placed on three different.
Another extent (B) of the same virtual disk might have its three copies placed on different nodes, for example 1, 3, 4, and so on. This means that a virtual disk might have its extents distributed across all storage nodes and the copies of each extent is placed on different nodes.
Look at the various failure scenarios and how Storage Spaces handles them.
Scenario 1: In this scenario, Storage Spaces will re-provision the extent that is impacted by failing sectors. The extent will be moved to another disk in the same node or a disk in another node that does not already have a copy of the extent. For example: If the three copies of the extent are on node A, B, and C, and the extent on node A is impacted by a sector failure, the new copy gets generated on a different disk in node A or any disk in Node D. The disks in node B and C are not illegible because these nodes already have a copy of the extent.
Scenario 2: Here Storage Spaces retires the physical disk from the storage pool when it discovers the disk has failed. As soon as the physical disk has been retired, each virtual disk begins a repair process. The virtual disks thus generate a new copy of the extents that were on the retired physical disk. And once again, new copy gets generated on a different disk in node A or any disk in Node D. The disks in node B and C are not illegible because these nodes already have a copy of the extent.
Scenario 3: Storage Spaces will do one of two things in this scenario. If the storage node or the physical enclosure to which the physical disk is attached is faulting, Storage Spaces ignores the actual physical disk. If, however, only the physical disk is missing, Storage Spaces retires the disk.
Scenario 4: In this scenario, Storage Spaces does not automatically retire physical disks from the storage pool for the reasons described in scenario 3. As soon as storage node comes back online, Storage Spaces automatically updates all extents that are not up to date with the copies that were not affected by a restart or maintenance.
Scenario 5: With permanent storage node failure, Storage Spaces forces a manual retiring of all the affected physical disks from the storage pool. You can then add additional storage nodes to the storage system, if needed, and begin repair. In this scenario, Storage Spaces does not know if it is a temporary or permanent failure and thus does not initiate a repair that could potentially result in significant I/O and CPU activity.
In Scenario 1, during a storage node restart or temporary maintenance of a storage node, all the disks associated with that node will be reported missing. Automatically retiring all those disks would potentially result in a massive amount of repair activity as all extents on those disks would have to be rebuild elsewhere in the storage system. This could easily be multiple terabytes of data. If the disks are really missing and will not come back to the storage system, the administrator will need to retire the missing physical disks and start the repair process.
Summary
Windows Server 2016 file services give administrators several options when it comes to building fault-tolerant servers, configuring data storage, and securing access to data. With the updated Storage Spaces Direct feature, administrators have a lot of flexibility with building and expanding fault-tolerant virtual disks. For more information on implementing Storage Spaces Direct for high availability, see Chapter 28, “Operational Fault Tolerance (Clustering/Network Load Balancing).”
Best Practices
The following are best practices from this chapter:
![]() Try to provide disk fault tolerance for your operating system and data drives, preferably using hardware-based RAID sets, through the use of Windows fault-tolerant volumes or by deploying resilient mirrored or parity virtual disks on storage pools that include multiple physical disks.
Try to provide disk fault tolerance for your operating system and data drives, preferably using hardware-based RAID sets, through the use of Windows fault-tolerant volumes or by deploying resilient mirrored or parity virtual disks on storage pools that include multiple physical disks.
![]() Verify that the drive containing the staging folder for a replication connection contains ample space to accept the amount of replicated data inbound and outbound to this server and adjust the staging folder quote for each replication group as required.
Verify that the drive containing the staging folder for a replication connection contains ample space to accept the amount of replicated data inbound and outbound to this server and adjust the staging folder quote for each replication group as required.
![]() When creating virtual disks within storage pools, create resilient disks by selecting either a mirror or parity disk layout.
When creating virtual disks within storage pools, create resilient disks by selecting either a mirror or parity disk layout.
![]() If user claims based on attributes will be used to compare against resource properties assigned to folder classifications, ensure that the user attributes selected are not editable by the end users themselves.
If user claims based on attributes will be used to compare against resource properties assigned to folder classifications, ensure that the user attributes selected are not editable by the end users themselves.