CHAPTER 13
Securing Data in Transit
IN THIS CHAPTER
![]() Introduction to Securing Data in Transit with Windows Server 2016
Introduction to Securing Data in Transit with Windows Server 2016
![]() Deploying a Public Key Infrastructure with Windows Server 2016
Deploying a Public Key Infrastructure with Windows Server 2016
![]() Understanding Active Directory Certificate Services in Windows Server 2016
Understanding Active Directory Certificate Services in Windows Server 2016
![]() AD DS Rights Management Services
AD DS Rights Management Services
![]() Using IPsec Encryption with Windows Server 2016
Using IPsec Encryption with Windows Server 2016
In the past, networks were closed environments, insulated from each other and accessible only on internal segments. Data usage was limited to each network and rarely shared across untrusted networks. Over time, a need developed to share information between these networks, and connections were established to transmit data from network to network. The transmission of this information often crosses untrusted networks such as the Internet and was originally insecure. As a result, if the information was intercepted, it could easily be read or modified by unauthorized persons. The need to secure this information during transit was subsequently made a priority and became a critical component of network and data infrastructures.
If integrating with Azure, and internal servers are accessed by external networks and the cloud, you will also need to enroll certificates on your enterprise network and export certificates to the Azure Windows Servers.
Over time, the technology used to keep this information safe evolved along with the technology available to exploit and obtain unauthorized access to data. Despite these threats, intelligent design and configuration of secure data transport solutions using Windows Server 2016 greatly increase the security of a network. In many cases, they are absolutely required, especially for data sent across uncontrolled network segments, such as the Internet.
This chapter focuses on the mechanisms that exist to protect and encrypt information sent between computers on a network. Data transport security features in Windows Server 2016 are highlighted, and sample situations are detailed. IPsec, public key infrastructure (PKI), and virtual private network (VPN) use, especially with regard to Azure infrastructure and the cloud when you will need to configure site-to-site VPNs. In addition, specific server functionality, such as that provided by Windows Server 2016 Active Directory Certificate Services (AD CS) and Active Directory Rights Management Services (AD RMS), is outlined.
Introduction to Securing Data in Transit in Windows Server 2016
Securing data in transit refers to preventing unauthorized access to data as part of the communications between client and server and between servers. In addition to physical security and network-level security, the implementation of security at the data transit layer is yet another level of security important in the design and implementation of a protected network environment.
The Need for Another Layer of Security
The very nature of interconnected networks requires that all information be sent in a format that can easily be intercepted by any client on a physical network segment. The data must be organized in a structured, common way so that the destination server can translate it into the proper information. This simplicity also gives rise to security problems, however, because intercepted data can easily be misused if it falls into the wrong hands.
The need to make information unusable if intercepted is the basis for all transit-level encryption. Considerable effort goes into both sides of this equation: Security specialists develop schemes to encrypt and disguise data, and hackers and other security specialists develop ways to forcefully decrypt and intercept data. The good news is that encryption technology has developed to the point that properly configured environments can secure their data with a great deal of success, as long as the proper tools are used. Windows Server 2016 offers much in the realm of transit security, and deploying some or many of the technologies available is highly recommended to properly secure important data.
Modern businesses and the technology that supports them have also created a diverse group of users and entities which interact with each system and are trusted to varying degrees. The security layer that protects network data presents some challenges in such a nuanced environment. An addition layer of tools that are flexible, dynamic, and can protect data based on content and context is required.
Deploying Security Through Multiple Layers of Defense
Because even the most secure infrastructures are subject to vulnerabilities, deploying multiple layers of security on critical network data is recommended. If a single layer of security is compromised, the intruder must bypass the second or even third level of security to gain access to the vital data. For example, relying on a complex 256-bit “unbreakable” encryption scheme is worthless if an intruder simply uses social engineering to acquire the password or PIN from a validated user. Putting in a second or third layer of security, in addition to the first one, makes it that much more difficult for intruders to break through all layers.
Securing data in transit with Windows Server 2016 uses multiple levels of authentication, encryption, and authorization to provide for an enhanced degree of security on a network. The configuration capabilities supplied with Windows Server 2016 allow for the establishment of several layers of transport-level security focused on protecting the confidentiality and integrity of the data.
NOTE
Security through multiple layers of defense is not a new concept, but is rather adapted from military strategy, which rightly holds that multiple lines of defense are better than one.
Understanding Encryption Basics
Encryption, simply defined, is the process of taking intelligible information and scrambling it so as to make it unintelligible for anyone except the user or computer that is the destination of this information. Without going into too much detail on the exact methods of encrypting data, the important point to understand is that proper encryption allows this data to travel across unsecured networks, such as the Internet, and be translated only by the designated destination. If packets of properly encrypted information are intercepted, they are worthless because the information is garbled. All mechanisms described in this chapter use some form of encryption to secure the contents of the data sent.
Deploying a Public Key Infrastructure with Windows Server 2016
The term public key infrastructure (PKI) is often loosely thrown around, but is not often thoroughly explained. PKI, in a nutshell, is the collection of digital certificates, registration authorities, and certificate authorities that verify the validity of each participant in an encrypted network. Effectively, a PKI itself is simply a concept that defines the mechanisms that ensure that data in transit cannot be read and validates the identity of the user or entity that sent the data. PKI implementations are widespread and are becoming a critical component of modern network and system implementations. Windows Server 2016 fully supports the deployment of multiple PKI configurations, as defined in the following sections.
PKI deployments can range from simple to complex, with some PKI implementations utilizing an array of smart cards (or other two factor authentication tokens) and certificates to verify the identity of all users with a great degree of certainty. Understanding the capabilities of PKI and choosing the proper deployment for an organization are subsequently a must.
Defining Private Key Versus Public Key Encryption
Encryption techniques can primarily be classified as either symmetric or asymmetric. Symmetric encryption requires that each party in an encryption scheme hold a copy of a private key, which is used to encrypt and decrypt information sent between the two parties. The problem with private key encryption is that the private key must somehow be transmitted to the other party without it being intercepted and used to decrypt the information. In addition, each unique two parties would need a unique key to protect the data. The resulting key management is the main obstacle to implementing private key encryption, which is a must-have technology.
Public key, or asymmetric, encryption uses a combination of two keys, which are mathematically related to each other. The first key, the private key, is kept closely guarded and is used to digitally sign or decrypt the information. The second key, the public key, can be used to verify the digital signature or encrypt the information. The integrity of the public key is ensured through certificates, which is explained in depth in the following sections of this chapter. The asymmetric approach to encryption makes key management much easier because the public key does not need to be protected and each user only has a single private key. This improved management comes at a performance cost due to the mathematics involves.
Many implementations of encryption and asymmetric keys (including most PKI implementations) actually use an asymmetric process to select a private key, which is then used for data protection. This combines the benefits of both approaches.
Exploring Digital Certificates
A certificate is essentially a digital document that is issued by a trusted authority (central, internal or local) which can then be used by others to validate a user’s identity. Central, trusted authorities such as VeriSign, Thawte or DigiCert are widely used on the Internet to ensure that software from Microsoft, for example, is really from Microsoft, and not a virus in disguise.
Certificates are used for multiple functions, such as the following:
![]() Secure email
Secure email
![]() Web-based authentication
Web-based authentication
![]() Secure networks using IP Security (IPsec)
Secure networks using IP Security (IPsec)
![]() Code signing
Code signing
![]() Certification hierarchies
Certification hierarchies
However, all of these functions amount to either encrypting data, as in the case of securing email or protecting web-based passwords and content, or digitally signing data to ensure integrity and identity, as in the case of code signing or digital email signatures.
Certificates are signed using information from the subject’s public key, along with identifying information, such as name, email address, and so on, and a digital signature of the certificate issuer, known as the certificate authority (CA). As long as both users and computers or both trust the same central authority that issued the certificates, they can trust each other.
Understanding Active Directory Certificate Services in Windows Server 2016
Windows Server 2016 includes a built-in CA technology that is known as Active Directory Certificate Services (AD CS). The first iteration of AD CS emerged with Windows Server 2008, though previous versions of the technology were simply known as Certificate Services. AD CS can be used to issue certificates and subsequently manage them; it is responsible for ensuring their validity and managing their revocation and expiration. AD CS is often used in Windows Server 2016 if there is no particular need to have a third-party verify an organization’s certificates. It is common practice to set up an internal certificate authority for uses which are limited to internal users and systems. Third-party certificate authorities such as DigiCert are frequently used when external users and systems are involved and typically require an additional recurring cost.
NOTE
Although the term Active Directory has been incorporated into the name of the Windows Certificate Services function, it should be understood that AD CS does not necessarily require integration with an existing Active Directory Domain Services (AD DS) forest environment. Although this is commonly the case, it is important to understand that AD CS has independence over AD DS forest design. For more information about AD DS, see Chapter 4, “Active Directory Domain Services Primer,” and Chapter 5, “Designing a Windows Server 2016 Active Directory.”
Windows Server 2016 includes several key AD CS features, including the following:
![]() Certificate Enrollment Web Service and Certificate Enrollment Policy Web Service—This feature, introduced with Windows Server 2008 R2, allows certificates to be enrolled directly over HTTP and HTTPS, enabling non-domain or Internet-connected clients to connect and request certificates from a CA server.
Certificate Enrollment Web Service and Certificate Enrollment Policy Web Service—This feature, introduced with Windows Server 2008 R2, allows certificates to be enrolled directly over HTTP and HTTPS, enabling non-domain or Internet-connected clients to connect and request certificates from a CA server.
![]() Automatic renewal for non-domain members—Extending the support for non-domain members, the Certificate Enrollment Policy Web Service in Windows Server 2016 supports automatic renewal.
Automatic renewal for non-domain members—Extending the support for non-domain members, the Certificate Enrollment Policy Web Service in Windows Server 2016 supports automatic renewal.
![]() Support for Windows Server 2016 Core Edition and Nano Server—AD CS is supported on Core and Nano Edition servers.
Support for Windows Server 2016 Core Edition and Nano Server—AD CS is supported on Core and Nano Edition servers.
![]() Support for cross-forest certificate enrollment—Introduced to AD CS in Windows Server 2008 R2, the platform allows for CA consolidation across multiple forests.
Support for cross-forest certificate enrollment—Introduced to AD CS in Windows Server 2008 R2, the platform allows for CA consolidation across multiple forests.
Reviewing the CA Roles in AD CS
AD CS for Windows Server 2016 can be installed as one of the following CA types:
![]() Enterprise root CA—The enterprise root CA is the most trusted CA in an organization and should be installed before any other CA. All other CAs are subordinate to an enterprise root CA. This CA should be highly physically secured because a compromise of the enterprise CA effectively makes the entire chain compromised.
Enterprise root CA—The enterprise root CA is the most trusted CA in an organization and should be installed before any other CA. All other CAs are subordinate to an enterprise root CA. This CA should be highly physically secured because a compromise of the enterprise CA effectively makes the entire chain compromised.
![]() Enterprise subordinate CA—An enterprise subordinate CA must get a CA certificate from a root CA, but can then issue certificates to all users and computers in the enterprise. These types of CAs are often used to provide a scalable, highly available set of certificate authorities while protecting the root CA.
Enterprise subordinate CA—An enterprise subordinate CA must get a CA certificate from a root CA, but can then issue certificates to all users and computers in the enterprise. These types of CAs are often used to provide a scalable, highly available set of certificate authorities while protecting the root CA.
![]() Standalone root CA—A standalone root CA is the root of a hierarchy that is not related to the enterprise domain information. Multiple standalone CAs can be established for particular purposes. A standalone root CA is often used as the root for other enterprise subordinate CAs to improve security in an environment because a standalone root can be taken offline. In other words, the root is configured as standalone, and subordinate enterprise domain integrated CAs are set up within the domains in a forest to provide for auto-enrollment across the enterprise.
Standalone root CA—A standalone root CA is the root of a hierarchy that is not related to the enterprise domain information. Multiple standalone CAs can be established for particular purposes. A standalone root CA is often used as the root for other enterprise subordinate CAs to improve security in an environment because a standalone root can be taken offline. In other words, the root is configured as standalone, and subordinate enterprise domain integrated CAs are set up within the domains in a forest to provide for auto-enrollment across the enterprise.
![]() Standalone subordinate CA—A standalone subordinate CA receives its certificate from a standalone root CA and can then be used to distribute certificates to users and computers associated with that standalone CA.
Standalone subordinate CA—A standalone subordinate CA receives its certificate from a standalone root CA and can then be used to distribute certificates to users and computers associated with that standalone CA.
CAUTION
Making decisions about the structure of AD CS architecture is no small task, and should not be taken lightly. Simply throwing AD CS on a server as an enterprise CA and letting it run is not the best approach from a security perspective because compromise of that server can have a disastrous effect. Subsequently, it is wise to carefully consider AD CS design before deployment. For example, one common best practice is to deploy a standalone root CA, then several enterprise subordinate CAs, and then to take the standalone root CA physically offline and secure it in a very safe location, only turning it on again when the subordinate CAs need to have their certificates renewed.
Detailing the Role Services in AD CS
AD CS is composed of several role services that perform different tasks for clients. One or more of these role services can be installed on a server as required. These role services are as follows:
![]() Certification Authority—This role service installs the core CA component, which allows a server to issue, revoke, and manage certificates for clients. This role can be installed on multiple servers within the same root CA chain.
Certification Authority—This role service installs the core CA component, which allows a server to issue, revoke, and manage certificates for clients. This role can be installed on multiple servers within the same root CA chain.
![]() Certification Authority Web Enrollment—This role service handles the web-based distribution of certificates to clients. It requires Internet Information Services (IIS) to be installed on the server.
Certification Authority Web Enrollment—This role service handles the web-based distribution of certificates to clients. It requires Internet Information Services (IIS) to be installed on the server.
![]() Online Responder—The role service responds to individual client requests regarding information about the validity of specific certificates. It is used for complex or large networks, when the network needs to handle large peaks of revocation activity, or when large certificate revocation lists (CRLs) need to be downloaded.
Online Responder—The role service responds to individual client requests regarding information about the validity of specific certificates. It is used for complex or large networks, when the network needs to handle large peaks of revocation activity, or when large certificate revocation lists (CRLs) need to be downloaded.
![]() Certificate Enrollment Web Service—This service enables users and computers to enroll for certificates remotely or from non-domain systems via HTTP.
Certificate Enrollment Web Service—This service enables users and computers to enroll for certificates remotely or from non-domain systems via HTTP.
![]() Certificate Enrollment Web Policy Service—This service works with the related Certificate Enrollment Web Service, but simply provides policy information rather than certificates.
Certificate Enrollment Web Policy Service—This service works with the related Certificate Enrollment Web Service, but simply provides policy information rather than certificates.
![]() Network Device Enrollment Service—This role service streamlines the way that network devices such as routers receive certificates.
Network Device Enrollment Service—This role service streamlines the way that network devices such as routers receive certificates.
Installing AD CS
To install AD CS on Windows Server 2016, determine which server will serve as the root CA, keeping in mind that it is highly recommended that this be a dedicated server and also recommended that it be physically secured and shut off for most of the time to ensure integrity of the certificate chain. It is important to note that an enterprise CA cannot be shut down; however, a standalone root with a subordinate enterprise CA can be shut down. If the strategy of having a standalone root with a subordinate enterprise CA is taken, the root CA must first be created and configured, and then an enterprise subordinate CA must then be created.
In smaller scenarios, an enterprise root CA can be provisioned, though in many cases, those smaller organizations might still want to consider a standalone root and a subordinate enterprise CA. For the single enterprise root CA scenario, however, the following steps can be taken to provision the CA server:
CAUTION
After AD CS (certificate services) is installed onto a server, the name of that server and the domain status of that server cannot change. Also, the server name must not change while it is a CA.
1. Open Server Manager.
2. From the Manage menu, select the Add Roles and Features.
3. Click Next at the Before You Begin page.
4. Accept the default installation type and click Next.
5. Select the server to become the AD certificate server from the list and click Next.
6. On the Select Server Roles page, check the box for Active Directory Certificate Services, click Add Features to accept the required features and click Next.
7. Click Next to accept the list features.
8. Review the information about AD CS on the Introduction page, and then click Next to continue.
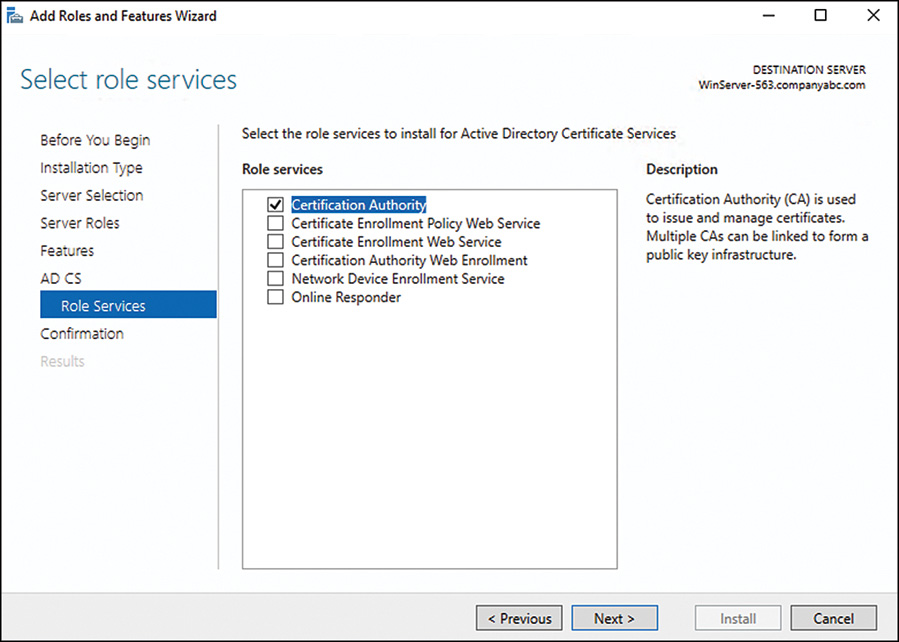
9. On the Select Role Services page, shown in Figure 13.1, choose which role services will be required. A base install will need only the Certificate Authority role. Click Next to continue.
10. Click Install.
11. When the installation is complete, click the Configure Active Directory Certificate Services on the destination server link.
12. If needed, click Change to change the credentials, and then click Next.
13. Select the Certificate Authority role service to be configured and click Next.
14. Select whether to install an Enterprise (integrated with AD DS) CA or a Standalone CA on the subsequent page. In this example, we are installing a domain-based enterprise root CA. Click Next to continue.
15. On the Specify CA Type page, specify the CA type, as shown in Figure 13.2. In this case, we are installing a root CA on the server. Click Next to continue.

16. On the following Private Key page, you can choose whether to create a new private key from scratch or reuse an existing private key from a previous CA implementation. In this example, we create a new key. Click Next to continue.
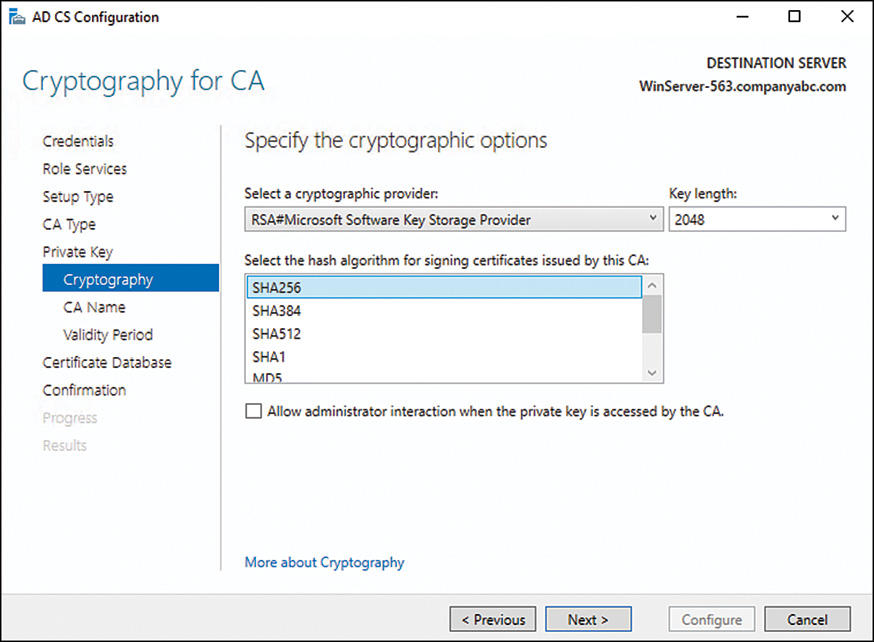
17. On the Configure Cryptography for CA page, enter the private key encryption settings, as shown in Figure 13.3. Normally, the defaults are fine, but there might be specific needs to change the CSP, key length, or other settings. Click Next to continue.
18. Choose a common name that will be used to identify the CA. Remember that this name will appear on all certificates issued by the CA. In this example, we enter the common name CompanyABC-CorpCA. Click Next to continue.
19. Set the validity period for the certificate that will be installed on this CA server. If this is a root CA, the server will have to reissue the certificate chain after the expiration period has expired. In this example, we choose a 5-year validity period, though many production scenarios will have a 20-year CA created for the root. Click Next to continue.
20. Specify a location for the certificate database and log locations, and click Next to continue.
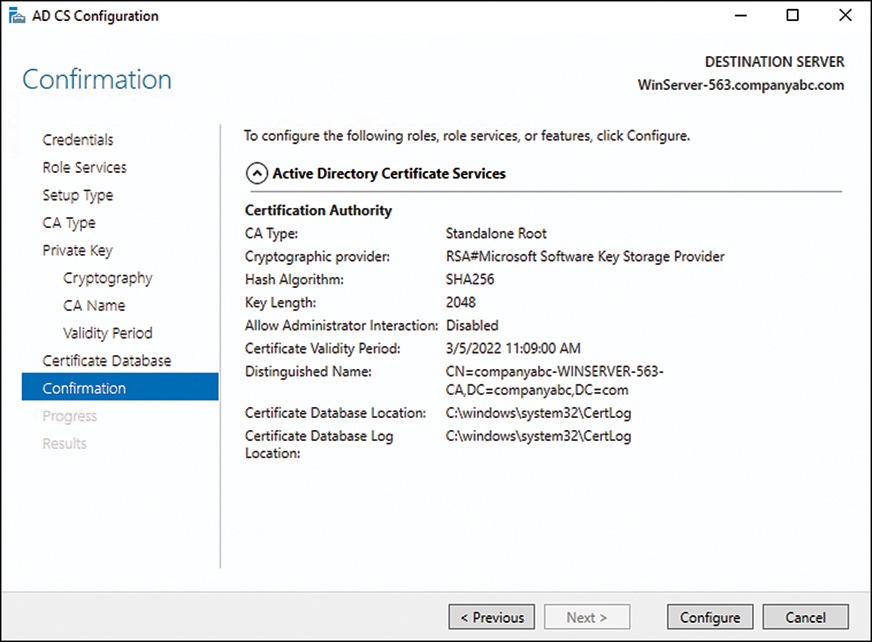
21. Review the configuration selections on the confirmation page, as shown in Figure 13.4, and click Configure.
22. Click Close when the wizard is complete.
After you install AD CS, you can install additional CAs as subordinate CAs, and administration of the PKI can be performed from the Certification Authority console. (From the Server Manager Tools menu, choose Certification Authority.)
Configuring Auto-Enrollment
With the CA installed, certificates can now be issued. Certificates for application servers such as web servers, Microsoft Exchange servers, Microsoft Lync servers, and so on are often deployed manually by an administrator. Larger deployments of certificates, however, could involve hundreds, thousands, or more certificates and therefore require an automated enrollment process. Windows Server 2016 provides such an automated process, both for domain members and non-domain members.
The following example demonstrates the deployment of a computer certificate to all domain members. The following high-level steps are involved:
1. Assign template permissions.
2. Enable the template on the CA.
3. Configure a group policy object (GPO) for auto-enrollment of domain members.
4. Configure auto-enrollment for non-domain members.
To assign the required template permissions, follow these steps:
1. Click the Start button and right click the menu option to access Run from the Start menu.
2. Enter mmc in the Run field.
3. Select File, Add/Remove Snap-In.
4. Add the Certificate Templates snap-in and click OK.
5. Select the Certificate Templates root folder.
6. In the results pane, right-click the Workstation Authentication template and select Duplicate Template. Give the new template a name.
7. Click the Security tab.
8. Select the Domain Computers entry and check the Auto-Enroll check box in the Allow column, as shown in Figure 13.5.
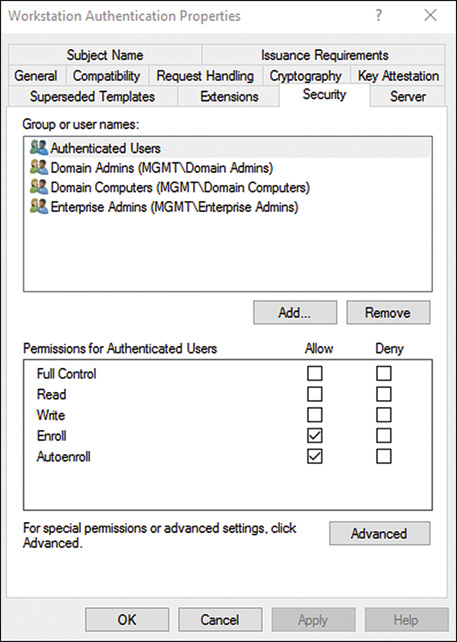
9. Click OK.
To enable the template on the CA, follow this process on the AD CS server:
1. Open Server Manager.
2. From the Tools menu, select Certification Authority.
3. Expand the root authority folder.
4. Right-click the Certificates Templates folder and select New, Certificate Template to Issue.
5. Select the duplicated copy of the Workstation Authentication template and click OK.
To configure a GPO for auto-enrollment, following this process on a domain controller:
1. Open Server Manager
2. From the Tools menu, select Group Policy Management.
3. Expand the forest name Domains and the domain name folders.
4. Right-click the domain and select Create a GPO in This Domain, and Link It Here.
5. Enter a name for the new GPO, such as Computer certificate auto-enrollment, and then click OK.
6. Right-click the newly created GPO and select Edit.
7. Expand Computer ConfigurationPoliciesWindows SettingsSecurity SettingsPublic Key Policies.
8. In the results pane, double-click the Certificate Services Client–Auto-Enrollment.
9. Change the Configuration Model setting to Enabled.
10. Check both the Renew Expired Certificates, Update Pending Certificates, and Remove Revoked Certificates and the Update Certificates That Use Certificate Templates check boxes. Click OK.
Use the following process to validate the certificate enrollment:
1. Click the Start button to open the Metro screen.
2. Enter mmc to open the search field and find the mmc executable.
3. Run mmc using the search results.
4. Select File, Add/Remove Snap-In.
5. Select the Certificates snap-in and click Add.
6. Select Computer Account Management Scope and click Next.
7. Accept the Local Computer target, click Finish, and then click OK.
8. Expand the Certificates (Local Computer) folder, the Personal folder, and select the Certificates subfolder.
9. Review and validate the certificate listed in the results pane.
Using Smart Cards in a Public Key Infrastructure
A robust solution for a PKI network can be found in the introduction of smart card authentication for users. Smart cards can be microchip enabled plastic cards, USB keys, or other devices.
User logon information, as well as certificates installed from a CA server, can be placed on a smart card. When a user needs to log on to a system, she places the smart card in a smart card reader or simply swipes it across the reader itself. The certificate is read, and the user is prompted only for a PIN, which is uniquely assigned to each user. After the PIN and the certificate are verified, the user is logged on to the domain.
Smart cards are a form of two-factor authentication and have obvious advantages over standard forms of authentication. It is no longer possible to simply steal or guess someone’s username and password in this scenario because the username can be entered only via the unique smart card. If stolen or lost, the smart card can be immediately deactivated and the certificate revoked. Even if a functioning smart card were to fall into the wrong hands, the PIN would still need to be used to properly access the system. Smart cards are fast becoming a more accepted way to integrate the security of certificates and PKI into organizations.
Using the Encrypting File System
Just as transport information can be encrypted via certificates and PKI, so too can the Resilient File System (ReFS) on Windows Server 2016 be encrypted to prevent unauthorized access. The Encrypting File System (EFS) option in Windows Server 2016 allows for this type of functionality and improves on previous EFS models by allowing offline folders to maintain encryption sets on the server. EFS is advantageous, particularly for laptop users who tote around sensitive information. If the laptop or hard drive is stolen, the file information is worthless because it is scrambled and can be unscrambled only with the proper key. EFS is proving to be an important part of PKI implementations.
Windows BitLocker goes one step further than EFS, allowing for the entire hard drive, aside from a few boot files, to be encrypted.
Integrating PKI with Non-Microsoft Kerberos Realms
Windows Server 2016’s Active Directory component can use the PKI, which utilizes trusts between foreign non-Microsoft Kerberos realms and Active Directory. The PKI serves as the authentication mechanism for security requests across the cross-realm trusts that can be created in Active Directory.
Active Directory Rights Management Services
Active Directory Rights Management Services (AD RMS) is a Digital Rights Management (DRM) technology that allows for restrictions to be placed on how content is managed, transmitted, and viewed. RMS uses like PKI technology to encrypt content such as documents and email messages, and only allows access to view said content if restrictions are placed on the content, such as disabling the ability to print, cut/paste, or forward information.
AD RMS in Windows Server 2016 is the next iteration of the Windows Rights Management Server technology that has been developed over a period of several years. In addition to retaining existing functionality, it adds tighter integration with Active Directory Domain Services (AD DS) and greater scalability.
Understanding the Need for AD RMS
Many organizations are faced with the problem of defining how their intellectual property can be managed after it has been distributed. Several high-profile leaks of sensitive internal emails from major corporations have exposed the need to manage and restrict how email that contains sensitive corporate information is disseminated.
The problem stems from the fact that computer systems have historically been good at restricting information to unauthorized individuals, but as soon as an authorized individual gains access to that data, those organizations have traditionally lost control over what is done with the content. Authorized individuals have copied documents offsite, emailed sensitive information, had their laptops stolen, and have found a myriad of other ways to lose control of an organization’s confidential information.
Active Directory RMS was designed to give the control back to an organization. It allows enforcement personnel the ability to restrict how a document is transmitted, printed, copied, or when it expires. Integration with Active Directory Domain Services allows the content to be only decrypted by individuals stipulated in the policies as well.
NOTE
Changes to RMS-protected documents are not reflected unless the document itself is “republished” and the client does not have the use license cached in conjunction with a local copy of the RMS-protected document. If the original use license has not expired, users continue to have access to protected documents that have either not been republished or have been moved from the location of the newly published document.
AD RMS also includes a role service known as Identity Federation Support. Installing this service allows an organization to share rights-protected content with other organizations.
Understanding AD RMS Prerequisites
Before installing AD RMS, the following prerequisites must be satisfied:
![]() Create a service account for RMS within AD DS. The service account must be different from the account that is used to install RMS.
Create a service account for RMS within AD DS. The service account must be different from the account that is used to install RMS.
![]() The AD RMS server must be a domain member within the domain of the user accounts that will use the service.
The AD RMS server must be a domain member within the domain of the user accounts that will use the service.
![]() An AD RMS root cluster for certification and licensing must be created.
An AD RMS root cluster for certification and licensing must be created.
![]() A fully qualified domain name (FQDN) resolvable from the locations where RMS files will be consumed needs to be set up. For example, rms.companyabc.com can be set up for clients to be able to connect to the AD RMS server to validate their RMS rights.
A fully qualified domain name (FQDN) resolvable from the locations where RMS files will be consumed needs to be set up. For example, rms.companyabc.com can be set up for clients to be able to connect to the AD RMS server to validate their RMS rights.
A server running SQL Server must be available to store the AD RMS databases. It is highly recommended to use an alternate server than the one where AD RMS is installed.
Installing AD RMS
Installation of AD RMS can be performed using the Server Manager utility by adding the AD RMS role to the server. The process of adding the AD RMS role is as follows:
1. Open Server Manager.
2. From the Manage menu, select Add Roles and Features.
3. Click Next at the Welcome page and at the Installation Type page.
4. Select the AD RMS server from the list and click Next.
5. On the Select Server Roles page, check the box for Active Directory Rights Management Services, click Add Features to accept the required features, and then click Next.
6. Click Next to accept the list features.
7. Review the information about AD RMS on the Introduction page, and then click Next to continue.
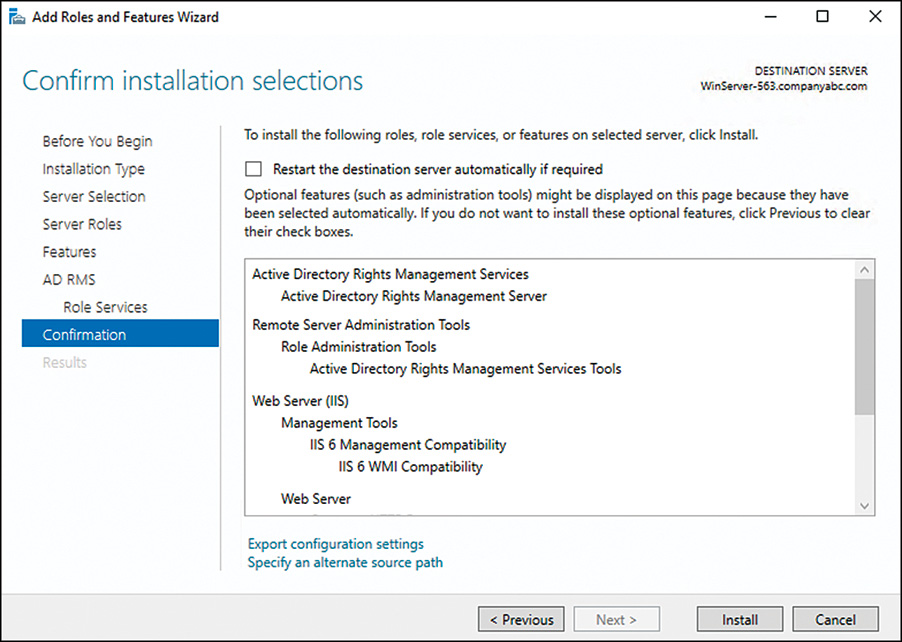
8. On the Select Role Services page, choose which role services will be required. A base install needs only the Active Directory Rights Management Server role. Click Next to continue.
9. Click Install and monitor the installation progress, as shown in Figure 13.6.
10. When the installation completes, click the Perform Additional Configuration link.
Complete the configuration wizard as follows:
1. Review the introductory description and click Next.
2. Accept the default select to create a new cluster and click Next.
3. Select the Use Windows Internal Database on This Server option. Click Next.
NOTE
While the Windows Internal Database is appropriate for nonproduction environments and this example, it does not scale well and does not support high-availability options and is therefore not recommended for production deployments.
4. Enter the service account credentials and click Next.
5. Accept the default cryptographic mode and click Next
6. Accept the default of centralized key storage and click Next.
7. Enter a password for the key and click Next.
8. Accept the default web site and click Next.
9. Select the security connection type and enter the RMS URL and click Next.
NOTE
Production deployments are strongly encouraged to use HTTPS for all RMS access. Environments with internal only content consumers can use Internet certificates. If integration with external consumers is required, a third-party certificate should be used.
10. Select the certificate to be used for the cluster and click Next.
11. Enter a descriptive name for the certificate that will establish your RMS identity. It is recommended to use the same host name as the URL. Click Next.
12. Select when to register an AD Service Connection Point (SCP). In projects, the SCP is typically published at a later date after RMS templates have been configured and tested. After the SCP is published, RMS features and templates immediately become available to Office and Windows users. Click Next.
13. Review the installation parameters and click Install.
14. When the installation completes, click Close to complete the install.
Using IPsec Encryption with Windows Server 2016
IP Security (IPSec), mentioned briefly in previous sections, is essentially a mechanism for establishing end-to-end encryption of all data packets sent between computers. IPsec operates at Layer 3 of the OSI model and subsequently uses encrypted packets for all traffic between members.
IPsec is often considered to be one of the best ways to secure the traffic generated in an environment, and is useful for securing servers and workstations both in high-risk Internet access scenarios and also in private network configurations for an enhanced layer of security.
Understanding the IPsec Principle
The basic principle of IPsec is this: All traffic between clients—whether initiated by applications, the operating system, services, and so on—is entirely encrypted by IPsec, which then puts its own header on each packet and sends the packets to the destination server to be decrypted. Because every piece of data is encrypted, this prevents electronic eavesdropping, or listening in on a network in an attempt to gain unauthorized access to data.
Several functional IPsec deployments are available, and some of the more promising ones are actually built in to the network interface cards (NICs) of each computer, performing encryption and decryption without the operating system knowing what is going on. Beside from these alternatives, Windows Server 2016 includes a robust IPsec implementation by default, which you can configure to use a PKI certificate network.
Detailing Key IPsec Functionality
IPsec in Windows Server 2016 provides for the following key functionality that, when combined, provides for one of the most secure solutions available for client/server encryption:
![]() Data privacy—All information sent from one IPsec machine to another is thoroughly encrypted by such algorithms as 3DES, which effectively prevents the unauthorized viewing of sensitive data.
Data privacy—All information sent from one IPsec machine to another is thoroughly encrypted by such algorithms as 3DES, which effectively prevents the unauthorized viewing of sensitive data.
![]() Data integrity—The integrity of IPsec packets is enforced through ESP headers, which verify that the information contained within an IPSec packet has not been tampered with.
Data integrity—The integrity of IPsec packets is enforced through ESP headers, which verify that the information contained within an IPSec packet has not been tampered with.
![]() Antireplay capability—IPsec prevents streams of captured packets from being resent, known as a replay attack, blocking such methods of obtaining unauthorized access to a system by mimicking a valid user’s response to server requests.
Antireplay capability—IPsec prevents streams of captured packets from being resent, known as a replay attack, blocking such methods of obtaining unauthorized access to a system by mimicking a valid user’s response to server requests.
![]() Per-packet authenticity—IPsec uses certificates or Kerberos authentication to ensure that the sender of an IPsec packet is actually an authorized user.
Per-packet authenticity—IPsec uses certificates or Kerberos authentication to ensure that the sender of an IPsec packet is actually an authorized user.
![]() NAT Traversal or Teredo—Windows Server 2016’s implementation of IPsec now allows for IPSec to be routed through current Network Address Translation (NAT) implementations, a concept that is defined more thoroughly in the following sections.
NAT Traversal or Teredo—Windows Server 2016’s implementation of IPsec now allows for IPSec to be routed through current Network Address Translation (NAT) implementations, a concept that is defined more thoroughly in the following sections.
![]() Diffie-Hellman 2048-bit key support—Nearly unbreakable Diffie-Hellman 2048-bit key lengths are supported in Windows Server 2016’s IPsec implementation, essentially ensuring that the IPsec key cannot be broken.
Diffie-Hellman 2048-bit key support—Nearly unbreakable Diffie-Hellman 2048-bit key lengths are supported in Windows Server 2016’s IPsec implementation, essentially ensuring that the IPsec key cannot be broken.
Exploring IPsec NAT Traversal
As previously mentioned, IPSec in Windows Server 2016 supports the concept of Network Address Translation Traversal (NAT-T). Understanding how NAT-T works first requires a full understanding of the need for NAT itself.
Network Address Translation was developed simply because not enough IP addresses were available for all the clients on the Internet. Because of this, private IP ranges were established (10.x.x.x, 192.168.x.x, and 172.16-31.x.x) to allow all clients in an organization to have a unique IP address in their own private space. These IP addresses were designed to not route through the public IP address space, and a mechanism was needed to translate them into a valid, unique public IP address.
NAT was developed to fill this role. It normally resides on firewall servers or routers to provide for NAT capabilities between private and public networks. Routing and Remote Access Service (RRAS) for Windows Server 2016 provides NAT capabilities as well.
Because the construction of the IPsec packet does not allow for NAT addresses, IPsec traffic has, in the past, simply been dropped at NAT servers, because there is no way to physically route the information to the proper destination. This posed major barriers to the widespread implementation of IPsec because many of the clients on the Internet today are addressed via NAT.
NAT-T, which was introduced in Windows Server 2008 and is available in Windows Server 2016’s IPsec implementation, was jointly developed as an Internet standard by Microsoft and Cisco Systems. NAT-T works by sensing that a NAT connection will need to be traversed and subsequently encapsulating the entire IPsec packet into a User Datagram Protocol (UDP) packet with a normal UDP header. NAT-T handles UDP packets flawlessly, and they are subsequently routed to the proper address on the other side of the NAT.
NAT-T works well but requires that both ends of the IPsec transaction understand the protocol so as to properly pull the IPsec packet out of the UDP encapsulation. With the latest IPsec client and server, NAT-T becomes a reality and is positioned to make IPsec into a much bigger success than it is today.
NOTE
NAT-T was developed to keep current NAT technologies in place without changes. However, some implementations of NAT have attempted to make IPsec work natively across the translation without NAT-T. Disabling this functionality with NAT-T might not be wise, however; it might interfere with IPsec because both NAT-T and the NAT firewall will be attempting to overcome the NAT barrier.
Summary
In today’s interconnected networks, securing data in transit is a major, if not one of the most important, security consideration for any organization. Securing the communications between users and computers on a network is vital, and in some cases required by law. Windows Server 2016 builds on the strong security base of Windows Server 2008 and Windows Server 2008 R2 to include support for transport-level security mechanisms, such as IPsec and PKI, using technologies such as AD CS and AD RMS. Proper configuration and use of these tools can effectively lock down an organization’s transmission of data and ensure that it is used only by the appropriate persons.
![]() To secure a networking environment, deploy some or many of the transit-level security technologies available.
To secure a networking environment, deploy some or many of the transit-level security technologies available.
![]() Because even the most secure infrastructures are subject to vulnerabilities, it is recommended to deploy multiple layers of security on critical network data.
Because even the most secure infrastructures are subject to vulnerabilities, it is recommended to deploy multiple layers of security on critical network data.
![]() It is highly recommended to avoid installing the AD RMS database locally on the RMS server. Instead, use a remote full SQL Server instance.
It is highly recommended to avoid installing the AD RMS database locally on the RMS server. Instead, use a remote full SQL Server instance.
![]() Take extra care to secure the Active Directory Certificate Services root CA server because a security breach of this server would compromise the entire CA chain.
Take extra care to secure the Active Directory Certificate Services root CA server because a security breach of this server would compromise the entire CA chain.
![]() Store a standalone root CA server in a physically locked location and shut it down when not in use. This best practice does not apply to enterprise root CAs, which cannot be shut down for long periods of time.
Store a standalone root CA server in a physically locked location and shut it down when not in use. This best practice does not apply to enterprise root CAs, which cannot be shut down for long periods of time.
![]() Implement IPsec to secure the traffic generated in an environment and for securing servers and workstations both in high-risk Internet access scenarios and also in private network configurations.
Implement IPsec to secure the traffic generated in an environment and for securing servers and workstations both in high-risk Internet access scenarios and also in private network configurations.