CHAPTER 35
Windows Server Virtualization
IN THIS CHAPTER
![]() Understanding Microsoft’s Virtualization Strategy
Understanding Microsoft’s Virtualization Strategy
![]() What’s New in Windows Server 2016 Hyper-V
What’s New in Windows Server 2016 Hyper-V
![]() Introduction to Dockers and Containers
Introduction to Dockers and Containers
![]() Planning Your Implementation of Hyper-V
Planning Your Implementation of Hyper-V
![]() Installing the Microsoft Hyper-V Role
Installing the Microsoft Hyper-V Role
![]() Becoming Familiar with the Hyper-V Administrative Console
Becoming Familiar with the Hyper-V Administrative Console
![]() Installing a Guest Operating System Session
Installing a Guest Operating System Session
![]() Modifying Guest Session Configuration Settings
Modifying Guest Session Configuration Settings
![]() Launching a Hyper-V Guest Session
Launching a Hyper-V Guest Session
![]() Using Snapshots of Guest Operating System Sessions
Using Snapshots of Guest Operating System Sessions
![]() Quick Migration and Live Migration
Quick Migration and Live Migration
Hyper-V within Windows Server 2012 underwent a series of significant improvements until it met and exceeded the feature and function capabilities of what used to be the top virtualization technologies in the market. Now stand as far back from the server as possible because Hyper-V on Windows Server 2016 rocks.
Hyper-V on Windows Server 2016 was enhanced to support 64 virtual CPUs and a terabyte of RAM per virtual machine, it has built-in host-to-host failover clustering, and it can do site-to-site failover in an extremely efficient manner, all built on the base Windows Server 2012 operating system that network administrators know how to configure and operate. In just a few short years, Microsoft not only jumped into the virtual server marketplace, but has invested and expanded the capabilities of Hyper-V over the years. Now with Hyper-V in Windows Server 2016, it has surpassed the competition in features, functions, and ease of implementation of core high-availability, scalability, and disaster recovery technologies, but Microsoft has also surpassed itself.
We begin this chapter with some history and background on Windows Server virtualization and then we get into the specifics of Windows Server 2016 support for Hyper-V and the new support for Dockers and Containers.
Understanding Microsoft’s Virtualization Strategy
Server virtualization is the ability for a single system to host multiple guest operating system sessions, effectively taking advantage of the processing capabilities of a very powerful server. Just a couple years ago, most servers in datacenters were running under 5% to 10% processor utilization, meaning that there was significant excess capacity on the servers unused. By combining multiple servers running within a virtual server host operating system, organizations can now utilize more capacity of a server. Even with server virtualization, however, organizations are still only pushing their servers to 40% to 50% utilization, leaving more than half the capacity of the server unused.
The key to pushing capacity to 70% or 80% or more falls on the virtualization technology to better support redundancy, failover, capacity utilization, monitoring, and automated management. This is what Microsoft has added in Hyper-V in Windows Server 2016, along with even more enhanced monitoring and management from the System Center 2016 family of products it recently released (covered in Chapter 36, “Integrating System Center Operations Manager 2016 with Windows Server 2016”). With the core technology improvements within Windows Server 2012 Hyper-V, organizations can safely push server utilization to higher limits, which includes the ability to build in failover redundancy and capacity management for a more efficiently managed and maintained virtual server environment.
History of Windows Virtualization
Microsoft’s position in the virtualization marketplace before the release of the last version of Windows Server (Windows Server 2012 R2) wasn’t one where Microsoft particularly had a bad product. However, because Microsoft had only jumped into the server virtualization space just a couple years prior to the release of Windows 2008 R2, it was a relatively newcomer to server virtualization and so required more maturity in its product.
Acquisition of Virtual PC
Microsoft jumped into the virtualization marketplace through the acquisition of a company called Connectix in 2003. At the time of the acquisition, Virtual PC provided a virtual session of Windows on either a Windows system or on a Macintosh computer system. Virtual PC was used largely by organizations testing server software or performing demos of Windows systems on desktop and laptop systems—or in the case of Virtual PC for the Mac, the ability for a Macintosh user to run Windows on their Macintosh computer.
Microsoft later dropped the development of Virtual PC for the Mac; however, it continued to develop virtualization for Windows systems with the release of Virtual PC 2007. Virtual PC 2007 enabled users running Windows XP or Vista to install, configure, and run virtual guest sessions of Windows or even non-Windows operating systems.
Microsoft Virtual Server
Virtual PC was targeted at operating under an operating system that was typically optimized for personal or individual applications, so Virtual PC did not scale for a datacenter wanting to run four, eight, or more sessions on a single system. At the time of the acquisition of Connectix, Connectix was in development of a virtual server solution that allowed for the operation of virtualization technologies on a Windows 2003 host server system.
Because a Windows Server 2003 system provided more RAM availability, supported multiple processors, and generally had more capacity and capabilities than a desktop client system, Microsoft Virtual Server provided organizations with more capabilities for server-based virtualization in a production environment.
Virtual Server 2005
Although the initial Virtual Server acquired through the Connectix acquisition provided basic server virtualization capabilities, it wasn’t until Virtual Server 2005 that Microsoft had its first internally developed product. Virtual Server 2005 provided better support and integration into a Windows 2003 environment, better support for multiprocessor systems and systems with more RAM, and better integration and support with other Microsoft server products.
In just two years, Microsoft went from having no virtual server technologies to a second-generation virtual server product; however, even with Virtual Server 2005, Microsoft was still very far behind its competitors.
Virtual Server 2005 R2
Over the subsequent two years, Microsoft released two major updates to Virtual Server 2005 with the release of an R2 edition of the Virtual Server 2005 product and a service pack for the R2 edition. Virtual Server 2005 R2 Service Pack 1 provided the following capabilities:
![]() Virtual Server host clustering—This technology allowed an organization to cluster host systems to one another, thus allowing guest sessions to have higher redundancy and reliability.
Virtual Server host clustering—This technology allowed an organization to cluster host systems to one another, thus allowing guest sessions to have higher redundancy and reliability.
![]() x64 host support—x64 host support meant that organizations had the capability to use the 64-bit version of Windows 2003 as the host operating system, thus providing better support for more memory and system capacity found in x64-bit systems. Guest operating systems, however, were still limited to x86 platforms.
x64 host support—x64 host support meant that organizations had the capability to use the 64-bit version of Windows 2003 as the host operating system, thus providing better support for more memory and system capacity found in x64-bit systems. Guest operating systems, however, were still limited to x86 platforms.
![]() Hardware-assisted virtualization—New to processors released from Intel (Intel VT) and AMD (AMD-V) were processors that provided better distribution of processor resources to virtual guest sessions.
Hardware-assisted virtualization—New to processors released from Intel (Intel VT) and AMD (AMD-V) were processors that provided better distribution of processor resources to virtual guest sessions.
![]() iSCSI support—This technology allowed virtual guest sessions to connect to iSCSI storage systems, thus providing better storage management and storage access for the guest sessions running on a virtual server host.
iSCSI support—This technology allowed virtual guest sessions to connect to iSCSI storage systems, thus providing better storage management and storage access for the guest sessions running on a virtual server host.
![]() Support for more than 16GB virtual disk sizes—Virtual disk sizes were now able to reach 2TB in size, thus allowing organizations the ability to have guest sessions with extremely large storage capacity.
Support for more than 16GB virtual disk sizes—Virtual disk sizes were now able to reach 2TB in size, thus allowing organizations the ability to have guest sessions with extremely large storage capacity.
These capabilities—among other capabilities of the latest Virtual Server 2005 product—brought Microsoft a little closer to its competition in the area of server virtualization.
Hyper-V in Windows Server 2008 and Window Server 2008 R2
It really wasn’t until the release of Windows Server 2008 just a few short years ago that Microsoft truly had a server virtualization offering. Microsoft knew it had to make significant investments in Hyper-V to be able to be taken seriously in the faster growing server virtualization marketplace, and with the release of Windows Server 2008 and Hyper-V, Microsoft finally had a contender. Over the subsequent two years, Microsoft released major updates to Hyper-V in its Windows Server 2008 R2 and Windows Server 2008 R2 SP1 updates.
Major enhancement in Hyper-V in the Windows Server 2008 family of operating systems include the following:
![]() Support for 64-bit guest sessions—This was critical, until Hyper-V, Microsoft would only support 32-bit guest sessions. By 2008, in a world where servers were 64-bit, Microsoft needed to support 64-bit guest sessions, and Hyper-V supported that capability!
Support for 64-bit guest sessions—This was critical, until Hyper-V, Microsoft would only support 32-bit guest sessions. By 2008, in a world where servers were 64-bit, Microsoft needed to support 64-bit guest sessions, and Hyper-V supported that capability!
![]() Guest sessions with up to 64GB memory—With support for 64-bit server guest sessions, Microsoft had to support more than 16GB or 32GB of RAM memory, and with each subsequent release of Hyper-V, Microsoft expanded its support for more and more RAM in each guest session.
Guest sessions with up to 64GB memory—With support for 64-bit server guest sessions, Microsoft had to support more than 16GB or 32GB of RAM memory, and with each subsequent release of Hyper-V, Microsoft expanded its support for more and more RAM in each guest session.
![]() Ability to support four virtual CPUs per virtual guest sessions—With physical hardware supporting 8-, 16-, and 32-core processors, Microsoft provided support for up to four virtual CPUs per virtual guest session, thus enabling scalability of the processing support within each guest session.
Ability to support four virtual CPUs per virtual guest sessions—With physical hardware supporting 8-, 16-, and 32-core processors, Microsoft provided support for up to four virtual CPUs per virtual guest session, thus enabling scalability of the processing support within each guest session.
![]() Built-in Live Migration high availability—As organizations were putting multiple server workloads onto a single physical server, if that physical server failed, an organization could lose several guest session systems simultaneously. Microsoft added Live Migration to Hyper-V in Windows Server 2008, thus enabling failover of a single guest session or multiple guest sessions from one Hyper-V host server to another Hyper-V host server with (typically) no interruption to the application or user’s accessing the application. Live Migration enabled organizations to successfully failover host-to-host servers and to have redundancy just in case a host server failed.
Built-in Live Migration high availability—As organizations were putting multiple server workloads onto a single physical server, if that physical server failed, an organization could lose several guest session systems simultaneously. Microsoft added Live Migration to Hyper-V in Windows Server 2008, thus enabling failover of a single guest session or multiple guest sessions from one Hyper-V host server to another Hyper-V host server with (typically) no interruption to the application or user’s accessing the application. Live Migration enabled organizations to successfully failover host-to-host servers and to have redundancy just in case a host server failed.
All of these capabilities finally got Microsoft into contention in the virtual server marketplace, and for small businesses and for relatively basic application workloads, Hyper-V was an excellent solution for organizations. Hyper-V was included in Windows Server licensing, it used a familiar Windows interface for administration and management, and it worked on any hardware platform that Windows Server 2008/2008 R2 worked on. It simply provided server virtualization without special hardware, configuration, or complexity. However, Hyper-V was still a step (or two) behind its biggest rival, VMware, in terms of core scalability, high availability, and functionality. With the release of Windows Server 2016, that changed as Microsoft has now met and exceeded the capabilities of VMware.
Integration of Hypervisor Technology in Windows Server
To leap beyond its competition in the area of server virtualization, Microsoft had to make some significant changes to the operating system that hosted its next-generation virtual server technology. Starting with the original development of Hyper-V within Windows Server 2008, Microsoft took the opportunity to lay the foundation for the integrated server virtualization technology right within the core Windows Server operating system. The core technology, commonly known as the hypervisor, is effectively the layer within the host operating system that provides better support for guest operating systems sessions. As has been noted already in this chapter, Microsoft calls this hypervisor-based technology Hyper-V.
Prior to the inclusion of Hyper-V in Windows 2008 and Windows 2012, the virtualization “stack” sat on top of the host operating system and effectively required all guest operating systems to share system resources, such as network communications, video-processing capabilities, memory allocation, and system resources. In the event that the host operating system had a system failure of something like the host network adapter driver, all guest sessions would simultaneously fail to communicate on the network.
Technologies such as VMware ESX, Citrix XenServer, and Hyper-V leverage a hypervisor-based technology that allows the guest operating systems to effectively bypass the host operating system and communicate directly with system resources. In some instances, the hypervisor manages shared guest session resources, and in other cases guest sessions bypass the hypervisor and process requests directly to the hardware layer of the system. By providing better independence of systems communications, the hypervisor-supported environment provides organizations better scalability, better performance, and, ultimately, better reliability of the core virtual host environment.
Hyper-V is available right within the Windows Server Standard and Datacenter editions.
NOTE
Hyper-V in Windows Server 2016 is only supported on x64-bit systems that have hardware-assisted virtualization support. CPUs must support Intel VT or AMD-V option and Data Execution Protection (DEP). Also, these features must be enabled in the computer BIOS. Fortunately, almost all new servers purchased since late 2006 include these capabilities.
Windows Server Hyper-V
As mentioned, significant improvements in Hyper-V in Windows Server finally make Hyper-V not only a comparative contender in the server virtualization marketplace, but now a leader that has raised the bar on what virtual server technologies need to be and do for an organization. There are many long-awaited features and technologies built in to Hyper-V. These can be broken down into three major categories: increased host and guest session capacity, integrated high-availability technologies, and enhanced manageability.
Increased Host and Guest Session Capacity
Microsoft not only improved host and guest session capacity: It blew the roof off what it supports in terms of the amount of memory support within a virtual guest session and the number of virtual CPUs supported per guest session, among other core guest session capabilities. Table 35.1 compares Hyper-V in Windows Server 2016 with what was supported in Hyper-V in Windows Server 2008 R2 and what is supported in Microsoft’s biggest competitor, VMware.
TABLE 35.1 Hyper-V Capacity Comparison
Capability |
Hyper-V (Windows Server 2008 R2) |
VMware ESXi 5.0/vSphere 5.0 Enterprise Plus |
Hyper-V (Windows Server 2012) |
Hyper-V (Windows Server 2016) |
Logical processors (per host) |
64 |
160/160 |
320 |
320 |
Physical memory (per host) |
1TB |
32GB/2TB |
4TB |
4TB |
Virtual CPUs per virtual guest session |
4 |
8/32 |
64 |
64 |
Memory per guest session |
64GB |
32GB/1TB |
1TB |
1TB |
Active virtual guests per host |
384 |
512/512 |
1,024 |
1,024 |
Maximum nodes in a cluster |
16 |
NA/32 |
64 |
64 |
Integrated High-Availability Technologies
Hyper-V in Windows Server 2012 also greatly improved high availability of Hyper-V host and guest sessions on everything from zero-downtime patching and updating of hosts and guest sessions as well as server-to-server and site-to-site failover. Specifically, the integrated technologies in Hyper-V for high availability include the following:
![]() Live migration failover (no SAN required)—Live migration is the ability to failover a guest session from one Hyper-V host server to another without the end users connected to the guest session losing connectivity to their application. Introduced in Windows 2008 Hyper-V, Live Migration at that time required a storage-area network (SAN) as the shared storage for the guest session failover. This made Live Migration expensive and not as flexible for smaller businesses or sites of large organizations. With Hyper-V in Windows Server 2016, live migrations of guest sessions can now be done with just a basic Windows 2016 file server as the shared storage for the cluster failover.
Live migration failover (no SAN required)—Live migration is the ability to failover a guest session from one Hyper-V host server to another without the end users connected to the guest session losing connectivity to their application. Introduced in Windows 2008 Hyper-V, Live Migration at that time required a storage-area network (SAN) as the shared storage for the guest session failover. This made Live Migration expensive and not as flexible for smaller businesses or sites of large organizations. With Hyper-V in Windows Server 2016, live migrations of guest sessions can now be done with just a basic Windows 2016 file server as the shared storage for the cluster failover.
![]() Zero downtime patching/updating—Another challenge with server virtualization is the reliance of one host server managing several (sometimes a dozen or more) live guest sessions. When the host operating system has to be patched or updated, it requires bringing down all the virtual guest sessions, or Live Migrating the guest sessions to other servers. With Windows Server 2016, Microsoft now includes Cluster Aware Updates (CAU), a feature that automatically updates a node of a cluster (like a Hyper-V cluster node) without interruption to end users by automatically failing the cluster node to another cluster node during the patching process. You can find more information about CAU in Chapter 28, “System-Level Fault Tolerance (Clustering/Network Load Balancing).
Zero downtime patching/updating—Another challenge with server virtualization is the reliance of one host server managing several (sometimes a dozen or more) live guest sessions. When the host operating system has to be patched or updated, it requires bringing down all the virtual guest sessions, or Live Migrating the guest sessions to other servers. With Windows Server 2016, Microsoft now includes Cluster Aware Updates (CAU), a feature that automatically updates a node of a cluster (like a Hyper-V cluster node) without interruption to end users by automatically failing the cluster node to another cluster node during the patching process. You can find more information about CAU in Chapter 28, “System-Level Fault Tolerance (Clustering/Network Load Balancing).
![]() Integrated site-to-site replication—As much as failover of guest sessions has been supported in Hyper-V since Windows Server 2008 Hyper-V, the ability to failover guest session between sites has not been a strength in Hyper-V. Now with Windows Server 2016 Hyper-V, Microsoft has included a technology called Hyper-V Replica that replicates virtual guest session data between sites so that in the event of a site failure, another site can come online with replicated copies of the guest session systems. You can find more about site-to-site replication in the section “Utilizing Hyper-V Replica for Site-to-Site Redundancy.”
Integrated site-to-site replication—As much as failover of guest sessions has been supported in Hyper-V since Windows Server 2008 Hyper-V, the ability to failover guest session between sites has not been a strength in Hyper-V. Now with Windows Server 2016 Hyper-V, Microsoft has included a technology called Hyper-V Replica that replicates virtual guest session data between sites so that in the event of a site failure, another site can come online with replicated copies of the guest session systems. You can find more about site-to-site replication in the section “Utilizing Hyper-V Replica for Site-to-Site Redundancy.”
![]() Built-in NIC teaming—Network interface card (NIC) teaming, effectively the ability to have multiple network adapters in a virtual server host system sharing network communications load, is nothing new in the industry, as hardware vendors like Hewlett-Packard, Dell, and IBM have provided drivers and support for NIC teaming. The significance of NIC teaming in Windows Server 2016 is that it is now built-in to the operating system. Now when NIC aggregation or NIC separation is configured on a Hyper-V host for performance/redundancy and a Hyper-V host server fails over to another host server, Windows Server 2016 Hyper-V understands the underlying networking operations to support the failover. There’s no more finger-pointing between vendors of drivers and functionality because the technology is now core to Windows Server 2016.
Built-in NIC teaming—Network interface card (NIC) teaming, effectively the ability to have multiple network adapters in a virtual server host system sharing network communications load, is nothing new in the industry, as hardware vendors like Hewlett-Packard, Dell, and IBM have provided drivers and support for NIC teaming. The significance of NIC teaming in Windows Server 2016 is that it is now built-in to the operating system. Now when NIC aggregation or NIC separation is configured on a Hyper-V host for performance/redundancy and a Hyper-V host server fails over to another host server, Windows Server 2016 Hyper-V understands the underlying networking operations to support the failover. There’s no more finger-pointing between vendors of drivers and functionality because the technology is now core to Windows Server 2016.
Enhanced Manageability
Core to consolidating physical servers to virtual guest sessions on a limited number of physical host servers is the ability to more easily manage and support the guest sessions. Without manageability, “server sprawl” exists, where it is so easy to spin up a server that organizations do so without realizing it. Eventually, the organization has a lot more servers than it needs, doesn’t have an easy way to manage or administer the servers, and spends more time managing the guest sessions than it did before with physical servers.
Key to Windows Server 2016 is its ability to more easily manage and support systems (physical and virtual). Key improvements in manageability include the following:
![]() Server Manager console—Windows Server 2016 Server Manager is a centralized server management console that enables an administrator to virtually see, organizationally group, and centrally manage systems, whether physical or virtual. By being able to see, manage, and administer groups of systems at a time, a simple configuration or a simple update can be done once to many systems simultaneously. Unlike other virtual server technologies that focus just on the ability to create more virtual guest sessions, Windows Server 2016 with Hyper-V provides not only a better way of spinning up guest sessions, but also a better way of managing the guest sessions. Server Manager and Windows systems management is covered in Chapter 17, “Windows Server 2016 Administration.”
Server Manager console—Windows Server 2016 Server Manager is a centralized server management console that enables an administrator to virtually see, organizationally group, and centrally manage systems, whether physical or virtual. By being able to see, manage, and administer groups of systems at a time, a simple configuration or a simple update can be done once to many systems simultaneously. Unlike other virtual server technologies that focus just on the ability to create more virtual guest sessions, Windows Server 2016 with Hyper-V provides not only a better way of spinning up guest sessions, but also a better way of managing the guest sessions. Server Manager and Windows systems management is covered in Chapter 17, “Windows Server 2016 Administration.”
![]() IP address mobility—During a failover from one datacenter to another, one of the biggest challenges for organizations is the need to change IP addresses based on the subnet and configuration of network resources after the site failover. Windows Server 2016 enables you to make IP addresses, including Dynamic Host Configuration Protocol (DHCP)-issued addresses, portable between sites. Upon failover, address tables are automatically updated, and issued IP addresses are available in the redundant datacenter for immediate operations with no need for IT to readdress systems in the surviving datacenter. You can find more information about IP address mobility in Chapter 10, “DHCP, IPv6, IPAM.”
IP address mobility—During a failover from one datacenter to another, one of the biggest challenges for organizations is the need to change IP addresses based on the subnet and configuration of network resources after the site failover. Windows Server 2016 enables you to make IP addresses, including Dynamic Host Configuration Protocol (DHCP)-issued addresses, portable between sites. Upon failover, address tables are automatically updated, and issued IP addresses are available in the redundant datacenter for immediate operations with no need for IT to readdress systems in the surviving datacenter. You can find more information about IP address mobility in Chapter 10, “DHCP, IPv6, IPAM.”
![]() BitLocker encryption of hosts and guests—With virtual guest sessions spinning up virtually everywhere in an enterprise, even in small and remote sites, the need for better security of hosts and guest sessions becomes critical for the security of the enterprise. Windows Server 2016 supports BitLocker encryption of both host and guest sessions with the ability to encrypt local disk storage, encrypt failover cluster disks, and encrypt cluster shared volumes. This helps an organization better improve security of Hyper-V hosts and guests. You can find more about BitLocker encryption in Chapter 12, “Server-Level Security.”
BitLocker encryption of hosts and guests—With virtual guest sessions spinning up virtually everywhere in an enterprise, even in small and remote sites, the need for better security of hosts and guest sessions becomes critical for the security of the enterprise. Windows Server 2016 supports BitLocker encryption of both host and guest sessions with the ability to encrypt local disk storage, encrypt failover cluster disks, and encrypt cluster shared volumes. This helps an organization better improve security of Hyper-V hosts and guests. You can find more about BitLocker encryption in Chapter 12, “Server-Level Security.”
NOTE
Hyper-V provides the capability to host-guest operating systems for Windows servers, client systems, and non-Windows systems, and additional tools and virtual host and guest session management can be enhanced with the use of Microsoft System Center 2016 Virtual Machine Manager (VMM).
VMM enables you to do physical-to-virtual image creation and virtual-to-virtual image copying and extends beyond just virtual guest and host management to also include the management of the “fabric” of a network. The fabric of a network includes the management of SANs, creation of virtual local-area networks (VLANs), and the automatic creation of entire two-tier and three-tier bundles of servers.
System Center 2016 is complementary to the management and administration of Hyper-V hosts. The entire System Center 2016 suite of products is covered in the Sams Publishing book System Center 2016 Unleashed, which addresses not only VMM for automating the process of spinning up guest session environments, but also covers Configuration Manager for patching and managing host servers and virtual guest sessions, Data Protection Manager for backing up hosts and guests, and the other components in the System Center family.
Microsoft Hyper-V Server as a Role in Windows Server 2016
Hyper-V is enabled as a server role just as Windows Server 2016 Remote Desktop Services, DNS Server, or Active Directory Domain Services are added to the server.
New and Improved Windows Server 2016 Hyper-V
This section describes what’s new and updated in Hyper-V on Windows Server 2016 and Microsoft Hyper-V Server 2016. To use new features on virtual machines created with Windows Server 2016 R2 and moved or imported to a server that runs Hyper-V on Windows Server 2016, you’ll need to manually upgrade the virtual machine configuration version.
Production checkpoints
Virtual Machine Checkpoints, or, in older versions, Virtual Machine Snapshots, were a great solution to take a state of a virtual machine and save it. You could then make some changes, and if something failed, you could simply revert back to the time you took the checkpoint. This was not really supported to use in production, since a lot of applications couldn’t handle that process. Microsoft has now changed that behavior and now fully supports it in production environments.
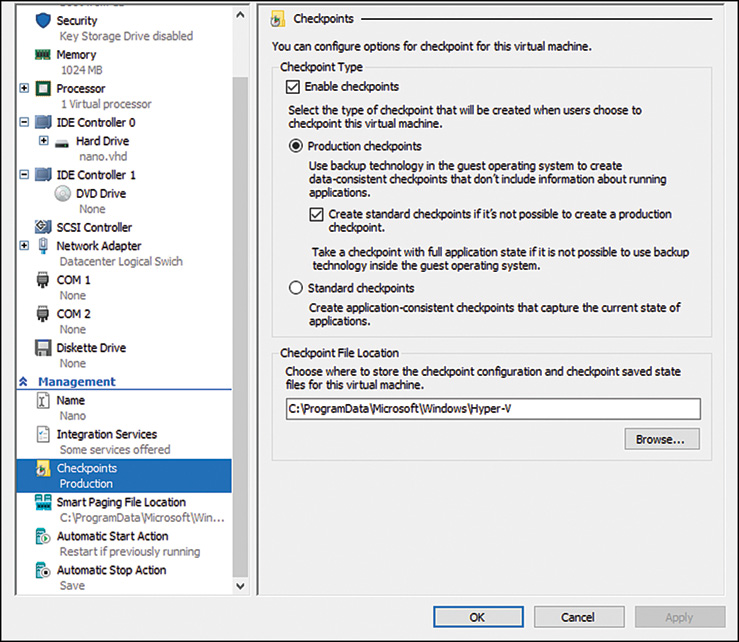
For this, Production Checkpoints are now using VSS instead of the Saved State to create the checkpoint. This means if you are restoring a checkpoint, this is just like restoring a system from a backup. For the user, everything works as before and there is no difference in how you have to take the checkpoint. Production Checkpoints are enabled by default (see Figure 35.1), but you can change back to the old behavior if you need to. Still, using Checkpoints brings some other challenges, like the growing .avhdx files, which still apply.
Host Resource Protection
Host resource protection is a technology that was initially built and designed for Microsoft’s hyperscale public cloud, Azure, and is now making its way into private cloud environments within Windows Server 2016. Host Resource protection is enabled by default whenever you install Windows Serer 2016. Malware, ransomware, and other malicious activities are becoming the norm both in public and private cloud environments. Host Resource Protection aims to identify abnormal patterns of access by leveraging its heuristics-based approach to dynamically detect malicious code. When an issue is identified, the VM’s performance is throttled back as to not affect the performance of the other VMs that reside on the Hyper-V host.
This monitoring and enforcement is off by default. Use Windows PowerShell to turn it on or off. To turn it on, run this command:
Set-VMProcessor -EnableHostResourceProtection $true
Hot add and remove for network adapters and memory
Windows Server 2016 give you the ability to add and remove network adapters on the fly, without downtime. The VM, however, will need to be a generation 2 VM. You can also adjust the memory of the VM while it is running. This works on generation 1 and 2 VMs, and it doesn’t even require dynamic memory to be enabled for a specific VM.
Discrete device assignment protection
This allows users to take some of the PCI Express devices in their PCs and pass them directly through to the VM. This performance-enhancing feature allows the VM to access the PCI device directly, so it bypasses the virtualization stack. You may want to get the most out of Photoshop or some other thing that just needs a graphics processor, or GPU. If you have GPUs in your machine that aren’t needed by the Windows management OS, you can dismount them and pass them through to a guest VM.
Nested virtualization
Nested virtualization provides the ability of running a virtualization environment inside a virtual machine (VM). You may ask, why would I do that? One of the most common uses for nested virtualization is in lab environments and training environment as it reduces the number of physical servers needed to run hypervisors to train users.
In short, nested virtualization allows you to install the Hyper-V role on a physical server, create a VM that executes in the Hyper-V hypervisor, install and run the Hyper-V role in that VM, and create a new VM inside the original.
Windows PowerShell Direct
PowerShell Direct lets you remote connect to a Virtual Machine running on a Hyper-V host, without any network connection inside the Virtual Machine. PowerShell Direct uses the Hyper-V VMBus to connect inside the Virtual Machine. This feature is really handy if you need it for automation and configuration for Virtual Machines or if you, for example, messed up network configuration inside the virtual machine and you don’t have console access.
To get started, open PowerShell on your Hyper-V host and type the VM as it appears in Hyper-V. Enter the credential of the Admin account on the virtual machine. After you’ve connected, you can run any cmdlet under the virtual machine.
Linux Secure Boot
Microsoft added a secure boot mode option for Hyper-V virtual machines with Windows Server 2016 R2, but the option wasn’t available for Linux VMs. However, in Windows Server 2016, administrators will now be able to enable secure boot mode for VMs running a variety of Linux operating systems.
Secure boot mode is a signature-checking process that occurs during the OS boot up. Secure boot ensures that only approved OS components are loaded during the boot. This feature prevents malicious code from running under the security context of the system account and then gain access to OS components.
To enable secure boot mode using the Hyper-V Manager, go to the property of a Linux VM, select the security tab, check the Enable Secure Boot checkbox in the right pane, and then select Microsoft UEFI Certificate Authority from the template drop-down list.
Shared virtual hard disks
Shared VHDX was first introduced in Windows Server 2012 R2. It provides shared storage for use by virtual machines without having to “break through” the virtualization layer. However, shared VHDX has some limitations:
![]() Resizing and migrating a shared VHDX is not supported.
Resizing and migrating a shared VHDX is not supported.
![]() Making a backup or a replica of a shared VHDX is not supported.
Making a backup or a replica of a shared VHDX is not supported.
The new way of installing is based on a VHD Set. This feature has not these limitations. However, VHD Set is available only for Windows Server 2016 guest operating system.
Shared VHDX is still available to us in Windows Server 2016. The benefit of this is that you will not be forced to upgrade your Windows Server 2016 R2 guest clusters when you move them to Windows Server 2016 Hyper-V cluster hosts.
To create a VHD Set, you can use the Graphical User Interface GUI or PowerShell cmdlets. From the GUI, open the Hyper-V Manager, select New and then Virtual Disk.
Hyper-V Manager Improvements
![]() Alternate credentials support—You can now use a different set of credentials in Hyper-V Manager when you connect to another Windows Server 2016 or Windows 10 remote host. You can also save these credentials to make it easier to log on again.
Alternate credentials support—You can now use a different set of credentials in Hyper-V Manager when you connect to another Windows Server 2016 or Windows 10 remote host. You can also save these credentials to make it easier to log on again.
![]() Manage earlier versions—With Hyper-V Manager in Windows Server 2016 and Windows 10, you can manage computers running Hyper-V on Windows Server 2012, Windows 8, Windows Server 2012 R2, and Windows 8.1.
Manage earlier versions—With Hyper-V Manager in Windows Server 2016 and Windows 10, you can manage computers running Hyper-V on Windows Server 2012, Windows 8, Windows Server 2012 R2, and Windows 8.1.
![]() Updated management protocol—Hyper-V Manager now communicates with remote Hyper-V hosts using the WS-MAN protocol, which permits CredSSP, Kerberos, or NTLM authentication. When you use CredSSP to connect to a remote Hyper-V host, you can do a live migration without enabling constrained delegation in Active Directory. The WS-MAN-based infrastructure also makes it easier to enable a host for remote management. WS-MAN connects over port 80, which is open by default.
Updated management protocol—Hyper-V Manager now communicates with remote Hyper-V hosts using the WS-MAN protocol, which permits CredSSP, Kerberos, or NTLM authentication. When you use CredSSP to connect to a remote Hyper-V host, you can do a live migration without enabling constrained delegation in Active Directory. The WS-MAN-based infrastructure also makes it easier to enable a host for remote management. WS-MAN connects over port 80, which is open by default.
New Storage Quality of Service (QoS)
In Windows Server 2016, Storage QoS can centrally manage and monitor storage performance for Hyper-V servers and the virtual machines that they host. And Storage QoS is built into the Hyper-V role in Windows 2016. It can be used with either a Scale-Out File Server or traditional block storage in the form of CSV. Storage QoS is represented as a cluster resource in Failover Cluster Manager and is managed directly by the failover cluster. After some virtual machines are using the Scale-Out File Server or CSV, Storage QoS monitors, and tracks storage flow.
Integration services delivered through Windows Update
In Windows Server 2016 Integration Services, updates will be delivered by Windows Update, which is a great way to get more of those VMs with the latest components. This functionality will also allow for tenants or workload owners to have control over this process, so they are not dependent on infrastructure services anymore.
The vmguest.iso image file is no longer needed, so it isn’t included with Hyper-V on Windows Server 2016.
Windows Containers and Hyper-V Containers in Windows Server 2016
Containers are a very popular technology in the Linux world today as they solve a number of challenges related to application deployment.
Containers create a complete dependency for an application including middleware, runtimes, libraries, and even the OS requirements. Additionally, each of these dependencies/layers are packaged up and run in their own user-mode container, isolating them from other applications avoiding problems with applications’ not being compatible with each other. These applications running in containers have their own view of the file system, registry, and even networking addresses.
We will return to more on containers later in this chapter.
Planning Your Implementation of Hyper-V
For the organization that chooses to leverage the capabilities of Windows Server 2016 virtualization, a few moments should be spent to determine the proper size, capacity, and capabilities of the host server that would be used as the virtual server host system. Many server system applications get installed with little assessment as to resource requirements of the application itself because most servers in a datacenter are running less than 10% server utilization, so there is plenty of excess server capacity to handle server workload capabilities.
With Hyper-V, however, because each guest session is a discretely running operating system, the installation of as few as three or four high-performance guest sessions could quickly bring a server to 60% or 70% of the server performance limits, and as much as you want host servers to be running at 60% to 80% utilization, balancing the server load and optimization utilization is the key. So, the planning phase is an important step in a Hyper-V implementation.
Sizing Your Windows Server 2016 Server to Support Virtualization
The minimum requirements for server compatibility for Windows Server 2016 applies, but because server virtualization is the focus of this server system, the minimum Windows Server 2016 server requirements will not be sufficient to run Hyper-V virtualization.
In addition, although Windows Server 2016 supports up to 320 processor cores, 4TB of RAM, and 1,024 concurrently running virtual machines, the reality on the scaling of Windows virtualization comes down to the raw capabilities of network I/O that can be driven from a single host server. In many environments where a virtualized guest system has a relatively low system utilization and network traffic demand, a single host system could easily support a dozen, two dozen, or more guest sessions. In other environments where virtualized guest sessions have an extremely high system utilization, lots of disk I/O, and significant server network I/O, the organization might find that a single host server would maximize its capacity with as few as seven or eight guest sessions.
RAM for the Host Server
The rule of thumb for memory of a Windows Server 2016 server running Hyper-V is to have 2GB of RAM for the host server, plus enough memory for each guest session. Therefore, if a guest session needs to have 2GB of RAM, and there are three such guest sessions running on the host system, the host system should be configured with at least 8GB of RAM. If a guest session requires 8GB of memory and three of those systems are running on the system, the server should be configured with 24GB of memory to support the three guest sessions, plus at least 2GB of memory for the host system itself.
Processors for the Host Server
The host server itself in Windows Server 2016 virtualization has very little processor I/O requirements. In the virtualized environment, the processor demands of each guest session dictate how much processing capacity is needed for the server. If a guest session requires two cores to support the processing requirements of the application, and seven guest sessions are running on the system, the server should have at least 15 cores available in the system. With quad-core processors, the system would need four physical processors. With dual-core processors, the system would need at least eight physical processors. Because Microsoft licenses Windows Server 2016 based on the number of physical processor sockets, the organization is best off getting a single quad-core system than two dual-core processors. Processor density is the balance between maximizing the most number of core processors in as few sockets as possible.
With Windows Server 2016 virtualization, each host server can have up to 320 core processors, so processing capacity can be distributed, either equally or as necessary to meet the performance demands of the organization. By sharing cores among several virtual machines that have low processing needs, an organization can more fully utilize their investment in hardware systems.
Disk Storage for the Host Server
A host server typically has the base Windows Server 2016 operating system running on the host system itself with additional guest sessions either sharing the same disk as the host session or the guest sessions virtual disks being stored on a SAN or some form of external storage.
Each guest session takes up at least 7GB of disk space. For guest sessions running databases or other storage-intensive configurations, the guest image can exceed 10GB, 20GB, or more. When planning disk storage for the virtual server system, plan to have enough disk space to support the host operating system files (typically about 7GB of actual files plus space for the pagefile) and then disk space available to support the guest sessions.
Running Other Services on the Hyper-V System
On a system running Hyper-V, typically an organization would not run other services on the host system, such as making the host server also a file and print server, a SharePoint server, or so on. Typically, a server running virtualization is already going to be a system that will maximize the memory, processor, and disk storage capabilities of the system. So, instead of impacting the performance of all the guest sessions by having a system-intensive application like SharePoint running on the host system, organizations choose to make servers running virtualization dedicated solely to the operation of virtualized guest sessions.
Of course, exceptions apply to this general recommendation. If a system will be used for demonstration purposes, frequently the host system is set up to run Active Directory Domain Services, DNS, DHCP, and other domain utility services. So, effectively, the host server is the Active Directory system. Then, the guest sessions are created to run things like Microsoft Exchange, SharePoint, or other applications in the guest sessions that connect back to the host for directory services.
Other organizations might choose to not make the host system the Active Directory server, but instead put the global catalog functions in yet another guest session and keep the host server dedicated to virtualization.
Planning for the Use of Snapshots on the Hyper-V System
A technology built in to Hyper-V is the concept of a snapshot. A snapshot uses the Microsoft Volume Shadow Copy Service (VSS) to make a duplicate copy of a file; however, in the case of virtualization, the file is the virtual server guest virtual disk.
The first time a snapshot is taken, the snapshot contains a compressed copy of the contents of RAM on the system along with a bitmap of the virtual disk image of the guest session. If the original guest image is 8GB in size, the snapshot will be significantly smaller in size; however, the server storage system still needs to have additional disk space to support both the original disk image, plus the amount of disk space needed for the contents of the snapshot image.
Subsequent snapshots can be taken of the same guest session. However, the way VSS works, each additional snapshot just identifies the bits that are different from the original snapshot, thus reducing the required disk space for those additional snapshots to be just the same as needed for the incremental difference from the original snapshot to the current snapshot. This difference might be just megabytes in size.
The use of snapshots in a Windows virtualization environment is covered in more detail later in this chapter in the section “Using Snapshots of Guest Operating System Sessions.”
Installing the Microsoft Hyper-V Role
With the basic concepts of Windows virtualization covered so far in this chapter, and the background on sizing and planning for server capacity and storage, this section now focuses on the installation of the Microsoft Hyper-V Server role on a Windows Server 2016 system.
Installing Windows Server 2016 as the Host Operating System
The first step is to install Windows Server 2016 with Hyper-V as the host operating system. The step-by-step guidance to install the Windows operating system is covered in Chapter 3, “Installing Windows Server 2016 and Server Core.” Typically, the installation of a Windows Server 2016 to run the Hyper-V role is a new clean server installation, so the “Installing a Clean Version of Windows Server 2016 Operating System” section in Chapter 3 is the section to follow to set up Windows Server 2016 for virtualization.
Running Server Manager to Add the Hyper-V Role
After the base image of Windows Server 2016 has been installed, some basic initial tasks should be completed, as noted in Chapter 3. The basic tasks are as follows:
1. Change the server name to be a name that you want the virtual server to be.
2. Configure the server to have a static IP address.
3. Join the server to an Active Directory domain (assuming the server will be part of a managed Active Directory environment with centralized administration).
4. Run Windows Update to confirm that all patches and updates have been installed and applied to the server.
After these basic tasks have been completed, the next step is to add the Hyper-V role to the server system. Do the following to add the server role to the system:
1. Make sure you are logged on to the server with local administrator or domain admin privileges.
2. Start the Server Manager console if it is not already running on the system.
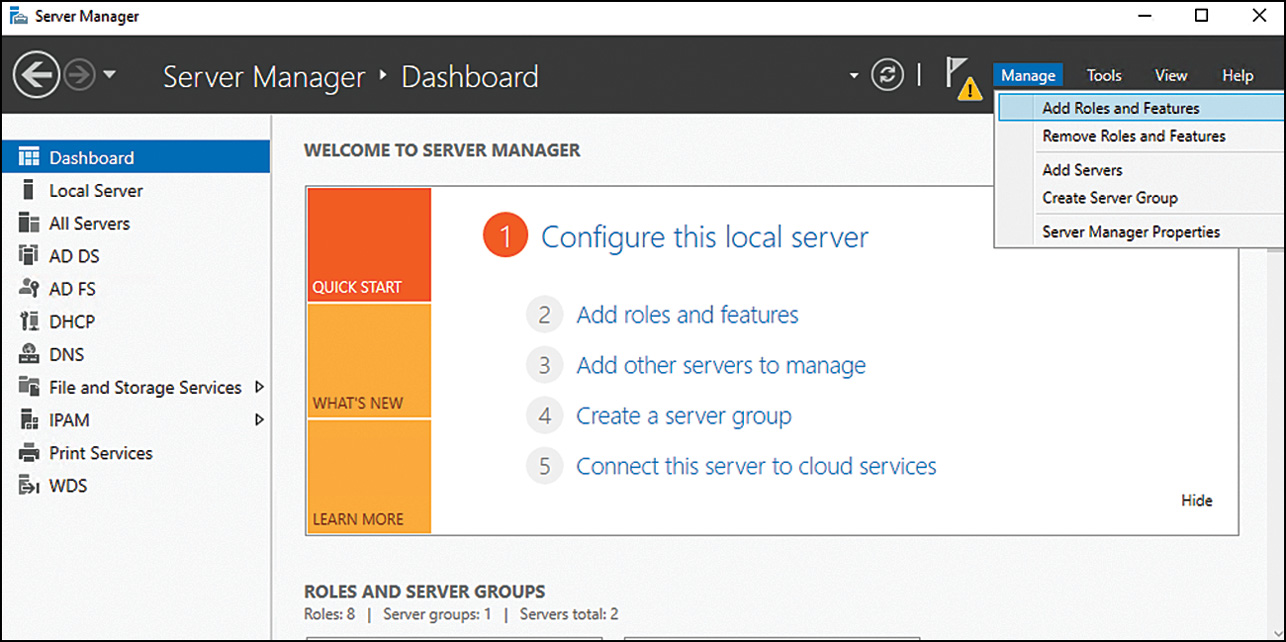
3. Click Manage in the upper-right side of the console and select Add Roles and Features, as shown in Figure 35.2.
4. After the Add Roles Wizard loads, click Next to continue past the Welcome screen.
5. On the Select installation type page, select Role-Based or Feature-Based Installation, and then Next.
6. On the Select Destination Server page, chose Select a Server from the Server Pool, which should have highlighted the server you are on, and then click Next.
7. On the Select Server Roles page, select the Hyper-V role, and then click Next.
NOTE
Hyper-V requires a supported version of hardware-assisted virtualization. Both Intel VT and AMD-V chipsets are supported by Hyper-V. In addition, virtualization must be enabled in the BIOS. Check your server documentation for details on how to enable this setting.
8. When prompted to Add Features that include the Remote Server Administration Tools and Hyper-V Management Tools, click Add Features, and then click Next.
9. On the Select features page, just click Next because you are not adding any new features beyond the Hyper-V role and features.
10. On the Hyper-V page, just click Next.
11. On the Create Virtual Switches page, select the LAN adapters you want to have shared with guest sessions. Click Next to continue.
NOTE
It is recommended that you reserve one network adapter for remote access to the host server. To reserve a network, do not select it to be used as a virtual network.
12. When prompted about whether you want to Allow This Server to Send and Receive Live Migrations of Virtual Machines, if you plan to use this machine for failover of guest sessions between hosts, check the check box; if not, leave it unchecked, and then click Next.
NOTE
If you choose not to select the send and receive live migration option at this time, it can be configured later from the Hyper-V Manager console (Actions, Hyper-V Settings, Live Migrations)
13. For the default stores, choose where you want the VHDX virtual server files and configuration files for the guest sessions stored by default, and then click Next.
14. On the Confirm Installation Selections page, review the selections made, and then click Install.
NOTE
On the Confirm Installation Selections page, checking the Restart the Destination Server Automatically if Required check box will reboot the server upon completion. This is usually preferred because the server will need to be rebooted; it might as well do it automatically upon completion.
15. After the server restarts, log on to the server with local administrator or domain admin privileges.
16. After logging on, the installation and configuration will continue for a few more moments. When complete, the Installation Results page will be displayed. Review the results on the page and confirm that the Windows Hyper-V role has been installed successfully. Click Close.
NOTE
The server’s network configuration will change when virtual networking is installed. When network adapters are used in virtual networks, the physical network adapter becomes a Microsoft virtual switch and a new virtual network adapter will be created. By default, this virtual network adapter is shared between the host and the guest VMs.
Installing the Hyper-V Role Using PowerShell
Another option for installing the Hyper-V Server role is to using PowerShell. PowerShell is convenient in that with just a handful of line commands, a server is built, simplifying the installation process, and allowing organizations to more consistently build servers because the PowerShell installation script can be simply copy/pasted or run as a PS1 PowerShell script.
To install the Hyper-V role using PowerShell, do the following
1. From Server Manager, click the Tools option in the upper right of the console and choose Windows PowerShell to launch PowerShell.
2. In PowerShell, type Install-Windows Feature Name Hyper-V Include Management Tools.
Becoming Familiar with the Hyper-V Administrative Console
After Hyper-V has been installed, the next step is to install guest images that will run on the virtual server. However, before you jump into the installation of guest images, here is a quick guide on navigating the Hyper-V administrative console and the virtual server settings available to be configured that apply to all guest sessions on the server.
Launching the Hyper-V Administrative Console
There are (at least) two ways to open the Hyper-V administrative console and access the server’s configuration options. One way is to use the Server Manager console and launch the Hyper-V Manager from the Tools option, and the other option is to launch the Hyper-V Manager straight from the Administrative Tools of the host server.
NOTE
In earlier versions of Windows Server, the Server Manager provided the ability to run administrative functions from within the Server Manage console. With Windows 2016, the Server Manager allows systems to be centrally viewed and tools to be launched, but the actual administrative console for Hyper-V is the separate Hyper-V Manager tool.
To launch the Hyper-V Manager from within the Server Manager console, follow these steps:
1. Click Tools in the upper-right corner of Server Manager and choose Hyper-V Manager.
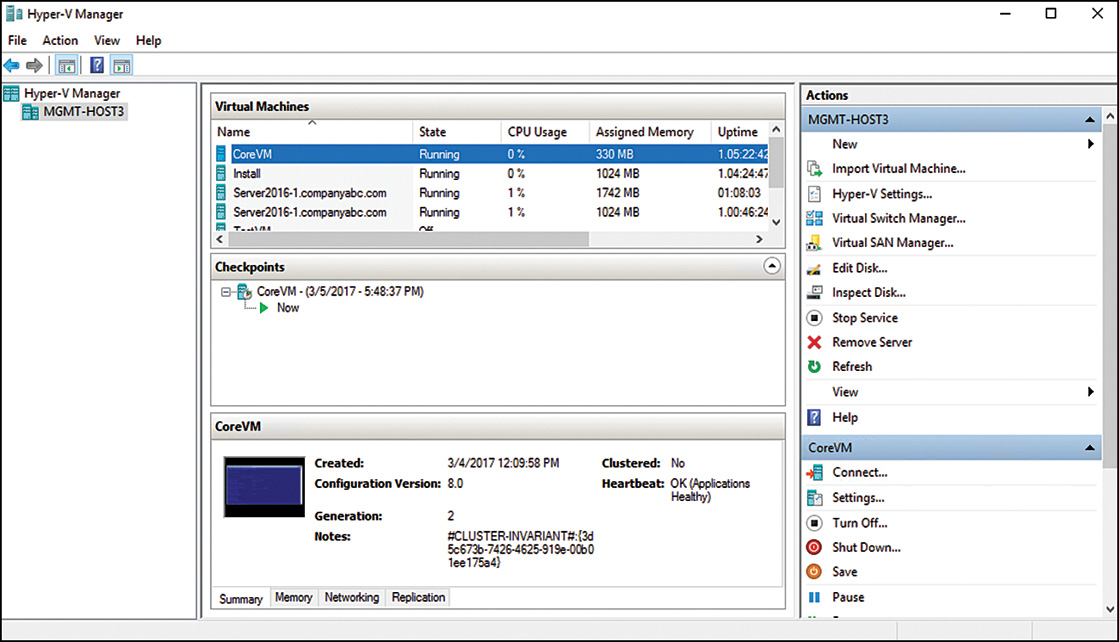
2. Click the name of one of the virtual hosts, and then select one of the virtual machines listed to see details and actions available for the guest system. By default, the Hyper-V Manager will have the local virtual server system listed, as shown in Figure 35.3.
Connecting to a Remote Hyper-V Host
If you want to administer or manage a remote Hyper-V host system, you can connect to that server using the Hyper-V Manager. To connect to a remote virtual server, follow these steps:
1. From within the Hyper-V Manager Console, click the Hyper-V Manager object in the left pane.
2. In the actions pane, click Connect to Server.
3. Select Another Computer and either enter in the name of the server and click OK, or click Browse to search Active Directory for the name of the Hyper-V server you want to remotely monitor and administer.
4. When the server appears in the Hyper-V Manager Console, click to select the server to see the actions available for administering and managing that server.
Navigating and Configuring Host Server Settings
Once in the Hyper-V Manager, there are host server settings you’d want to set, such as specifying where virtual guest session images are stored, networking configuration settings, and the like. When you click the virtual server system you want to administer, action settings become available. These action settings appear on the right side of the Hyper-V console.
Hyper-V Settings
When you select the Hyper-V Settings action item in the actions pane, you have access to configure default paths and remote control keyboard settings. Specifics on these settings are as follows:
![]() Virtual Hard Disks and Virtual Machines—This option enables you to set the drive path for the location where virtual hard disk files and virtual machine configuration files are stored. This might be on the local C: volume of the server system or could be stored on an external SAN or storage system.
Virtual Hard Disks and Virtual Machines—This option enables you to set the drive path for the location where virtual hard disk files and virtual machine configuration files are stored. This might be on the local C: volume of the server system or could be stored on an external SAN or storage system.
![]() Physical GPUs—This option allows for the enabling of physical graphical processing units (GPUs) that are used for RemoteFX when the Hyper-V host server is used as a Remote Desktop Server (RDS) or for Virtual Desktop Infrastructure (VDI) guest sessions. If you are using the Hyper-V host for remote guest session access for client systems and want to improve video graphic rendering and processing, a GPU video graphic card (frequently used for online gaming) can drastically improve the graphical experience of guest sessions connected to the Hyper-V host.
Physical GPUs—This option allows for the enabling of physical graphical processing units (GPUs) that are used for RemoteFX when the Hyper-V host server is used as a Remote Desktop Server (RDS) or for Virtual Desktop Infrastructure (VDI) guest sessions. If you are using the Hyper-V host for remote guest session access for client systems and want to improve video graphic rendering and processing, a GPU video graphic card (frequently used for online gaming) can drastically improve the graphical experience of guest sessions connected to the Hyper-V host.
![]() NUMA Spanning—This option is enabled by default and allows for more virtual machines to run at the same time, but NUMA Spanning does result in the decrease of performance of the virtual guest sessions. Non-Uniform Memory Architecture (NUMA) allocates memory per CPU in the system based on the architecture of the system motherboard. If the system motherboard has two CPU sockets each running a quad-core processor with eight memory sockets, four memory sockets are often allocated to each CPU, or effectively one memory socket per core processor. The relationship between core CPU and memory is allocated by the NUMA boundaries. Crossing the NUMA boundary by enabling NUMA spanning provides a broader distribution of guest sessions on a host system, although a slight performance degradation occurs as more guest sessions cross the NUMA boundaries during execution.
NUMA Spanning—This option is enabled by default and allows for more virtual machines to run at the same time, but NUMA Spanning does result in the decrease of performance of the virtual guest sessions. Non-Uniform Memory Architecture (NUMA) allocates memory per CPU in the system based on the architecture of the system motherboard. If the system motherboard has two CPU sockets each running a quad-core processor with eight memory sockets, four memory sockets are often allocated to each CPU, or effectively one memory socket per core processor. The relationship between core CPU and memory is allocated by the NUMA boundaries. Crossing the NUMA boundary by enabling NUMA spanning provides a broader distribution of guest sessions on a host system, although a slight performance degradation occurs as more guest sessions cross the NUMA boundaries during execution.
![]() Live Migrations—Enabling incoming and outgoing live migrations allows the Hyper-V host server to move guest sessions to and from other Hyper-V host servers. Live migrations are covered later in this chapter in the “Live Migrations” section.
Live Migrations—Enabling incoming and outgoing live migrations allows the Hyper-V host server to move guest sessions to and from other Hyper-V host servers. Live migrations are covered later in this chapter in the “Live Migrations” section.
![]() Storage Migrations—Storage migrations are the ability to move the VHDs of guest sessions from one host server to another as a method of redundancy. By default, a Hyper-V host can migrate two guest session VHDs at the same time. This number can be increased. Increasing the number impacts disk and LAN performance for other Hyper-V functions during the migration process.
Storage Migrations—Storage migrations are the ability to move the VHDs of guest sessions from one host server to another as a method of redundancy. By default, a Hyper-V host can migrate two guest session VHDs at the same time. This number can be increased. Increasing the number impacts disk and LAN performance for other Hyper-V functions during the migration process.
![]() Replication Configuration—Enabling replication allows Hyper-V guest sessions to move between host server, typically across a wide-area network to a different datacenter site. You can find more on Hyper-V replication in the section “Utilizing Hyper-V Replica for Site-to-Site Redundancy.”
Replication Configuration—Enabling replication allows Hyper-V guest sessions to move between host server, typically across a wide-area network to a different datacenter site. You can find more on Hyper-V replication in the section “Utilizing Hyper-V Replica for Site-to-Site Redundancy.”
![]() Keyboard—This option specifies where special Windows key combinations (for example, Alt+Tab and the Windows key) are sent. These keys can always be sent to the virtual machine, the host machine, or the virtual machine only when it is running in full screen.
Keyboard—This option specifies where special Windows key combinations (for example, Alt+Tab and the Windows key) are sent. These keys can always be sent to the virtual machine, the host machine, or the virtual machine only when it is running in full screen.
![]() Mouse Release Key—By default, the key combination that releases the guest session so the administrator can gain keyboard control back to the host console is Ctrl+Alt+left arrow. The Remote Control/Release Key option allows for the selection of other key options.
Mouse Release Key—By default, the key combination that releases the guest session so the administrator can gain keyboard control back to the host console is Ctrl+Alt+left arrow. The Remote Control/Release Key option allows for the selection of other key options.
![]() Reset Check Boxes—Selecting to reset this option returns Hyper-V confirmation messages and wizard pages back to default so that pages and messages are not hidden.
Reset Check Boxes—Selecting to reset this option returns Hyper-V confirmation messages and wizard pages back to default so that pages and messages are not hidden.
Virtual Switch Manager
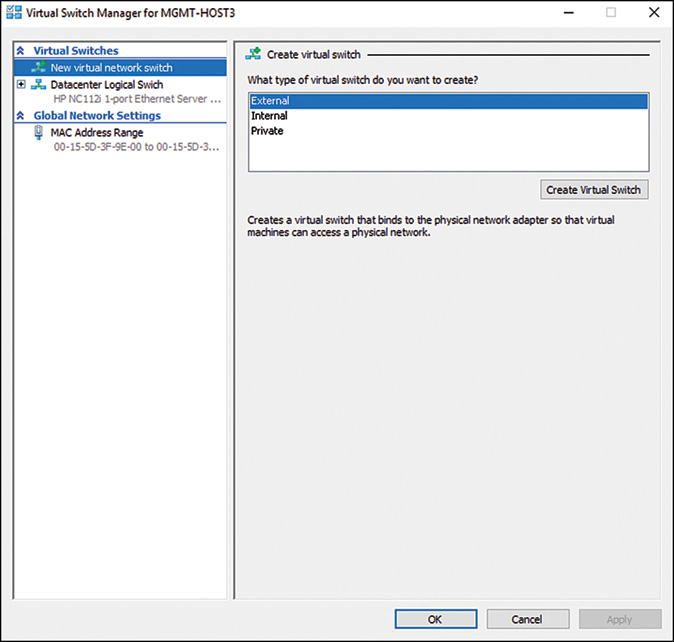
By selecting the Virtual Switch Manager action item, you have access to configure the virtual network switches, as shown in Figure 35.4. Here is where you configure the LAN and WAN connections available for the guest sessions of the virtual server host.
Configuration settings include the following:
![]() Create Virtual Switch—This configuration option allows for the addition of a new external, internal, or private network segment available to the guest sessions. An external network binds to the physical network so the virtual machines can access the physical network, just like any other host on the network. An internal network segment would be a connection that is solely within the virtual server system, where you might want to set up a VLAN so that the virtual server guests within a system can talk to each other and the host, but not with the physical network. A private network segment can only be used by the virtual machines that run on that host. They are completely isolated and cannot even communicate directly with the host server.
Create Virtual Switch—This configuration option allows for the addition of a new external, internal, or private network segment available to the guest sessions. An external network binds to the physical network so the virtual machines can access the physical network, just like any other host on the network. An internal network segment would be a connection that is solely within the virtual server system, where you might want to set up a VLAN so that the virtual server guests within a system can talk to each other and the host, but not with the physical network. A private network segment can only be used by the virtual machines that run on that host. They are completely isolated and cannot even communicate directly with the host server.
NOTE
The option to Allow Management Operating System to Share This Network Adapter in external networks (when checked) simplified communications where both network traffic from virtual guest sessions and Hyper-V management all goes across a single network adapter. However, by deselecting this option, you isolate the management operating system from communications between virtual machines and other computers on a physical network, thus improving security by separating Hyper-V management from normal Hyper-V communications traffic.
Here, the administrator can also choose to configure VLAN identification (VLAN ID) for the management operating system. This enables the administrator to tag the virtual network for a specified VLAN.
![]() Virtual Switches—If the system you are managing already has virtual networks configured, they will be listed individually in the left pane of the Virtual Network Manager dialog box. By selecting an existing virtual network switch, you can change the name of the virtual network; change the internal, private, or external connection that the network has access to; or remove the network altogether.
Virtual Switches—If the system you are managing already has virtual networks configured, they will be listed individually in the left pane of the Virtual Network Manager dialog box. By selecting an existing virtual network switch, you can change the name of the virtual network; change the internal, private, or external connection that the network has access to; or remove the network altogether.
![]() MAC Address Range—Every virtual network adapter must have a unique Media Access Control (MAC) address to communicate on an Ethernet network. The administrator can define the range of MAC addresses that can be assigned dynamically to these adapters.
MAC Address Range—Every virtual network adapter must have a unique Media Access Control (MAC) address to communicate on an Ethernet network. The administrator can define the range of MAC addresses that can be assigned dynamically to these adapters.
Virtual SAN Manager
New to Windows Server 2016 Hyper-V is the concept of a virtual Fibre Channel SAN. The Fibre Channel SAN groups physical host bus adapter (HBA) ports together so that virtual Fibre Channel adapters can be added to a virtual machine and can be connected to a SAN.
Edit Disk
The Edit Disk option enables you to modify an existing virtual hard disk (VHD) image. Specifically, the options are as follows:
![]() Compact—This option enables you to shrink a virtual hard disk to remove portions of the disk image file that are unused. This is commonly used when a disk image will be archived and stored and having the smallest disk image file possible is preferred.
Compact—This option enables you to shrink a virtual hard disk to remove portions of the disk image file that are unused. This is commonly used when a disk image will be archived and stored and having the smallest disk image file possible is preferred.
![]() Convert—This option enables you to convert a virtual hard disk to VHD format (that support a 2TB VHD) or to VHDX (that supports up to 64TB VHDX). In addition, the VHD/VHDX can be set to a fixed size or dynamically expanding size disk
Convert—This option enables you to convert a virtual hard disk to VHD format (that support a 2TB VHD) or to VHDX (that supports up to 64TB VHDX). In addition, the VHD/VHDX can be set to a fixed size or dynamically expanding size disk
![]() Expand—This option enables you grow the size of a dynamic disk image. For example, you might have initially created the disk image to only be 8GB maximum in size, and now that you’ve added a lot of applications to the guest image, you are running out of space in the VHD file. By expanding the image file, you effectively have the ability to add more applications and data to the guest session without having to recreate the guest session all over again.
Expand—This option enables you grow the size of a dynamic disk image. For example, you might have initially created the disk image to only be 8GB maximum in size, and now that you’ve added a lot of applications to the guest image, you are running out of space in the VHD file. By expanding the image file, you effectively have the ability to add more applications and data to the guest session without having to recreate the guest session all over again.
![]() Merge—This option allows you to merge changes stored in a differencing disk into the parent disk or another disk.
Merge—This option allows you to merge changes stored in a differencing disk into the parent disk or another disk.
![]() Shrink—This option allows you to reduce the storage capacity of a virtual hard disk.
Shrink—This option allows you to reduce the storage capacity of a virtual hard disk.
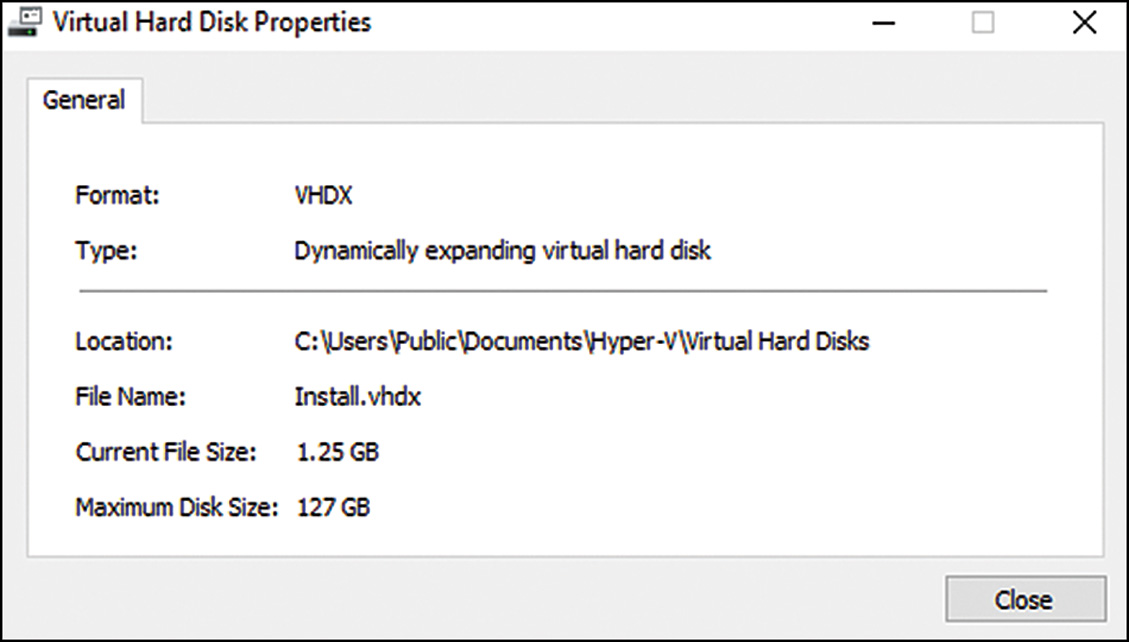
Inspect Disk
The Inspect Disk option in the Virtual Network Manager action item menu enables you to view the settings of an existing virtual image file. For the example shown in Figure 35.5, the disk image is currently 4MB in size, can dynamically grow up to the maximum limit of 127GB, and is located on the local hard drive in the directory C:VMS1.
Stop Service
The Stop Service option in the Hyper-V Manager actions pane provides for the ability to stop the Hyper-V Virtual Machine Management on the Hyper-V host machine being managed. You might choose to stop the service if you needed to perform maintenance or begin the shutdown process of an administered system.
New Configuration Wizard
One of the options listed in the Hyper-V Manager actions pane (in fact, at the top of the Actions list) is a wizard that allows for the creation of new virtual machines, hard disks, and floppy disks. Configuration options are as follows:
![]() New–Virtual Machine—This option enables you to create a new virtual guest session. The whole purpose of running Windows virtualization is to run virtual guest sessions, and this option is the one that enables you to create new guest sessions.
New–Virtual Machine—This option enables you to create a new virtual guest session. The whole purpose of running Windows virtualization is to run virtual guest sessions, and this option is the one that enables you to create new guest sessions.
![]() New–Hard Disk—This option enables you to create a new virtual hard disk (VHD/VHDX) images. When you create a new virtual machine in the first option, this includes creating a hard disk image for the operating system; however, some servers will need additional virtual hard disks. This wizard walks you through the configuration of a new virtual hard disk image.
New–Hard Disk—This option enables you to create a new virtual hard disk (VHD/VHDX) images. When you create a new virtual machine in the first option, this includes creating a hard disk image for the operating system; however, some servers will need additional virtual hard disks. This wizard walks you through the configuration of a new virtual hard disk image.
![]() New–Floppy Disk—This option enables you to take an existing floppy disk and create a virtual floppy disk image from the physical disk. This might be used to create an image of a bootable floppy disk that would later be used in configuring or managing a guest image, or used to create a floppy disk image of a disk that has drivers or utilities on it that will be used in a virtual guest session.
New–Floppy Disk—This option enables you to take an existing floppy disk and create a virtual floppy disk image from the physical disk. This might be used to create an image of a bootable floppy disk that would later be used in configuring or managing a guest image, or used to create a floppy disk image of a disk that has drivers or utilities on it that will be used in a virtual guest session.
Installing a Guest Operating System Session
One of the key tasks noted in the previous section is to begin the installation of a new guest operating system session. The guest operating system installation is wizard driven and enables the administrator to configure settings for the guest session, and to begin the installation of the guest operating system software itself. A guest session could be a server-based session running something like Windows Server 2008 or Windows Server 2016, a client-based session running Windows 8 or Windows 7, or a guest session running a non-Windows operating system.
Gathering the Components Needed for a Guest Session
When creating a guest operating system, the administrator needs to make sure they have all the components needed to begin the installation. The components needed are as follows:
![]() Operating system media—A copy of the operating system installation media is required for the installation of the guest image. The media could be either a DVD or an ISO image of the media disc itself.
Operating system media—A copy of the operating system installation media is required for the installation of the guest image. The media could be either a DVD or an ISO image of the media disc itself.
![]() License key—During the installation of the operating system software, if you are normally prompted to enter in the license key for the operating system, you should have a copy of the license key available.
License key—During the installation of the operating system software, if you are normally prompted to enter in the license key for the operating system, you should have a copy of the license key available.
Other things you should do before starting to install a guest operating system on the virtual server system include the following:
![]() Guest session configuration settings—You will be prompted to answer several core guest session configuration setting options, such as how much RAM you want to allocate for the guest session, how much disk space you want to allocate for the guest image, and so on. Either jump ahead to the next section, “Beginning the Installation of the Guest Session,” so that you can gather up the information you’ll need to answer the questions you’ll be asked, or be prepared to answer the questions during the installation process.
Guest session configuration settings—You will be prompted to answer several core guest session configuration setting options, such as how much RAM you want to allocate for the guest session, how much disk space you want to allocate for the guest image, and so on. Either jump ahead to the next section, “Beginning the Installation of the Guest Session,” so that you can gather up the information you’ll need to answer the questions you’ll be asked, or be prepared to answer the questions during the installation process.
![]() Host server readiness—If you will be preplanning the answers to the questions that you’ll be asked, make sure that the host system has enough RAM, disk space, and so on to support the addition of your guest session to the virtual server system. If your requirements exceed the physical capacity of the server, stop and add more resources (memory, disk space, and so on) to the server before beginning the installation of the guest operating system.
Host server readiness—If you will be preplanning the answers to the questions that you’ll be asked, make sure that the host system has enough RAM, disk space, and so on to support the addition of your guest session to the virtual server system. If your requirements exceed the physical capacity of the server, stop and add more resources (memory, disk space, and so on) to the server before beginning the installation of the guest operating system.
Beginning the Installation of the Guest Session
After you are ready to begin the installation of the guest operating system, launch the guest operating system Installation Wizard as follows:
1. From the actions pane, choose New, Virtual Machine. The New Virtual Machine Wizard will launch.
2. Click Next to continue past the initial Before You Begin screen.
3. Give your virtual machine a name that will be descriptive of the virtual guest session you are creating, such as AD Global Catalog Server, or Exchange 2010 Client Access Server 1, or SharePoint Frontend.
4. If you had set the default virtual machine folder location where guest images are stored, the new image for this virtual machine will be placed in a subfolder of that default folder. However, if you need to select a different location where the image files should be stored, click Store the Virtual Machine in a Different Location, and select Browse to choose an existing disk directory or to create a new directory where the image file for this guest session should be stored. Click Next to continue.
5. Enter in the amount of RAM you want to be allocated to this guest image (in megabytes), and then click Next.
NOTE
When assigning memory, you can choose the option Use Dynamic Memory for This Virtual Machine, which is a good option to choose in optimizing the memory in a server. Instead of randomly picking (typically more) memory than is needed for a guest session that may not be fully utilized, choosing dynamic memory allows you to configure a range of memory. If the additional memory is not needed, the guest session “gives back” the unused memory for other guest sessions to use.
6. Choose the network segment to which you want this guest image to be initially connected. This would be an external, internal, or private network segment. Click Next.
NOTE
You can also choose Not Connected during this virtual machine creation process and change the network segment option at a later date.
7. The next option, shown in Figure 35.6, enables you to create a new virtual hard disk or use an existing virtual hard disk for the guest image file. Creating a new virtual hard disk creates a VHDX disk image in the directory you choose. By default, a dynamic virtual disk image size setting is set to 127GB. The actual file itself will only be the size of the data in the image (potentially 4GB or 8GB to start, depending on the operating system) and will dynamically grow up to the size indicated in this setting. Alternately, you can choose an existing hard disk image you might have already created (including an older image you might have created in Windows Server 2008 Hyper-V), or you can choose to select a hard disk image later. Click Next to continue.

NOTE
Dynamic VHD performance in Windows Server 2016 has been greatly enhanced, essentially equaling that of fixed disks. This means you can now seriously consider using dynamic disks instead of fixed disks in production environments.
8. The next option, shown in Figure 35.7, allows for the installation of an operating system on the disk image you created in the previous step. You can choose to install an operating system at a later time, install an operating system from a bootable CD/DVD or ISO image file, install an operating system from a boot floppy disk image, or install an operating system from a network-based installation server (such as Windows Deployment Services). Typically, operating system source discs are on either a physical disc or ISO image file, and choosing a CD or DVD or an associated ISO image file will allow for the operating system to be installed on the guest image. Select your option, and then click Next to continue.

9. Review the summary of the options you have selected and click Finish if the settings you’ve chosen are fine, or click Previous to go back and make changes. Click Finish to create the new virtual machine.
Completing the Installation of the Guest Session
When the new virtual machine is started, the guest operating system installation will proceed to install just like the process of installing the operating system on a physical system. Typically, at the end of an operating system installation, the guest session will restart and bring the session to a logon prompt. Log on to the guest operating system and configure the guest operating system as you would any other server system. This usually has you do things such as the following:
1. Change the system name to a name that you want the virtual server to be. For many versions of operating systems, you will be prompted to enter the name of the system during the installation process.
2. Configure the guest session with an appropriate IP address. This might be DHCP issued; however, if you are building a server system, a static IP address is typically recommended.
3. Join the system to an Active Directory domain (assuming the system will be part of a managed Active Directory Domain Services environment with centralized administration).
4. Download and apply the latest patches and updates on the guest session to confirm that all patches and updates have been installed and applied to the system.
The installation of the guest operating system typically requires yet another reboot, and the operating system will be installed and operational.
Modifying Guest Session Configuration Settings
After a guest session has been installed, whether it is a Microsoft Windows server guest session, a Microsoft Windows client guest session, or a guest session running a non-Windows operating system, the host configuration settings for the guest session can be changed. Common changes to a guest session include things such as the following:
![]() Adding or limiting the RAM of the guest session
Adding or limiting the RAM of the guest session
![]() Changing network settings of the guest session
Changing network settings of the guest session
![]() Mounting an image or physical CD/DVD disc
Mounting an image or physical CD/DVD disc
Adding or Limiting the RAM of the Guest Session
A common configuration change that is made of a guest session is to increase or decrease the amount of memory allocated to the guest session. The default memory allocated to the system frequently is fine for a basic system configuration; however, with the addition of applications to the guest session, there might be a need to increase the memory. As long as the host server system has enough memory to allocate additional memory to the guest session, adding memory to a guest session is a very simple task.
To add memory to the guest session, follow these steps:
1. From the Hyper-V Manager, click to select the guest session for which you want to change the allocated memory.
2. Right-click the guest session name, and choose Settings.
3. Click Memory and enter in the amount of RAM you want allocated for this guest session (in megabytes).
4. Click OK when you are finished.
NOTE
You cannot change the allocated RAM on a running virtual guest session. The guest session must be shut down first, memory reallocated to the image, and then the guest image booted for the new memory allocation to take effect.
Changing Network Settings for the Guest Session
Another common configuration change made to a guest session is to change the network setting for the guest session. An administrator of a virtual server might choose to have each guest session connected directly to the network backbone with an external network, just as if the guest session had a network adapter connected to the backbone, or the network administrator might choose to set up an isolated (internal or private) network just for the guest sessions. The configuration of the internal, private, and external network segments that the administrator can configure the guest sessions to connect to is covered earlier in this chapter in the section “Virtual Switch Manager.”
The common configuration methods of the virtual network configurations can be broken down into two groups, as follows:
![]() Direct addressing—The guest sessions can connect directly to the backbone of the network to which the virtual server host system is attached. In this instance, an administrator would configure an external connection in the Virtual Switch Manager and have an IP address on that external segment.
Direct addressing—The guest sessions can connect directly to the backbone of the network to which the virtual server host system is attached. In this instance, an administrator would configure an external connection in the Virtual Switch Manager and have an IP address on that external segment.
![]() Isolated network—If the administrator wants to keep the guest sessions isolated off of the network backbone, the administrator can set up either an internal or private connection in the Virtual Switch Manager and the guest sessions would have an IP address of a segment common to the other guest sessions on the host system. In this case, the virtual server acts as a network switch connecting the guest sessions together.
Isolated network—If the administrator wants to keep the guest sessions isolated off of the network backbone, the administrator can set up either an internal or private connection in the Virtual Switch Manager and the guest sessions would have an IP address of a segment common to the other guest sessions on the host system. In this case, the virtual server acts as a network switch connecting the guest sessions together.
NOTE
To connect the internal network segment with the external network segment, a guest session can be configured as a router or gateway between the internal network and external network. This router system would have two virtual network adapters, one for each network.
To change the connected network used by a guest session adapter, follow these steps:
1. From the Hyper-V Manager console, click to select the guest session for which you want to change the network configuration.
2. Right-click the guest session name, and choose Settings.
3. Click the network adapter that requires reconfiguration. From the list in the Network field, select the desired network.
4. Click OK when you are finished.
Mounting a Physical CD/DVD Image or Mounting a CD/DVD Image File
When installing software on a guest session of a virtual server system, the administrator would either insert a CD or DVD into the drive of the physical server and access the disc from the guest session, or mount an ISO image file of the disc media.
To access a physical CD or DVD disc or to mount an image of a CD or DVD, follow these steps:
1. From the Hyper-V Manager console, click to select the guest session for which you want to provide access to the CD or DVD.
2. Right-click the guest session name and choose Settings.
3. Click DVD Drive and choose Physical CD/DVD Drive if you want to mount a disc in the physical drive of the host system, or click Image File and browse for the ISO image file you want to mount as a disc image.
4. Click OK when you are finished.
Other Settings to Modify for a Guest Session Configuration
You can also change other settings for a guest session. These options can be modified by going into the Settings option of the guest session and making changes. These other settings include the following:
![]() BIOS—This setting allows for the selection of boot order on the guest machine to boot in an order that can include floppy, CD, IDE (disk), or network boot.
BIOS—This setting allows for the selection of boot order on the guest machine to boot in an order that can include floppy, CD, IDE (disk), or network boot.
![]() Processor—Hyper-V provides the ability to allocate core processors to the guest image, so a guest image can have up to 32 virtual CPUs allocated for each session. In addition, resource control can be weighted between guest sessions by allocating system resource priority to key guest server sessions versus other guest sessions.
Processor—Hyper-V provides the ability to allocate core processors to the guest image, so a guest image can have up to 32 virtual CPUs allocated for each session. In addition, resource control can be weighted between guest sessions by allocating system resource priority to key guest server sessions versus other guest sessions.
NOTE
Windows Server 2016 provides a processor compatibility check box to limit processor functionality for virtual machines that will be live migrated between dissimilar hosts. Live migration is discussed later in this chapter.
![]() IDE Controller—The guest session initially has a single virtual hard drive associated with it. Additional virtual hard drives can be added to a virtual guest session.
IDE Controller—The guest session initially has a single virtual hard drive associated with it. Additional virtual hard drives can be added to a virtual guest session.
![]() SCSI Controller—A virtual SCSI controller can be associated with a virtual guest session as well providing different drive configuration options for the different drive configurations.
SCSI Controller—A virtual SCSI controller can be associated with a virtual guest session as well providing different drive configuration options for the different drive configurations.
![]() COM Ports—Virtual communication ports such as COM1 or COM2 can be associated with specific named pipes for input and output of information.
COM Ports—Virtual communication ports such as COM1 or COM2 can be associated with specific named pipes for input and output of information.
Launching a Hyper-V Guest Session
After a Hyper-V guest session has been created, and the settings have been properly modified to meet the expected needs of the organization, the virtual guest session can now be launched and run. Decisions need to be made whether you want the guest session to automatically launch as soon as the host server is booted, or whether you want to manually launch a guest session. In addition, a decision needs to be made on the sequence in which guest sessions should be launched so that systems that are prerequisites to other sessions come up first. For example, you’d want a global catalog server session and DHCP server session to come up before an application server that logs on and authenticates to Active Directory comes online and needs to authenticate to Active Directory before the server service begins.
Automatically Launching a Guest Session
One option for launching and loading guest sessions is to have the guest session boot right after the physical host server completes the boot cycle. This is typically the preferred option if a guest session is core to the network infrastructure of a network (such as a domain controller or host server system) so that in the event of a physical server reboot, the virtual guest sessions boot up automatically as well. It would not be convenient to have to manually boot each virtual server session every time the physical server is rebooted.
The option for setting the startup option for a virtual session is in the configuration settings for each guest session.
To change the startup action, follow these steps:
1. From the Hyper-V Manager console, right-click the virtual machine for which you want to change the setup option, and select Settings.
2. In the Management section of the settings, click Automatic Start Action.
3. You are provided with three options, as shown in Figure 35.8, of what to do with this virtual guest session upon startup of the physical host server. Either click Nothing (which would require a manual boot of the guest session), click Automatically Start If It Was Running When the Service Stopped, or click Always Start This Virtual Machine Automatically. To set the virtual session to automatically start after the physical server comes up, choose the Always Start This Virtual Machine Automatically option.

4. Also on this setting is the ability to have an automatic start delay. This enables you to sequence the startup of virtual machines by having some VMs take longer to automatically start than others. If a server requires another system to start before it is started (such as an Exchange server requires a domain controller to start and be available before the Exchange server comes online), delaying the start for that Exchange server guest session will improve the success of that Exchange server of starting as expected. Click OK to save these settings.
Manually Launching a Guest Session
Another option for guest session startup is to not have a guest session automatically start after a physical server boots up. This is typically the preferred option if a guest session will be part of a demonstration or test server where the administrator of the system wants to control which guest sessions are automatically launched, and which sessions need to be manually launched. It would not be convenient to have a series of demo or test sessions automatically boot up every time the system is booted. The administrator of the system would typically want to choose to start these guest sessions.
To set the startup action to manually launch a guest session, follow these steps:
1. From the Hyper-V Manager console, right-click the virtual machine for which you want to change the setup option and select Settings.
2. In the Management section of the settings, click Automatic Start Action.
3. When provided the three options of what to do with this virtual guest session upon startup of the physical server, either click Nothing (which would require a manual boot of the guest session), click Automatically Start If It Was Running When the Service Stopped, or click Always Start This Virtual Machine Automatically. Choose the Nothing option, and the session will need to be manually started.
Save State of a Guest Session
In Windows Server 2016 Hyper-V, there are two ways to save guest images: snapshots and a saved state. At any time, an administrator can right-click a guest session and choose Save. This Save function is similar to a Hibernate mode on a desktop client system. It saves the image state into a file with the option of bringing the saved state image file back to the state the image was in prior to being saved.
Using Snapshots of Guest Operating System Sessions
A highly versatile function in Windows Server 2016 Hyper-V is the option to create a snapshot of a guest session. A snapshot in Windows Hyper-V uses Microsoft Volume Shadow Copy Service (VSS) technology that captures an image of a file on a server; in this case, the file is the VHD image of the virtual server itself. At any point in time in the future, the snapshot can be used for recovery.
Snapshots for Image Rollback
One common use of a guest image snapshot is to roll back an image to a previous state. This is frequently done with guest images used for demonstration purposes, or test labs where a scenario is tested to see the results and compared with identical tests of other scenarios, or for the purpose of preparing for a software upgrade or migration.
In the case of a guest image used for demonstration purposes, a user might run through a demo of a software program where they add information, delete information, make software changes, or otherwise modify information in the software on the guest image. Rather than having to go back and delete the changes, or rebuilding the image from scratch to do the demo again, with a snapshot, the user can simply roll the image back to the snapshot that was available before the changes were made to the image.
Image rollback has been successfully used for training purposes where an employee runs through a process, and then rolls back the image so they can run through the same process all over again repeating the process on the same base image but without previous installations or configurations.
In network infrastructures, a snapshot is helpful when an organization applies a patch or update to a server, or a software upgrade is performed and problems occur; the administrator can simply roll back the image to the point prior to the start of the upgrade or migration.
Snapshots for Guest Session Server Fault Tolerance
Snapshots are commonly used in business environments for the purpose of fault tolerance or disaster recovery. A well-timed snapshot right before a system failure can help an organization roll back their server to the point right before the server failed or problem occurred. Instead of waiting hours to restore a server from tape, the activation of a snapshot image is nothing more than choosing the snapshot and selecting to start the guest image. When the guest image starts up, it is in the state that the image was at the time the snapshot was created.
Creating a Snapshot of a Guest Image
Snapshots are very easy to create. To create a snapshot, follow these steps:
1. From the Hyper-V Manager console, click to select the guest session for which you want to create a snapshot.
2. Right-click the guest session name and choose Snapshot. A snapshot of the image is immediately taken of the guest image and the snapshot shows up in the Snapshots pane, as shown in Figure 35.9.
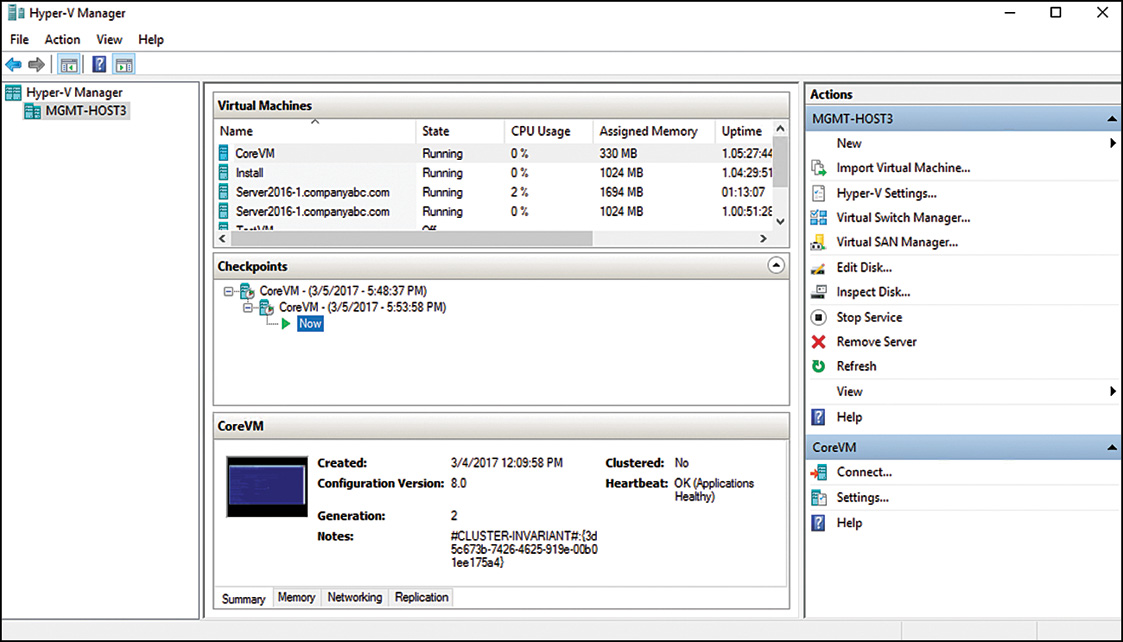
Rolling Back a Guest Image to a Previous Snapshot Image
The term used in Windows Server 2016 Hyper-V to roll back an image is called applying a snapshot to an existing image. When an image is rolled back, the image that is currently running has the snapshot information applied to the image, thus bringing the image back to an earlier configuration state. To apply a snapshot, follow these steps:
1. From the Hyper-V Manager console, click the snapshot to which you want to revert the running guest image.
2. Right-click the snapshot image and choose Apply. The configuration state of the image will immediately be reverted to the state of the image when the snapshot was taken.
NOTE
By default, the name of the snapshot image takes on the date and time the image was created. For example, if the virtual machine is called Windows 2016 IIS, an image taken on September 2, 2016 at 9:42 p.m. shows up as Windows 2016 IIS-(9/2/2016 - 9:42:22 PM). Snapshots can be renamed to something more meaningful, if desired, such as Clean Build with All Patches.
Reverting a Snapshot Session
When working with snapshots, if you snapshot a session, the revert action can be used on the virtual machine to revert the guest session’s state to the last created or applied snapshot. All changes since the last creation or application of a snapshot will be discarded.
Quick Migration and Live Migration
There are two forms of automated migration provided by Windows Server 2016 Hyper-V: quick migration and live migration. These migration processes can be used to increase service availability for planned and unplanned downtime.
Although both technologies achieve the same thing—moving virtual servers between Hyper-V hosts—they use different methods and mechanisms to achieve it. Both require at least two Hyper-V host servers in a cluster, attached to the shared storage system. The shared storage can be a traditional SAN over iSCSI or Fibre Channel, and with Windows Server 2016 clustering, shared storage can now be simply a Server Message Block (SMB) file share.
Quick Migration
The Quick Migration function provides a way to quickly move a virtual machine from one host server to another with a small amount of downtime.
In a quick migration, the guest virtual machine is suspended on one host and resumed on another host. This operation happens in the time it takes to transfer the active memory of the virtual machine over the network from the first host to the second host. For a host with 8GB of RAM, this might take a few minutes using a gigabit iSCSI connection.
Quick migration was the fastest migration available for Windows Server 2008 Hyper-V. Microsoft made considerable investments in Hyper-V migration technologies, trying to reduce the time required to migrate virtual machines between Hyper-V hosts. The result was the Live Migration feature, which has the same hardware requirements as Quick Migration, but with a near instantaneous failover time.
Live Migration
Since the release of Hyper-V v1 with Windows Server 2008, a highly requested functionality by organizations is the ability to migrate running virtual machines between hosts, with no downtime. VMware’s VMotion has been able to do this for some time. With Windows Server 2008 R2 Hyper-V, doing live migrations between hosts was now done natively with Hyper-V for no extra cost. This made it a compelling reason to move to Hyper-V.
Live Migration uses failover clustering. The quorum model used for the cluster depended on the number of Hyper-V nodes in the cluster. In this example, we will use two Hyper-V nodes in a Node and Disk Majority Cluster configuration. There will be one shared storage logical unit LUN used as the cluster quorum disk and another used as the Cluster Shared Volume (CSV) disk, described later in this chapter. For more details on clustering, see Chapter 28.
If there is only one shared storage LUN available to the nodes when the cluster is formed, Windows will allocate that LUN as the cluster quorum disk and it will not be available to be used as a CSV disk.
This section describes how to use Hyper-V Live Migration to move virtual machines between clustered Hyper-V hosts.
Configuring the Cluster Quorum Witness Disk
Live migration with shared storage requires a Windows Server 2016 cluster configured to use shared storage. Typically, these are LUNs provisioned on an iSCSI or Fibre Channel SAN. One LUN will be used as the witness disk for quorum and another will be used as a CSV to store the virtual machine images. The CSV will be configured later in this chapter.
The LUN for the shared witness quorum disk must be configured before the cluster is formed, so that cluster manager can configure the cluster properly. Connect this LUN via iSCSI or Fibre Channel to both nodes you will use for the cluster. The disk must be initialized and formatted with an NTFS file format prior to cluster use. When properly configured, both nodes share the same online Basic disk and can access the disk at the same time.
IMPORTANT
The Windows cluster service always uses the first shared disk as the cluster quorum disk. Provision this disk first on each node.
Now that the shared storage witness disk has been configured, we can move on to installing the Windows cluster.
Installing the Failover Clustering Feature
Before a failover clustering can be deployed, the necessary feature must be installed on each Hyper-V host. To install the Failover Clustering feature, follow these steps:
1. Log on to each of the Windows Server 2016 Cluster nodes with an account with administrator privileges.
2. From Server Manager, click the upper-right Manager and select Add Roles and Features
3. In the Before you begin option, click Next to continue.
4. On the Select installation type page, select Role-Based or Feature-Based Installation, and then click Next.
5. On the Select Destination Server page, chose Select a Server from the Server Pool, which should have highlighted the server you are on, and then click Next.
6. On the Select Server Roles page, just click Next (not selecting any new roles).
7. When prompted to add features, select Failover Clustering (and when prompted to add features that are required for Failover Clustering, click Add Features), and then click Next.
8. On the Confirm Installation Selections page, click install to install Failover Clustering to this server.
NOTE
On the Confirm Installation Selections page, click Restart the Destination Server Automatically If Required so that the server will reboot after installation of the Failover Clustering feature.
9. When the installation completes, click Close to close the information screen.
Running the Validate a Configuration Wizard
Failover Cluster Manager is used to administer the Failover Clustering feature. After the feature is installed, run the Validate a Configuration Wizard from the Tasks pane of the Failover Cluster Manager console. All nodes should be up and running when the wizard is run. To run the Validate a Configuration Wizard, follow these steps:
1. Log on to one of the Windows Server 2016 cluster nodes with an account with administrator privileges over all nodes in the cluster.
2. From Server Manager, select Tools in the upper-right side of the consultant and select Failover Cluster Manager.
3. When the Failover Cluster Manager console opens, click the Validate Configuration link in the actions pane.
4. When the Validate a Configuration Wizard opens, click Next on the Before You Begin page.
5. On the Select Servers or a Cluster page, enter the name of a cluster node and click the Add button. Repeat this process until all nodes are added to the list, as shown in Figure 35.10, and then click Next to continue.

6. On the Testing Options page, read the details that explain the requirements for all tests to pass to be supported by Microsoft. Select the Run All Tests (Recommended) option button and click Next to continue.
7. On the Confirmation page, review the list of servers that will be tested and the list of tests that will be performed, and then click Next to begin testing the servers.
NOTE
For years, administrators have complained that the Validate a Configuration Wizard window is too small. In Windows Server 2016, administrators can resize the window by dragging the lower-right corner. This is not obvious, but try it; it works!
8. When the tests complete, the Summary page displays the results, and if the tests pass, click Finish to complete the Validate a Configuration Wizard. If the tests failed, click the View Report button to review the details and determine which test failed and why it did.
Even if the Validate a Configuration Wizard does not pass every test, depending on the test, creating a cluster might still be possible. After the Validation a Configuration Wizard is completed successfully, the cluster can be created.
Creating a Node and Disk Majority Cluster
When the failover cluster is first created, all nodes in the cluster should be up and running. To create the failover cluster, follow these steps:
1. Log on to one of the Windows Server 2016 cluster nodes with an account with administrator privileges over all nodes in the cluster.
2. From Server Manager, click Tools in the upper-right corner of the console and choose Failover Cluster Manager.
3. When the Failover Cluster Manager console opens, click the Create a Cluster link in the actions pane.
4. When the Create Cluster Wizard opens, click Next on the Before You Begin page.
5. On the Select Servers page, enter the name of each cluster node, and click the Add button. When all the nodes are listed, click Next to continue.
6. On the Validation Warning page, select No. I Do Not Require. The validation test can be run after the configuration is complete. Click Next to continue.
7. On the Access Point for Administering the Cluster page, type in the name of the cluster, complete the IPv4 address (if DHCP services are not available), and click Next, as shown in Figure 35.11. The name you choose for the cluster will become a cluster computer account in Active Directory.
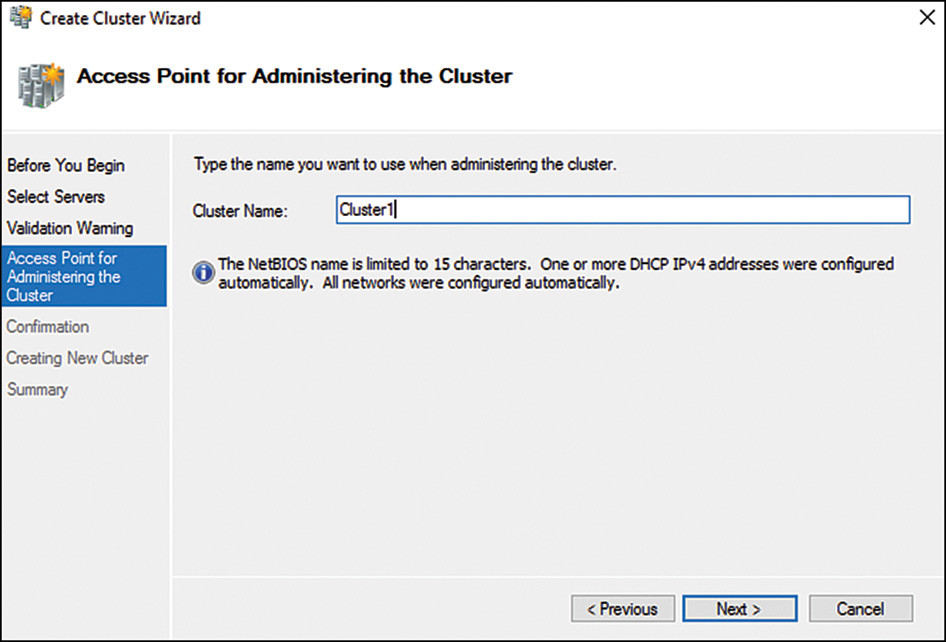
8. On the Confirmation page, review the settings, and then click Next to create the cluster.
9. On the Summary page, review the results of the cluster creation process and click Finish to return to the Failover Cluster Manager console. If there are any errors, you can click the View Report button to reveal the detailed cluster creation report.
10. Back in the Failover Cluster Manager console, select the cluster name in the tree pane. In the Tasks pane, review the configuration of the cluster.
11. In the tree pane, select and expand Nodes to list all the cluster nodes.
12. Select Storage and review the cluster storage in the Tasks pane. The shared storage disk will be listed as the witness disk in quorum. This disk is used to maintain quorum.
13. Expand Networks in the tree pane to review the list of networks. Select each network and review the names of the adapters in each network.
14. Click Validate Configuration in the actions pane to start an automated review of the cluster configuration. See the previous section, “Running the Validate a Configuration Wizard,” for more details. Keep in mind that Microsoft support for the cluster will require a successful execution of the validation process.
Adding Additional Shared Storage
At this point, we have a Node and Disk Majority cluster using a shared witness disk to maintain quorum. We can now add the shared storage that will be used as a Cluster Shared Volume.
Another LUN must be provisioned for the CSV to hold the virtual machine images used in live migration. This LUN may be a new unpartitioned volume or one that already contains virtual machine images and data.
Connect this LUN via iSCSI or Fibre Channel to both nodes in the cluster. The disk must be initialized and formatted with an NTFS file format prior to cluster use in the cluster. When properly configured, the disk shows in Disk Management on both nodes.
Next, add the new shared disk to the cluster, as follows:
1. On one of the cluster nodes, open Failover Cluster Manager.
2. Expand the Cluster and select Storage.
3. Click Add Disk in the actions pane.
4. Select the disk to add and click OK. The disk will be added to available storage.
Configuring Hyper-V over SMB
Hyper-V over SMB is new with Windows Server 2016 and enables organizations to do clustering and failover of Hyper-V guests without a SAN. Hyper-V over SMB simply uses a Windows 2016 file share as the shared storage that Hyper-V users for live migration. With Hyper-V over SMB, any node can host the virtual machine and any node can access the VHD on the SMB share, so virtual machine and disk ownership can move freely across cluster nodes.
NOTE
While Hyper-V over SMB is merely connected to a file share, the file share must be on a Windows Server 2016 server set up as a SMB share. A traditional Windows share (on Windows 2003 or Windows 2008) conceptually is the exact same thing, but Windows 2016 SMB provides a higher transport and transfer of data between the Windows 2016 SMB file server and the Hyper-V host that is needed for Hyper-V over SMB.
To enable and configure Hyper-V over SMB, you must first create an SMB share on a server. On a Windows Server 2016 with adequate storage space that will be used for the SMB share, add the File Services role to the system, as follows:
1. Make sure you are logged on to the server with local administrator or domain admin privileges.
2. Start the Server Manager console if it is not already running on the system.
3. Click Manage in the upper-right side of the console and select Add Roles and Features.
4. After the Add Roles Wizard loads, click Next to continue past the Welcome screen.
5. On the Select Installation Type page, select Role-Based or Feature-Based Installation, and then click Next.
6. On the Select Destination Server page, chose Select a Server from the Server Pool, which should have highlighted the server you are on, and then click Next.
7. On the Select Server Roles page, select the File Services role, and then click Next.
8. On the Select Features page, because you are not adding any new features beyond the File Services role and features, just click Next.
9. On the Confirm Installation Selections page, review the selections made, and then click Install.
NOTE
On the Confirm Installation Selections page, selecting the Restart the Destination Server Automatically If Required check box will reboot the server upon completion. This is usually preferred; because the server will need to be rebooted, it might as well do it automatically upon completion.
10. After the server restarts, log on to the server with local administrator or domain admin privileges.
After the file services role has been installed on the server that’ll serve as the SMB share host, create an SMB share that will be accessible by the Hyper-V cluster host servers. To create a share, follow these steps:
1. Make sure you are logged on to the server with local administrator or domain admin privileges.
2. Start the Server Manager console if it is not already running on the system.
3. Click File and Storage Services.
4. Click Shares.
5. Click To Create a File Share, Start the New Share Wizard.
6. When prompted to select the profile for this share, choose SMB Share Basic, and then click Next
7. In the Select the Server and Path for This Share section, choose the storage location where you plan to share (such as Share Location C:, or custom path e:share, or the like), and then click Next
8. When prompted to specify the share name, give it a name that makes sense for this share, such as HyperVShare, and then click Next.
9. Choose whether you want to enable access-based enumeration, allow caching of share, or encrypt data access. (These items are usually left unchecked for Hyper-V shares because it is anticipated the access to this shared server will be protected and relatively limited. However, if this shared server and the Hyper-V hosts are in a semi-unsecured branch location or the like, encrypting data access may be of interest.) Click Next.
10. For your Specify Permissions to Control Access options, the defaults are usually adequate. However, with the assumption that the access from Hyper-V to this shared server will only be done by the Hyper-V host systems, customizing permissions to only allow the Hyper-V hosts to access the share will tighten security. The key is if you tighten security for the initial two or three cluster hosts you are providing access. If you add more servers, you’ll need to make sure to modify the permission rights of the additional servers for continued access of the cluster. Make changes as necessary, and click Next to continue.
11. Review the settings and click Create to continue.
After the share has been created, go to each of the nodes of the cluster to validate you have access to the SMB share you just created. A simple test is as follows:
1. On each of the Windows cluster nodes, open Windows Explorer (the yellow folder icon at the bottom of the screen).
2. Enter the Universal Naming Convention (UNC) for the file share (which is \server nameshare name). In my example shown in Figure 35.12, it is \filesmbshare.

With successful access to the SMB share, you can now proceed to create a clustered Hyper-V virtual guest session.
Deploying New Virtual Machines on a Hyper-V Failover Cluster
After the desired cluster configuration and storage access is achieved, the cluster is ready for the deploying of virtual machines:
1. On one of the cluster nodes, open Failover Cluster Manager.
2. Expand the cluster and select Roles.
3. Now that Cluster Storage Volumes have been configured, the Virtual Machines application is available in the actions pane. Click Virtual Machines, New Virtual Machine, and then select the cluster node on which to deploy the virtual machine. (If you are unsure, just choose the first cluster node shown.) Then click OK.
4. The New Virtual Machine Wizard will launch. Click Next at the Before You Begin screen.
5. Provide a name for the new virtual machine and check the Store the Virtual Machine in a Different Location check box. Enter the path to the SMB share you just created (in my case, it is \filesmbsharevms), similar to what is shown in Figure 35.13, and then click Next.
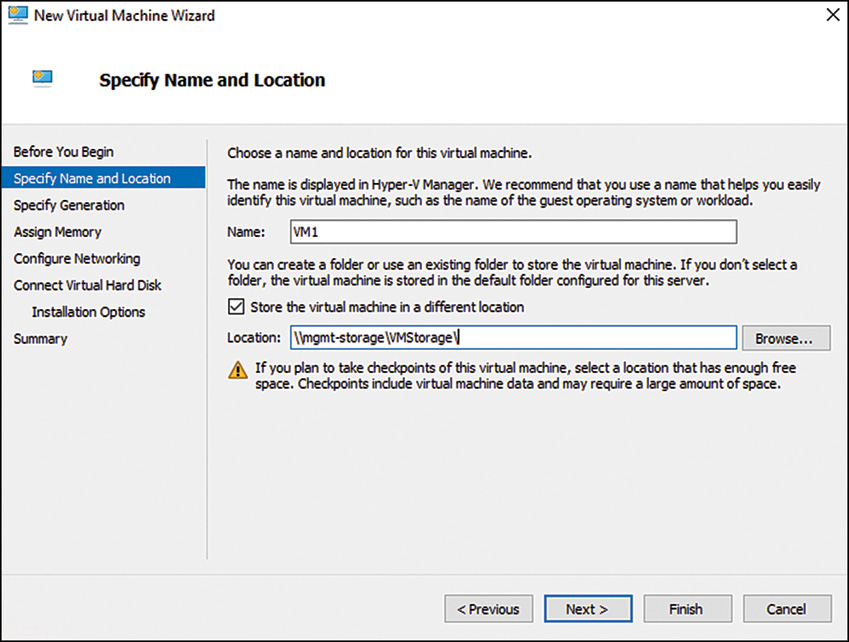
It is recommended on Hyper-V servers using Live Migration to change the default location to store virtual machines to the CSV path. This is configured in Hyper-V Settings of the Hyper-V Manager console, as described earlier in this chapter.
6. Assign the desired amount of memory for the new virtual machine and click Next.
7. Select the virtual network, or choose Not Connected to configure it later. Click Next.
8. Create a new virtual hard disk in the SMB share folder or select an existing VHD, and click Next.
NOTE
Both the virtual machine configuration file and its associated VHD files must reside in the CSV folder location for Live Migration to work.
9. Select how you will install the operating system for the new virtual machine, either using a boot CD-DVD ROM, ISO image, floppy disk, or from a network-based installation server, and click Next.
10. Review the summary of the options you have selected and click Finish if the settings you’ve chosen are fine, or click Previous to go back and make changes.
11. Click Finish to create the new virtual machine. After the virtual machine is saved to the CSV path, the High-Availability Wizard configures the virtual machine for use in live migration. Click View Report to review the step the High-Availability Wizard used to configure the virtual machine for live migration.
NOTE
It is normal for the High-Availability Wizard to report a warning if the operating system for the virtual machine will be installed from the host’s physical CD/DVD-ROM, an ISO file, or a floppy drive. This is because the drive or file used for installation is not in a location available to the cluster. Most of the time, this does not matter, but it can be overcome if needed by installing the operating system from an ISO located on the CSV location.
12. Click Finish to complete the configuration of the new virtual machine.
13. Change the virtual machine settings, if desired, to increase the number of virtual processors, change the drive configuration, and so on.
14. Right-click the virtual machine in Failover Cluster Manager and select Start Virtual Machines to start the virtual machine and install the operating system.
After the operating system is installed, you can use Live Migration to move the cluster from one node to another.
Deploying Existing Virtual Machines on Failover Clusters
If the storage provisioned as a shared storage in the cluster contains existing virtual machine images, these can be made highly available. You can also copy any virtual hard disk to the shared storage volume and make it highly available, as follows:
1. On one of the cluster nodes, open Failover Cluster Manager.
2. Expand the cluster and select Roles.
3. Right-click Roles and select Configure Role. This opens the High-Availability Wizard.
4. Click Next on the Before You Begin page.
5. On the Select Role page, click Virtual Machine and click Next.
6. Select the virtual machines to be made highly available, as shown in Figure 35.14, and click Next.

7. Review the Summary page in the wizard and click Finish.
8. Select the virtual machine in the Roles pane and click Start to start the virtual machine.
Performing a Live Migration
The virtual machine runs on one of the cluster nodes, known as the owner. When a live migration is performed, multiple steps are performed. These steps can be broken down into three stages: preflight migration, virtual machine transfer, and final transfer/startup of the virtual machine.
The first step in live migration occurs on the source node (where the virtual machine is currently running) and the target node (where the virtual machine will be moved) to ensure that migration can, in fact, occur successfully.
The detailed steps of a live migration are as follows:
1. Identify the source and destination machines.
2. Establish a network connection between the two nodes.
3. The preflight stage begins. Check whether the various resources available are compatible between the source and destination nodes:
![]() Are the processors using similar architecture? (For example, a virtual machine running on an AMD node cannot be moved to an Intel node, and vice versa.)
Are the processors using similar architecture? (For example, a virtual machine running on an AMD node cannot be moved to an Intel node, and vice versa.)
![]() Are there a sufficient number of CPU cores available on the destination?
Are there a sufficient number of CPU cores available on the destination?
![]() Is there sufficient RAM available on the destination?
Is there sufficient RAM available on the destination?
![]() Is there sufficient access to required shared resources (VHD, network, and so on)?
Is there sufficient access to required shared resources (VHD, network, and so on)?
![]() Is there sufficient access to physical device resources that must remain associated with the virtual machine after migration (CD drives, DVDs, and LUNs or offline disks)?
Is there sufficient access to physical device resources that must remain associated with the virtual machine after migration (CD drives, DVDs, and LUNs or offline disks)?
Migration cannot occur if there are any problems in the preflight stage. If there are, the virtual machine will remain on the source node and processing ends here. If preflight is successful, migration can occur and the virtual machine transfer continues.
4. The virtual machine state (inactive memory pages) moves to the target node to reduce the active virtual machine footprint as much as possible. All that remains on the source node is a small memory working set of the virtual machine.
The virtual machine configuration and device information are transferred to the destination node and the worker process is created. Then, the virtual machine memory is transferred to the destination while the virtual machine is still running. The cluster service intercepts memory writes and tracks actions that occur during the migration. This page will be retransmitted later. Up to this point, the virtual machine technically remains on the source node.
5. What remains of the virtual machine is briefly paused on the source node. The virtual machine working set is then transferred to the destination host, storage access is moved to the destination host, and the virtual machine is reset on the destination host.
The only downtime on the virtual machine occurs in the last step, and this outage is usually much less than most network applications are designed to tolerate. For example, an administrator can be accessing the virtual machine via Remote Desktop while it is being live migrated and will not experience an outage. Or a virtual machine could be streaming video to multiple hosts, live migrated to another node, and the end users don’t know the difference.
Use the following steps to perform a live migration between two cluster nodes:
1. On one of the cluster nodes, open Failover Cluster Manager.
2. Expand the Cluster and select Roles.
3. Select the virtual machine to live migrate.
4. Click Move, Live Migration, and either let the Failover Cluster Manager choose the Best Possible Node or manually select Select Node and choose your preferred destination for the guest session. The virtual machine will migrate to the selected node using the process described previously.
NOTE
If there are processor differences between the source and destination node, Live Migration will display a warning that the CPU capabilities do not match. To perform a live migration, you must shut down the virtual machine and edit the settings of the processor to Migrate to a Physical Computer with a Different Processor Version.
Performing a Quick Migration
To perform a quick migration, the same process is followed, the difference is that during the quick migration the memory state of the guest session is not moved real time. The guest session is effectively hibernated and saved to disk, and then the guest session is restarted on another node. Quick migrations have 20 seconds to two to three minutes of downtime during the cutover process. If an application migrates across in a live migration without any performance problems caused by network bandwidth or disk performance, it is better to just do a live migration as the end state is the same. If you want to perform a quick migration, follow these steps:
1. On one of the cluster nodes, open Failover Cluster Manager.
2. Expand the Cluster and select Roles.
3. Select the virtual machine to quick migrate.
4. Click Move, Quick Migration, and either let the Failover Cluster Manager choose the Best Possible Node or manually select Select Node and choose your preferred destination for the guest session. The virtual machine will migrate to the selected node using the process described previously.
NOTE
The same processor differential for a Quick Migration exists as in a live migration in that if there are processor differences between the source and destination node, Quick Migration will display a warning that the CPU capabilities do not match. To perform a quick migration, you must shut down the virtual machine and edit the settings of the processor to Migrate to a Physical Computer with a Different Processor Version.
Utilizing Hyper-V Replica for Site-to-Site Redundancy
New to Windows 2012 Hyper-V was the ability to do a Hyper-V replica from one Hyper-V host server to another. A Hyper-V replica trickles changes of Hyper-V guest sessions from one host to another so that if the primary (source) Hyper-V fails or needs to be brought offline, the secondary (destination) Hyper-V guest session can be brought online. Unlike a live migration where there are two hosts and one VHDX virtual guest session file, in Hyper-V replicas, there are two hosts and two VHDX virtual guest session files, and information replicates from source to destination.
Hyper-V Replica is a great solution for a cross-datacenter environment in two separate locations, effectively “disaster recovery” of Hyper-V guests. In the event that Site A fails, Site B can come online with the guest session. However, before getting too excited about making Hyper-V Replica the sole high-availability (local) and disaster recovery (remote) replicated solution, do note that Hyper-V Replica’s replicate every five minutes, which is a non-changeable configuration state. While changed state of the VHDX files is tracked, logged, and queued up to be sent to the destination server continuously, the actual transfer is queued up and batch sent.
In addition, Hyper-V replicas can only go from one server to a target server (one-to-one relationship), a Hyper-V replica cannot go one to many, or daisy chained from one server to another server to yet another server. For a high-availability and disaster recovery solution, an organization can set up a live migration cluster within a datacenter for high-availability and near zero downtime, and then secondarily set up Hyper-V replica between sites for disaster recovery; that is a supported configuration.
The key to Hyper-V Replica is that it is included right in the box with Hyper-V. It does not require anything fancy to replica (no need for SANs, no need for Fibre Channel, no need for third-party plug-ins). You take any Windows 2016 Hyper-V host server, select a Hyper-V guest session, and choose to replicate that guest session to another Hyper-V host server and the pairing relationship happens, and the guest session data is replicated between the two servers.
Initial Hyper-V Replica Configuration
To be able to support Hyper-V Replica, the destination server needs to be configured to accept the replication of the source server Hyper-V guest session. And if you configure the destination server for configuration, you might as well configure the source server so that you can replicate the guest session back to the primary server as part of the failback process. The configuration on a destination server is as follows:
1. On a Windows Server 2016 Hyper-V host server that you want to configure as a destination for replication, open the Hyper-V Manager console.
2. Expand the Hyper-V Manager navigation on the left pane, and click the Hyper-V host you want to configure as a destination server.
3. On the actions pane on the right, click Hyper-V Settings.
4. Click Replication Configuration and select Enable This Computer as a Replica Server.
5. Choose either Kerberos (HTTP) or certificate-based (HTTPS) authentication. Kerberos is the easiest to configure; because it is all done through Windows and Active Directory, no special configuration settings need to be done. However, certificate-based authentication (HTTPS) is more secure because the data is sent over the network encrypted. In addition, if you plan to replicate guest sessions on Hyper-V hosts that are not part of an Active Domain (that is, Hyper-V hosts that might be in a DMZ unsecure leg of a network, or a Hyper-V host that is being hosted in a datacenter by a third-party cloud provider, or the like), doing the certificate-based authentication is required for certificate exchange. If you choose Use Certificate-Based Authentication (HTTP), you are prompted to select the certificate in the Trusted Root certificate store of the local (destination server) you can currently configure.
6. On the same Hyper-V Settings page, choose to allow replication from any authenticated server (and specify the directory on the local (destination) server where you want the guest images from the primary (source) server to be replicated to). In addition, you can choose to allow replication from the specified servers and choose servers you allow to receive replicated guest sessions from. The configuration will look similar to Figure 35.15. Click OK

Repeat this configuration on all Hyper-V host servers you intend to be destination servers for Hyper-V Replica.
Initiating a Guest Session to Replicate to Another Host Server
With the source and destination servers configured from the previous section, “Initial Hyper-V Replica Configuration,” to initiate the guest session replication from one host server to another on the source server, follow these steps:
1. From within the Hyper-V Manager console, right-click the Virtual Machine in the Hyper-V Manager and choose Enable Replication.
2. In the Before You Begin section, click Next.
3. In the Specify Replica Server section, click Browse and choose your server and then click Next.
4. If you get a The specified Replica server is not configured to receive replication from this server error, click Configure Server. Otherwise, if you followed the previous section steps already, skip to step 8.
5. In the Hyper-V settings under Replication Configuration, click Enable This Computer as a Replica Server.
6. For authentication and ports, choose either HTTP or HTTPS (HTTPS is preferred because it encrypts the communications), choose to Allow Replication from Any Authenticated Server, choose the directory where you want the VMs stored, and then click OK.
7. For Specify Connection Parameters, the Replica server should already be showing port 443. Choose Use Certificate-Based Authentication (choose the root CA), choose Compress the Data That Is Transmitted Over the Network, and then click Next.
8. For Choose Replication VHDs, choose the virtual hard disks you want to replicate (unselect those you do not want to replicate) and click Next.
9. For Configure Recovery History, choose either Only the Latest Recovery Point or choose Additional Recovery Points (and then choose 1 to 15 recovery points). The Latest Recovery Point option only keeps one replica. Many times, organizations choose to replicate every two to four hours. If so, choose Replicate Incremental VSS Copy Every 1, 2, 4, or 12 hours as you see fit, and for additional recovery points, keep 4 or 6 recovery points so that you have a day of recovery points available in case of corruption or a problem. Click Next.
10. For Choose Initial Replication Method, choose Send Initial Copy over the Network, Send Initial Copy Using External Media, Use an Existing Virtual Machine on the Replica Server as the Initial Copy. Many organizations in testing just replicate over the network, which could take two hours to two days to replicate dependent on the size of the guest session and the available bandwidth between host servers. Alternatively, exporting an initial copy of the guest session to a USB drive and shipping the drive can save days of replication (especially if several guest sessions are involved). Choose to Start Replication Immediately or choose a time to start, and then click Next.
11. Review the summary and click Finish.
Checking Hyper-V Replication Health
To determine whether Hyper-V replication is working properly and the health of the replica, follow these steps:
1. In Hyper-V Manager, usually on the source server where your primary guest session resides, right-click the guest session and choose Replication, View Replication Health.
2. View the Replication Health summary similar to what is shown in Figure 35.16. Key factors to view are the replication health, the replication state, and any pending replication. If there are errors, the errors are noted as well as an opportunity to click View Events (which opens event logging on the source server that’ll provide more information).
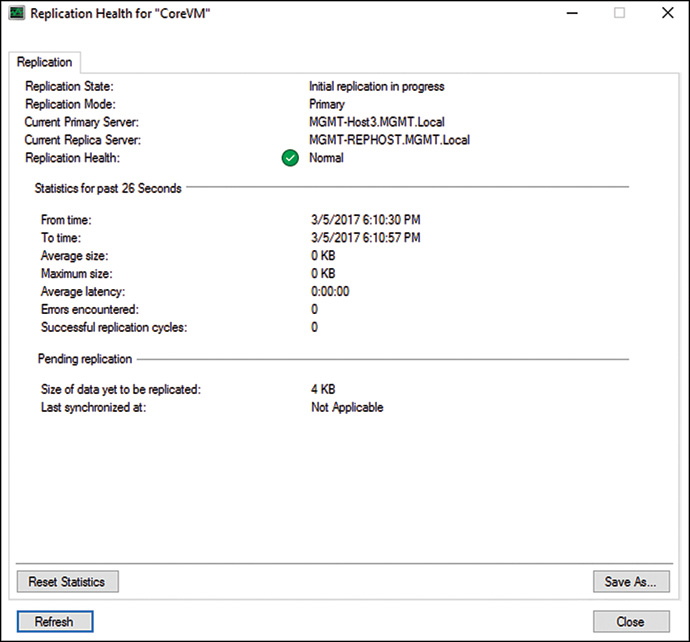
NOTE
If replication is working properly, the replication state will show Replication Enabled. Successful replication cycles will show several successful replications, and pending replication will be minutes of information (not days of information queued up still pending replication).
Planned Failover from Source to Destination Hyper-V Replica
To failover a guest session to another site, a planned failover, follow these steps:
1. In the Hyper-V Manager console on the source server, right-click the guest session that you want to failover to the destination server and choose Replication, Planned Failover.
2. Review the prerequisites for a planned failover, as shown in Figure 35.17. Pre-requisites include shutting down the source server. Click Fail Over to initiate the failover process.

The guest session will failover from primary server to destination server and still start up as soon as the session fails over.
Unplanned Failover to Destination Hyper-V Replica
In the event of a failure event where the source server is nonresponsive, or the site is nonresponsive, and the organization needs to failover to the destination server, follow these steps:
1. In the Hyper-V Manager console on the destination server, right-click the guest session that you want to failover to the destination server and choose Replication, Failover.
2. A warning appears that notes that data may be lost because the last replication data has not transferred. Review the warning, as shown in Figure 35.18. Click Fail Over to initiate the failover process.

NOTE
In an unplanned failover, the latest replica of the source server is used as the initial state of the recovered server. Some data will be lost, specifically any data from the last snapshot. Validate the state of lost information and its potential impact on the integrity of the system. For traditional file servers, relatively static web servers, and systems that have minimal replication, the loss of data will likely not be a problem for the organization. However, for SQL database servers, transaction servers, messaging servers, and systems where data integrity is highly critical, the use of Hyper-V replication for those instances needs to be considered.
Options in Hyper-V Replication Failover
In a Hyper-V replication failure state, you have several different options. Depending on the state of the replication, it is critical to understand the impact. Review these options carefully before proceeding with one or another state because data loss will occur. It is best to test the assumed process in a lab before initiating a failover and failover recovery so that it is clear what the results will be and what data may potentially be lost in the process.
Assuming a guest session on Server A was replicating to Server B, and the connection between the two servers failed (WAN break, Internet connection failure, either Server A or Server B rebooted, or temporarily went down), when the servers are back up and running and connection state has resumed, if Server A was not failed over to Server B, the administrator can simply go to Server A (the source server), right-click Replication, and choose Resume Replication. Replication then picks up where it left off, continuing to replicate from Server A to Server B. It might take some time for replication to catch up and for Server B to have a full updated set of data if Server A continued to operate for a long period of time while users continued to access Server A as normal. But no data would have been lost, and once Server B catches up for replication, it’ll be available to be a failover destination target server.
In the situation where Server A failed for some period of time and Server B was manually brought online as a forced failover, all transactions on Server A that weren’t flushed to Server B would have been lost. This might be a few minutes of data; it all depends on the replication timing and how long it was before Server B was brought online. In the situation where Server A will never be turned on again (that is, server crashed, site burned down, site will never be recoverable), the data loss might be better than nothing. Server B can be brought online and operational. In this state, once a new server is built up (call it Server C), replication can be removed on Server B, including recovery points, and replication from Server B to Server C can be initiated.
If Server A failed for some period of time and Server B was manually brought online as a forced failover, and Server B came online temporarily, but the organization wants to just go back to Server A and resume replication, the administrator can Cancel Failover on Server B and the Resume Replication on Server A. Any data that was temporarily written to Server B will be lost. Server A will resume replication.
If Server A is failed over to Server B, and Server B is forced to be the main server, data written to Server A that didn’t make it over to Server B in a replication cycle is invalid and lost. Server B would run for a period of time, and when Server A comes back online, Server A can be set to Remove Replication, and then on Server B, replication can be set to Reverse Replication. This causes Server B to replicate to Server A, effectively overwriting what was on Server A with whatever is new in Server B.
Hyper-V replication is very powerful and provides an “in-the-box” solution for site-to-site failover and recovery. As with any high-availability or disaster recovery solution, knowing exactly how it performs and testing the process is critical so that information is not accidentally lost when a process is initiated that deletes data that might otherwise be recoverable at a later date.
NOTE
When replicating between source and destination servers, one way to improve replication performance and eliminate unnecessary changes from source to destination servers is to exclude the pagefile.sys from replication. The pagefile is the size of memory of the server, which could be 8GB or 16GB or more in size. The pagefile changes as the contents of the server memory changes. But when it comes to real data in site-to-site failover, the pagefile is unnecessary for replication. Unfortunately there is no way to individually eliminate the pagefile from replication, so the way to eliminate the pagefile is to create a separate VHD, place the pagefile on that VHD, and replicate the VHD that has just the Windows, applications, and data, not the pagefile.
Hyper-V Containers in Windows Server 2016
Containers differ from the traditional VM that IT professionals are used to deploying. VMs are completely segmented, virtualized instances of hardware and operating systems that run applications. Defined within them are virtual hard disks, unique operating systems, virtual memory, and virtual CPUs.
With containers, the parent OS is shared, so all application instances would need to support the OS of the parent as shown in Figure 35.19.
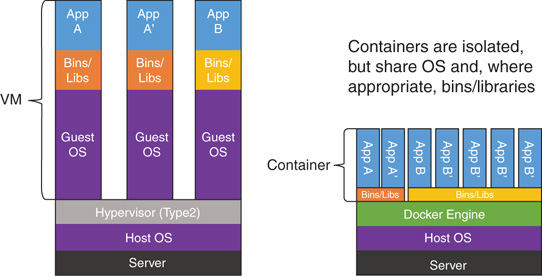
Windows Containers include two different container types, or runtimes:
![]() Windows Server Containers—These provide application isolation through process and namespace isolation technology. A Windows Server container shares a kernel with the container host and all containers running on the host.
Windows Server Containers—These provide application isolation through process and namespace isolation technology. A Windows Server container shares a kernel with the container host and all containers running on the host.
![]() Hyper-V Containers—These expand on the isolation provided by Windows Server Containers by running each container in a highly optimized virtual machine. In this configuration, the kernel of the container host is not shared with the Hyper-V Containers (Figure 35.20).
Hyper-V Containers—These expand on the isolation provided by Windows Server Containers by running each container in a highly optimized virtual machine. In this configuration, the kernel of the container host is not shared with the Hyper-V Containers (Figure 35.20).
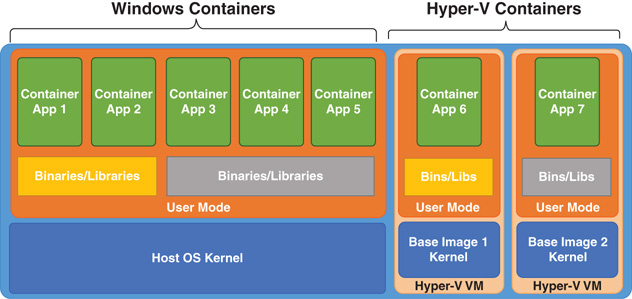
There are two challenges with Windows Server Containers that may cause a problem in certain environments:
![]() Not enough isolation since the isolation is at user-mode meaning a shared kernel. In a single tenant environment where applications can be trusted, this is not a problem, but in a multi-tenant environment, a bad tenant may try to use the shared kernel to attack other containers.
Not enough isolation since the isolation is at user-mode meaning a shared kernel. In a single tenant environment where applications can be trusted, this is not a problem, but in a multi-tenant environment, a bad tenant may try to use the shared kernel to attack other containers.
![]() There is a dependency on the host OS version and even patch level that may cause problems if a patch is deployed to the host that then breaks the application.
There is a dependency on the host OS version and even patch level that may cause problems if a patch is deployed to the host that then breaks the application.
This is where Hyper-V Containers can be used. Hyper-V Containers use the base image defined for the application and automatically creates a Hyper-V VM using that base image. Inside that VM are the various binaries, libraries, and the application inside a Windows Container—and that is a critical point. Hyper-V Containers are still using Windows Containers within the VM. The only difference is the Windows Container is now running inside a Hyper-V VM that provides kernel isolation and separation of the host patch/version level from that used by the application. The application is containerized using Windows containers and then at deployment time you pick the level of isolation required by choosing a Windows or Hyper-V Container.
Windows Docker Containers
Application virtualization separates the applications from the hardware (virtual or physical) by creating containerized instances of those individual applications. To manage containers, it is important to understand the relationship of Microsoft Windows Containers and Docker. Docker, an open-source container management suite, provides everything that an application needs to run including the system library and code. Docker has also become a household name in the container ecosystem as they created a common toolset for Linux-based packaging and a deployment of applications to any Linux host. Docker Containers ensure that the applications can run consistently, regardless of the environment, as long as the environment was Linux.
Within Windows Server 2016, Docker and Microsoft are working together to provide the same consistent experience across both the Linux and Windows ecosystem. Windows Server 2016 will extend functionality to run Docker on Windows.
With the introduction of Windows Server Containers and Hyper-V Containers, Docker becomes even more useful because you can use it to manage Docker containers on Windows as well as the traditional Linux environment.
The Docker runtime engine works as an abstraction on top of Windows Server Containers and Hyper-V Containers. Docker provides all of the necessary tooling to develop and operate its engine on top of Windows Containers, be it Hyper-V Containers or Windows Server Containers. This will afford the same flexibility of developing an application in one container and being able to run it truly anywhere, as shown in Figure 35.21.
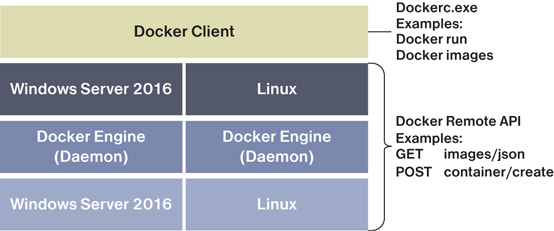
The Docker engine runs at the same level in either a Windows Server Container or Linux Container environment, and it can run with Windows Server or Linux above the Docker engine. The Docker client connects to any Docker engine and provides a consistent management experience for the end user.
Build and run your first Windows Docker
This exercise walks through basic deployment and use of the Windows container feature on Windows Server. After completion, you will have installed the container role and have deployed a simple Windows Server container.
After Windows Server 2016 is running, log in and run Windows Update to ensure you have all the latest updates.
1. Install Container Feature.
The container feature needs to be enabled before working with Windows containers. To do so, run the following command in an elevated PowerShell session:
Install-WindowsFeature containers
When the feature installation has completed, reboot the computer.
Restart-Computer -Force
2. Install Docker
Docker is required in order to work with Windows containers. Docker consists of the Docker Engine and the Docker client. Both will be installed.
3. Download the release candidate of the Commercially Supported Docker Engine and client as a .zip archive.
Invoke-WebRequest "https://download.docker.com/components/engine/windows-server/
cs-1.12/docker-1.12.2.zip" -OutFile "$env:TEMPdocker.zip" -UseBasicParking
4. Expand the .zip archive into Program Files.
Expand-Archive -Path "$env:TEMPdocker.zip" –DestinationPath
$env:ProgramFiles
5. Add the Docker directory to the system path.
#For quick use, does not require shell to be restarted.
$env:path += ";c:program filesdocker"
# For persistent use, will apply even after a reboot.
[Environment]::SetEnvironmentVariable("Path", $env:Path + ";C:Program Files
Docker", [EnvironmentVariableTarget]::Machine)
6. To install Docker as a Windows service, run the following:
dockerd.exe –register-service
7. After it’s installed, the service can be started.
Start-Service docker
8. Deploy your first Container.
You will download a pre-created .NET sample image from the Docker Hub registry and deploy a simple container running a .Net Hello World application.
User docker run to deploy the .Net container. This will also download the container image which may take a few minutes.
docker run Microsoft/sample-dotnot
The container will start, prints the hello world message, and then exit. That’s all that there is to the docker run command.
Summary
Windows Server virtualization has come a long way in just a few short years, and even further since Windows Server 2008 was released. With Windows Server 2016, virtualization provides organizations with a way to consolidate server applications onto a fewer number of virtual server systems and provide enterprise-level high availability and fault tolerance. Key to the release of Windows Server Hyper-V is the ability to perform live migrations without a SAN, reducing failover times from minutes to nearly instantaneous. This technology competes directly with other competitors, such as VMware, head-to-head, but at a much lower cost.
Virtualization Windows Server 2016 enables you to host Windows server, Windows client, and non-Windows guest sessions and consolidate dozens of physical servers into a single virtual server system. By adding additional virtual server systems to an enterprise, an organization can drastically reduce the number of physical servers it has, plus provide a method of implementing server redundancy, clustering, and disaster recovery without the need to double the number of physical servers the organization requires to provide better computing services to the organization.
![]() Plan for the number of virtual guest sessions you plan to have on a server to properly size the host system with respect to memory, processor, and disk requirements.
Plan for the number of virtual guest sessions you plan to have on a server to properly size the host system with respect to memory, processor, and disk requirements.
![]() Have the installation media and license keys needed for the installation of the guest operating system handy when you are about to install the guest operating system session.
Have the installation media and license keys needed for the installation of the guest operating system handy when you are about to install the guest operating system session.
![]() Apply all patches and updates on guest sessions soon after installing the guest operating system, just as you would for the installation of updates on physical systems.
Apply all patches and updates on guest sessions soon after installing the guest operating system, just as you would for the installation of updates on physical systems.
![]() For Microsoft Windows guest sessions, install the Windows add-in components to improve the use and operation of the guest session.
For Microsoft Windows guest sessions, install the Windows add-in components to improve the use and operation of the guest session.
![]() After installing the guest session and its associated applications, confirm whether the memory of the guest session is enough and adjust the memory of the guest session accordingly to optimize the performance of the guest session.
After installing the guest session and its associated applications, confirm whether the memory of the guest session is enough and adjust the memory of the guest session accordingly to optimize the performance of the guest session.
![]() Allocate enough disk space to perform snapshots of images so that the disk subsystem can handle both the required guest image and the associated snapshots of the guest session.
Allocate enough disk space to perform snapshots of images so that the disk subsystem can handle both the required guest image and the associated snapshots of the guest session.
![]() Consider using snapshots before applying major patches, updates, or upgrades to an image session to allow for a rollback to the original image.
Consider using snapshots before applying major patches, updates, or upgrades to an image session to allow for a rollback to the original image.
![]() Consider Live Migration rather than Quick Migration to quickly migrate virtual servers between hosts with little to zero downtime.
Consider Live Migration rather than Quick Migration to quickly migrate virtual servers between hosts with little to zero downtime.
![]() Ensure that the hardware used in Live Migration is on the Windows Server 2016 compatibility list and is using the same Intel or AMD platform.
Ensure that the hardware used in Live Migration is on the Windows Server 2016 compatibility list and is using the same Intel or AMD platform.
![]() Use Cluster Shared Volumes for Hyper-V live migration clusters and consider using the new Hyper-V over SMB replication for lower-cost (non-SAN required) failovers.
Use Cluster Shared Volumes for Hyper-V live migration clusters and consider using the new Hyper-V over SMB replication for lower-cost (non-SAN required) failovers.
![]() Configure Windows Failover Cluster before adding shared storage, which will be provisioned as CSVs.
Configure Windows Failover Cluster before adding shared storage, which will be provisioned as CSVs.
![]() For Live Migration nodes, change the default location to store virtual machines to either a Cluster Shared Volume path or a SMB share path that is accessible by all Hyper-V cluster nodes.
For Live Migration nodes, change the default location to store virtual machines to either a Cluster Shared Volume path or a SMB share path that is accessible by all Hyper-V cluster nodes.
![]() Ensure that both the virtual machine configuration file and its associated VHD files reside in the CSV folder location for live migration virtual machines.
Ensure that both the virtual machine configuration file and its associated VHD files reside in the CSV folder location for live migration virtual machines.
![]() Use Hyper-V replication for site-to-site replication of Hyper-V guest sessions for improved site redundancy.
Use Hyper-V replication for site-to-site replication of Hyper-V guest sessions for improved site redundancy.
![]() Test Hyper-V replication for failover and failback scenarios in a test environment before performing the replication in a live production environment on live data so that the results are clear and understandable before initiating any failover, re-replication, reverse replication, or the like.
Test Hyper-V replication for failover and failback scenarios in a test environment before performing the replication in a live production environment on live data so that the results are clear and understandable before initiating any failover, re-replication, reverse replication, or the like.