CHAPTER 12
Server-Level Security
IN THIS CHAPTER
![]() Defining Windows Server 2016 Security
Defining Windows Server 2016 Security
![]() Using the Integrated Windows Firewall with Advanced Security
Using the Integrated Windows Firewall with Advanced Security
![]() Using Windows Server Update Services
Using Windows Server Update Services
With the cloud and virtualization going mainstream, and with hybrid cloud/customer premise integration popping up everywhere, Windows Server 2016 needed to take server security to new levels.
Azure relies on strong authentication techniques to ensure that the networks and servers that have been hardened at customer locations do not become vulnerable through integration with cloud-based infrastructure. There is thus a reliance on public and private key pairs in Azure; the onsite and cloud-based public key infrastructure is now more critical a component than before; and we now also have Trusted Platform Module chips on the endpoints.
As mentioned in the earlier chapter on Active Directory, Active Directory Federation Services, Azure Active Directory, and Lightweight Directory Access Protocol (LDAP) are now more tightly integrated; as is access control and single sign-on.
PowerShell also brings new security features to Windows Server 2016. Just Enough Administration, which made its debut in 2014, is now on board. It allows you to apply more granular restrictions on users; thus limiting the damage when a hacker manages to take advantage of too-liberal security, of loopholes that open up through malevolence, or of work orders that fall through the cracks.
We also spoke about HTTP/2 in the previous chapter. The new support for this protocol includes denial-of-service protection, header compression, protocol block sizes, and flow control.
Many features from the previous versions, such as Core Edition, role-based installation, Windows Server Update Service, AppLocker, and many more, secure the operating system.
Windows Defender is up as soon as you install the operating system. It’s even up and running on the non-GUI editions before the OS can accept or initiate any connections.
As mentioned in Chapter 7, “Active Directory Infrastructure,” the telnet server is history. It has always been a risk to have this service on board. Like a back door on a house you want to keep locked, a telnet server always presents the risk that someone will open it because it’s there.
This chapter thus focuses on the server-side security mechanisms in Windows Server 2016. Advanced features such as the intelligent integrated firewall, dynamic access control, and BitLocker are explained in this chapter. Particular emphasis is placed on the importance of keeping servers up-to-date with security patches through such utilities as Windows Server Update Services, a key feature of Windows security. In addition, file-level security, physical security, and other critical server security considerations are presented.
Defining Windows Server 2016 Security
Security on the server level is one of the most important considerations for a network environment. Servers in an infrastructure not only handle critical network services, such as domain name system (DNS), Dynamic Host Configuration Protocol (DHCP), directory lookups, and authentication, but they also serve as a central location for most, if not all, critical files in an organization’s network. Subsequently, it is important to establish a server security plan and gain a full understanding of the security capabilities of Windows Server 2016.
Common Language Runtime
All Microsoft code is verified through a process called common language runtime. It processes application code and automatically checks for security holes that can be caused by mistakes in programming. In addition, it scrutinizes security credentials that are used by specific pieces of code, making sure that they perform only those actions that they are supposed to. Through these techniques, the common language runtime effectively reduces the overall threat posed to Windows Server by limiting the potential for exploitations and vulnerabilities.
Understanding the Layered Approach to Server Security
Security works best when it is applied in layers. It is much more difficult to rob a house, for example, if a thief not only has to break through the front door, but also has to fend off an attack dog and disable a home security system. The same concept applies to server security: Multiple layers of security should be applied so that the difficulty in hacking into a system becomes exponentially greater.
Windows Server 2016 seamlessly handles many of the security layers that are required, using Kerberos authentication, NTFS file security, and built-in security tools to provide for a great deal of security right out of the box. Additional security components require that you understand their functionality and install and configure their components. Windows Server 2016 makes the addition of extra layers of security a possibility and positions organizations for increased security without sacrificing functionality.
Deploying Physical Security
One of the most overlooked but perhaps most critical components of server security is the actual physical security of the server itself. The most secure, unbreakable web server is powerless if a malicious user can simply unplug it. Worse yet, someone logging interactively on to a critical file server could potentially copy critical data or sabotage the machine directly.
Physical security is a must for any organization because it is the most common cause of security breaches. Despite this fact, many organizations have poorly implemented physical security standards for their mission-critical servers. An understanding of what is required to secure the physical and logon access to a server is, consequently, a must.
Restricting Physical Access
Servers should be physically secured behind locked doors, in a controlled-access environment. It is unwise to place mission-critical servers at the feet of administrators or in similar unsecure locations. Rather, a dedicated server room or server closet that is locked at all times is the most ideal environment for the purposes of server security.
Most hardware manufacturers also include mechanisms for locking out some or all the components of a server. Depending on the other layers of security deployed, it might be wise to use these mechanisms to secure a server environment.
Restricting Logon Access
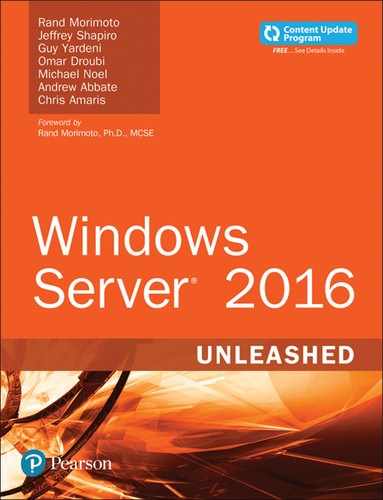
All servers should be configured to allow only administrators to physically log on to the console. By default, such use is restricted on domain controllers, but other servers such as file servers, utility servers, and the like must be configured to specifically forbid these types of logons. To restrict logon access, follow these steps:
1. Open Server Manager, select Tools, and then click the Local Security Policy option.
2. In the node pane, navigate to Security Settings, Local Policies, User Rights Assignment.
3. Double-click Allow Log On Locally.
4. Remove any users or groups that do not need access to the server, as shown in Figure 12.1. Click OK when you have finished.
NOTE
The Allow Log On Locally right can also be configured for an entire domain or organizational unit (OU) using a domain-based group policy, but that mechanism only allows granting users or groups the right rather than removing it. To prevent users or groups from logging on locally with a group policy, use the Deny log On Locally right. For more information about setting up these types of group policies, see Chapter 26, “Group Policy Management for Network Clients.”
Using Smart Cards for Logon Access
Increased security is provided for the logon process in secured infrastructures using so-called smart cards for logon access; these smart cards are fully supported in Windows Server 2016. A smart card can exist in multiple forms, commonly as a credit card-sized piece of plastic with an encrypted microchip embedded within or as a USB key. Each user is assigned a unique smart card and an associated PIN. Logging on to a workstation or server is as straightforward as inserting the smart card into a smart card reader and entering in the PIN, which can be a combination of numbers and letters, similar to a password.
Security can be tightened further by requiring that when the smart card is removed the user is automatically logged off the console. In this scenario, users insert into the smart card reader a smart card that is physically attached to their person via a chain or string. After entering their PIN, they log on and perform all necessary functions. Upon leaving, they just remove the smart card from the reader, which automatically logs them off the workstation. In this scenario, it is nearly impossible for users to forget to log off because they must physically detach themselves from the computer to leave.
Securing Wireless Networks
Wireless security has always been an issue, but recent trends in the proliferation of wireless networks have made it even more so. Most organizations are shocked to see the kind of damage that can be done to a network by an authorized person being able to connect via a network port. The deployment of wireless networks makes access much easier. An unsavory individual can simply pull up to the parking lot and access an organization’s local-area network (LAN) via a laptop computer and a standard wireless card. The standard security employed by many wireless networks, Wi-Fi Protected Access (WPA) is significantly better than past solutions, but is still unsecure, as is any solution using a pre-shared secret or key.
Controlling the network ports and securing network switches are common parts of an organization’s security policy. For organizations with deployed wireless networks, similar policies must be created and monitored to ensure the protection of wireless access to internal networks. Deployment of wireless networks protected using network access control with the 802.1x protocol vastly increases the security of the network. Microsoft uses 802.1x to secure its vast wireless network, and Windows Server 2016 fully supports the protocol.
For those organizations without the time or resources to deploy 802.1x, the simple step of placing wireless access points outside the firewall and requiring virtual private network (VPN) access through the firewall can effectively secure the wireless network. Even if trespassers were to break the shared key, they would be connected only to a public network, with no access to internal networks.
Firewall Security
Deployment of an enterprise firewall configuration is a must in any environment that is connected to the Internet. Servers or workstations directly connected to the Internet are prime candidates for hacking. Modern firewall implementations from third-party independent software vendors (ISV) offer advanced configurations, such as web proxying and demilitarized zone (DMZ) configuration, as well. Proper setup and configuration of a firewall in between a Windows Server 2016 network and the Internet is a must.
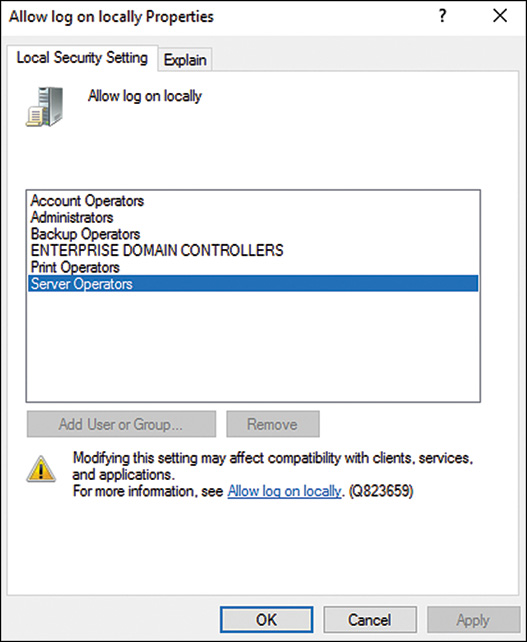
Using the Integrated Windows Firewall with Advanced Security
Windows Server 2016 includes a vastly improved integrated firewall that is turned on by default in all installations of the product. The firewall, administered from an MMC snap-in shown in Figure 12.2 (Server Manager, Tools menu, Windows Firewall with Advanced Security) gives unprecedented control and security to a server.
Understanding Windows Firewall Integration with Server Manager
The firewall with advanced security is fully integrated with the Server Manager utility and the Add Roles and Features Wizard. For example, if an administrator runs the Add Roles and Features Wizard and chooses to install file services, only then are those ports and protocols that are required for file server access opened on the server.
It is instinctual for most administrators to disable software firewalls on servers because they have caused problems with functionality in the past. This is not recommended in Windows Server 2016, however, because the product itself is tightly integrated with its firewall, and the firewall itself provides for a much greater degree of security than earlier versions of Windows Server provided.
Creating Inbound and Outbound Rules on the Windows Firewall
In certain cases, when a third-party application is not integrated with the firewall, or when needing to open specific individual ports, it might become necessary to create firewall rules for individual services to run properly. Both inbound rules, addressing traffic to the server, and outbound rules, addressing how the server can communicate out, can be created. Rules can be created based on the following factors:
![]() Program—A rule can be created that allows a specific program executable access. For example, you can specify that the C:Program FilesCustom Programmyprogram.exe file has full outbound access when running. The Windows Firewall program will then allow any type of connections made by that program full access. This can be useful in scenarios when a specific application server uses multiple varied ports, but the overall security that the firewall provides is still desired.
Program—A rule can be created that allows a specific program executable access. For example, you can specify that the C:Program FilesCustom Programmyprogram.exe file has full outbound access when running. The Windows Firewall program will then allow any type of connections made by that program full access. This can be useful in scenarios when a specific application server uses multiple varied ports, but the overall security that the firewall provides is still desired.
![]() Port—Entering a traditional UDP or TCP port into the New Rule Wizard is supported. This covers traditional scenarios such as “We need to open port 8787 on the server.”
Port—Entering a traditional UDP or TCP port into the New Rule Wizard is supported. This covers traditional scenarios such as “We need to open port 8787 on the server.”
![]() Predefined—Windows Server also has built-in predefined rules, such as those that allow AD DS, DFS, BITS, HTTP, and many more. The advantage to using a predefined rule is that Microsoft has done all the legwork in advance and so it becomes much easier to allow a specific service. Some predefined rules are not available unless the relevant role or feature are installed.
Predefined—Windows Server also has built-in predefined rules, such as those that allow AD DS, DFS, BITS, HTTP, and many more. The advantage to using a predefined rule is that Microsoft has done all the legwork in advance and so it becomes much easier to allow a specific service. Some predefined rules are not available unless the relevant role or feature are installed.
![]() Custom—The creation of custom rule types not covered in the other categories is also supported.
Custom—The creation of custom rule types not covered in the other categories is also supported.
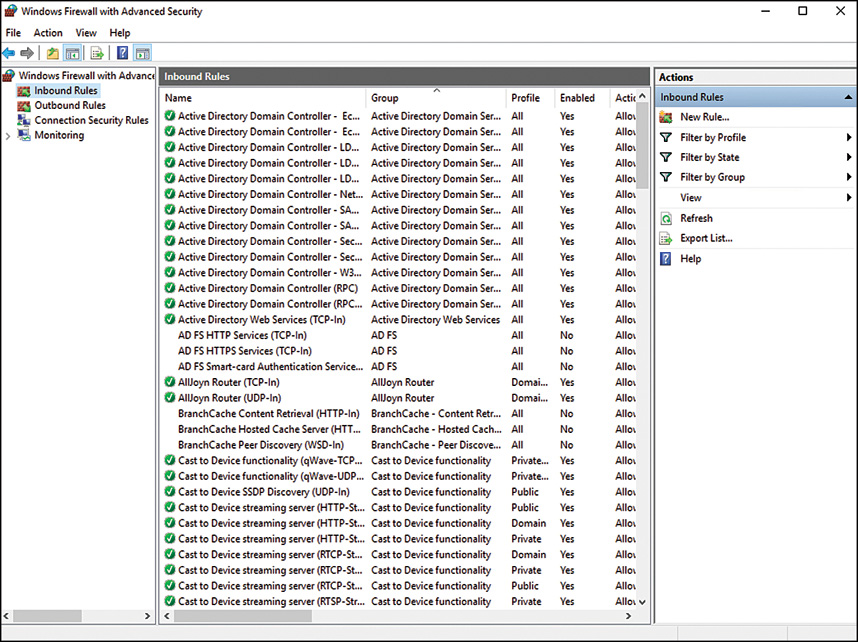
For example, the following procedure details the creation of an inbound rule to allow a custom application to use TCP port 8787 for inbound communication:
1. Open the Windows Firewall with Advanced Security management console (Server Manager, Tools menu, Windows Firewall with Advanced Security).
2. Click the Inbound Rules node in the node pane.
3. In the Actions pane, click the New Rule link.
4. On the Rule Type page of the New Inbound Rule Wizard, shown in Figure 12.3, select Port to create a rule based on the port, and then click Next to continue.
FIGURE 12.3 Creating a Port in the Rule Type section of the New Inbound Rule Wizard of Windows Firewall.
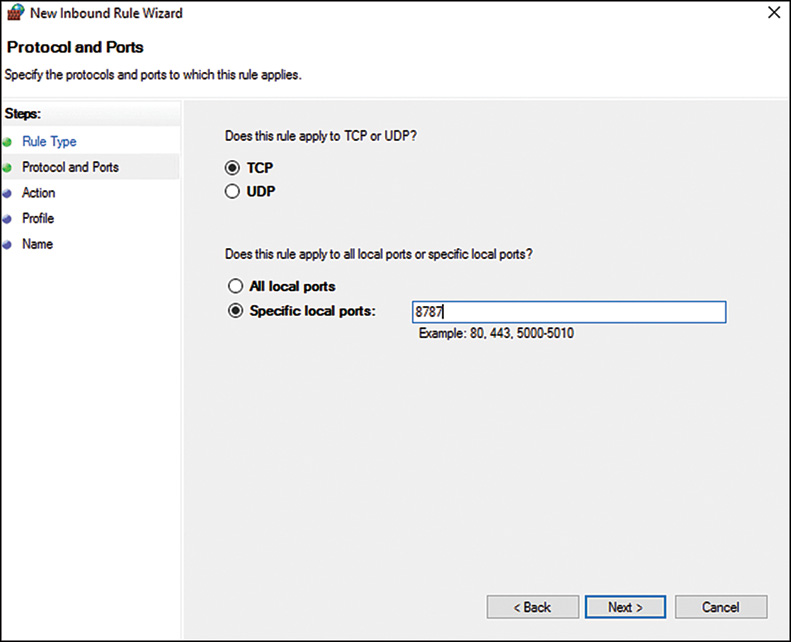
5. On the Protocol and Ports page, shown in Figure 12.4, select TCP, and enter 8787 in the Specific Local Ports field. Click Next to continue.
6. On the Action page, select Allow the Connection, and then click Next.
NOTE
The Action page of the New Inbound Rule Wizard also allows for a rule to be configured that only allows the connection if it is secured using IPsec technologies. For more about IPsec, see Chapter 13, “Securing Data in Transit.”
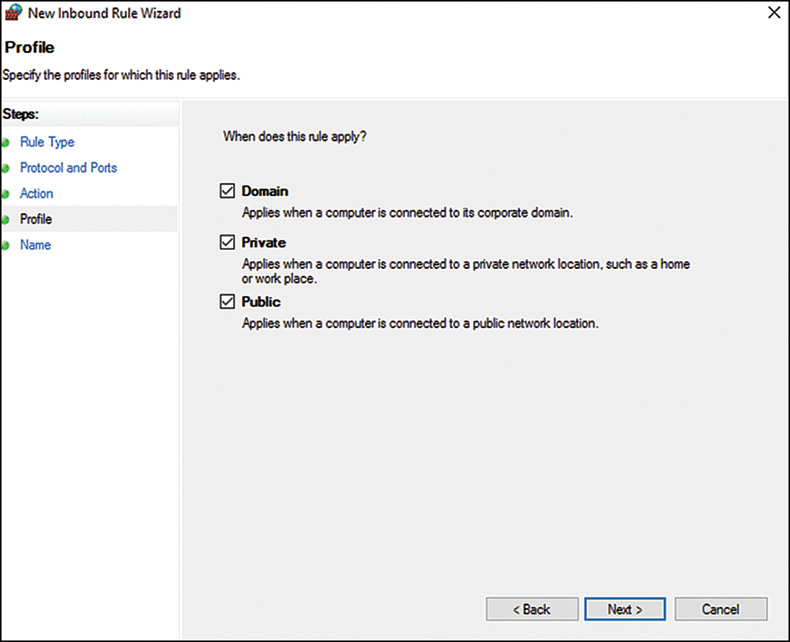
7. On the Profile page, shown in Figure 12.5, check all three check boxes. This enables an administrator to specify that a rule only applies when connected to specific networks. Click Next to continue.
8. Enter a descriptive name for the rule, and then click Finish.
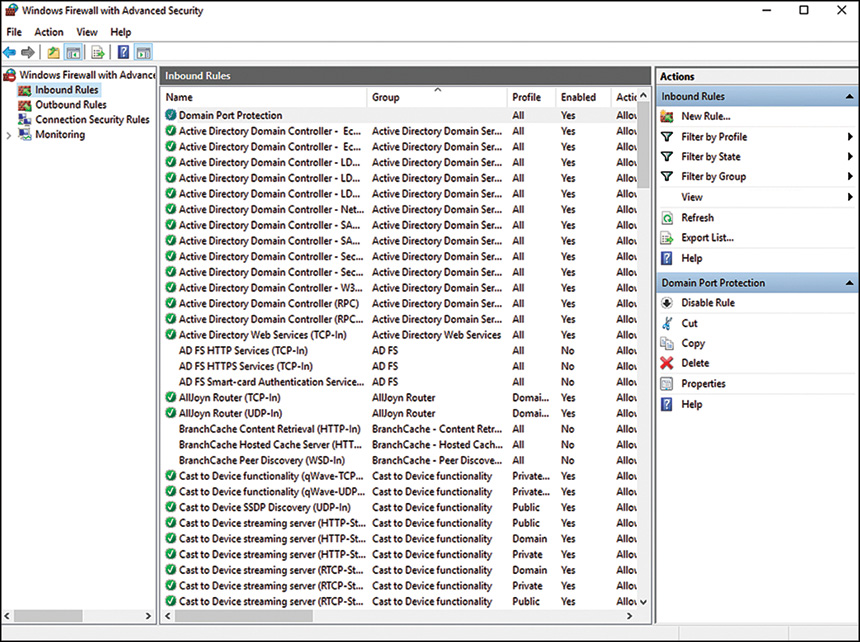
Review the rule settings in the Inbound Rules node, shown in Figure 12.6. This allows for a quick-glance view of the rule settings. You can also include a rule in a rule group, which allows for multiple rules to be tied together for easy on/off application.
Using the integrated Windows firewall is no longer just a good idea, it’s a vital part of the security of the product. The addition of the ability to define rules based on factors such as scope, profile, IPsec status, and the like further positions the Server OS as one with high levels of integrated security and control.
Hardening Servers
Earlier versions of Windows Server required a great deal of configuration after installation to “harden” the security of the server and ensure that viruses and exploits would not overwhelm or disable the server. The good news with Windows Server 2016 is that, by default, many less commonly used services are turned off. In fact, a fresh installation of Windows Server 2016 only has those services enabled that are vital for the OS to run properly, and everything else must be enabled, typically by adding roles and features using Server Manager. In addition, by default an intelligent firewall is enabled, and only those network services that absolutely needed are allowed through the firewall.
Therefore, in Windows Server 2016, it is important to first define which roles a server will use and then to turn on only those services that are necessary using Server Manager or PowerShell to automate the deployment and configuration of server roles and features.
Defining Server Roles
Depending on the size of an organization, a server might be designated for one or more system roles. Planning the roles deployment is an important and complex exercise that must take into account available hardware, role compatibility, anticipated workloads, a variety of best-practice guidelines, and security concerns. One tool that help provide flexibility and scalability in the design process is Hyper-V. The virtualization platform that is now a part of both Windows 10 client and Windows server 2016 provides an opportunity for organizations of every size to provision multiple guests on a small number of physical hosts.
Because any service that is enabled increases the overall risk, it is important to fully define which roles a server will take on so that those services can be properly configured and protected. Although these components can be set up manually, the process of turning on these services is streamlined through the use of Server Manager.
Securing a Server Using Server Manager
With the list of roles that a server will perform in hand, the ideal utility for installing these roles and securing them is the newly renovated Server Manager. By default, if a server is a DNS server but does not provide file and print services, Server Manager not only opens the ports required for DNS, but also blocks any file and print access to the server.
Windows Server 2016 Server Manager, shown in Figure 12.7, allows for individual roles to be installed on a server. After being installed, those roles are enabled, and the proper ports to run those roles are opened on the server.
Reducing Attack Surface
Windows Server 2016 installs with basic functionality and uses the server role management model to ensure that the attack surface of the system is as small as it can be while allowing the system to fulfill its function. Even in that basic functionality, however, there are features that impact attack surface and are not needed for many server environments. Features such as the GUI, Internet Explorer, or .NET applications are features that increase the attack surface of a system and are not always necessary for roles such as a file server or DNS server.
In addition to the familiar full-feature edition, also called the Server Graphical Shell, Windows Server 2016 provides several other minimalistic modes of operation. Each mode sacrifices some functionality to reduce the attack surface of the server. To assist with configuring the various modes of operation, two new features were introduced in Windows Server 2016: the Server Graphical Shell and the Graphical Management Tools and Infrastructure.
Removing the Server Graphical Shell feature transitions the system to the Minimal Server Interface, which doesn’t include a desktop or Windows Explorer but still includes PowerShell and a variety of graphical management tools. Some of these can be removed to further reduce the server attack surface.
To reduce the attack surface to a minimum, Windows 2008 introduced the Core Edition of the operating system, available as an option during installation. The Windows Server 2016 version includes some managed code, most importantly PowerShell and a subset of the .NET Framework. Windows Server 2016 version of Core Edition has the ability to install the Server Graphical Shell on the system, converting it to a full interface using the following PowerShell commands:
Import-Module Dism
Enable-WindowsOptionalFeature -online -Featurename
ServerCore-FullServer,Server-Gui-Shell,Server-Gui-Mgmt
The Core Edition is an excellent fit for several roles, including Hyper-V, Active Directory Domain Services, File Server, Print Server, and more. The Core Edition also represents a highly secure version of the platform that not only reduces the attack surface but also requires less resources and fewer patches and is simple to administer using remote tools and consoles.
AppLocker
A powerful security tool introduced with Windows Server 2008 R2 and expanded all the way to Windows Server 2016, AppLocker is a group policy–based component providing an application whitelisting feature set. Application whitelisting restricts software running on the system to a predefined list of allowed software (white list). The configuration and management of the list is based on granular business logic combining filenames, locations, unique hash values, and even digital signatures.
To provide additional support during deployments, AppLocker can be run in audit only mode, recording applications that would be blocked if the policy was enforced. The combination of audit mode, the inherent flexibility of group policies, and the limited set of required applications makes AppLocker a very efficient tool in protecting server against current and future threats.
Deploying AppLocker involves five steps:
1. Group servers by workload.
2. Create a GPO and scope to a server type.
3. Configure AppLocker rules and set to audit mode.
4. Monitor and review AppLocker audit logs.
5. Adjust rules and enable enforcement mode.
Each step is discussed in detail in the following sections.
Grouping Servers by Workload
Servers must be grouped to allow scoping of group policy objects to servers of a specific workload (file, print, SQL Server, Exchange, and so on). Some workload types, such as Exchange or Remote Desktop Services servers are at times grouped by OU, but using universal security groups is more flexible and easier to implement.
To support dynamic server environments, an automated script can be created to add the server to the correct group automatically based on deployed roles. Such a script could be attached to a virtual management and deployment platform such as System Center Virtual Machine Manager 2016 or an operational monitoring solution such as System Center Operations Manager 2016.
Creating a GPO Scoped to a Server Type
Using the groups created previously, follow this process to create a new GPO that is scoped only to a specific server group:
1. From the Server Manager Tools menu, run Group Policy Management. (If needed, the tools can be installed from the features list.)
2. Expand the nodes within the console until the servers OU is available. Right-click the servers OU and select Create a GPO in This Domain, and Link It Here.
3. Enter a name for the new GPO, such as AppLocker for File Servers, and then click OK.
4. Expand the OU and select the newly created GPO.
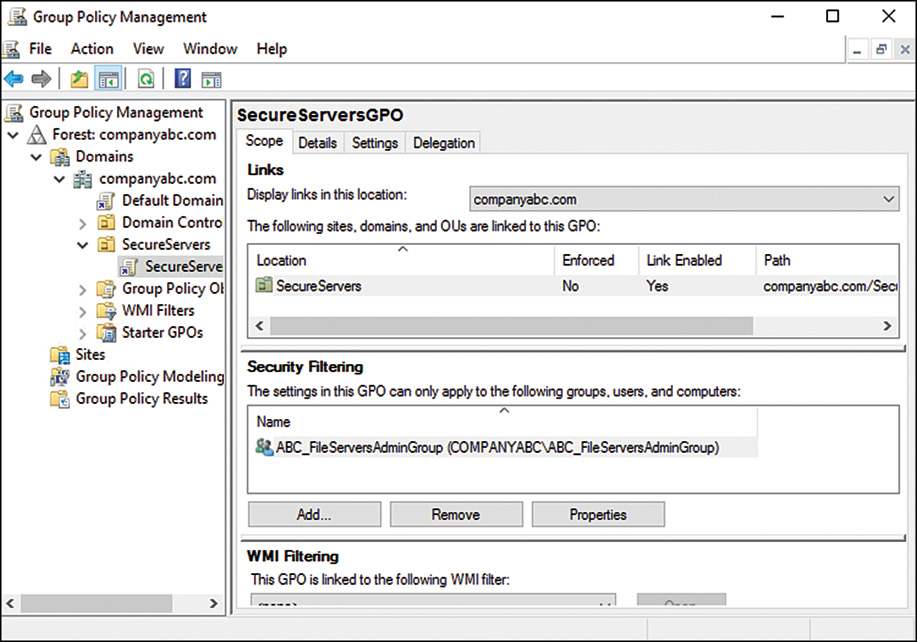
5. Open the Scope tab, and in the Security Filtering section, remove Authenticated Users from the delegate list.
6. Click Add and enter the name of the server group being configured (for instance, ABC_FileServers) and click OK.
Figure 12.8 shows the result.
Configuring AppLocker Rules for Audit Mode
After the GPO has been created using the steps outlined previously, the correct AppLocker policy must be configured as follows:
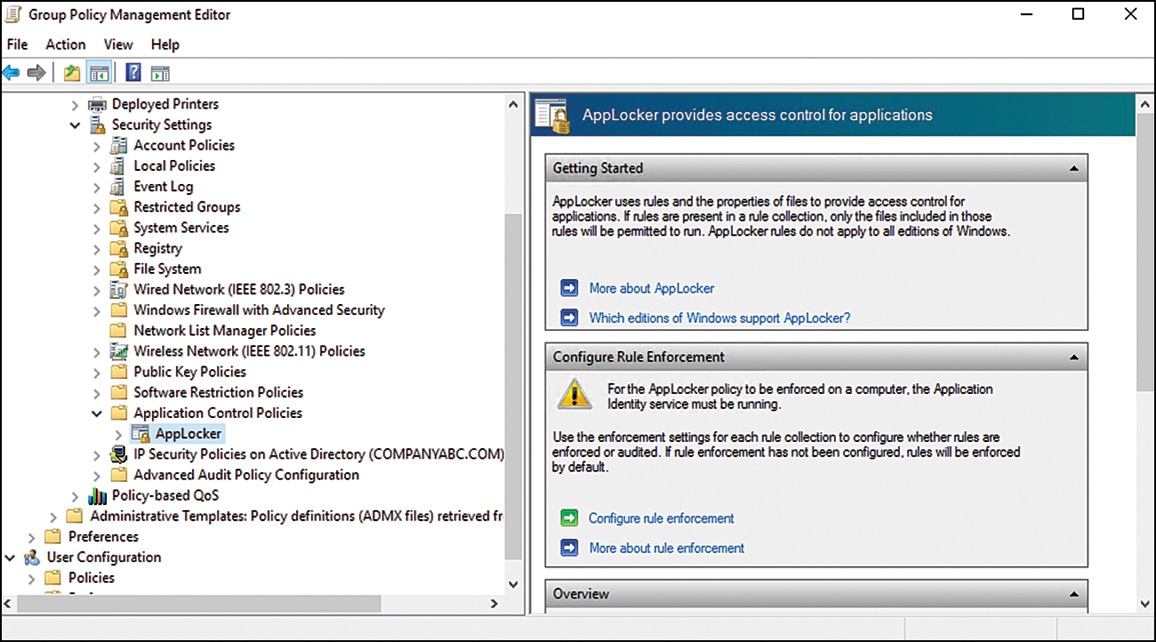
1. Within the Group Policy Management console, right-click the newly created AppLocker policy and select Edit.
2. Navigate to Computer ConfigurationPoliciesWindows SettingsSecurity Settings Application Control PoliciesAppLocker as shown in Figure 12.9.
3. Under the AppLocker container, four containers correspond to the four different rule types supported by AppLocker. Select the appropriate container, and then right-click it and select one of the following options:
![]() Create New Rule—The first and most commonly used option allows the manual configuration of a rule.
Create New Rule—The first and most commonly used option allows the manual configuration of a rule.
![]() Automatically Generate Rules—A wizard-based configuration import based on the existing configuration or files and folders.
Automatically Generate Rules—A wizard-based configuration import based on the existing configuration or files and folders.
![]() Create Default Rules—A default set of rules to allow access to commonly used files such as those in the Windows or Program Files folder.
Create Default Rules—A default set of rules to allow access to commonly used files such as those in the Windows or Program Files folder.
These options can be used to create allow or deny rules for specific users or group on selected files or folders based on digital signature (publisher, product, filename, or version), filename, or file hash. The rules can be configured in one of these four categories:
![]() Executable rules—These rules can allow or deny specific executables (*.EXE and *.COM) or folders.
Executable rules—These rules can allow or deny specific executables (*.EXE and *.COM) or folders.
![]() Windows Installer rules—These rules allow or deny the use of a specific windows installer files (*.MSI and *.MSP) or folders.
Windows Installer rules—These rules allow or deny the use of a specific windows installer files (*.MSI and *.MSP) or folders.
![]() Script rules—These rules allow or deny the use of a specific windows installer files (*.PS1, *.BAT, *.JS, *.CMD, and *.VBS).
Script rules—These rules allow or deny the use of a specific windows installer files (*.PS1, *.BAT, *.JS, *.CMD, and *.VBS).
![]() AppX rules (Packaged app rules)—These rules allow or deny the use of specific Windows Metro-based AppX packages based on digital signature only.
AppX rules (Packaged app rules)—These rules allow or deny the use of specific Windows Metro-based AppX packages based on digital signature only.
To configure audit mode, follow these steps:
1. Within the Group Policy Management Editor, right-click the AppLocker container and select Properties.
2. On the Enforcement tab, check the check boxes to enable the required rule types.
3. For each selected rule type, extend the pull-down list and select the Audit Only option.
And finally, to start the Application Identity service on all scoped servers, follow these steps:
1. Within the Group Policy Management Editor, navigate to Computer Configuration PoliciesWindows SettingsSecurity SettingsSystem Services
2. Double-click the Application Identity service and check Define This Policy Setting check box.
3. Set the startup mode to Automatic and click OK.
NOTE
In many environments, there are a large variety of server workloads, and many servers will end up with a unique AppLocker ruleset. As a result, it can be tempting to configure AppLocker rules using the local policy. This approach should be reserved for servers that are not members of a domain because this approach is more difficult to manage, nearly impossible to audit, and scales poorly.
Monitoring and Reviewing AppLocker Audit Logs
With the rules running in audit mode, the server’s event logs should be reviewed to confirm that required applications are not within the configuration of the policy before activating enforcement.
AppLocker events appear in a set of dedicated event logs based on the rule types used. You can find all the event logs in Event Viewer under Applications and Services LogsMicrosoftWindowsAppLocker. Event IDs 8002–8007 in each event log should provide information about file that were allowed (IDs 8002 and 8005) and those that were allowed but would have been blocked (8003 and 8006).
Adjusting Rules and Enabling Enforcement Mode
The final step in the implementation is to revise the rules as necessary based on the monitor phase and enable enforcement mode.
Based on the audit logs reviewed in the previous phase, rules should be modified to include necessary files, expand allowed digital certificates, or deny access to untrusted sources. A thorough testing cycle should follow each rule change to confirm the desired result.
When the ruleset is finalized, the following process activates enforcement for the current configuration:
1. Within the Group Policy Management Editor, right-click the AppLocker container and select Properties.
2. On the Enforcement tab, for each selected rule type, extend the pull-down list and select the Enforce Rules option.
NOTE
You can use the Advanced tab to activate the DLL rule collection. This feature can have a significant impact on performance and can be very complex to configure correctly. As a result, DLL protection should be used only when necessary and after the effects have been understood and tested.
Using Administration-Only Accounts with Run As
High-privilege administration accounts represent a security challenge. The use of these accounts as primary network accounts for routine tasks and workstation login greatly increases the challenge. The potential damage of an administrator making a mistake while performing routine tasks or of an intruder gaining access to a system with administrative credentials that was left unattended can be significant.
For this reason, it is wise to consider a logon strategy that incorporates the Run as Different User and Run as Administrator commands that are embedded in Windows Server 2016. Essentially, this means that all users, including IT staff, log on with restricted, standard user accounts. When administrative functionality is required, IT support personnel can invoke the tool or executable by using the Run as Different User or Run as Administrator commands, which effectively gives that tool administrative capabilities. If an administrator leaves a workstation console without logging off, the situation is not critical because the console will not grant an intruder full administrator access to the network.
When using a two account logon model, application behavior will differ depending on application security requirements:
Applications that support User Account Control (UAC) prompt the user for credentials when requiring elevation.
UAC-aware applications that do not always require elevation can be executed in elevated mode by right-clicking the application and selecting Run as Administrator.
Applications that do not support UAC or that require elevated network credentials can be executed by holding down the Shift key, right-clicking the application, and selecting Run as Different User.
And, of course, applications that do not require elevation will execute as always.
The following example illustrates how to invoke the Computer Management console using the Run as Different User command from the GUI:
1. Click the blue Start icon at the bottom-left corner of the taskbar, next to Cortana, and select All Apps at the bottom of the menus, under the Power icon.
2. When the list of applications appears, scroll down to the application group holding the application you want to configure.
3. Find the application, right-click it, click More, and then select Run as Administrator.
In addition to the manual method of using Run as Different User, an administrator’s desktop can be configured to have each shortcut automatically run as a computer administrator (Figure 12.10). For example, the Active Directory Users and Computers MMC snap-in can be set to permanently run with elevated privileges as follows:
1. Click the blue Start icon at the bottom-left corner of the taskbar, next to Cortana, and select All Apps at the bottom of the menus, under the Power icon.
2. When the list of applications appears, scroll down to the application group holding the application you want to configure; find the application, right-click it, click More, and then select Open File Location. File Explorer opens to the location of the shortcut to the application and selects it for you.
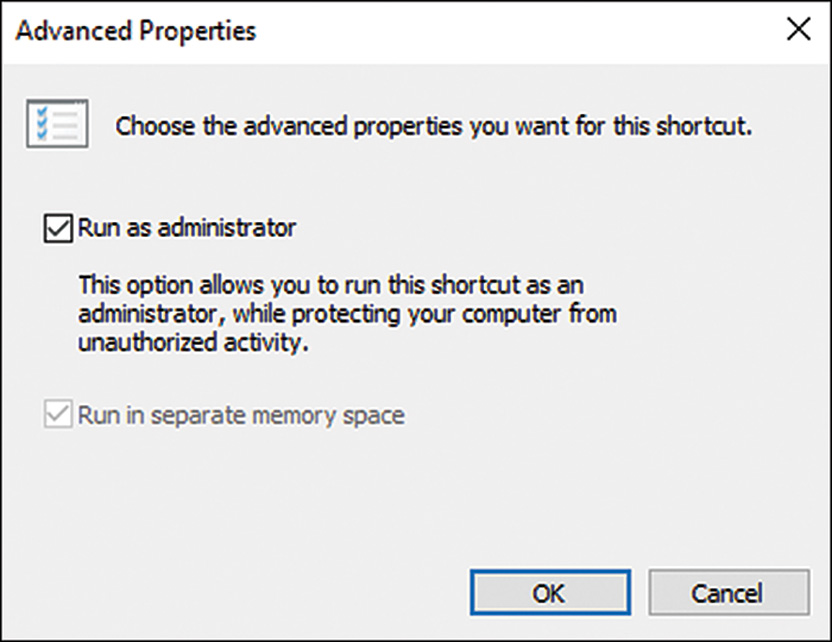
3. Right-click the shortcut and select Properties from the drop-down menu.
4. On the Shortcut tab of the Properties dialog box, click the Advanced button. The Advanced Properties dialog box opens with an option to choose Run as Administrator.
5. Check Run as Administrator and then click OK.
Ironically, administrative access is sometimes required to be able to change some of the shortcut properties. Consequently, you might need to log on as a user with higher privileges to set up the shortcuts on other users’ profiles.
Examining File-Level Security
Files secured on Windows Server 2016 are only as secure as the permissions that are set on them. Subsequently, it is good to know that Windows Server 2016 does not grant the Everyone group full control over share-level and NTFS-level permissions. In addition, critical operating system files and directories are secured to disallow their unauthorized use.
Despite the overall improvements made, a complete understanding of file-level security is recommended to ensure that the file-level security of a server is not neglected, especially for those servers hosting the file server role.
Understanding File System Security
Windows Server 2016 introduced a new file system, ReFS, or Resilient File System. The file system is backward compatible with NTFS. In fact, because the focus of the updated file system is data integrity, scalability, reliability, and ease of management, security mechanisms are largely unchanged from the earlier version of the product.
Each object that is referenced in ReFS, which includes files and folders, is marked by an access control list (ACL) that physically limits who can and cannot access a resource. File and folder permissions utilize this concept to strictly control read, write, and other types of access on files.
File servers should make judicious use of file-level and folder-level permissions, and all directories should have their permissions audited to determine whether there are any unexpected entries or unprotected resources in the permission set. Changing ReFS permissions in Windows Server 2016 is a straightforward process. Just follow these steps:
1. Right-click the folder or file onto which the security will be applied and choose Properties.
2. Open the Security tab.
3. Click the Advanced button.
4. Click the Disable Inheritance button.
5. Click Remove All Inherited Permissions from This Object when prompted about the application of parent permissions.
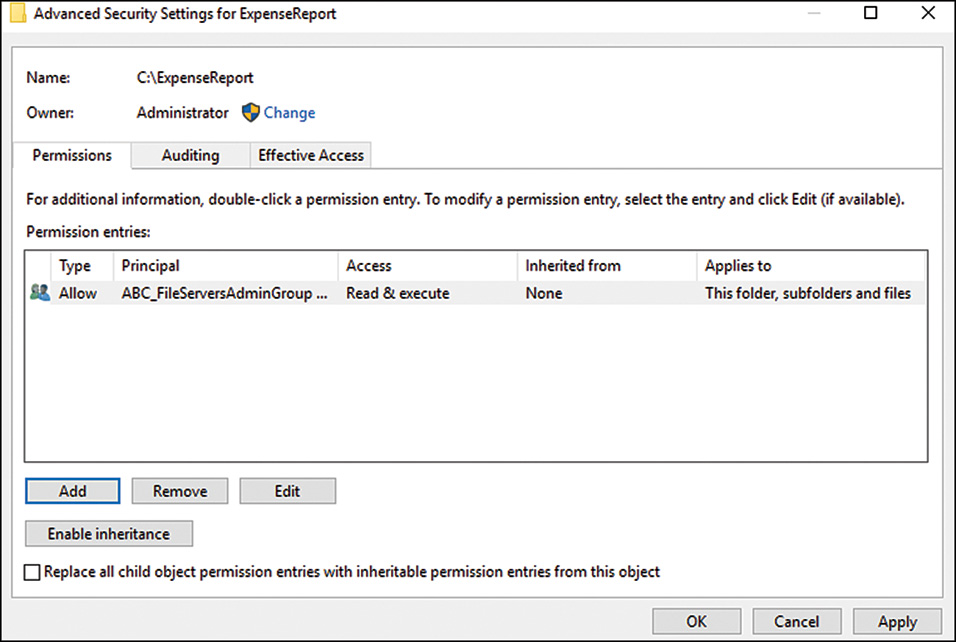
6. While you’re in the Advanced Security Settings dialog box, use the Add button to give access to the groups/users who need access to the files or folders.
7. Check the Replace All Child Object Permissions with Inheritable Permissions from This Object check box, as shown in Figure 12.11, and then click OK.
8. When prompted about replacing security on child objects, click Yes to replace child object security and continue.
9. Click OK and then click OK again to close the property pages.
Dynamic Access Control
A more modern approach to managing file system permissions was introduced in Windows Server 8. Dynamic access control introduced a new format to ACLs on files and folders, one that can include expressions. The expressions are based on three components:
![]() User/device claims—These properties of users and devices are stored in the token, making them as fast to verify as group membership. The properties can represent any claims that the user or device make about themselves. For example:
User/device claims—These properties of users and devices are stored in the token, making them as fast to verify as group membership. The properties can represent any claims that the user or device make about themselves. For example:
User.Department = “Human Resources”
User.Role = “Executive”
Device.Location = “Los Angeles”
Device.Type = “Desktop”
![]() Resource properties—Specific properties associated with protected resources (files and folders), typically used to classify the data. For example:
Resource properties—Specific properties associated with protected resources (files and folders), typically used to classify the data. For example:
Resource.Sensitivity = “High”
Resource.Location = “Los Angeles”
![]() Permissions—The familiar permissions available in standard ACLs, including whether the entry is an allow or a deny.
Permissions—The familiar permissions available in standard ACLs, including whether the entry is an allow or a deny.
A resulting access policy might look like this:
Apply To: $Resource.Sensitivity="High" | Allow Read/Write | If
{$User.Role = "Executive"} and {$Device.Type = "Desktop"}
The use of dynamic access control requires an initial investment in data classification and access validation. For many organizations, this effort has already begun because of regulatory requirements. The result is a structure that reduces administration, improves overall security, and facilitates auditing and oversight. For more information about dynamic access control, see Chapter 28, “File System Management and Fault Tolerance.”
Examining Share-Level Security
Most data on Windows file servers is accessed using a share. The share is a network alias assigned to a folder (for example, \filemarketing). Shares can also be assigned security settings for access control. These share-level permissions are a legacy component left over from legacy file systems that did not support file and folder permissions (for example, FAT, FAT32). As a result, they are an outdated implementation and poor control and granularity. In many situations, share permissions only serve to make troubleshooting more complex, and data is secured with file-level permissions only. However, for more sensitive systems or shares, it may be prudent to use both layers of protection in case of an error in configuration that removes a layer of security.
Auditing File Access
A good practice for file-level security is to set up auditing on a particular server, directory, or file. Auditing on ReFS volumes enables administrators to be notified of who is accessing, or attempting to access, a particular directory. For example, it might be wise to audit access to a critical network share, such as a finance folder, to determine whether anyone is attempting to access restricted information.
NOTE
Audit entries are another example of security settings that can be automatically set via security templates in Windows Server 2016. It is wise to consider the use of security templates to more effectively control audit settings.
The following steps illustrate how to set up simple auditing on a folder in Windows Server 2016:
1. Right-click the folder or file onto which the auditing will be applied, and choose Properties.
2. Open the Security tab.
3. Click the Advanced button.
5. Using the Add button, enter all users and groups that will be audited. If you’re auditing all users, enter the Everyone group.
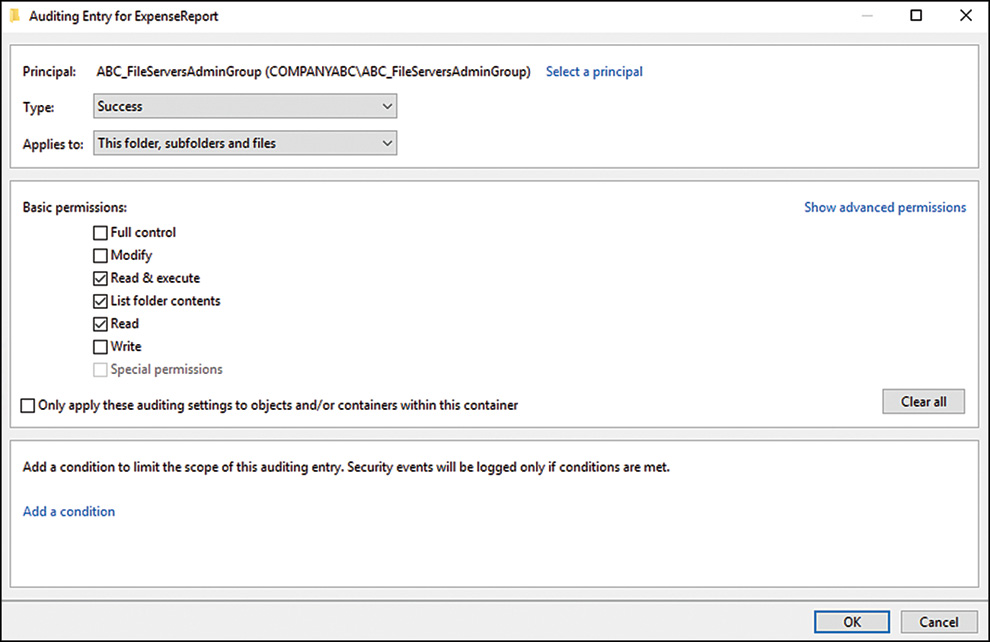
6. On the Auditing property page, select all types of access that will be audited. If you’re auditing for all success and failure attempts, select all the options, as indicated in Figure 12.12.
7. Click OK to apply the settings.
8. Click OK twice to save the settings.
NOTE
An effective way of catching “snoops” in the act is to create serious-looking shares on the network, such as Financial Statements, Root Info, or similar such shares, and audit access to those folders. This mechanism, known as a honeypot, has been successfully used to identify internal (or external) saboteurs before they could do some serious damage.
Encrypting Files with the Encrypting File System
Windows Server 2016 continues support for the Encrypting File System (EFS), a method of scrambling the contents of files to make them unintelligible to unauthorized users. EFS has proven to be valuable for organizations that desire to keep proprietary data, especially those stored on laptops, out of the wrong hands. A more comprehensive approach to client encryption is with BitLocker Drive Encryption, which encrypts all files on the entire hard drive, with the exception of a few files required for startup.
BitLocker for Servers
BitLocker Drive Encryption was introduced with Windows Vista and continued to mature and improve with the release of Windows 7. Support for BitLocker continues with Windows 2016. Several features make it a great candidate for securing servers. Providing an additional layer of physical security can be a welcome tool in sensitive environments or ad hoc facilities.
The following features of BitLocker should be of interest to server and security administrators:
![]() Support for BitLocker for clustered disks—Including failover cluster disks and cluster shared volumes.
Support for BitLocker for clustered disks—Including failover cluster disks and cluster shared volumes.
![]() Faster provisioning—Faster initial encryption with option to encrypt used disk space only, faster deployment by integrating encrypted volumes into the imaging process.
Faster provisioning—Faster initial encryption with option to encrypt used disk space only, faster deployment by integrating encrypted volumes into the imaging process.
![]() Network unlock—Used in conjunction with TPM, the server is automatically unlocked on the corporate network but requires a PIN when not connected to the corporate network.
Network unlock—Used in conjunction with TPM, the server is automatically unlocked on the corporate network but requires a PIN when not connected to the corporate network.
![]() Improved BitLocker auditing and events.
Improved BitLocker auditing and events.
For more information about BitLocker, including deployment instructions and best practices, see Chapter 32, “Optimizing Windows 2016 for Branch Office Communications.”
Malware and Backup Protection
In an unsecure world, a server is only as secure as the software that runs on it. Windows Server 2016 is the most secure Windows yet, and includes many built-in mechanisms to keep a server secure. All the protection mechanisms are useless, however, if malicious or inadvertent action results in malware being installed on the server. Therefore, implementing measures to protect the server from malware is a necessity.
Well-crafted security policies must also account and plan for eventual security breaches. Implementing effective and secured backup and recovery procedures is a key component in recovering from an incident and protecting data.
Antivirus Precautions
Viruses might be one of the most dangerous threats faced by servers. Many viruses are written to specifically exploit key vulnerabilities that are present in server infrastructure. Others infect files that might be held on a server, spreading the infection to clients who download files. Consequently, it is extremely important to consider the use of an enterprise antivirus solution on all file servers in a network. All the major antivirus manufacturers include robust file-level scanners, and administrators should consider using them.
Microsoft itself has released a line of antivirus products with tight integration with the Windows Server line. This is part of the Forefront line of security products. An advantage to using the Forefront product suite is that it uses five antivirus engines all running at the same time. This way, if one of the engines does not catch a virus or is not updated quickly enough, there is a good chance that one of the other vendors’ engines will detect the virus. You can find more information about the Forefront line at http://www.microsoft.com/forefront.
An aggressive plan should be in place to keep antivirus patterns and engines up-to-date. Because virus outbreaks can wreak havoc worldwide in a matter of hours, rather than days, it is wise to have servers check for updates at least daily.
Trusted Boot Architecture with Secure Boot, AM Preloading, and Measured Boot
A new set of features, collectively called the Trusted Boot Architecture, or Platform Integrity Architecture, is being introduced with Windows Server 2016. These features do not require any action on behalf of the administrator but provide a significant improvement in protecting the server against malware, especially low-level threats such as rootkits and bootkits.
The following security features are now part of every Windows Server 2016 (and Windows 8 Client) installation:
![]() Secure boot—The OS firmware will only boot using a signed trusted loader. The loader requires signature verification from later components. This additional check should target boot kits trying to introduce a payload into the boot process.
Secure boot—The OS firmware will only boot using a signed trusted loader. The loader requires signature verification from later components. This additional check should target boot kits trying to introduce a payload into the boot process.
![]() Anti-Malware preboot—Compatible anti-malware software is loaded first by the OS loader before any third-party drivers and many malware packages. As with other boot components, the anti-malware driver must be signed and trusted.
Anti-Malware preboot—Compatible anti-malware software is loaded first by the OS loader before any third-party drivers and many malware packages. As with other boot components, the anti-malware driver must be signed and trusted.
![]() Measured boot—Throughout the secure boot process, client status and metrics are recorded to the TPM. The anti-malware client can access this record and use it to influence the boot process and to upload the data to an attestation server for analysis.
Measured boot—Throughout the secure boot process, client status and metrics are recorded to the TPM. The anti-malware client can access this record and use it to influence the boot process and to upload the data to an attestation server for analysis.
Deploying Backup Security
Although the need for a backup strategy might seem obvious to most people, it is often surprising to find out how inadequately prepared many organizations are with regard to their backups. All too often, a company will discover that it is very easy to back up a server but often more difficult to restore. In addition to disaster recovery issues, the issue of backup security is often neglected.
File server backups require that an authenticated user account with the proper privileges copy data to a storage mechanism. This requirement ensures that not just anyone can back up an environment and run off with the tape. Keeping this point in mind, the tapes that contain server backups should be protected with the same caution given to the server itself. All too often, a big pile of server backup tapes is left out on unsecured desks, and there is often no mechanism in place to account for how many tapes are in which location. Implementing a strict tape retention and verification procedure is, subsequently, a must.
Windows Server Update
One of the main drawbacks to Windows security has been the difficulty in keeping servers and workstations up-to-date with the latest security fixes. For example, the security fix for the Index Server component of Internet Information Services (IIS) was available for more than a month before the Code Red and Nimbda viruses erupted onto the scene. If the deployed web servers had downloaded the patch, they would not have been affected. The main reason that the vast majority of the deployed servers were not updated was that keeping servers and workstations up-to-date with the latest security patches was an extremely manual and time-consuming process. For this reason, a streamlined approach to security patch application was required and realized with the formulation of Windows Server Update Services (WSUS).
In addition to WSUS, Microsoft also updated the Automated Updates client in the server operating system, so that a server will update even in the absence of a WSUS server on the network. The Update Service client Introduced with Windows 10 can now also be found on the main panel of the Settings applet in Windows Server 2016. And for non-GUI servers such as Core and Nana Server, updating can be configured via group policy.
Understanding the Background of WSUS: Windows Update
Before we delve into Windows Update, a quick history lesson will set the scene. In response to the original concerns about the difficulty in keeping computers properly patched, Microsoft made available a centralized website called Windows Update to which clients could connect, download security patches, and install those patches. Invoking the Windows Update web page remotely installed an executable, which ran a test to see which hotfixes had been applied and which were needed, based on the Microsoft components installed on the machine. Those that were not applied were offered up for download, and users could easily install these patches.
Windows Update streamlined the security patch verification and installation process, but the major drawback was that it required a manual effort to go up to the server every few days or weeks and check for updates. A more efficient, automated process was required.
Understanding the Automatic Updates Client
The Automatic Updates client was developed to automate the installation of security fixes and patches and to give users the option to automatically “drizzle” patches across the Internet to the local computer for installation. Drizzling, also known as Background Intelligent Transfer Service (BITS), is a process in which a computer intelligently utilizes unused network bandwidth to download files to the machine. Because only unused bandwidth is used, there is no perceived effect on the network client itself.
All currently supported versions of Microsoft clients include the Automatic Updates client built in to the OS.
Understanding the Development of Windows Server Update Services
The Windows Update website and the associated client provided for the needs of most home users and some small offices. However, large organizations, concerned about the bandwidth effects of hundreds of machines downloading large numbers of updates over the Internet, often disabled this service or discouraged its use. These organizations often had a serious need for Windows Update’s capabilities. This fact led to the development of Software Update Services (SUS), which was later improved into the new product, Windows Server Update Services (WSUS).
WSUS started as a free download from Microsoft that effectively gives organizations their own, independent version of the Windows Update server. The latest version of WSUS was integrated into the operating system and deployed using System Manager. Clients connect to a central intranet WSUS server for all their security patches and updates.
WSUS is not considered to be a replacement technology for existing software deployment solutions such as System Center Configuration Manager (SCCM), but rather it is envisioned as a solution for all organizations from small businesses to large enterprises to take control over the fast deployment of security patches as they become available. It also offers a myriad of reports for administrators.
Examining WSUS Prerequisites
Deploying WSUS on a dedicated server is preferable, but it can also be deployed on a Windows Server 2016 server that is running other tasks, as long as that server is running IIS. The following list details the software requirement for WSUS:
![]() Internet Information Services (IIS)
Internet Information Services (IIS)
![]() Background Intelligent Transfer Service (BITS)
Background Intelligent Transfer Service (BITS)
![]() Windows Internal Database role or SQL Server 2005 (or later) installed locally or on a remote server
Windows Internal Database role or SQL Server 2005 (or later) installed locally or on a remote server
![]() Microsoft .NET Framework 2.0 or later
Microsoft .NET Framework 2.0 or later
Installing WSUS on a Windows Server 2016 Server
The installation of WSUS is very easy because it is installed as a server role from Server Manager. The guided setup installs WSUS and any required components.
To complete the initial installation of WSUS, follow these steps:
1. Launch Server Manager.
2. From the Manage menu, select Add Roles and Features to start the wizard.
3. Click Next three times.
4. Select Windows Server Update Services, and click Next.
5. The Add Role Services and Features Required for Windows Server Update Services window prompts for additional components to install, if necessary. Required components are the Web Server (IIS) web server and management tools, the Windows Process Activation Service, and the .NET Framework. Click Add Features to continue.
6. Click Next twice.
7. Read the Introduction to Web Server (IIS) overview, and click Next.
8. Click Next to select the default role services to install for Web Server (IIS).
9. Read the Introduction to Windows Server Update Services overview, and click Next.
10. Leave the default role services to install using Windows Internal Database. To install using an existing SQL server installation, remove the WID Database role server and select the Database role service. Click Next.
11. Enter a local disk location for the WSUS updates themselves and click Next.
12. Read the summary of installation selections, and click Install.
13. When the installation completes, click the Launch Post-Installation Tasks link.
To complete the initial configuration for WSUS, follow these steps:
1. From the Tools menu in Server Manager, launch Windows Server Update Services. This launches the Configuration Wizard.
2. Click Next past the initial page and past the Update Improvement Program page.
3. Select the default upstream configuration, which is to obtain data directly from Microsoft servers. Click Next.
4. Complete the proxy configuration if necessary and click Next.
5. Click the Start Connecting button to have the Configuration Wizard download data required for the configuration process. Click Next when the initial download is complete.
6. Select required languages for the patch. Keep in mind that selecting many languages can greatly increases the time and storage requirements for the update system and processes. It is therefore recommended to install only the required languages.
7. Select the products for which you want updates, as shown in Figure 12.13, and click Next.
8. Select the classifications of updates you want to download, and then click Next.
9. Configure the schedule that you want WSUS to synchronize with the Microsoft Update servers or select Synchronize Manually. Click Next.
10. Ensure that Begin Initial Synchronization is selected, and then click Finish.
11. Review the installation results and click Close.
WSUS administration is performed from the Update Services management console. This console is the main location for all configuration settings for WSUS and is the sole administrative console. You can access it from Server Manager, Tools menu, Windows Server Update Services.
Automatically Configuring Clients via Group Policy
The configuration of the Automatic Updates client included with all current versions of Windows can be streamlined by using a group policy in an Active Directory environment. Windows Server 2003 or later domain controllers automatically contain the proper Windows Update Group Policy extension, and a group policy can be defined by following these steps:
1. Open Group Policy Management using the Tools menu in Server Manager.
2. Navigate to the organizational unit that will have the group policy applied, right-click the name of the OU, and choose Create a GPO in This Domain, and Link It Here.
3. Enter a name for the GPO, such as WSUS GPO. You also have the option to start from the settings of an existing GPO. Click OK.
4. Right-click the newly created GPO, and select Edit to invoke the Group Policy Management Editor.
5. Expand the Group Policy Management Editor to Computer ConfigurationPolicies Administrative TemplatesWindows ComponentsWindows Update.
6. Double-click the Configure Automatic Updates setting.
7. Set the group policy to be enabled, and configure the automatic updating sequence as desired. The three options given—2, 3, and 4—allow for specific degrees of client intervention. For automatic download without installation, choose option 3, as shown in Figure 12.14.

8. Schedule the interval that updates will be installed, bearing in mind that some updates require reboots.
9. Click Next Setting to configure more options.
10. Click Enabled to specify the web location of the WSUS server. Entering the fully qualified domain name of the server is recommended. Enter both settings (usually the same server), and click OK to save the Group Policy settings. Click Next Setting.
NOTE
Organizations that choose to use a custom web IIS website are required to use port 8530 for client access to WSUS. In this case, enter the web location with the port number, such as http://sfwsus.companyabc.com:8530, for both settings.
11. Enter how often the client checks for updates, and then click Next Setting.
12. Review the remaining option settings and configure as desired. Click OK when you have finished.
13. Repeat the procedure for any additional organizational units. (The same group policy can also be linked in more than one location.)
NOTE
Organizations that do not use Active Directory or group policies have to manually configure each client’s settings to include the location of the WSUS server. This can be done through a local policy or manually through Registry settings, as defined in the WSUS Help.
Deploying Security Patches with WSUS
Depending on the settings chosen by the group policy or the Registry, the clients that are managed by WSUS automatically download updates throughout the day and install them at a specified time. Some computers might be configured to allow for local interaction, scheduling proper times for the installation to take place and prompting for “drizzle” downloading.
Clients that are configured to use WSUS are not prompted to configure their Automatic Update settings, and they are grayed out to prevent any changes from occurring. Users without local administrative access cannot make any changes to the installation schedule, although local admin users can postpone forced installs.
NOTE
Generally, it is good practice to allow servers to control the download and installation schedule, but to force clients to do both automatically. Depending on the political climate of an organization, this might or might not be a possibility.
Summary
Out of the box, Windows Server 2016 is by far the most secure Windows yet. Increased security emphasis through the Trustworthy Computing initiative helps to increase overall server security by disabling unnecessary services and locking out file-level permissions by default. In addition to the standard features, advanced options in Windows Server 2016, such as the integrated intelligent firewall, AppLocker, and dynamic access control enable administrators to add multiple layers of security to servers, further protecting them from attacks and vulnerabilities. In addition, the automatic updating capabilities of tools such as Windows Server Update Services give organizations an edge in protecting servers and workstations from constantly changing security threats.
![]() Physically secure servers behind locked doors, in a controlled-access environment.
Physically secure servers behind locked doors, in a controlled-access environment.
![]() Apply security in layers.
Apply security in layers.
![]() Use the Server Roles and Features Wizard for turning on server roles and having them automatically secured.
Use the Server Roles and Features Wizard for turning on server roles and having them automatically secured.
![]() Use the integrated Windows Firewall for enhanced security, and only open ports or allow protocols when necessary.
Use the integrated Windows Firewall for enhanced security, and only open ports or allow protocols when necessary.
![]() Use both inbound and outbound firewall rules to limit the exposure a compromised server would have.
Use both inbound and outbound firewall rules to limit the exposure a compromised server would have.
![]() Reduce server attack surface by removing the server graphical shell and using Core Edition.
Reduce server attack surface by removing the server graphical shell and using Core Edition.
![]() Use the Run as Administrator command when administrative access is required instead of logging on as an administrator.
Use the Run as Administrator command when administrative access is required instead of logging on as an administrator.
![]() Deploy AppLocker for as many servers as possible.
Deploy AppLocker for as many servers as possible.
![]() Configure AppLocker using digital signature-based rules.
Configure AppLocker using digital signature-based rules.
![]() Consider a honeypot solution by creating serious-looking shares on the network, such as Financial Statements, Root Info, or similar such shares, and audit access to those folders to identify internal (or external) saboteurs before they can do some serious damage.
Consider a honeypot solution by creating serious-looking shares on the network, such as Financial Statements, Root Info, or similar such shares, and audit access to those folders to identify internal (or external) saboteurs before they can do some serious damage.
![]() Plan to run the initial synchronization of WSUS over a weekend, beginning the download on Friday evening.
Plan to run the initial synchronization of WSUS over a weekend, beginning the download on Friday evening.
![]() Test and approve WSUS patches before deploying them to production, either manually or through a process of setting up a pilot WSUS server and a production WSUS server.
Test and approve WSUS patches before deploying them to production, either manually or through a process of setting up a pilot WSUS server and a production WSUS server.